29+ Whoville Christmas Decorations DIY Ideas That Will Make Your Holiday Dreamy

Whoville Christmas decorating is having a serious moment on Pinterest right now — and it’s not the polite, greenery-only kind. People are bending candy canes into wreaths, painting Grinch hands onto ornaments, and turning entry tables into miniature snow-covered villages. It’s maximalist, a little chaotic, and genuinely joyful.
We spent real time browsing Etsy, Hobby Lobby, Target, Walmart, and Amazon to bring you only what’s worth your attention this year — ideas that run from about $6 in craft supplies to $180 for a proper statement piece.
Inside you’ll find 29 curated ideas, from whimsical maximalism and Grinch-inspired kitsch to full Whoville village vignettes and classic red-and-green nostalgia. Budget and luxury versions sit side by side throughout, and every idea is shoppable with direct product links.
The 2026 shift is toward handmade, character-driven decor over matched sets — rooms that look collected and a little strange, not catalog-perfect. And stay until the end — we break down the most common mistakes that can ruin these looks.
📌 Save this to Pinterest for later — you’ll want to revisit these ideas.
1. Patchwork Velvet Stocking With Appliquéd Snowmen
Velvet and felt behave nothing alike, and that contrast is the entire trick behind this stocking. Cut your appliqué shapes from a wool-blend felt rather than craft felt — craft felt pills after one season of being stuffed and yanked. Fuse a lightweight interfacing to the back of each shape, then stitch around it with a 1/8-inch blanket stitch so the edges stay crisp. Keep every motif under four inches tall. Anything bigger swallows the band and the stocking stops reading as a stocking.
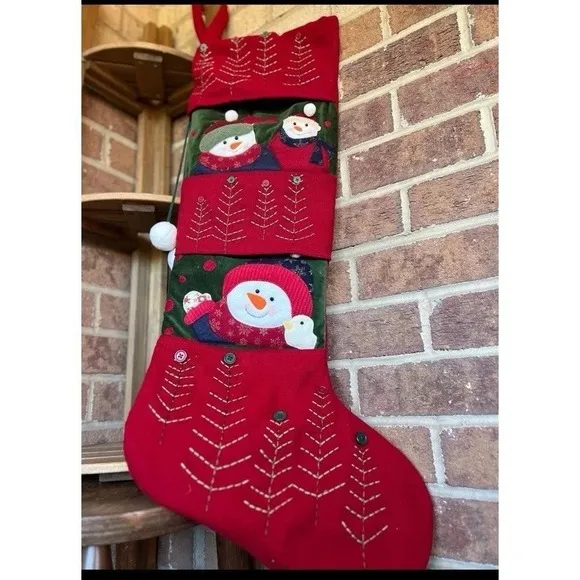
Making the banded version yourself takes about three hours and $30-45 in materials.
- Cut two 8-by-20-inch panels from red cotton velvet and two 8-by-7-inch panels from dark green velvet for the cuff band.
- Press fusible interfacing onto the back of your felt trees and snowman shapes.
- Blanket-stitch each motif to its panel, alternating red and green sections.
- Sew a small dark button at each tree base and attach the pom-pom to the side seam.
- With right sides together, stitch the panels, clip the curves, turn, and press.
- Add a 4-inch fabric loop at the top corner before the final topstitch.
2. Eight-Foot Cindy Lou Who Inflatable With Candy Cane
An eight-foot inflatable is a sail, and it will behave like one. Plan on four ground stakes and two sandbags minimum — the kind of winds that flatten a lightweight snowman will fold this character in half overnight. Run the blower on its own GFCI outlet, keep the cord out of standing water, and never leave it inflated in sustained gusts above 25 mph. When the season ends, deflate it fully and store it flat and dry. Mildew is what kills these things, not snow.
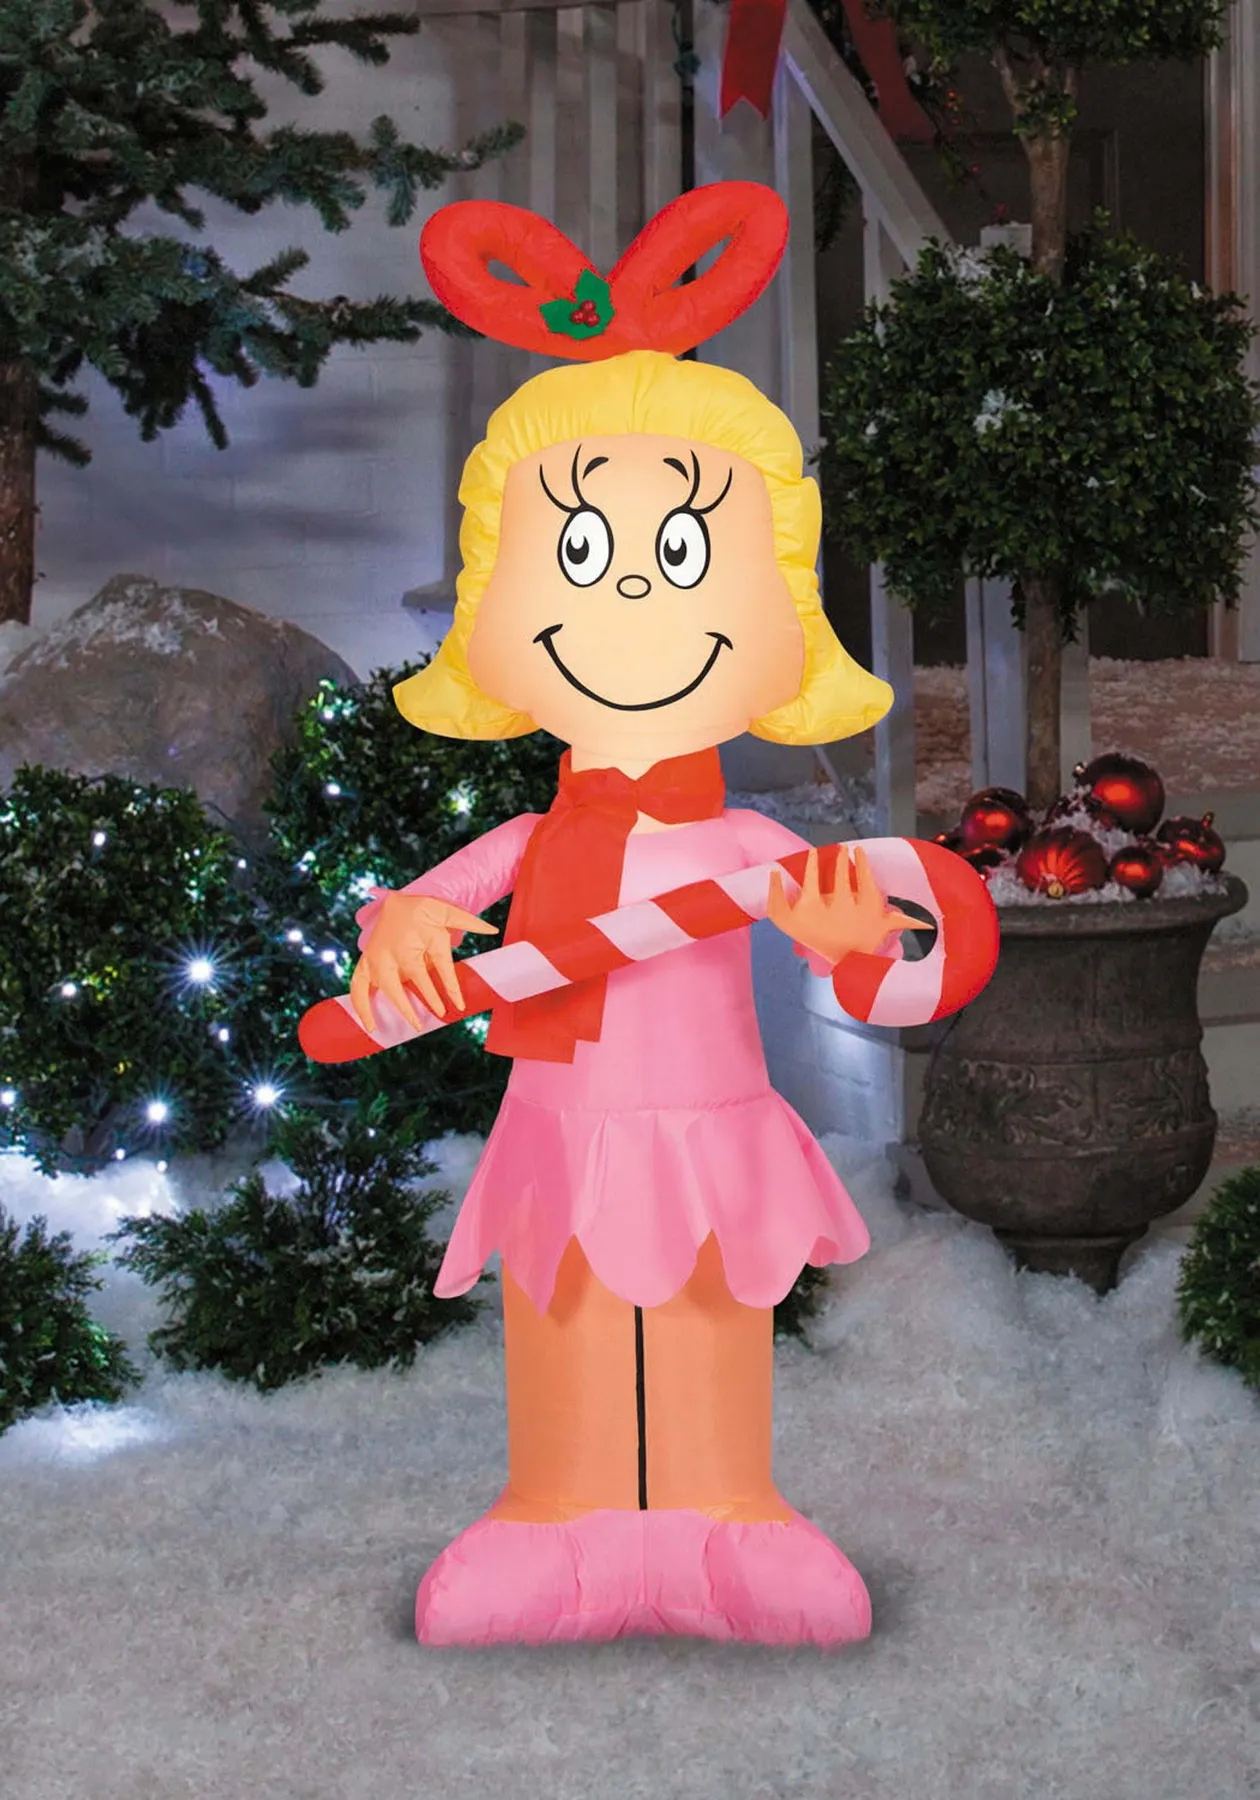
The color formula is roughly 45% pink-and-yellow character, 30% red, and 25% green-and-white surroundings. That ratio is why it reads as Whoville instead of generic Christmas — the pink does the heavy lifting and the red accents keep it holiday-adjacent. Swap the pink dress for lavender and you keep the formula with a softer mood. Push pink to 60% and the whole thing slides toward Easter. Keep the evergreen behind it lit warm white, never cool.
3. Illuminated Gingerbread Castle With Dripping Icing
Take away the dripping white icing and this is just a lit brown facade. That scalloped, slightly sloppy icing line along the battlements is what turns a structure into a cookie — it’s the one detail that sells the illusion from thirty feet away, and it happens to hide every seam, joint, and staple in the build. If you’re making your own, cut the icing from 1/4-inch foam board or PVC sheet and paint it bright flat white rather than cream. Warm white lights behind it, always.
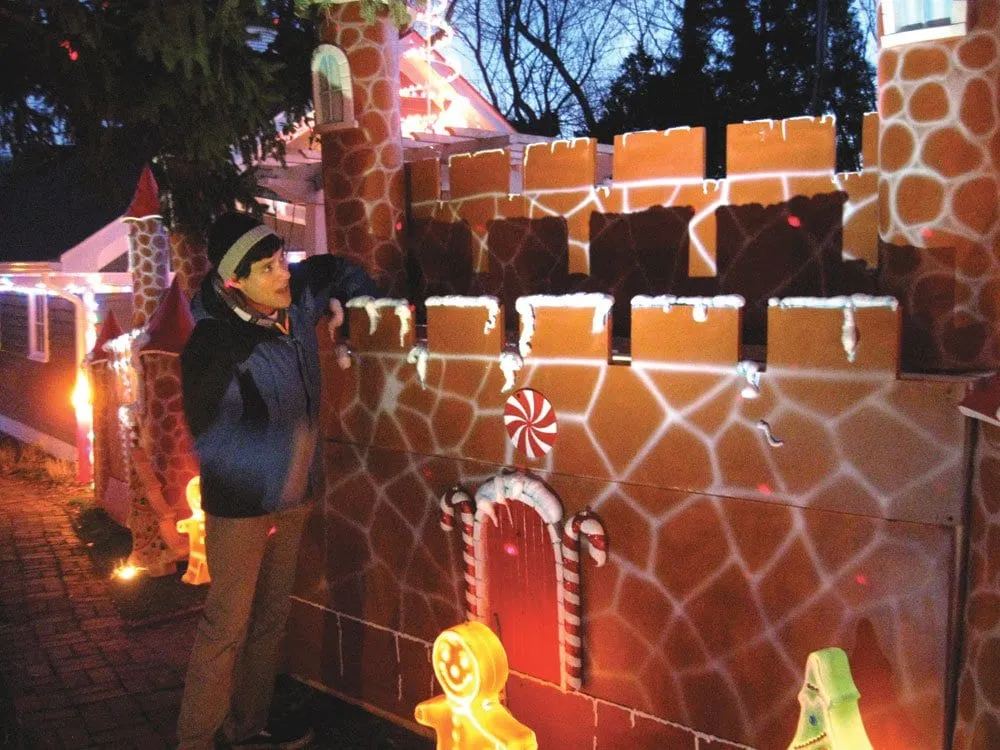
Building a scaled-down version for a garage or porch wall is genuinely doable:
- Foam board or corrugated plastic panels: $60-120
- Warm white string lights and clips: $25-45
- Peppermint and candy cutouts (painted plywood or printable): $20-60
- Illuminated gingerbread figures: $40-90
- Outdoor paint and sealant: $30-50
Total: roughly $175-365 for a substantial facade.
4. Lime Green Gift Stack Under a Striped-Ribbon Tree
Three things are doing the work here. First, the heights: the gift stack steps down from tall to small instead of sitting in a flat row, which gives the tree base a silhouette. Second, the color clash is deliberate — forest green and lime sit right next to hot pink and silver, and that friction is what makes the arrangement feel energetic rather than coordinated. Third, the ribbons repeat one stripe pattern at three different scales, so the chaos reads as intentional. See how the wreath in Idea #8 runs the same palette trick.
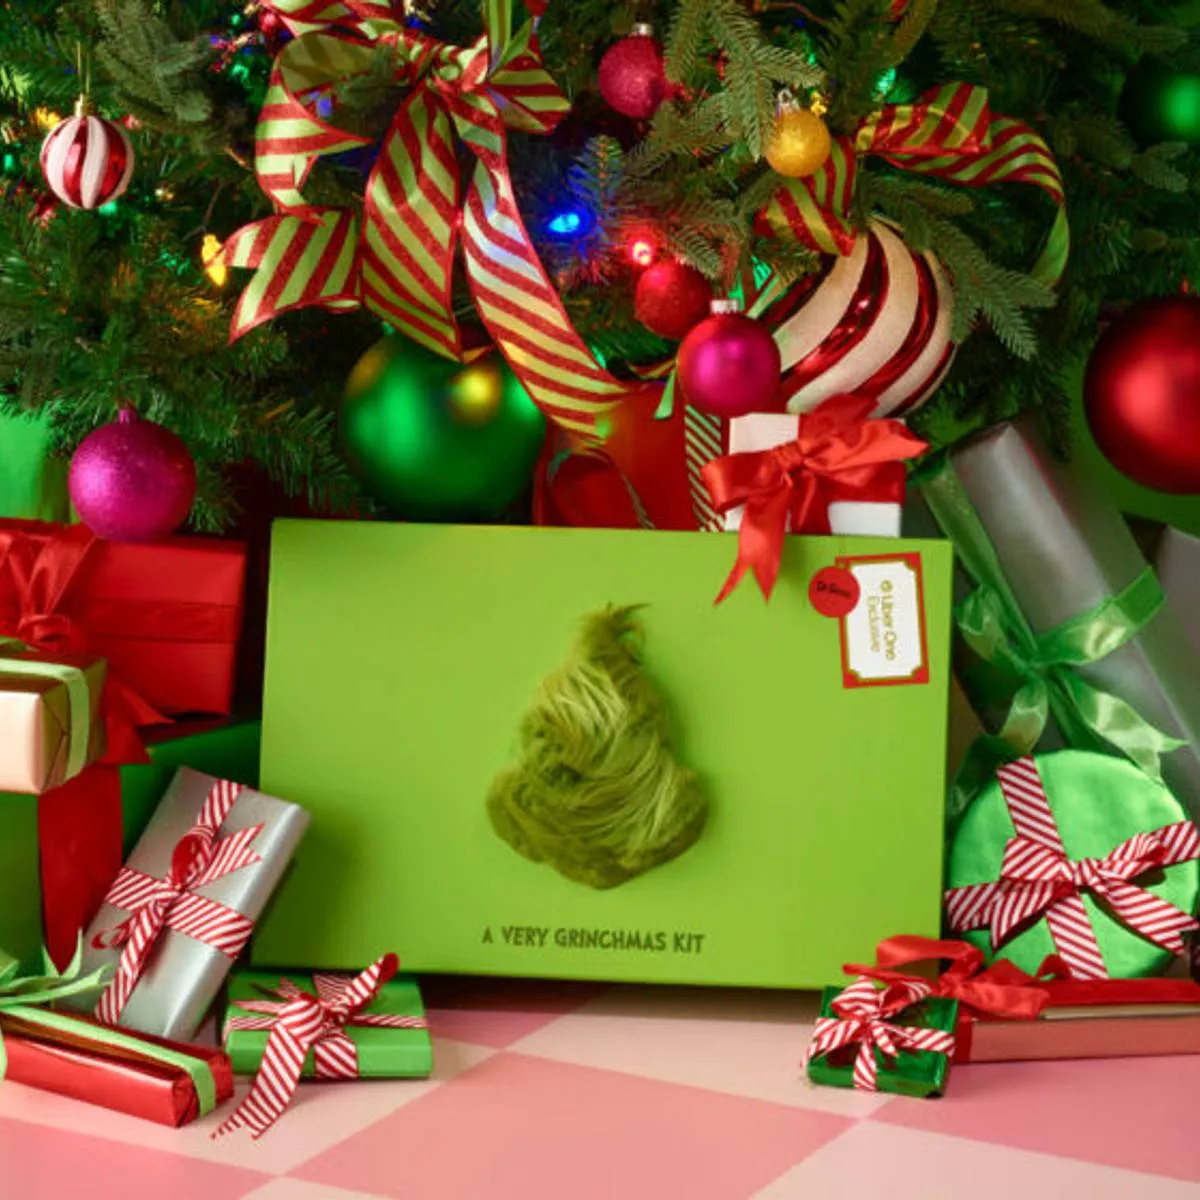
You don’t need a boutique wrapping station to get this. Buy one roll of wide striped ribbon at Walmart ($6-9) and cut it into three widths for instant pattern variation. Wrap boxes in plain kraft or solid green paper from Target ($4-6 a roll) and let the ribbon do the talking. The oversized green gift box is the only piece worth spending on; check Facebook Marketplace in early December, where people unload last year’s photo props for $10-20. Total for a full tree base: under $45.
5. Layered Mesh Wreath With a ‘Stink! Stank! Stunk!’ Sign
A 24-inch work wreath with pre-attached ties takes about 90 minutes and $40-60 in supplies.
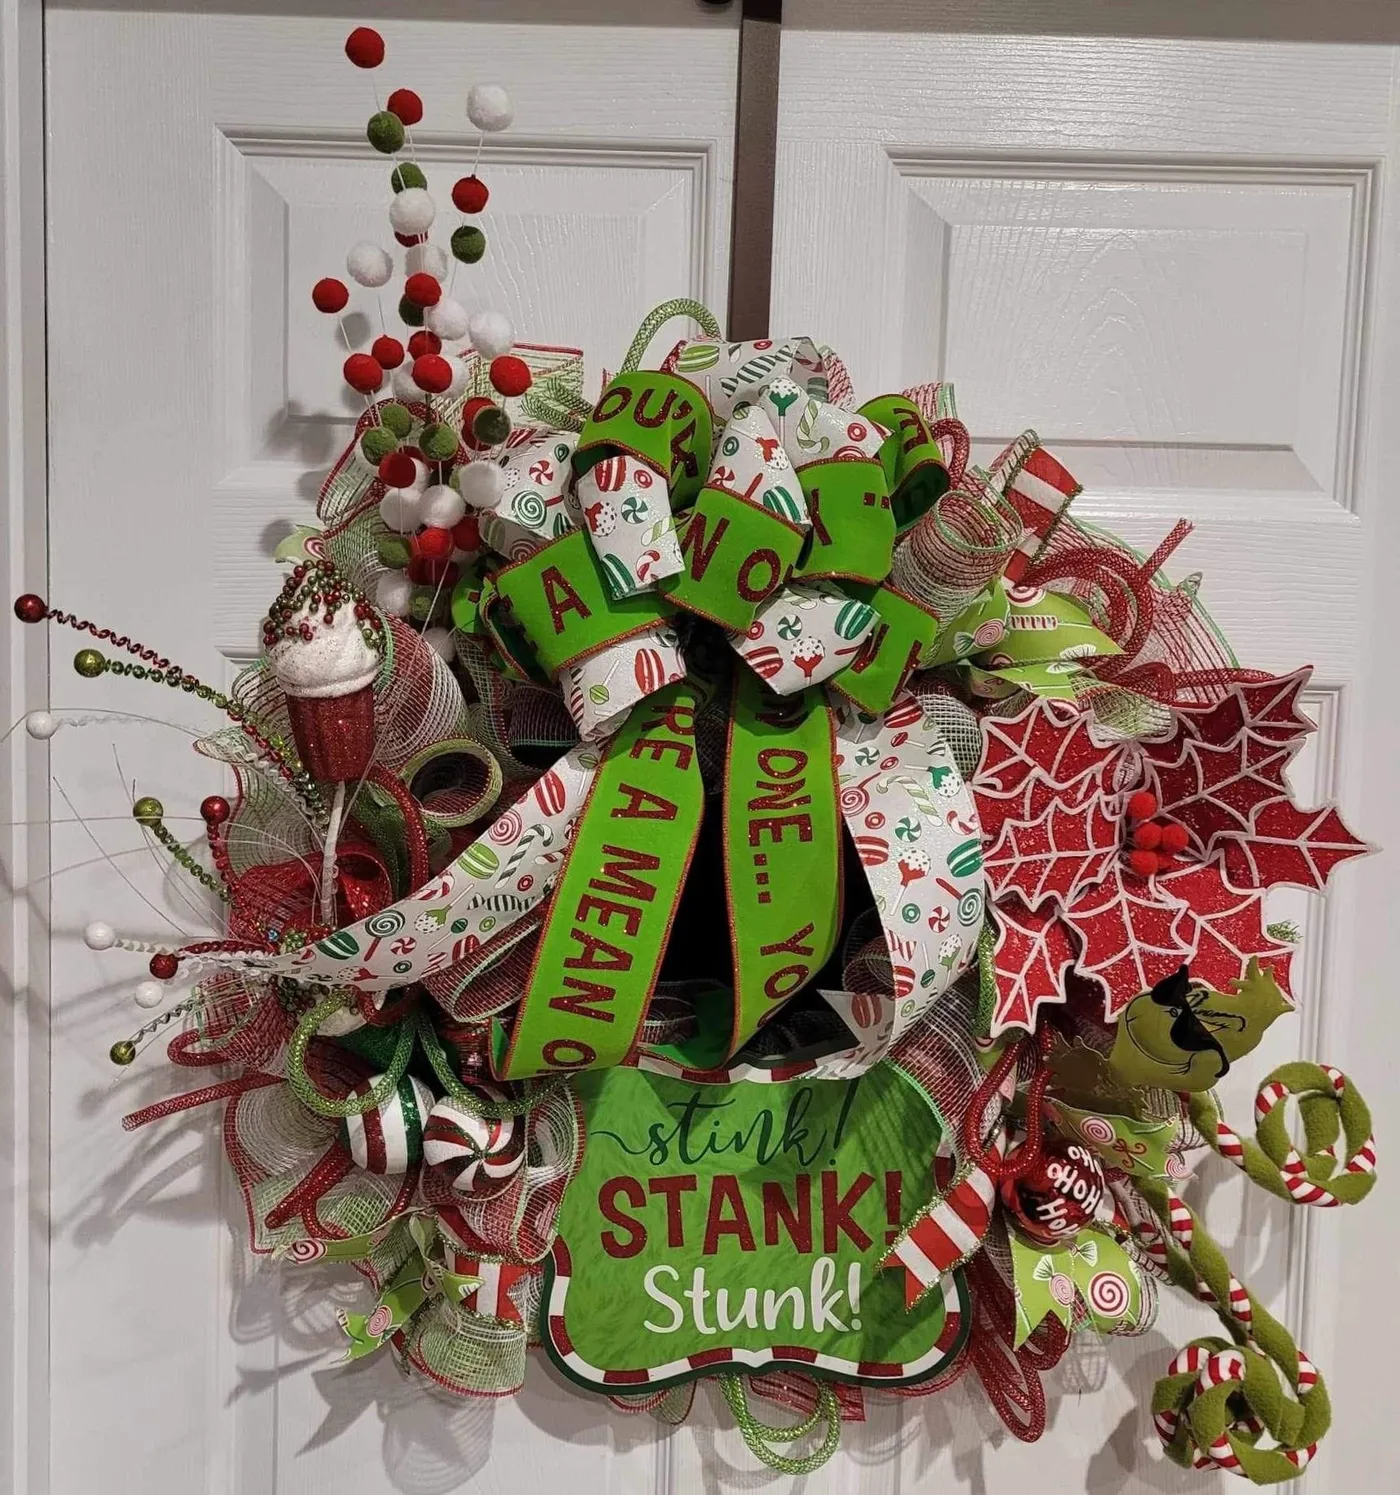
- Start with a 24-inch wire work wreath; fluff two 10-inch deco mesh rolls into 8-inch loops, twisting each into a tie.
- Work clockwise, alternating red and green loops until the form is full — roughly 18-22 loops.
- Layer three ribbon tails per cluster, cutting each tail to 14 inches with a dovetail notch.
- Hot-glue the novelty pieces last — cupcake, candy canes, sign — and only after the mesh is set.
- Hang with a 12-inch floral wire loop, not the form’s own hook.
Wreaths went maximalist around 2024 and haven’t come back down. What changed by 2026 is the audience: mesh wreaths used to live exclusively in craft-fair territory, and now they show up in design-forward entryways because people want a front door that reads as a personality, not a color scheme. The risk is that this style dates faster than fresh greenery — treat the base as the investment and the novelty pieces as what you’ll swap in two years.
6. Grapevine Wreath Layered With Peppermints and ‘HO HO HO’
Ribbon layering is where most DIY wreaths go soft. Use two widths — 2.5-inch as the base layer, 1.5-inch on top — and cut tails in a 1:1.5 ratio so the shorter ribbon never disappears. Pinch each cluster with a 6-inch zip tie rather than hot glue; glue fails in cold garages and sheds glitter forever. Place your sign at the 4 o’clock position instead of dead center. Off-center keeps the eye moving around the wreath instead of stopping at a bullseye.
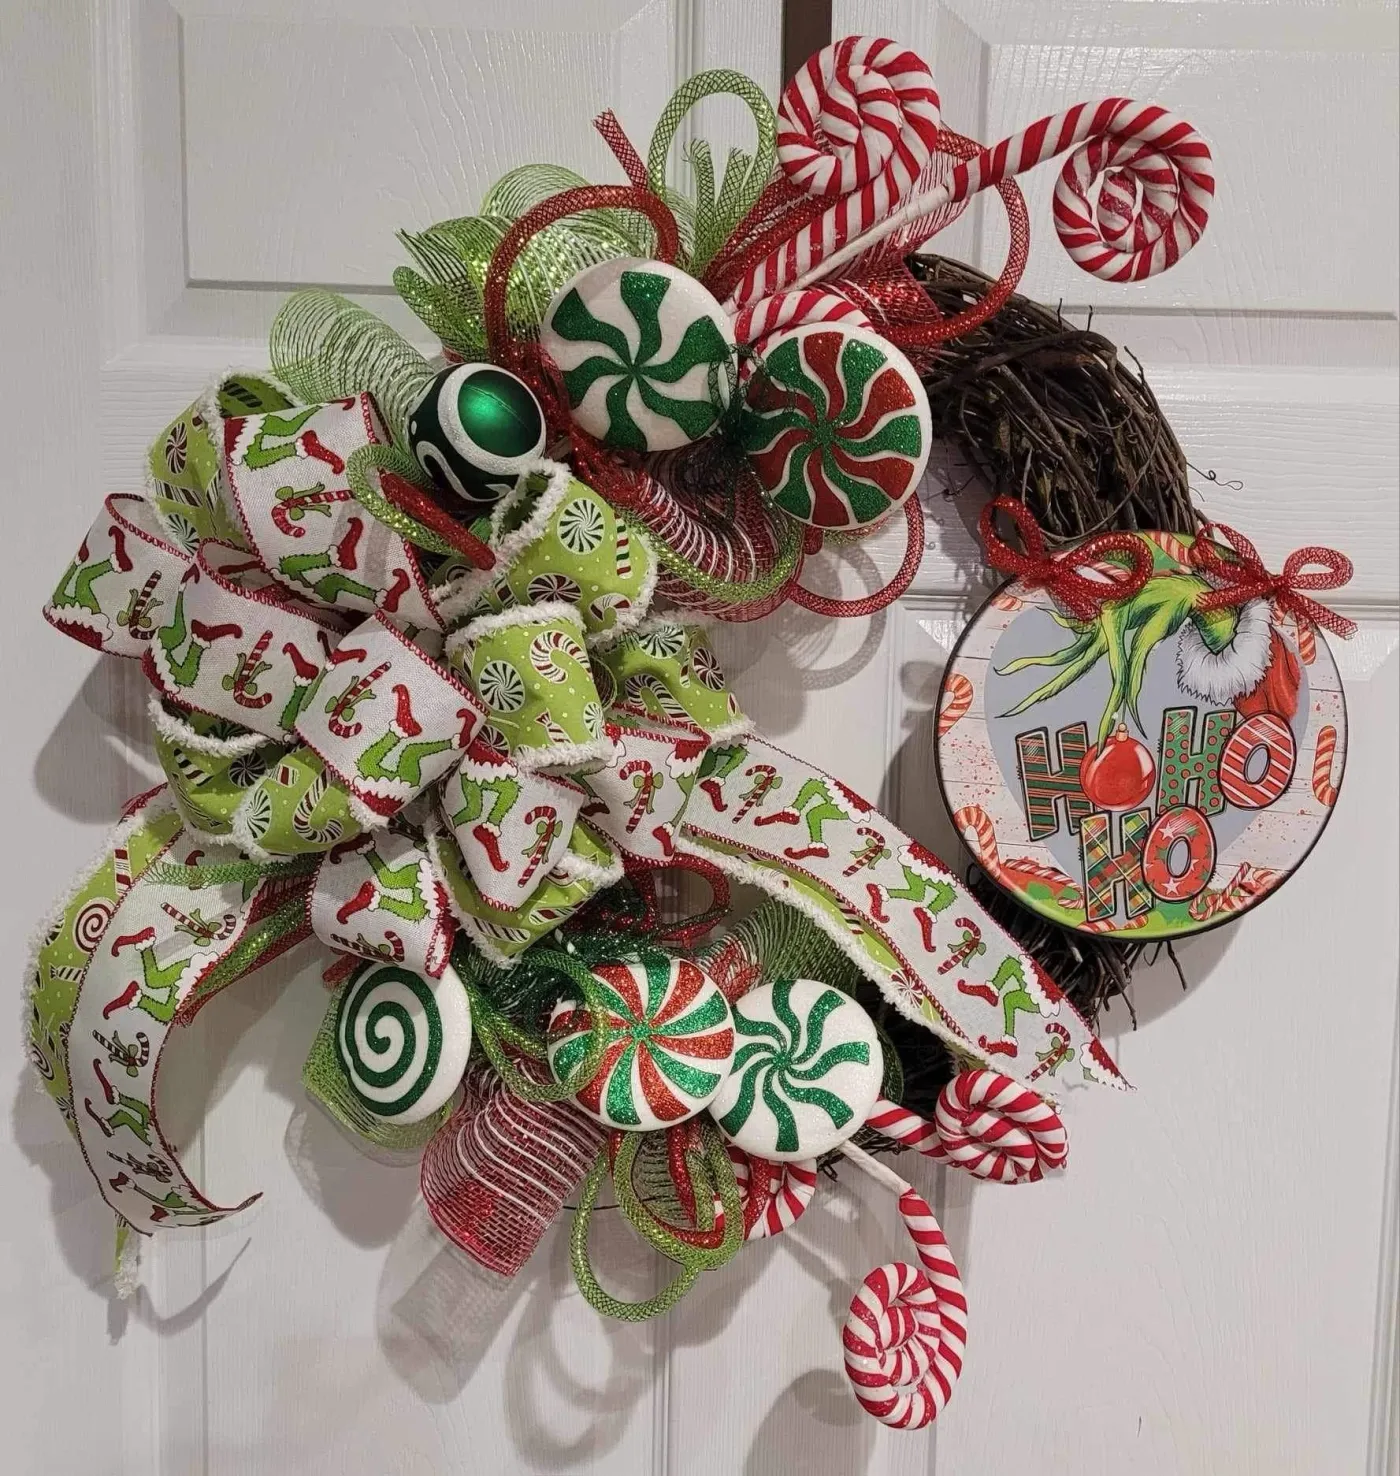
It’s the round “HO HO HO” sign with the green character face. Without it, this is a very pretty peppermint wreath — the kind you’d see on a hundred other doors. With it, the wreath has a punchline, and a punchline is what makes people stop and grin on the way up the steps. Notice the sign sits slightly off-center and overlaps the ribbon tails rather than floating above them. That small act of layering is the difference between decoration and composition.
7. Hand-Painted Grinch Hand Ornament on a Wooden Shelf
Hand-painted ornaments are the easiest thing on this list to ruin in the final hour. Acrylic craft paint needs 24 hours to cure and another 24 before you seal it, and humidity above 60% will stretch that to three days or leave a tacky surface that never quite dries. Paint in thin coats — two thin layers beat one thick one every time. Skip the temptation to hang it outdoors; one cold snap and the paint crazes. Keep them on a shelf or wooden surface indoors, seal with matte polycrylic, and they’ll last decades.
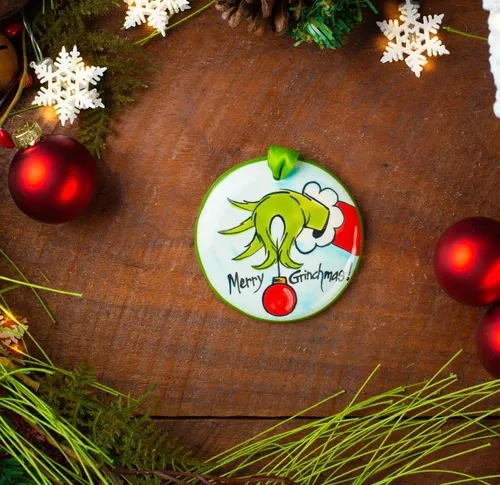
The full shelf vignette is one of the cheapest scenes in this whole guide.
- Blank wooden or ceramic ornament discs (6-pack): $8-14
- Acrylic paint set plus fine brushes: $12-20
- Matte polycrylic sealer: $8-12
- Red ball ornaments (bulk box): $10-16
- Faux pine picks and pinecones: $12-25
- Battery snowflake lights: $10-18
Total: around $60-105, and you’ll have paint left for next year.
8. Plush Grinch and Cindy Lou Who Wreath on a Wooden Door
The formula is about 40% lime green, 25% fuchsia, 20% red, and 15% turquoise and white. That’s an unusually high pink-and-blue content for a Christmas wreath, and it’s exactly why this one looks like a storybook instead of a craft store. Swap fuchsia for coral and turquoise for teal and the formula still holds — it stays playful as long as green never drops below 40%. The mistake would be adding gold. Gold pushes this palette toward traditional and kills the whimsy instantly.
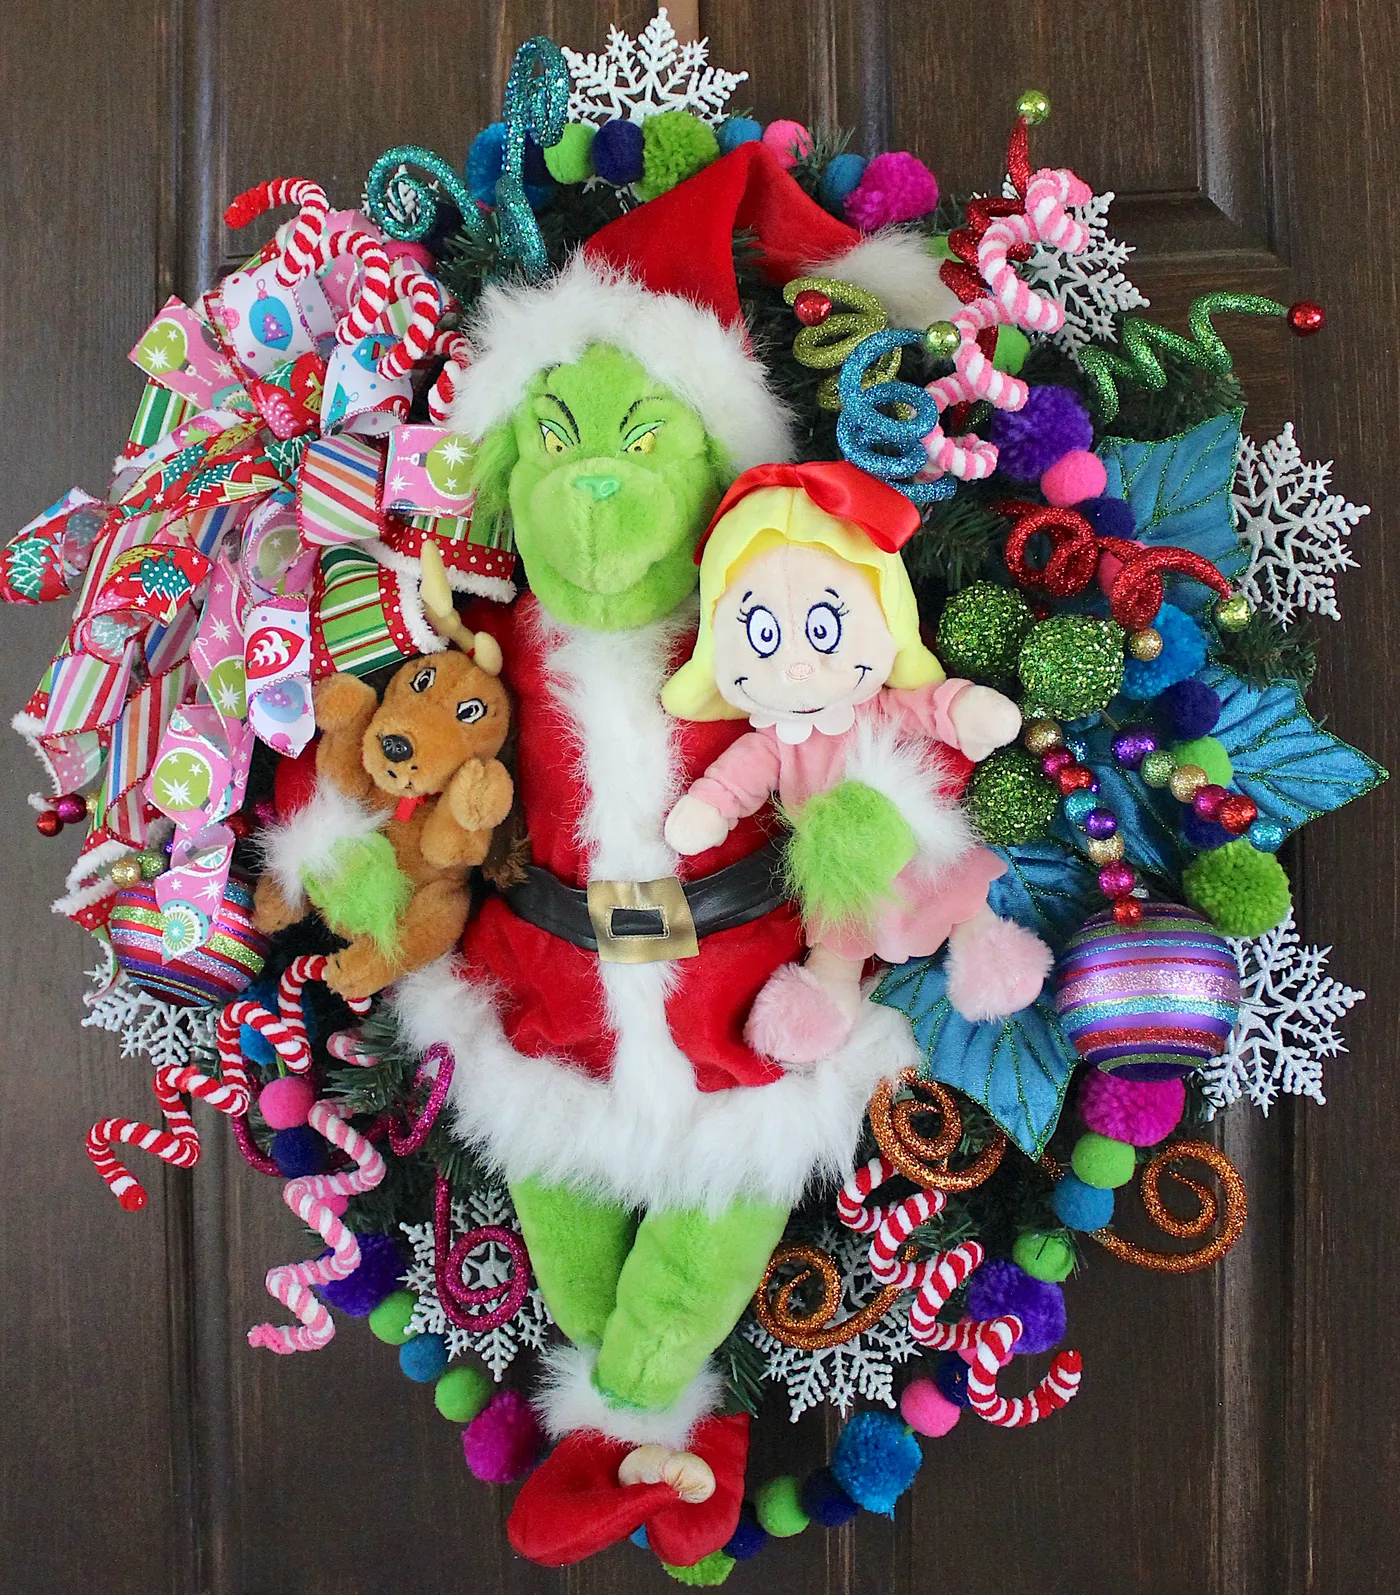
The plush figures work because they’re disproportionately large. On a 26-inch wreath, characters that eat up a third of the surface give your eye one place to land before it wanders into the ribbons. Then the pom-poms and spirals repeat at a much smaller scale, which keeps the texture busy without competing. It’s a two-speed composition: two big heroes, dozens of small confetti pieces, nothing in the middle. That gap is why it photographs well and why it doesn’t look cluttered in person.
9. Twig Wreath With ‘It’s Nice to Be Naughty’ Sign and Pom-Poms
Faux flowers, a sign, and a pom-pom garland take about two hours and $35-50.
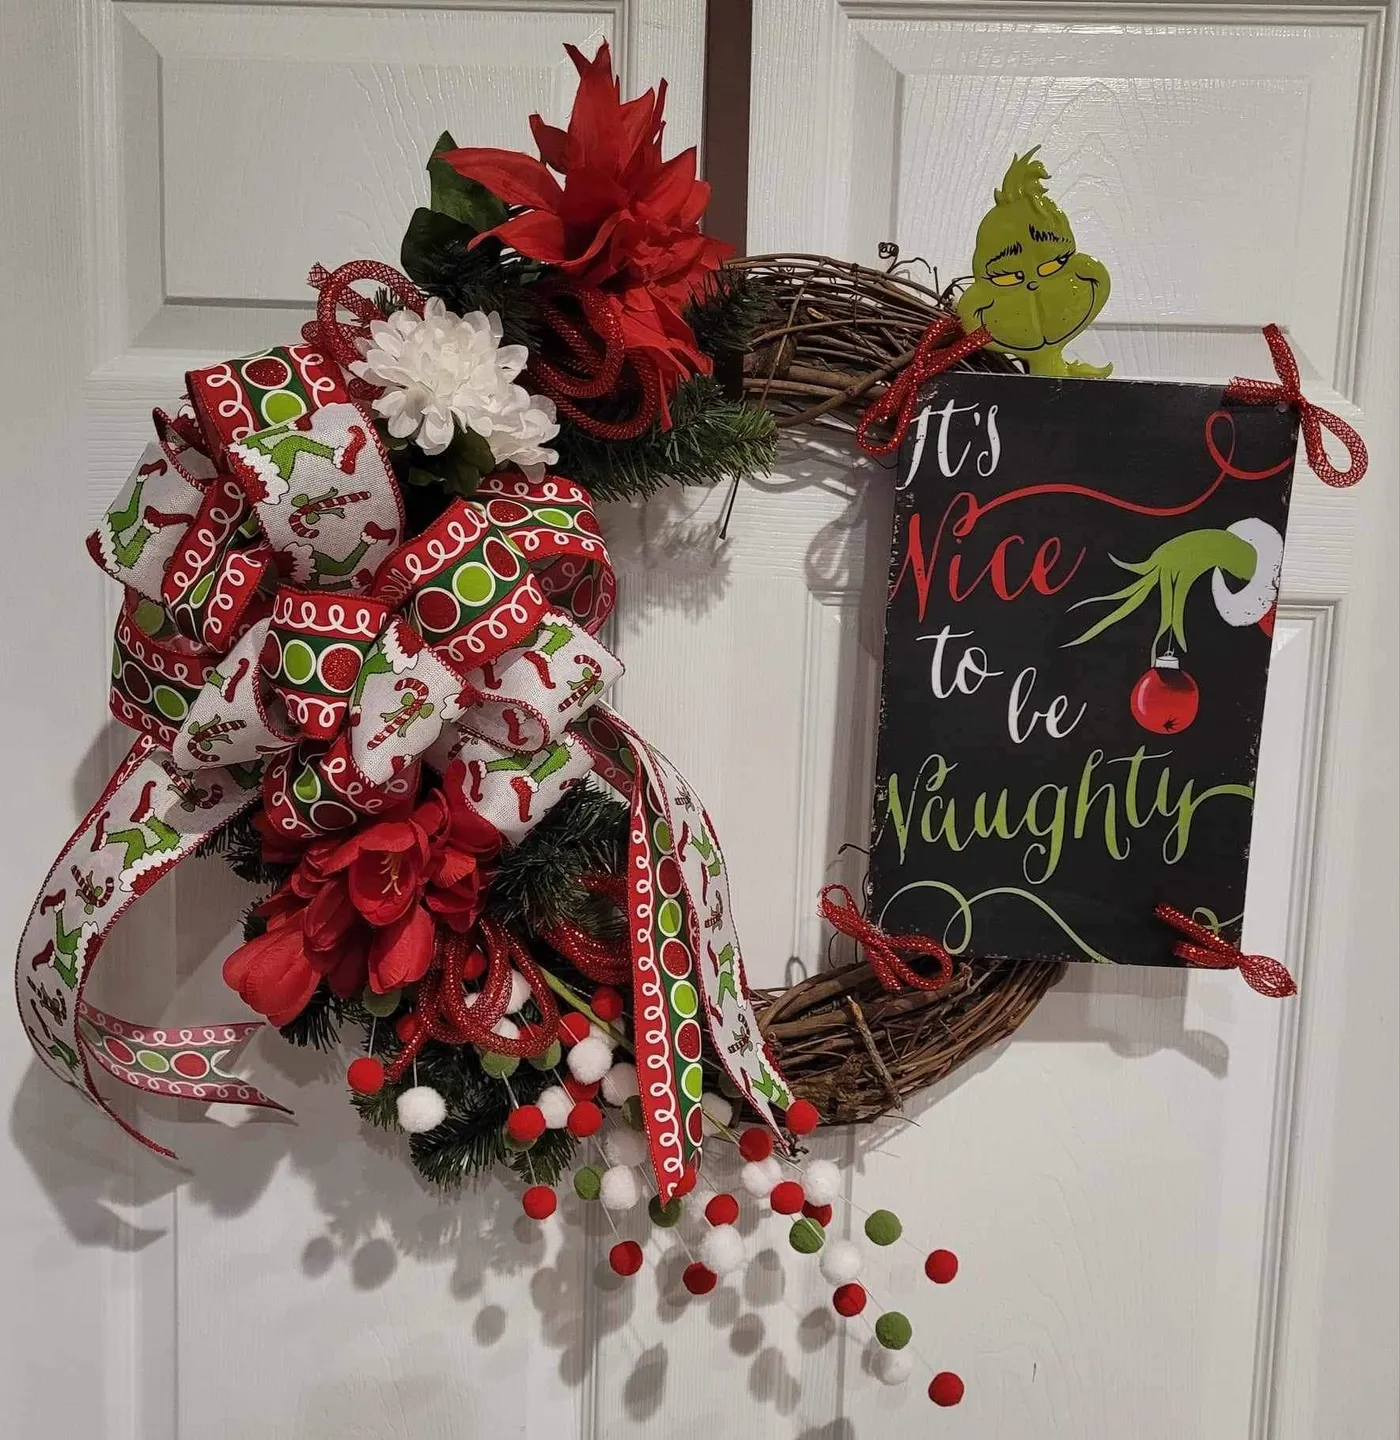
- Start with an 18-inch grapevine or twig wreath — the open structure lets ribbon and stems show through.
- Wire three clusters of red-and-white faux flowers evenly around the ring, spacing them at 10, 2, and 6 o’clock.
- Tuck short pine sprigs behind each cluster so greenery pokes out at odd angles, not in a tidy fan.
- Zip-tie the sign to the 6 o’clock cluster, letting it hang slightly below the wreath’s edge.
- Thread red, green, and white pom-poms on fishing line and drape it across the bottom third.
This one wants a door, not a wall. Twig wreaths read best at 20-24 inches on a standard 36-inch front door — smaller and the door swallows it.
- Standard entry door (36 inches wide): 20-24 inch wreath
- Double doors: two 18-20 inch wreaths at matching heights
- Interior door or pantry: 14-16 inch wreath
- Hang height: center of the wreath at 60-66 inches from the floor
For a wider interior wall, the vertical banner approach in Idea #25 does more work.
10. Grinch and Max Stocking on a White Carved Mantel
Stocking height is a proportion question most people skip. On a mantel, your stocking should be roughly one-third the width of the mantel section it hangs over — so a 60-inch mantel gets three or four stockings, not seven. Hang the cuff about six inches below the mantel edge, not flush, or the cuff disappears into the garland. If you’re using a faux fur cuff, comb it outward with a fine-tooth comb after hanging. Ten seconds of combing is the difference between fluffy and matted in every photo.
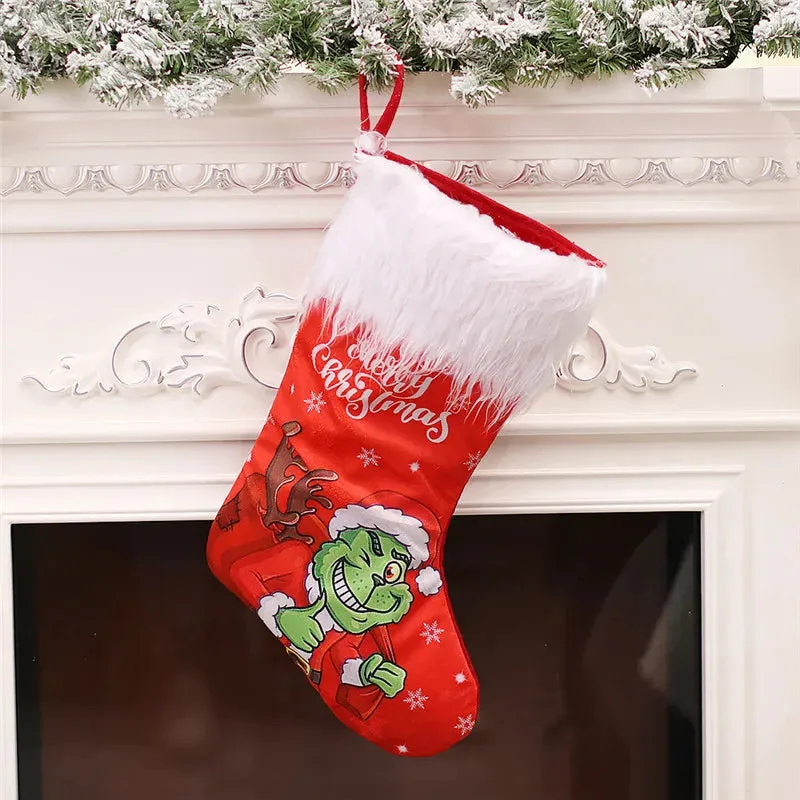
Faux fur cuffs are magnets for dust and pet hair, and they don’t machine wash well — spot clean with a damp cloth and a drop of dish soap, then air dry away from heat. Frosted garlands shed. Expect a light dusting of faux snow on your mantel every few days through December; a lint roller handles it. If the flocking is heavy, seal it with a light mist of matte spray adhesive outdoors, and let it cure a full day before it goes back inside.
11. Life-Size Grinch Figure in a Santa Suit
The green fur cuffs on the Santa suit are the detail that makes this figure work. A Grinch in a plain red suit reads as a costume; green fur cuffs and hands poking out of the sleeves read as a character who got dressed in a hurry. It’s a five-dollar detail that changes the entire read. If you’re assembling one from a plush and a Santa suit, source faux fur in a lime tone and trim the cuffs to about four inches deep — deeper looks like a Muppet, shallower disappears at three feet.
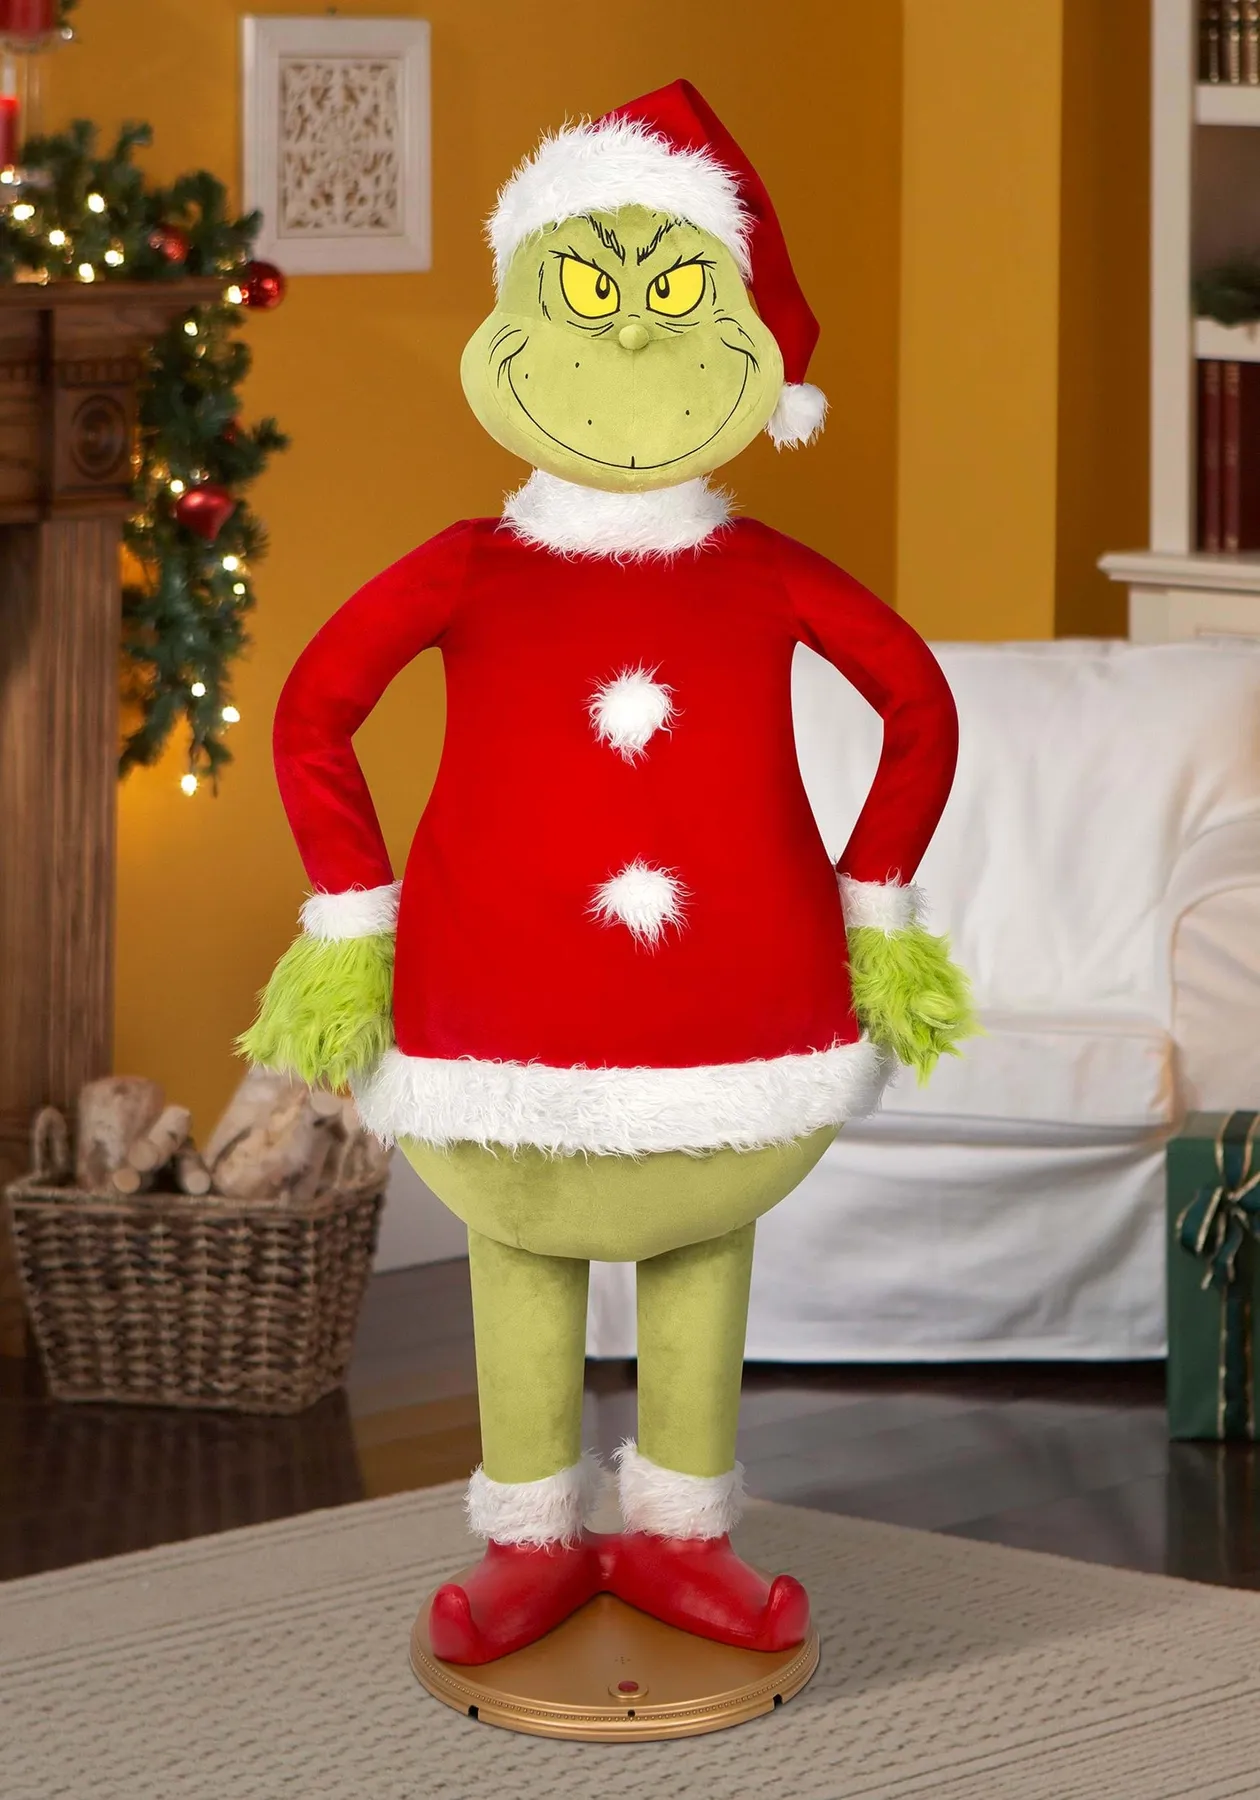
Life-size licensed figures run $150-400 new, and they’re not worth that for two weeks of display. Watch Facebook Marketplace and local buy-sell groups starting the first week of November, where last year’s display pieces move for $40-90. A cheaper route: a 36-inch plush from Walmart ($25-40) dressed in a child’s Santa suit from a thrift store ($6-12), seated on a bench or stool so it reads larger. Compare with Idea #13 — same character, entirely different scale of commitment.
12. Balloon Garland Backdrop With Whoville Direction Signs
Two things save this from looking like a school gym. The first is framing: the balloon garland runs up and over the backdrop like a proscenium arch, so the eye reads it as a stage rather than a wall of balloons. The second is the white fluffy rug on the floor, which gives all that saturated color something to sit on. Without it, red and lime floating over patterned carpet turns into visual noise. If you’re building one, put the heaviest balloon cluster at the corner where the arch meets the floor.
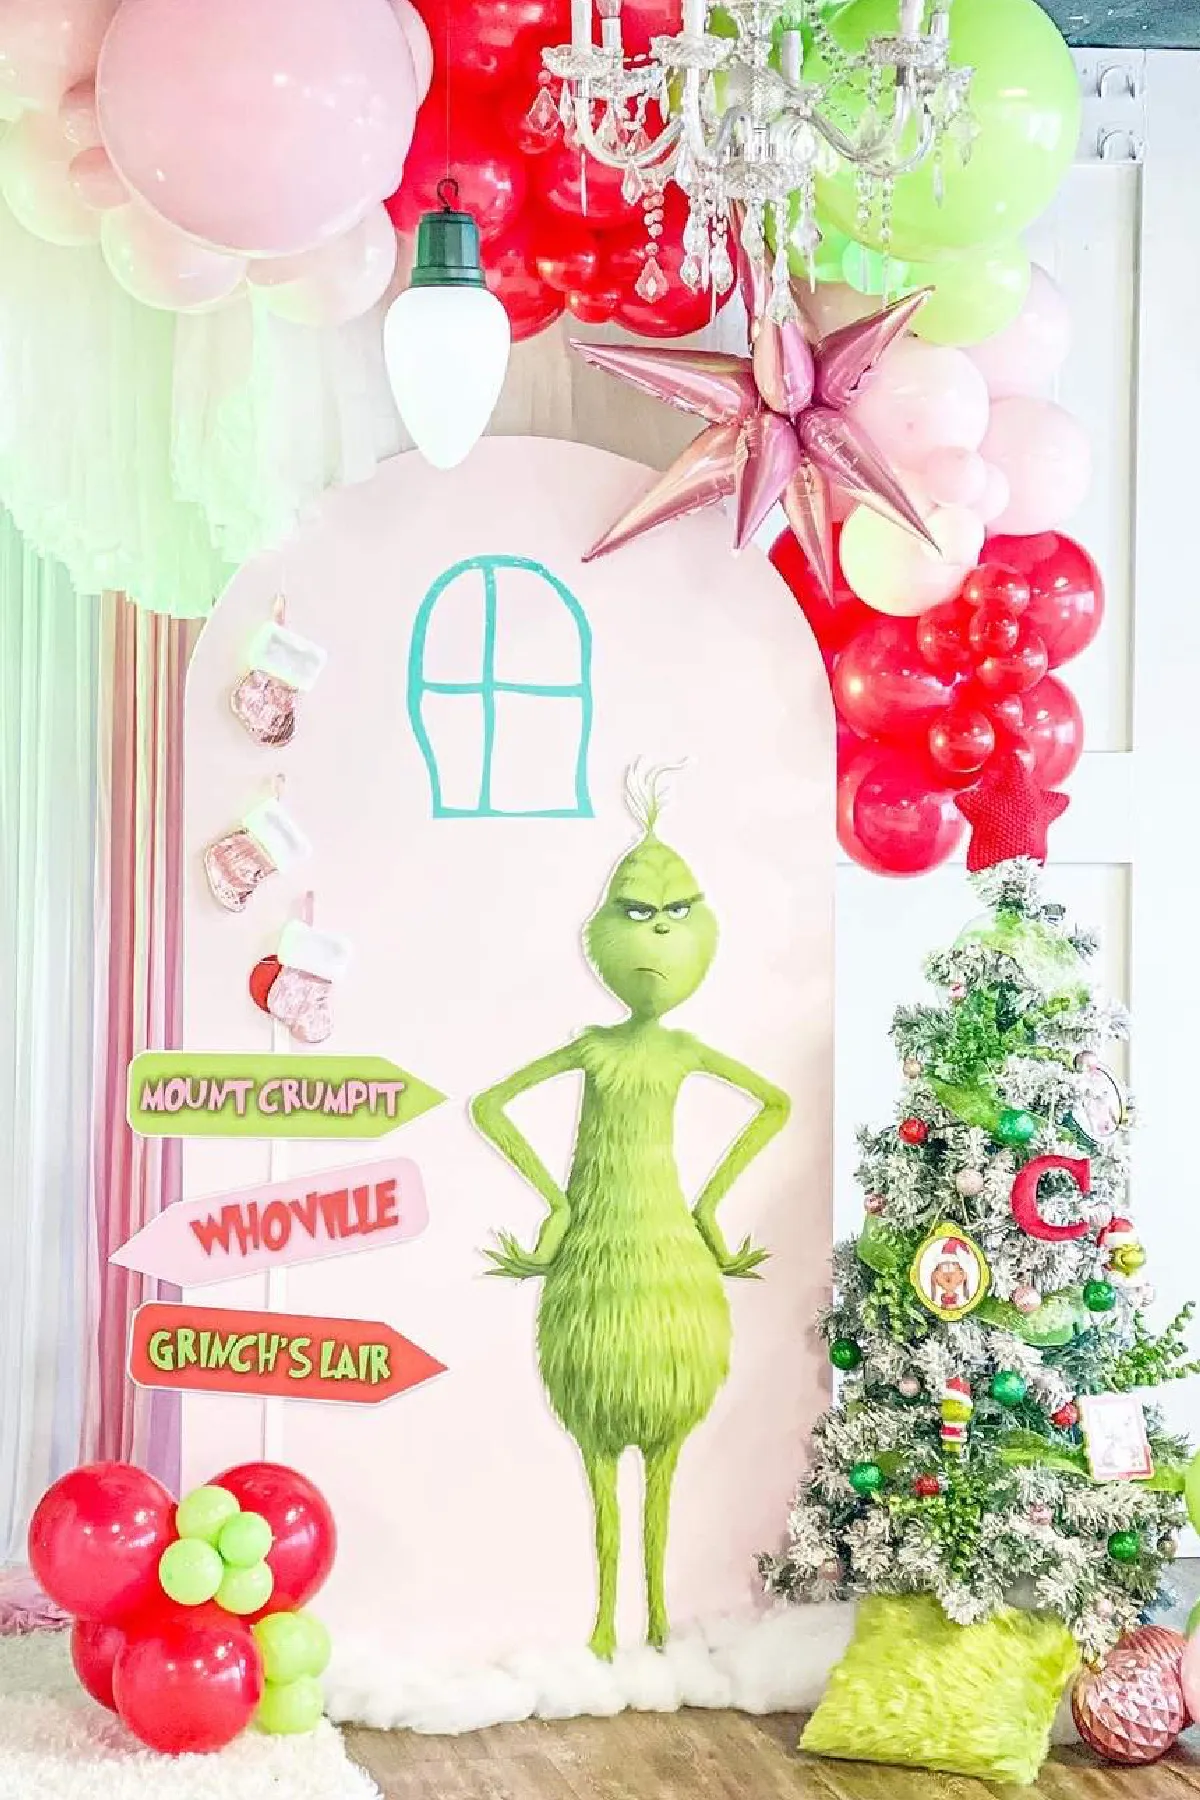
The whole setup lands well under $200 if you inflate it yourself.
- Balloon garland kit (red, pink, lime, 120+ pieces): $25-45
- Electric balloon pump: $18-30
- Flocked 6-foot tree: $45-90
- Whoville direction sign cutouts: $12-25
- Character cutout or wall decal: $15-40
- White faux fur rug: $25-50
Total: roughly $140-280, and the pump pays for itself after one party.
13. Sweater-Wearing Grinch Figurine Beside a Stone Fireplace
A resin figurine placed within three feet of an active fire will warp, craze, or discolor — the heat differential across the piece does it, not direct flame. Keep it at least 36 inches from the firebox and off any surface that gets warm to the touch. If you love the look and use the fireplace daily, consider a plush or fabric figure instead; they tolerate warmth far better. Also check the sweater: knit fabric on a figurine collects dust in the fibers, so plan on a monthly pass with a soft brush.
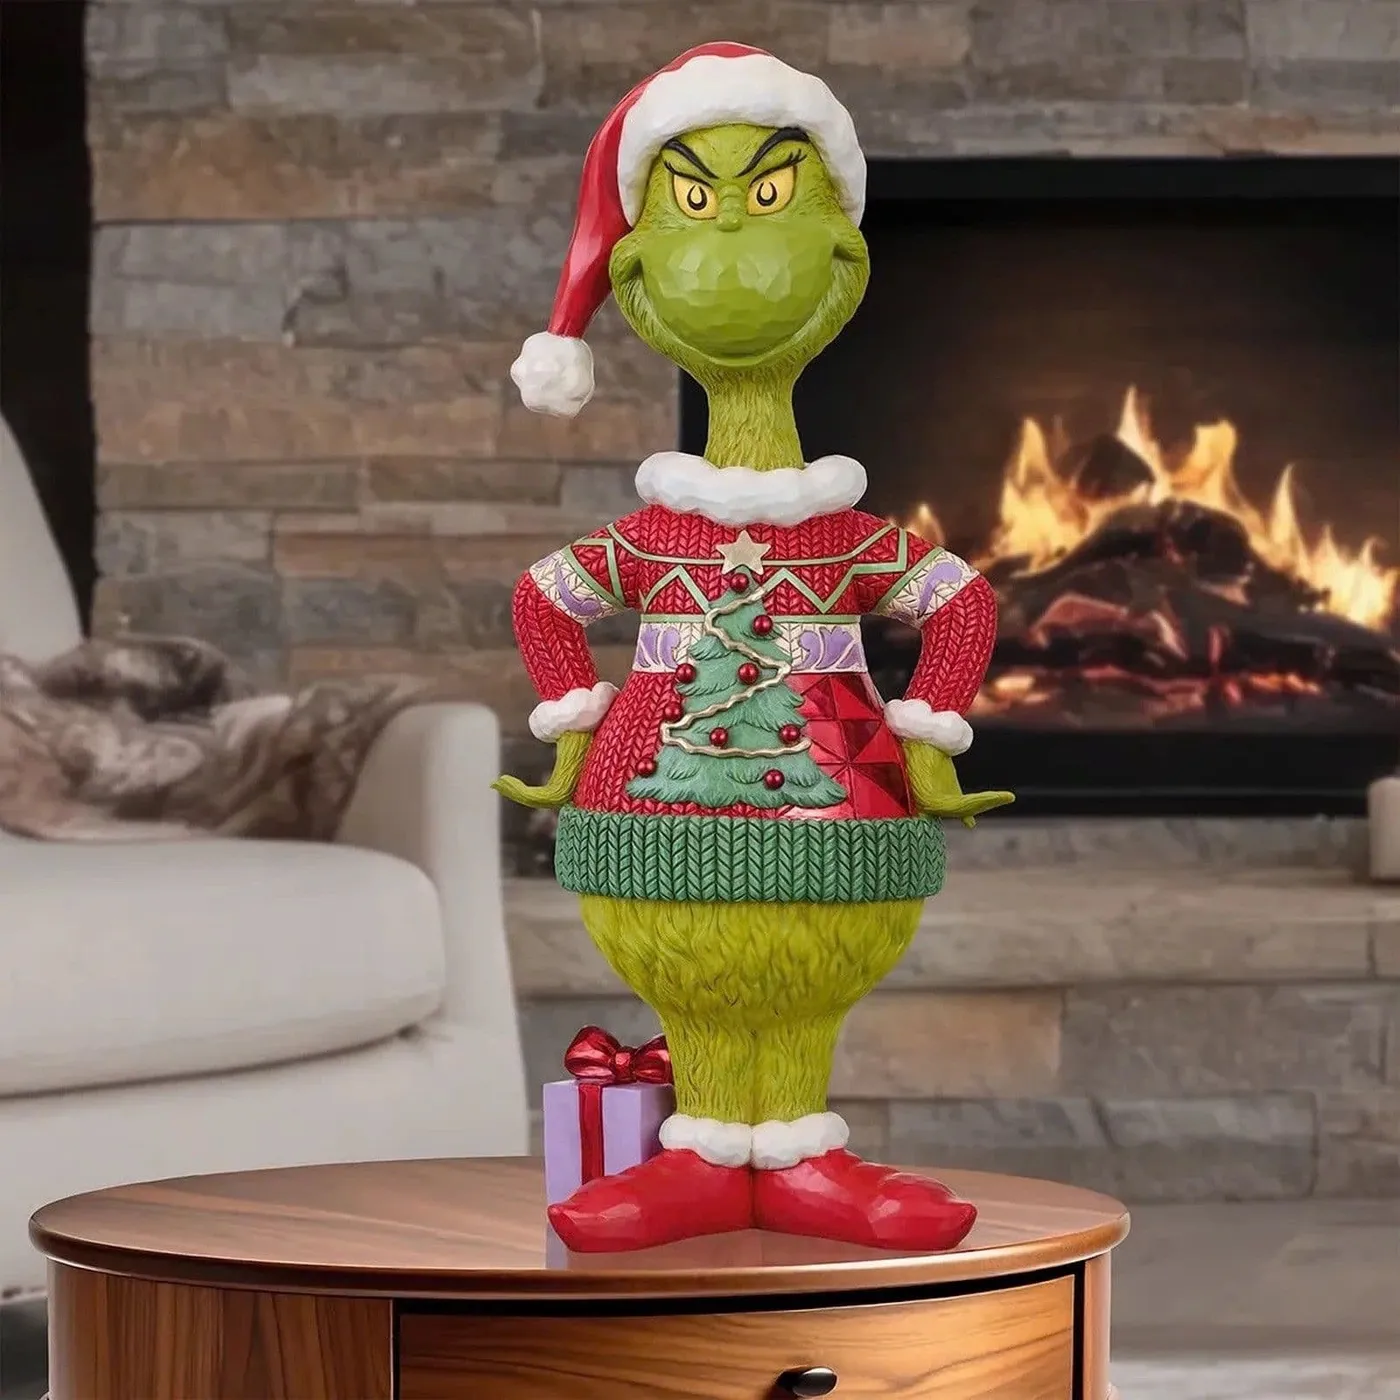
Scale the figurine to the side table, not to the room. A good rule: the figure should be 50-65% of the table’s width and roughly two-thirds the height of whatever sits behind it. On a 20-inch round side table, that’s a 12-14 inch figure — anything taller and the table reads as a pedestal. Turn the figure slightly toward the room rather than square to the camera. A three-quarter angle makes a mass-produced piece look styled instead of staged.
14. Whimsical Grinch Tree With a Curly Yellow Topper
The formula is simple and strangely hard to break: 70% green tree, 20% oversized red and white, 10% yellow. That last 10% is the whole personality. Swap the yellow topper for a gold star and the tree becomes conventional in one move. Keep ornaments deliberately oversized — four to six inches — and space them so you can see branches between them. If you want to change the mood without changing the formula, trade red for hot pink and leave the yellow topper exactly where it is.
The curly topper takes about 20 minutes and $8 in materials.
- Cut a 14-inch length of 12-gauge aluminum craft wire and bend it into a loose spiral around a broom handle.
- Slide the spiral off and stretch it slightly so the loops aren’t uniform.
- Wrap the wire with 1-inch yellow ribbon, dabbing hot glue every few inches to lock it.
- Leave a 3-inch straight tail at the bottom and bend it into a hook.
- Attach to the treetop and fluff the ribbon so it reads as a star, not a spring.
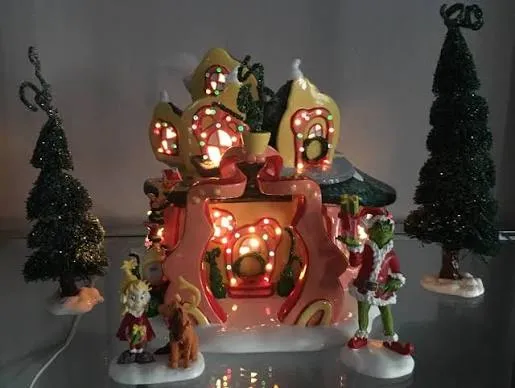
15. Miniature Whoville Village With a Curved Yellow House
Tabletop villages live or die by the table. You want a surface at least 24 inches wide and 12 inches deep, ideally at counter height — 36 inches — or above, so the scene sits near eye level when you’re standing. A coffee table handles 30-48 inches with 12-16 inches of scene depth; a console or entry table takes 36-60 inches and is ideal for a long village street. A 20-24 inch side table fits one house and two figures. Keep the tallest element under 14 inches so it never blocks sightlines across the room.
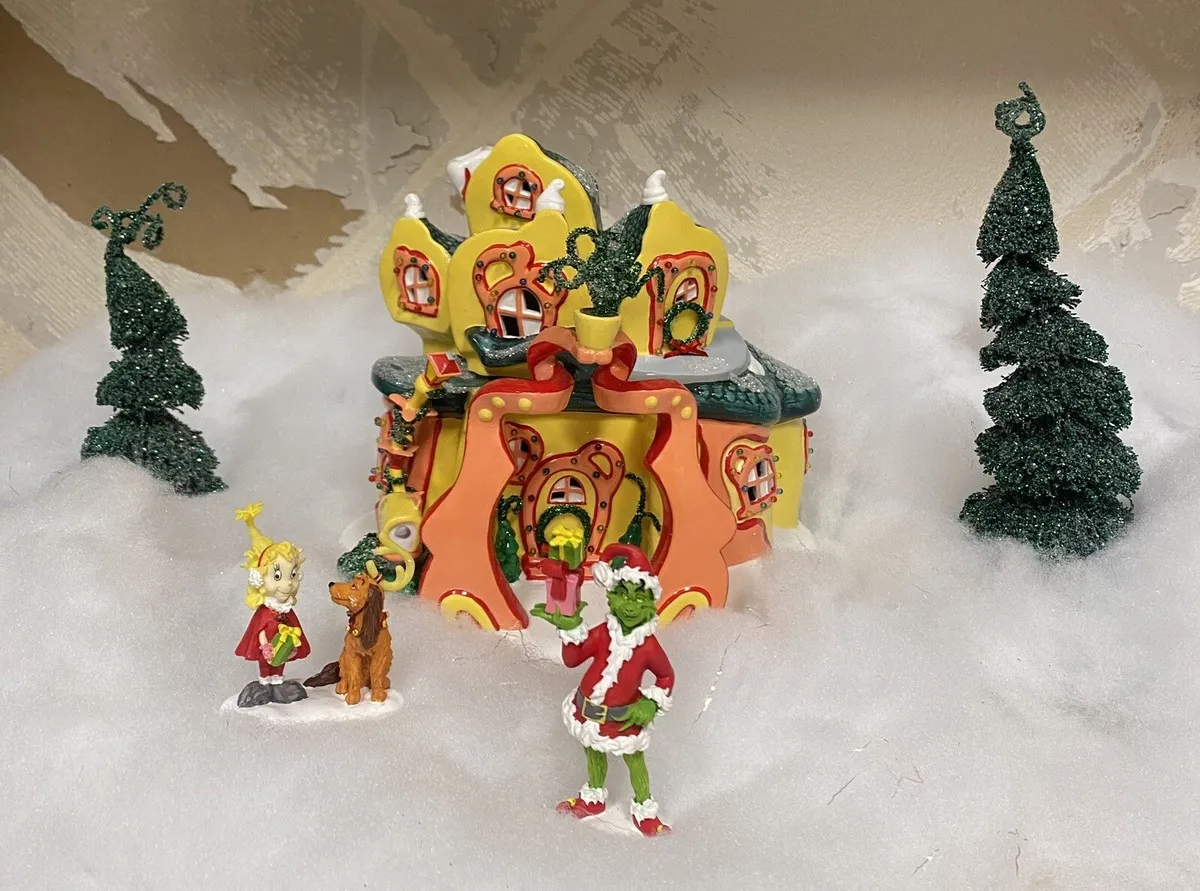
The curved, slightly leaning yellow house is the hero. Everything else here — figures, snow, trees — is standard holiday-village vocabulary. The house is not. Its italic lean and those rounded, off-kilter windows are what make the scene read as Whoville rather than a Victorian Christmas village. If you’re building one, spend your money here and buy the figures plain. A generic house with great characters is a craft project; a strange house with simple characters is a story.
16. Inflatable Max the Dog With a Blow-Up Tree
Inflatable sets are the cheapest way to fill a big visual space. A 6-foot character runs $30-60 at Walmart or Target, and a matching 7-foot tree is another $40-70. Want the pair for less? Watch post-Christmas clearance in the last week of December — these drop 60-75% and store small. Thrift stores and Marketplace are full of them in November, often $10-25, because people move and don’t want to re-stake them. Buy two and you have a backup blower, which is the part that always fails.

Every inflatable has one weak point: the blower motor. It’s the first thing to fail and the last thing you think about. Buy a model with a replaceable blower if you can, and never run one on an extension cord thinner than 14-gauge — voltage drop cooks motors quietly over a season. Store it loosely folded rather than vacuum-flattened so the seams don’t crack along the same fold lines year after year. And test it in October. Finding out it won’t inflate on December 1st is a special kind of heartbreak.
17. Wrapping-Paper Walls and a Grinch Face Wreath
Immersive, photo-ready holiday rooms became a genuine trend around 2024, and by 2026 they’ve filtered from event spaces into ordinary homes. The driver is social: people decorate for the photos they’ll take on December 24th, not just for the guests who’ll see it in person. Wrapping-paper walls are the cheapest way to buy that effect — four to six rolls cover a standard 8-by-10 wall. The caveat is permanence. This is a two-week look, not a season-long one, and it dates faster than almost anything else on this list.
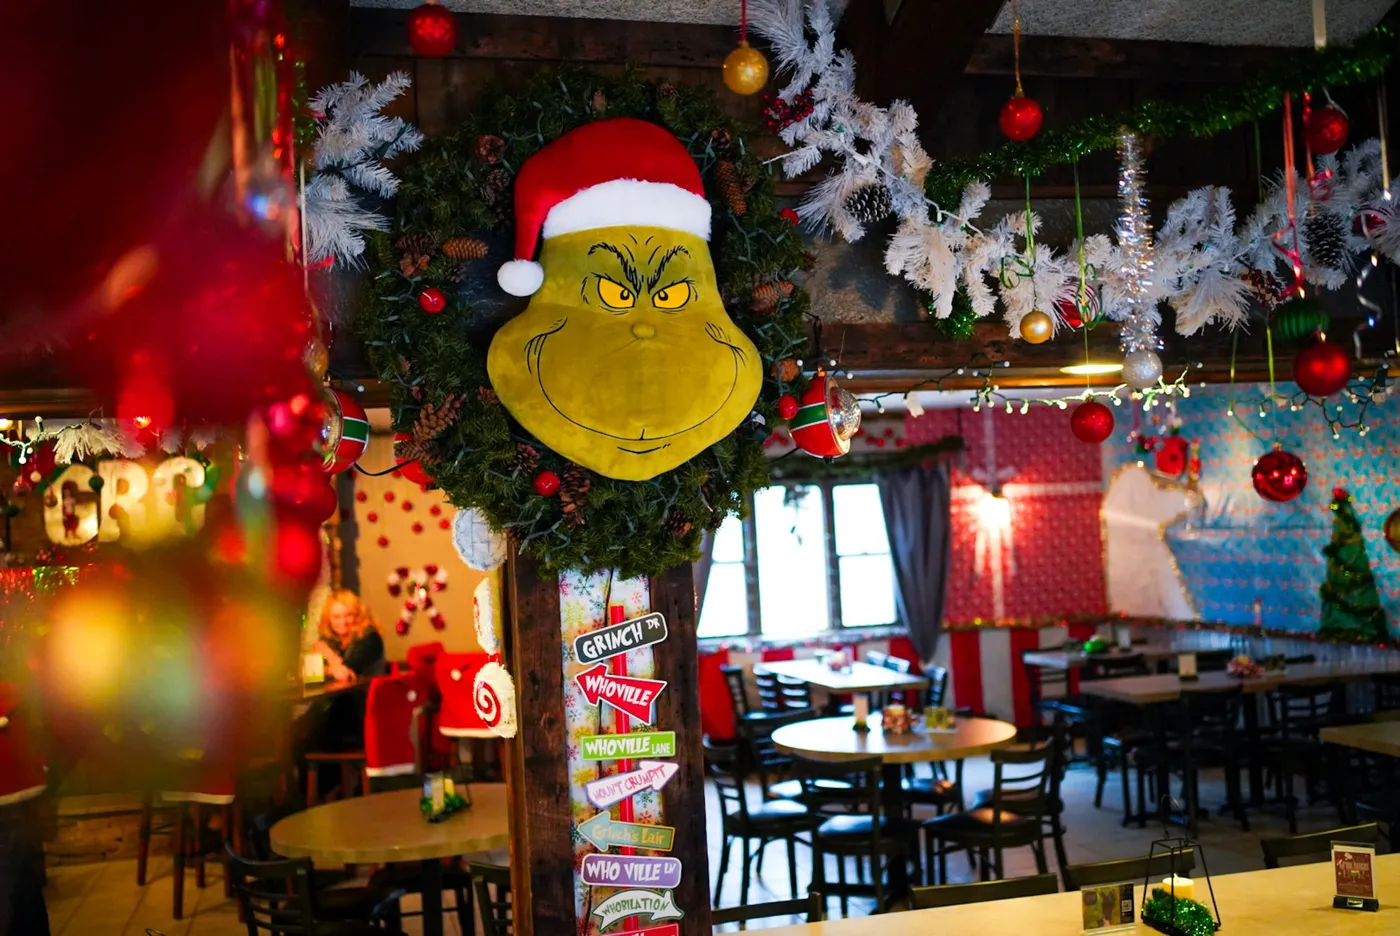
Hang the paper with painter’s tape along the top edge and a staple gun at the base, then cover the staples with a ribbon chair rail. Use a level on your first seam — patterned paper magnifies any tilt, and by the third roll a half-inch drift looks like a funhouse. Start at the least-visible corner and work toward the focal wall so your best seam lands where people stand. And buy one extra roll. Pattern matching eats 10-15% of every roll, which nobody accounts for until they’re one strip short.
18. Classical Bust and Chevron Stockings on an Ornate Mantel
Fresh evergreen is beautiful for about ten days and then it starts dropping needles onto everything below. Keep the garland away from heat sources and mist the greens every other day — a spray bottle is genuinely the whole secret. Faux garland has the opposite problem: it collects dust year-round, so rinse it in the shower and let it dry fully before the season starts. The feather arrangement in the bust will shed. Expect to find brown fluff in the tile grout until roughly March.
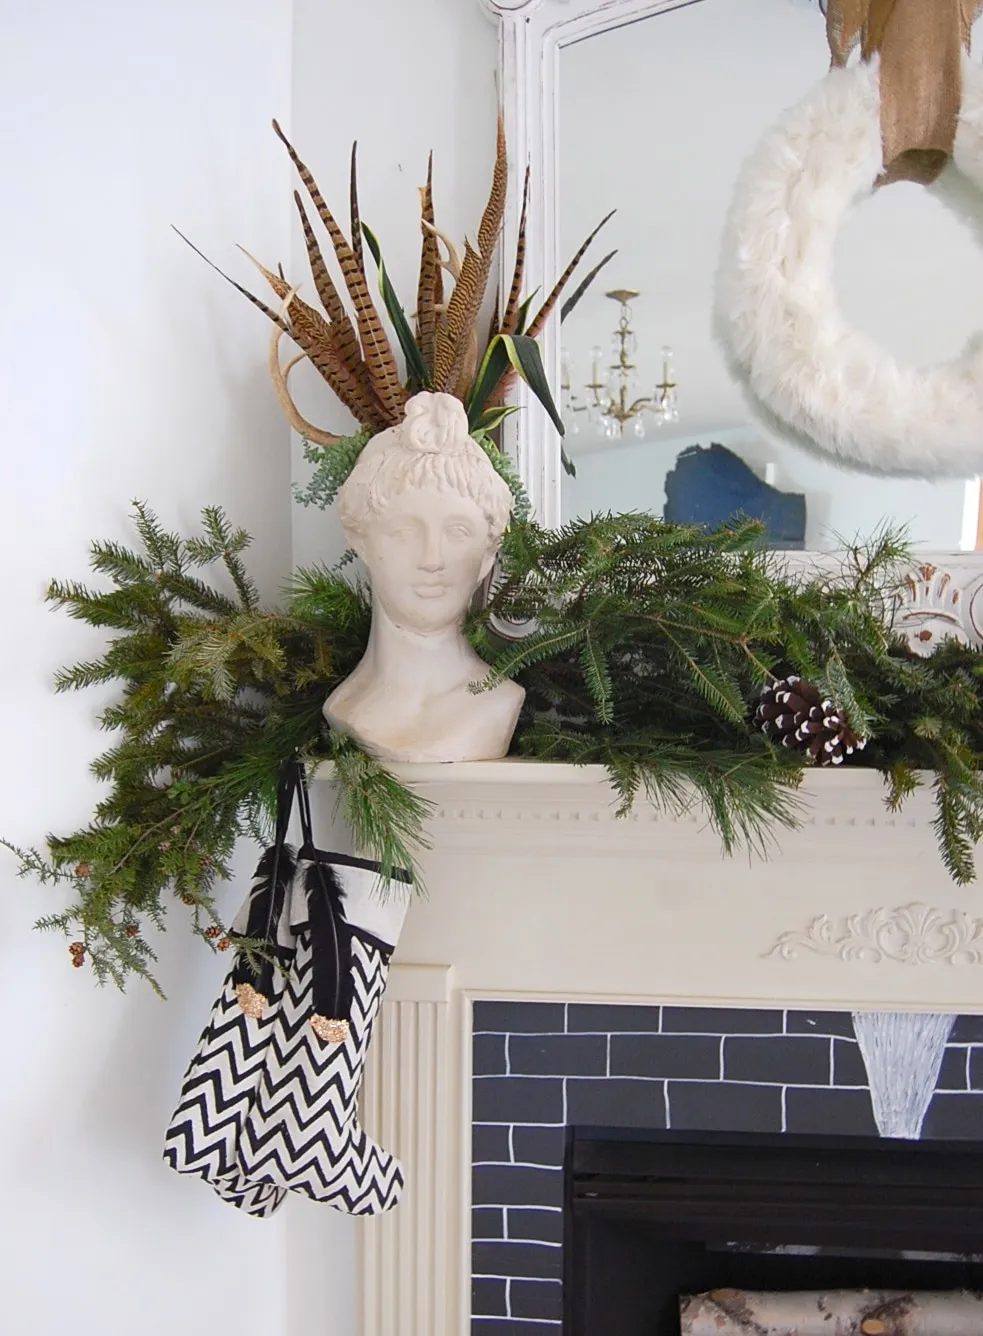
The palette is roughly 55% white, 25% evergreen, and 20% black with gold flashes. That’s a cool, high-contrast formula, which is why it reads elegant rather than cozy — and why the red berries act as tiny interruptions instead of a full color story. To warm it up without breaking it, swap black accents for deep bronze and keep white dominant. To push it colder and more formal, take white to 65% and let the black go almost architectural. Either way, keep gold under 10%.
19. Lit Cindy Lou Who Figure Beside a Brass Table Lamp
This is a corner vignette you can assemble for the price of a nice dinner out.

- 6-foot pre-lit tree: $50-110
- Red and gold ornament set: $18-35
- Wired decorative ribbons: $10-20
- Lighted character figure: $45-120
- Brass-toned table lamp: $25-60
Total: roughly $150-345, or under $90 if you already own the lamp and tree. The lamp earns its place — it gives the corner a second light source at a completely different height.
A lit character figure needs breathing room. Give it a footprint of at least three square feet and 18 inches of clearance from lamps, curtains, and anything that gets warm, because those internal bulbs put out more heat than people expect. The arrangement here works because the tree fills the vertical space behind the figure and the lamp anchors the left side, so nothing floats. In a room under 100 square feet, drop to a 4-foot tree and a tabletop scene instead of crowding the floor.
20. Red Directional Signpost With Stacked Plaid Gifts
Before you plant a signpost in your entry or living room, run through this:
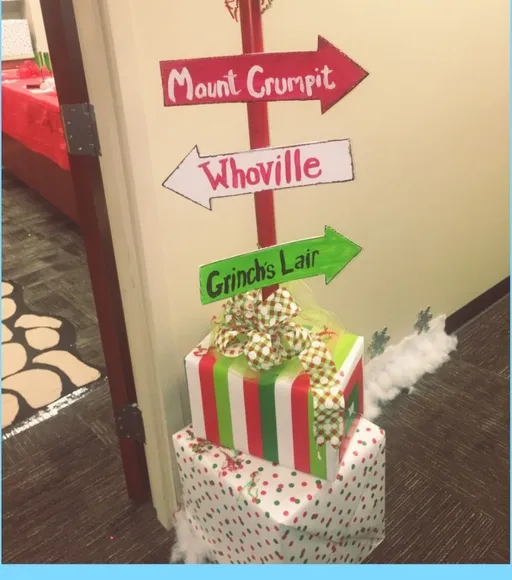
- Measure your ceiling height — a 5-foot post plus signs needs 8-foot ceilings to feel uncrowded
- Confirm your floor won’t scratch: felt pads under the base, always
- Check that the arrow signs won’t block a walkway or a door swing
- Decide on your faux snow footprint — 3 square feet is plenty, 8 looks like a spill
- Set a $60 ceiling, since this whole scene is achievable for less
Directional signs work because they imply a place exists just out of frame. That’s an unusually powerful trick for a decoration that costs almost nothing — three arrow shapes on a red pole. The stacked gifts below do structural work too: they anchor the post visually so it doesn’t look like it’s floating, and they give the eye a place to rest after the signs pull it upward. Together it’s a vertical composition on a horizontal floor, which is why it reads as a scene.
21. Paper Handprint Gnomes Against a Brick Fireplace Backdrop
Each gnome takes about 12 minutes and roughly 40 cents.
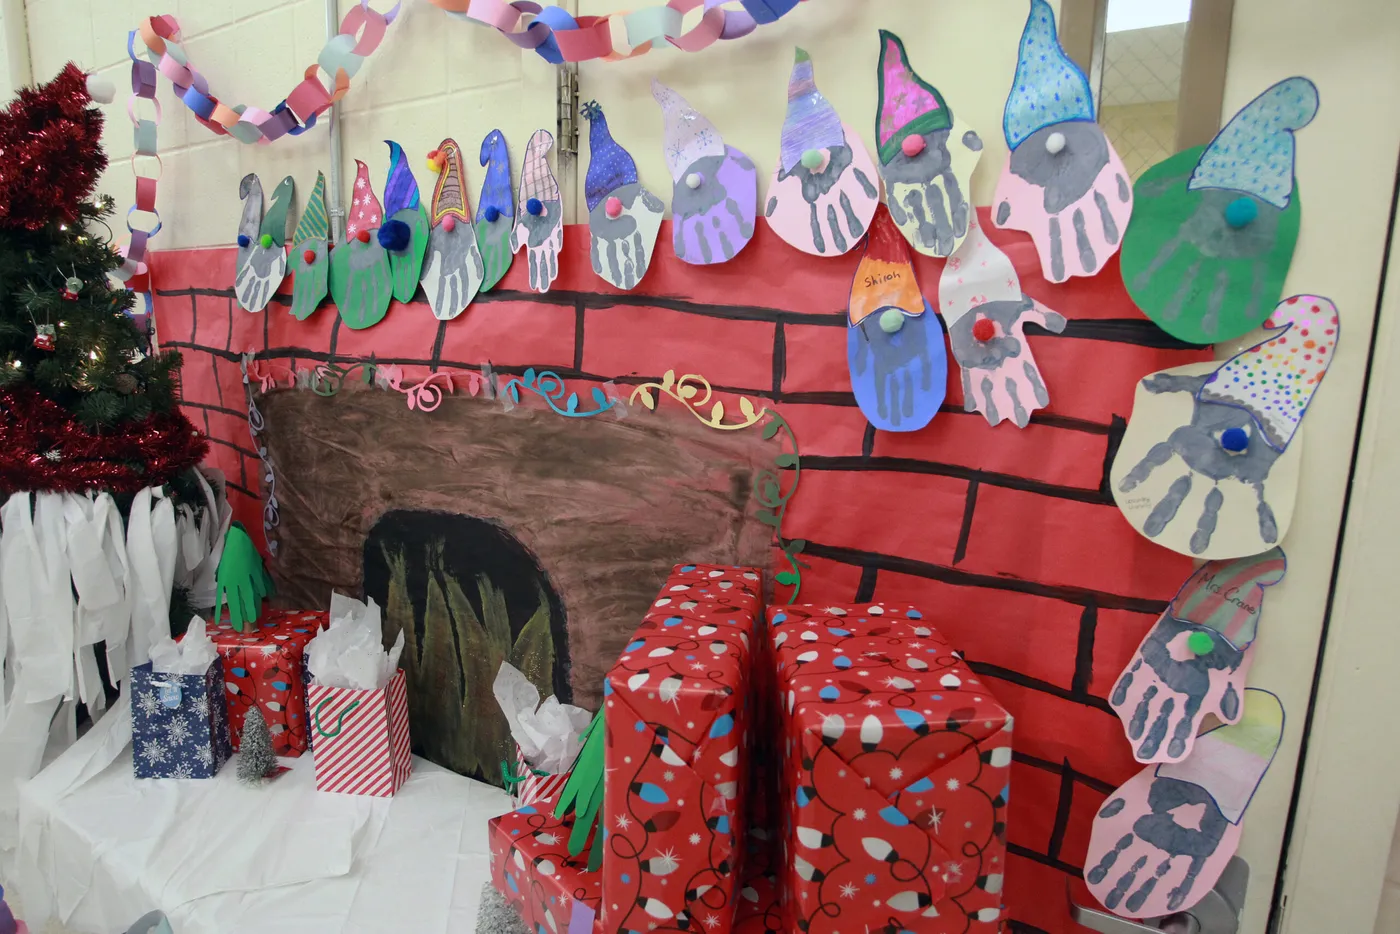
- Trace a child’s hand on 9-by-12 construction paper and cut it out — the fingers become the beard.
- Cut a triangle hat from contrasting paper and glue it over the palm.
- Add a wooden bead or paper circle for the nose, plus two dot eyes.
- Glue a small paper body rectangle behind the handprint so the gnome can stand.
- Stagger heights on the wall: tallest at the center, dropping two inches on each side.
- Back the whole display with a drawn brick fireplace on kraft paper for instant architecture.
This is the budget cousin of the elaborate facade in Idea #3 — same gingerbread-and-brick idea, about $300 cheaper. A classroom or playroom gets the entire look for under $25: one roll of kraft paper ($6), a pack of construction paper ($5), a bag of wooden beads ($4), and a small artificial tree from Walmart ($10-15) with a strand of red tinsel ($3). The charm is entirely in the imperfection. Machine-cut paper shapes would look worse, and every kid knows it.
22. Sleigh and Max Wall Decal Above a Snowy Hill
Decal placement is a math problem, not an eyeball one. Center the graphic at 57-60 inches from the floor — roughly eye level — and leave at least 12 inches of empty wall below it so the scene has air to travel through. Clean the wall with a damp cloth and let it dry fully; one speck of dust under a large decal becomes a visible bubble. Use a felt-edged squeegee and work from the center outward. If your wall is heavily textured, skip vinyl entirely and use a fabric banner instead.
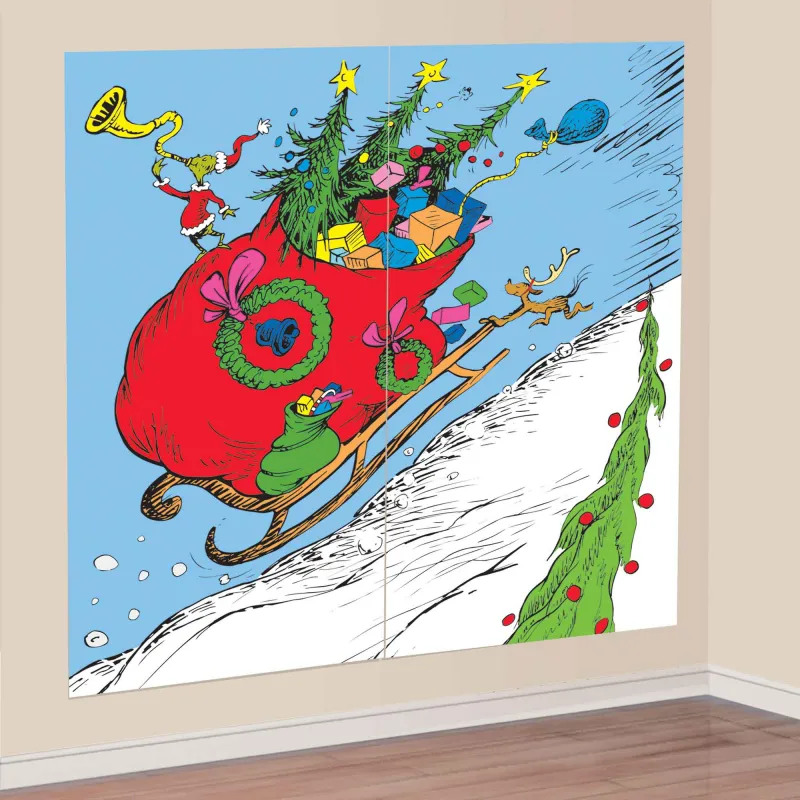
The honest downside of wall decals is removal. Standard vinyl can lift paint, especially on walls painted less than 30 days ago or finished in a flat sheen. Look for “removable” or “repositionable” vinyl and test a small corner in a closet first. Consider sun exposure too — a decal left up for six weeks can leave a faint bright rectangle where the wall didn’t fade with the rest. If you rent, or you’re precious about your paint, fabric banners give you the same scene with zero adhesive risk.
23. Mini Lit Tree on Faux Snow With a Grinchmas Pillow
The oversized frosted silver fabric leaves are what elevate this from tabletop craft to styled vignette. Everything else — mini tree, red ornaments, faux snow, gift boxes — is expected. Those big soft metallic leaves add a texture nothing else in the scene has, and they repeat the silver in the ornaments at five times the scale. Steal the move: pick one material that’s completely absent from the rest of your decor and use it at an exaggerated size. That contrast is what makes small scenes photograph like big ones.
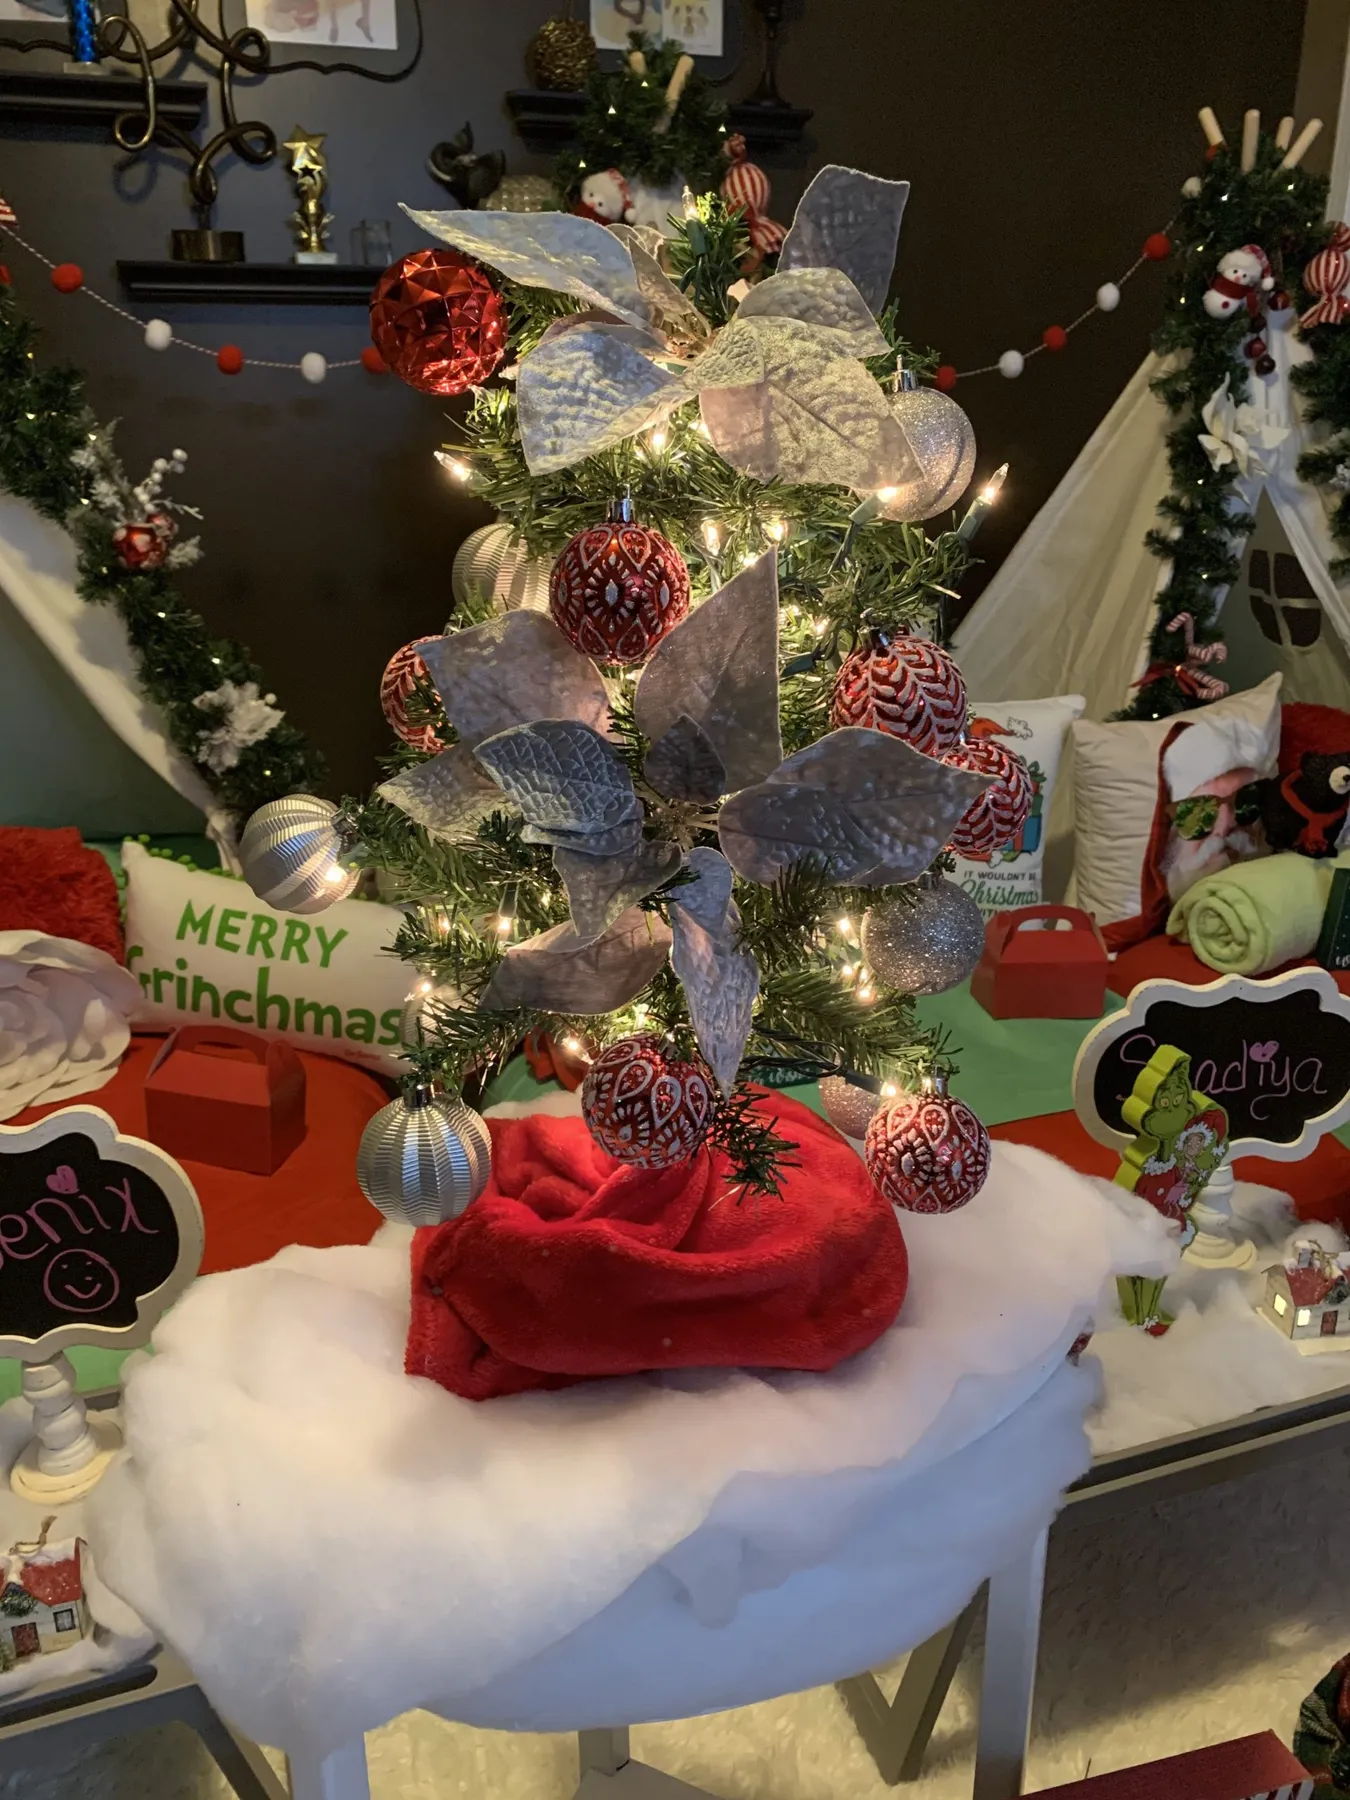
Roughly 50% green and white, 30% red, 15% silver, 5% lime. The white faux snow base is doing more than you think — it acts as the neutral that lets red and silver read as accents instead of a pile. Swap silver for champagne gold and the scene softens considerably. Push red above 40% and it starts looking like a Valentine’s display. Want it more Grinch and less generic? Add 5% lime through a single ribbon or the pillow.
24. Animated Brick Fireplace Figurine With a Snow Globe Center
Collectible animated pieces range widely, so here’s the honest spread.
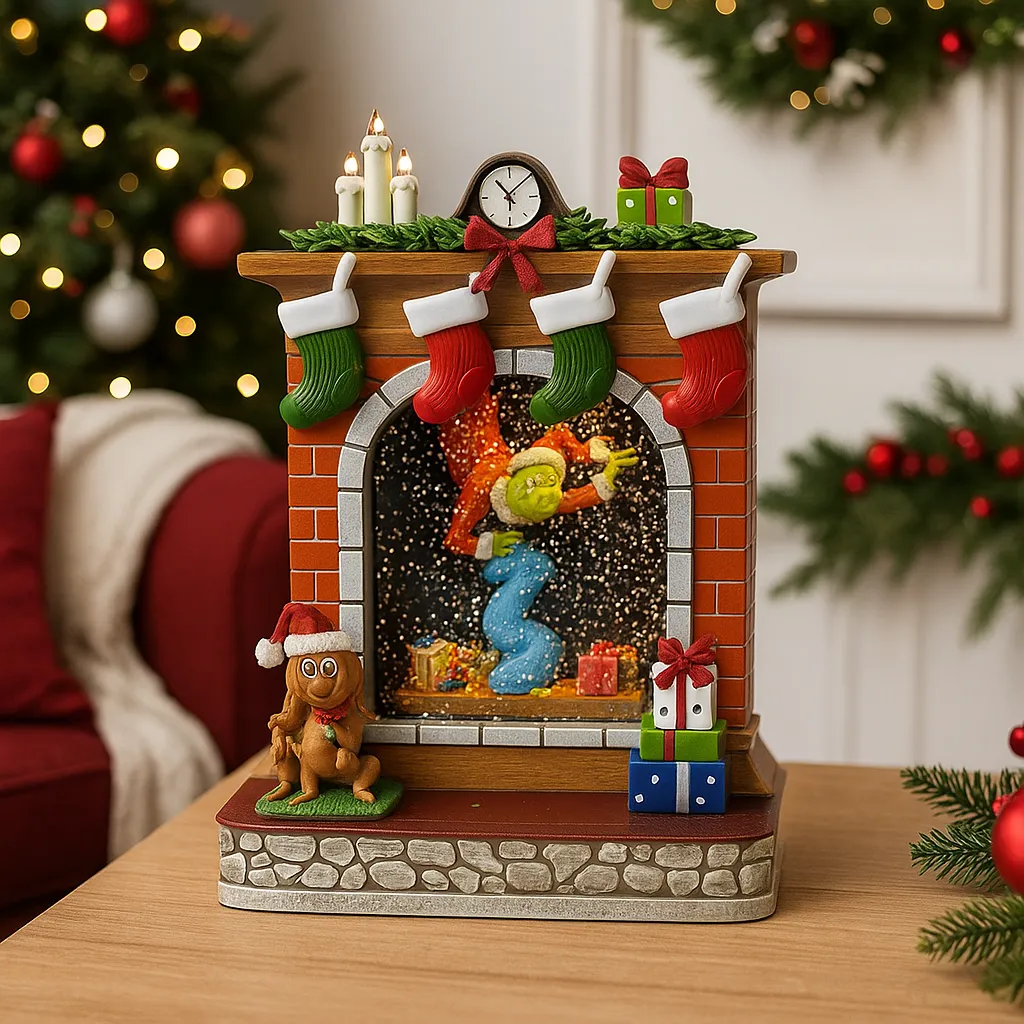
- Animated musical figurine with snow globe: $40-120
- Miniature stockings and gift-box props: $10-20
- Battery-operated fairy lights: $8-15
- Display riser or wooden crate: $12-25
- Faux snow or cotton batting: $6-12
Total: roughly $75-190 depending on how collectible you go. A basic light-and-music version at the low end delivers 90% of the charm for a third of the price.
Or make your own snow globe centerpiece in about 45 minutes for $20-30.
- Choose a wide-mouth glass jar with a tight-sealing lid — mason jars work well.
- Hot-glue a waterproof figurine to the inside of the lid and let it cure overnight.
- Fill the jar with distilled water and 1/2 teaspoon of glycerin so the glitter falls slowly.
- Add a pinch of fine glitter or faux snow, not both — mixed sizes clump.
- Seal the lid with a ring of silicone and let it dry 24 hours before flipping.
- Wrap the base in red ribbon to hide the threads.
25. Four Vertical Whoville Banners on a Paneled Wall
Banner sizing is straightforward once you know the numbers. Standard panels run 12 by 18 inches, and four of them want about 60 inches of horizontal wall space with 4-6 inch gaps between. Hang the top edge at 66-72 inches from the floor and keep all four tops level — a laser level saves 20 minutes of arguing. Leave 10-12 inches of wall above the banners before any ceiling trim or crown molding. On a narrow wall, drop to three panels rather than shrinking them; small banners on a big wall always look apologetic.
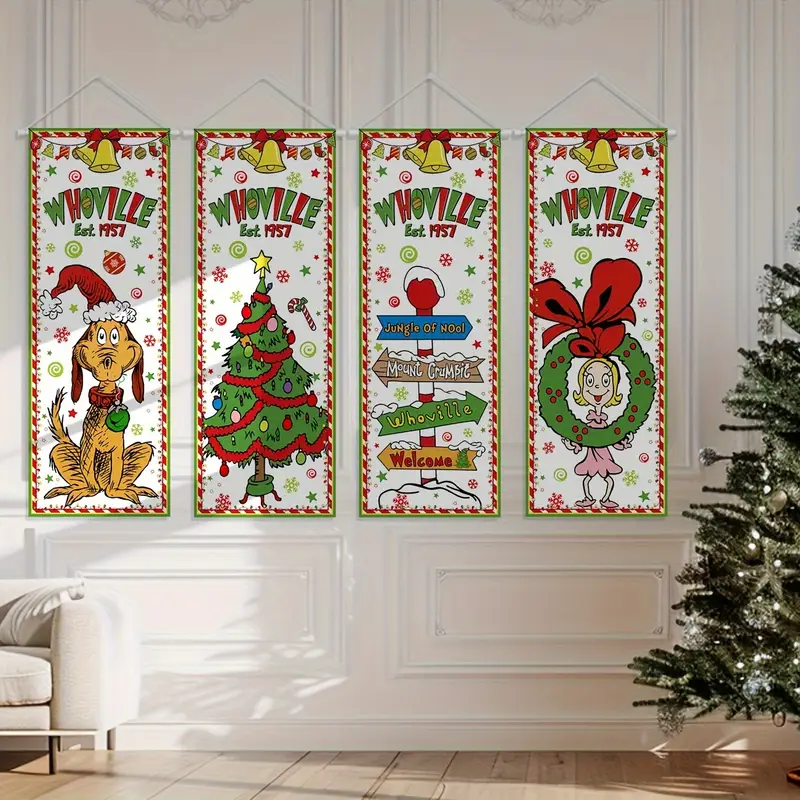
Fabric banners are quietly replacing paper garlands because they’re reusable, they don’t crinkle, and they photograph without glare. The Whoville-character versions speak to a 2026 mood specifically: people want recognizable characters in their decor, not abstract snowflakes. It’s the same instinct driving character-themed tree ornaments and storybook villages. The catch is longevity — character licensing cycles, and what feels fresh this year can feel dated by 2028. Buy banners you can flip or fold to a plain back for the off years.
26. Red Carousel Music Box Against a Rustic Plank Wall
Three principles are stacked here. Contrast of finish: a glossy painted red carousel against raw matte wood planks, and the clash makes both look better. Repetition of shape: the carousel’s arched canopy echoes the star cutouts and the reindeer silhouette above it. And light temperature — those string lights are warm, around 2700K, which is what makes the rough wood glow instead of looking grey. Swap in cool white LEDs and the entire wall goes cold and flat. It’s a small technical choice with an outsized effect.

Carousel music boxes run $25-60 new and $8-15 at thrift stores, where they’re oddly common because people buy them as gifts and never display them. The plank wall is the budget hero: a single sheet of 1/4-inch underlayment plywood runs $20-30, and you can cut it into 6-inch strips and nail it to furring strips for under $60 total. String lights: $12-18 for a 33-foot strand. Star cutouts: $6-10. The whole vignette lands under $120, and the wall stays up year-round.
27. Lighted Cindy Lou Who Figure Holding a Wreath
Lighted figures are wonderful and slightly demanding. Those internal bulbs generate heat, so keep the figure at least 12 inches from curtains, trees, and paper — and never cover it with fabric. Check the cord and plug for fraying before the season starts; older figures are notorious for brittle insulation. If it’s an indoor-only piece, don’t be tempted to put it on a covered porch; damp air corrodes the contacts even without direct rain. And put it on a timer. A figure lit 24/7 will burn out a bulb string by mid-December.
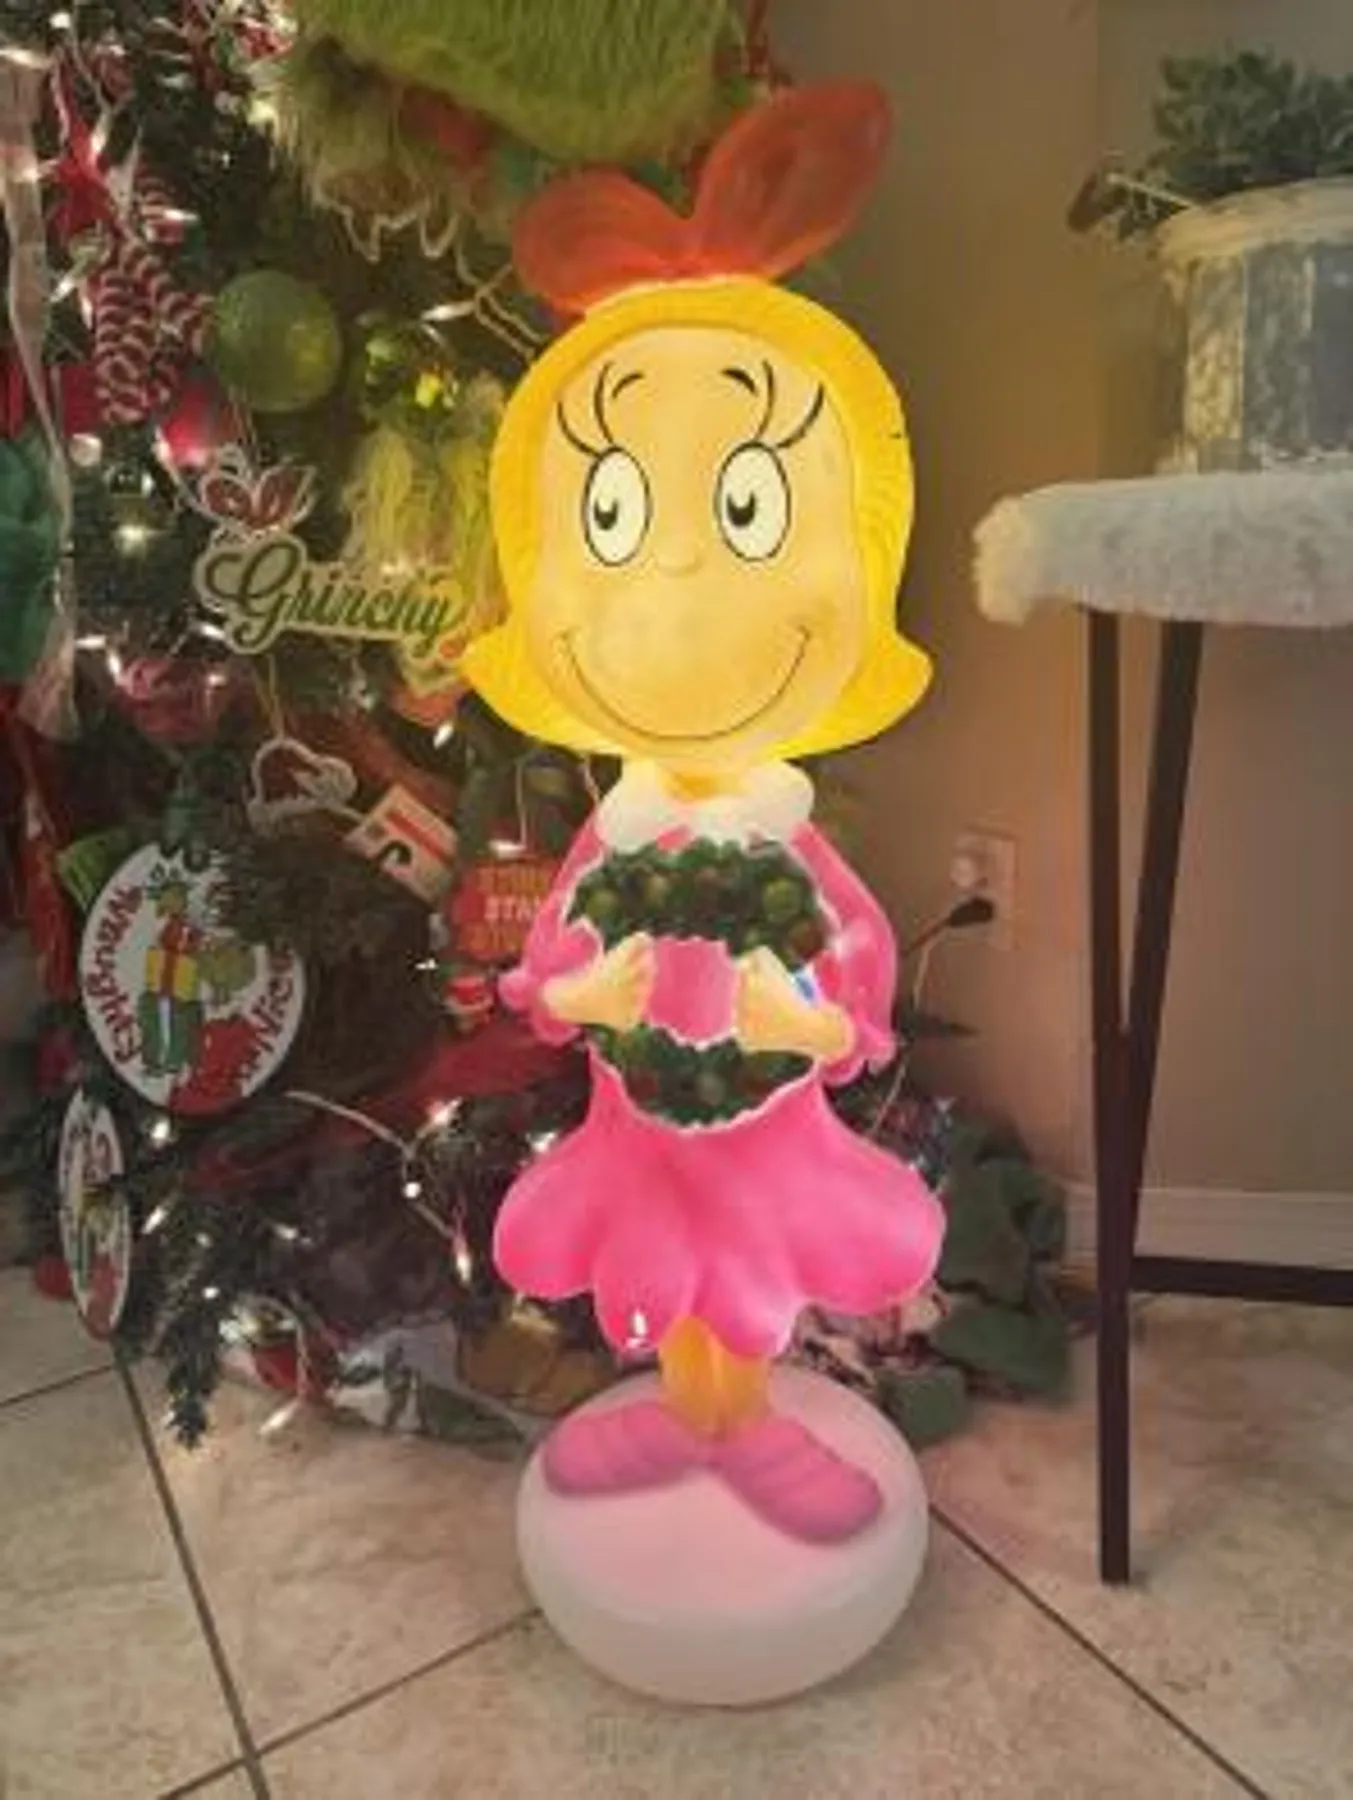
Run through this before you commit to a lighted figure display:
- Confirm a nearby outlet and whether you need a 6-foot extension
- Measure the footprint — these figures need about 2 square feet plus clearance
- Check bulb replaceability before buying; sealed units are disposable
- Decide on a timer or smart plug so it isn’t running all night
- Have a storage plan: a labeled bin with the cord coiled loose, not wrapped tight
28. Flocked Trees and Red Tapers on a White Mantel
Candle height is the fastest way to make a mantel look designed. Use an odd number — three or five — and stagger heights in a 1:1.3:1.6 ratio, so 9, 12, and 15 inches. Keep the tallest candle shorter than whatever hangs above the mantel, or the arrangement looks pinched. Group them off-center rather than spacing them evenly, and set them in front of the flocked trees, not behind. Depth matters more than symmetry on a mantel, and the pink ribbons want to trail slightly over the edge.
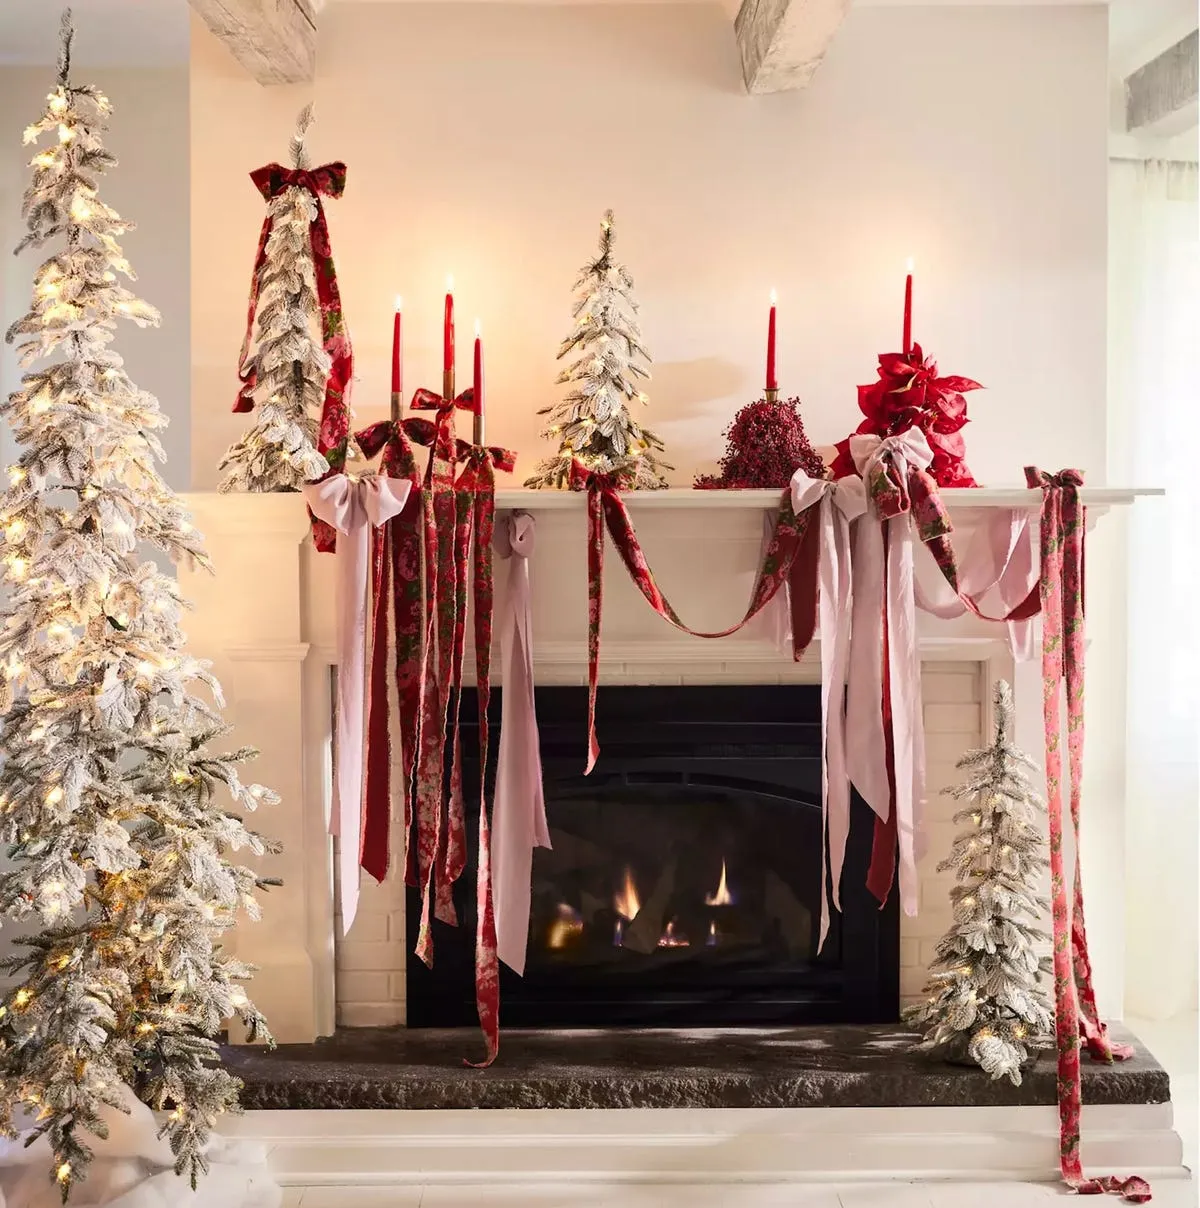
Flocked trees shed, and there’s no way around it. Expect a fine white dust on your hearth through December; a vacuum with a brush attachment handles it weekly. Never wash a flocked tree — the coating is essentially sprayed fiber and water will mat it permanently. Store it in a breathable bag, not a vacuum-sealed one, so moisture can escape. Real taper candles, meanwhile, drip. On stone or painted wood, use dripless beeswax tapers or switch to flameless and skip the wax scraping entirely.
29. White Flocked Tree With Lit Built-In Shelves
You don’t need custom millwork to get lit shelves. Battery puck lights ($12-20 for a six-pack) tucked under each shelf lip do most of the work, and a strip of warm-white LED tape ($15-25) along the back edge washes the wall behind your figurines — that’s the glow you’re actually seeing here. Style the shelves with what you own: group figurines in odd numbers, mix heights, and add one red garland across the top. Total spend for the lighting illusion: under $45. For the mantel half of this room, borrow the candle trick from Idea #28.
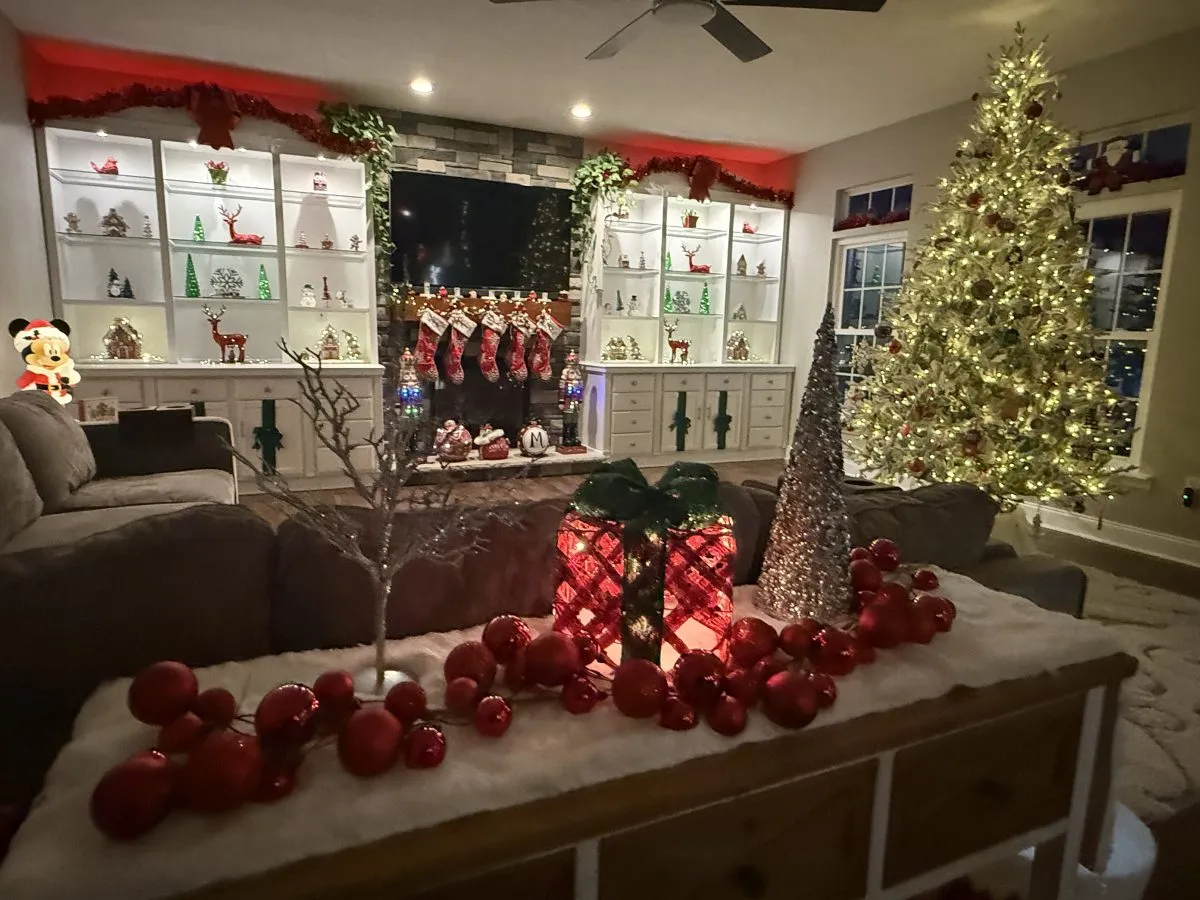
This level of layering needs room to breathe. It works in a living room of at least 200 square feet with 9-foot ceilings; below that, the flocked tree and the lit shelving start competing for the same visual air. Aim for 36 inches of walkway in front of the coffee table, keep shelf lighting under 2700K so it doesn’t glare, and cap tabletop decor at three heights — low, medium, and tall — so the coffee table reads as styled rather than stacked.
Whoville Doesn’t Need Snow — It Needs Nerve
Every idea here comes down to one thing: committing to the bit. The peppermint wreaths, the curly tree toppers, the leaning yellow houses — none of them work half-heartedly, and all of them work better than they should when you go all in. Start with one corner, one door, or one mantel this weekend, and let the rest of the room catch up next year.
📌 Pin your favorite idea now so it’s waiting for you when the boxes come out of storage.