32 Jaw-Dropping DIY Christmas Decorations for 2026 That Will Transform Your Home

Still scrolling past the same fifty Christmas DIYs and thinking none of them look like your actual living room? Same. So we combed through Dollar Tree, Target, Walmart and Michaels, checked what’s genuinely cute and genuinely cheap, and narrowed it down to 32 ideas that hold up in a real house — from $3 homemade ornaments to a $180 fireplace moment.
You’ll find rustic farmhouse, maximalist eclectic, pastel whimsical and traditional red-and-green, with the budget version sitting right next to the splurge so you can see exactly where the money goes. Most of these are kid-friendly, and none of them require a dedicated craft room.
It’s 2026, and the biggest shift on Pinterest right now is toward the handmade and slightly imperfect — paper chains, wood slices and yarn wreaths are beating the store-bought aisle because they photograph warmer and cost almost nothing.
And stay until the end — we break down the most common mistakes that can ruin these looks.
📌 Save this to Pinterest for later — you’ll want to revisit these ideas.
1. A Rustic Gift Table Styled with Twine and Cinnamon
Take away the gifts and this is just a nice fireplace. The thing that makes the scene feel finished is that the wrapping is doing the decorating — kraft paper, twine, pinecones and cinnamon sticks tucked into the knots, arranged on a rustic wood table that sits between you and the fire. It reads as a styled vignette instead of storage. If you copy one thing from this room, copy that: set your gifts out where people walk in, and actually light the orange pillar candle before guests arrive.

This setup wants a wall wide enough for a stone fireplace with breathing room on both sides — call it a 12-by-14-foot living room minimum, with 9-foot ceilings so the mantel doesn’t crowd the trim. Leave about 24 inches between the table and the hearth so nobody’s shins meet hot stone. Working smaller? Idea #21 shrinks the same rustic mood into a wooden bowl you can park on a console.
2. A Hot Pink Tree Against a Full-Wall Gallery Wall
Three things hold this room together. The pink tree is the only saturated thing at eye level — the rust sofa, the black-and-white plaid and the vintage rug all sit in a lower, warmer register, so the tree reads as art rather than a color accident. The gallery wall does the job wallpaper would normally do, without competing for the same visual plane as the tree. And every textile is a different scale of pattern: big plaid, fine stripe, dense rug.
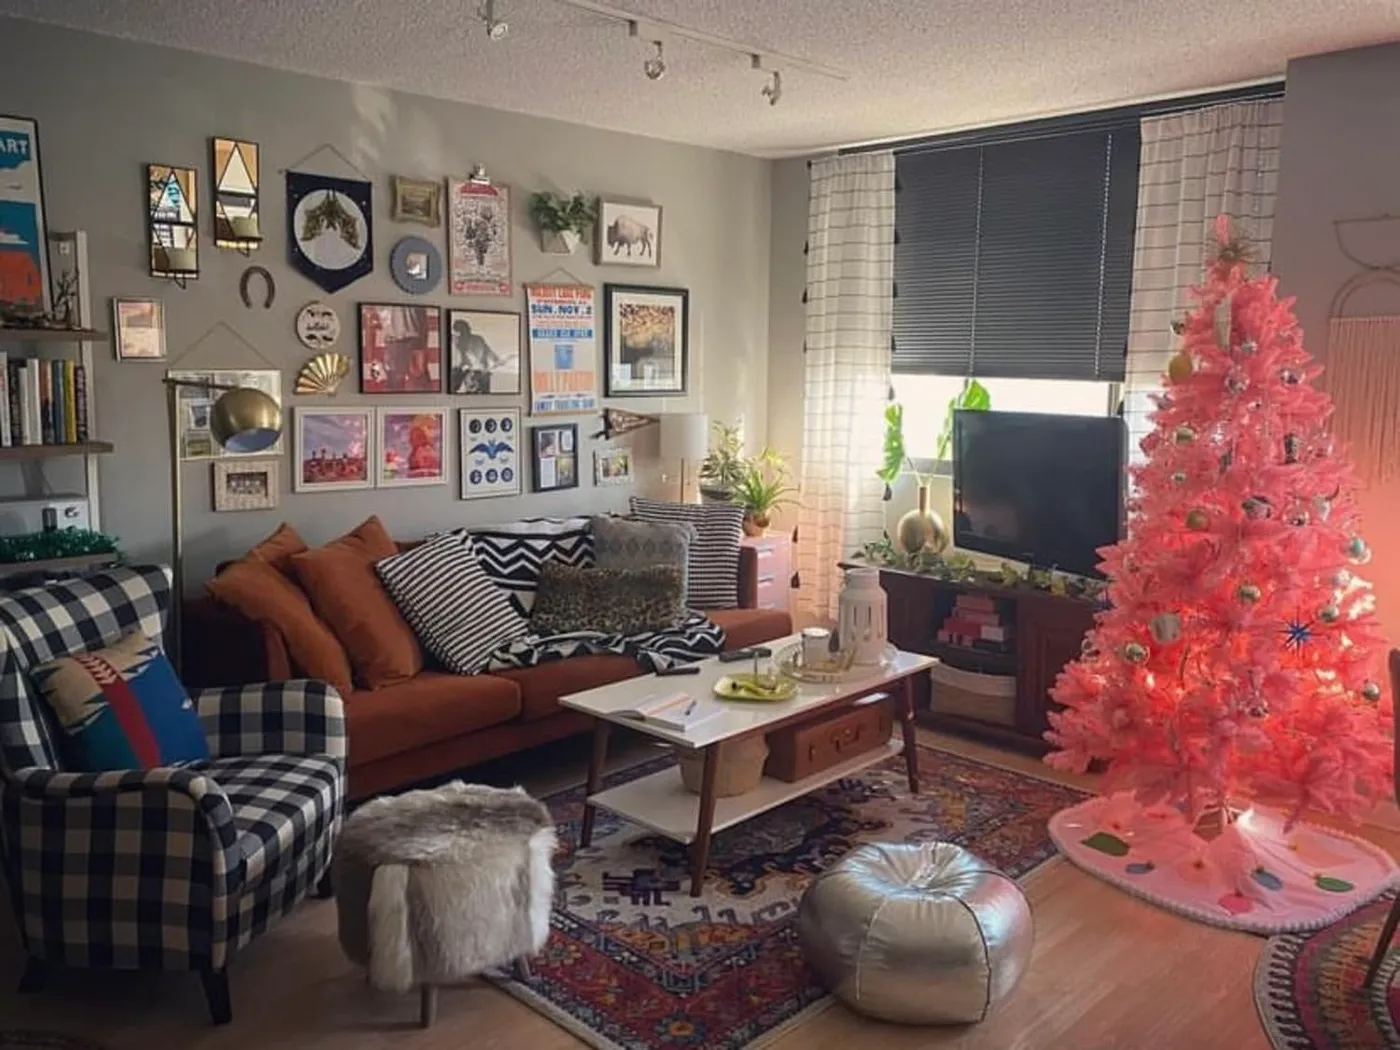
The gallery wall is where most people go wrong. Keep the gaps between frames tight and consistent — 2.5 to 3 inches — and treat the whole arrangement as one shape instead of a dozen separate hangings. If you can’t commit, cut newspaper templates, tape them up and live with them for two days before you make a single hole.
Pink Christmas stopped being a novelty a while ago; it’s a full branch of the maximalist, dopamine-decor wave that took over Pinterest feeds and stayed. That’s good news for your budget, because pink trees, ornaments and ribbon now turn up everywhere from dollar stores to high-end shops — and thrifted pink ornaments are easier to find than ever.
3. A Figure-Eight Yarn Snowman Wreath with a Tiny Top Hat
Building the snowman shape takes about 90 minutes and roughly $25 in supplies.
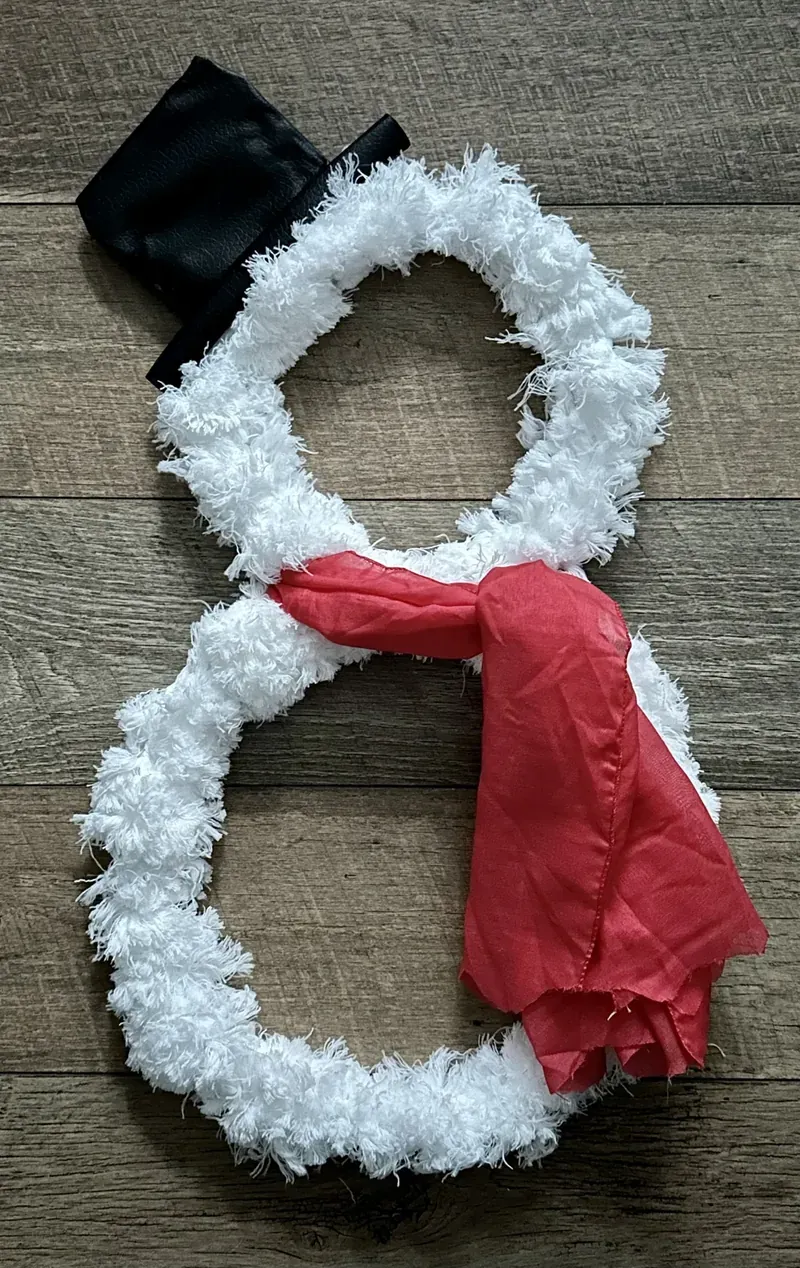
- Wire two wreath forms together at one point so they form a figure-eight.
- Wrap yarn in tight, overlapping loops around each ring until the foam disappears.
- Fluff the loops with your fingers so the whole thing reads as textured snow.
- Wire the mini top hat to the upper ring at a slight tilt.
- Tie the red scarf where the two rings meet, and trim the ends at an angle.
Two honest notes. White textured yarn is a dust magnet, and it does not like a damp garage — you’ll get a musty smell you can’t wash out. The figure-eight also gives up its shape if the two rings aren’t wired tightly enough, so reinforce that joint with florist wire before you add a single loop.
4. A Floating Candle Set Inside a Fresh Cedar Wreath
A 3-inch floating candle needs a glass cylinder roughly three times its width so the flame doesn’t scorch the rim, and the water should sit at least an inch below the top. The trick most people miss: soak the dried leaves for ten minutes before you sink them, or they’ll float up around the wick and smoke. Set the cylinder dead center on the wreath, and make sure the wreath sits flat — a cedar ring with a high spot will tip the glass.

- Fresh cedar wreath: $25–$45
- 4-inch glass cylinder vase: $6–$14
- Floating candles, box of 12: $8–$16
- Dried leaves and pinecones: $0–$12
- Textured gray tablecloth: $30–$70
- Cloth napkins: $12–$30
Total: $81–$187. Budget version: a faux cedar wreath from a dollar store plus a thrifted cylinder and tea lights instead of floaters runs $20–$35 — the layered look survives, the open flame doesn’t.
5. A Clothesline Advent Calendar of Felt Stockings
This one is friendly to a small budget because felt and cotton scraps are basically free if you already sew, and a dollar store pack of felt sheets runs about $1.25 for eight. Wooden clothespins are a couple of dollars for fifty, and one $3 spool of jute twine covers the whole line. You can build this for under $15, versus $60 to $120 for a boutique fabric version. Use a permanent marker for the numbers if you’d rather not stitch twenty-four of them.

- Measure the wall first — budget about 10 inches per pouch, so 24 pouches want roughly 7 feet of space.
- Anchor both ends of the string into studs, or use hooks rated for at least 10 pounds.
- Decide how you’ll fill the pouches before you sew — candy, notes and tiny ornaments all weigh differently.
- If kids are involved, keep every filling larger than a toilet paper tube.
Fair warning: a clothesline calendar hung low becomes a toy. Twenty-four pouches plus clothespins add real weight to a single strand, and small hands pull. Hang it above adult shoulder height and expect to re-clip a few every few days.
6. A Fuzzy Loop-Yarn Reindeer Wreath with Sequin Antlers
The nose is the whole joke. A dark gray loop-yarn ring with sequined antlers is a perfectly nice wreath; add an oversized glossy red bulb at the bottom and it becomes a reindeer with a personality. Remove it and you lose the punchline, the color anchor, and any reason for the antlers to be up there at all. Add two more small red touches — nothing beyond that — and stop.
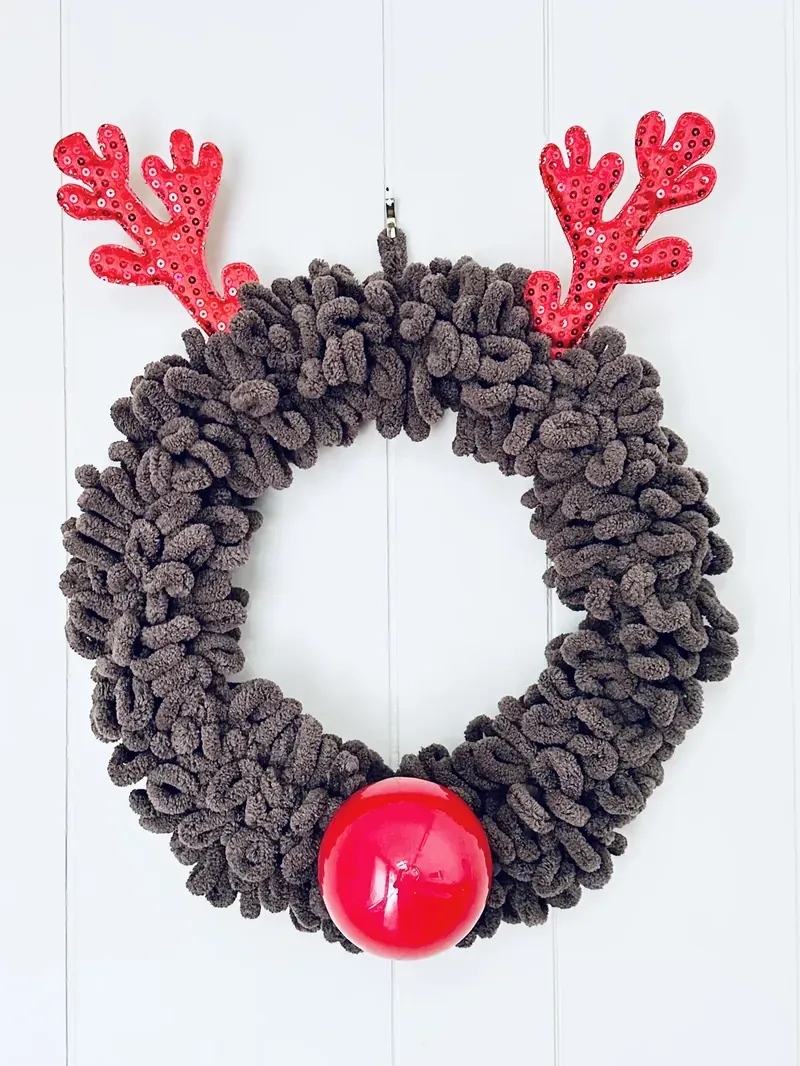
Loop yarn is a dust trap, and against a white paneled wall you’ll spot every stray fiber. Run a lint roller over the loops once a month and fluff them back into place; if you vacuum it, use a brush attachment on the lowest setting or you’ll pull whole loops loose. The sequins shed, so keep this one off any surface where food goes. Indoors it holds up for years; on a covered porch in a humid climate, expect the gray to fade and the antlers to dull within a season or two.
7. A Foraged Wreath Kit Laid Out on White Wood
Foraging is the entire point here, and it changes the math completely. Almost everything in that flat lay can come from a walk and one trip down a craft aisle.
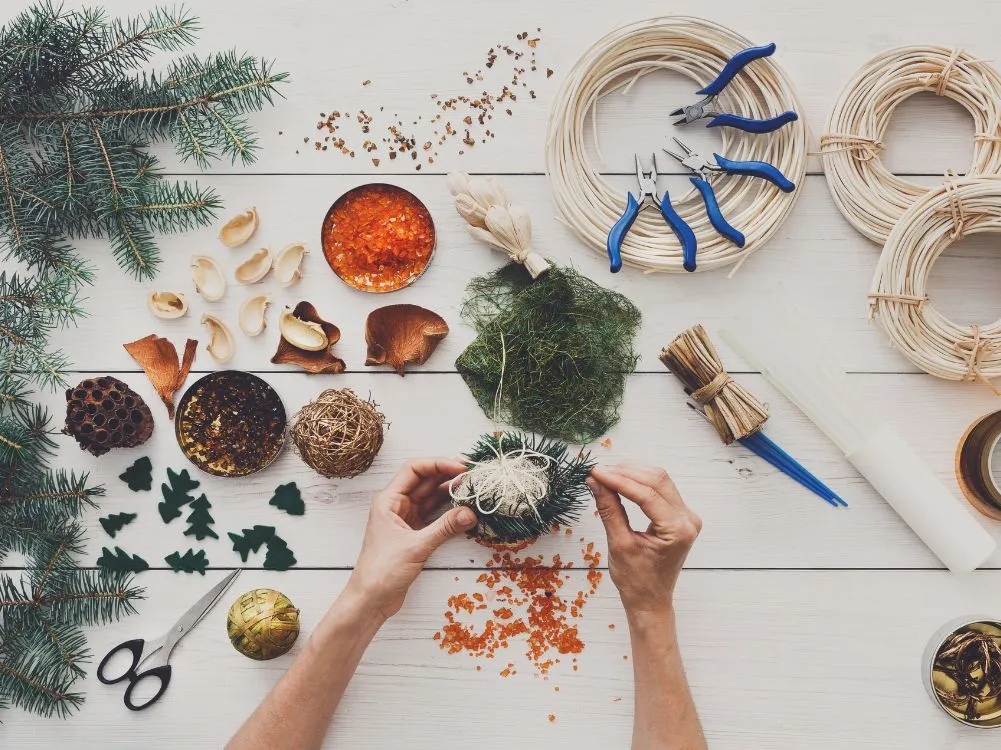
- Grapevine or wicker wreath ring: $5–$12
- Floral wire and clippers: $3–$12
- Sheet moss: $6–$15
- Seed pods and dried potpourri: $0–$15
- Evergreen and pine clippings: $0–$20
Total: $14–$74. Skip the premade floral picks and wire your own bundles — a dollar store bunch of faux greenery plus one real cedar branch reads better than three plastic sprays.
Give your cut greens a 24-hour soak in a bucket of water before you wire them in. Sap seals cut ends fast, and a branch that goes onto the ring dry will look dusty within a week. Wire each bundle on a 45-degree angle pointing the same direction, and keep every sprig within about 1.5 times the width of the ring — go bigger and your wreath starts to look like a hedge.
8. White Ice Skates on a Garland-Draped Front Door
Two things will test your patience with this look. A door that opens inward will crush anything hung on the inside face, so the garland has to sit tight against the frame — check the swing before you hang a single hook. And suction cups simply do not hold a cedar garland on glass in cold weather. Use over-door hooks or adhesive hooks rated for at least 5 pounds, and plan on the greens shedding. If your door faces full sun, keep faux greenery at head height.
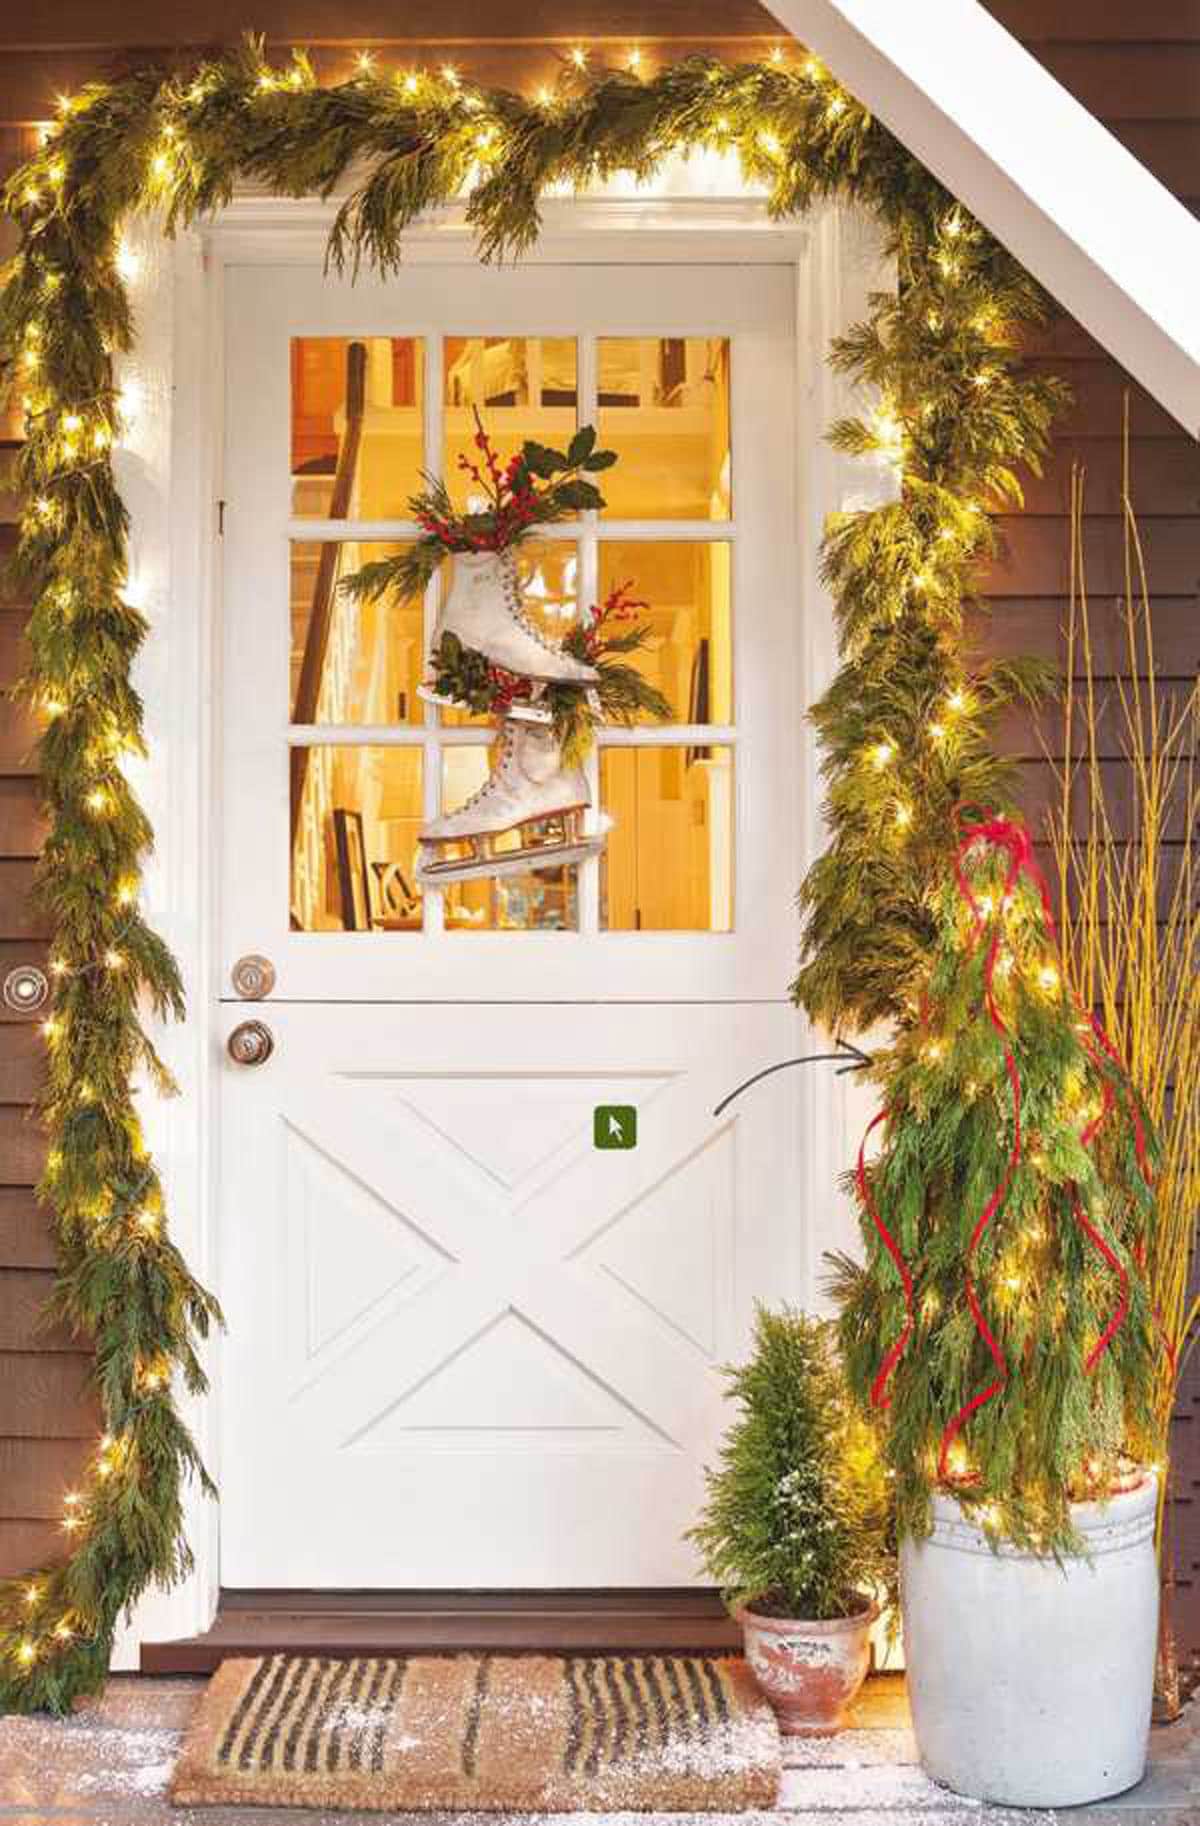
- Measure down each side from the top corners; real garland settles about 10 percent lower once it hangs.
- Secure the garland at four points — two top corners, two mid-height — with zip ties instead of wire so it can flex.
- Zip-tie the skates straight to the garland. Loop through the laces and pull tight rather than hanging them from the glass.
- Wire in the red berries last so they sit in front, then step back and check that both sides match.
- Hide the battery pack behind the garland where no one can see it.
9. A Family of Snowmen Built from Painted Wood Blocks
Three painted wood blocks are three painted wood blocks. What turns them into a family is everything above the shoulders — a red fabric sack hat, a black top hat with a hand-painted snowflake, a blue plaid scarf with matching earmuffs. Every figure has the same body, the same button eyes, the same painted smile, the same orange felt carrot nose. Only the headgear changes. Identical bodies, different characters — that’s the trick.

A 2×4 cut into blocks costs about $4 for the whole board, and craft paint runs $1 to $2 a bottle. Button eyes are about $2 a bag, and a quarter yard of plaid fabric is $3 to $5. Total for the trio lands around $15 to $25, versus $40-plus for a comparable set in a decor store — and you get to choose the fabric. Offcuts from a lumber yard scrap bin are often free; just sand the cut ends so the paint sits flat.
10. A Pastel Village of Bottle Brush Trees and Ceramic Houses
The formula is roughly 70 percent white, 20 percent pastel pink and pale blue, 10 percent gold. That’s the whole thing. Swap pink for mint and keep everything else and you get the same effect; swap gold for silver and it turns cooler and more wintry. The rule is that the neutral has to dominate — pastels only look intentional against a very white ground, and the moment white drops below about two-thirds of the display, it starts reading as clutter.
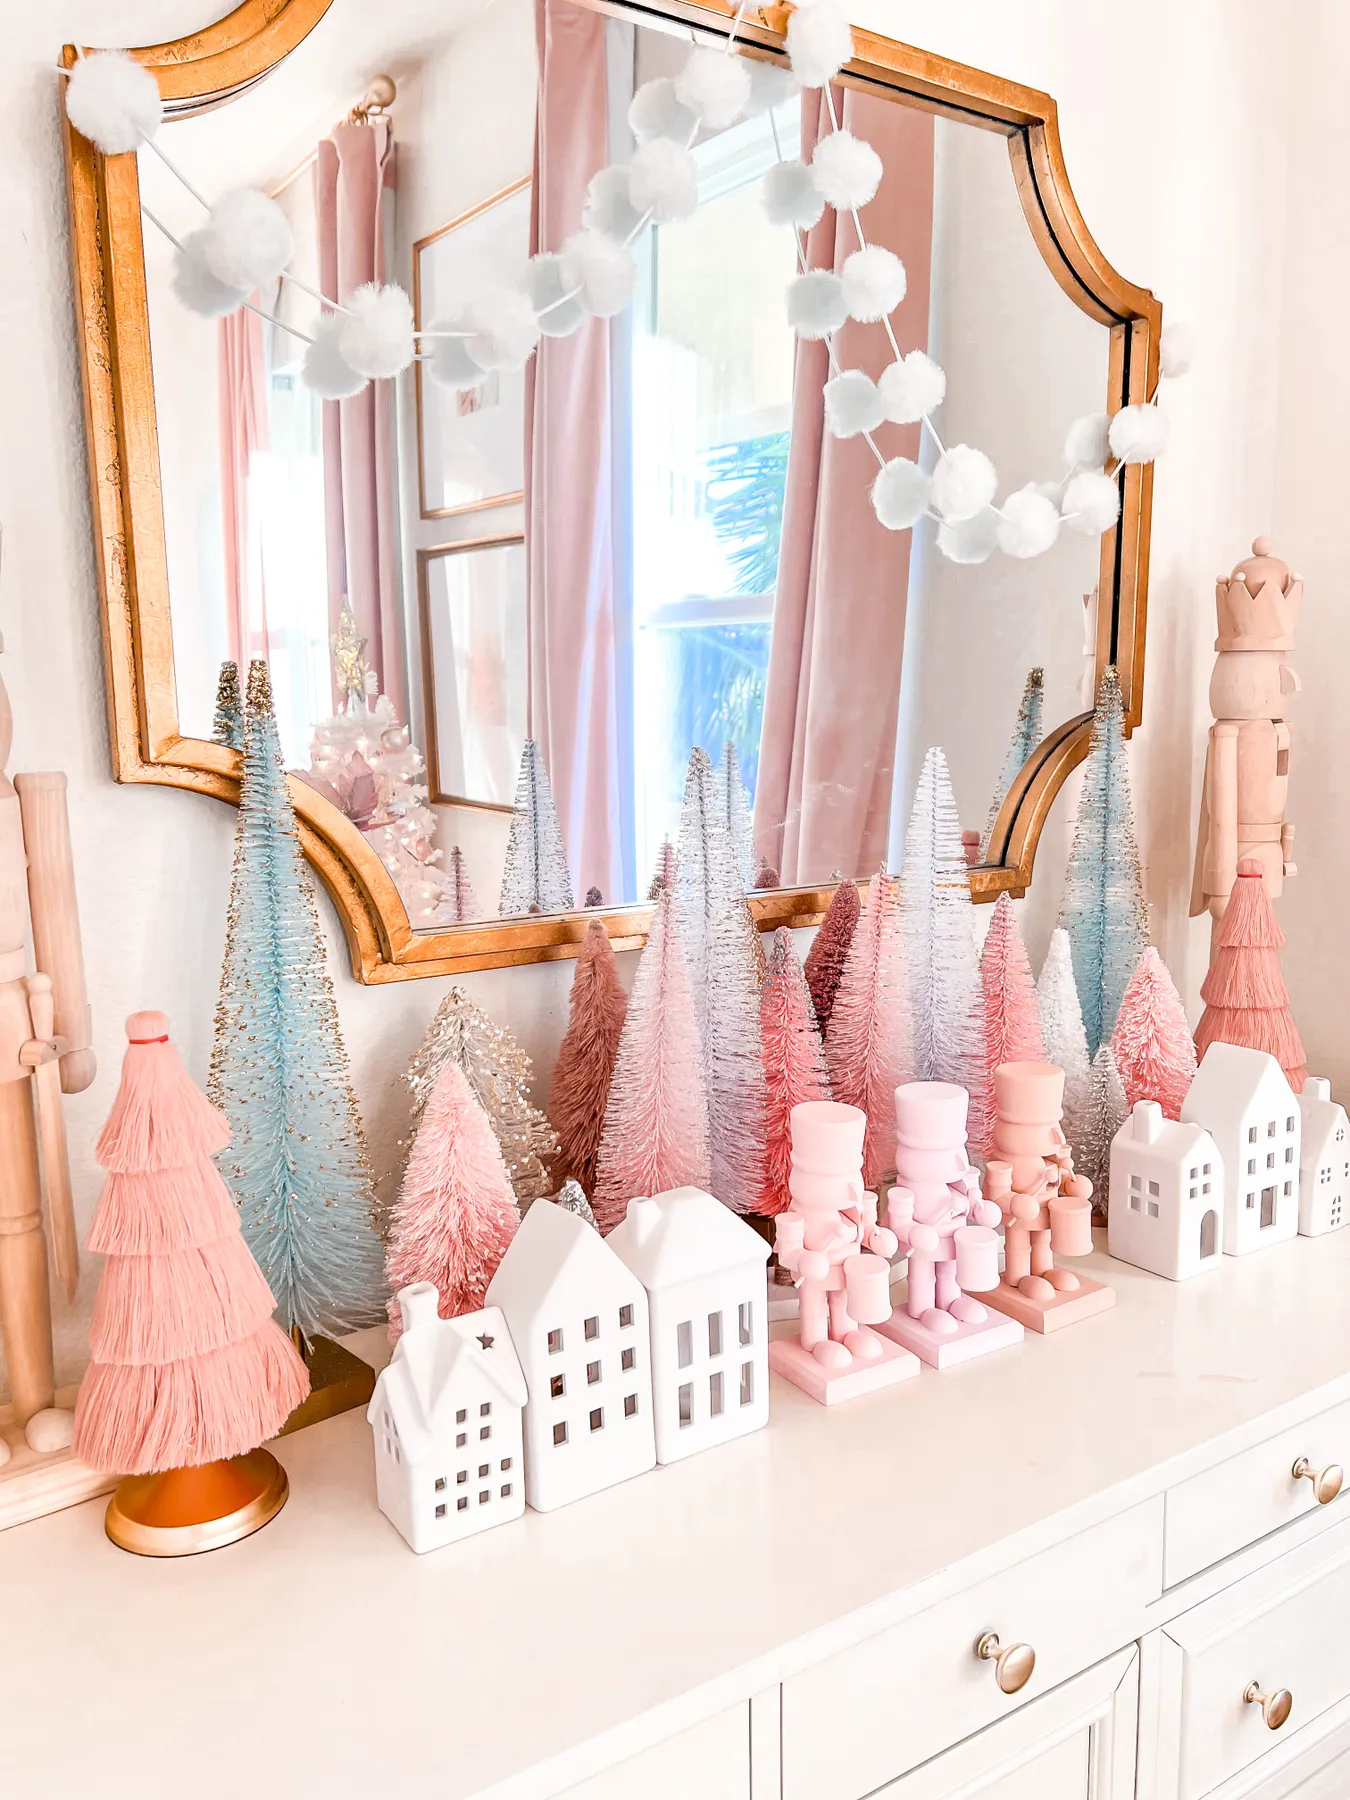
Bottle brush trees are the workhorse of pastel holiday styling and they’re cheap; a mixed bag of 15 often runs under $10. The ornate gold mirror is the real upgrade: reflecting the display doubles it without doubling the cost, and it fills a wall above a mantel that would otherwise look empty. Pink nutcrackers are a newer find, usually $5 to $12 each.
Pastel Christmas has been building for years and now has genuine momentum, driven partly by the candyland trend and partly by people wanting a tree that suits the room year-round instead of one seasonal palette. Of everything on this list, it’s the look most likely to still feel current in five years.
11. Handmade Ornaments: Frosted Pinecones and Polka-Dot Baubles
Frosted pinecones and glittered ornaments are the messiest things on most trees. Store pinecones in a paper bag rather than plastic — plastic traps moisture and invites mold — and expect only a couple of seasons of decent frost before it starts flaking off. Painted details chip at the cap, which is exactly where ornaments knock together in storage, so wrap each one in tissue or nest them in an egg carton. Anything hand-painted gets a fresh coat of clear sealer every other year.

Hang ornaments on 4-inch ribbon loops instead of the factory caps, and cut the loops yourself so the lengths vary. The eye reads varying drop lengths as depth, and almost all mass-produced loops are identical — which is why store displays can look flat even when the pieces are lovely. For a bundle like this, with frosted pinecones, polka-dot baubles, large bulbs and a fuzzy white bell shape, group in odd numbers inside a 10-inch zone, then leave a gap before the next cluster.
12. Magenta Glass Cone Trees with Faceted Finials
Three graduated glass cones want a surface at least 30 inches wide and roughly 34 to 38 inches high — a console, sideboard or sofa table. Sit them off-center so the tallest lands about two-thirds of the way across, and keep the front edge clear so light can move through the glass. It’s a small-space hero: it needs no floor area at all and works under a window where a full tree would block the light. If you’re styling a mantel instead, Idea #25 uses a palette that pairs well with magenta.
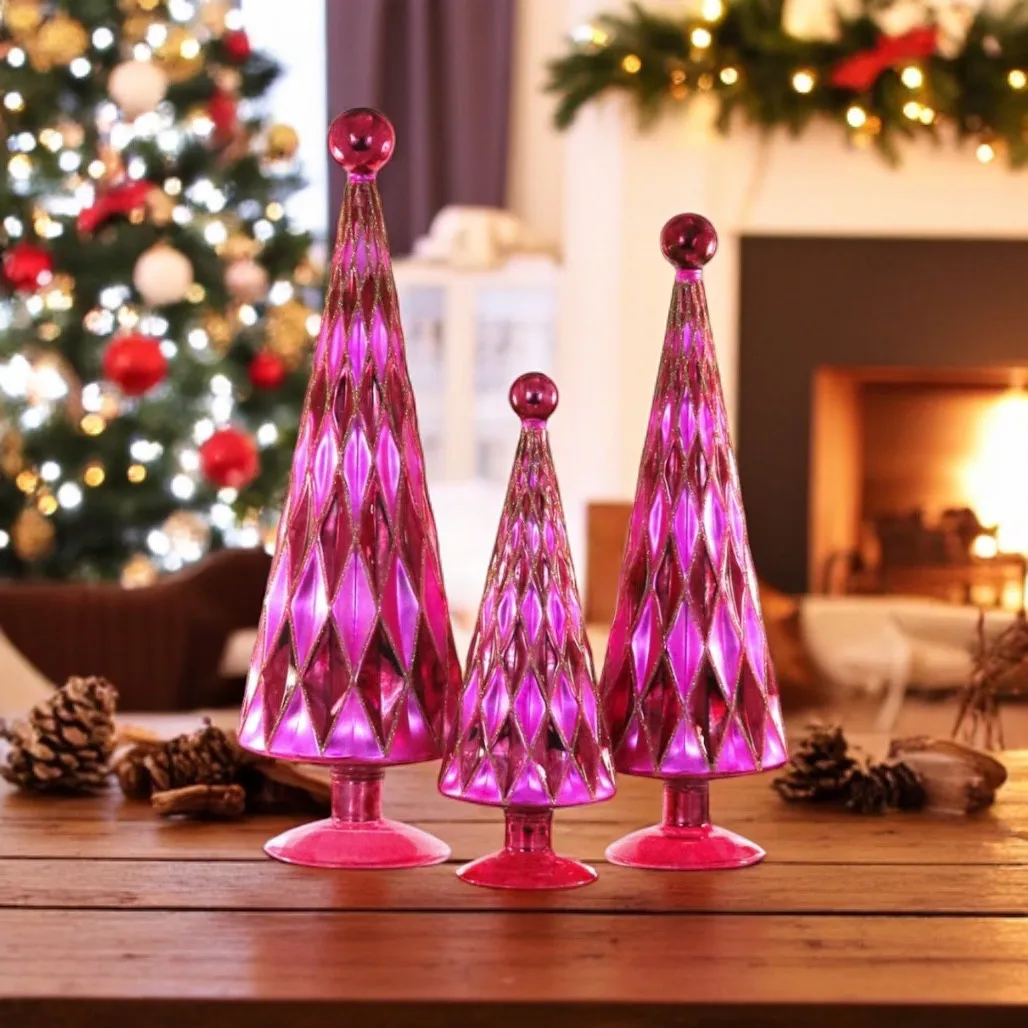
The faceted surface is doing all the heavy lifting. Every angle catches a different piece of light, which is why these cones glow when the fireplace behind them is lit and go quiet when it isn’t. Magenta is also rare enough in a sea of red and green that three small pieces read as a statement. Keep the wood toned down — natural or dark stain — because warm wood lifts pink out of candy territory and into something closer to jewel-toned.
13. White Glass Ornaments with Hand-Lettered Holiday Words
Plain glass ornaments take paint better than plastic, and the lettering is faster than it looks.
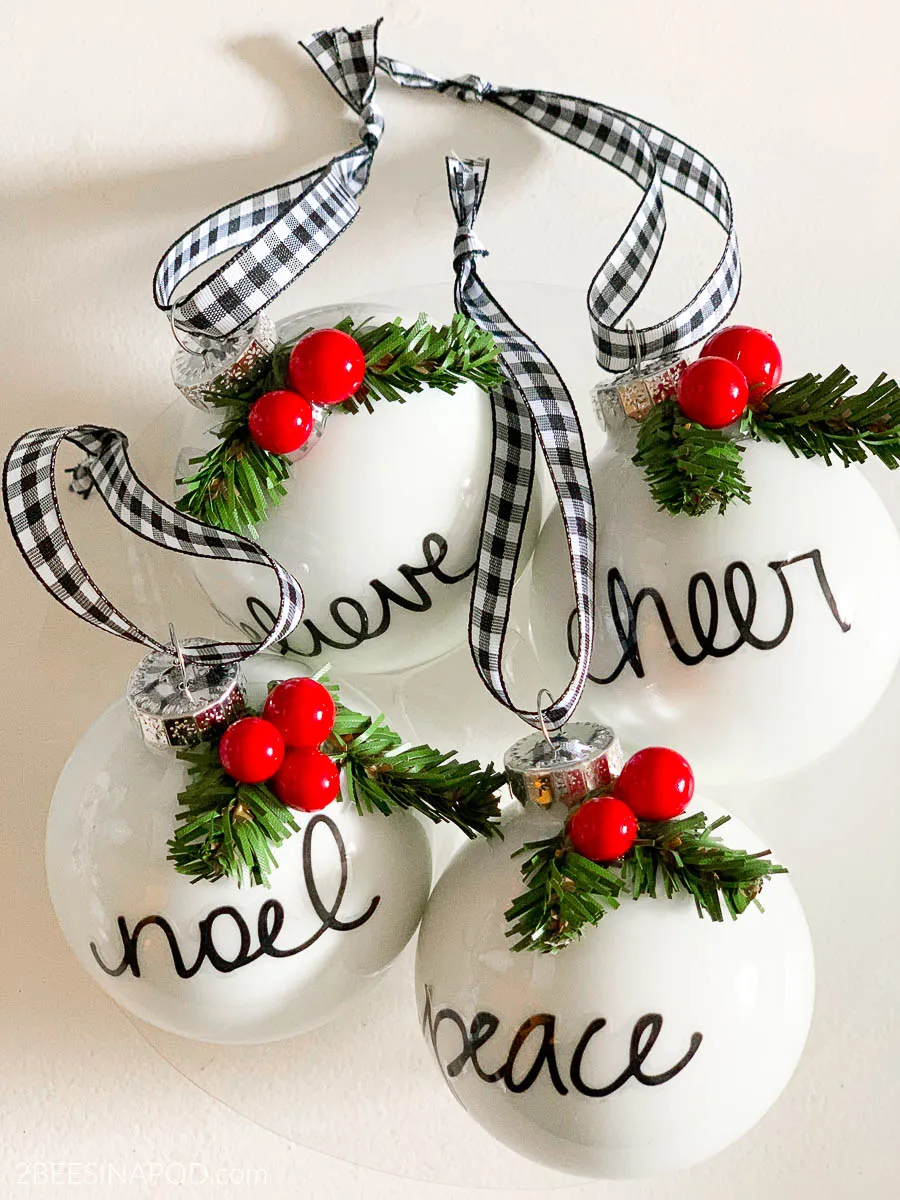
- Wipe each ornament with rubbing alcohol and let it dry completely.
- Sketch the word on paper first — short words work best: noel, cheer, believe, peace.
- Letter with an oil-based paint pen, resting the ornament on a cup so it doesn’t roll.
- Let it cure for 24 hours, then go back over thin strokes a second time.
- Tuck in a pine sprig and two red berries, then hang from a buffalo check ribbon loop.
Budget: about an hour for four ornaments. Six-packs run $8–$15, paint pens $6–$12, faux greenery picks $5–$10, berries $3–$6 and ribbon $4–$8 a roll — so a first batch of four lands between $26 and $51, and every ornament after that costs almost nothing until you run out of pens.
14. Seed-Pod Flowers Painted Red and White for the Tree
If you can gather seed pods and husks on a walk, these cost you the price of paint and beads. Wooden beads run about $3 for 50, craft paint is a dollar or two a bottle, and twine is $3 a spool. Even buying the pods, a dozen ornaments come in under $15, compared with $8 to $15 each for similar natural ornaments at a boutique. Layered petals, one bead in the center, one loop of twine — done. The painted red and the painted white versions together do more than a dozen matching ones would.
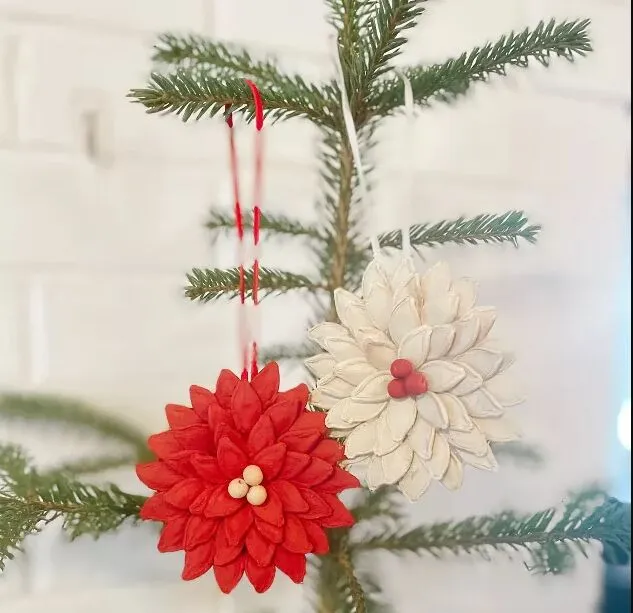
Nature comes with roommates. Anything you bring in from outside should go onto a foil-lined sheet pan in a 200°F oven for about an hour to dry out insects and moisture — do that before you paint, not after. Skip it and you may find tiny holes in the petals by February. These are also light and brittle, so hang them high where a cat or toddler can’t reach, and keep them away from radiators, which will curl the pods.
15. Pleated Paper Angels Strung on Baker’s Twine
The pleat is the whole ornament. Flat paper is a cutout; run that paper through an accordion fold and suddenly the skirt has volume, catches light in stripes and springs open at the hem. Everything else — the twine loop, the paper pattern, the length — is negotiable. If you change one thing, change how tightly you crease your folds, because a loose fold loses the effect entirely and the angel goes limp.
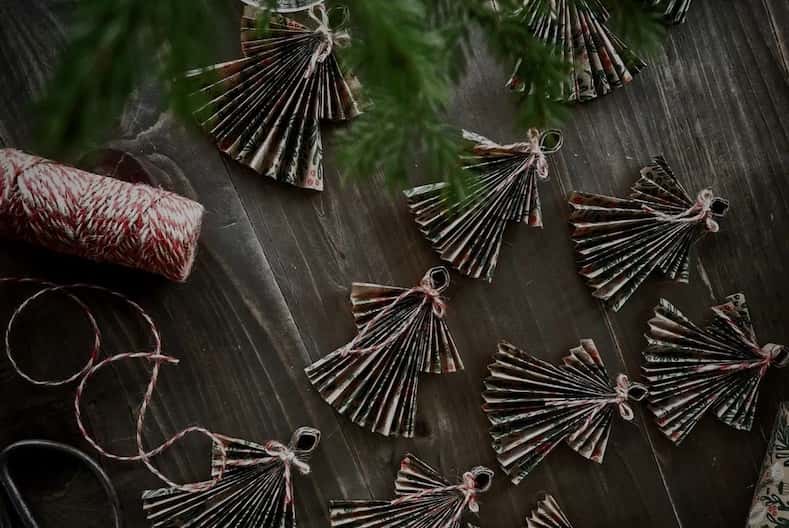
These run about 3 to 4 inches, which means scale matters more than style. On a full 7.5-foot tree they disappear unless you hang eight or ten together in a cluster. They shine on a 2-to-4-foot tabletop tree, tied onto wrapped packages, or strung along a mantel on baker’s twine. For a smaller display, this pairs nicely with the pastel tabletop arrangement in Idea #10, which was built for exactly this kind of shelf space.
16. A Santa-Sleeve Cookie Moment with a Candy Cane Mug
The Santa-sleeve-and-cookie shot is its own genre now — feeds fill up with it every December, and it works because it’s a scene rather than a product photo. The white glove, the candy-cane mug, the marshmallows, the stacked red-and-white plates: every piece does one small job and none of them cost much. It’s also the easiest holiday styling idea to translate straight into a short video, which is exactly why it keeps resurfacing.

That blurred tree behind the mug isn’t a filter — it’s distance. Put the tree at least six feet behind your subject, open your lens as wide as it goes, and add one small light source on the near side of the cookie. The stacked plates under the mug are what make it read as a moment instead of a drink: three plates in slightly different diameters, with the mug set off-center so the cookie has somewhere to land.
17. A Giving Tree Hung with Gift-Request Tags
Building a giving tree takes one evening and almost no money.

- Buy kraft tags at least 3 by 5 inches — the tiny ones can’t hold a family’s details.
- Punch a hole in the corner and write the household size, ages and two or three specific wishes.
- Cut a 6-inch length of twine for each tag, thread it through the hole and knot both ends.
- Hang tags at eye level across the front and sides, spread out rather than clustered in one spot.
- Keep a printed list of every tag you hung so you can match gifts to families later.
The red-and-gold-on-green combination is why this tree reads from across a room: the flat paper tags sit against the branches and act as a fine texture layer, while the red truck and Santa ornaments plus the gold tinsel garland supply the big, shiny anchors. Keep every tag at roughly the same height and the tree stays legible instead of turning into noise.
18. A Craft Table Set Up for Reindeer and Snow Globe Kits
A craft afternoon for a few kids comes in under $50 if you shop the kits rather than buying supplies piece by piece.
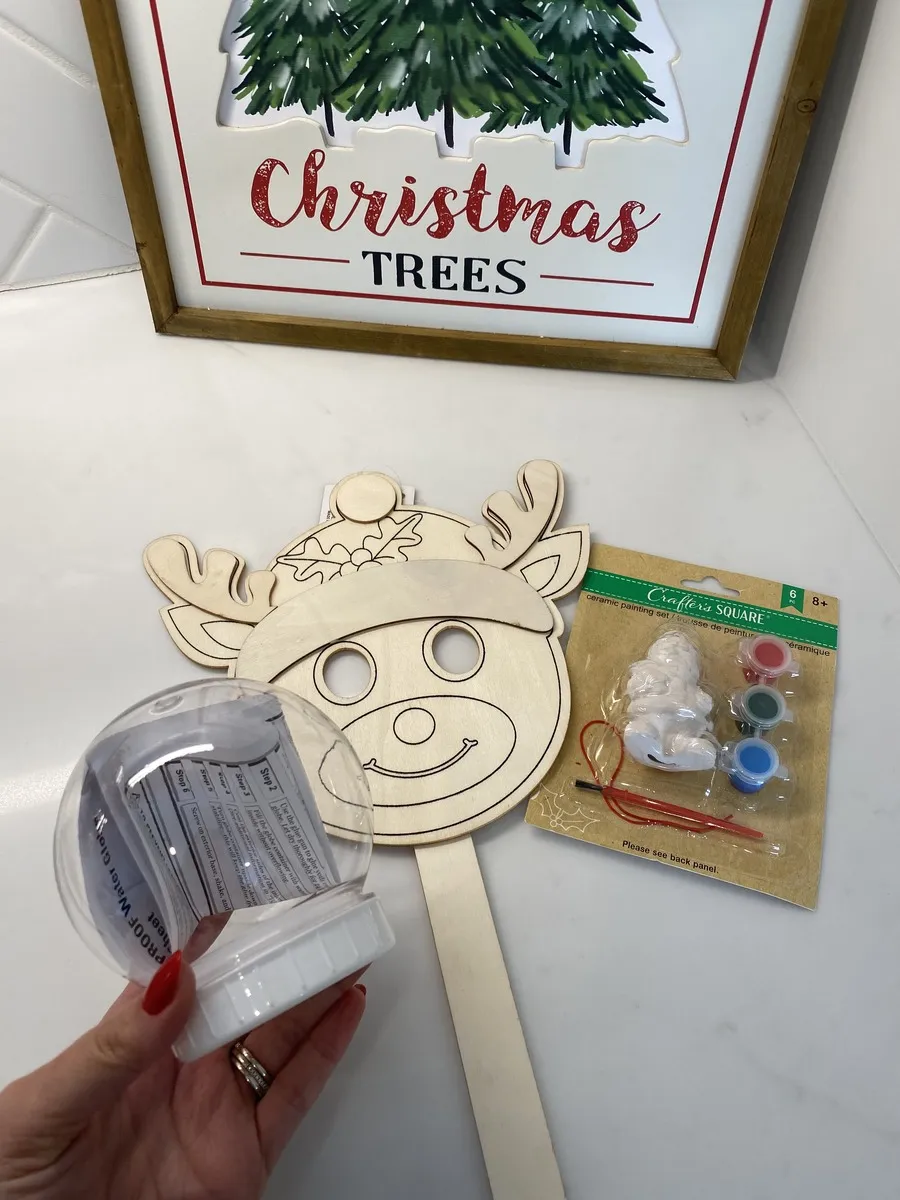
- Unfinished wooden reindeer cutout on a stick: $1–$3
- Water globe kit with instructions inside: $8–$15
- Ceramic painting kit with mini figurines and paint pots: $6–$12
- Framed painted sign to finish the shelf: $5–$10
- Extra acrylic paint and brushes: $4–$8
Total: $24–$48. Set it up like Idea #3 — one material per station, nothing shared — and the table runs itself. Kids finish at wildly different speeds, so having a second project ready saves the afternoon.
- Cover the table with paper or a plastic cloth before anyone sits down.
- Pick a spot with hard flooring or a washable rug, never a wool carpet.
- Check the paint kits are washable and kid-safe.
- Decide now where wet projects will dry for 24 hours, out of reach.
19. A Moss-and-Candle Miniature Scene in a Shallow Bowl
The light is the point, and you can’t see it. A tea light tucked inside a terracotta pot with moss draped over the opening turns a bowl of soil and river stones into something that glows from within. Without that hidden source you have a craft project; with it, the moss looks lit from inside and the whole scene goes quiet and deliberate. The little handwritten paper sign and the wooden cross only work because the candle is behind them.
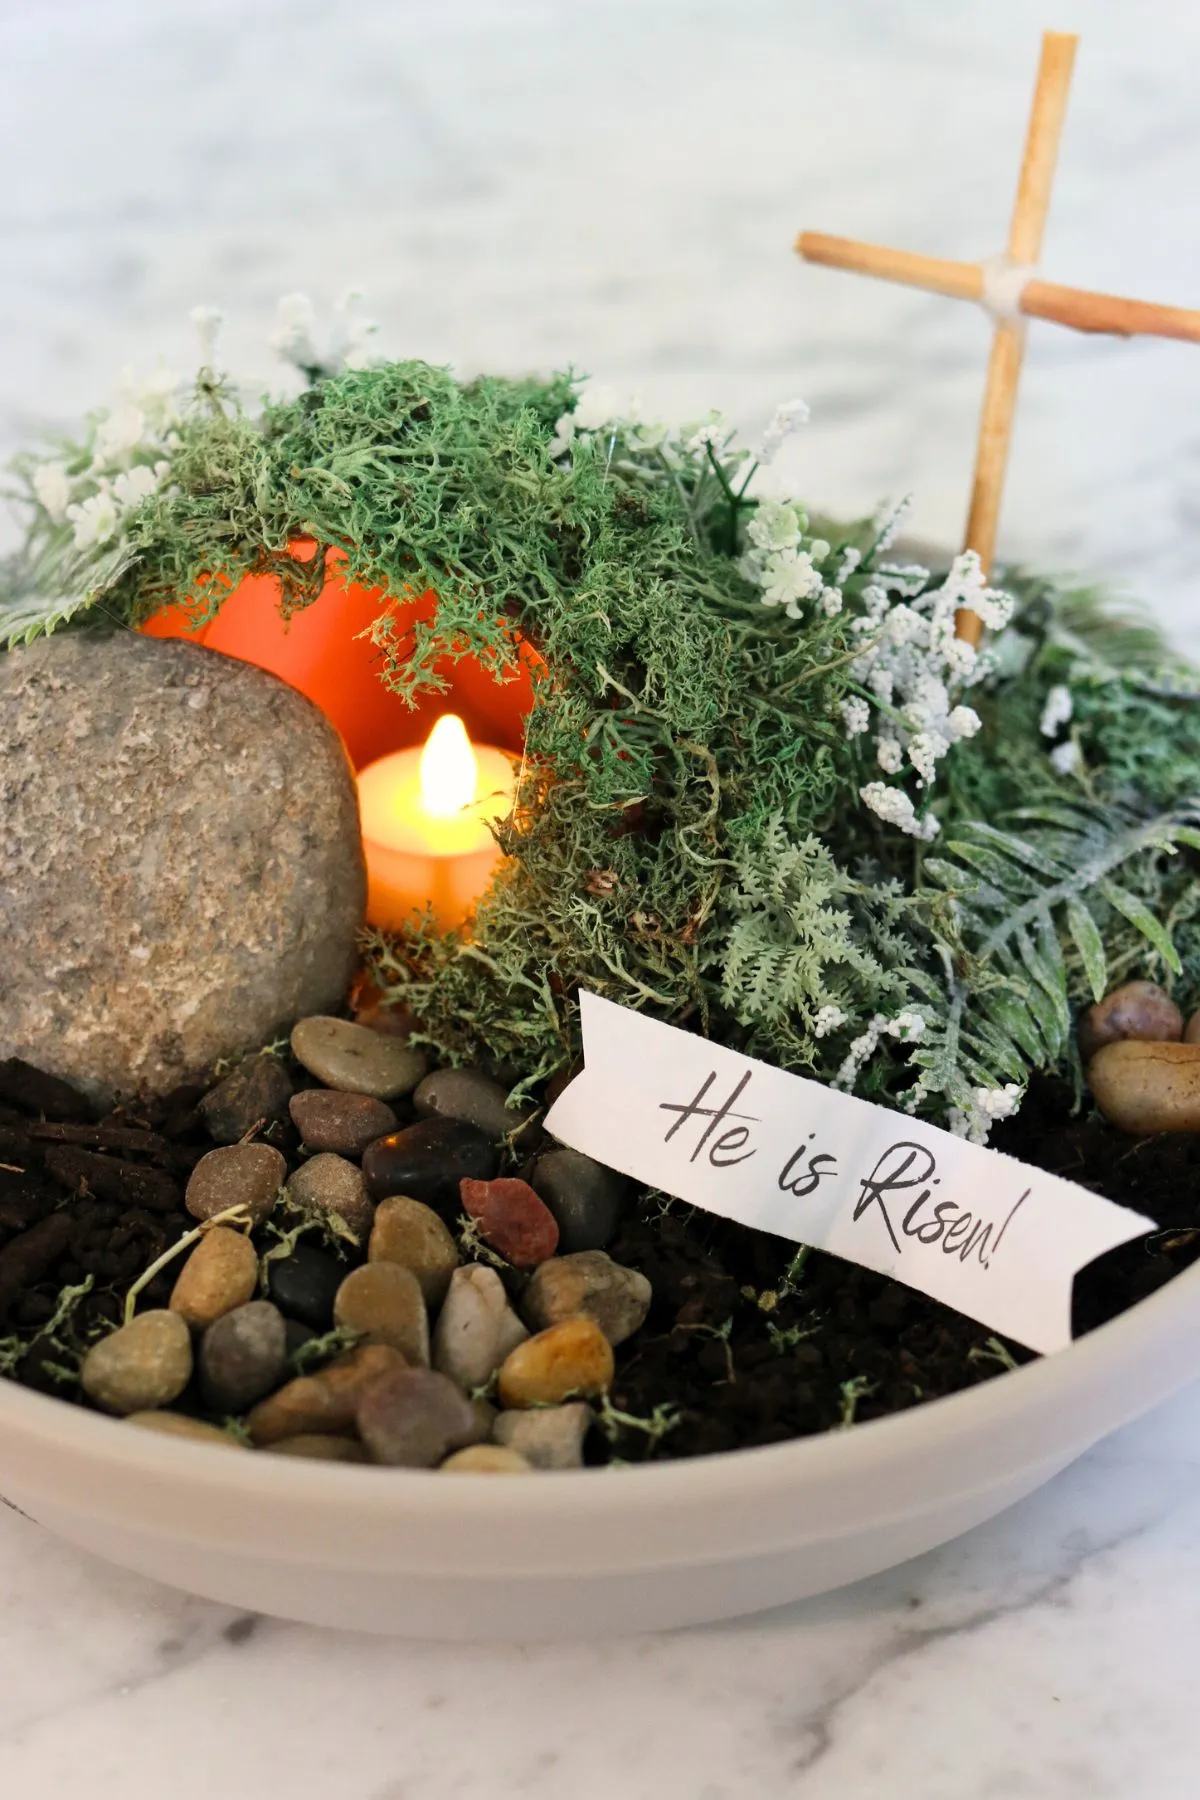
Scale decides whether this lands. An 8-to-10-inch shallow bowl is the sweet spot — room for a couple of stones and the pot, small enough to sit on a console without claiming the whole surface. Leave about 6 inches of clearance above so the glow reads, which rules out the top shelf of a bookcase. Technically a springtime scene, but the moss-over-a-hidden-light technique is worth stealing for any holiday vignette you want to feel hushed rather than sparkly.
20. A Paper Tree Garland Strung with White Pom-Poms
Fold your paper in an accordion before you cut and you’ll get two matching trees per snip with a symmetrical edge. Punch the hanging hole about an inch down from the top point, and space pieces three to four inches apart on the twine — closer than that and the chain bunches at every low spot. Alternate white and green as you go. If you want the garland to sit on the tree rather than hang straight, drape it in three shallow arcs instead of one long line. Compare with Idea #26 — same paper-and-loop idea, completely different pattern.
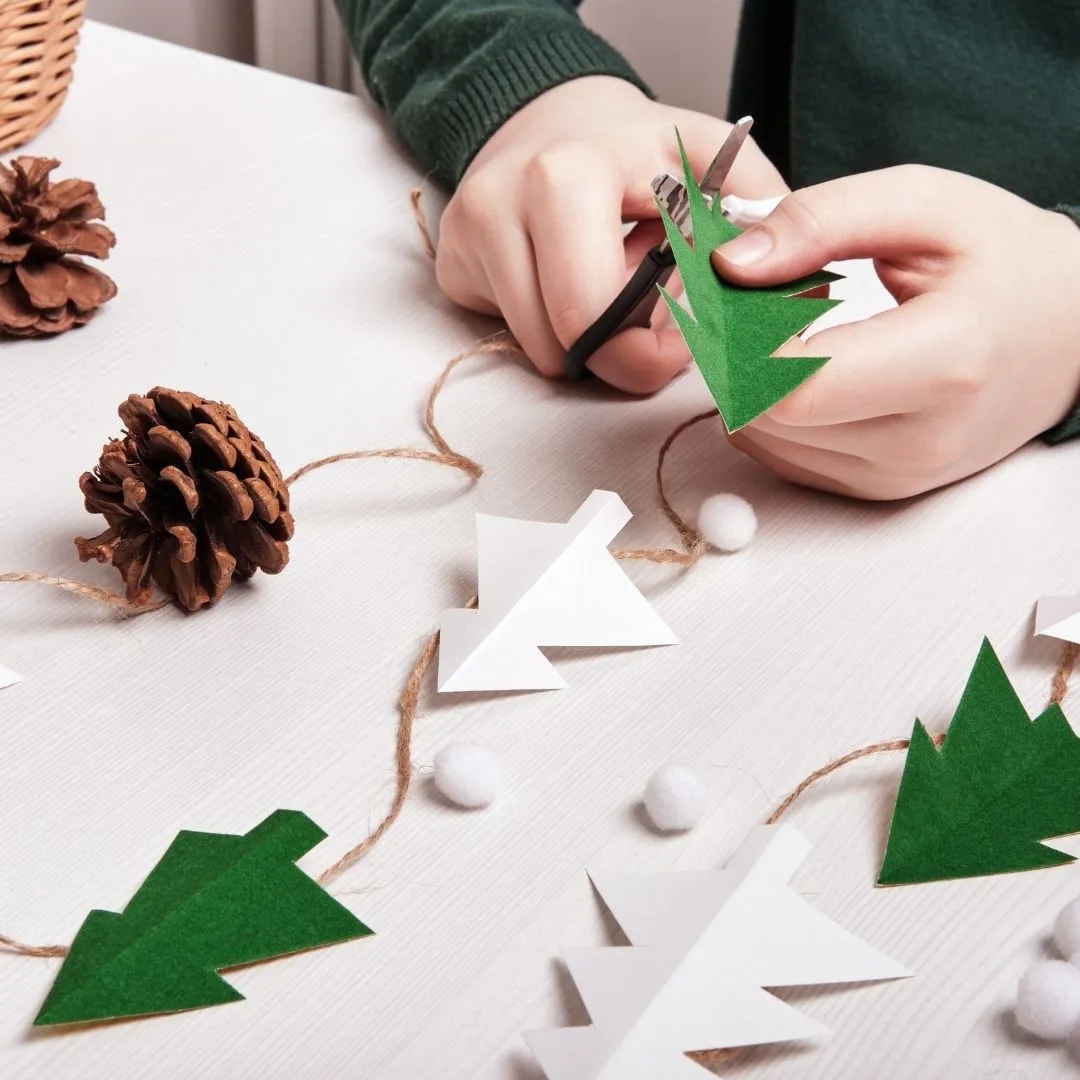
Paper garlands crease, and once a crease is in a little tree cutout it stays there. Store it wound around a cardboard tube instead of stuffed in a box, and keep it out of a humid basement or the loops will warp. The white pom-poms will collect dust by February, so run a lint roller over them or blow them clean with a hair dryer on cool. Expect two or three good seasons before the paper looks tired — which is fine, since replacing it costs pennies.
21. A Miniature Village Tucked Inside a Carved Wood Bowl
The formula is 60 percent natural wood, 25 percent white cotton snow, 10 percent green trees, 5 percent red. The bowl and the little houses carry the neutral base, the batting is your white layer, the bottle brush trees are the accent, and Santa and the snowman are the tiny red hit that keeps it from going beige. Swap the figures for brass animals and the same formula turns metallic and more grown-up. Drop the red entirely and it goes Scandinavian and very calm.
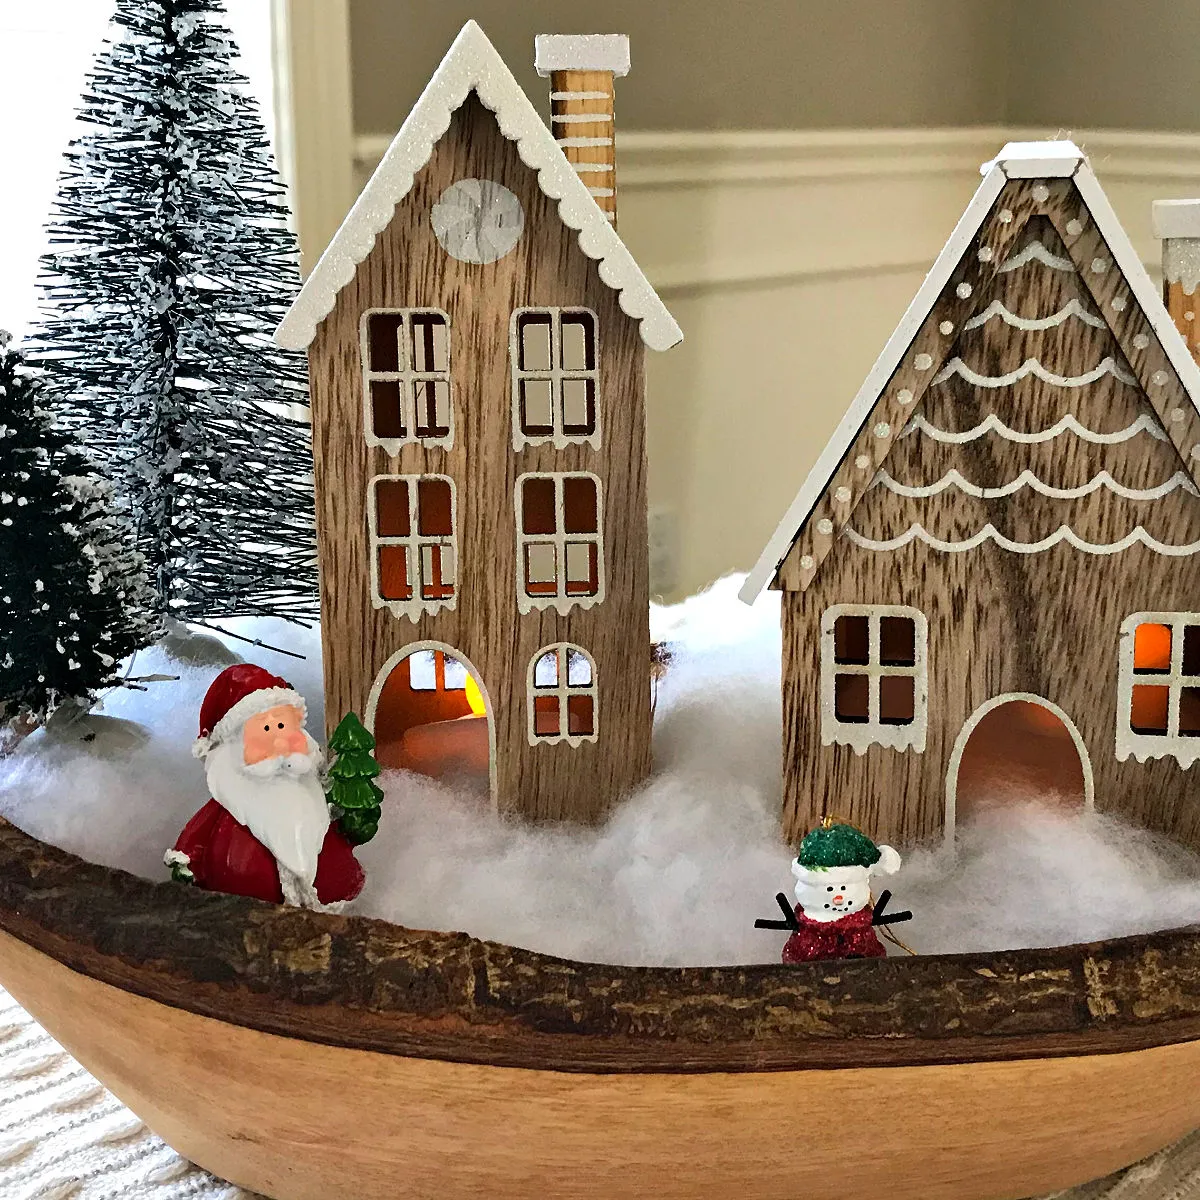
Dollar store houses painted white with warm fairy lights inside run about $1.25 each, cotton batting is $3 to $5 a bag, and a carved wooden bowl turns up at thrift stores for $5 or less. That’s a $15 version of a $60 display — and honestly, the bowl is the only piece anyone notices. It’s the shelf-sized answer to the full wall of rustic warmth in Idea #1.
22. A Glittered Vintage Santa Face Among Copper Baubles
Glitter sheds. Not a little — a lot. If a Santa face ornament like this one lands near the table you eat at, you will find glitter in the butter. Hang it on the upper half of the tree, shake it out over a trash can once a year, and give it its own small bag in storage so it doesn’t dust everything else. That twine hanger will also fray within a season, so swap it for wire if you want this piece to last a decade.
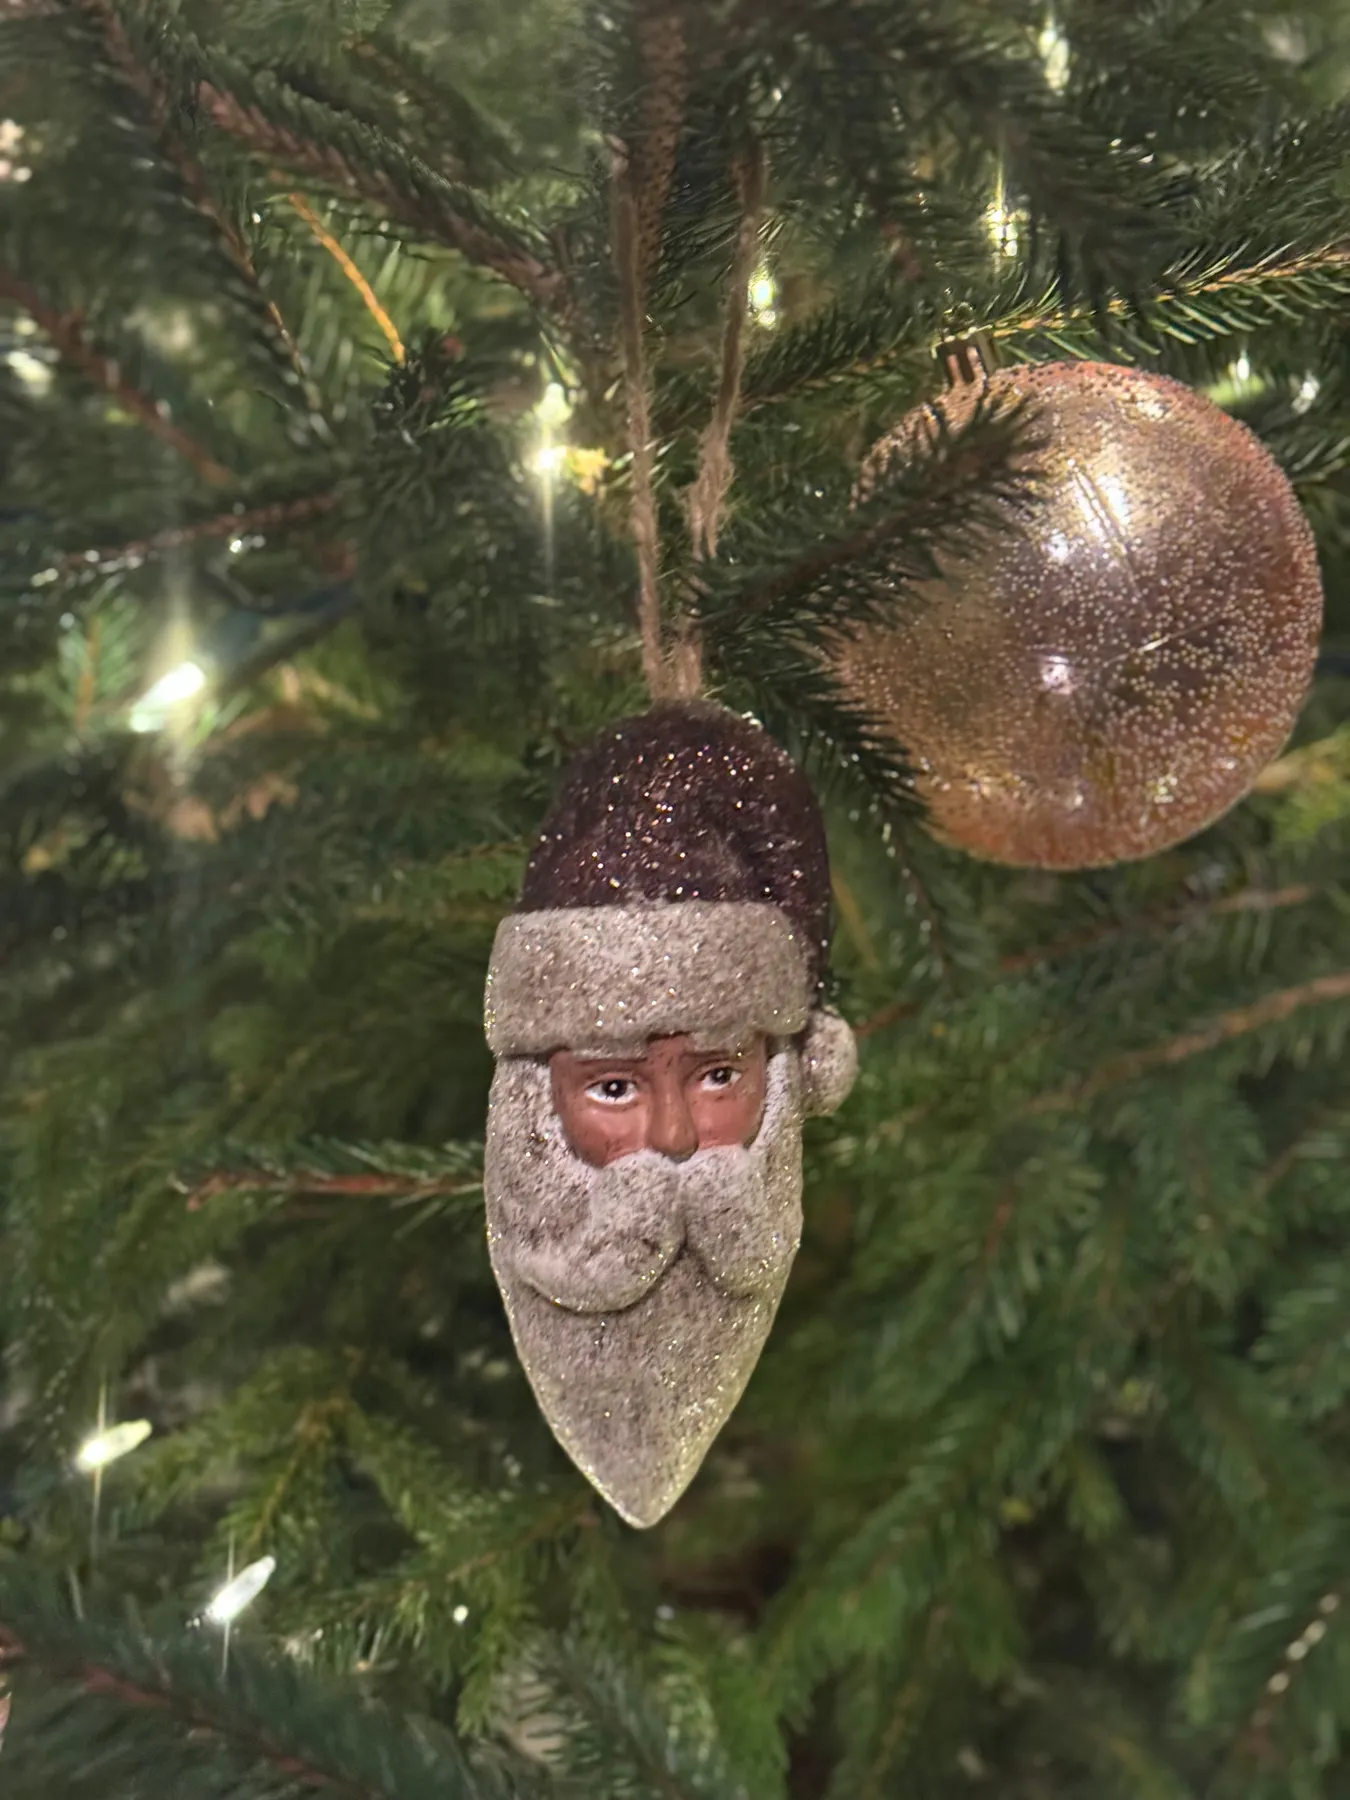
What makes the pairing work is contrast in finish and scale. The Santa face is matte, glittery and detailed; the copper bauble beside it is smooth, reflective and simple. One is small and busy, the other bigger and quiet. Then the warm string lights sit behind both and bounce off the copper, which is what pulls your eye into the branch. Mix one matte piece with one shiny piece in the same tone family and any tree looks styled instead of store-bought.
23. A Pink House-Shaped Pillow with Faux-Fur Roof Trim
Pillows want odd numbers and a size stagger. Start with a 20-inch neutral square against the sofa back, put the 18-inch house pillow in front of it, then angle one small lumbar shape beside them. Keep the pile to three or the seat disappears. And match the trim to something else in the room — that white faux-fur roofline echoes the cream knit throw, which is exactly why the whole corner looks intentional instead of themed.

- Cut two house shapes from pink textured fabric, adding a half-inch seam allowance.
- Sew the sides and roofline, leave the bottom open, clip the corners and turn it right side out.
- Hand-stitch a strip of white faux fur along the roofline so the nap points upward like snow.
- Embroider a small snowflake and a window outline, or use fabric paint if you’d rather.
- Stuff it, then hand-stitch the bottom closed and press the seams flat.
24. A Stacked Wood-Slice Snowman in Buffalo Check
The wood slices are the only real cost, and they’re often free if you know anyone with a chainsaw.
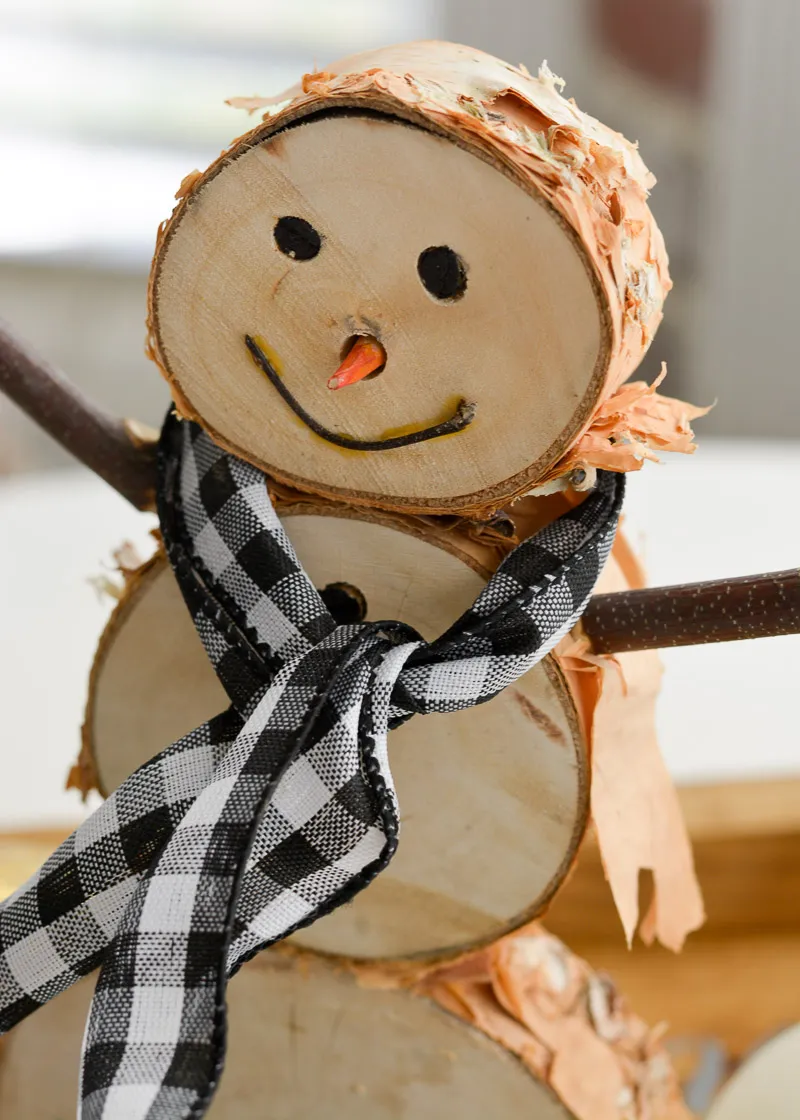
- Wood slices, assorted diameters: $8–$20
- Acrylic craft paint, black and orange: $3–$6
- Twigs for arms: $0
- Buffalo check fabric, quarter yard: $3–$6
- Hot glue and a small saw: $5–$12
Total: $19–$44. Budget shortcut: ask a local tree-trimming crew for log ends. They usually give them away, and a 4-inch round costs nothing to slice.
Wood slice crafts have been running strong for years, and the reason is practical: they photograph beautifully, they work in both rustic and modern rooms, and the materials are genuinely cheap. Buffalo check is the reliable partner because it reads as cozy without tipping into kitsch. It’s not going anywhere in 2026 — it’s the kind of project people make once and then hand down.
25. Dried Orange Slices Tied with Deep Red Satin Bows
The palette is about 55 percent green foliage, 25 percent dried orange, 15 percent deep red satin, and 5 percent rose gold. That last 5 percent matters more than it sounds — the metallic is what keeps the oranges from looking muddy against all that green. Swap rose gold for clear glass and it goes lighter and more Scandinavian; swap the deep red bows for cream ribbon and the tree turns into a natural, woodsy look instead.

Slice your oranges about a quarter-inch thick, blot them, then dry them at 200°F for three to four hours, flipping once — thicker slices mold, thinner ones curl. Thread twine through a small hole near the rind rather than wrapping the whole slice so it hangs flat and catches light. Then keep ornaments at least 8 to 10 inches apart on the front of the tree; dried orange and satin ribbon both read as texture from a distance, and texture needs a gap to rest against.
26. A Gingham Paper Chain Draped Through the Branches
- Cut gingham paper into strips about 1 inch wide and 6 inches long — a paper cutter makes this fast and keeps the checks lined up.
- Bring the ends of one strip together into a loop and glue or staple it closed.
- Thread the next strip through that loop, close it, and keep going, alternating the direction of every other loop.
- Build to the length you need — roughly four loops per foot — then drape it through the branches.
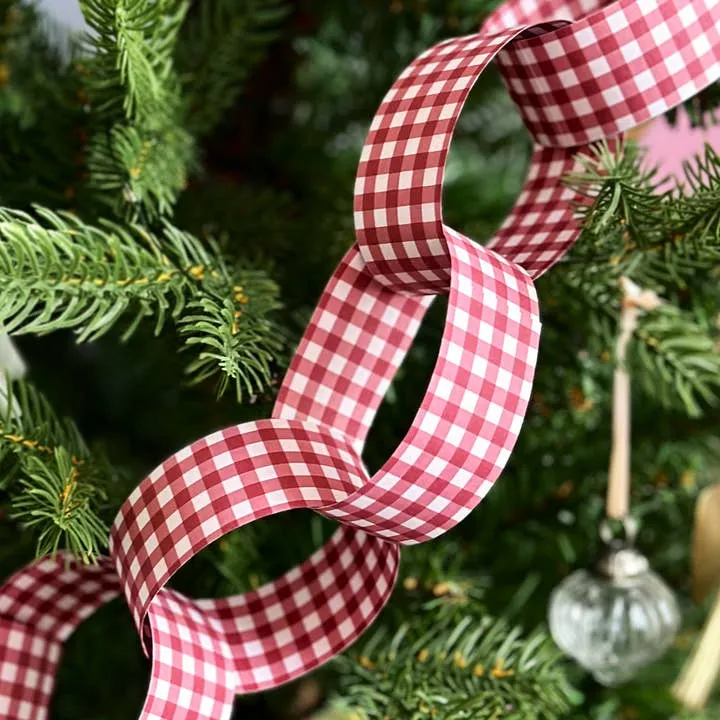
An hour gets you about four feet of chain and the paper costs a few dollars. If gingham paper is hard to find, plain red-and-white wrapping paper cut into strips works the same way, and dollar store paper pads usually have something close. Even easier: white printer paper with a red marker stripe along each edge, which reads as a check pattern from a few feet away. Twelve feet of garland for under $8.
27. A Marbled Glass Ornament in Pink, Gold and Navy
A 3-to-4-inch ornament needs company. On a 7.5-foot tree, one marbled glass ball gets swallowed by a single branch; hang them in groups of three, spaced a hand-width apart, and the pattern becomes a focal point instead of a speck. On a tabletop tree, one is plenty. If you’d rather display them off the tree, a shallow bowl on a console stops them rolling and lets light travel across the marbling.

Glass is glass. In a house with a toddler or a cat, these belong on the top third of the tree, near a wall rather than beside a walkway. The marbled finish is fused to the surface, so it can’t be touched up — a chip is permanent, and that spot will catch light differently from then on. If you love the look but not the risk, the same marbled effect shows up on shatterproof ornaments and on clear fillable baubles you stuff yourself.
28. A Green Canvas with a Tear-Away Winter Scene
The reveal is the whole idea. A green canvas with a bow is a sign; cut a window out of the center and layer a snowman and a decorated tree behind it and it becomes something people walk up to and study. That cut edge — and the shadow it throws — is what carries the piece. Lose it and you’re left with a painted board leaning on an easel.
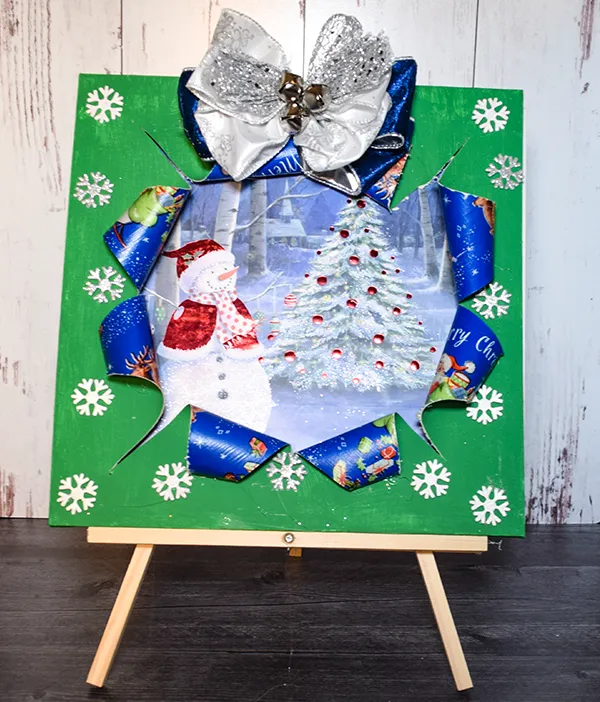
Two upkeep notes. A large ribbon bow on a leaning canvas slowly flattens under its own weight, so re-fluff it each season and steam it if you can. The cut edges of a painted canvas fray and chip when they get knocked, so keep the easel against a wall rather than in a hallway traffic lane, and store the piece flat with a sheet of paper over the cutout so the white snowflake stickers don’t grab the tissue. Compare with Idea #3 — same handmade spirit, much softer materials.
29. Wiring Pinecones and Red Baubles onto a Wreath Base
- Start with an artificial pine wreath base and fluff every branch until there are no gaps.
- Wire your three largest pinecones at 12, 4 and 8 o’clock to set anchor points.
- Fill the spaces between them with smaller pinecones, always pointing outward.
- Wire on the red baubles last, in clusters of three, tucked slightly behind the cones instead of sitting on top.
- Loop the ribbon through the top third and tie it off at the back.

Cost: a 20-inch base runs $5 to $15, pinecones are free if you gather them or about $8 for a bag, a dozen shatterproof red baubles $6 to $12, and a spool of ribbon $4 to $8. That’s roughly $23 to $43 and about 45 minutes of arranging. Gather your own pinecones a few weeks ahead and let them dry out completely before they go near wire.
30. Fillable Glass Baubles Packed with Stars and Numbers
Fillable clear ornaments are the cheapest route to a designer look. A set of six runs about $6 at a dollar store, pom-poms are $2 a bag, star confetti about $3, and a strand of silver beaded garland $3 to $5 to nest them on. Under $20 for the whole arrangement, versus $40 or more for a similar set at a decor boutique. Swap the contents for anything small and metallic — tiny jingle bells, paper numbers, even folded paper stars.
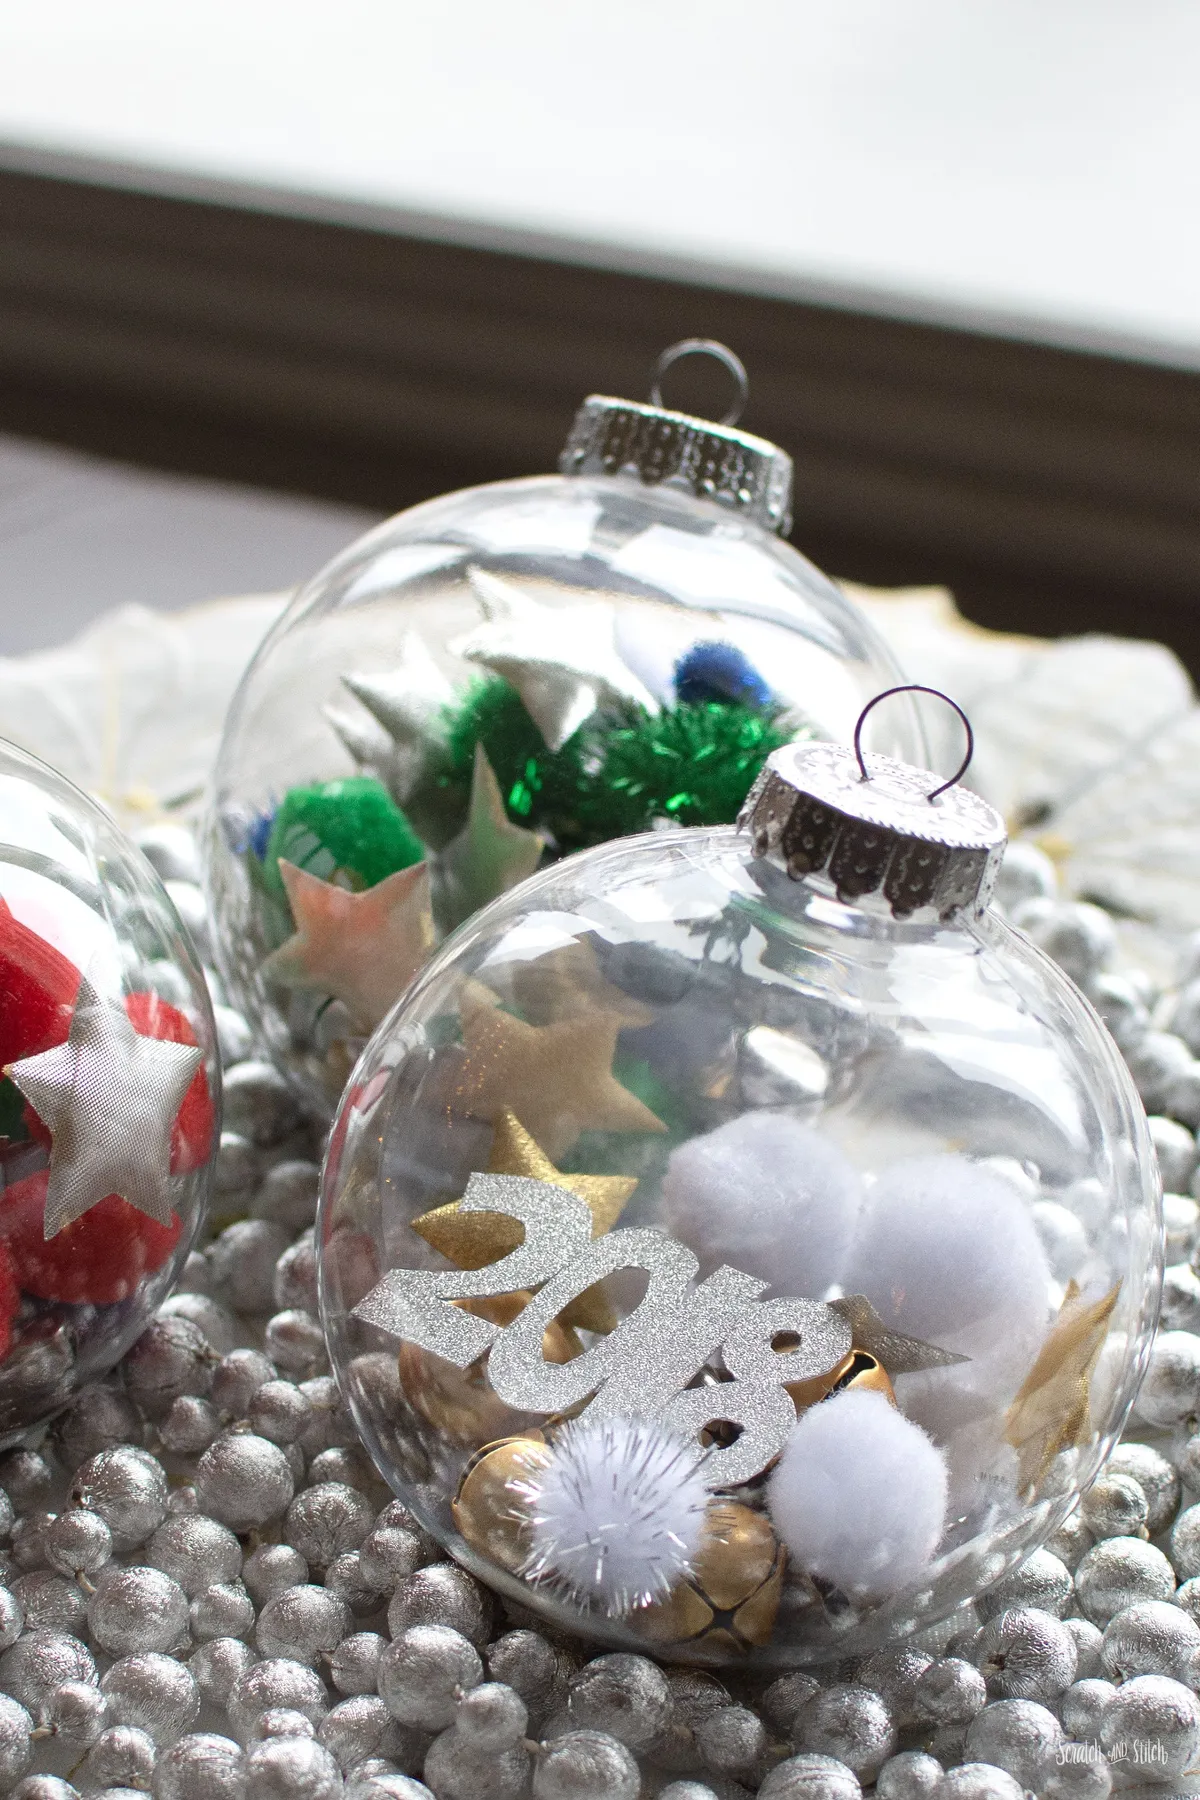
The formula is about 70 percent clear glass, 20 percent white and silver, 10 percent gold. The glass provides the volume, the pom-poms and glittery numbers give it texture, and the stars are the sparkle. Fill each ornament to about two-thirds rather than all the way, so the contents shift when someone picks one up — that movement is half the charm. Make the gold rose gold and it warms up; go all-silver and it turns cool and wintry.
31. A Two-Tier Tray Styled with a Faux Hot Cocoa Mug
Three principles are doing the work on this tray. One oversized object anchors each tier — the faux cocoa mug with its whipped cream topping on top, the greenery and berry cluster below — and everything else stays small. White repeats across the tray, the cream and the little wooden sign, which is what visually ties the two levels together. And there’s genuine negative space: the mug isn’t packed in with a dozen tiny objects, so your eye lands on it first.
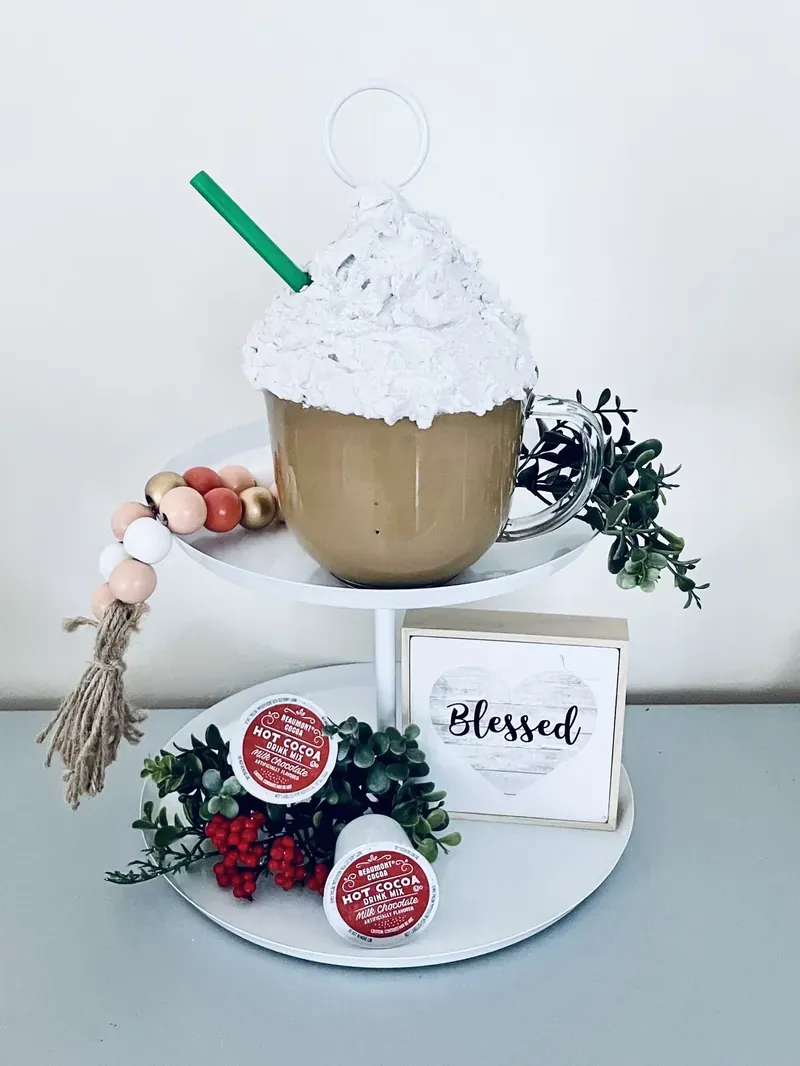
- Check the tray sits level on all four feet before you load the top tier.
- Confirm it’s out of reach of kids and pets — faux cocoa looks convincingly edible.
- Measure the clearance above the mug against whatever shelf or cabinet sits overhead.
- Drape the wooden bead garland before the greenery so the foliage holds it in place.
32. Folded Paper Stars and a Well-Ordered Craft Table
Set your table up like a workstation, not a pile. Wax paper or parchment goes down first to catch glue, and foil is best under anything that might stain. Keep twine and evergreen sprigs at the top of the table where your hands naturally rest, and push the paper stock to the side so it doesn’t get bent. If kids are working alongside you, pre-cut their strips before anyone sits down — the folding is the fun part, the measuring is not.
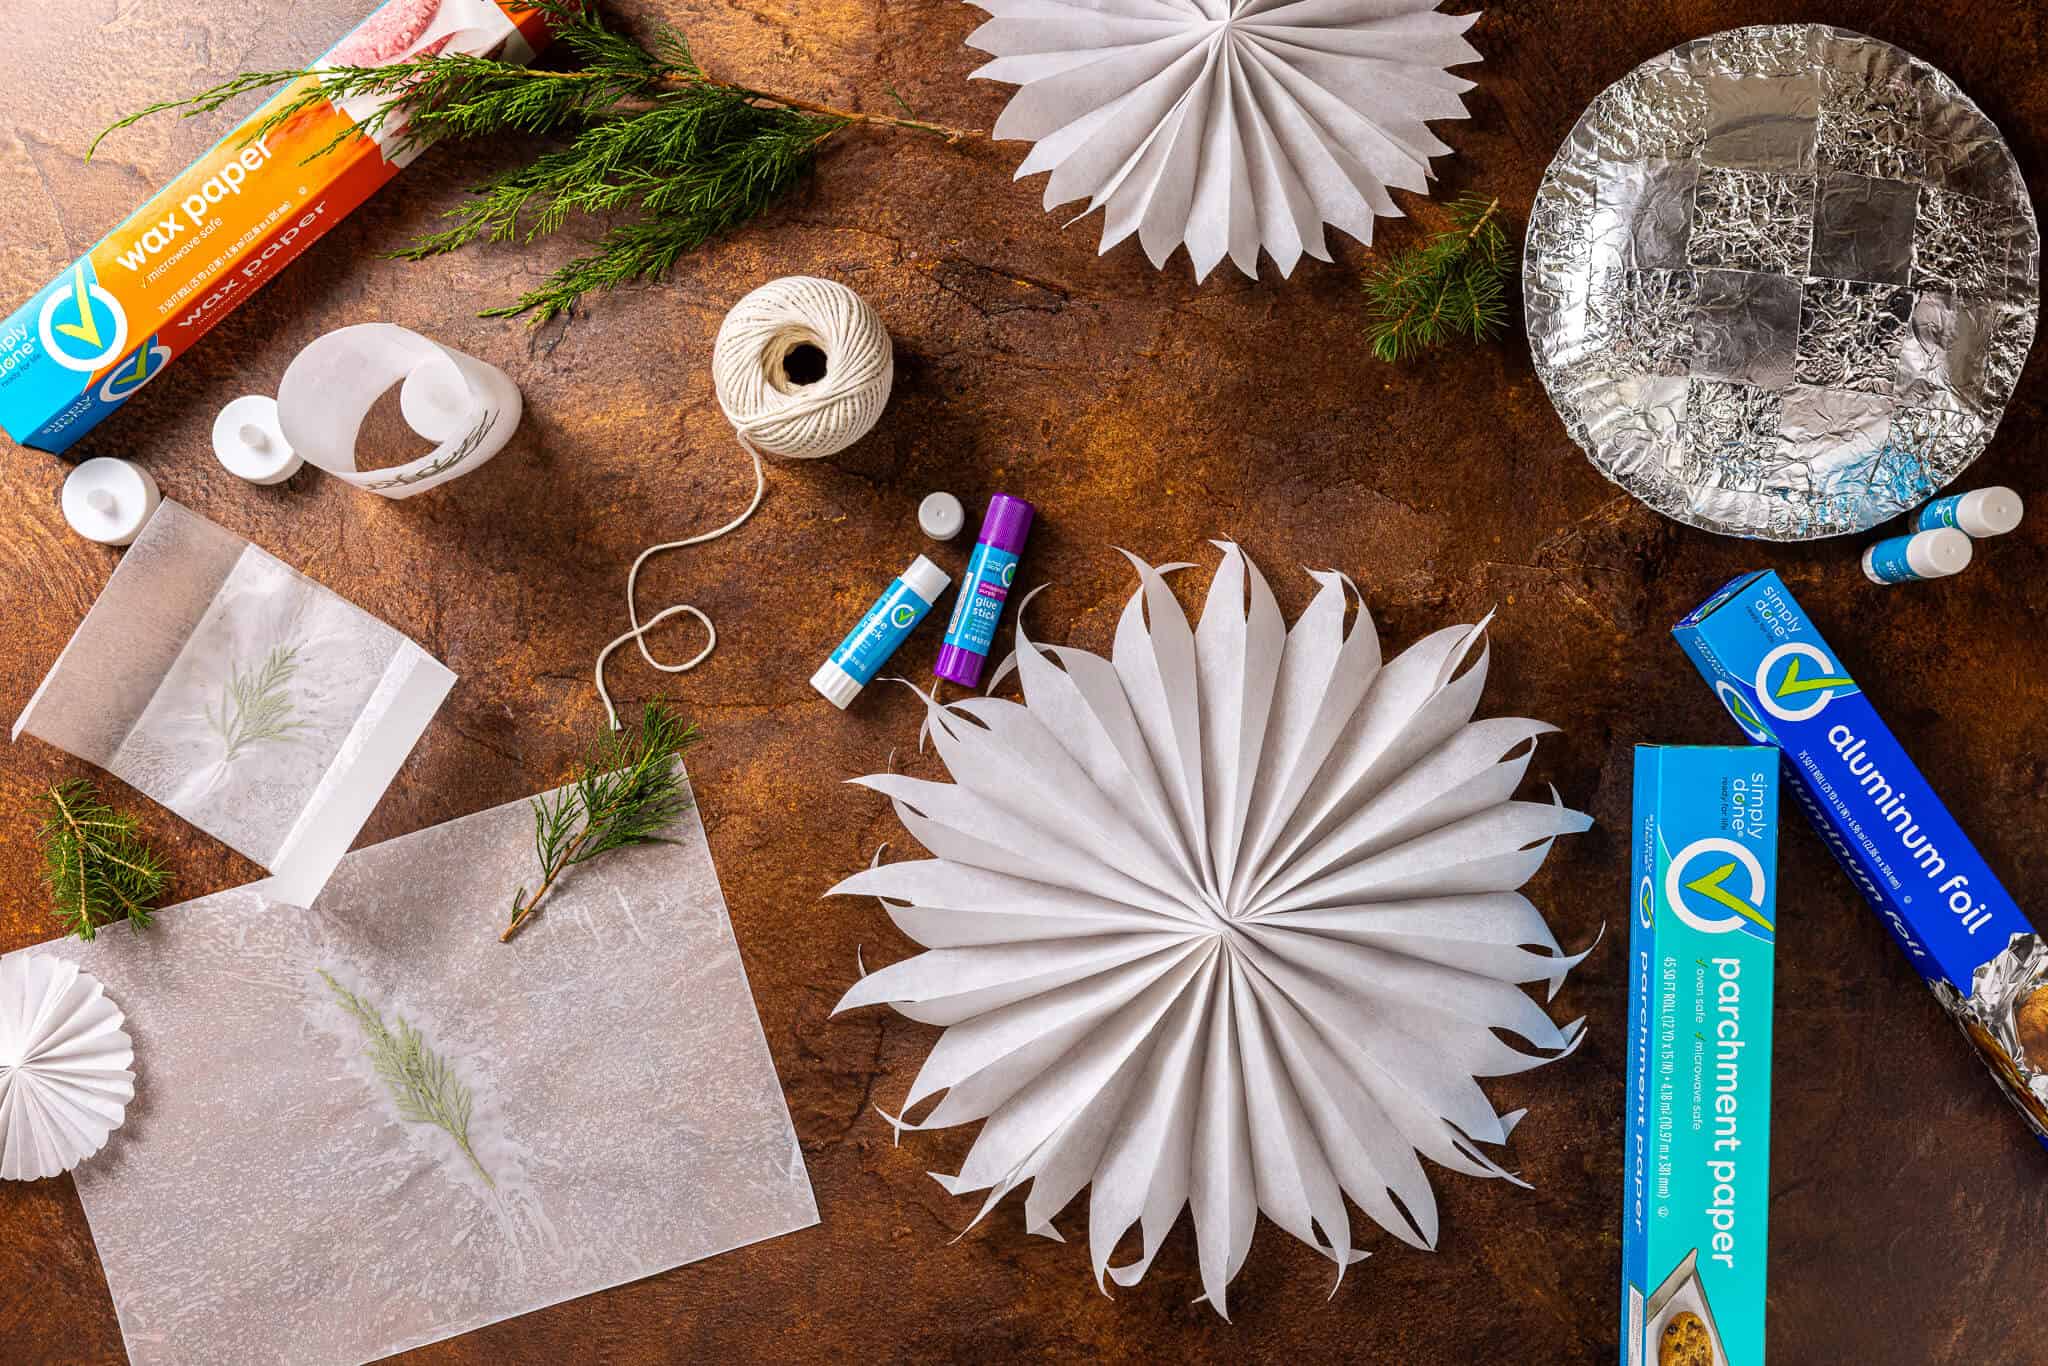
The folded star is the star of the show. No glue, no scissors after the strips are cut, just paper that becomes a shape far more finished-looking than it has any right to be. That’s why folded paper earns its extra five minutes: a dozen stars in a bowl read like a store-bought set, and the same stars tie onto packages or get tucked into branches. Make twenty. You’ll use them.
Start With One Pair of Scissors and a Free Afternoon
You don’t need a matching set, a big budget or a perfectly styled house to make any of this work — you need an afternoon, some paper, and the willingness to let it look handmade. Start with whichever project fits what you already own, then add one more next weekend.
📌 Save this to Pinterest so it’s waiting for you when the boxes come out, and pin your finished version so you can see how far you’ve come by next December.