Still scrolling past the same twelve glass baubles at every big-box store? You’re not alone. Pinterest’s holiday boards are full of ornaments that look like they came off a craft table in your own kitchen — and most of them cost less than a latte.
We combed through Target, Walmart, Michaels, Dollar Tree, and Facebook Marketplace to find the ideas worth your hot glue, and we compared budget and luxury versions side by side so you know where the splurge actually matters. Prices run from about $1 for a pack of sequins to $62 for a fully jeweled velvet heirloom.
You’ll find 23 ideas spanning rustic naturals, vintage nostalgia, hand-painted heirlooms, and pastel whimsy — from dried orange slices to felt mice on skis. And stay until the end, because we break down the three mistakes that quietly wreck an otherwise gorgeous tree.
Heads up: this post contains affiliate links. If you buy through them, we may earn a small commission at no extra cost to you.
📌 Save this to Pinterest for later — you’ll want to revisit these ideas.
1. A Kraft-Paper Craft Table of Clay Stars and Snow-Filled Glass
Filling a clear glass ball so the greenery stays put and the snow doesn’t smudge the inside takes about fifteen minutes once you’ve done one.
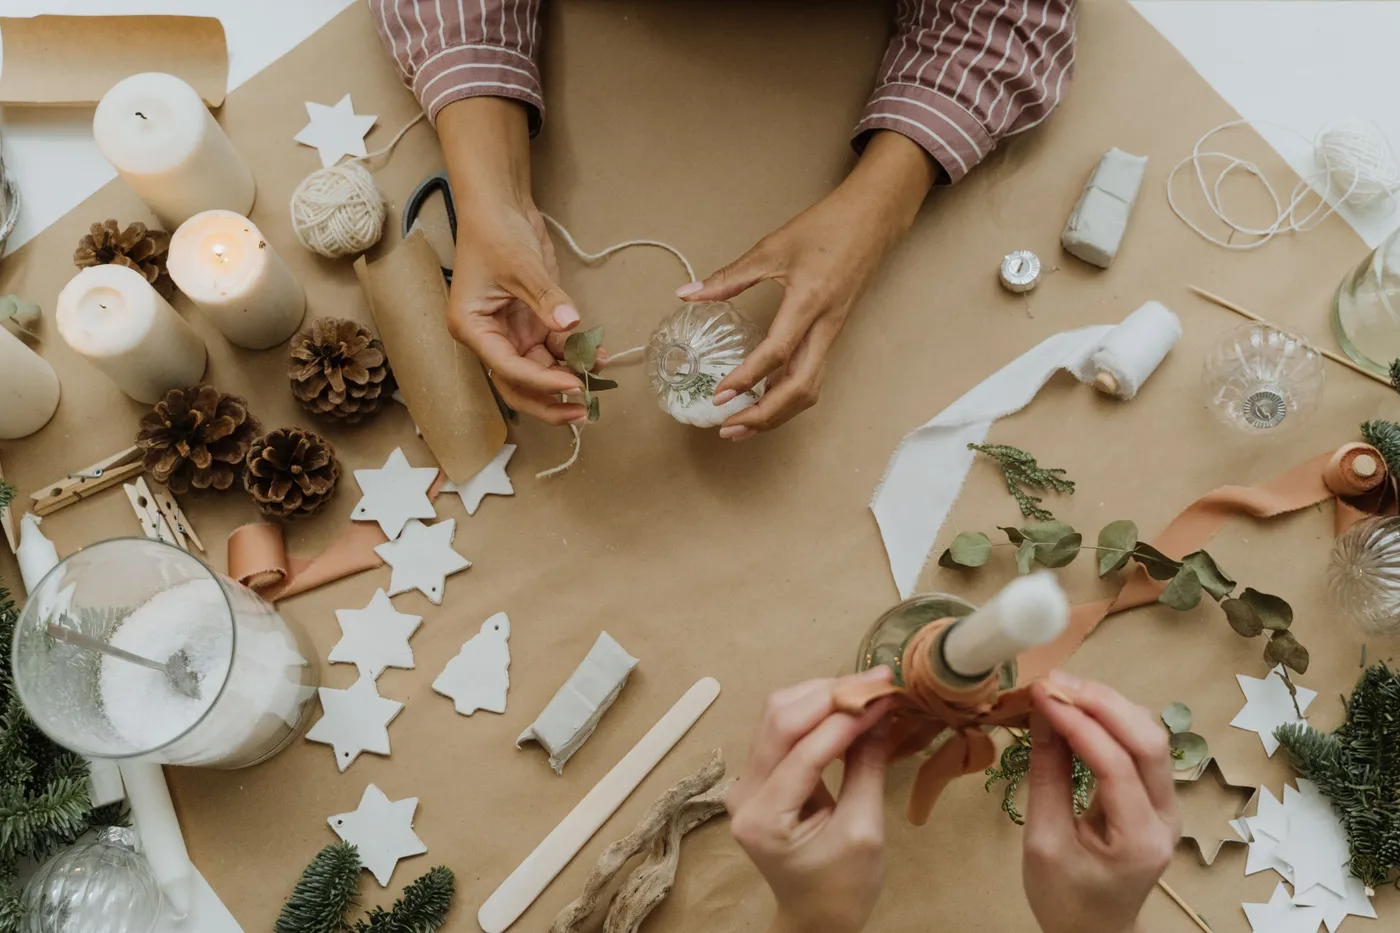
- Lay kraft paper across the whole table — you want the edges to catch stray snow and clay crumbs.
- Coil a 3-inch sprig of eucalyptus into a loose spiral so it slides through the one-inch opening of the glass ball.
- Spoon in two teaspoons of white faux snow, then press the greenery down the inside wall so it rests against the glass.
- Reattach the metal cap, thread a 12-inch length of rust-orange ribbon through the loop, and knot it once.
Roughly $2–3 per ornament after you own the supplies, and the pinecones and clay stars can be made in the same sitting.
Air-dry clay ornaments scuff and gray after a single season of handling, so brush a thin coat of matte polycrylic on the clay stars before you string them. One 8-ounce can covers about 60 ornaments and keeps the white from turning dingy. Skip the sealer on the glass, though — it clouds the surface and the whole point is the shine.
2. Dried Orange Slices with a Star Cut Through the Center
A dried orange slice is a dried orange slice — until you cut a five-point star out of its center. That single opening turns the fruit transparent exactly where it counts, so the tree lights pass straight through instead of stopping at the rind. Take it away and you’re just hanging potpourri. Keep the star centered and no wider than a quarter of the slice, or the ring gets brittle and cracks when you thread the twine through.
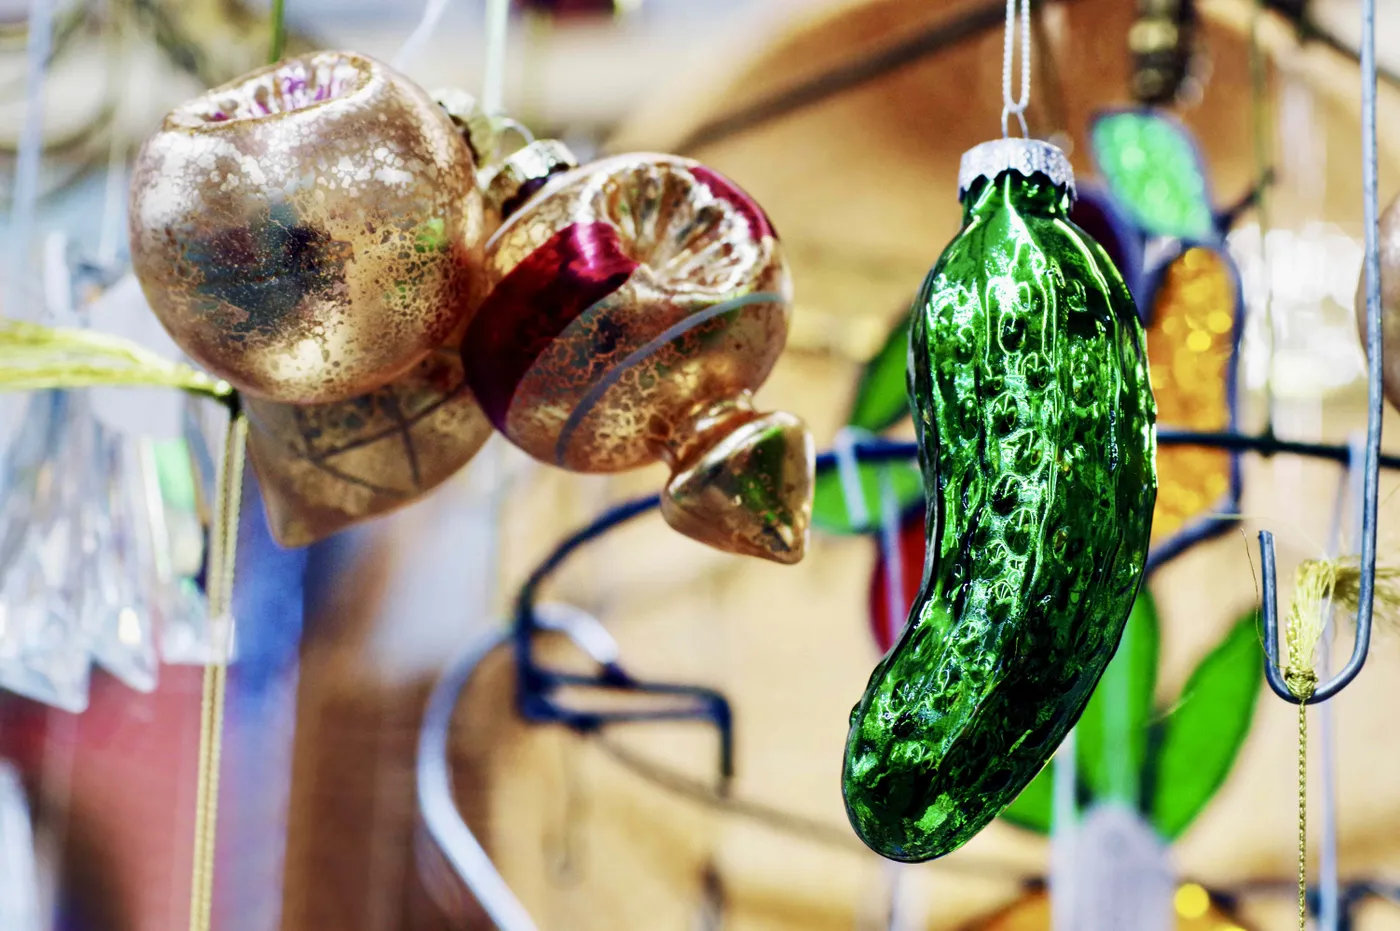
A bag of navel oranges runs about $4 and yields 10–12 slices. Cut them 1/4-inch thick, blot both sides dry, and dry them at 200°F for three hours on a wire rack, flipping once at the halfway mark. Add a pinecone from a walk and a sprig of rosemary, and a baker’s dozen comes in under $8. If you love this amber warmth but want it in glass, see Idea #9 for the same tones with a little more shine.
3. Vintage Glass Baubles Spilling Out of a White Footed Bowl
The “collected, not bought” approach is exactly why thrift stores now price single vintage glass ornaments at $3–8 instead of the old quarter-bin. Pinterest searches for vintage ornament displays have climbed every November since 2023, and it isn’t slowing. People want a tree that looks like it has history. The upside is that this is one of the rare holiday trends that improves with time, because your collection does too.
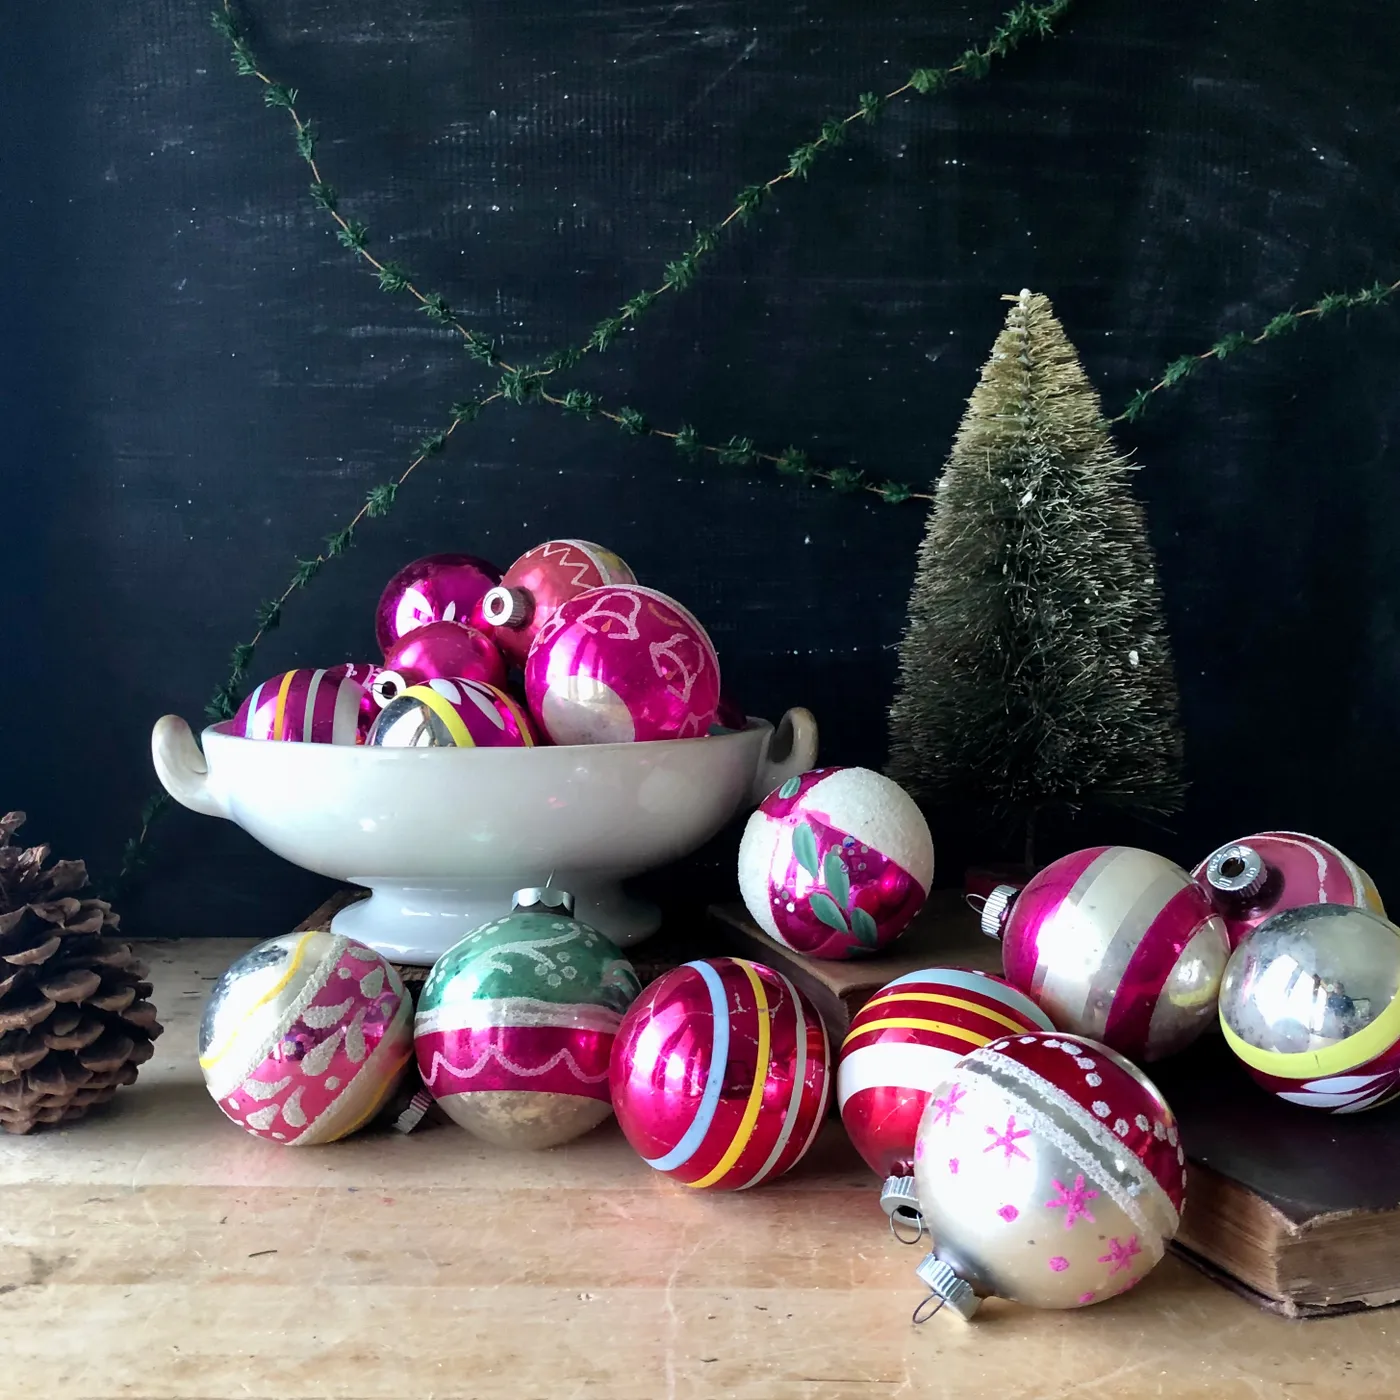
Count it out: 60% dark backdrop — that charcoal wall and the old book — 30% jewel-toned glass in fuchsia and silver, and 10% deep green from the garland draped behind. Swap the fuchsia for cobalt or emerald and the formula still holds, because contrast is doing the work, not any single hue. The white footed bowl is your neutral fulcrum. Leave it alone.
4. Crocheted Snowmen, Santa Heads, and a Wooden Bead Garland
Three things are pulling their weight here. First, repetition — every handmade figure sits at roughly the same 3-inch scale, so a crocheted snowman and a tiny stocking read as a matched set instead of clutter. Second, material contrast: soft yarn against hard wood beads against crisp paper chain. Third, the red and green bead garland traces the same line the paper chain does, echoing the shape without repeating the texture.
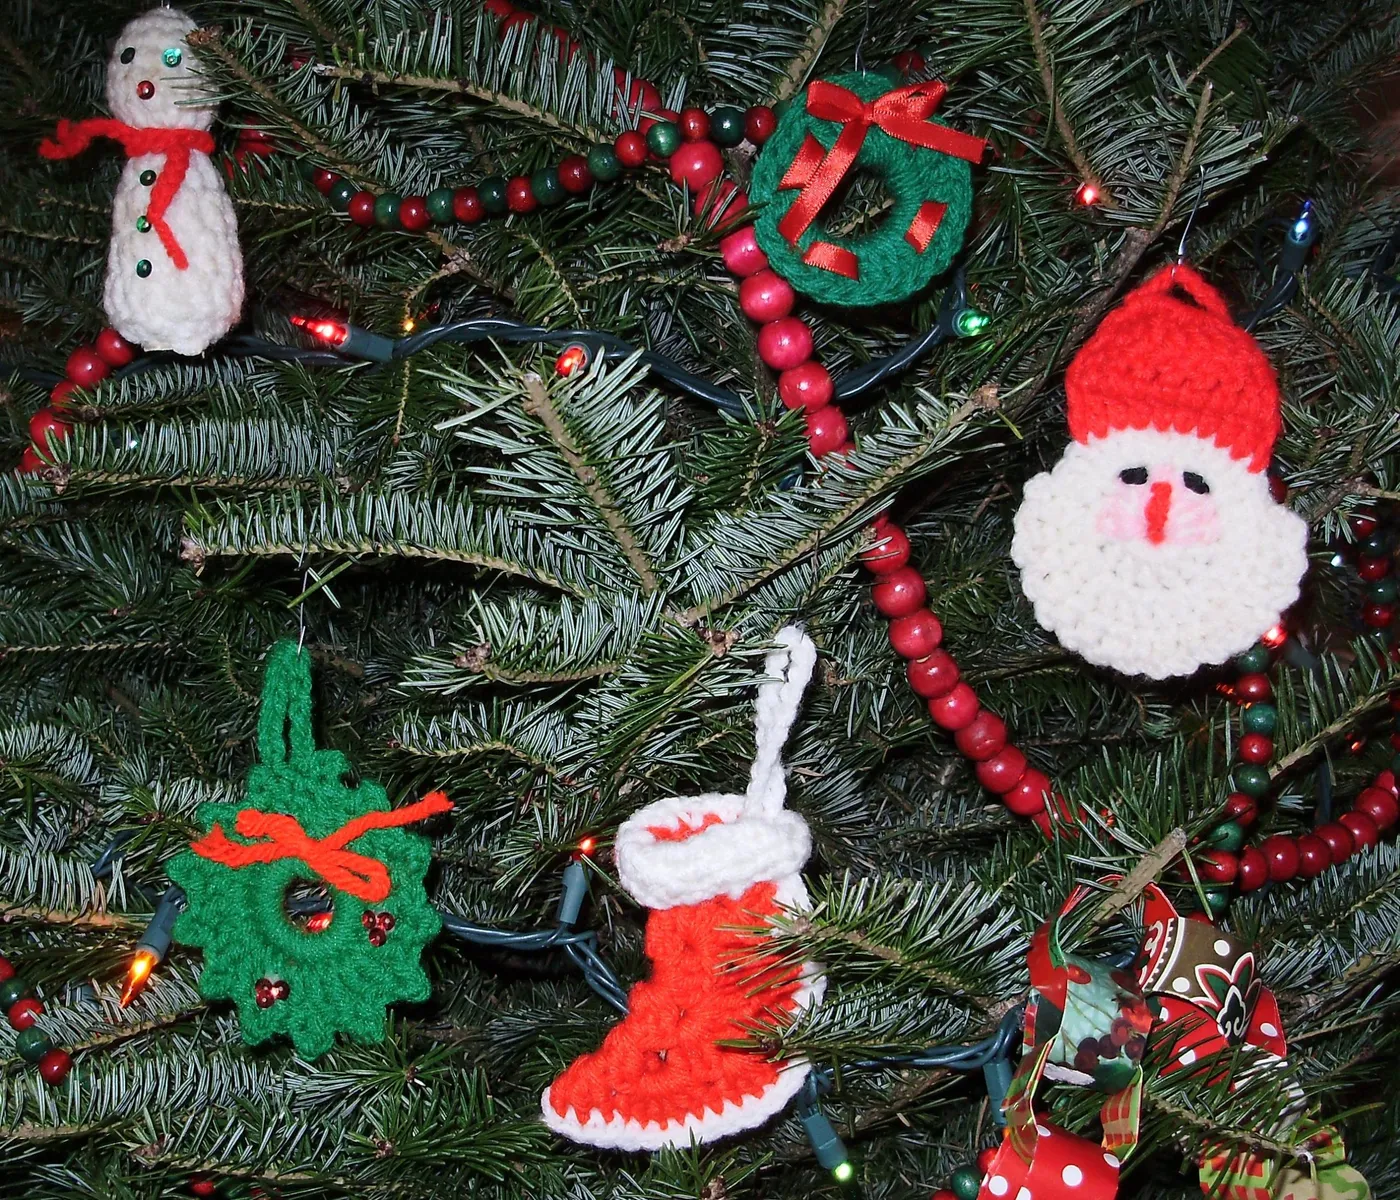
Yarn is a dust magnet, and cotton crochet thread will yellow in direct sun within two or three seasons. Go over each figure with a lint roller or a soft brush attachment every January, then pack them in tissue inside a hard-sided bin — never a ziplock, which traps moisture. Sequins will shed, so buy a $4 mixed pack and keep the leftovers in the bin for repairs.
5. A Driftwood Stable with Hand-Pressed Clay Figures
- Driftwood bundle (Facebook Marketplace or a beach walk): $0–12
- Air-dry clay, 2 lb: $8–15
- Copper star charms, set of 20: $6–12
- Dried moss, green and brown: $5–9
- Twine, tacky glue, matte varnish: $6–10
- Total: $25–58 for about eight ornaments
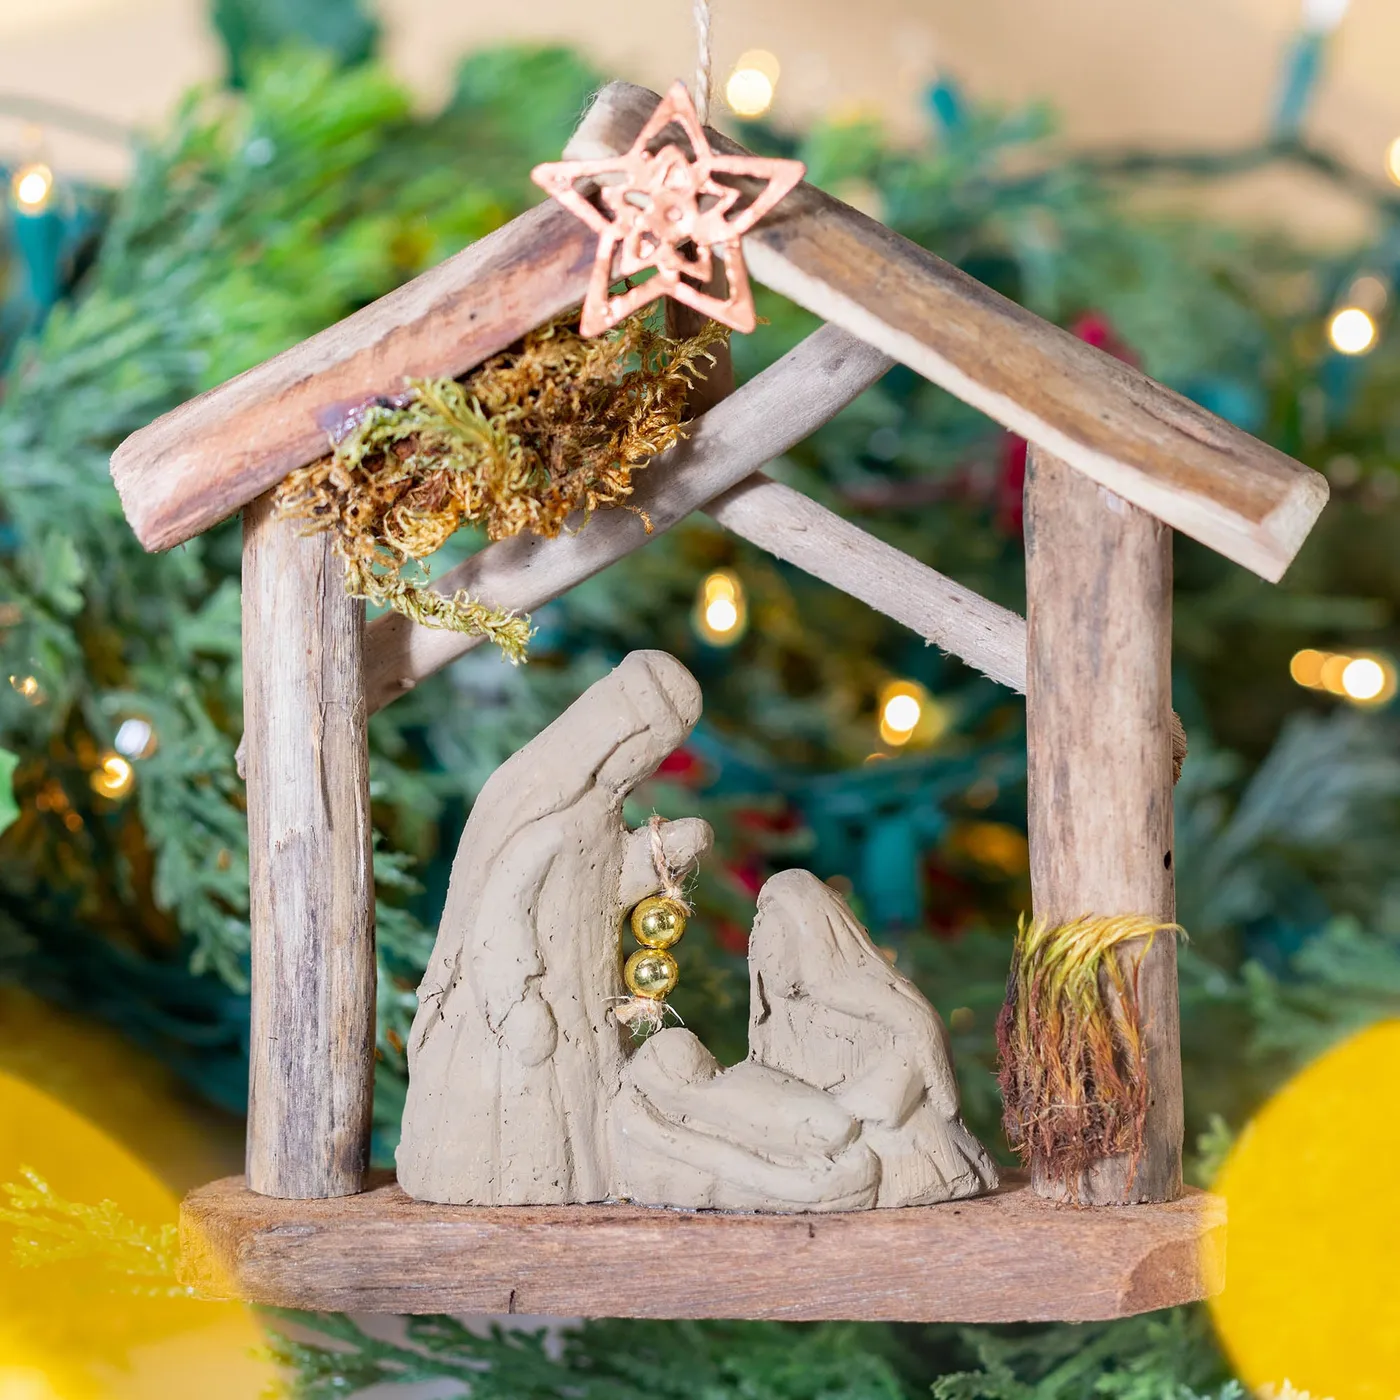
Budget alternative: popsicle sticks stained with coffee and small polymer clay figures bring the whole batch in under $15, and once the moss goes on nobody at the party will be able to tell the difference.
Air-dry clay shrinks 5–8% as it cures, which is why so many homemade nativity figures end up rattling loose inside their stables. Press each figure 1/8 inch taller than you want it, let it dry a full 48 hours, then glue it down. Attach the moss last, with a dot of tacky glue at each end rather than a full smear.
6. Glass Baubles and Curly Ribbon on a Burlap Backdrop
This display wants a console or sideboard at least 36 inches wide and 14 inches deep, with 20 inches of clear height above it so the curly ribbon can breathe. It works in rooms from about 90 square feet up. If your entry is tighter than that, the same collection reads just as well piled into a shallow bowl — Idea #3 is the small-space version of this exact palette.
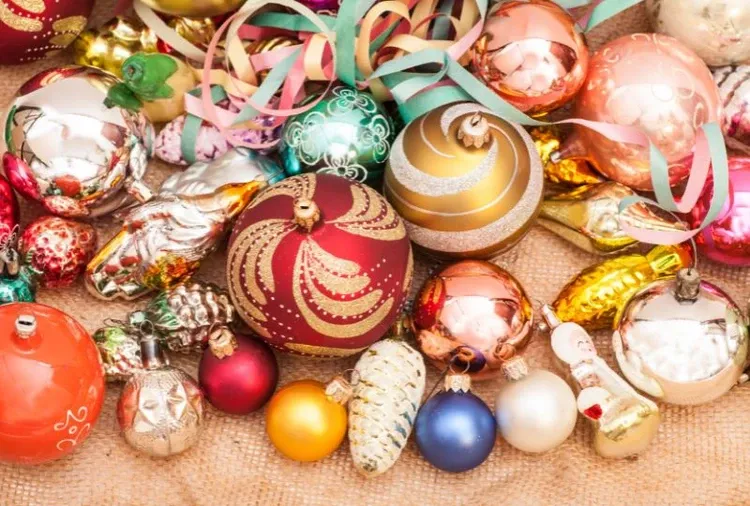
An open vessel of glass balls is a cat’s favorite toy and a toddler’s favorite sound. Set each piece on a pea-sized dot of museum putty or a felt pad so nothing slides, and keep the bowl back from the edge by at least six inches. Also worth knowing: burlap sheds. Shake it out on the porch before you style it, or you’ll be finding fibers in the rug through Valentine’s Day.
7. A Layered Shell Sphere That Catches Every Bit of Light
It’s the overlap. Each tiny shell is laid like a roof shingle over the one beneath it, and that’s what creates the iridescence — light hits the curved edges at slightly different angles instead of bouncing off one flat plane. Glue them in neat rows and you get a golf ball. Glue them in overlapping rows and you get something that looks lit from inside. Work bottom to top, one ring at a time.
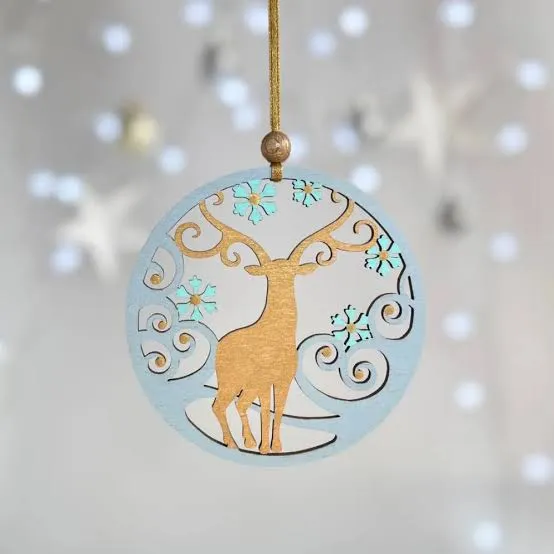
70% iridescent white, 20% warm natural wood, 10% soft greenery. That’s the entire formula, and it’s a forgiving one. Swap the shells for capiz chips, mother-of-pearl buttons, or even tiny mirror tiles and the math holds — what matters is that 70% of the surface stays that pale, light-catching neutral. Push the wood above 30% and the delicacy disappears.
8. Pastel Baubles and Neon Bottle Brush Trees on Plaid Ribbon
Bottle brush trees at Five Below run three for $5, and Target’s dollar section almost always has glossy pastel ornaments at $3–5 for a set of six. Walmart sells black-and-white plaid ribbon for under $4 a roll, and the textured white fabric underneath can be a $6 waffle-weave towel you already own. Whole arrangement: under $35. Compare with Idea #17, which is the all-in version of this same candy-color instinct.
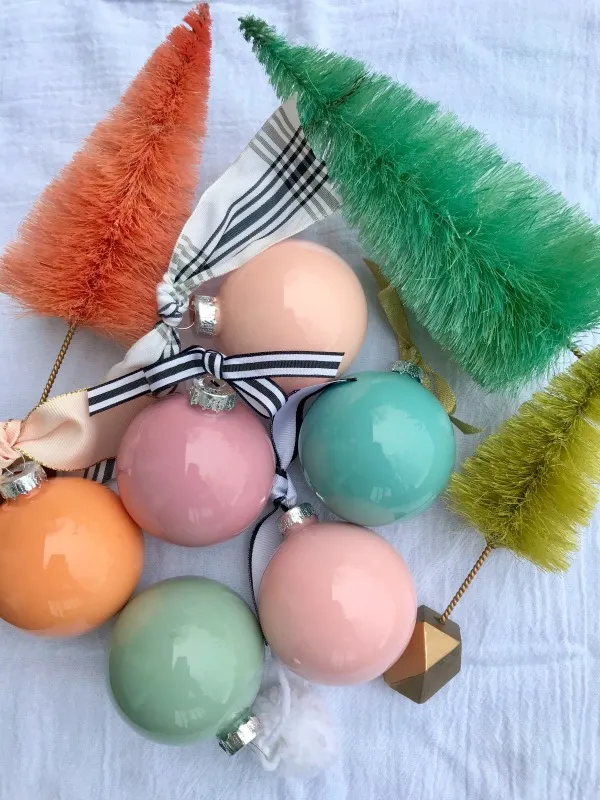
The black-and-white plaid is the adult in the room. Without it, pastels plus neon bottle brushes read like a nursery mobile. That high-contrast ribbon drops the value low enough that the soft tones start looking deliberate instead of accidental. The gold and dark bronze geometric charm does the same job in miniature — one hard, dark accent keeps the whole thing from floating away.
9. Burgundy, Gold, and Amber on an Olive Tiered Stand
If you’re putting a lit taper anywhere near this arrangement, keep the flame at least six inches above the stand surface, trim the wick to 1/4 inch before every burn, and never let faux berry sprays sit within four inches of it. Faux foliage is almost always polyester, and polyester melts into a permanent stain on a table runner. Real candles, real distance, every time.
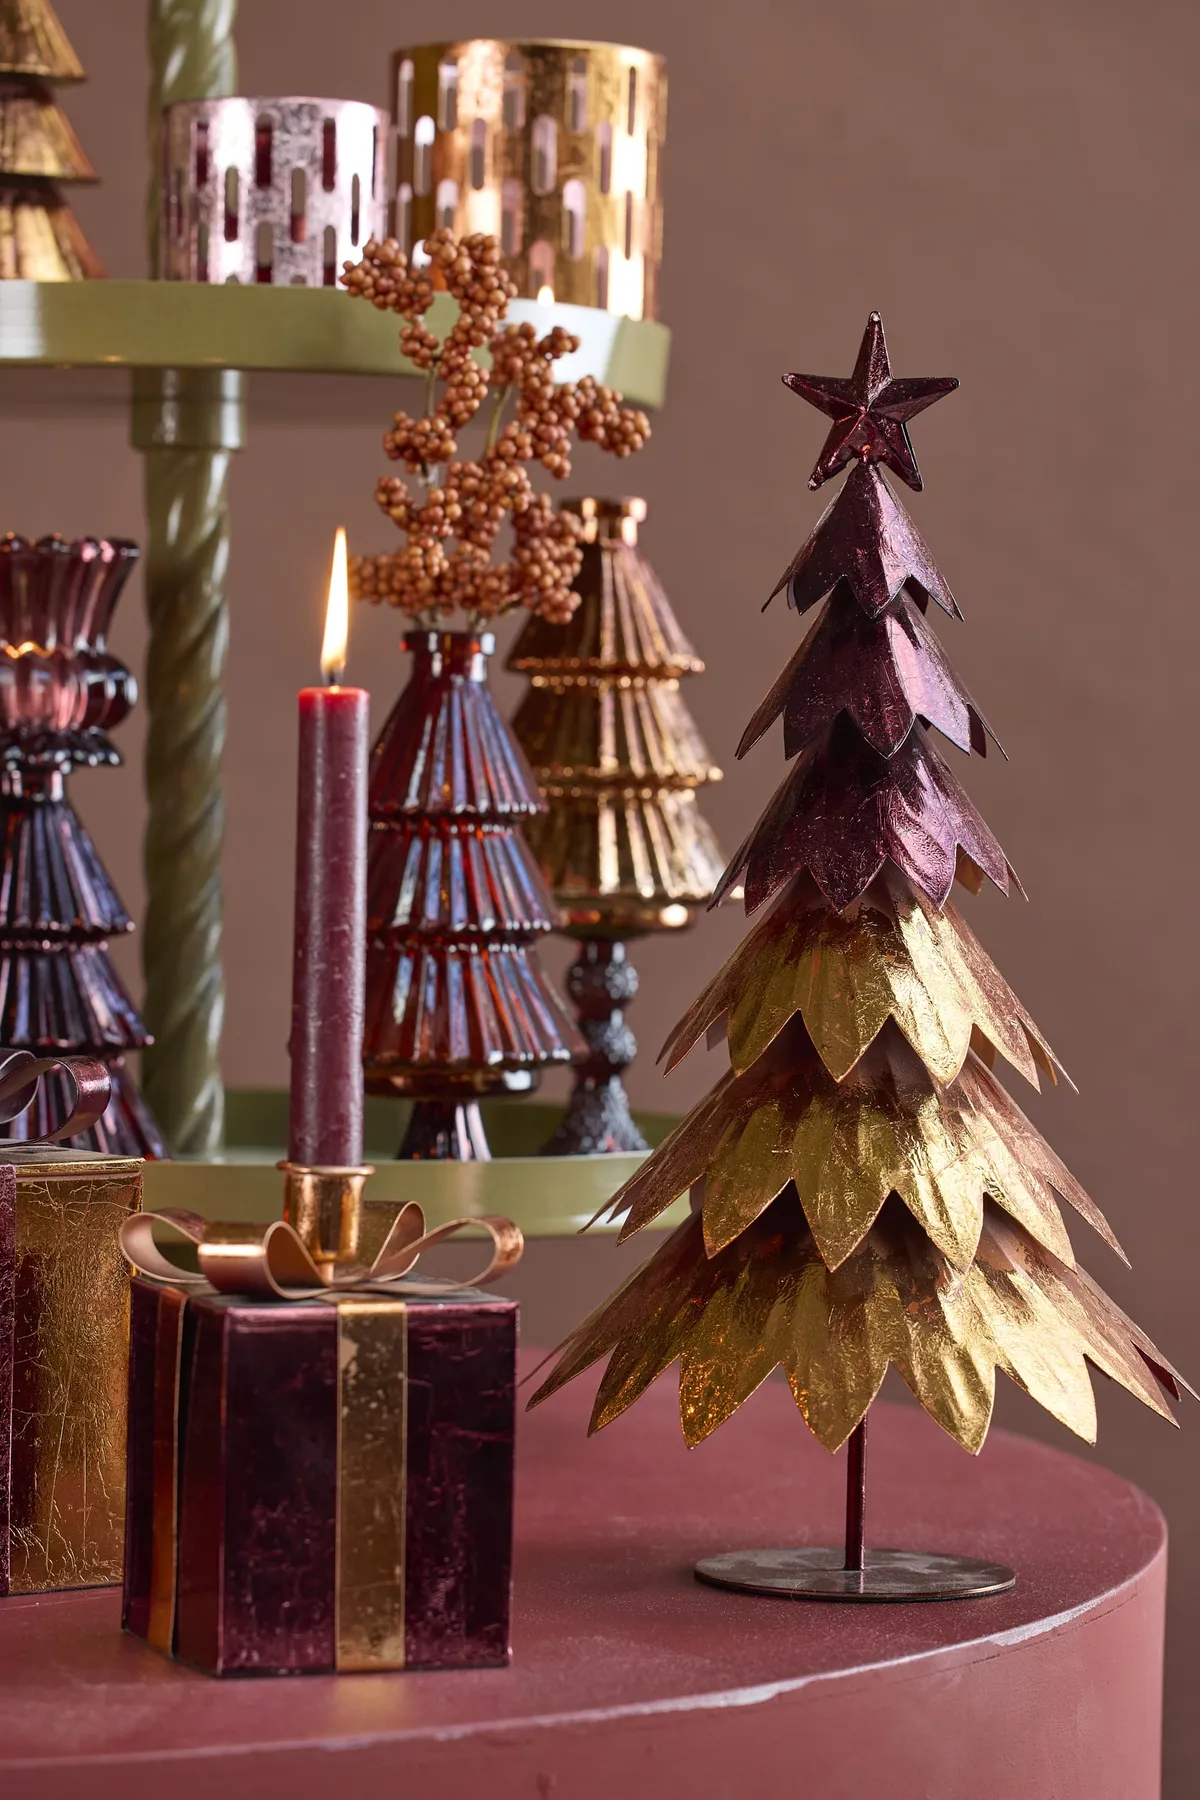
Burgundy has quietly replaced classic red as the holiday neutral of 2026 — it’s warmer, it photographs better in low light, and it pairs with gold without tipping into tinsel territory. The jewel-toned tabletop vignette is the natural offshoot: one rich arrangement on a tiered stand instead of a whole second tree. It has real staying power, because a burgundy glass tree candle holder works just as well in 2030.
10. Star-Shaped Santas — One Bright Yellow, One Dark and Rustic
Making a batch of these takes one afternoon of hands-on time.
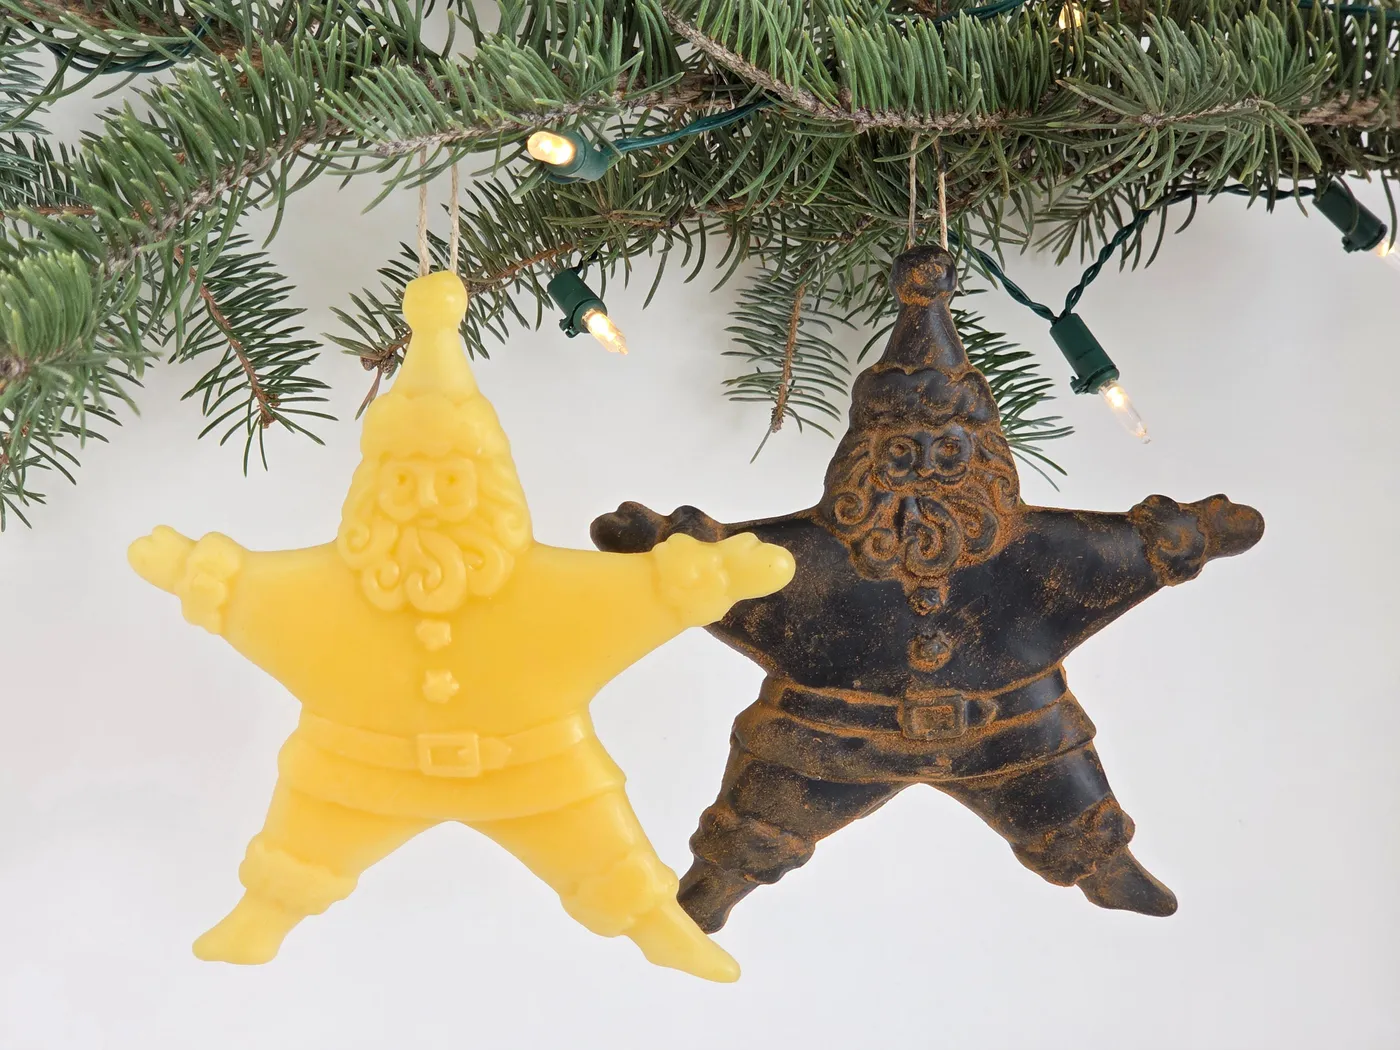
- Roll air-dry clay into a 1/4-inch slab and cut six stars with a 3-inch cookie cutter.
- Press a small ball of clay into the center for the face, then shape a pointed hat and a beard with a toothpick.
- Blot the surface with a damp sponge to smooth fingerprints, and poke the hanger hole while the clay is still soft.
- Dry 24 hours, then finish one bright yellow and rub the second with brown wax for a rustic surface.
About 45 minutes of hands-on work for six ornaments, and roughly $10 in materials.
Dark brown and deep gold ornaments vanish against a dark green tree once the room lights go off. Before you commit to a moody finish, hang one test piece, kill the overhead light, and look at it from the couch. If it disappears, brush the raised areas with a little gold wax — it catches the string lights and pulls the silhouette back out without brightening the whole ornament.
11. Pressed Flowers Suspended in a Hexagon of Clear Glass
The hexagon. Those six flat panes hold each pressed petal flush against the glass, so nothing curls or drifts to one side the way it does inside a round ball. That’s why the flowers read as suspended rather than piled up. If you’re filling a round ornament instead, press your flowers flat for at least three weeks and add them one at a time, tapping the ball gently between each so they settle along the curve.
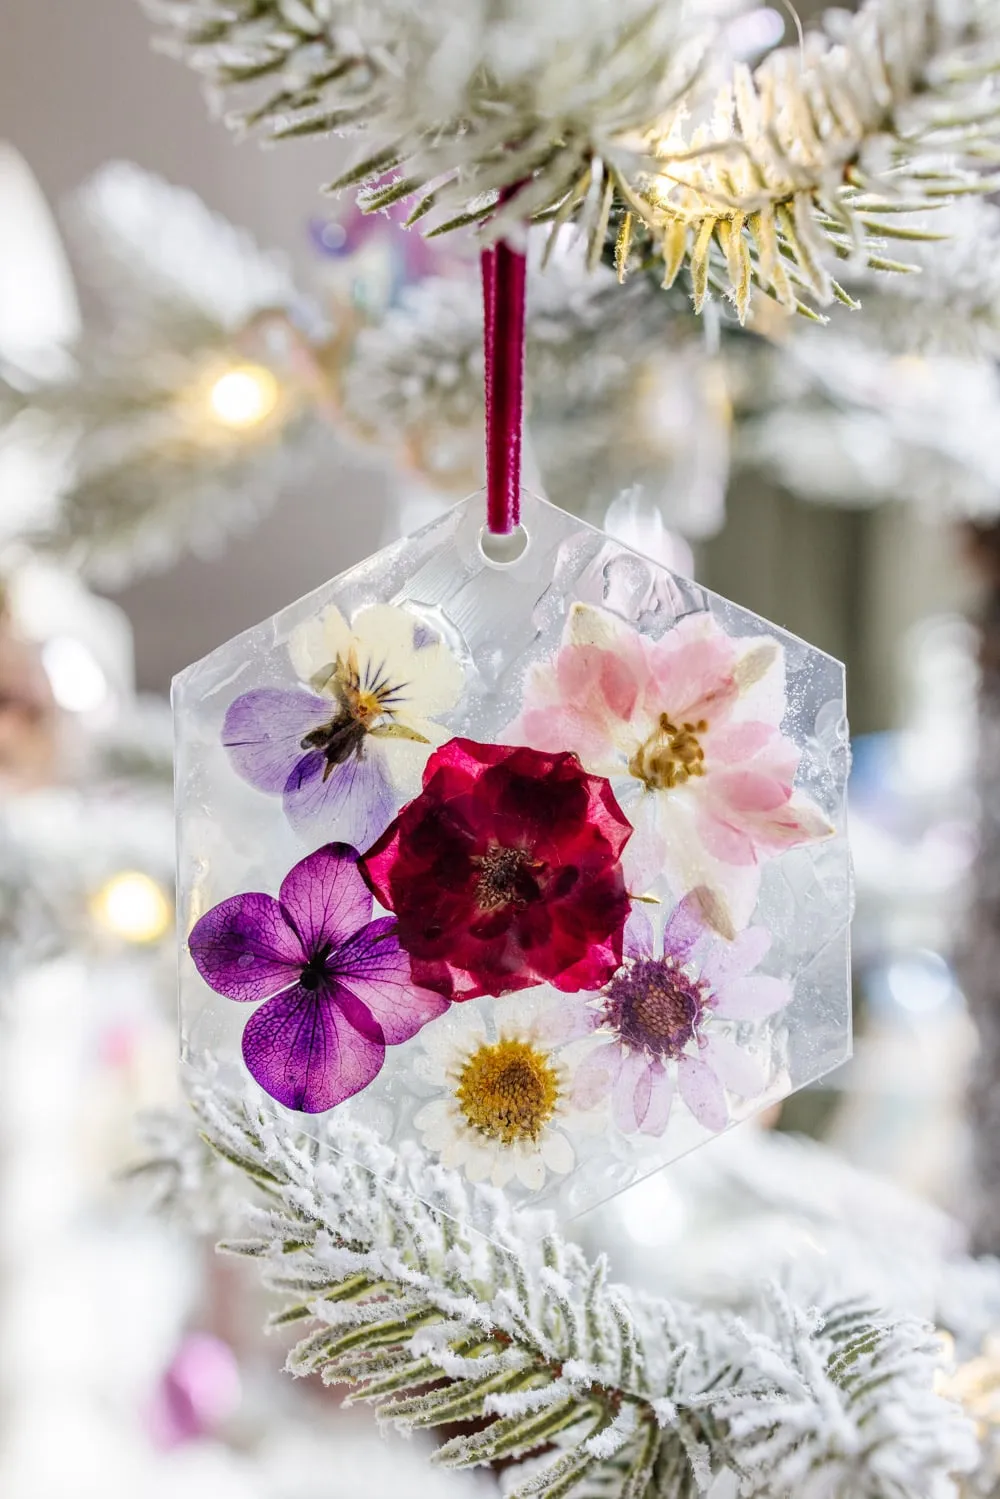
A 3-inch hexagon needs about eight inches of breathing room on a branch, and it looks best on a flocked tree that’s 6½ feet or taller — on a small tabletop tree the proportions go chunky. Pair it with Idea #17‘s iridescent pieces on the same white branches and keep the spacing loose. Overcrowding a flocked tree is the fastest way to make expensive ornaments look cheap.
12. A Yarn Snowman with Sequin Buttons and a Red Scarf
- White worsted yarn, one skein: $4–6
- Red yarn for the scarf: $3–5
- Mixed green and red sequins: $3–6
- 2-inch foam balls, pack of 12: $5–8
- Tacky glue and twine: $4–6
- Total: $19–31 for a dozen snowmen
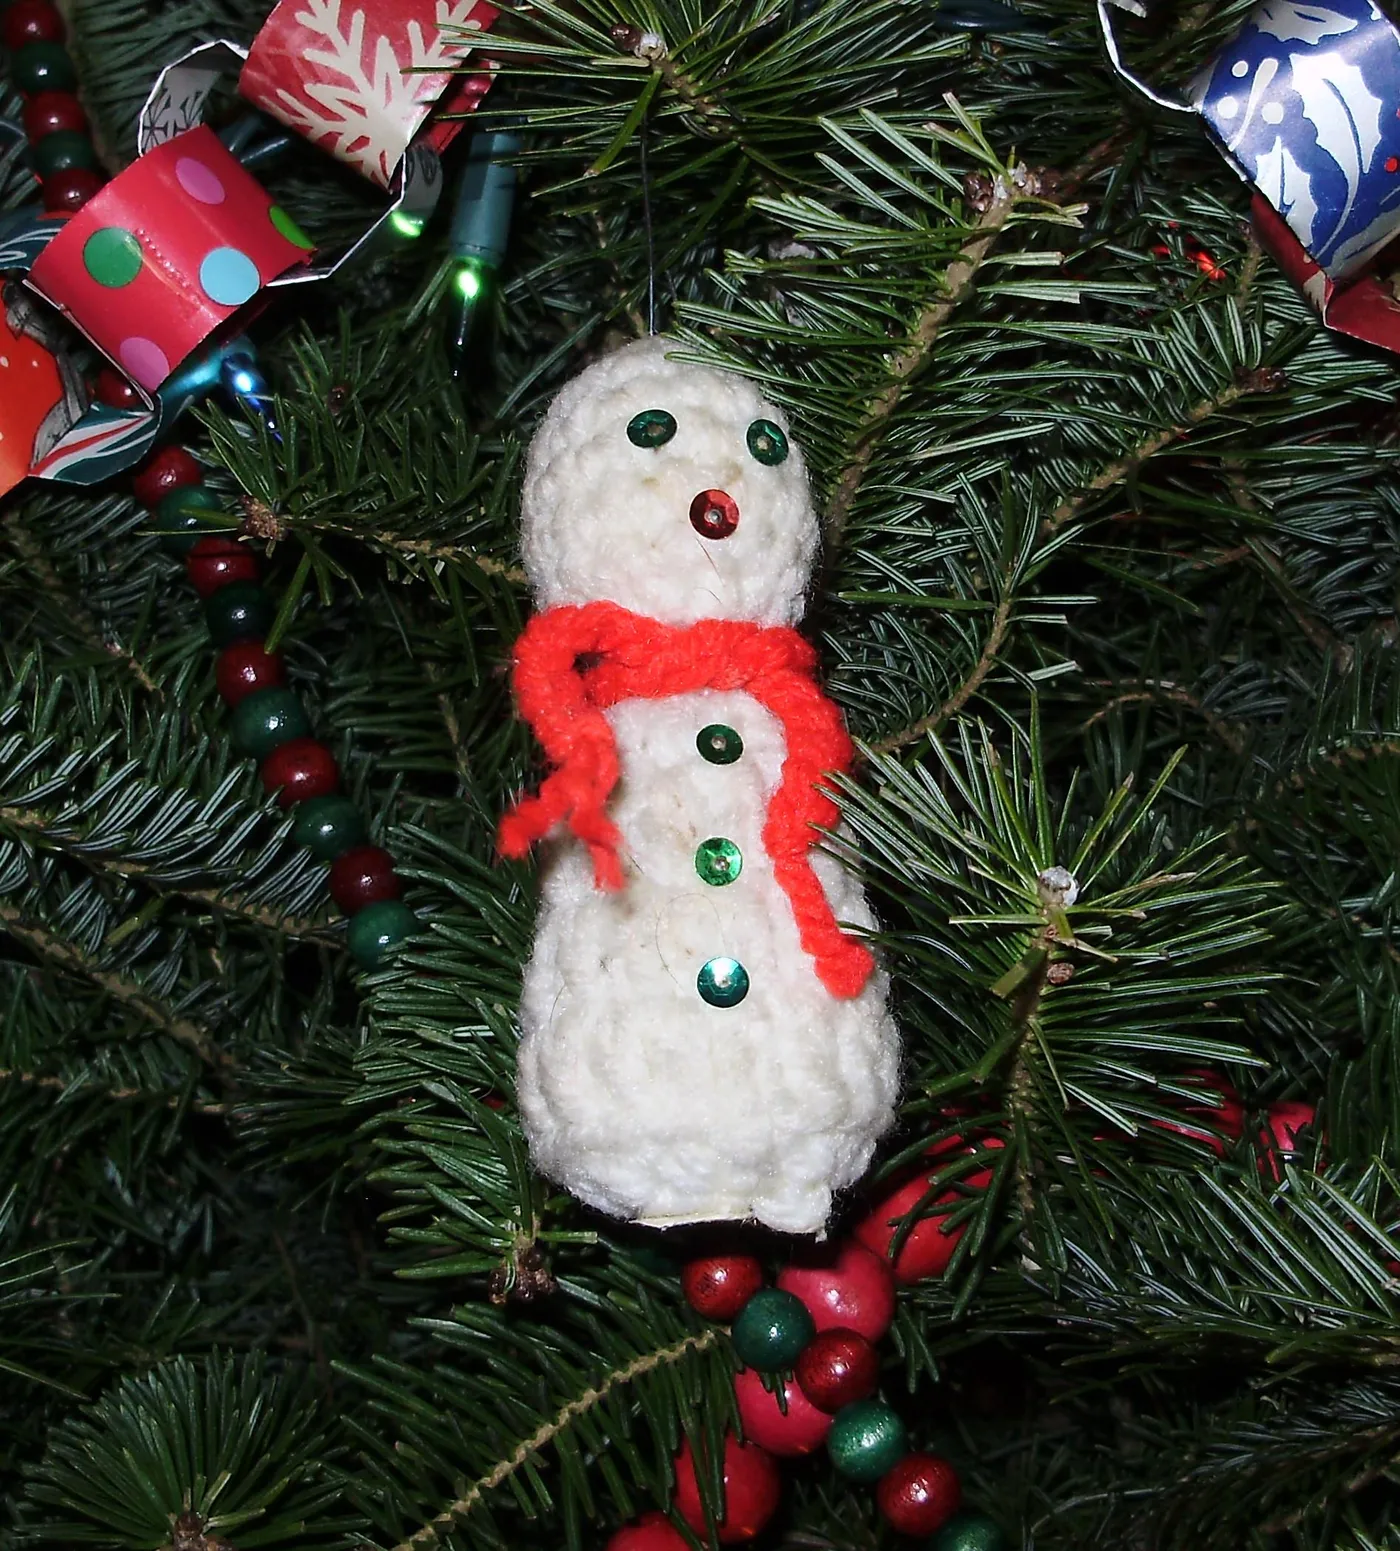
Budget alternative: use leftover yarn from your stash, cut sequin trim off a thrifted sweater, and buy the foam balls at Dollar Tree. You can bring the whole batch in under $10, and the sequin eyes will look exactly the same.
Foam-core ornaments crush if they’re packed under anything heavier than tissue, and the yarn fuzzes with friction. Store them in a single layer in a shoebox with the sequins facing up. If a button pops off, a dot of clear gel glue fixes it in thirty seconds — but let it cure overnight before the snowman goes back on the tree, or it’ll slide down his belly by morning.
13. Layered Laser-Cut Wood Ornaments with Engraved Names
- Count your hangers first — most laser shops sell in sets of six, so twenty ornaments means rounding up.
- Check that the engraved font is at least 3/8 inch tall, or names turn to mush at a glance.
- Order one test piece before the full run; stain color varies wildly between batches.
- Measure your branch thickness — anything over 1/4 inch needs a wider hanger loop than twine.
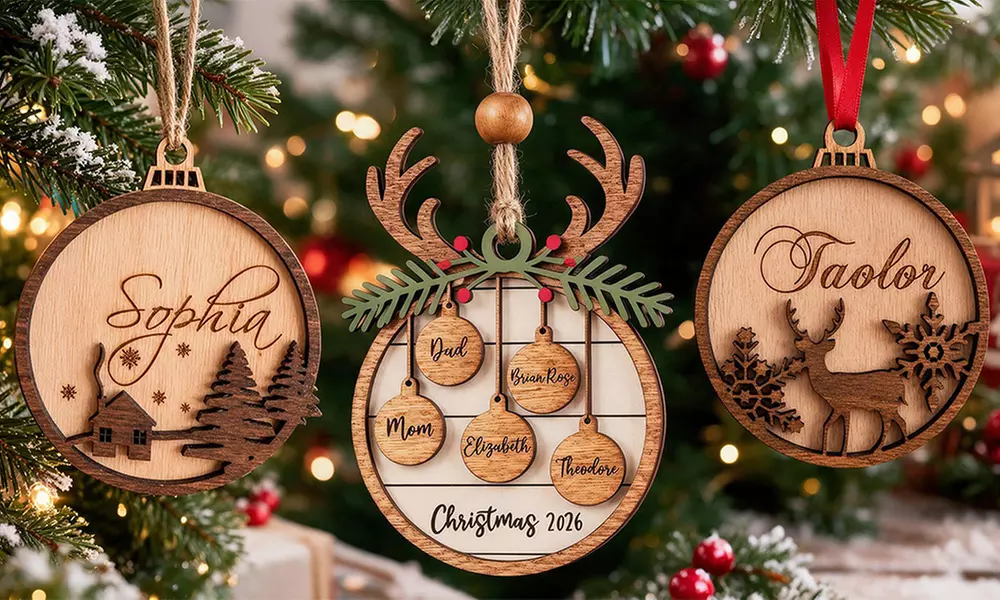
Make the dark stained backer plate 1/8 inch wider than the light wood face, all the way around. That sliver of shadow reads as depth from ten feet away, and it’s the difference between a flat token and something that looks carved. Before staining, sand every edge to 220 grit — end grain drinks stain faster than face grain and goes blotchy if you skip it.
14. Botanical Clay Ornaments with Wooden Bead Hangers
65% cream clay, 25% dark brown line work, 10% accents split between mustard and a soft dusty blue. The painted botanical strokes carry the visual weight; the beads and twine are just punctuation. Swap the mustard for terracotta and the blue for sage, and the whole set shifts warmer while keeping an identical formula. Keep those brown strokes thin — thick lines lose the hand-drawn feel and start looking like a stencil kit.
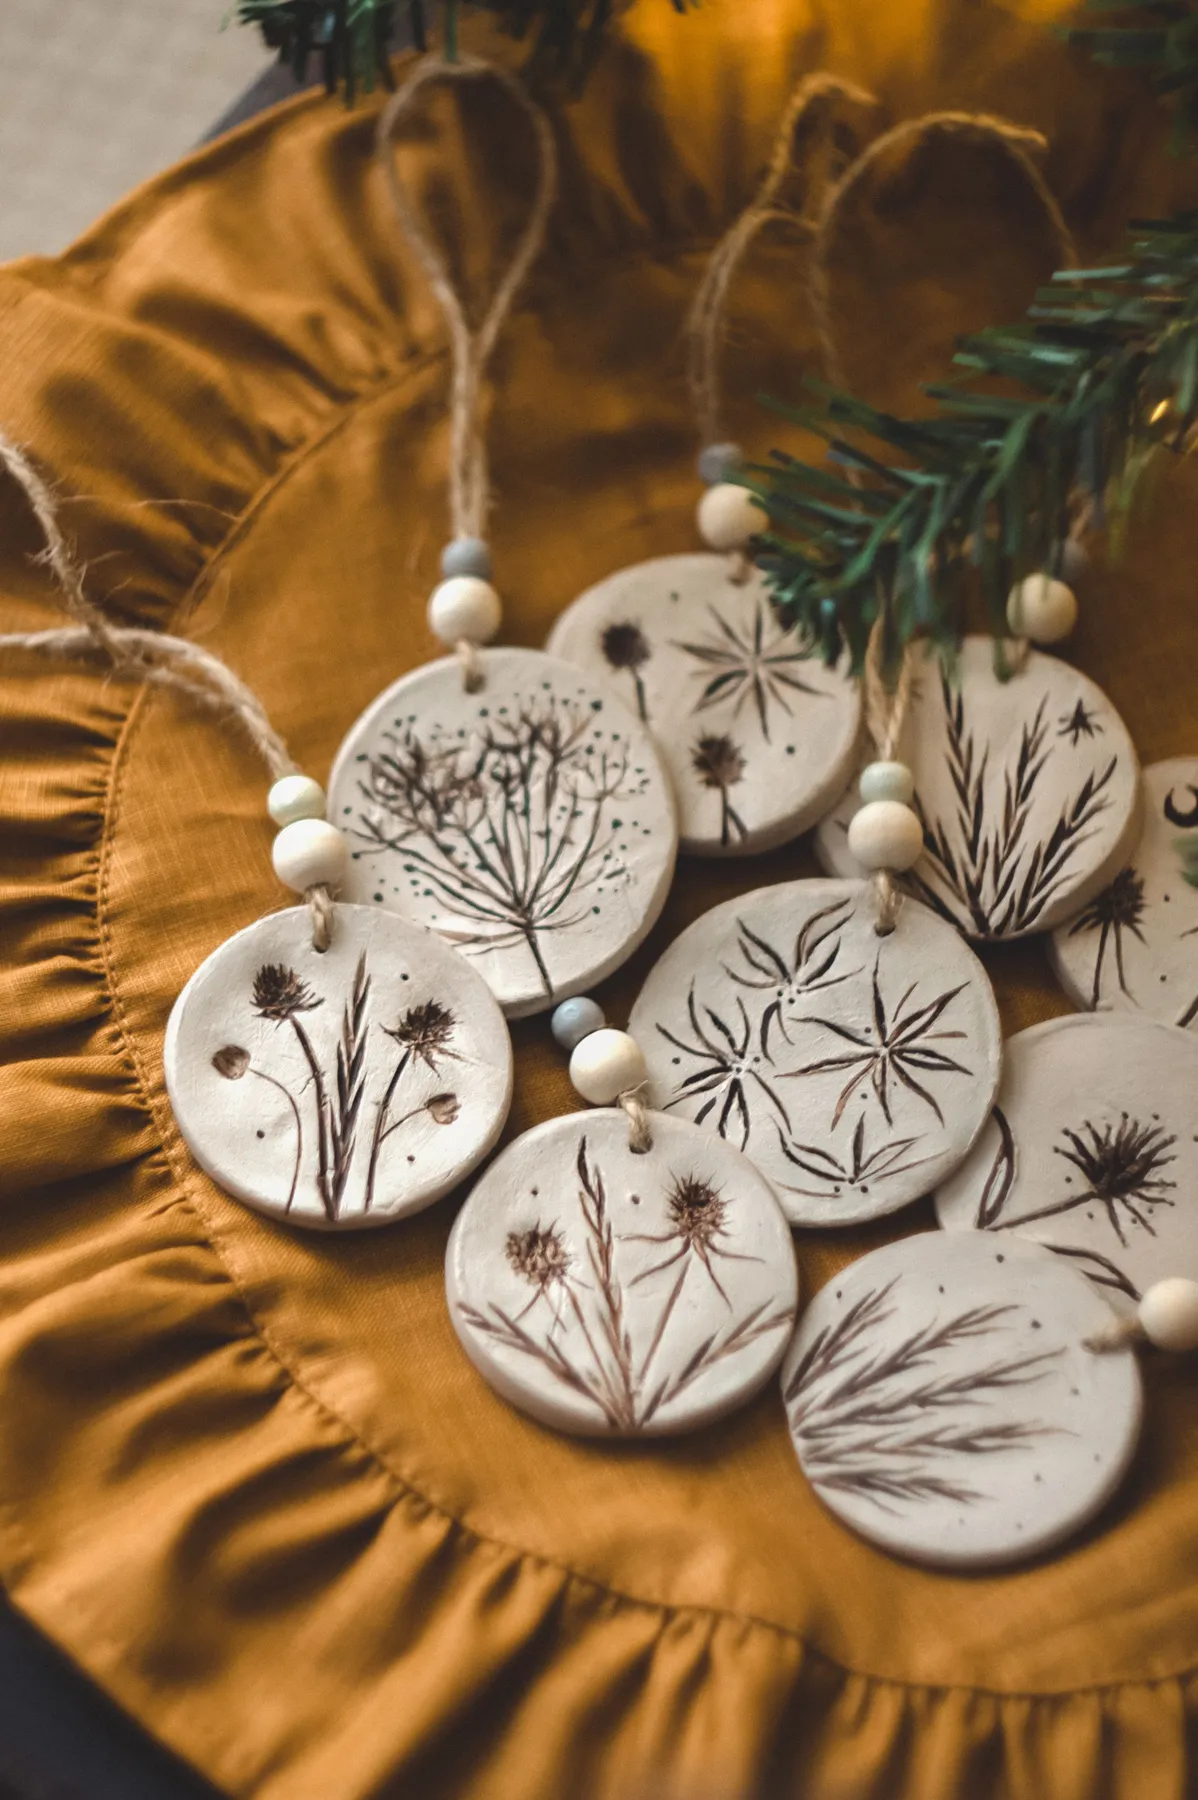
A 2-lb block of air-dry clay costs about $9 and makes fifteen ornaments. Add a $4 cookie cutter, $5 acrylic paint pens from Walmart, $3 jute twine, and a bag of wood beads from Michaels with a coupon, and you’re at $25 for a full tree’s worth. That’s roughly $1.70 per ornament, before you factor in the leftovers for next December.
15. A Glass Vase of Red Berries Beside the Gift Pile
Repetition does the color work. Twelve wrapped boxes in three or four patterns still look intentional because they only repeat three colors — red, green, cream — and your eye reads them as one mass instead of a jumble. The tall berry arrangement is the counterweight: everything else is a low horizontal pile, and one vertical element keeps the corner from looking like a store display.
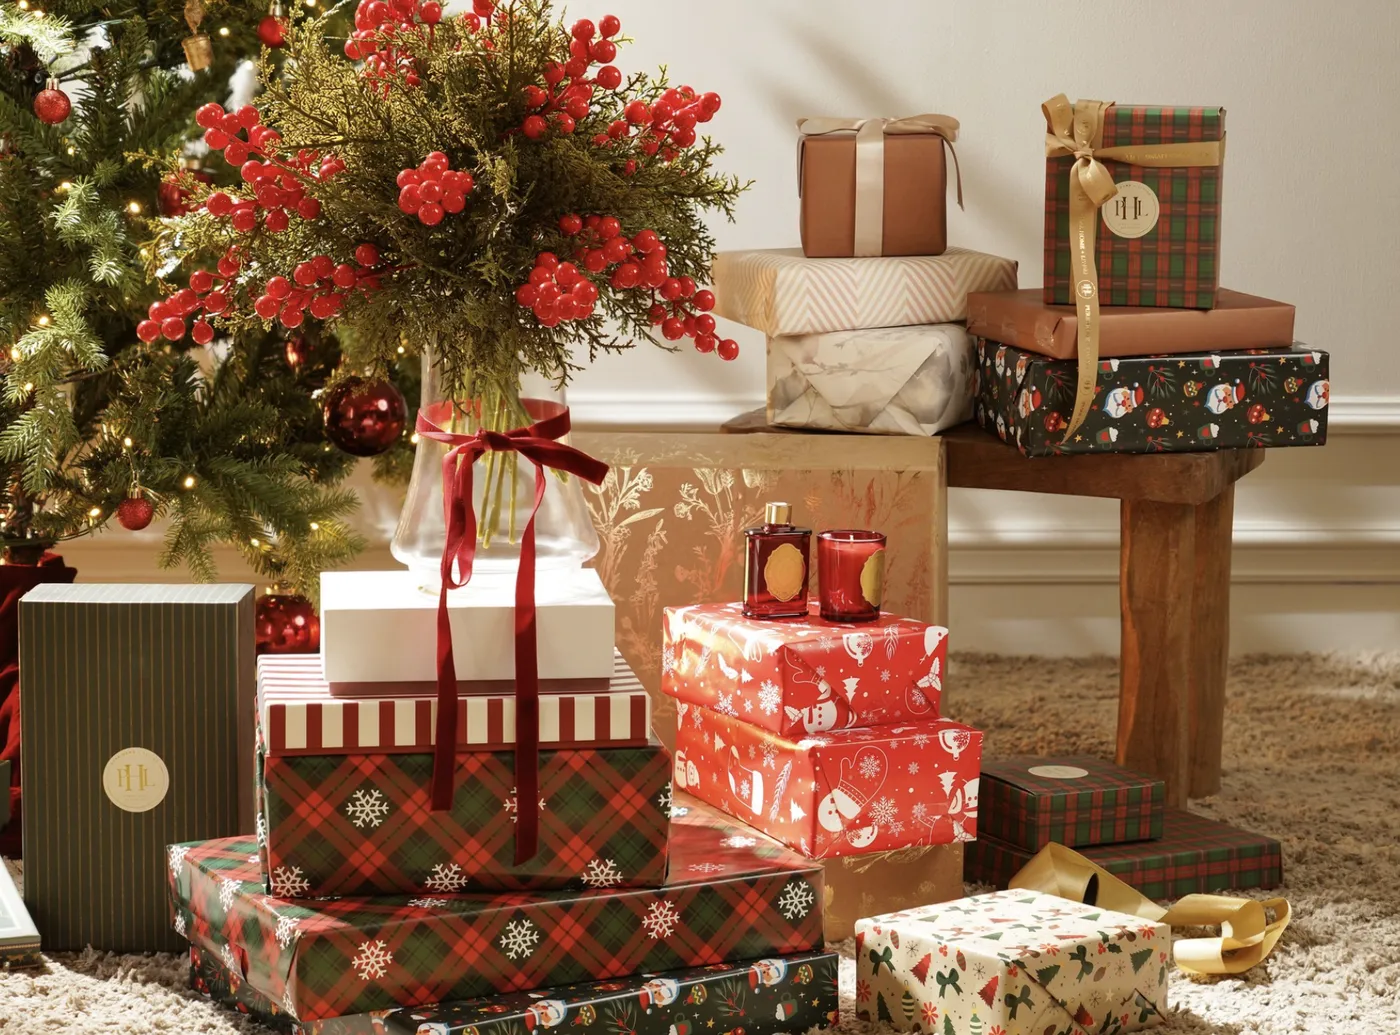
This corner setup needs a 4×4-foot footprint minimum, plus a rug that’s at least 8×10 so the gifts aren’t half on and half off the edge. In a smaller room, move the berry vase to a side table and stack the presents on the stool alone. See Idea #6 for a version that works on a narrow console instead.
16. White Plaster Stars Threaded by Hand
Plaster stars are quick once you get the mix right, and the mold does most of the work.
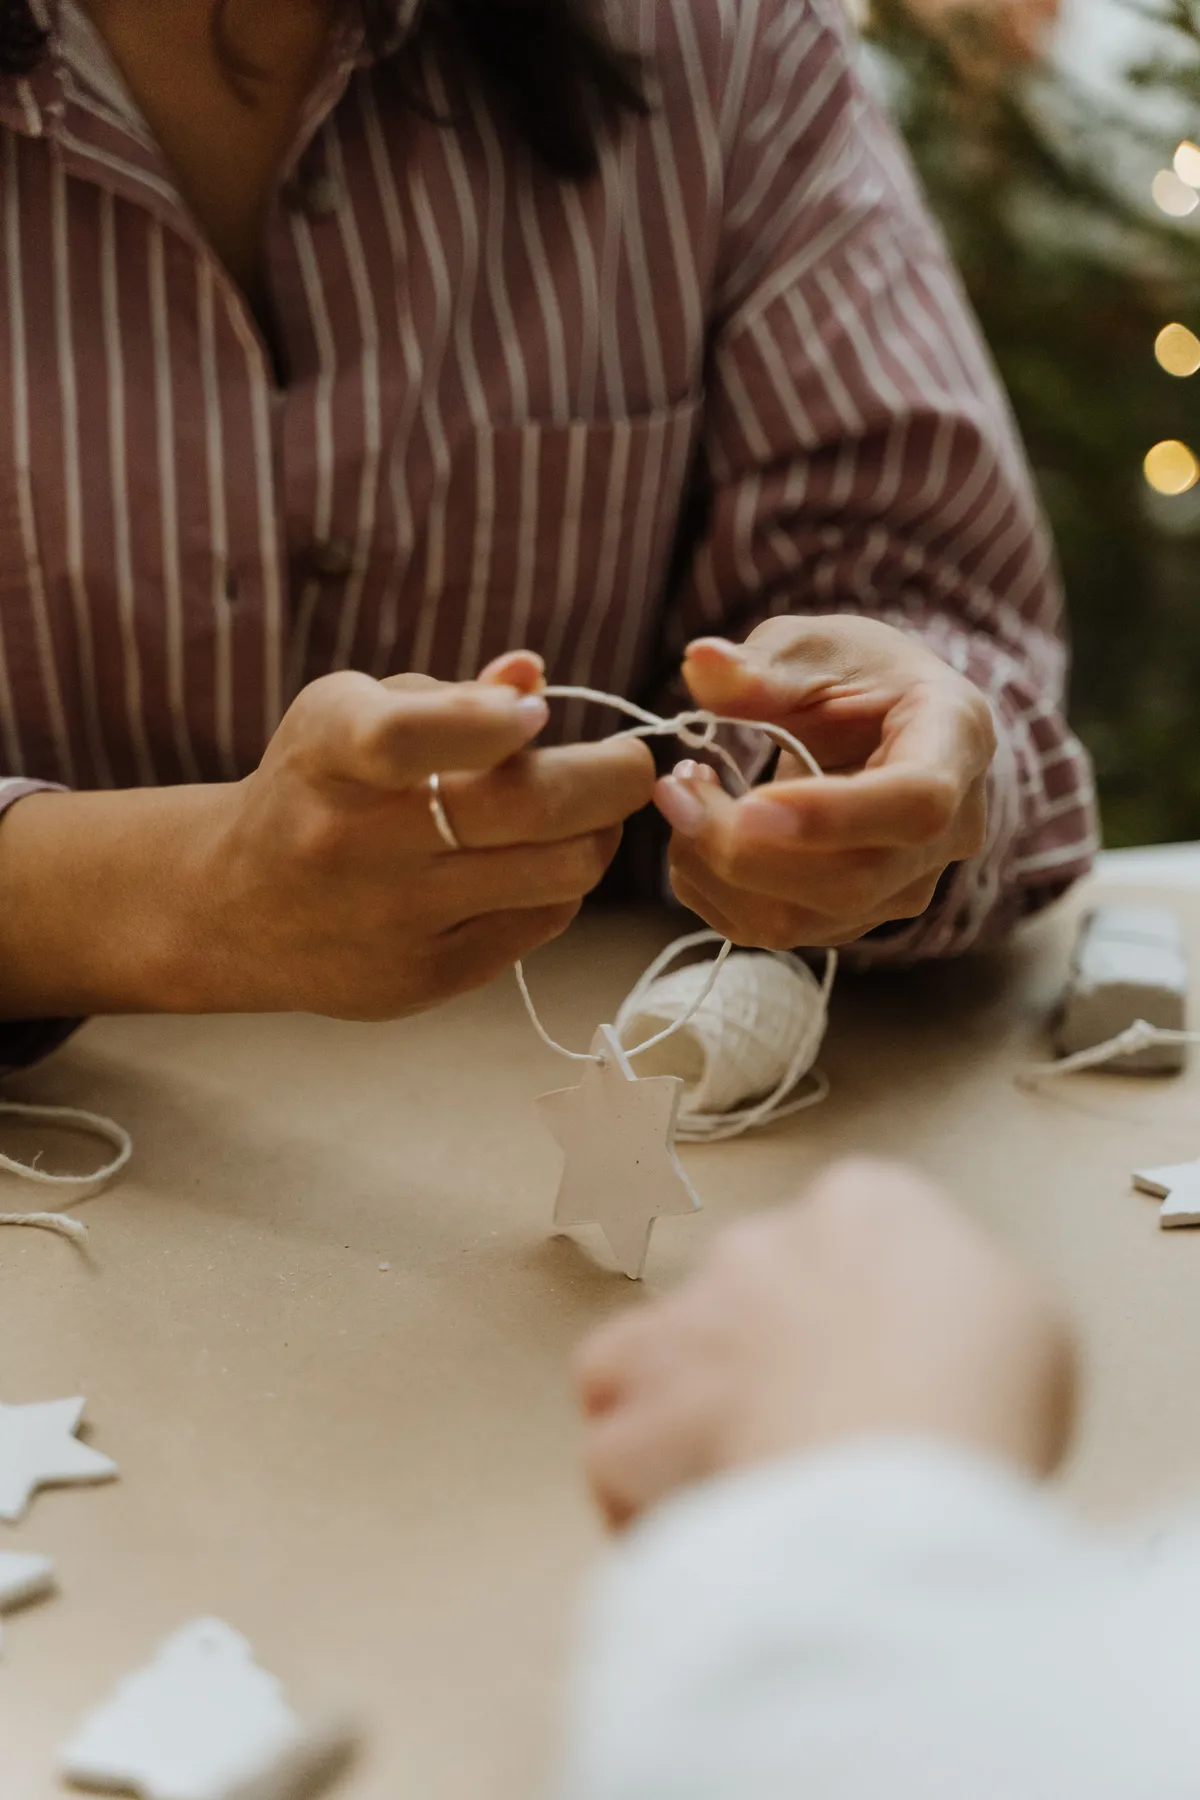
- Mix plaster of Paris with cool water at roughly two parts powder to one part water, stirring until it’s the texture of heavy cream.
- Pour it into a silicone star mold and tap the mold firmly on the counter five or six times to release bubbles.
- Let it set 30–45 minutes until it feels warm, then demold and smooth the edges with a damp fingertip.
- After 24 hours, thread white string through with a blunt tapestry needle and knot it behind the star.
About two hours of hands-on time and $12–18 for a dozen stars.
It’s the white-on-white string. A colored cord, a gold loop, a ribbon — any of them introduce a second idea and break the quiet. This ornament works because it looks unfinished, like a shape cut out of the room. Keep the knot behind the star so nothing interrupts the silhouette, and hang these lower on the tree where the lights are dimmer and the shape reads as a shadow.
17. Iridescent Film Ornaments on a White Tree
White trees show everything — scuffs from storage, dust, the faint gray line where a branch meets the trunk. Keep a lint roller in the box. The iridescent film is worse: it creases permanently, so wrap each ornament in a single layer of tissue and never stack them. And test your lights first. Warm white bulbs on a white tree often read as yellow rather than cozy, especially in a room with beige walls.
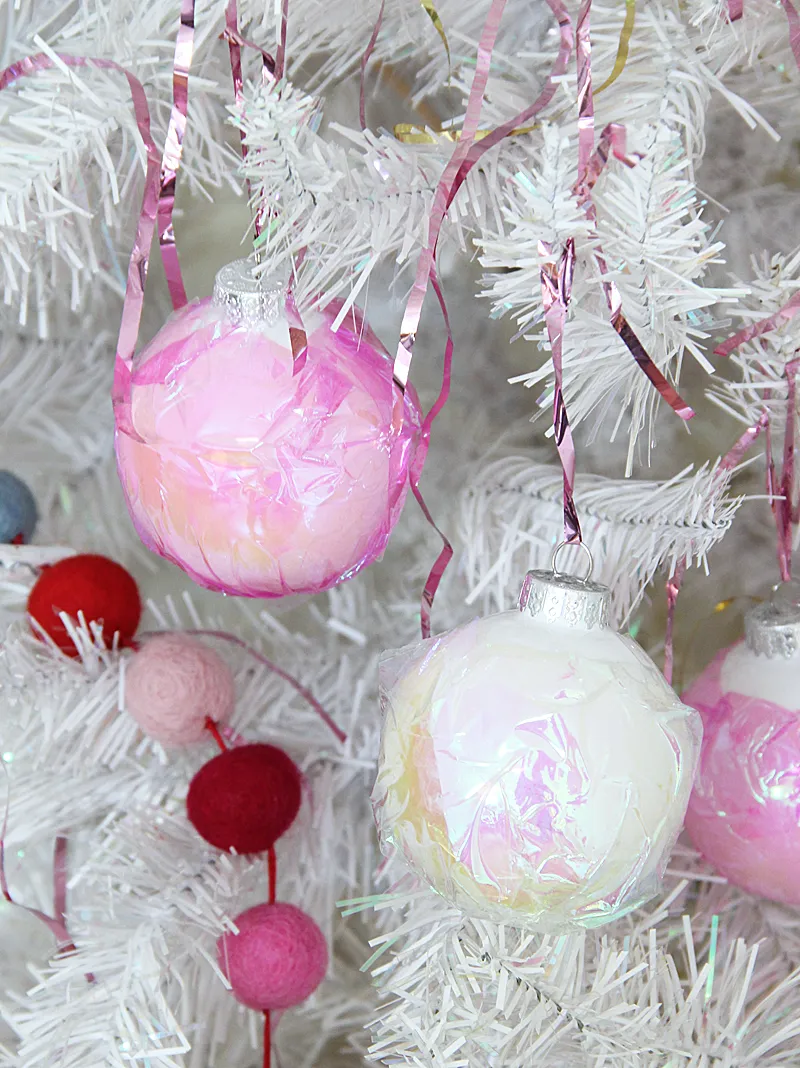
The fully monochrome tree is the pastel branch of the “unconventional tree” trend that’s been building since the Barbie-pink holiday season of 2023 — same instinct, quieter execution. What makes it last past 2026 is that it isn’t tied to a single color. The formula is one base tone, plus iridescence, plus felt pom-poms for texture, and you can run it in white, sage, or blush without changing anything else.
18. Blush Velvet Ornaments Wrapped in Silver Cording
- Velvet fabric, 1/4 yard: $8–14
- 3-inch foam balls, pack of six: $6–9
- Silver twisted cording, one spool: $6–10
- Jeweled buttons or brooches: $10–25 for a set
- Clear gel glue and thread: $4–6
- Total: $34–64 for six ornaments
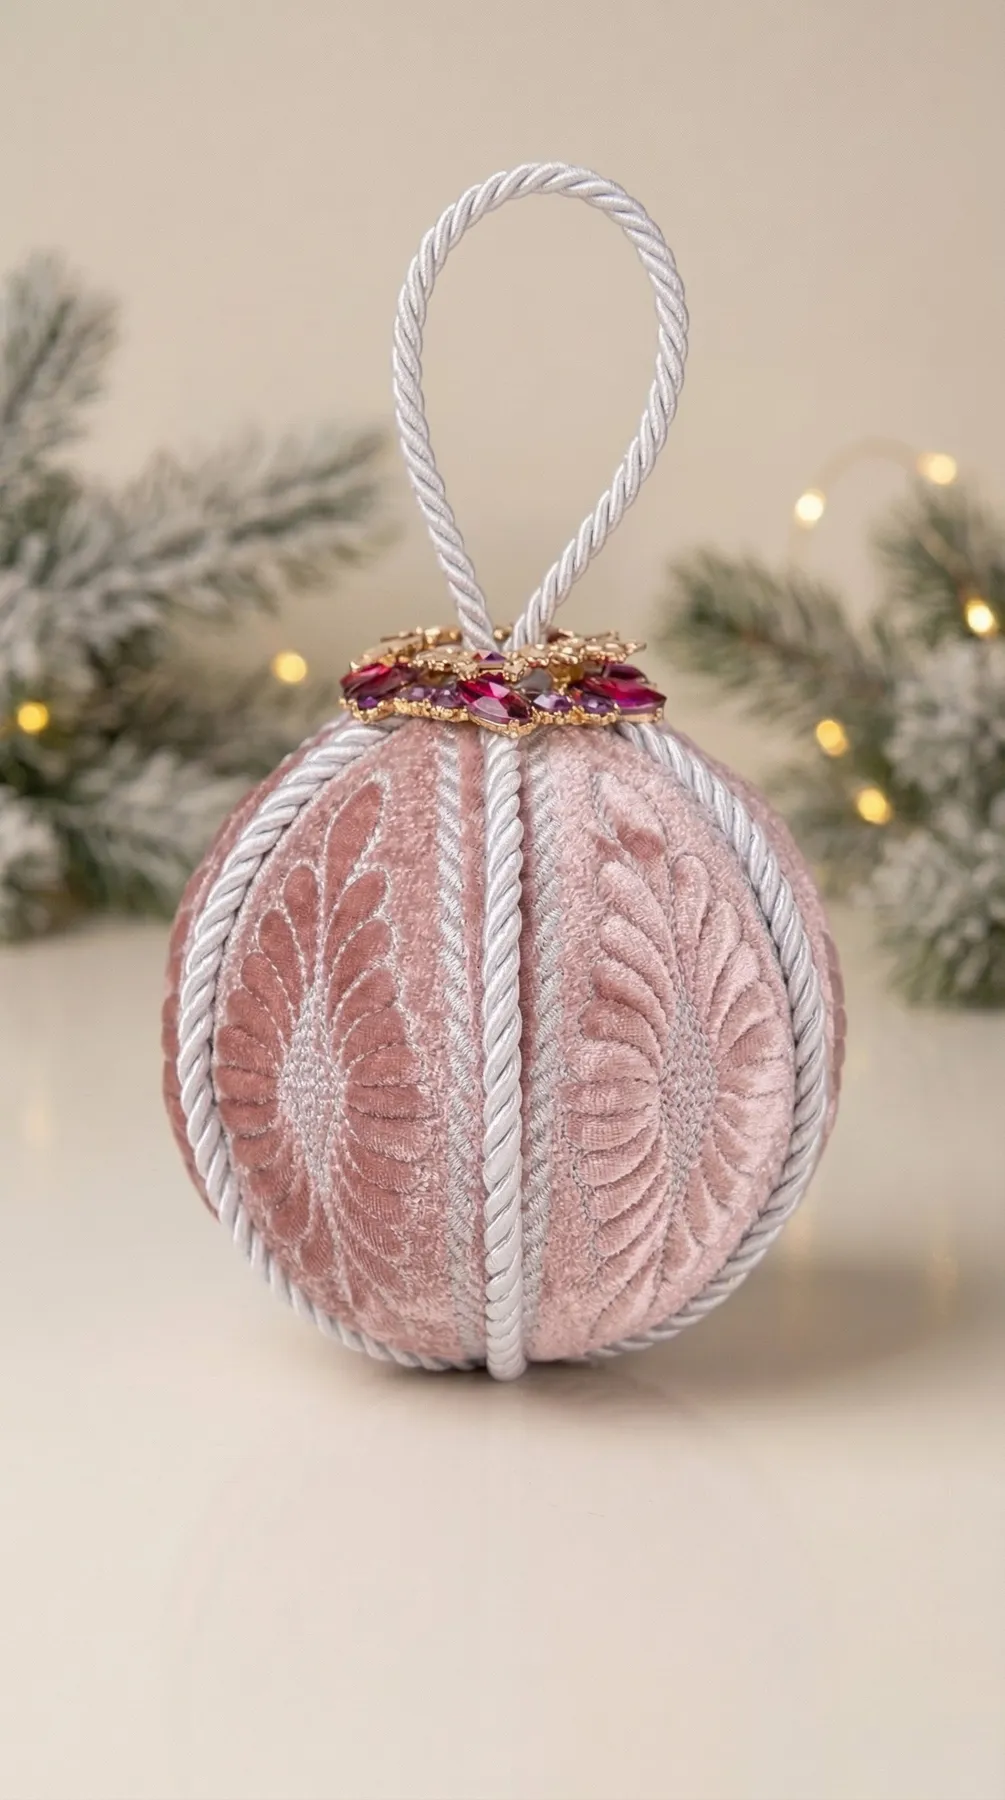
Budget alternative: a velvet blazer from Goodwill gives you four ornaments’ worth of fabric for $6. Pair it with rhinestone buttons from a craft store and you’re at roughly $18 for the batch — the cording is the only supply worth paying full price for.
Cut velvet with the nap running down, never against it, or the seams catch light and the whole ornament looks patchy. Glue the silver cording on before the jeweled top so the cord ends hide underneath the metal. And apply clear gel glue with a toothpick — velvet takes a fingerprint-sized smear of white glue and never lets it go.
19. Matte Pink Hearts with Satin Bows and Rhinestone Centers
- Wear nitrile gloves — matte finishes hold every fingerprint you leave behind.
- Weigh your finished ornament; anything over 2 ounces needs a wire hook, not twine.
- Test the branch first — a 3-inch heart wants a stem that springs back when you tap it.
- Buy 20% more rhinestones than you need; the small ones always fly off the tweezers.
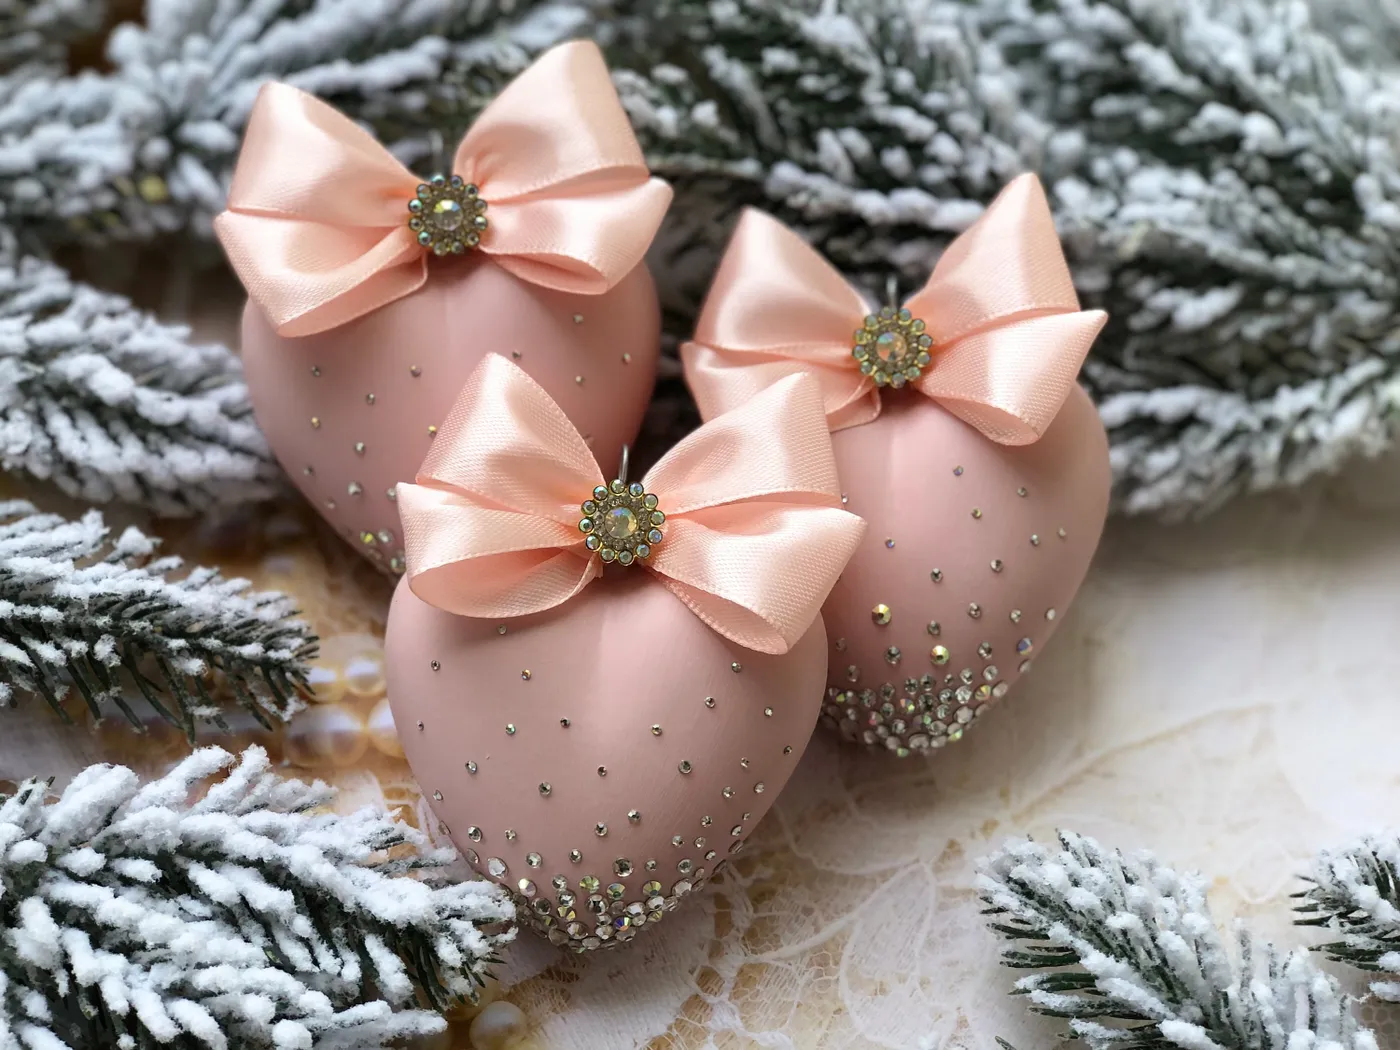
70% matte blush pink, 20% frost white from the branches and the lace, 10% iridescent sparkle. The matte finish is what saves this from looking like a Valentine’s display — saturation stays low, and the rhinestones are the only thing that shines. Swap blush for dove gray or pale lavender and the same math gives you a completely different mood without touching the layout.
20. Gold, Glitter Green, and One Big Candy Cane
A 12-pack of assorted gold and green spheres runs $8–12 at Walmart or Target right after Thanksgiving. Dollar Tree sells oversized candy cane ornaments two for $1.25, and the pinecone is free if you take a walk. Total for the look: under $20. Compare with Idea #3, which buys the same nostalgia at vintage-shop prices — both work, it just depends on whether you want the hunt or the shortcut.
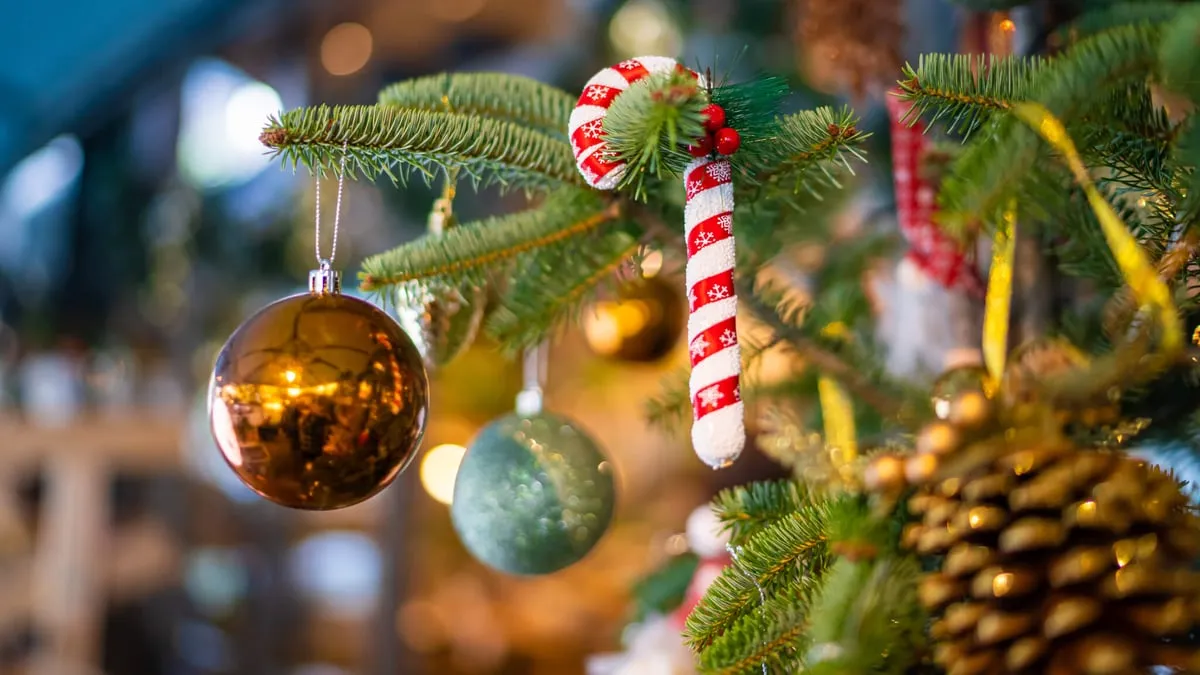
Glitter sheds. It will end up on your hands, your rug, and somehow in your coffee for three weeks. Spray glittered ornaments with a matte acrylic sealer in a well-ventilated garage and let them dry overnight, and you’ll cut the fallout by about 80%. When you clean up, use a vacuum brush attachment rather than a beater bar, or you’ll grind the sparkle into the carpet fibers for good.
21. Hand-Painted Winter Scenes on Round Glass Ornaments
Every ornament is a different subject — a cuckoo clock, a snowy cabin, a bird — but the palette never changes: white, light blue, a touch of red and green, a hint of gold. That’s textbook variety within constraint. The twig star at the center of the arrangement gives your eye a place to land, which is what keeps a collection of small detailed objects from turning into visual static.
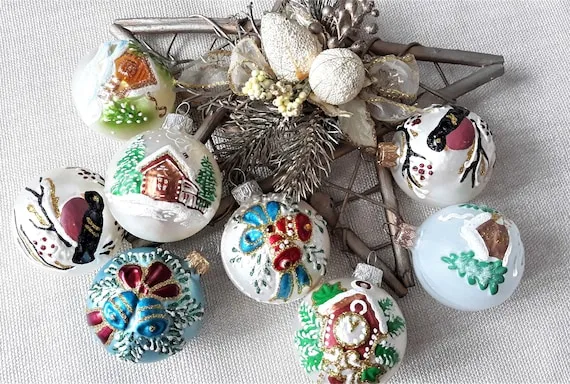
- Wipe the glass with rubbing alcohol and let it dry completely — paint won’t grip a fingerprint.
- Give it two thin coats of white enamel, letting each dry an hour. One thick coat will streak.
- Sketch the scene lightly in pencil, then paint the largest shapes first with a 3/4-inch flat brush.
- Add fine details with a 10/0 liner brush, and sprinkle glitter while the paint is still tacky.
About 25–40 minutes per ornament, and $3–5 each in supplies once you own the brushes.
22. A Storybook Set of Glass Ornaments with Gold Loops
Figural glass ornaments are heavier and wider than spheres, so give each one 10–12 inches of branch and hang them on inner stems where they won’t knock against each other. A collection like this really wants a tree seven feet or taller. On a six-footer, pick four or five favorites and rotate the rest — Idea #4 is a look that plays better on a smaller tree.
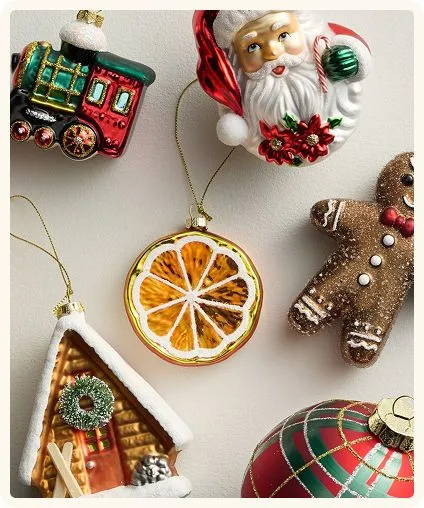
Hand-painted glass and painted-on glitter need dry care only. A wet cloth or glass cleaner lifts the paint and dulls the gold loop within a season. Dust each figure with a dry microfiber cloth every January, then pack them in tissue inside a divided ornament bin — about $15 at any big-box store and worth every penny, since a single shatter means a permanently broken set.
23. Felt Mice in Tiny Sweaters and on Skis
The costumes. A felt mouse body takes fifteen minutes and looks like a gray blob. The red snowflake sweater and the little striped ski outfit are what make people pull it off the branch and turn it over in their hands. If you’re short on time, make three mice with three completely different outfits rather than ten identical ones — a collection reads better as characters than as a crowd.
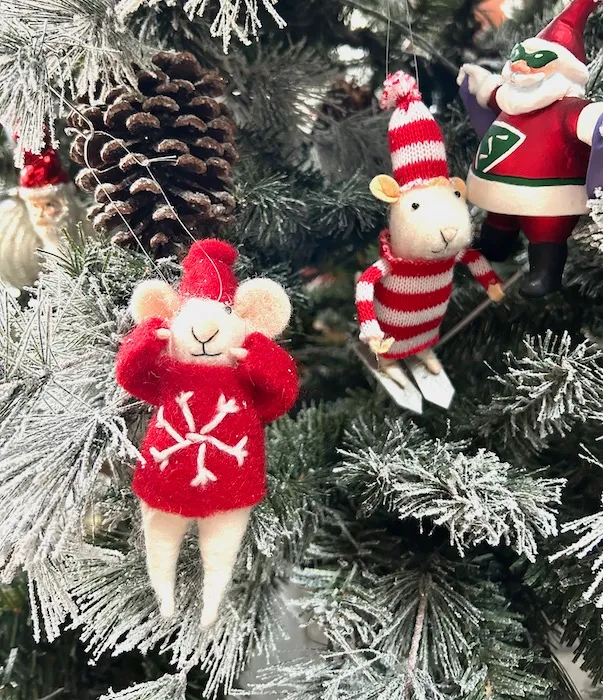
Felt sheets run about $1.50 for four at Michaels, embroidery floss is a dollar a skein, and a $4 bag of poly-fill will stuff an entire colony. Twenty-five ornaments comes in around $22, which is under a dollar each. Save the money for the details: a pair of tiny skis cut from a popsicle stick, and a scrap of red-and-white striped fabric from a thrifted sock.
Your Tree Should Look Like You Made It
Start with one ornament tonight — a dried orange slice, a white plaster star, whatever’s closest to your kitchen table — and by next December you’ll have a collection no store can sell you. Make the mess, keep the extras in a shoebox, and let the tree get a little more yours every year.
📌 Pin this guide to your Christmas board now, so it’s waiting for you when the glue gun comes out.