You know that feeling. You’ve scrolled through hundreds of outdoor project ideas on Pinterest, saving pin after pin, but you’re still not sure where to start. It all feels either too complicated or not quite right for your space. We get it. That’s why we did the heavy lifting, filtering through the noise to find what truly works for 2026. This isn’t just another list; it’s a curated collection of real-world inspiration.
Inside, you’ll find 28 brilliant DIY outdoor projects, ranging from rustic pallet furniture to sleek, modern planters. We focused on ideas that blend style with function, proving you don’t need a massive budget to create an incredible backyard escape. And stay until the end — we break down the most common mistakes that can ruin these looks. 📌 Save this to Pinterest for later — you’ll want to revisit these ideas.
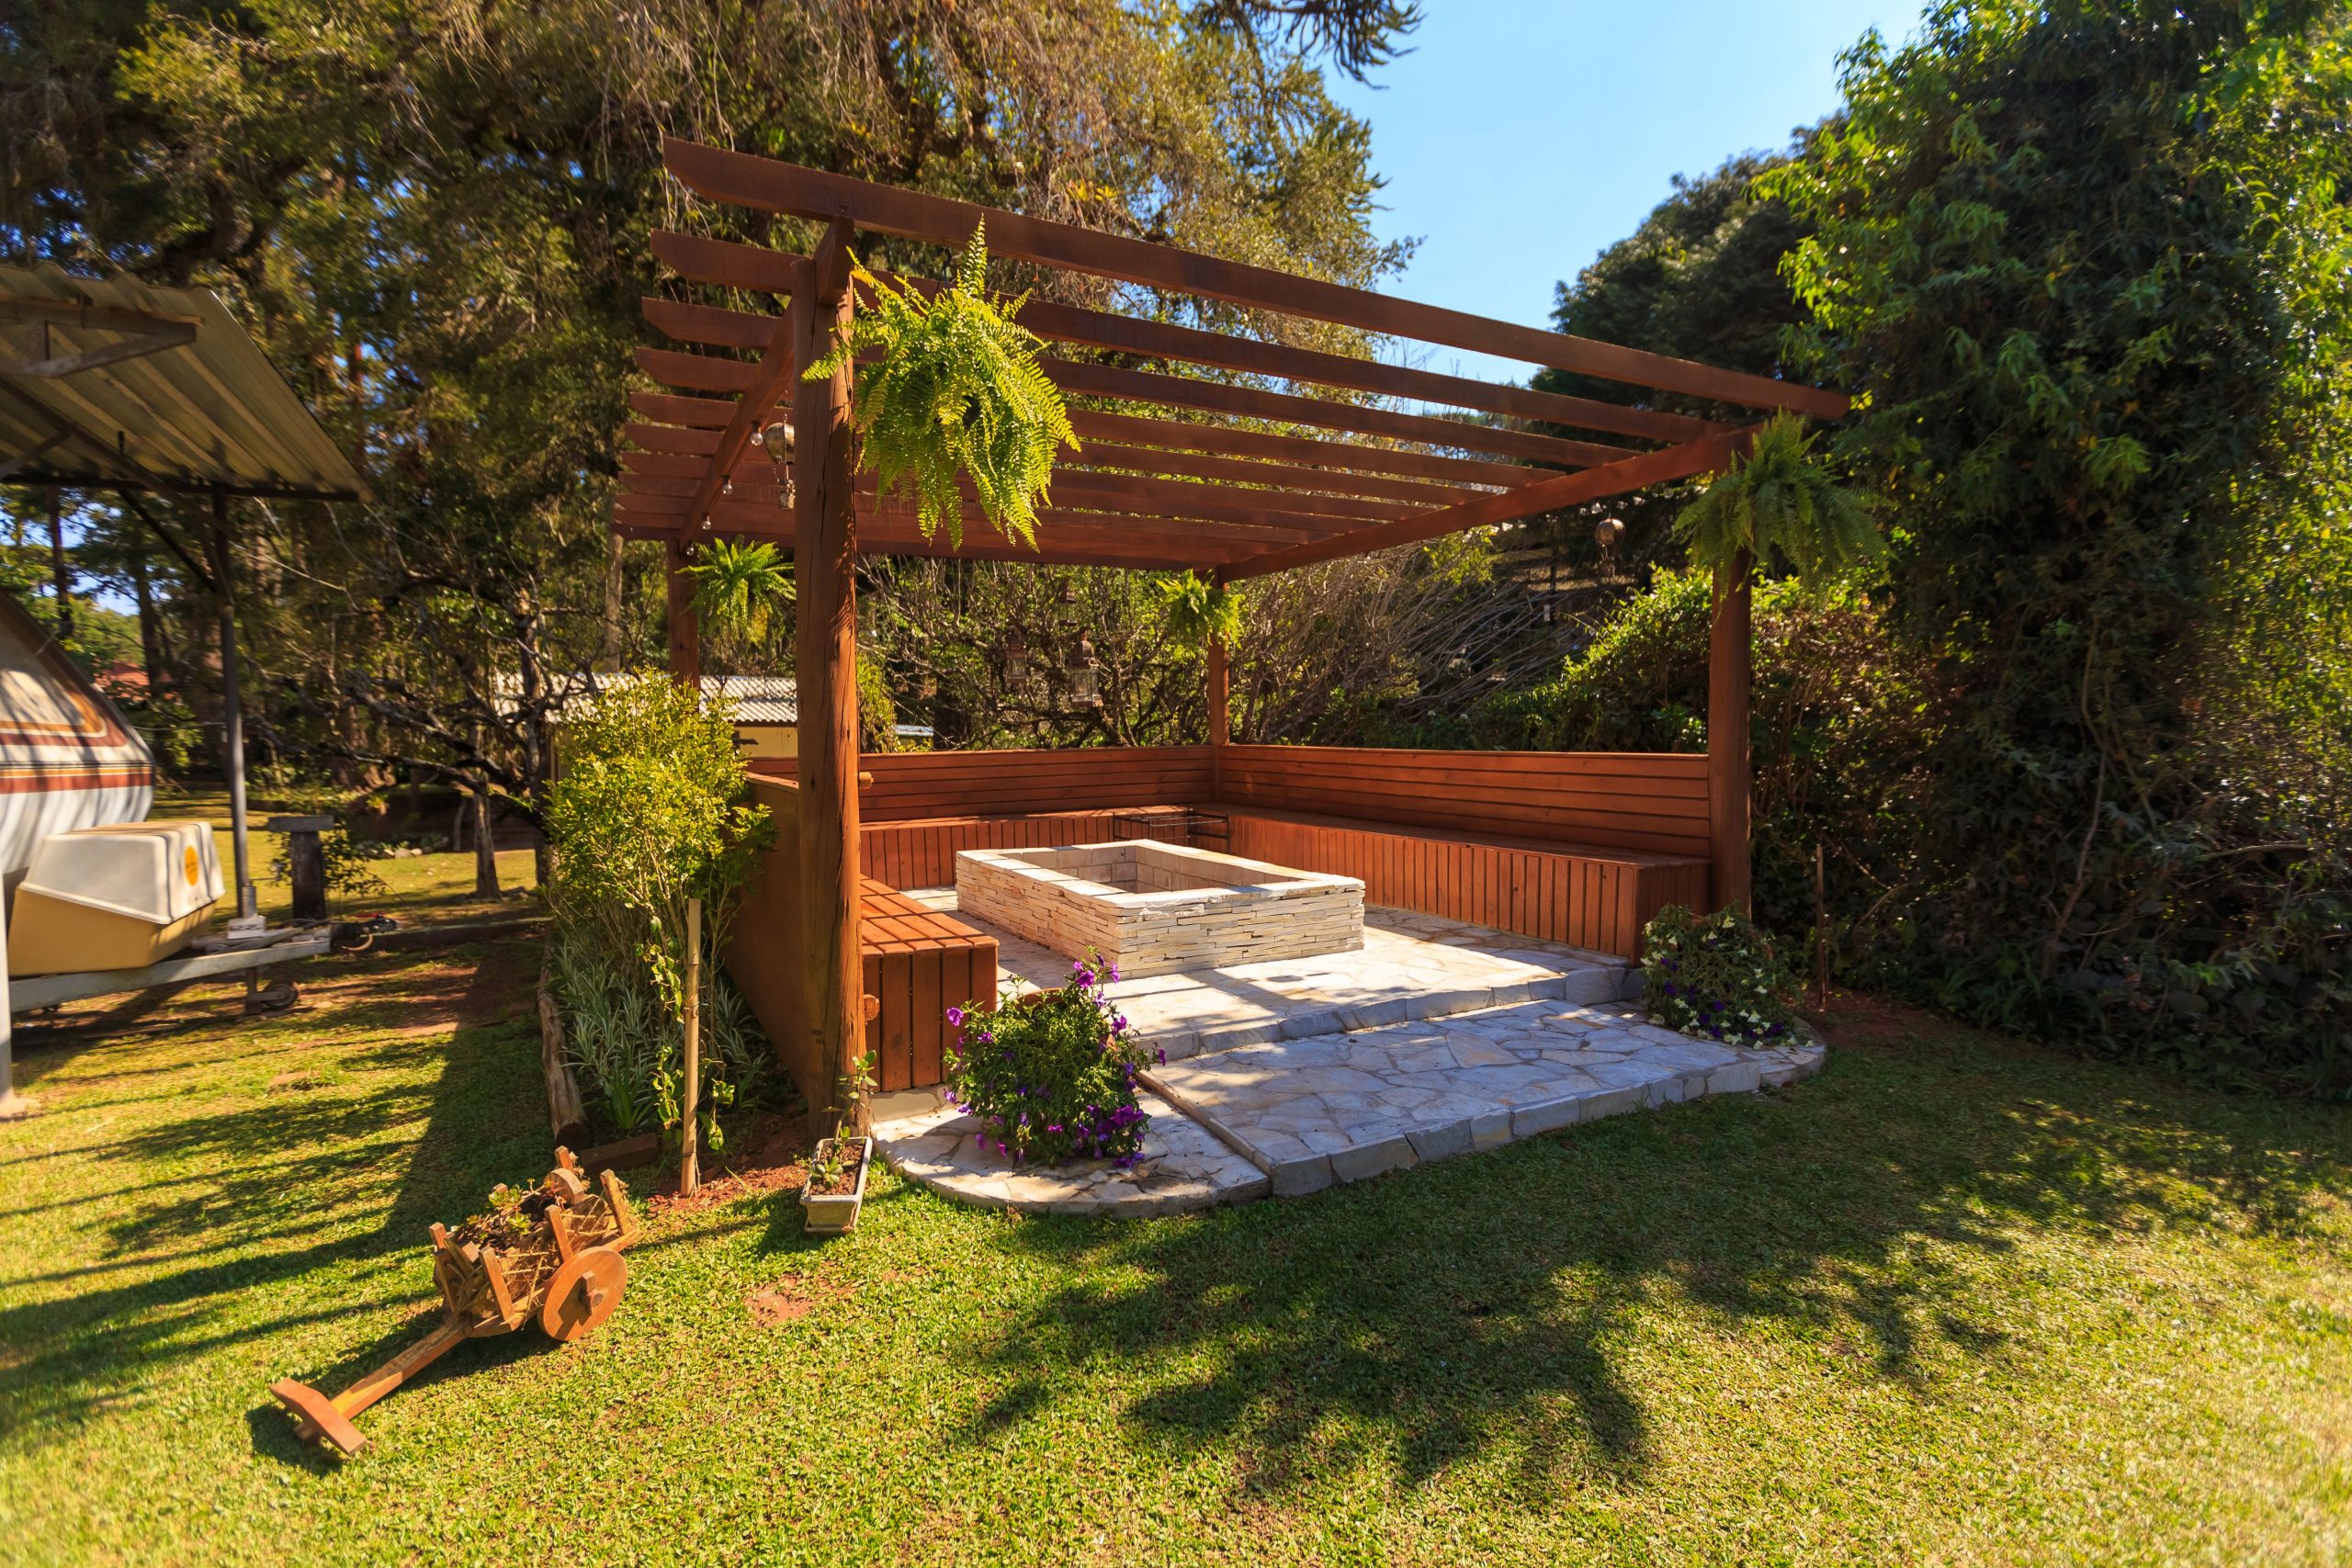
1. Build a Rustic Pergola with a U-Shaped Bench and Stone Fire Pit
This design creates a complete outdoor room by brilliantly integrating three key elements: shelter, seating, and a focal point. The pergola defines the space from above, the built-in bench creates a cozy, communal boundary, and the fire pit provides a clear center of gravity. It feels intentional and cohesive, not like a random collection of furniture. The mix of warm wood and cool stone is a classic pairing that provides textural contrast and a timeless, natural appeal that settles beautifully into the surrounding greenery.
💡 Designer Tip
The magic here is in the scale and proportion. The U-shaped bench isn’t just seating; it’s an architectural element that hugs the fire pit, making the conversation circle feel intimate and intentional. By building the seating directly into the pergola’s structure, the design eliminates the clutter of separate chairs and creates a unified, flowing space. The overhead beams of the pergola mirror the lines of the bench below, creating a satisfying sense of repetition and order that feels both grand and grounding.
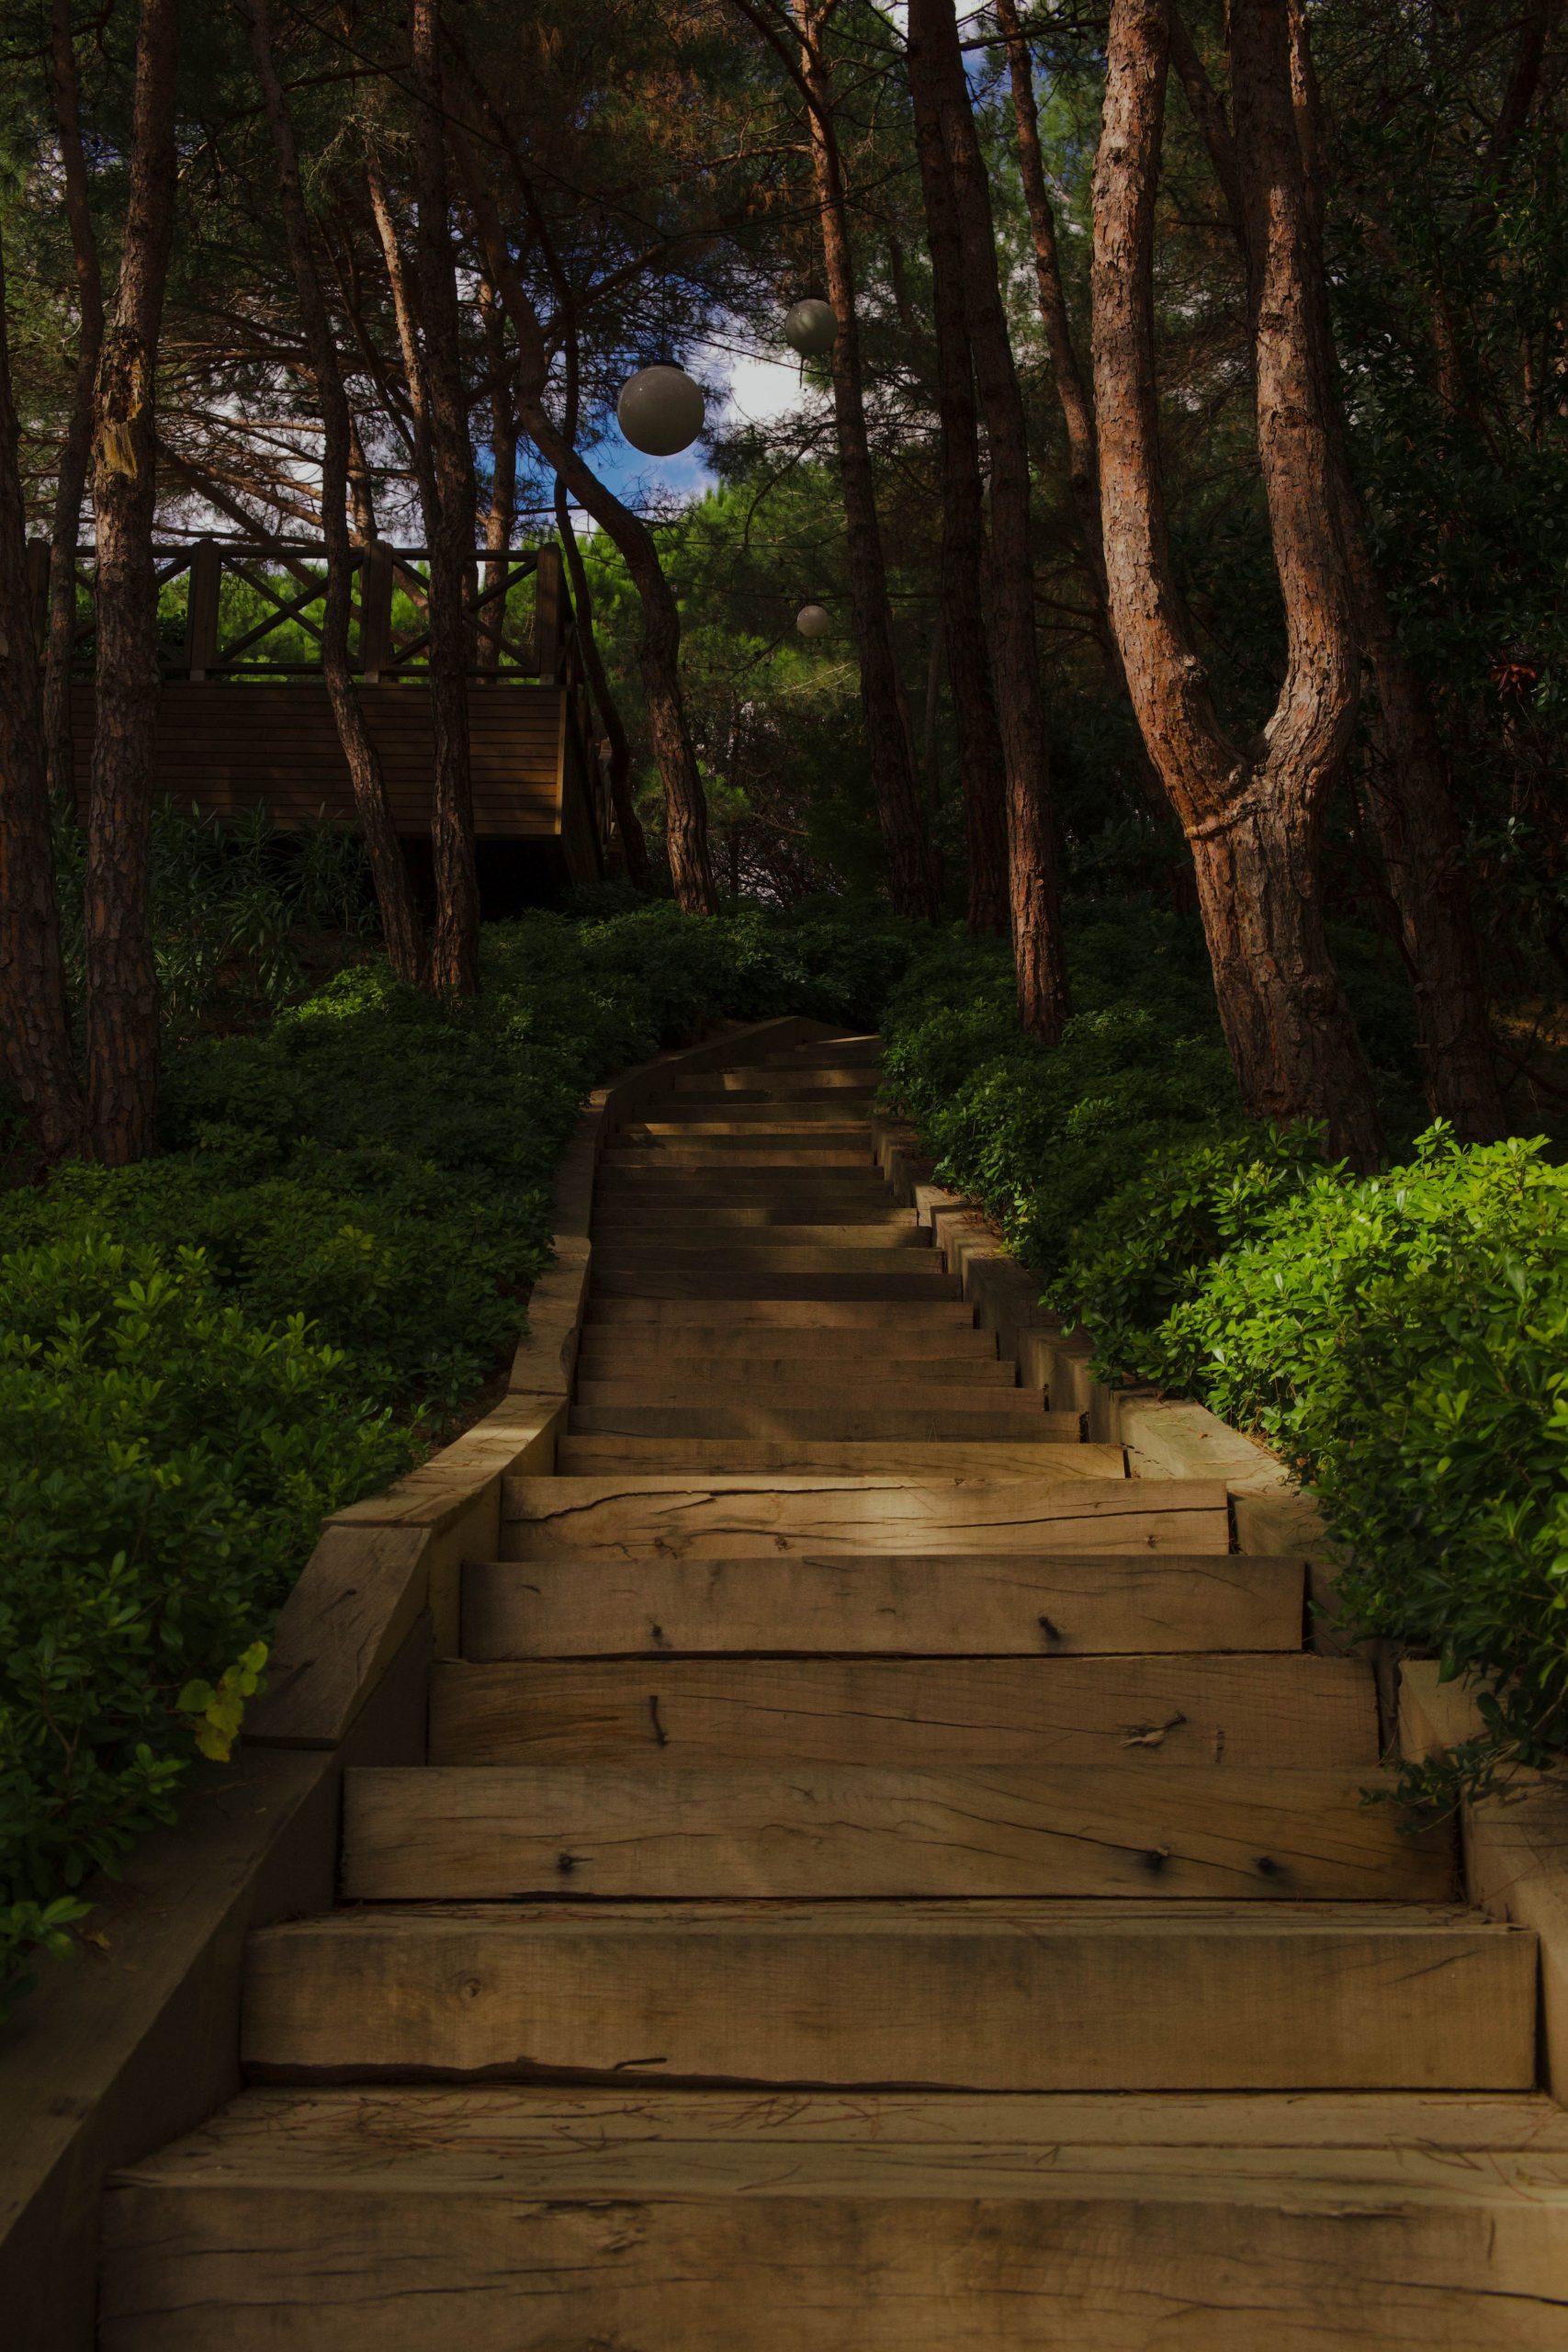
2. Craft an Enchanting Forest Staircase with Hanging Sphere Lights
To recreate this magical woodland path, focus on the lighting placement. Don’t just hang the lights randomly. Instead, use them to highlight key moments along the journey: a curve in the stairs, a particularly beautiful tree, or the entrance to the landing platform. For a project like this, use outdoor-rated globe pendants with a warm color temperature (around 2700K) to create that soft, inviting glow. Plan your wiring before you start, burying outdoor-rated cables in a shallow trench along the staircase for a clean, professional look.
💰 Budget Breakdown
A project of this scale is a significant undertaking that requires careful planning, especially on a slope. The ground must be properly graded and excavated to create stable, level footings for each step to prevent erosion and shifting. Using thick, rough-hewn timbers looks incredible, but they are heavy and difficult to maneuver into place. You’ll absolutely need a partner (or two) to help with the lifting and placement. Also, consider the long-term maintenance: natural wood in a damp, forested area will require regular sealing to prevent rot and slipperiness.
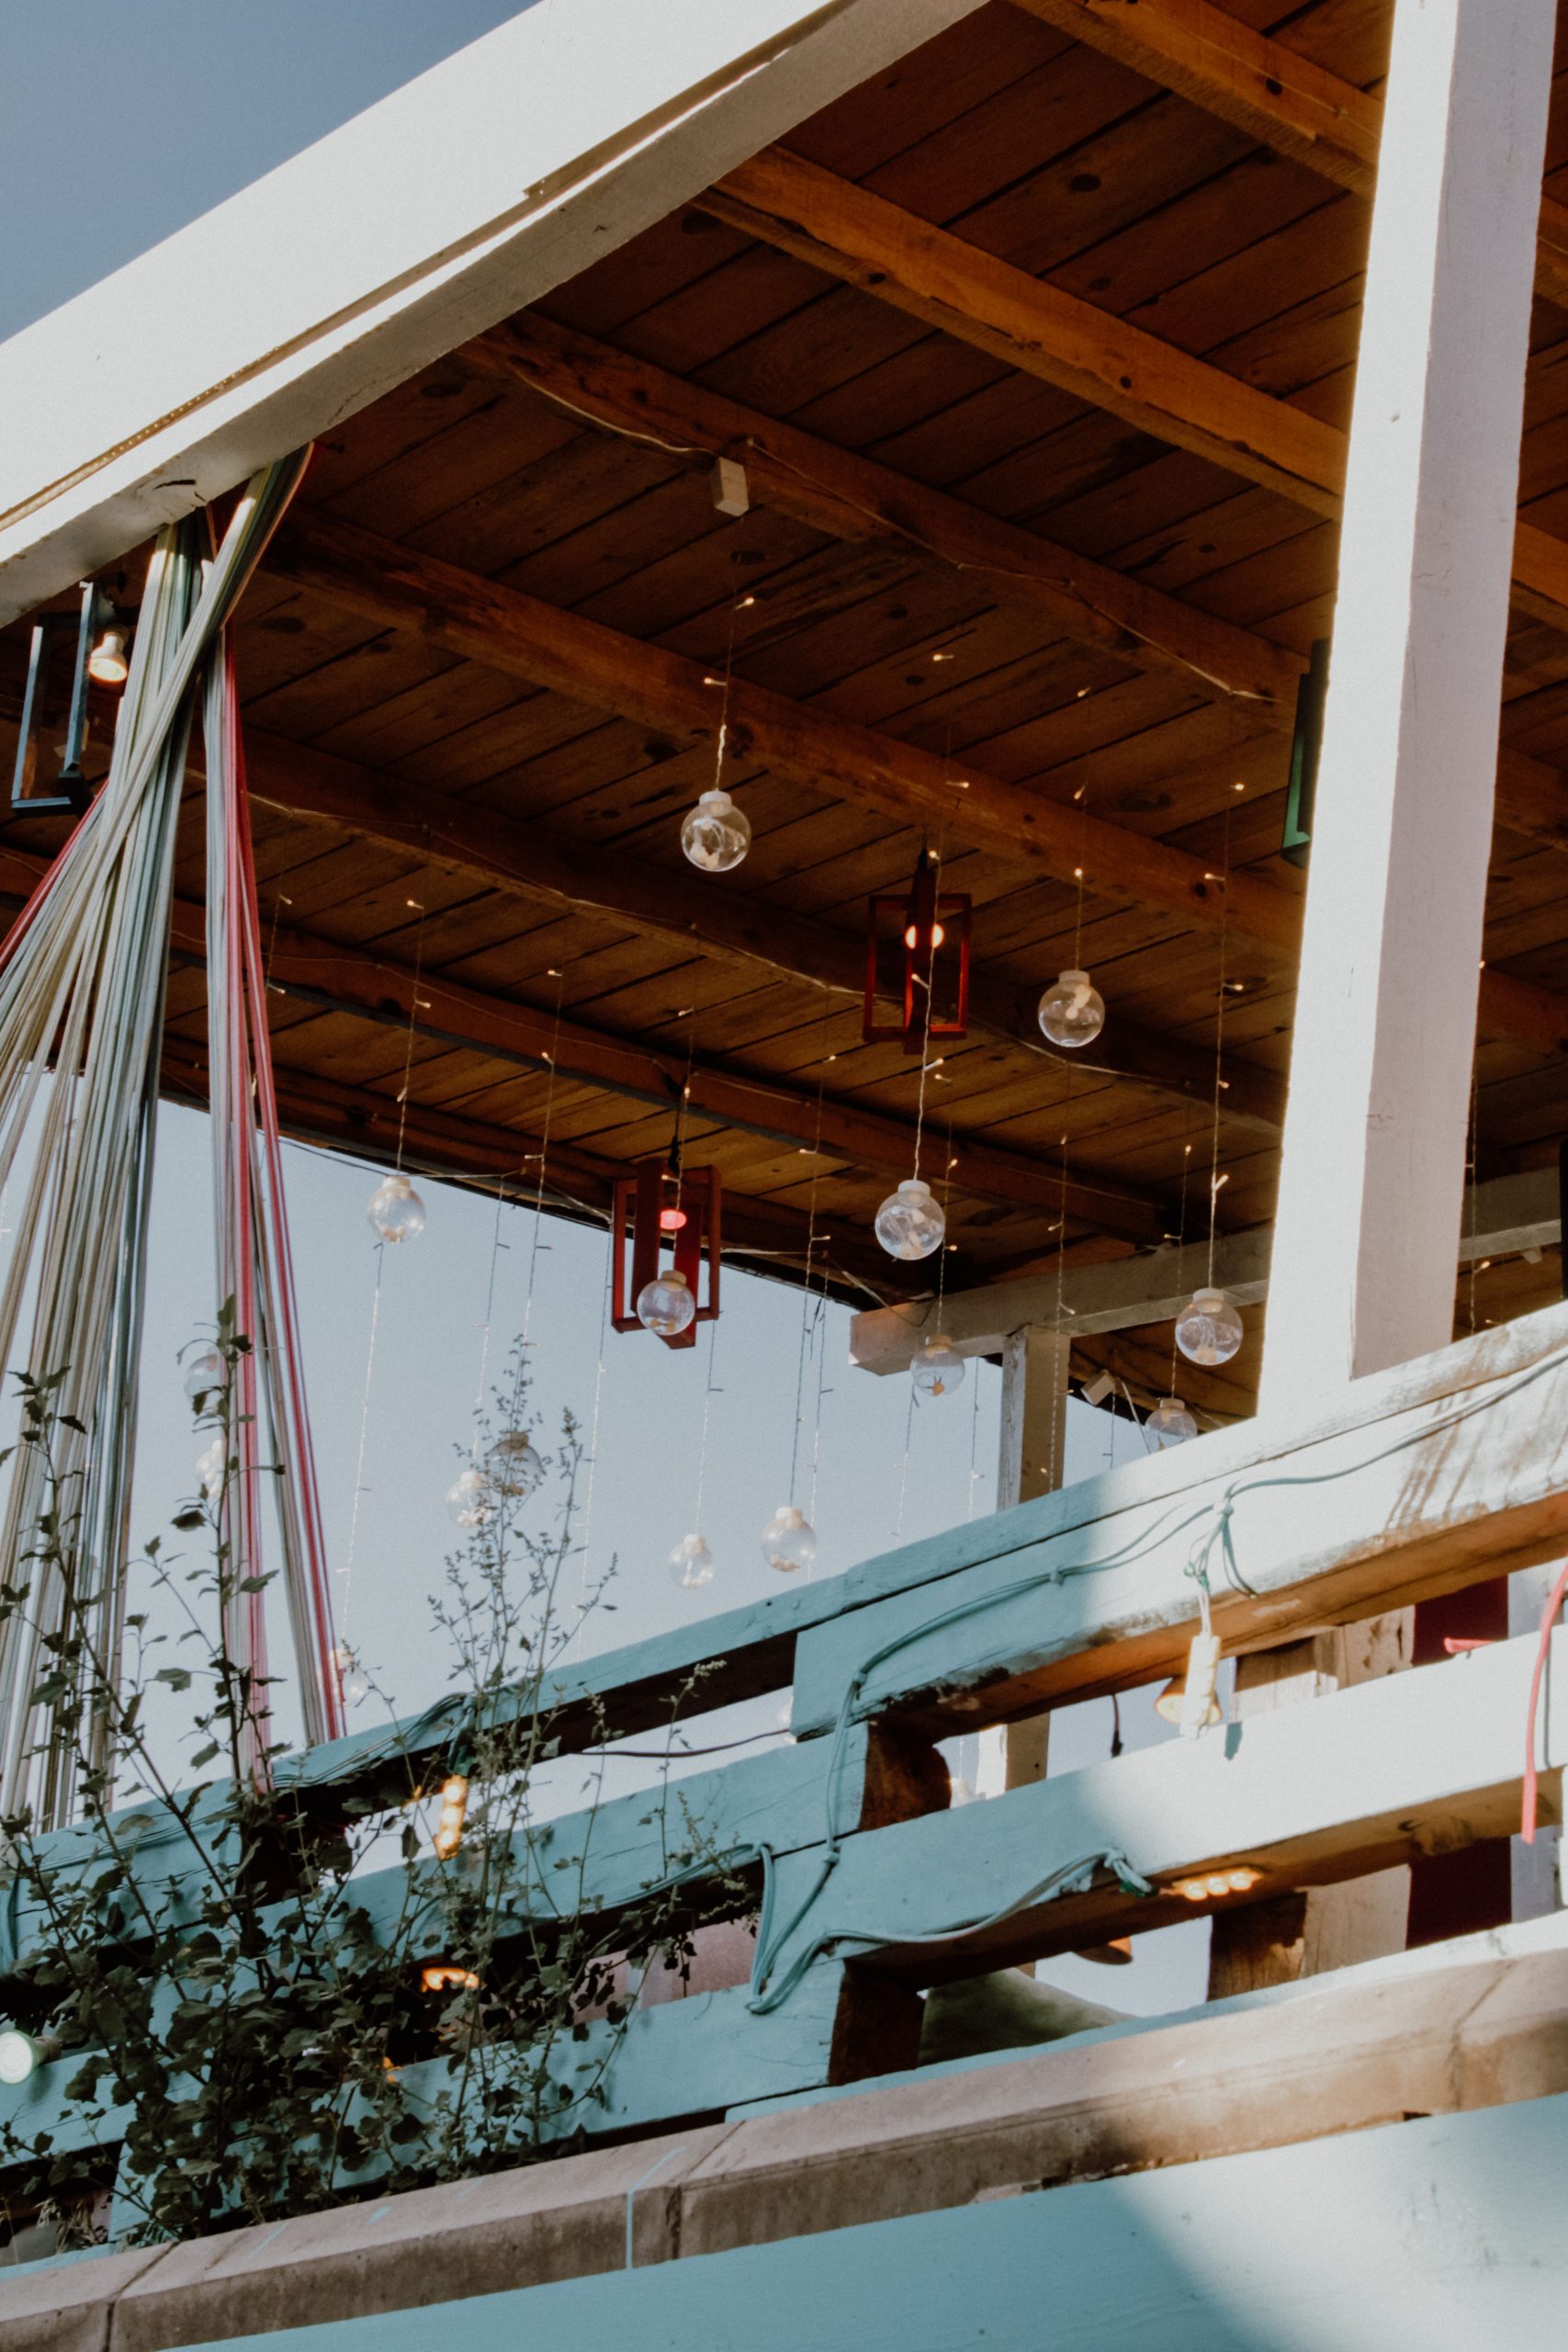
3. Layer String Lights and Red Lanterns Under a Wood-Planked Ceiling
The formula for this festive atmosphere is all about layering. Think of it as 60% base lighting + 30% feature lighting + 10% color accent. The string lights with their tiny bulbs are your base, providing an all-over warm glow. The larger globe lights are your feature, adding visual interest and a different scale of light. Finally, the red wooden lanterns are the 10% accent, injecting a pop of color and personality. You could swap the red for turquoise or yellow and the globes for star-shaped lights, and the formula would still hold perfectly.
⭐ The One Thing
The single element that makes this entire look work is the multitude of string lights. Without them, you’d just have a few decorative lanterns hanging from a ceiling. The dense web of tiny, warm bulbs is what creates the magical, immersive feeling, almost like being under a starry sky. It’s this foundational layer of light that provides the ambiance and makes the entire space feel like a special destination. Everything else—the globes, the lanterns—is just dressing, but the string lights are the soul of the design.
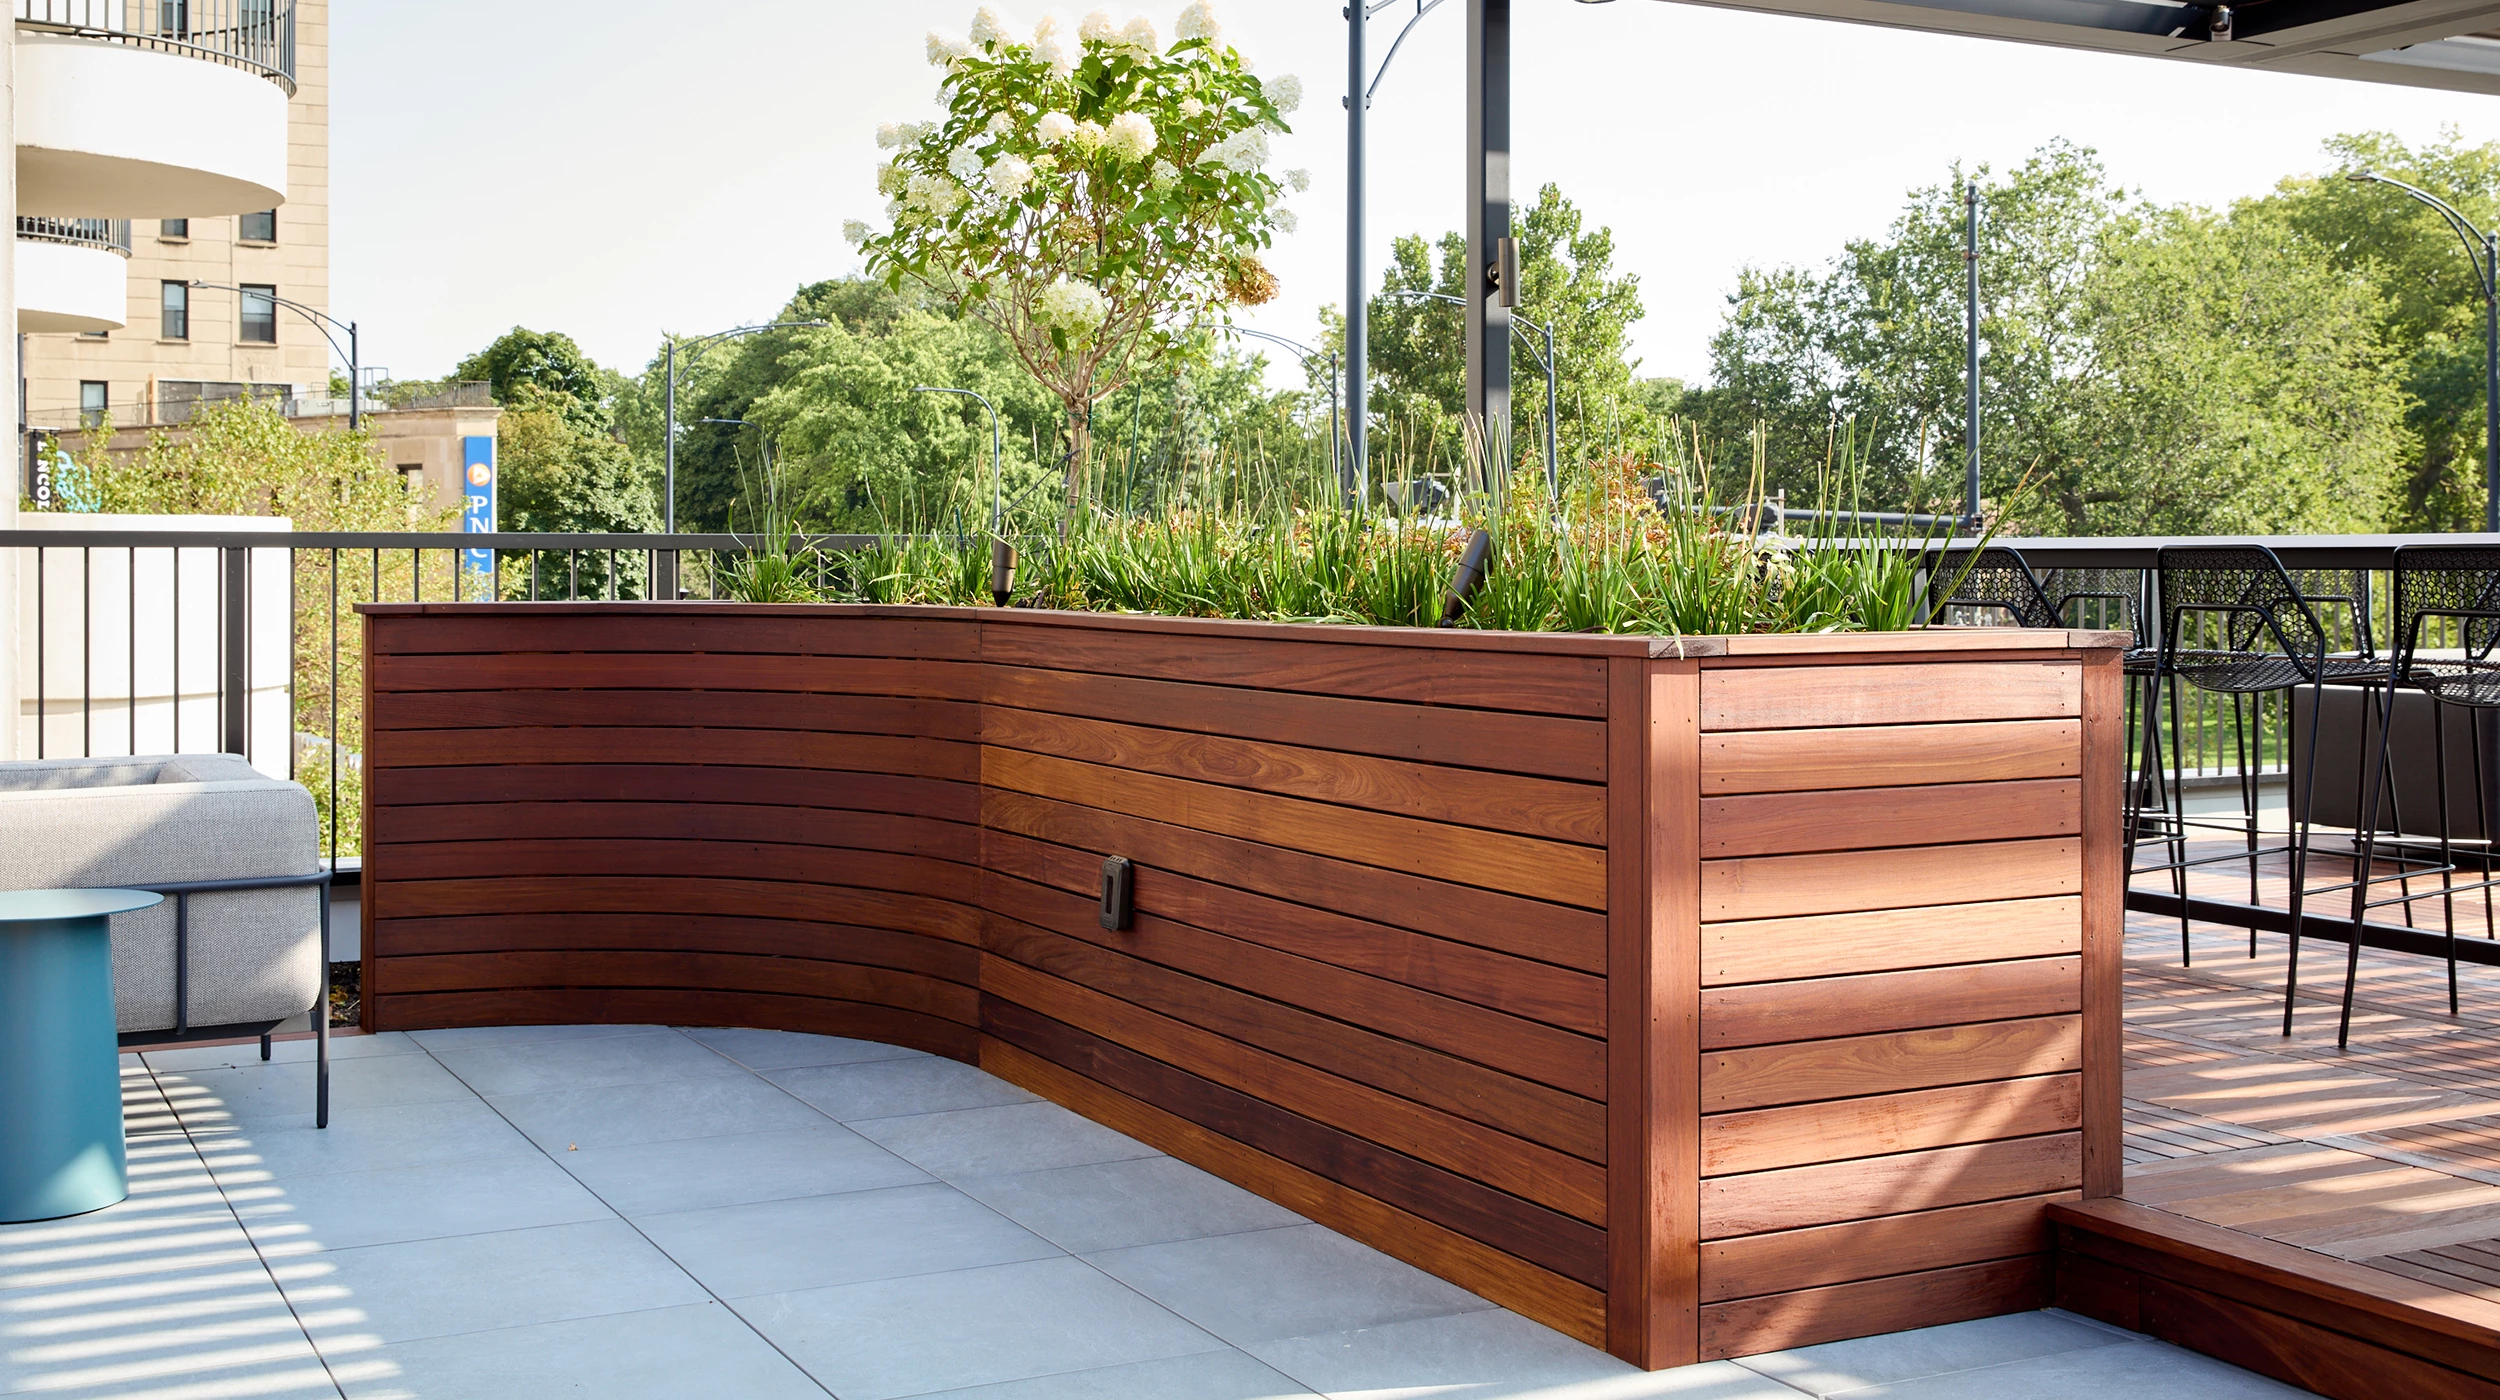
4. Install a Modern Curved Planter with a Built-In Slatted Wood Bench
While stunning, a slatted wood planter wall requires specific upkeep to stay looking sharp. The wood, especially a warm-toned variety, will need to be sealed every 1-2 years to prevent it from graying and weathering, particularly in a climate with harsh sun or heavy rain. The gaps between the slats can also trap dirt, pollen, and leaves, so a seasonal cleaning with a soft brush or a low-pressure hose is a must. Lastly, ensure the planter has excellent drainage from the start, as standing water is the number one enemy of any wooden structure.
✅ Before You Start
This design succeeds because it masterfully blends form and function. The planter isn’t just a box for plants; it’s a dynamic, curving wall that guides the eye and defines the patio area. Integrating the seating directly into the planter wall is a brilliant space-saving move that feels custom and high-end. This creates a single, cohesive piece of outdoor architecture rather than a collection of separate items. The contrast between the warm, organic lines of the wood and the clean, geometric grid of the gray pavers is a textbook example of modern design.
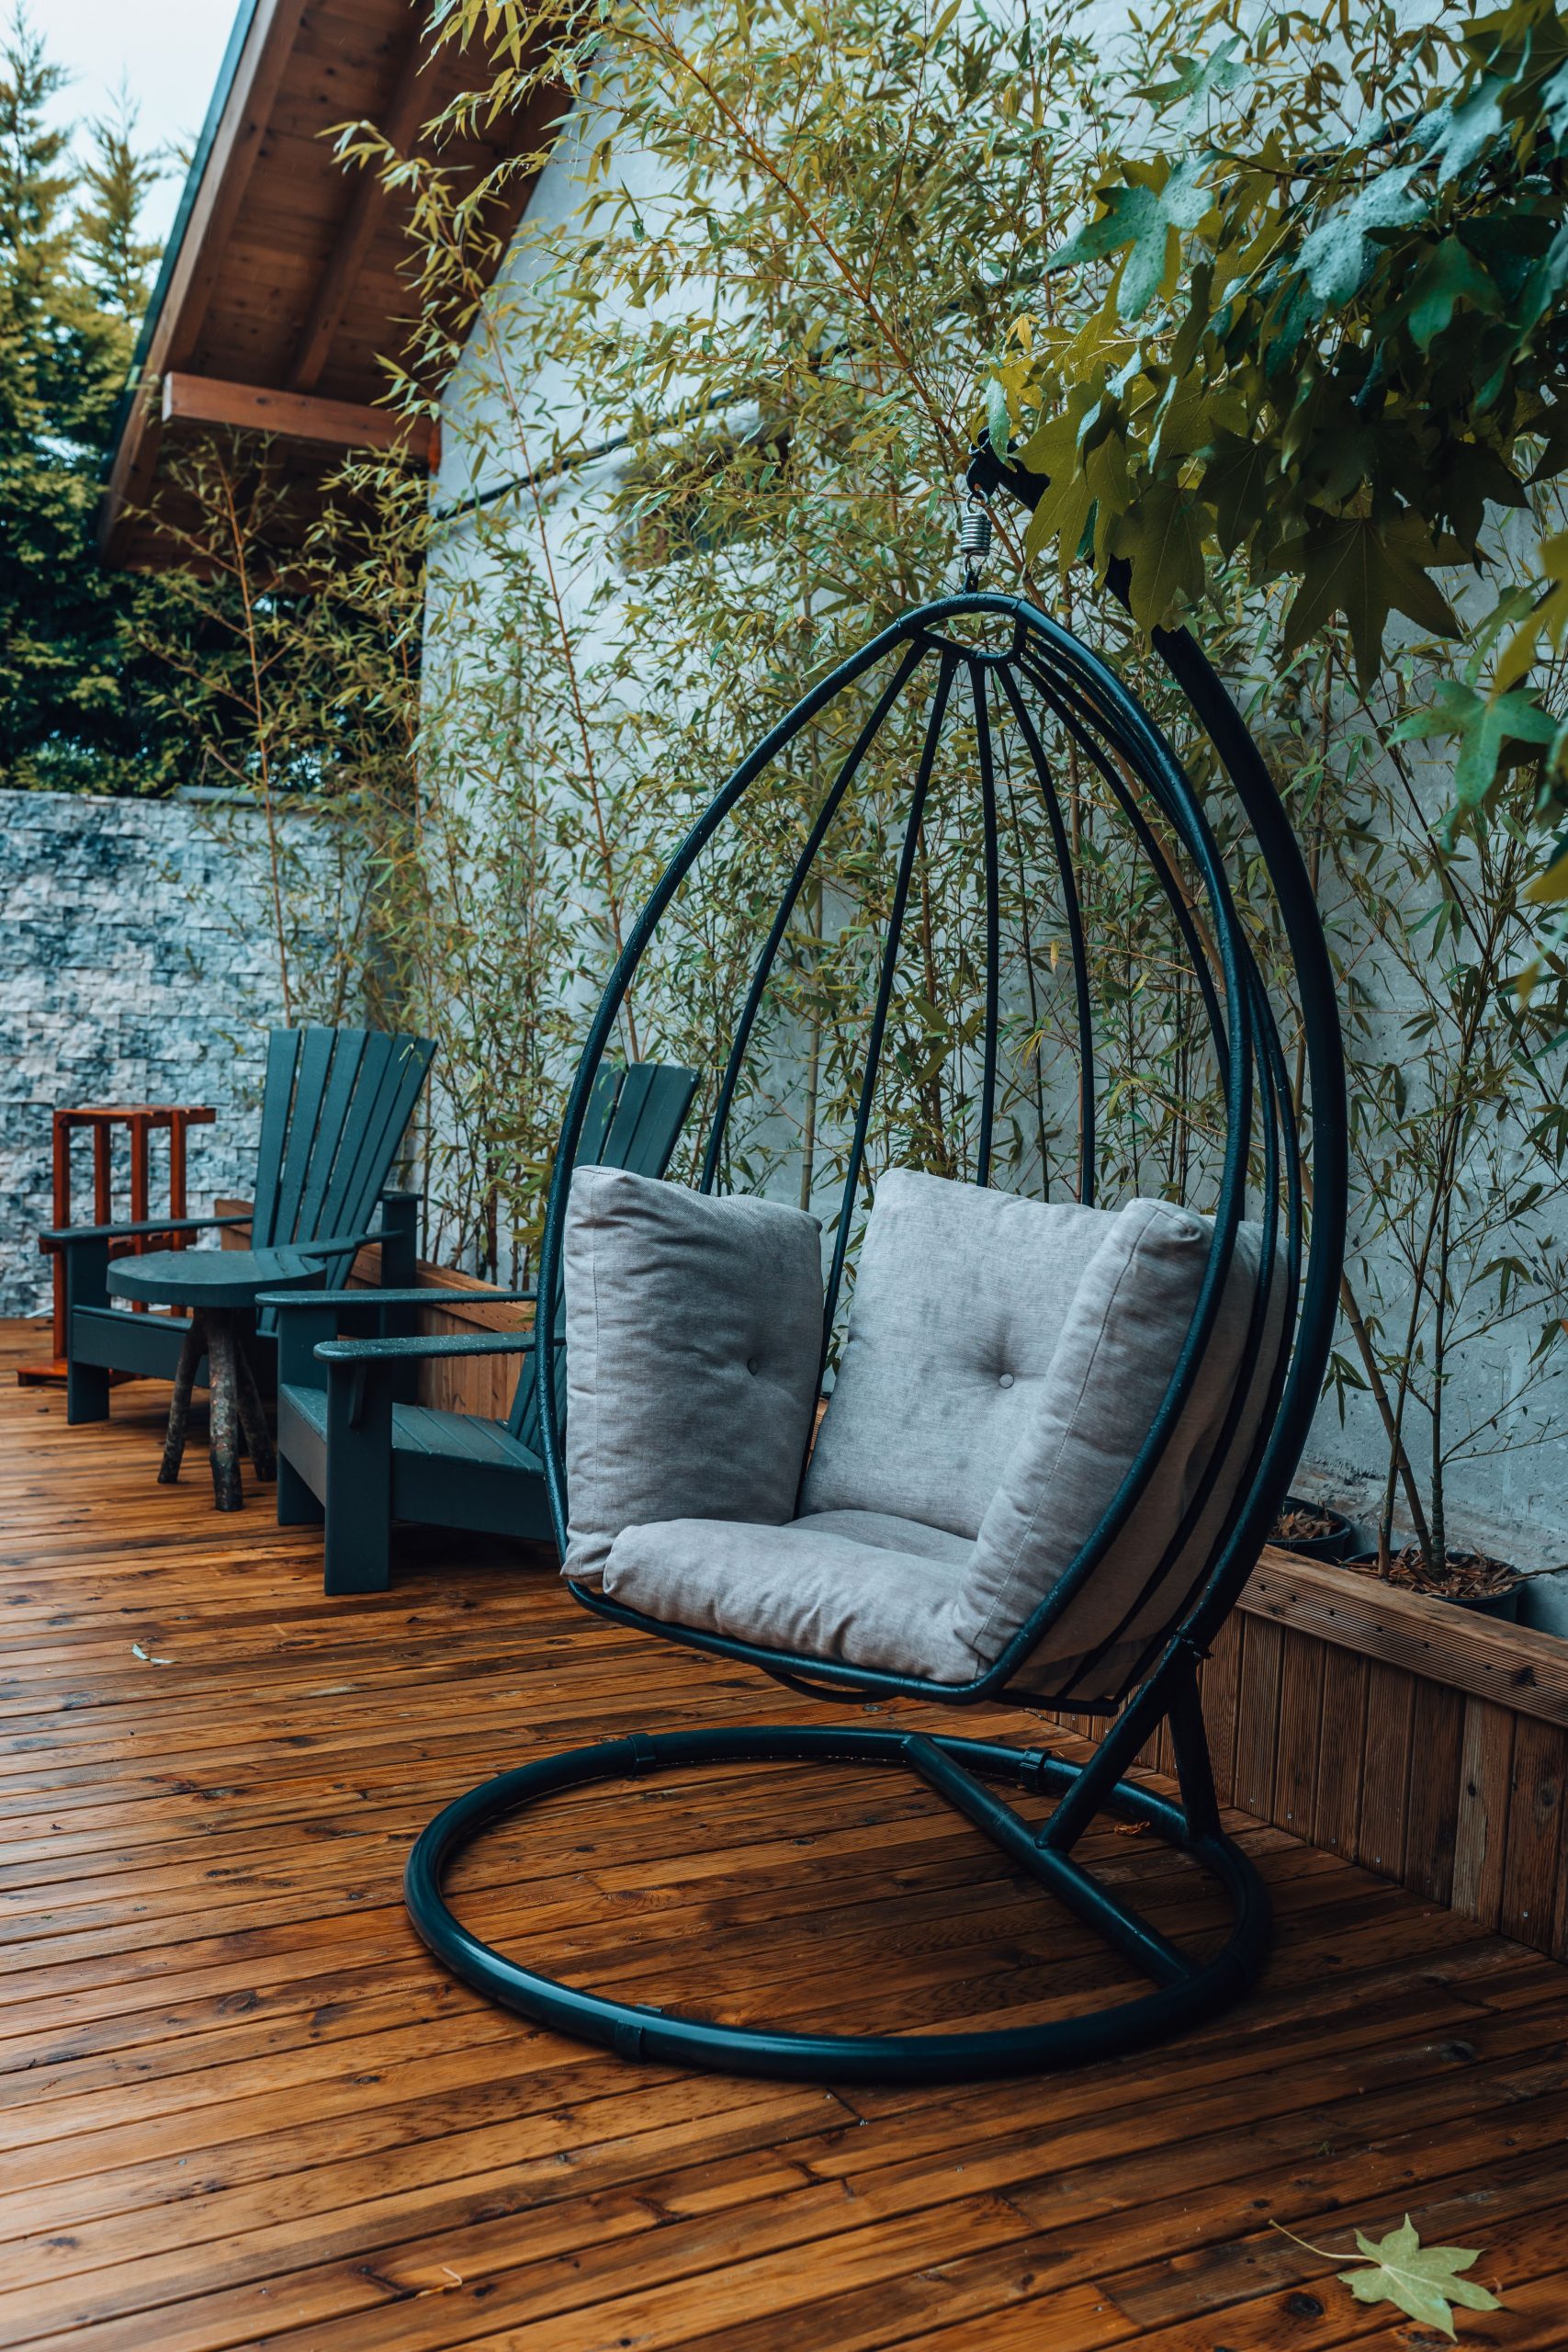
5. Create a Cozy Deck Retreat with a Hanging Egg Chair and Bamboo
You don’t need a designer budget to get this relaxed, sanctuary vibe. Check big-box stores like Target or Walmart for their summer collections; they often have hanging egg chairs for $300-$500. For the Adirondack chairs, a can of dark green exterior paint can transform a basic, unfinished set from a hardware store for under $100. Instead of a solid log, look for a ceramic or resin garden stool from a store like HomeGoods or At Home for around $40—it will provide the same function with a similar organic shape.
⚠️ Real Talk
The idea of a personal backyard retreat has exploded in popularity, driven by a collective desire for a private space to decompress. This isn’t about entertaining big crowds; it’s about creating a ‘corner for one’ (or two). The hanging egg chair is the perfect symbol of this trend—it’s a self-contained pod of comfort. Paired with the lush bamboo, which acts as a natural privacy screen, the entire setup taps into the ‘Japandi’ and ‘Biophilic Design’ movements, which prioritize connecting our living spaces with the calming, grounding elements of nature.
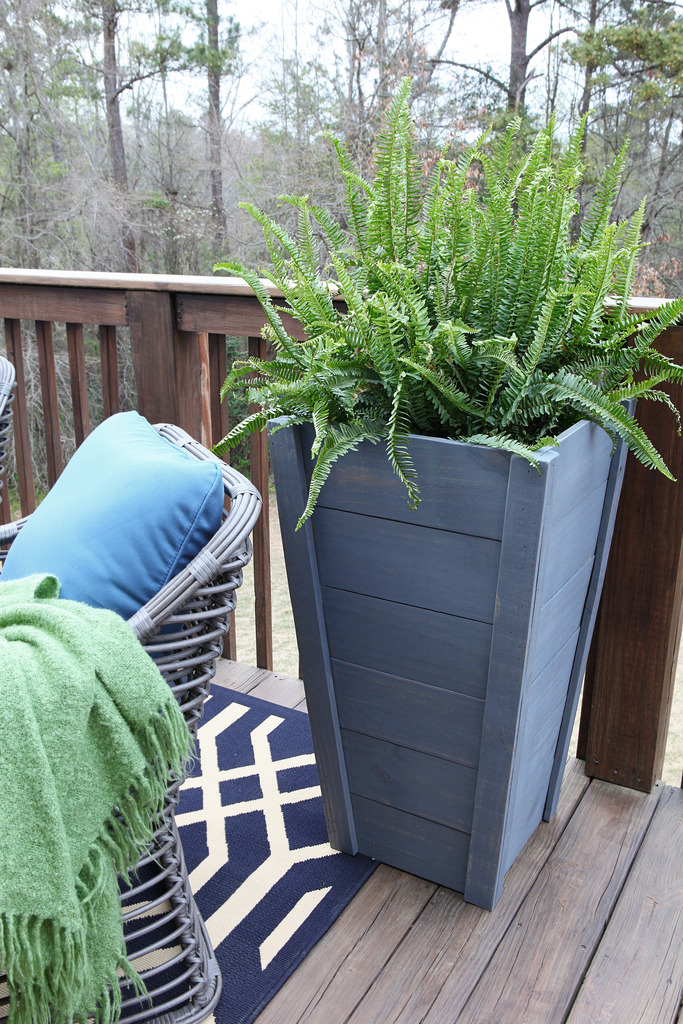
6. Style a Navy Planter and Green Fern on a Weathered Wood Deck
The key to making a simple planter vignette look professionally styled is layering textures and playing with height. Notice how the tall, smooth planter contrasts with the feathery fern, the chunky weave of the wicker chair, and the soft fluff of the throw blanket. When choosing a rug for an outdoor space like this, select a size that allows the front legs of all main furniture pieces to rest on it. This visually anchors the seating area and makes it feel like a cohesive, intentional ‘room’. An 5×7 or 6×9 rug is typically perfect for a small conversation set.
🎯 What Makes It Work
It’s the navy blue planter. If you replaced it with a standard terra cotta pot or a plain wooden box, the whole scene would lose its personality. The deep, moody navy is unexpected for an outdoor planter and elevates the entire palette. It creates a sophisticated anchor point that makes the green of the fern pop and smartly connects to the blue tones in the cushion and rug. It’s a deliberate, stylish choice that signals a confident design eye at work.
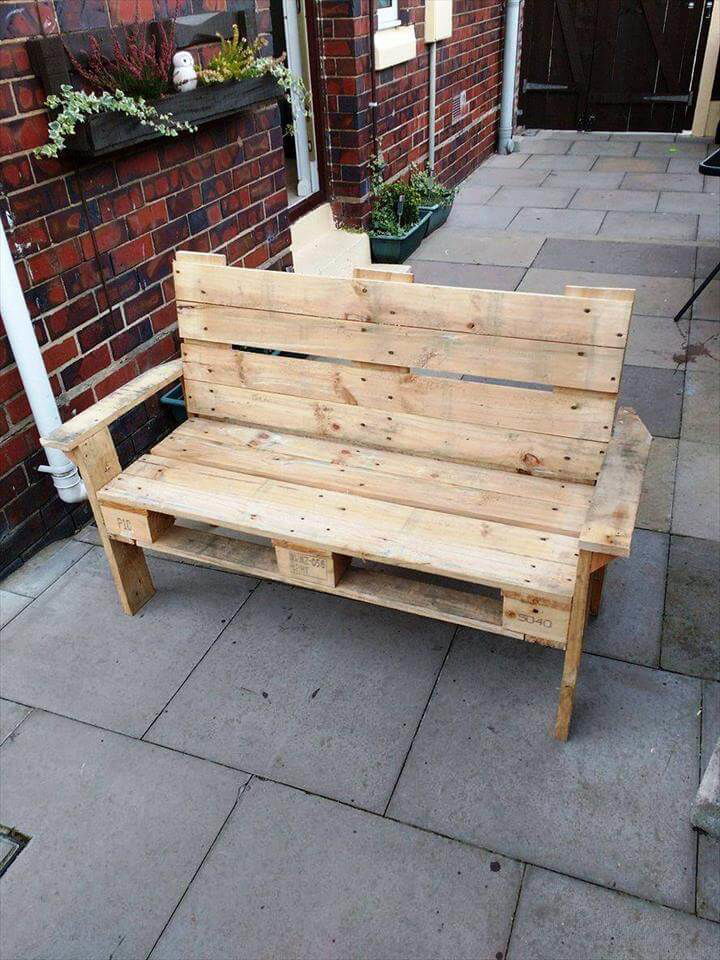
7. Assemble a Simple Pallet Bench for a Paved Patio
This is one of the most straightforward pallet projects you can tackle. Here’s a quick guide to building a similar bench. Time Estimate: 3-4 hours. Material Cost: $20-$50 (depending on if you get pallets for free).
- Source two or three pallets of the same size. Look for ones stamped with “HT,” which means they were heat-treated, not chemically treated.
- Thoroughly scrub the pallets with soap and water and let them dry completely.
- Sand all surfaces, paying special attention to the seat area, to remove splinters and rough patches. Start with a coarse grit (like 60) and finish with a finer grit (like 120).
- For a simple bench, stack two pallets for the base. For a version with a backrest, stand one pallet vertically and secure it to the back of the base stack using long wood screws or L-brackets.
🔧 How-To Brief
Let’s be honest: pallet furniture is more about rustic charm than ergonomic comfort. The slatted seat can be unforgiving, and the backrest is typically very upright. To make a pallet bench genuinely comfortable for lounging, you *must* invest in thick, high-quality outdoor cushions. We’re talking 3-4 inches of dense foam. Thin, flimsy cushions just won’t cut it and will flatten uncomfortably against the wood slats. Factor the cost of good cushions (which can easily be $100+) into your project budget. For a different take on pallet seating, check out the pallet swing in Idea #15.
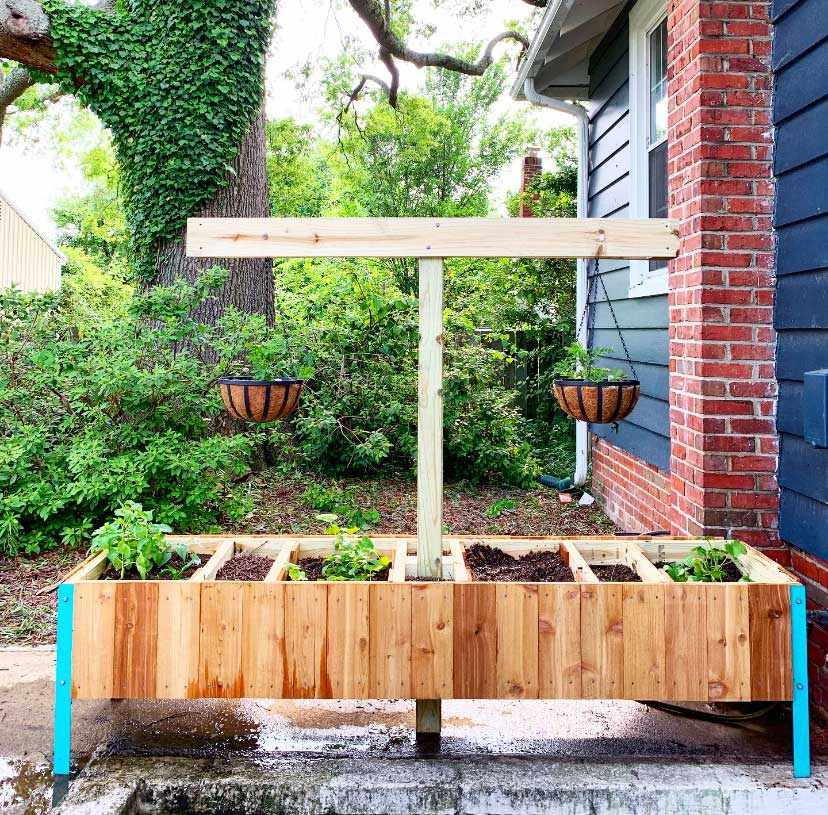
8. Build a Raised Planter with Teal Accents and a Post for Hanging Baskets
Before you even buy the lumber, think through these key points to make sure this project is a success:
- Measure Your Spot: A large planter box like this has a significant footprint. Make sure it won’t overwhelm your patio or block a pathway. Check the clearance needed for the overhanging baskets.
- Sunlight Check: Where will this live? Track the sun’s path for a full day. The spot you choose needs to provide the right amount of light for the specific plants you want to hang and grow in the box.
- Water Source: Is a hose or spigot nearby? A planter of this size requires a lot of water, and lugging a watering can back and forth will get old fast.
- Foundation: Will it sit on a deck, patio, or gravel? Ensure the surface is level. If placing on a deck, confirm the structure can handle the weight of the box, soil, and water.
📐 Style Math
This design is ideal for a medium-to-large yard or a spacious patio where it can act as a freestanding centerpiece or a natural divider. A minimum footprint of about 6 feet by 3 feet is needed for the planter box itself, but you’ll want at least 2-3 feet of clear space around it for easy access to planting and watering. The central post adds significant height (around 6-7 feet tall), so it works best in a location with open sky above it, rather than tucked under a low roofline or awning. It’s a great solution for adding vertical gardening space without needing a wall or fence to mount things on.
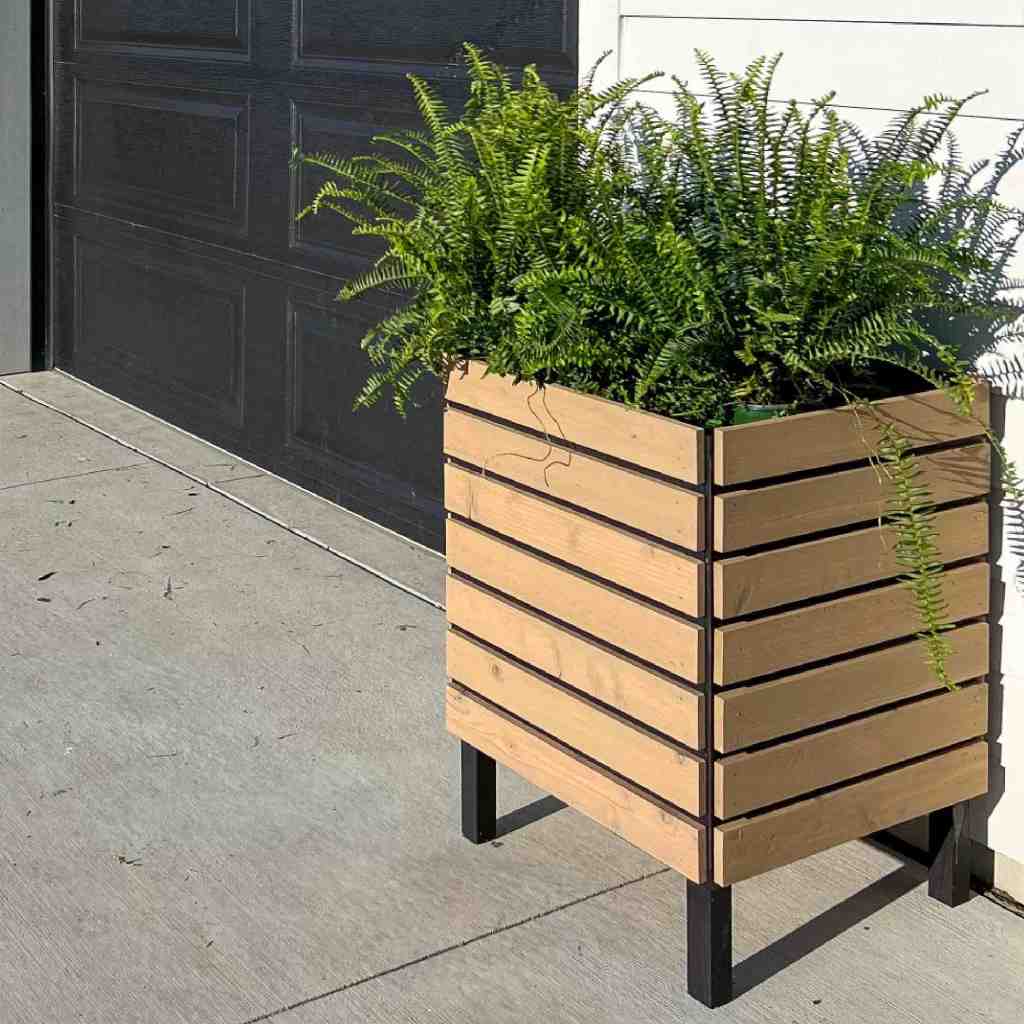
9. Construct a Modern Slatted Planter with Angled Legs
This planter feels so fresh and modern due to a few clever design choices. First, the clean lines of the horizontal slats create a sense of order and calm. Second, the angled, mid-century modern style legs give the box a light, elevated feel, preventing it from looking like a heavy, solid block. This negative space underneath is crucial. Finally, the choice of a light-toned wood against the dark gray backdrop is a classic high-contrast move that makes the planter and the vibrant green ferns inside it the undeniable star of the show.
📏 Scale Guide
When building a slatted planter, the spacing of the slats is everything. For this sleek, modern look, aim for a gap that is no more than half the width of the slat itself. For example, if you are using 1.5-inch wide slats, a 0.5-inch to 0.75-inch gap is perfect. This creates a pleasing visual rhythm. To ensure your plants have enough soil and don’t dry out too quickly, you must line the inside of the slatted frame with a durable landscape fabric before adding soil. Staple it securely along the top edge on the inside.
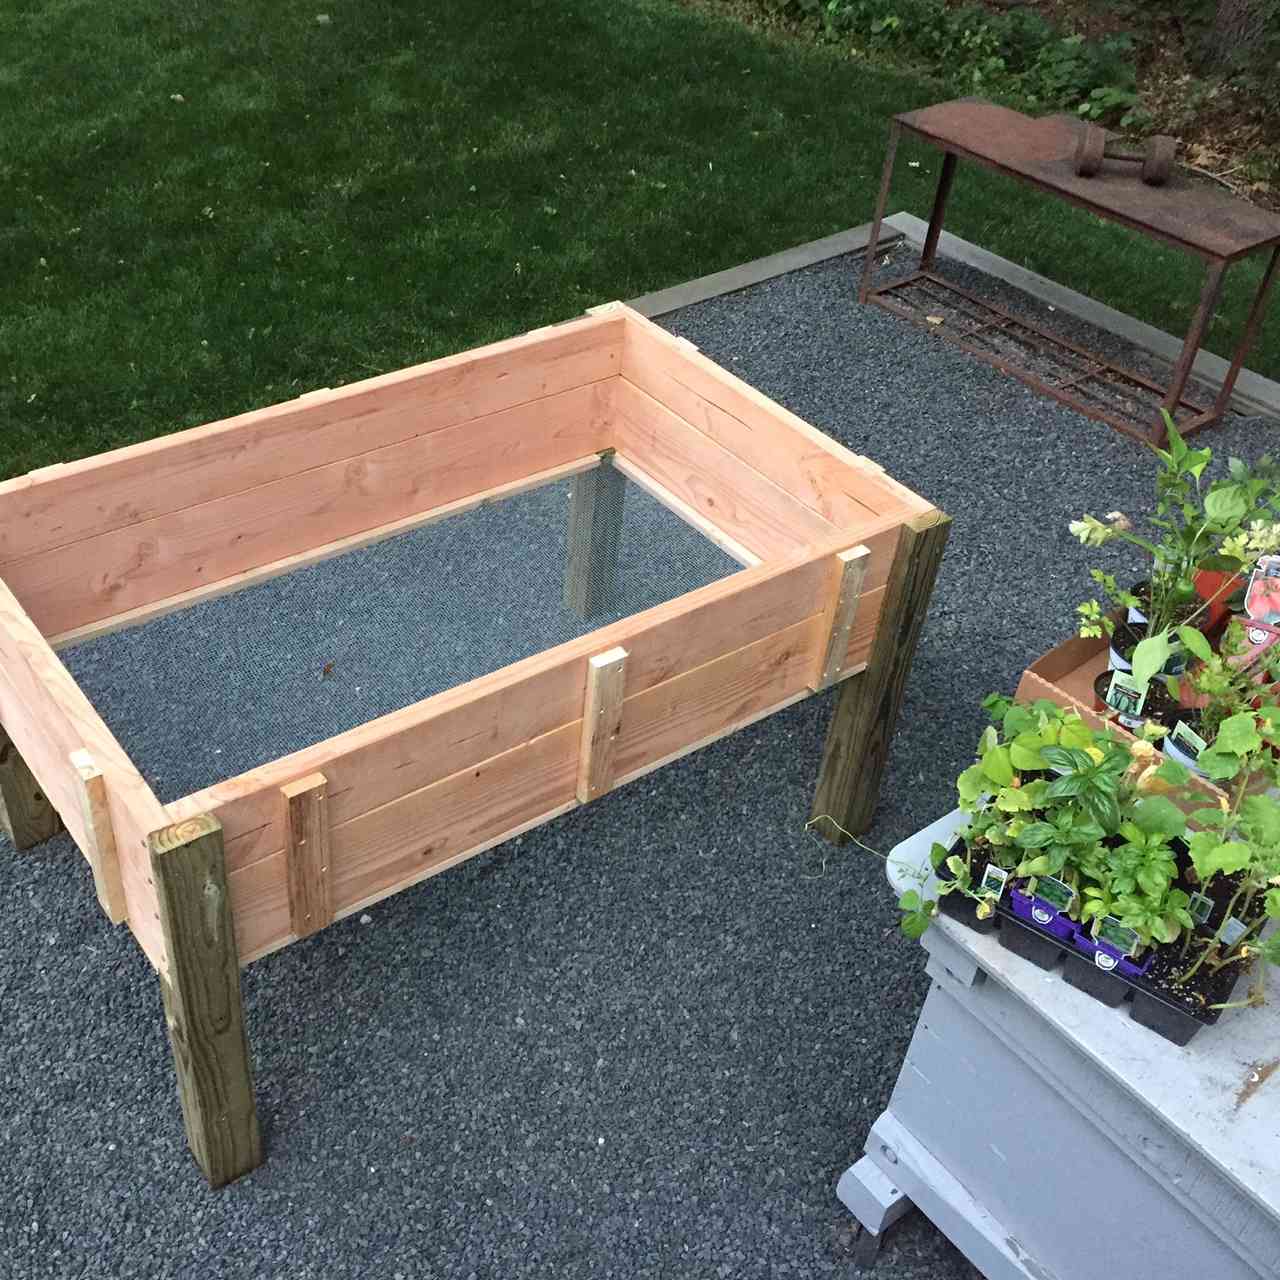
10. Design a Raised Garden Bed with a Screen Bottom for Drainage
The screen bottom is the absolute game-changer for this project. It’s not just a minor detail; it’s the core feature that guarantees superior drainage and aeration for the plant roots, which is the secret to a healthy garden. Unlike a traditional raised bed where soil sits directly on the ground, this design prevents soil compaction and stops roots from becoming waterlogged after heavy rain. It also provides a barrier against pests like gophers or moles that might tunnel up from below. For a similar raised bed project using pallet wood, see Idea #25.
🔥 Trending Context
While a screen or mesh bottom is fantastic for drainage, it also means the soil will dry out much faster than in an in-ground bed, especially on hot or windy days. You’ll need to be extra vigilant about watering. On a sunny summer day, you might even need to water it in the morning and again in the evening. If you’re building one, consider incorporating a soaker hose or a drip irrigation system snaked through the soil to make watering more efficient and consistent. This is not a ‘set it and forget it’ garden bed.
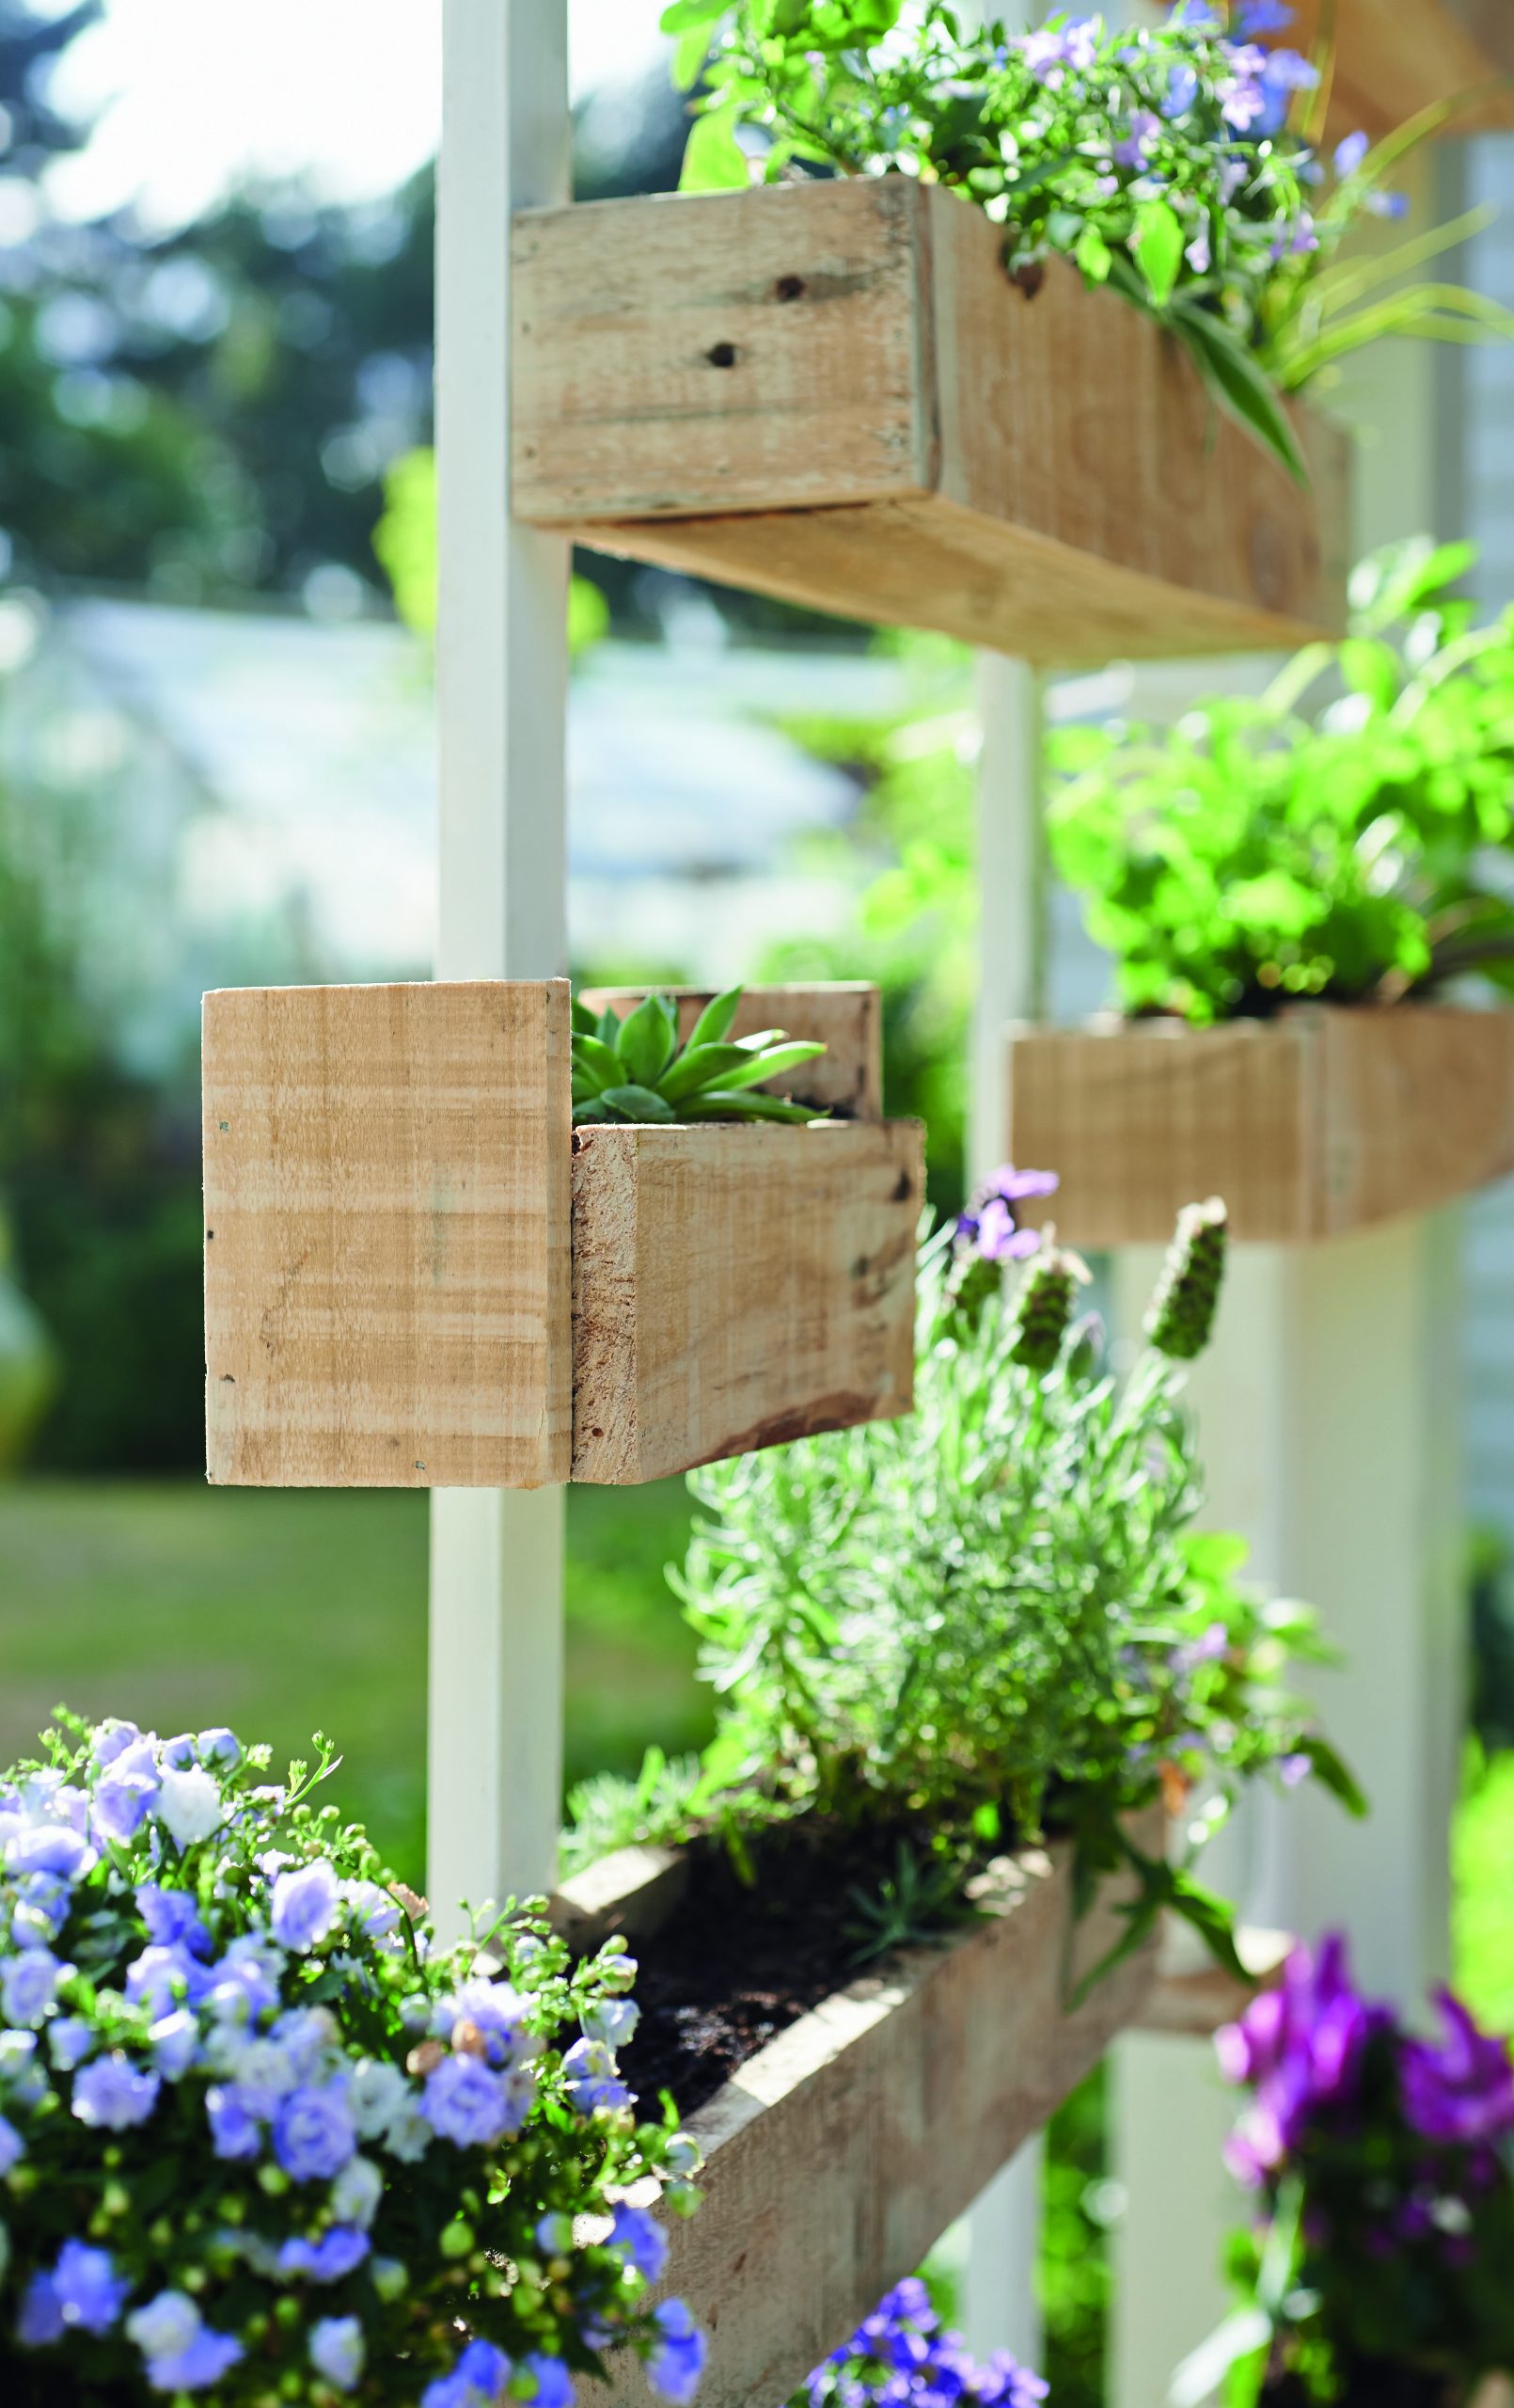
11. Build a Vertical Pallet Planter for Flowers and Succulents
This is a wonderfully budget-friendly project, as the main structure is just a few pallet sections. You can often find pallets for free behind shopping centers or on local marketplace sites (just be sure to ask first!). Instead of buying expensive, mature plants, start with small starter pots of succulents and annuals for just a few dollars each. Over the course of a season, they will fill in the planter beautifully. The white support post could be a simple 4×4 fence post, which costs less than $15 at a home improvement store.
🧹 Maintenance Reality
Here’s how to create the planting pockets in a vertical pallet planter. Time Estimate: 1-2 hours. Material Cost: $10 (for landscape fabric).
- Choose a pallet and stand it upright. Decide which side will be the front.
- You will be creating pockets using the slats on the front and back of the pallet.
- Cut pieces of landscape fabric that are twice as wide as the opening between pallet planks.
- Fold the fabric in half to create a durable sling.
- Use a heavy-duty staple gun to staple the fabric to the inside of the front and back planks of each opening you want to plant in, creating a pouch to hold soil.
- Fill your new fabric pockets with potting mix and you’re ready to plant!
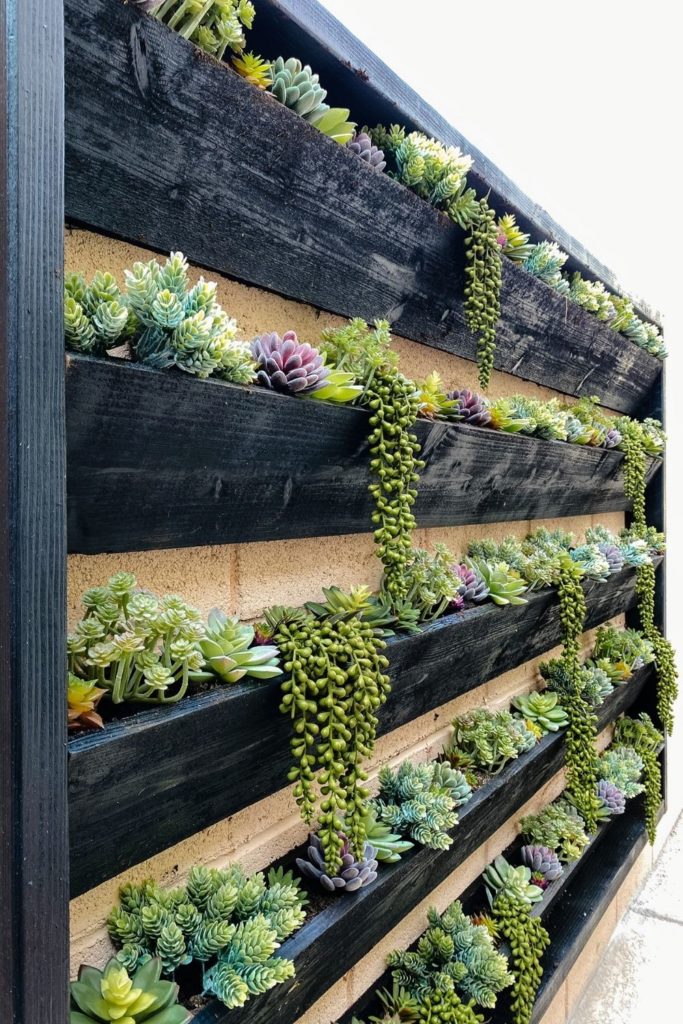
12. Mount Dark Wood Planter Boxes for a Succulent Wall Garden
This stunning living wall follows a simple but effective formula: 50% Structure + 40% Texture + 10% Drape. The dark-stained wood planters and the tan brick wall provide the strong, geometric structure. The various succulents, with their different shapes, sizes, and colors (from spiky to rosette), deliver a rich layer of texture. The final 10% comes from the trailing vines, which soften the hard lines of the boxes and add a sense of graceful movement. To change the vibe, you could use unstained cedar boxes and fill them with ferns and draping ivy for a softer, more woodland feel.
💸 Get This Look For Less
A succulent wall like this is gorgeous, but it’s not zero-maintenance. Succulents need excellent drainage, so ensure these planter boxes have plenty of holes in the bottom. They also need a surprising amount of light. A wall that gets at least 4-6 hours of direct sun is best. Watering can be tricky; you need to water thoroughly but infrequently, letting the soil dry out completely between sessions. In very hot climates, the dark wood and brick can absorb a lot of heat, potentially scorching the plants, so afternoon shade might be necessary.
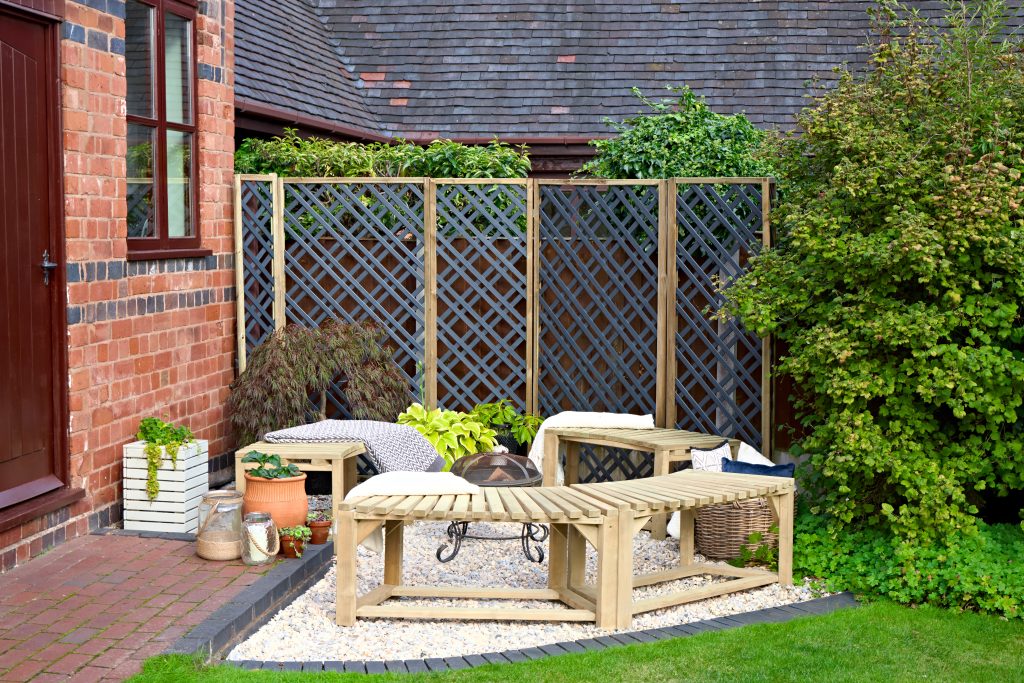
13. Install an Easy DIY Wooden Privacy Screen in Your Backyard
When building a wooden privacy screen, the visual density is key. For a modern look that provides privacy without feeling like a solid wall, space your horizontal slats one-half the width of the board apart. For example, if you use 3.5-inch wide boards (standard 1x4s), leave a gap of about 1.75 inches between them. This ratio blocks the direct line of sight from a distance but still allows light and air to filter through, preventing the screen from feeling like a heavy, oppressive fence. For a similar effect used on a planter, see Idea #26.
💡 Designer Tip
A simple privacy screen like this is incredibly versatile. It’s perfect for sectioning off a small patio area, hiding unsightly necessities like trash cans or AC units, or creating a backdrop for a seating area. A standard panel size is typically 6 feet tall by 8 feet wide. This scale is large enough to provide meaningful privacy without requiring the engineering of a full fence. For smaller spaces, like a condo balcony, a single 4×6 foot panel can be enough to create a sense of enclosure and block a neighbor’s view.
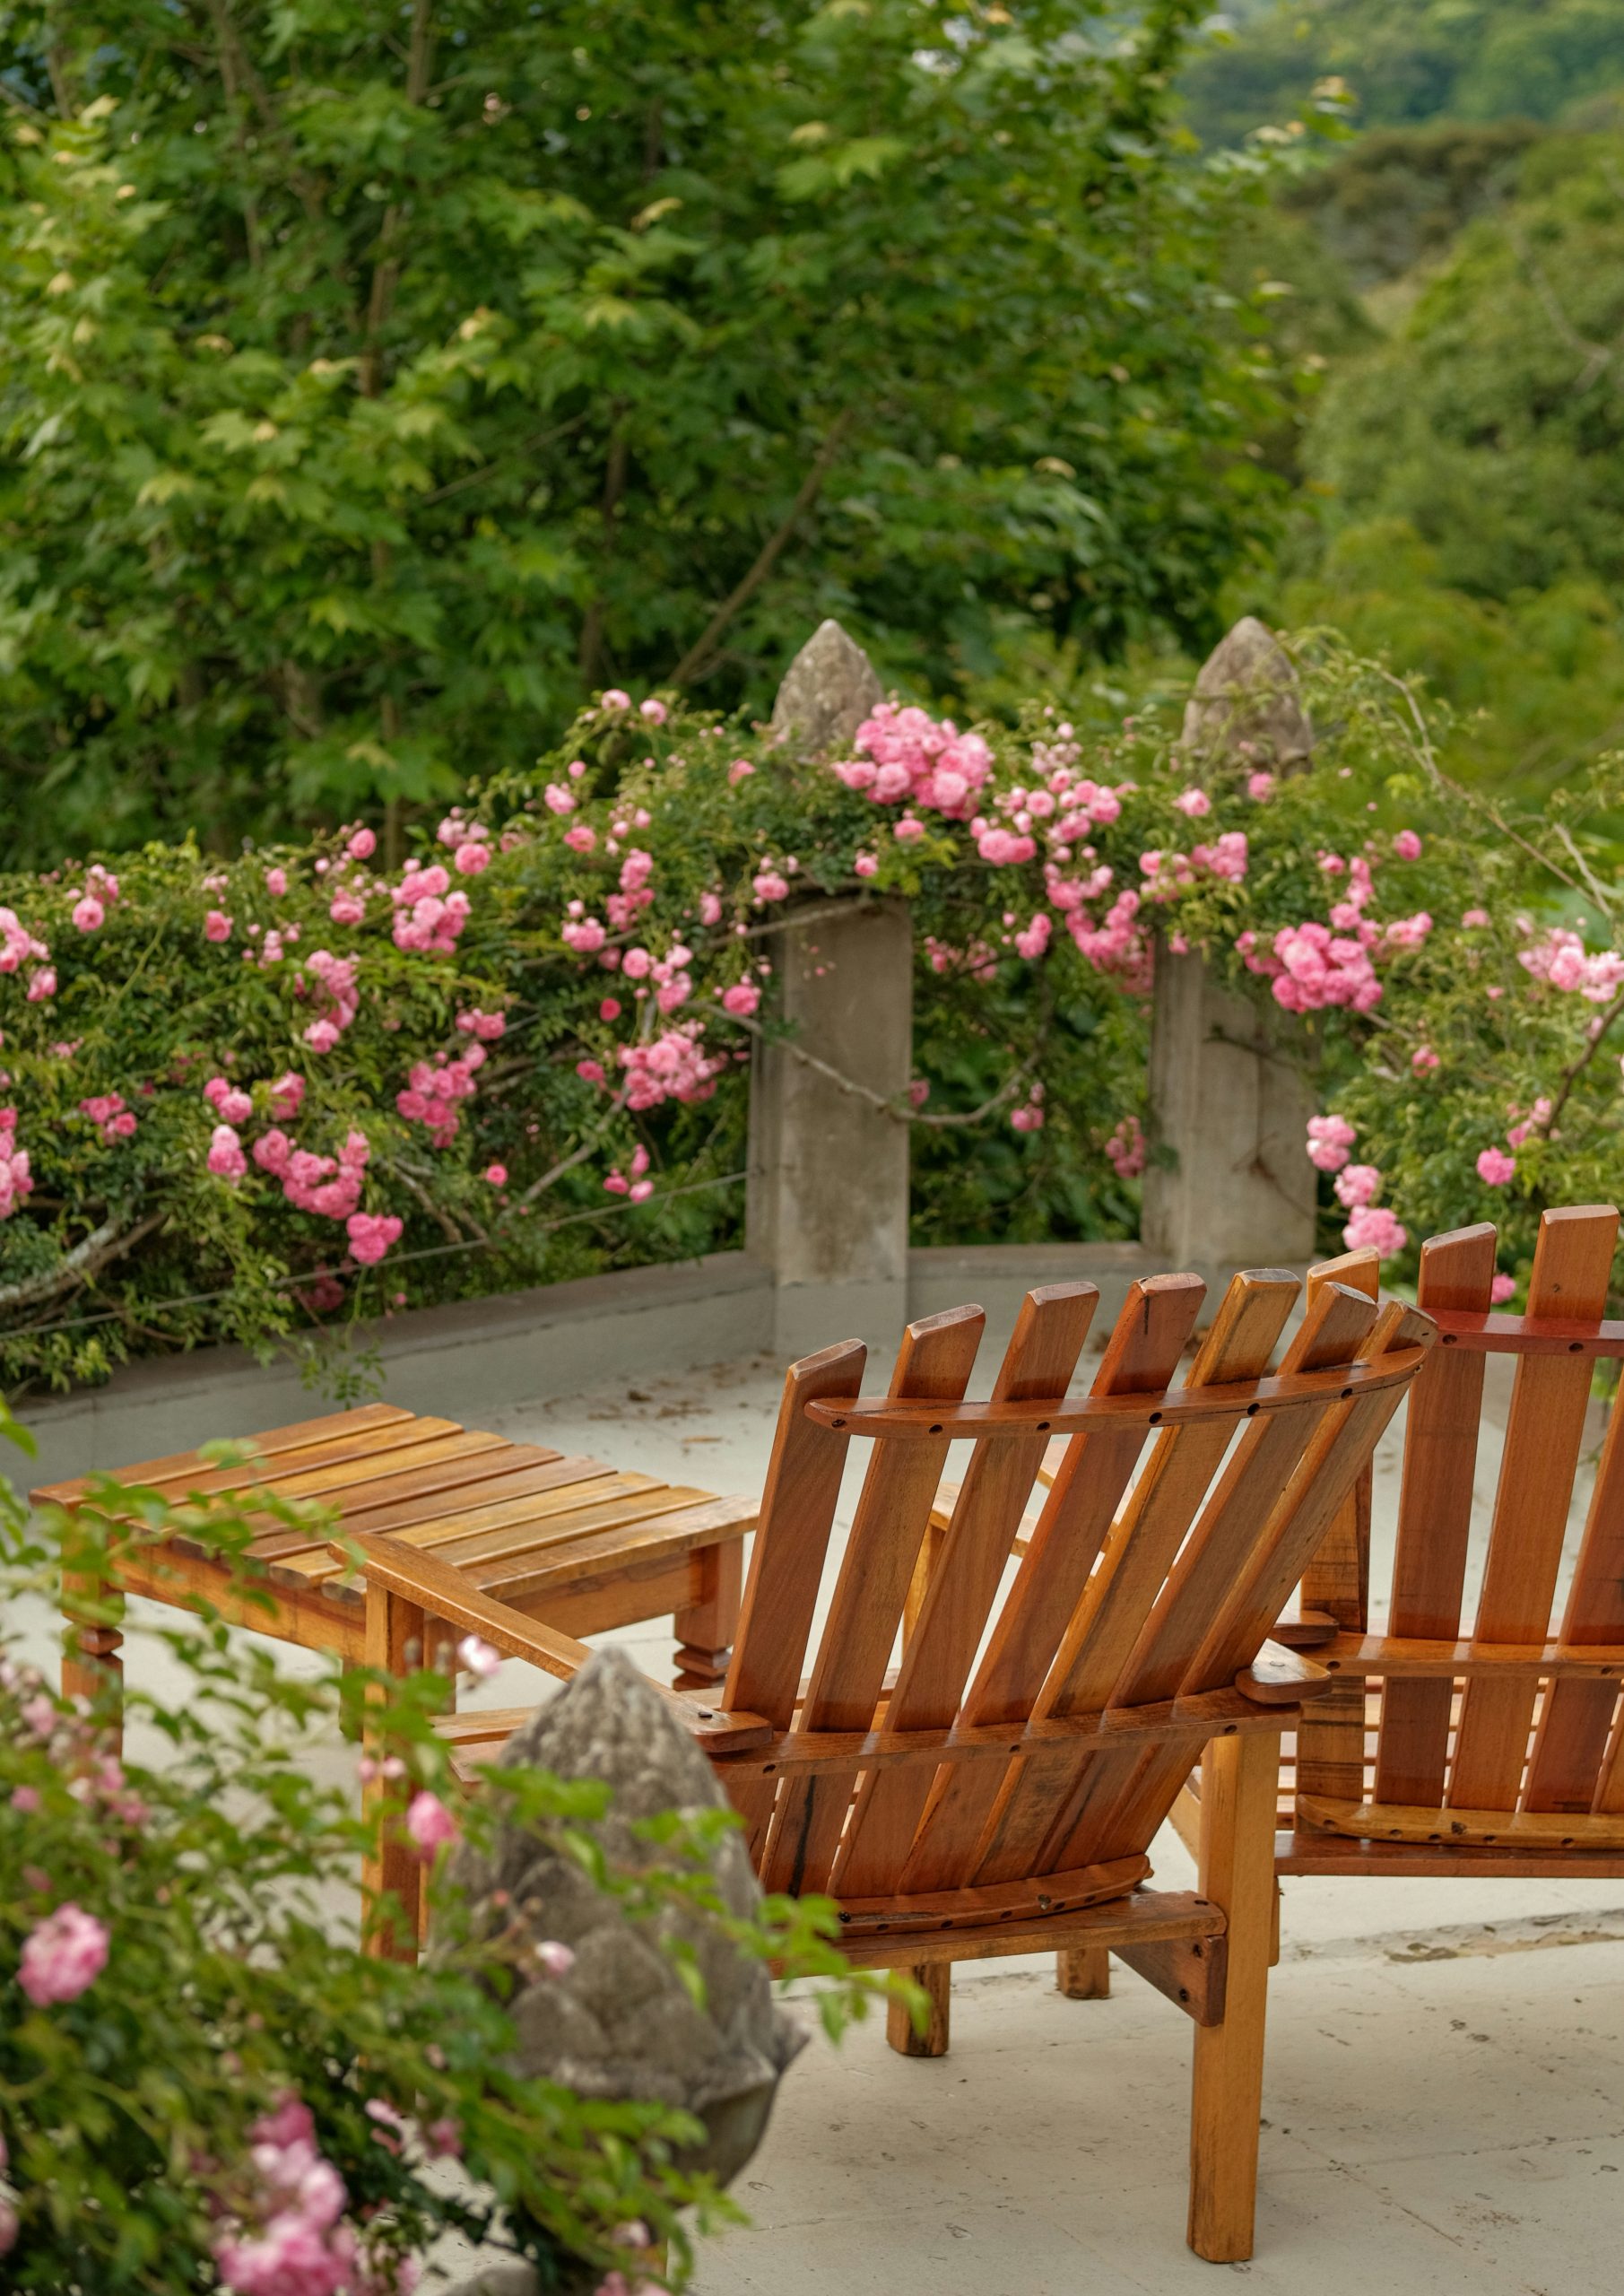
14. Add Adirondack Chairs to a Patio with Pink Flowering Vines
This scene is effortlessly inviting because of its masterful use of repetition and natural framing. The matching Adirondack chairs and side table, all in the same warm wood tone, create a cohesive and calming set. It doesn’t feel random. The real star, however, is the profusion of pink flowering vines. They act as a living, organic frame for the seating area, softening the hard edge of the concrete wall and immersing the space in nature. The vibrant pink against the cool grey concrete and lush green is a stunning color combination.
💰 Budget Breakdown
There’s a growing movement away from perfectly manicured, sterile backyards towards more ‘wild’ and naturalistic garden styles. This look taps right into that. Letting a flowering vine, like the bougainvillea shown here, grow abundantly over a structural element creates a sense of romance and establishment. It feels less like a recent installation and more like a garden that has been loved and tended for years. It’s a rejection of stark minimalism in favor of lush, immersive, and slightly untamed beauty.
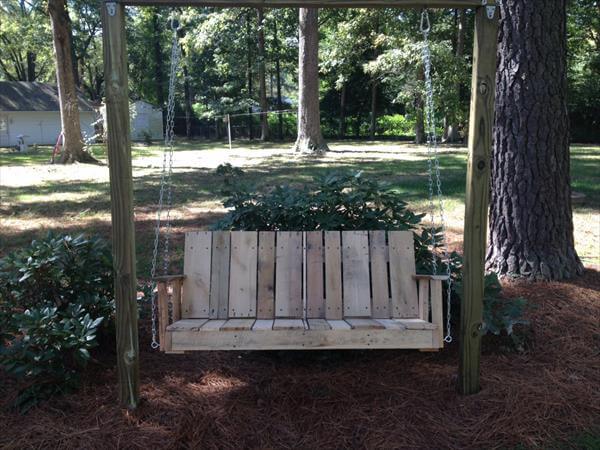
15. Build a Rustic Pallet Swing on a Timber A-Frame
Recreating this rustic swing is a very achievable DIY project with a straightforward budget. The beauty is in its simplicity and use of basic materials.
- Wood: 2-3 heat-treated pallets (often free) and four 8-foot timber posts for the A-frame ($80 – $150).
- Hardware: Heavy-duty chain, eye bolts, and fasteners ($50 – $75).
- Finishing: Exterior sealant or stain (optional, $20 – $40).
- Cushions: (optional but recommended) Custom-sized outdoor cushions ($100 – $250).
- TOTAL: $150 – $515
Budget alternative: Find an existing sturdy tree branch instead of building the A-frame to bring the core cost down to under $100.
⭐ The One Thing
Safety is the number one priority for a project like this. Before you start, you must confirm the stability of your anchor points. If you are building an A-frame, ensure the ground is perfectly level and consider setting the posts in concrete footers for maximum stability, especially if it will be used by multiple people. If you plan to hang the swing from a tree branch, consult an arborist. The branch needs to be at least 8 inches in diameter, healthy (no signs of disease or cracking), and made of a strong hardwood.
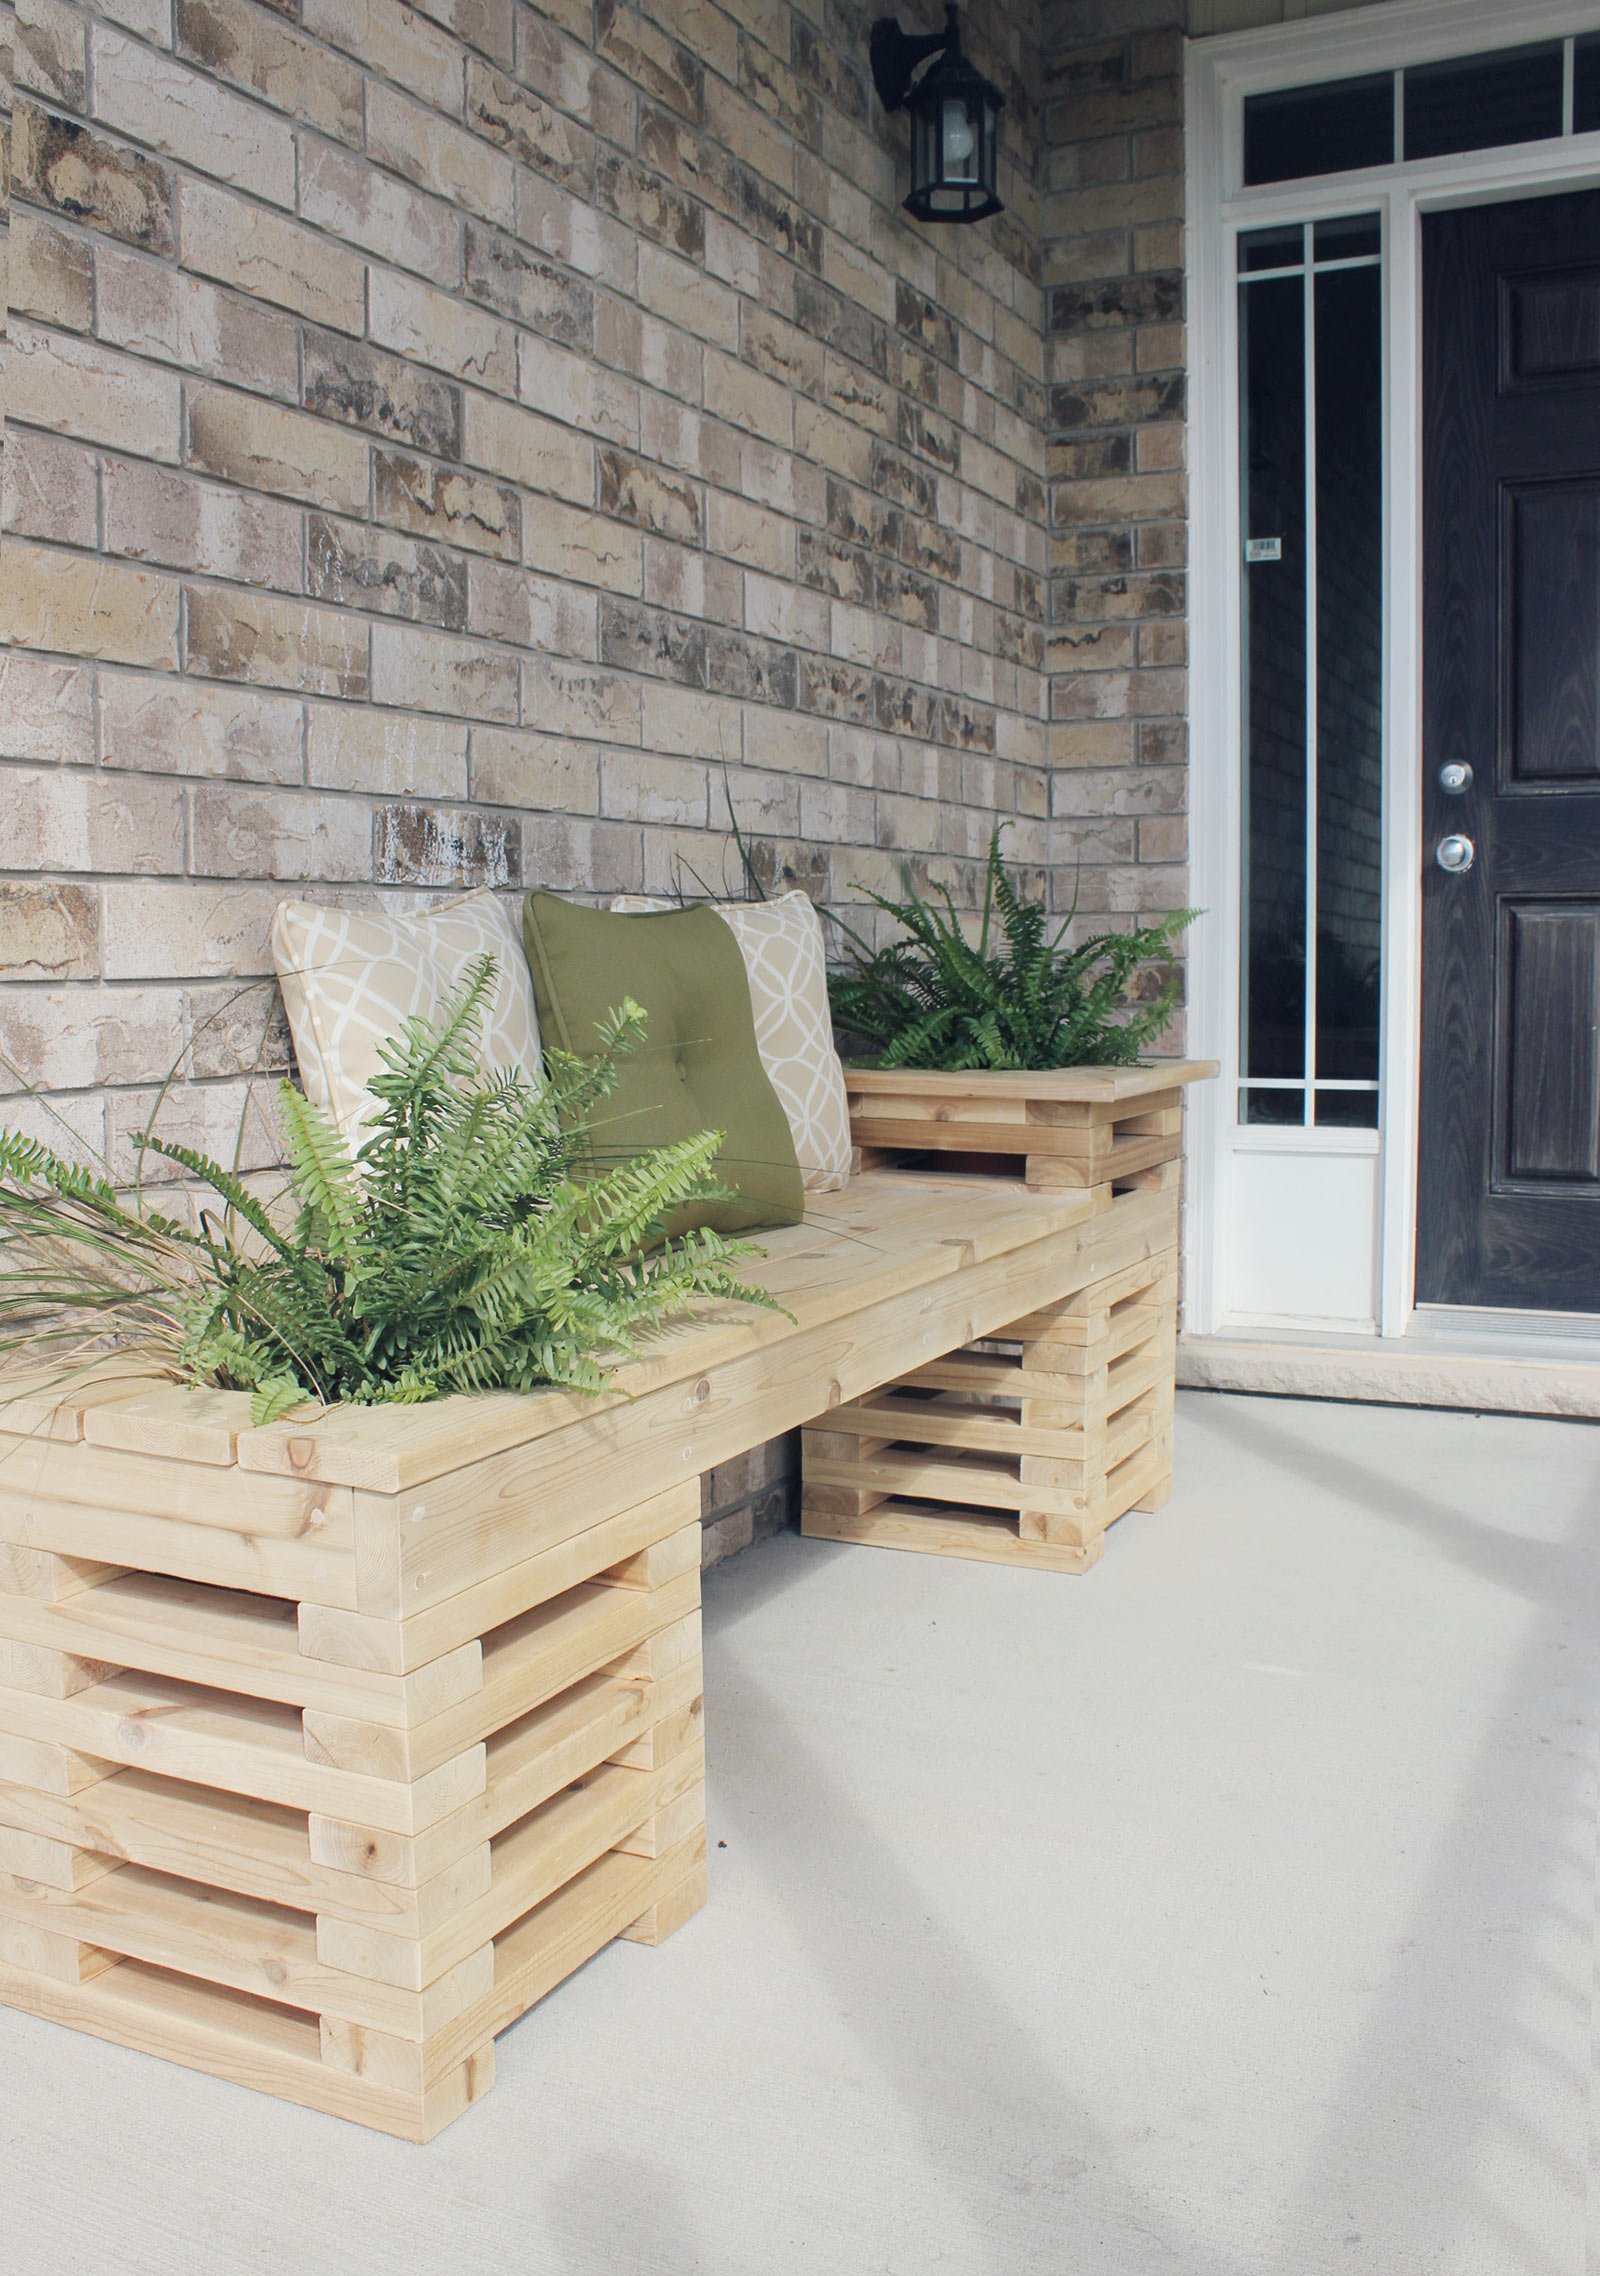
16. Craft a Pallet-Style Porch Bench with Built-in Planters
The integrated planters are what elevate this from a simple bench to a thoughtful piece of garden furniture. By building the plant boxes directly into the ends of the bench, the design seamlessly merges seating and greenery. It makes the entire piece feel alive and connected to its environment. Without the planters, it would be a functional but generic bench. With them, it becomes a miniature ecosystem and a statement piece that perfectly frames the entrance to the home.
✅ Before You Start
The visual recipe here is about creating a calm, nature-inspired welcome. Let’s call it 70% Natural Base + 20% Greenery + 10% Soft Accents. The light-toned wood of the bench and the beige brick wall form the expansive, neutral base. The vibrant green ferns in the built-in planters provide the essential pop of life and color. The final 10% comes from the soft, textural pillows, which add a touch of comfort and pattern. You could easily swap the ferns for colorful flowers or the olive pillow for a terracotta one to shift the mood without breaking the formula.
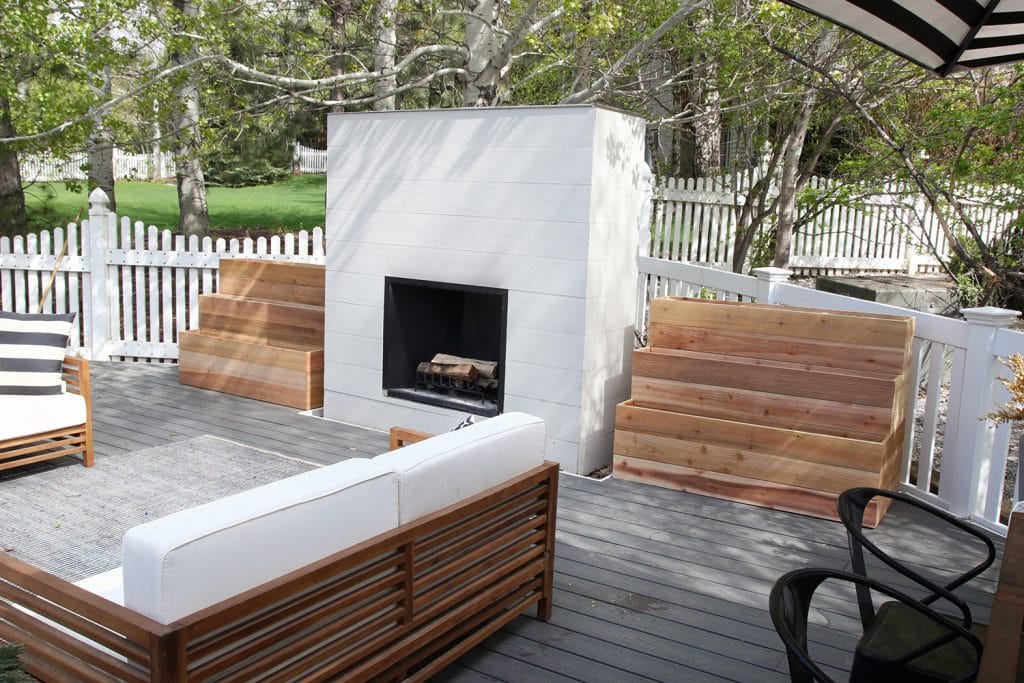
17. Design a Grey Deck with a White Fireplace and Tiered Planters
This is a high-impact, full-patio renovation. The costs can vary widely based on materials and labor, but here’s a general estimate for a DIY approach.
- Decking: Composite or wood for a 12×16 ft area ($1,500 – $4,000).
- Fireplace: Cinder block and concrete structure with paint ($500 – $1,200).
- Furniture: Slatted wood sofa and armchair set ($800 – $2,500).
- Decor: Tiered planters, outdoor rug, cushions ($300 – $700).
- TOTAL: $3,100 – $8,400
Budget alternative: Use a standalone metal fire pit ($150), build the planters from reclaimed wood ($50), and find second-hand furniture ($200) to get a similar zoned feel for around $1,000-$1,500 (plus the deck cost).
⚠️ Real Talk
This space feels so successful because it uses a strong central axis to organize everything. The fireplace is the undeniable focal point, and the entire layout is symmetrically balanced around it. The tiered planters and seating arrangement mirror each other on either side, creating a sense of calm and order. The tight, neutral color palette of grey, white, and light wood with black accents is sophisticated and allows the greenery in the planters to really stand out. It’s a disciplined design that feels both spacious and intentional.
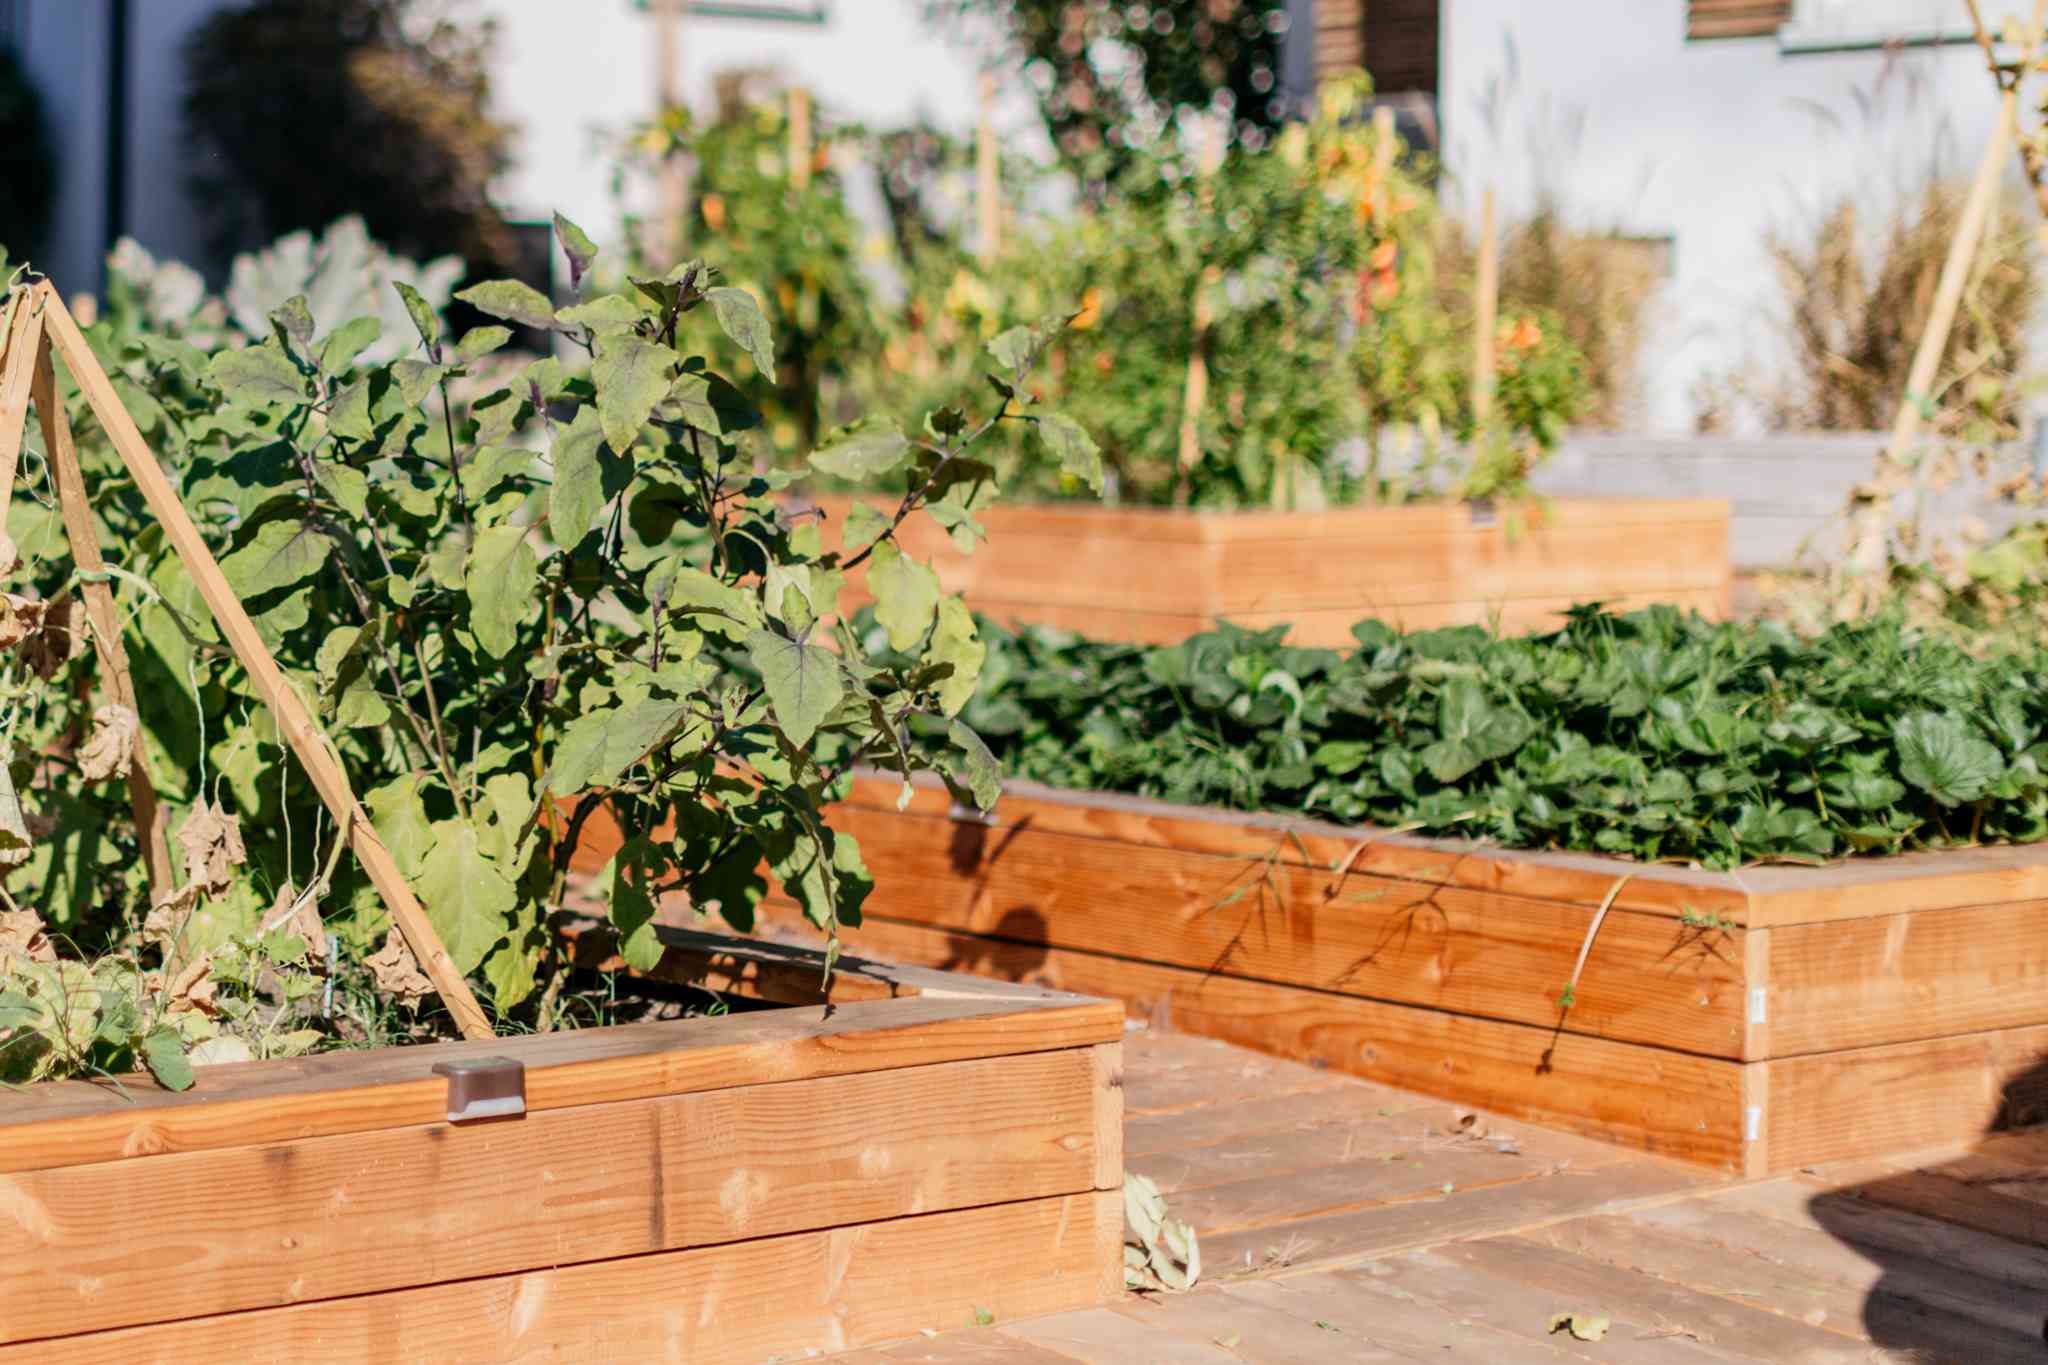
18. Build Bright Wood Raised Garden Beds on a Deck
Raised beds are fantastic for decks, but you must respect the scale and weight. For a standard deck built to code, a bed that is 4 feet long, 2 feet wide, and about 12-18 inches deep is a safe size. A collection of 2-3 beds of this size is usually manageable. Anything larger or taller, and you risk concentrating too much weight in one area. The wet soil is extremely heavy. Always place beds over the deck’s joists and beams, which are the main supports, rather than in the middle of a span between joists.
🎯 What Makes It Work
Wood-on-wood requires some specific care. Placing wooden garden beds directly on a wooden deck can trap moisture, leading to rot in both the planter and the deck surface over time. To prevent this, it’s crucial to elevate the garden beds slightly. Place small, non-porous spacers (composite shims or plastic feet work well) under the corners and middle of the bed to allow air to circulate and water to drain away freely. Also, applying a non-toxic, waterproof sealant to the inside of the planter box will extend its life significantly.
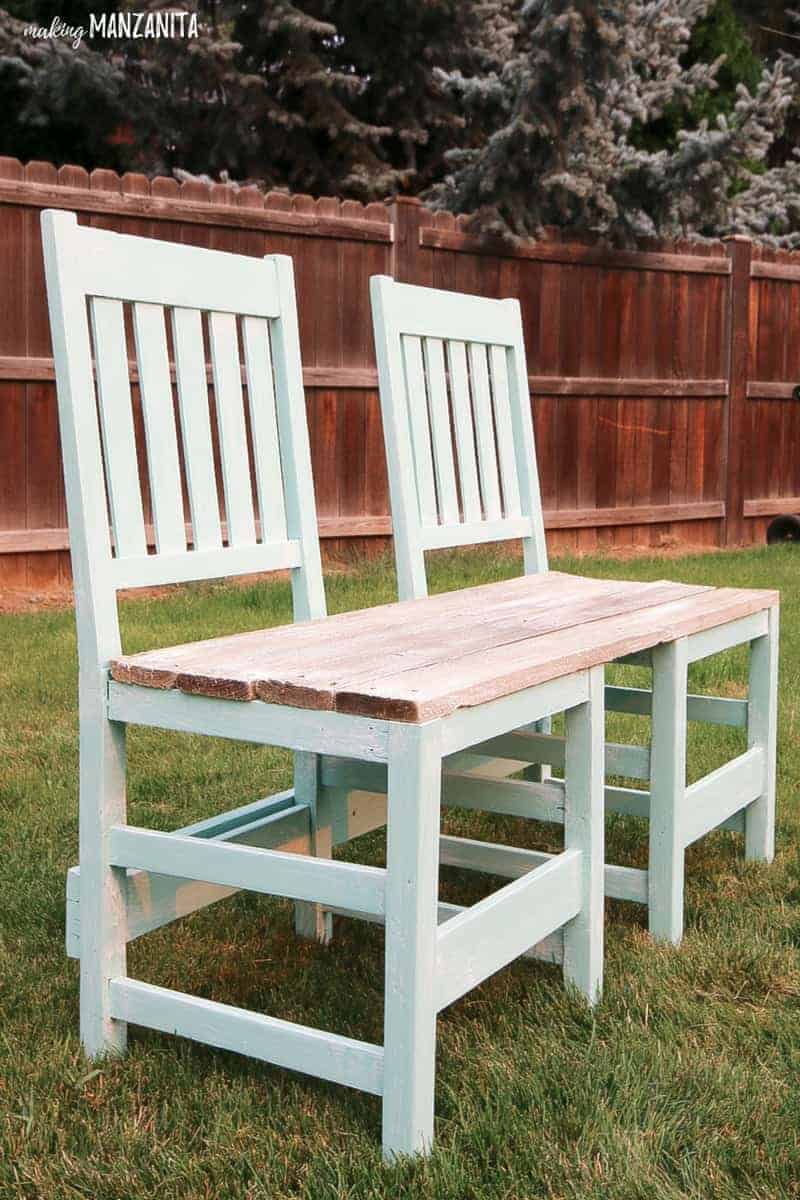
19. Upcycle Two Old Chairs into a Weathered Garden Bench
This whimsical bench is a fantastic weekend project. You can transform two forgotten chairs into a charming new piece of furniture. Time Estimate: 4-5 hours. Material Cost: $30-$60.
- Find two sturdy wooden chairs. They don’t have to match perfectly, but they should be the same height.
- Remove the seats from both chairs. You may need a screwdriver or a small pry bar.
- Measure the distance between the chairs when placed side-by-side to your desired width. Cut several 1×4 or 1×6 wood planks to this length for the new seat.
- Arrange the planks across the seat openings and secure them to the chair frames from below using wood screws.
- Lightly sand the entire bench to ensure a smooth finish and distress any new wood to match the chairs.
- Finish with a coat of exterior paint or clear sealant to protect it from the elements. A similar idea using just one type of material is the bench in Idea #28.
🔧 How-To Brief
The beauty of this project lies in its resourcefulness. The main components—the two chairs—are prime candidates for a thrift store or flea market find. You can often pick up old wooden dining chairs for $10-$20 each. The planks for the seat can be sourced from the cull lumber section at a home improvement store for just a few dollars. Even if you have to buy a small can of paint and some screws, you can easily create this entire bench for under $75, a fraction of the cost of a new decorative garden bench.
20. Construct a DIY Outdoor Bench from Pallets and Planks
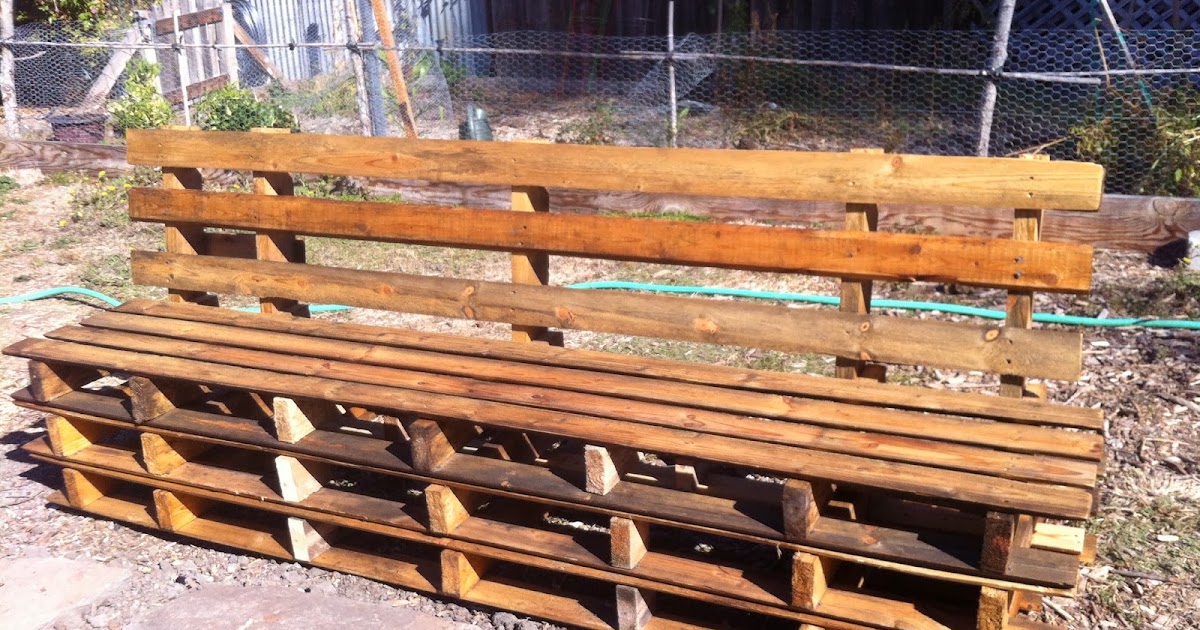
While this bench is a great example of rustic, low-cost construction, be prepared for the reality of working with reclaimed pallets. The wood is often rough, full of splinters, and can have protruding nails that need to be removed or hammered flat. A thorough sanding is not optional—it’s a requirement for safety and comfort. Furthermore, pallets are incredibly heavy and awkward to move. This is definitely a two-person job. Don’t expect perfectly aligned planks; the charm of a piece like this is in its imperfections. Compare the rustic feel here to the more refined pallet bench in Idea #27.
📐 Style Math
The defining feature of this particular pallet bench is its substantial, solid backrest made from vertically arranged planks. Many simple pallet benches are just stacked pallets or have a flimsy, angled back. This design, however, uses wide, sturdy planks to create a high, supportive back that gives the bench a more finished, sofa-like presence. It transforms the piece from a simple perch into a place where you could actually lean back and relax for a while (with the addition of some cushions, of course).
21. Create a Lakeside Pallet Daybed Swing with Patterned Cushions
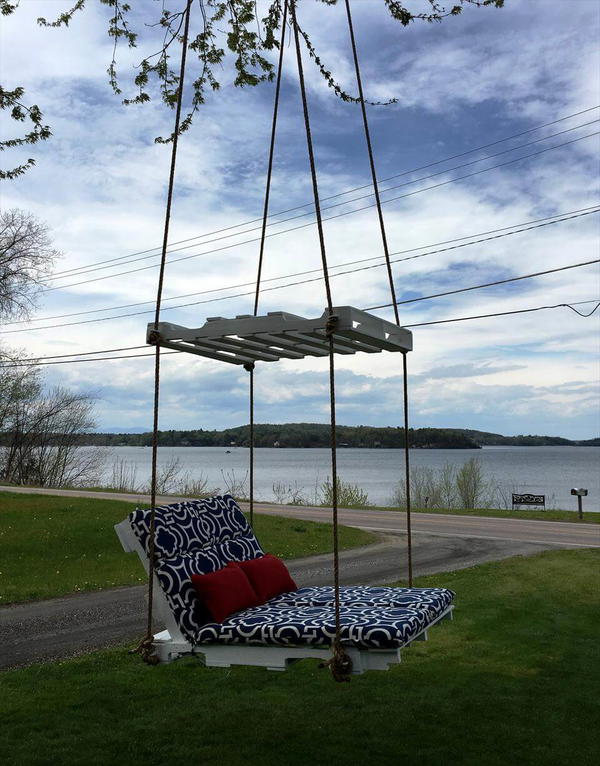
When hanging a swing of this size, the choice of rope and knot is critical for safety and aesthetics. Use a marine-grade rope with a diameter of at least 3/4 inch. It’s designed to withstand moisture and UV exposure. For securing the rope, don’t just use a simple granny knot. Learn to tie a proper bowline knot or a series of half-hitches. These knots are incredibly secure under load but can still be untied if you need to make adjustments. Visually, a well-tied, chunky knot adds to the authentic, nautical charm of the piece.
📏 Scale Guide
This daybed swing perfectly captures a feeling of carefree summer joy because it combines rustic simplicity with plush comfort. The DIY-vibe of the white-painted pallet base keeps it from feeling pretentious, making it fun and accessible. The magic happens with the addition of the thick, comfortable cushions and the stylish pillows. This combination signals that this isn’t just a place to sit; it’s a place to curl up, read a book, or take a nap. The navy and white pattern with a pop of red is a timeless, preppy color scheme that feels instantly cheerful and classic.
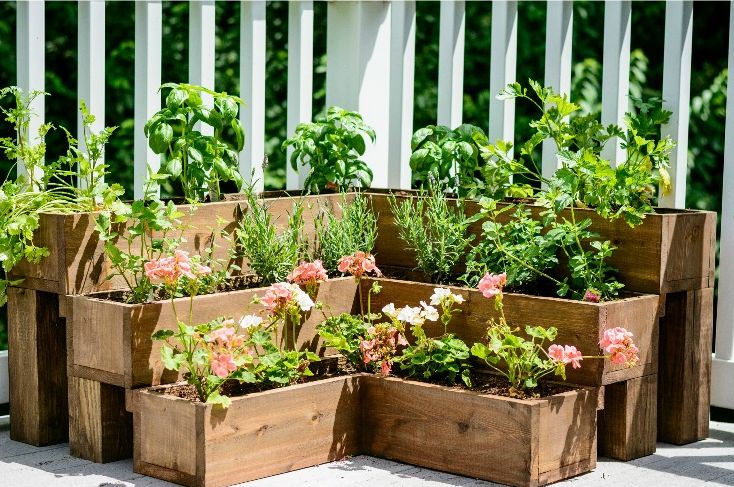
22. Arrange Tiered Wooden Planters with Herbs and Flowers
The concept of a ‘kitchen garden’ right on your deck or patio has become incredibly popular. People want the satisfaction of growing their own food, even in a small space. This tiered planter setup is the perfect expression of that trend. It’s a productive garden in miniature, allowing you to grow herbs like basil and parsley alongside pretty flowers. It’s beautiful and functional, tapping into the desire for a more sustainable, hands-on lifestyle. The visual appeal of the fresh greens makes it a decorative feature, not just a utility item.
🔥 Trending Context
You can find pre-made tiered planters like this online or at garden centers, but they can cost $150 or more. To get the look for less, you can easily create your own version. Build simple rectangular boxes from inexpensive cedar or pine fence pickets (which cost about $3-$4 each). Then, simply stack them in a cascading arrangement. You can also achieve a tiered effect by arranging standard pots of different sizes on a small set of outdoor steps or even on stacked bricks—the principle is the same: creating different levels to add visual interest and maximize growing space.
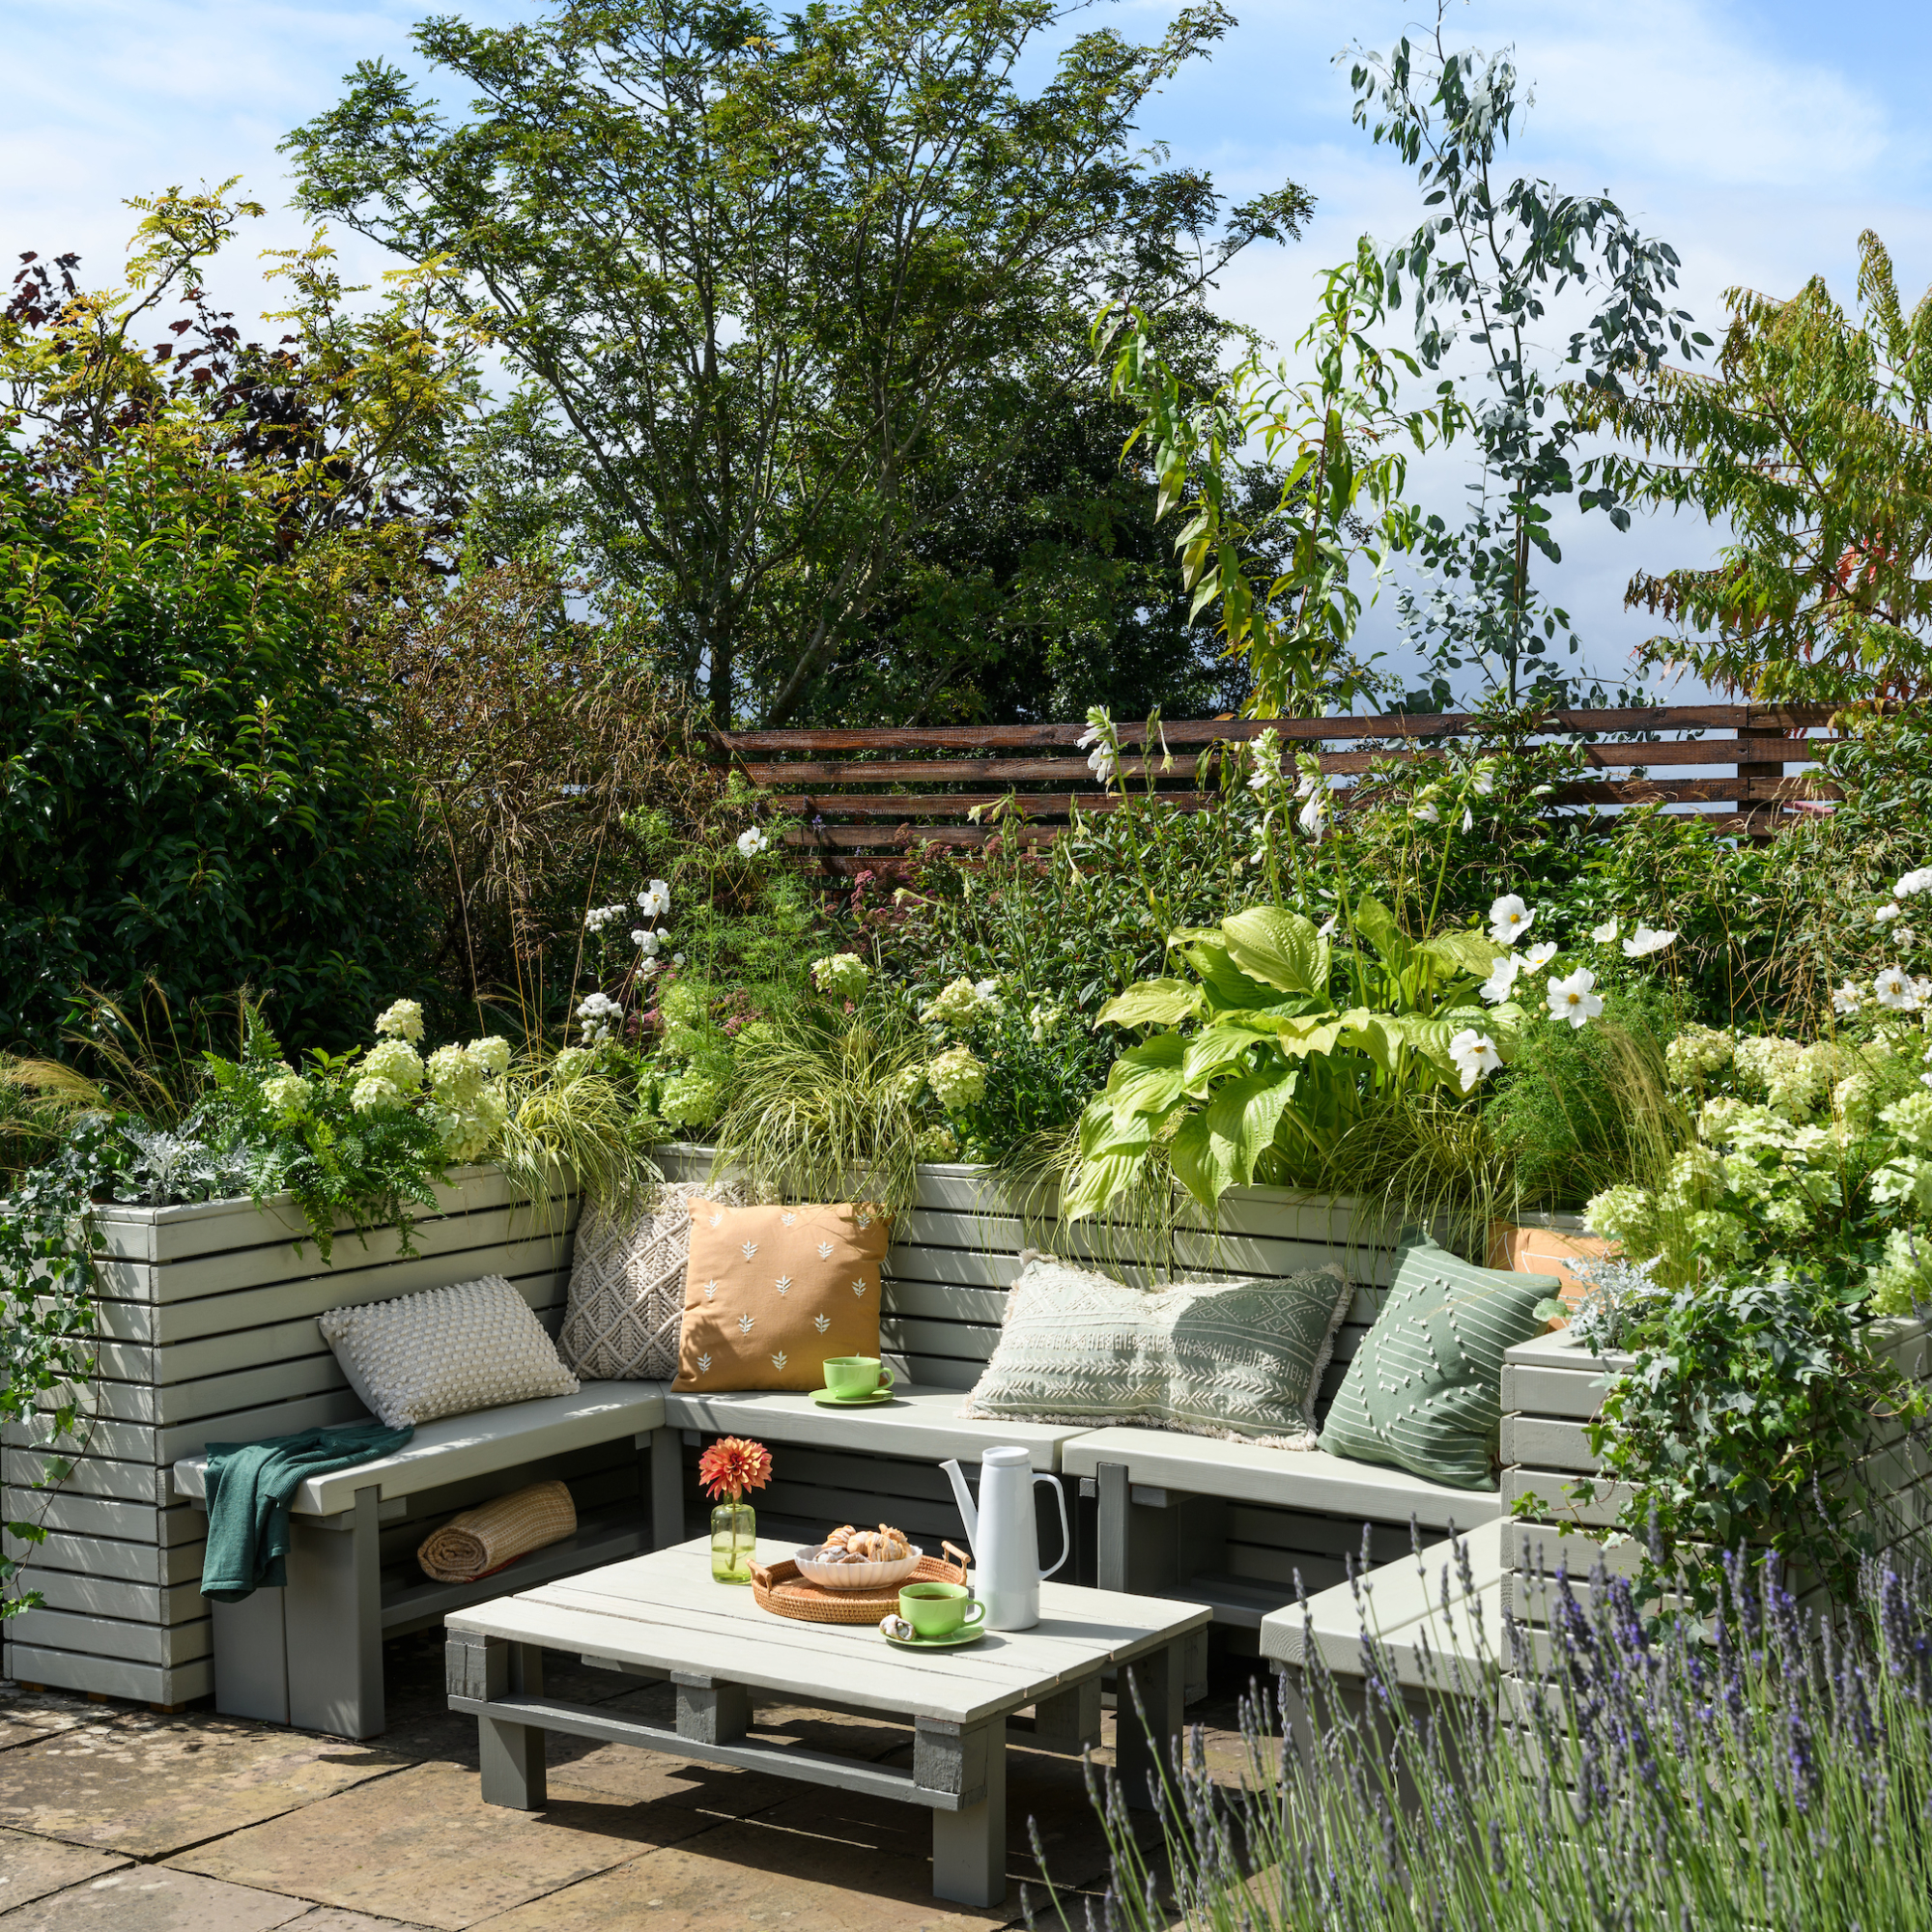
23. Build a Cozy L-Shaped Bench with Integrated Planters
This lush garden nook is a masterclass in color harmony. The formula is roughly 50% Greenery + 30% Sage + 20% Earthy Accents. The surrounding foliage and the plants in the integrated boxes provide the dominant, immersive green base. The sage green paint on the bench and table is the main color, acting as a soft, calming unifier for the furniture. The final 20% comes from the pops of color and texture in the pillows (terracotta, cream) and the warm tones of the flagstones. It’s a palette pulled directly from nature, which is why it feels so serene. This offers a much lusher feel than the more open design of Idea #5.
🧹 Maintenance Reality
The L-shaped design is the critical element. By wrapping the seating around the corner, it creates a sense of enclosure and intimacy that a straight bench could never achieve. It turns a simple seating area into a ‘conversation pit’. This shape inherently encourages people to turn towards each other, making the space feel social and connected. The built-in planters on the ends further enhance this by acting as living ‘walls’, making the nook feel like a secret garden room.
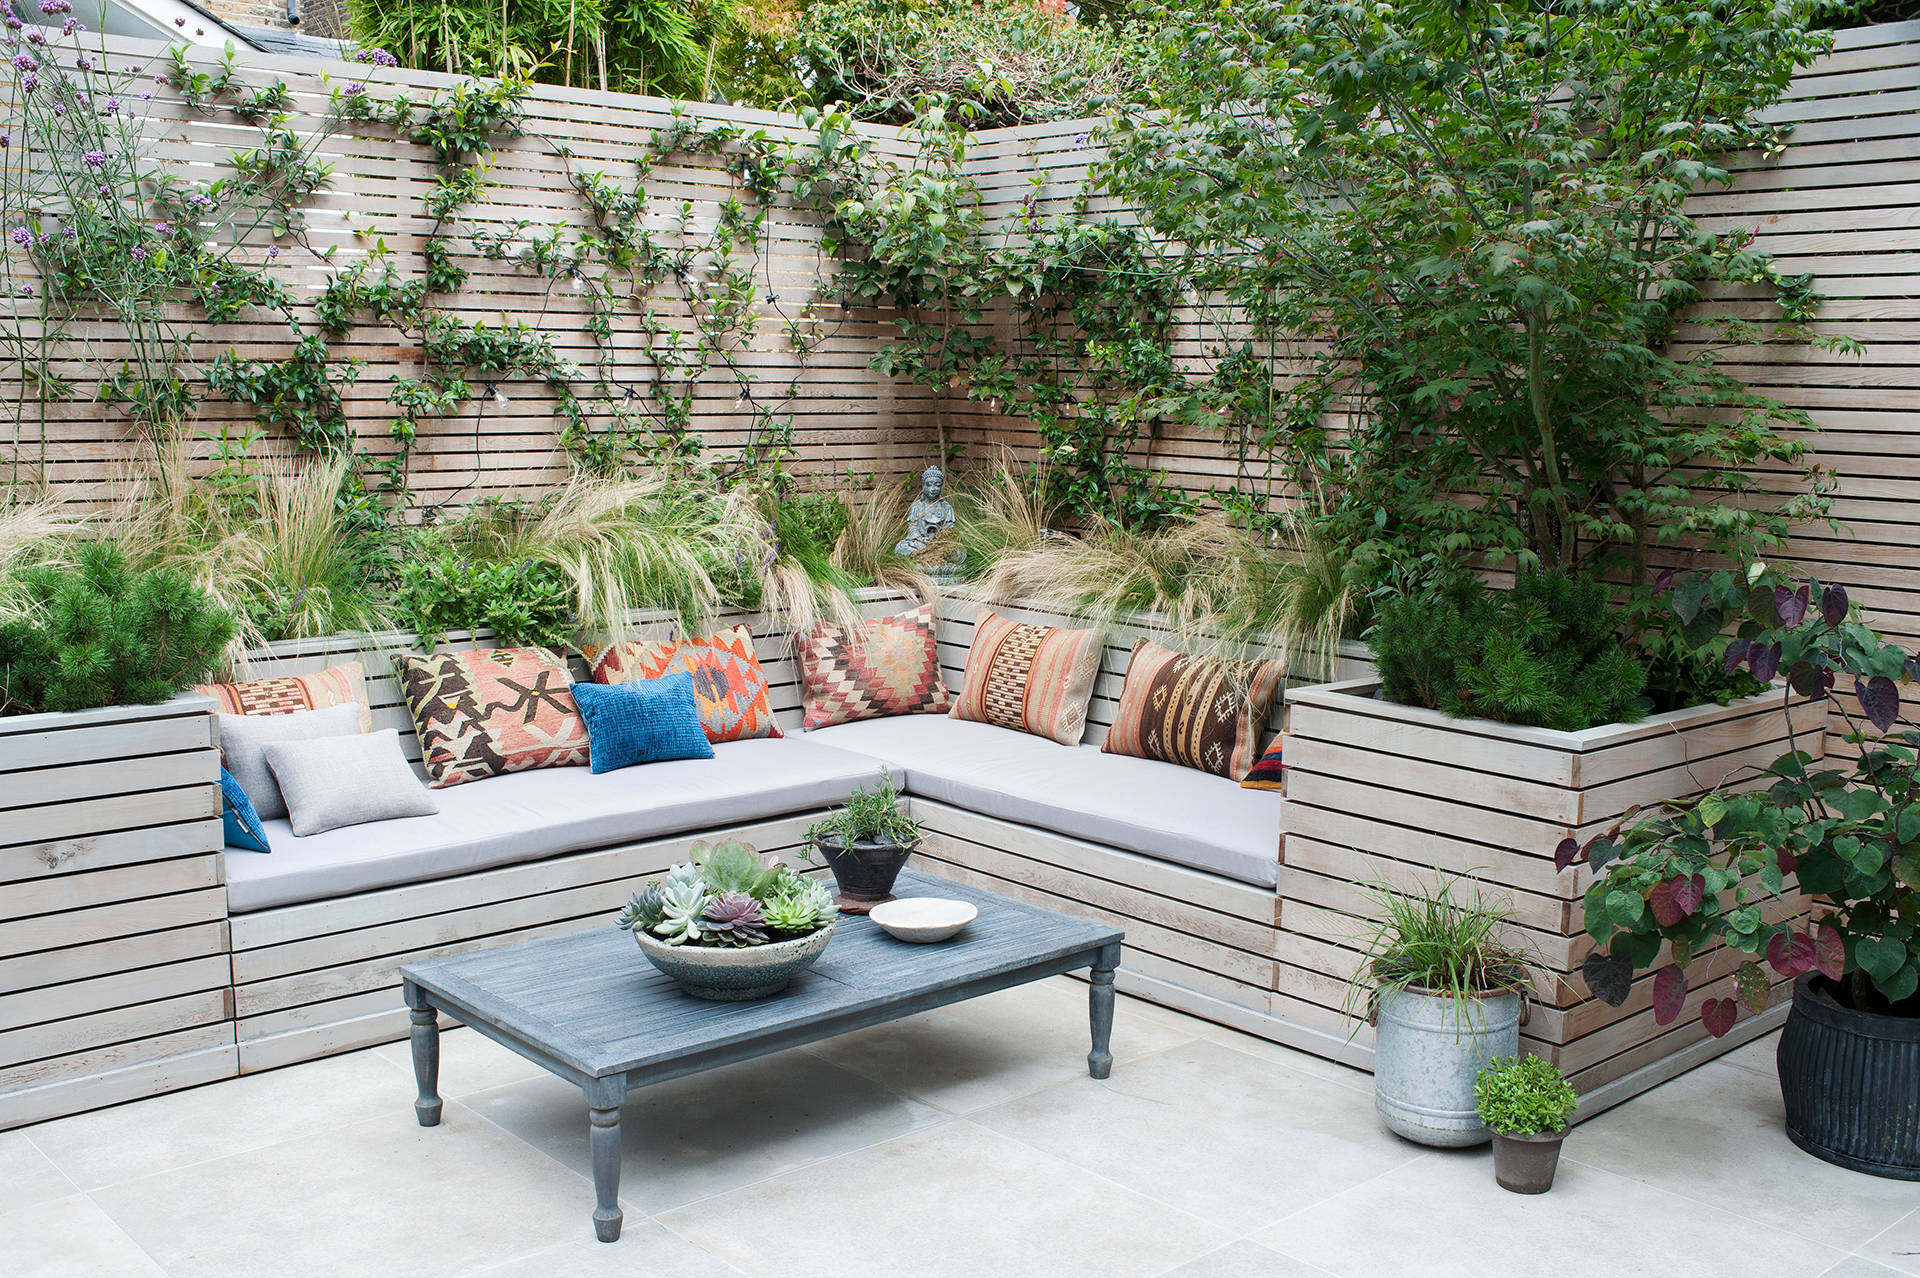
24. Design a Modern Courtyard with Slatted Walls and Built-in Seating
This design is a triumph of texture and containment. The repetition of the horizontal wooden slats across the walls, planters, and seating creates a powerful sense of rhythm and unity. This makes the space feel cohesive and intentionally designed. Crucially, the ‘GOMO’ (Grass and Other Materials) approach, where plants are allowed to grow up and through the structure, softens the modernism and prevents it from feeling sterile. The contrast between the clean, hard lines of the wood and the soft, organic forms of the plants is visually dynamic and engaging.
💸 Get This Look For Less
This is a perfect solution for a small, enclosed space like a courtyard, a city backyard, or a rooftop terrace, perhaps in the 150-300 square foot range. The brilliance of the integrated, wall-to-wall design is that it maximizes the usable area. By building the seating and planters directly into the perimeter, you eliminate the need for bulky, freestanding furniture, which would chop up the limited floor space. The vertical slatted walls also create privacy and a sense of being in a secluded oasis, even if neighbors are close by.
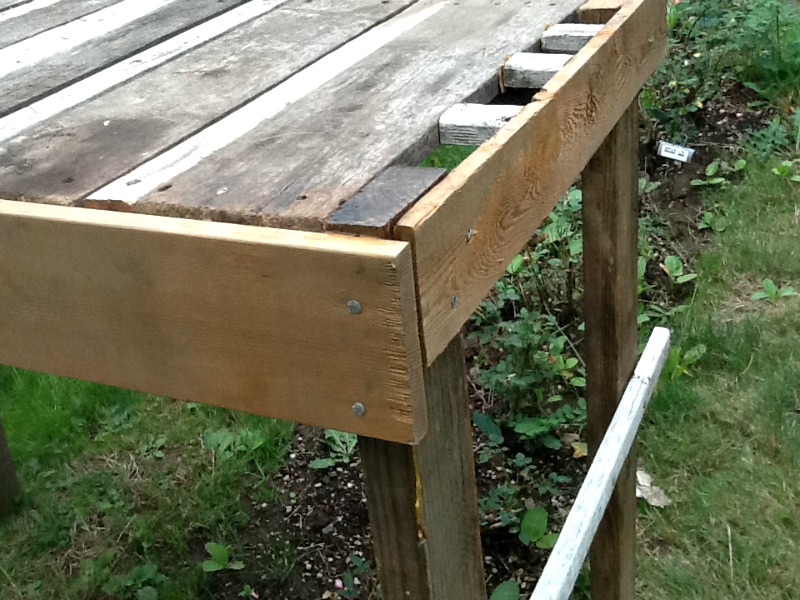
25. Construct a Rustic Raised Garden from Pallet and Pine
This project is the definition of resourceful, budget-friendly gardening. The main cost is your time. Reclaimed pallet wood can often be sourced for free. Check with local businesses or look on community marketplace websites. The pine frame can be constructed from inexpensive 2x4s. If you have to buy a box of screws, you can still easily build this entire raised bed for under $30. It’s a fantastic way to get a functional garden bed without the $100+ price tag of a pre-made kit. It has a similar DIY spirit to the raised bed in Idea #10, but with a more rustic finish.
💡 Designer Tip
Here’s how to assemble this simple and sturdy raised bed. Time Estimate: 2 hours. Material Cost: $15-$40.
- First, build a rectangular frame from your pine 2x4s to your desired dimensions (e.g., 4 feet by 3 feet). Screw the corners together to create the base.
- Cut four legs from the same pine stock, typically 18-24 inches long. Attach one leg inside each corner of your frame.
- Carefully pry the slats off a few reclaimed pallets using a pry bar and hammer. Remove any old nails.
- Cut the pallet slats to fit the top of your frame.
- Lay the slats across the top of the frame and secure them with wood screws, leaving small gaps for drainage.
- Flip the whole thing over, and your raised bed is ready to be placed and filled with soil!
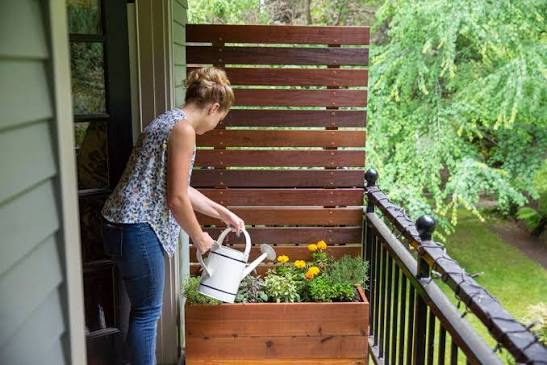
26. Add a Vertical Planter with a Privacy Screen to a Balcony
For a multi-functional piece like this, plant choice is everything. In the upper part of the privacy screen, use trailing plants like string of pearls or ivy. Their cascading growth will soften the lines of the screen and maximize the green effect. In the main planter box, place your taller, sun-loving plants with the most vibrant colors (like the yellow flowers shown here) in the front, and use fuller, leafier green plants in the back to create a lush backdrop. This layering method makes the arrangement look fuller and more dynamic.
💰 Budget Breakdown
A tall piece of furniture on a balcony can be a serious wind hazard. If you live in a high-rise or a windy area, you absolutely must secure this planter to the wall or railing of your balcony. A few sturdy L-brackets or heavy-duty zip ties can prevent a disaster during a storm. Also, consider the weight. A large wooden planter filled with wet soil is incredibly heavy. Check your balcony’s weight restrictions and consider using a lighter-weight potting mix and plastic pots inside the wooden frame to reduce the overall load.
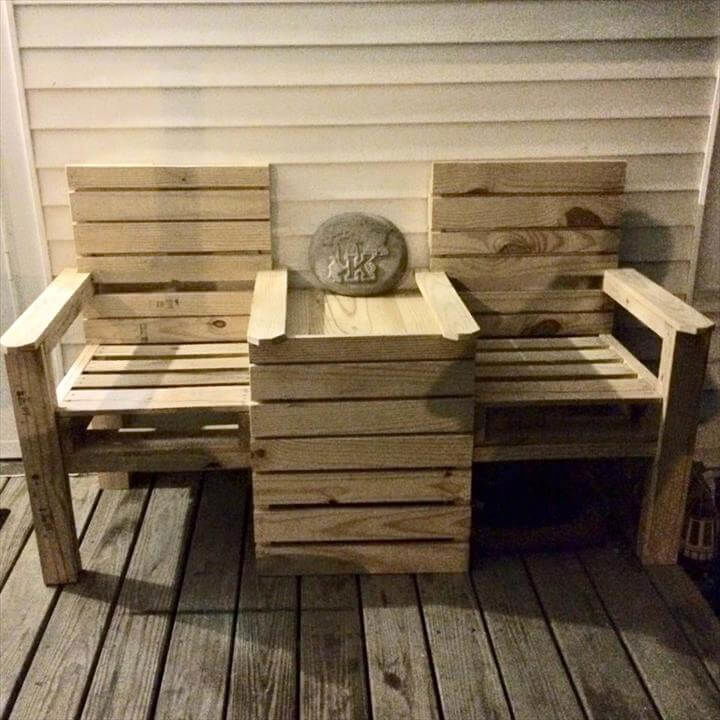
27. Assemble a Rustic Patio Bench with a Built-in Center Table
This design is brilliant in its simplicity and functionality. By connecting two simple benches with a central box table, it creates a single, unified piece of furniture that is more than the sum of its parts. This “love seat” configuration is inherently more social and useful than two separate benches. It provides dedicated seating and a shared surface for drinks or a small plant, all within a compact footprint. The use of the same slatted wood construction throughout makes it look cohesive and intentionally designed, not just cobbled together. It’s a more structured version of the bench in Idea #20.
⭐ The One Thing
This is a prime candidate for a DIY project using reclaimed or budget-friendly materials. Instead of buying expensive lumber, you could build this entire unit from cedar or pressure-treated fence pickets, which cost only a few dollars each. Check the ‘cull’ section at home improvement stores for discounted, slightly imperfect wood that would be perfect for a rustic project like this. With a saw, a drill, and a box of exterior screws, you could replicate this entire seating arrangement for well under $100.
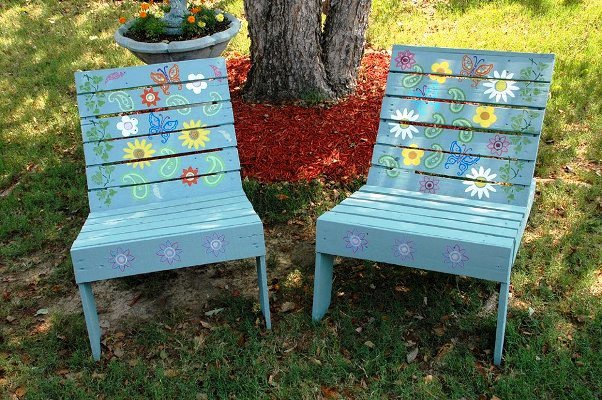
28. Personalize Garden Chairs with Hand-Painted Floral and Butterfly Motifs
Transform plain chairs into works of art with this fun painting project. Time Estimate: 3-6 hours (plus drying time). Material Cost: $25-$50.
- Start with wooden chairs. If they’re already painted, give them a light sanding to help the new paint adhere.
- Apply two coats of your base color (like the light blue shown here) using an exterior-grade paint. Let it dry completely.
- Use smaller artist brushes and acrylic craft paints to add your designs. Start with the larger elements, like the main flowers and butterflies on the backrest.
- Add smaller details and accents, like the paisley swirls and the repeating pattern on the front apron. Don’t be afraid to layer colors!
- Once your painted designs are fully dry, apply two coats of a clear, UV-resistant exterior sealant over the entire chair to protect your artwork from sun and rain. Compare this whimsical approach to the upcycled chair bench in Idea #19.
✅ Before You Start
The ‘cottagecore’ and ‘dopamine decor’ trends are all about filling your home and garden with items that are personal, joyful, and handmade. This project is the perfect embodiment of that ethos. It rejects mass-produced, generic furniture in favor of something unique and full of personality. The act of painting the chairs yourself infuses them with story and meaning. It’s a move towards maximalism and self-expression, proving that your backyard decor doesn’t have to be beige—it can be a vibrant reflection of your own creativity.
Your Backyard Canvas is Waiting
Armed with these 28 ideas, you’re ready to stop scrolling and start building. The best outdoor spaces are the ones that reflect your personality and how you want to live, so don’t be afraid to mix and match concepts to create a backyard that’s uniquely yours. Pick a project, grab your tools, and make it happen.
Feeling inspired? Pin your favorite ideas from this article to your own boards on Pinterest! It’s the best way to keep track of the looks you love and start planning your perfect outdoor oasis.