You know that feeling when you finally find the DIY kids playground idea that looks exactly right for your space? That spark of “Yes, that’s the one!” is what this guide is all about. After filtering through hundreds of real home builds, we’ve narrowed it down to the 31 most inspiring and achievable ideas you can actually build yourself. We’re covering everything from rustic log forts and sprawling pirate ships to clever solutions for smaller yards, with project costs ranging from a few hundred dollars to more ambitious builds.
For 2026, the biggest trend we see on Pinterest is a move toward natural materials and imaginative designs that blend beautifully with your garden, rather than overwhelming it with plastic. These aren’t just playgrounds; they’re invitations to adventure. And be sure to read to the end — we break down the most common mistakes that can ruin these projects.
📌 Pin this guide for later — your future self will thank you when it’s time to actually start building.
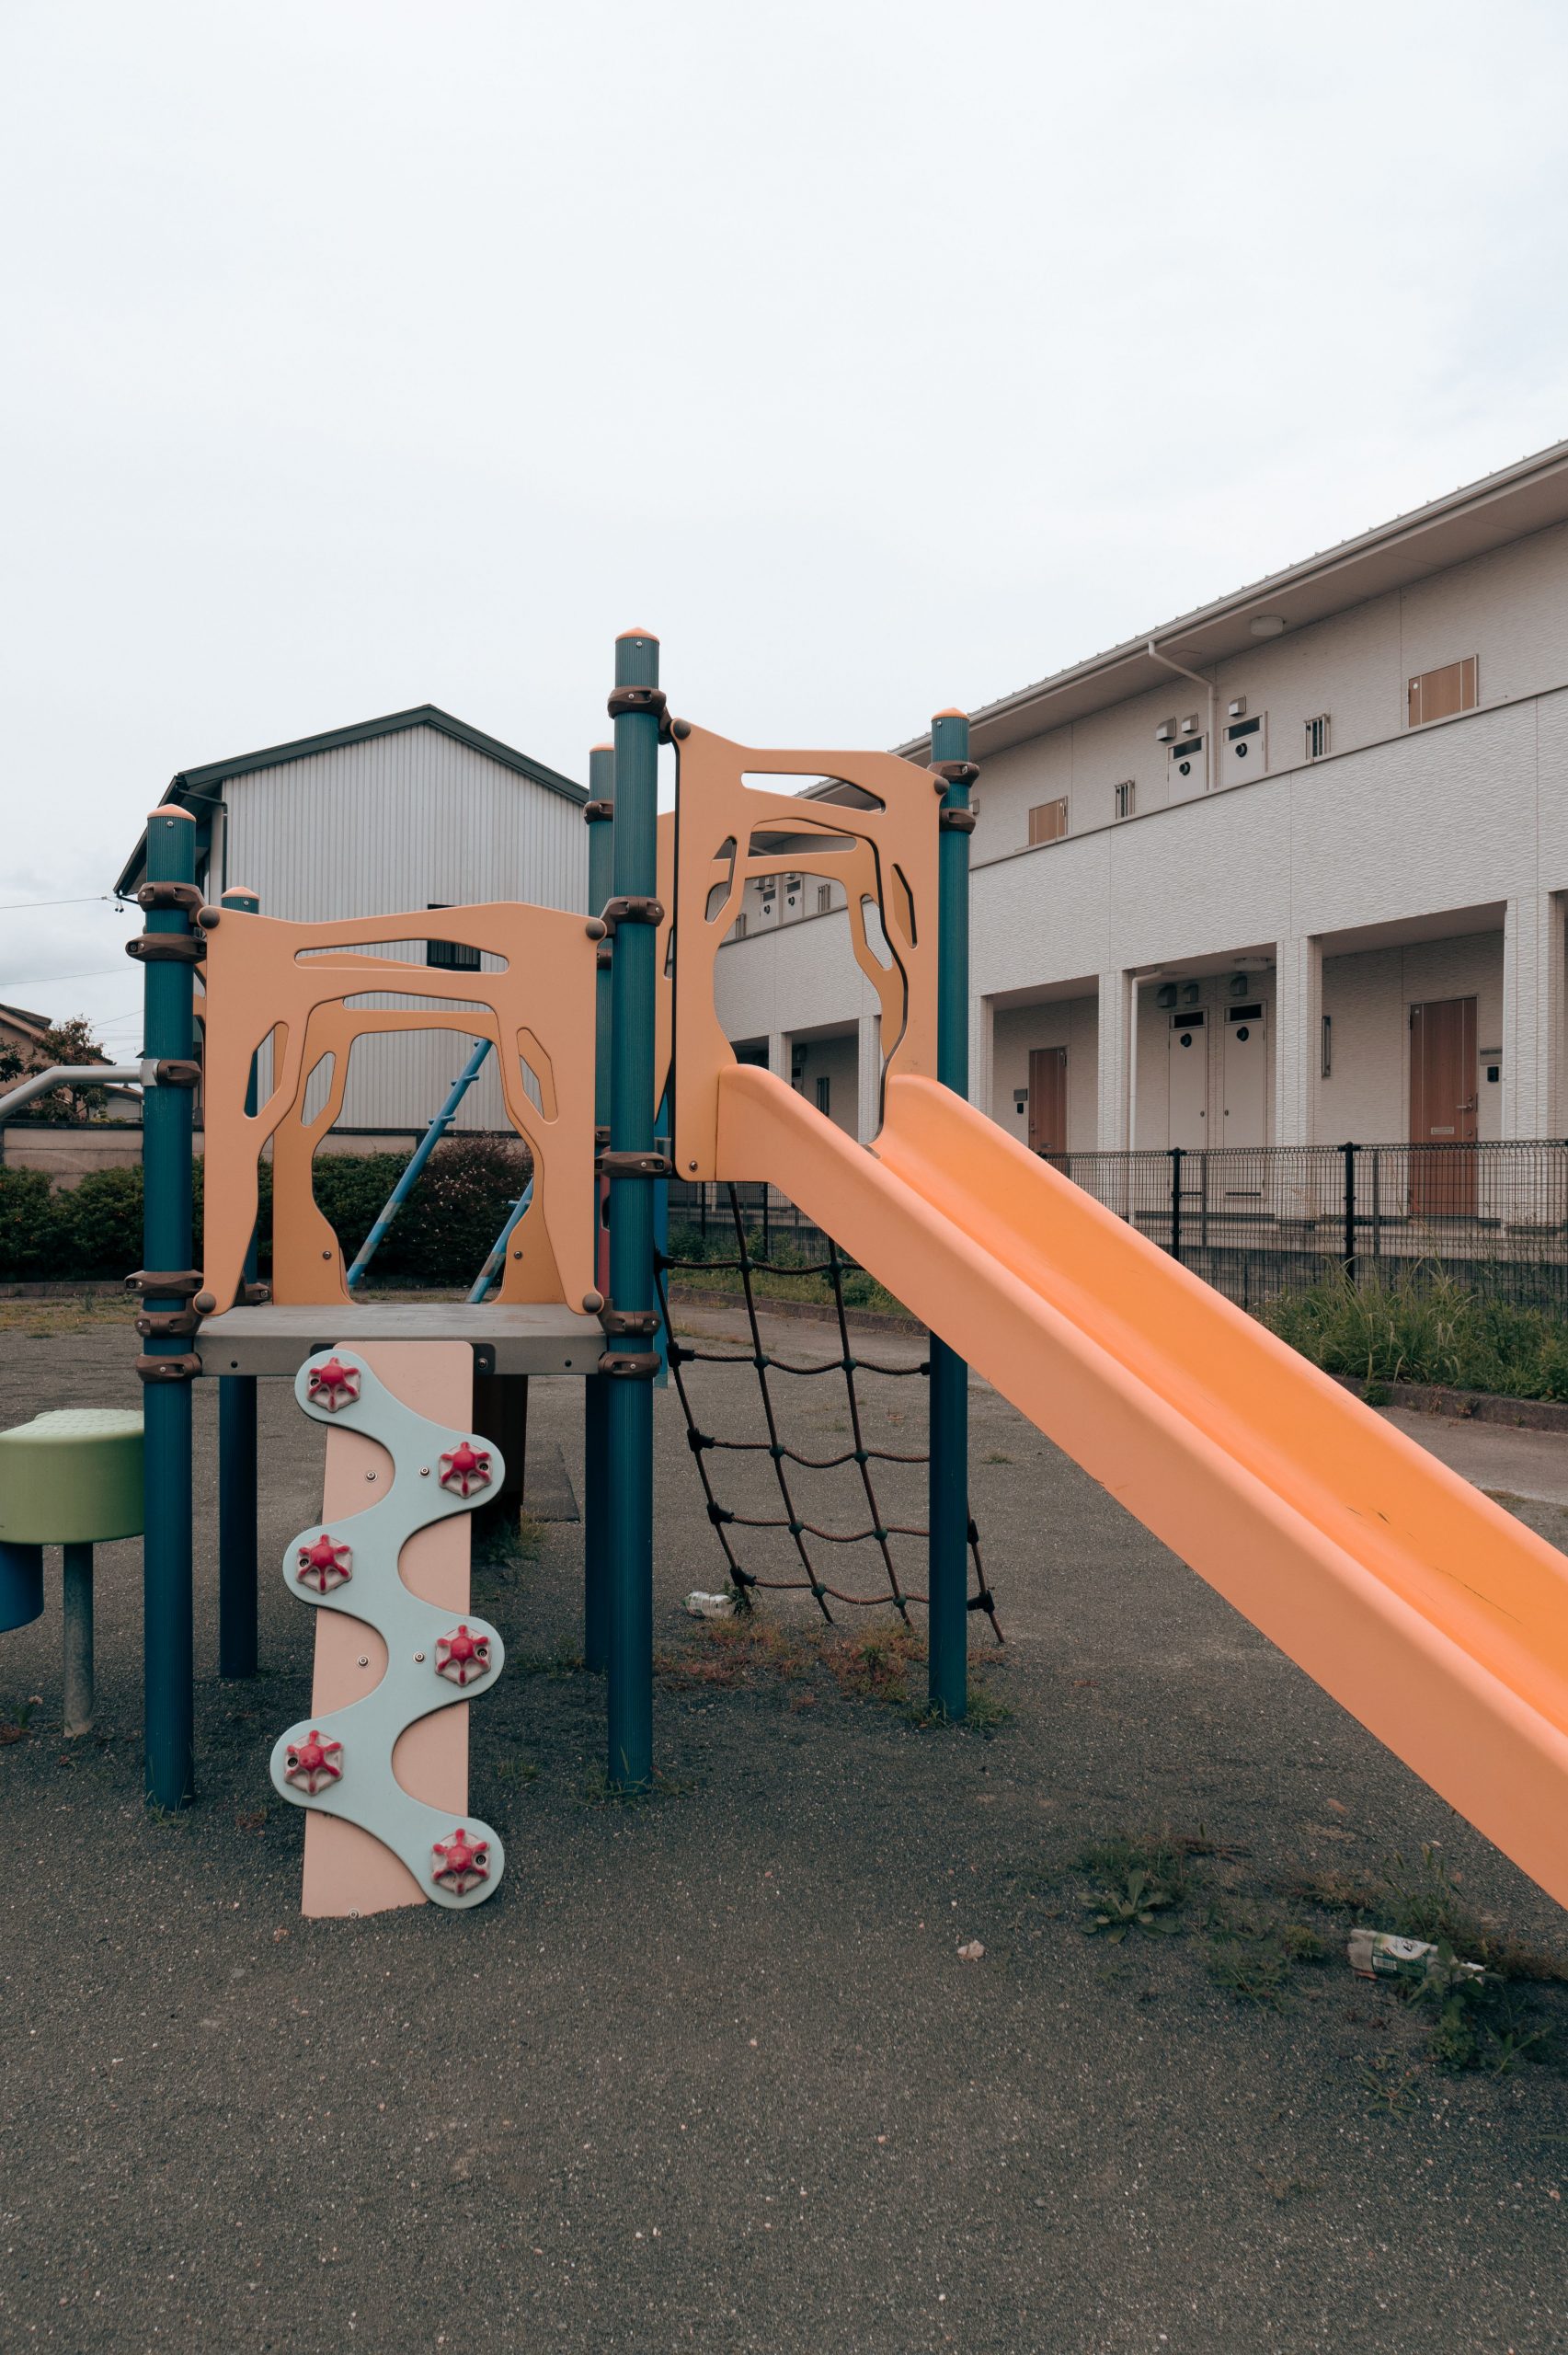
1. Build a Bold Playground with Teal Posts and an Orange Slide
The success of this design lies in its fearless use of color. The high-contrast pairing of bright orange and deep teal creates a visual pop that feels intentional and exciting, preventing the structure from looking like a generic kit. This complementary color scheme stimulates energy and fun. Furthermore, the variety of textures—from the smooth plastic slide to the coarse rope net and grooved climbing panels—offers a rich sensory experience for children, keeping them engaged for longer.
💡 Designer Tip
While incredibly fun, the materials require some thought. Metal poles, especially in wet climates, are prone to rust if the paint gets scratched or chipped. Do a quick inspection each spring and touch up any nicks with rust-proof paint. The vibrant orange plastic slide is a focal point, but intense, direct sunlight can cause the color to fade and the plastic to become brittle over several years. Applying a UV-protectant spray for plastics once a year can significantly prolong its life and color.
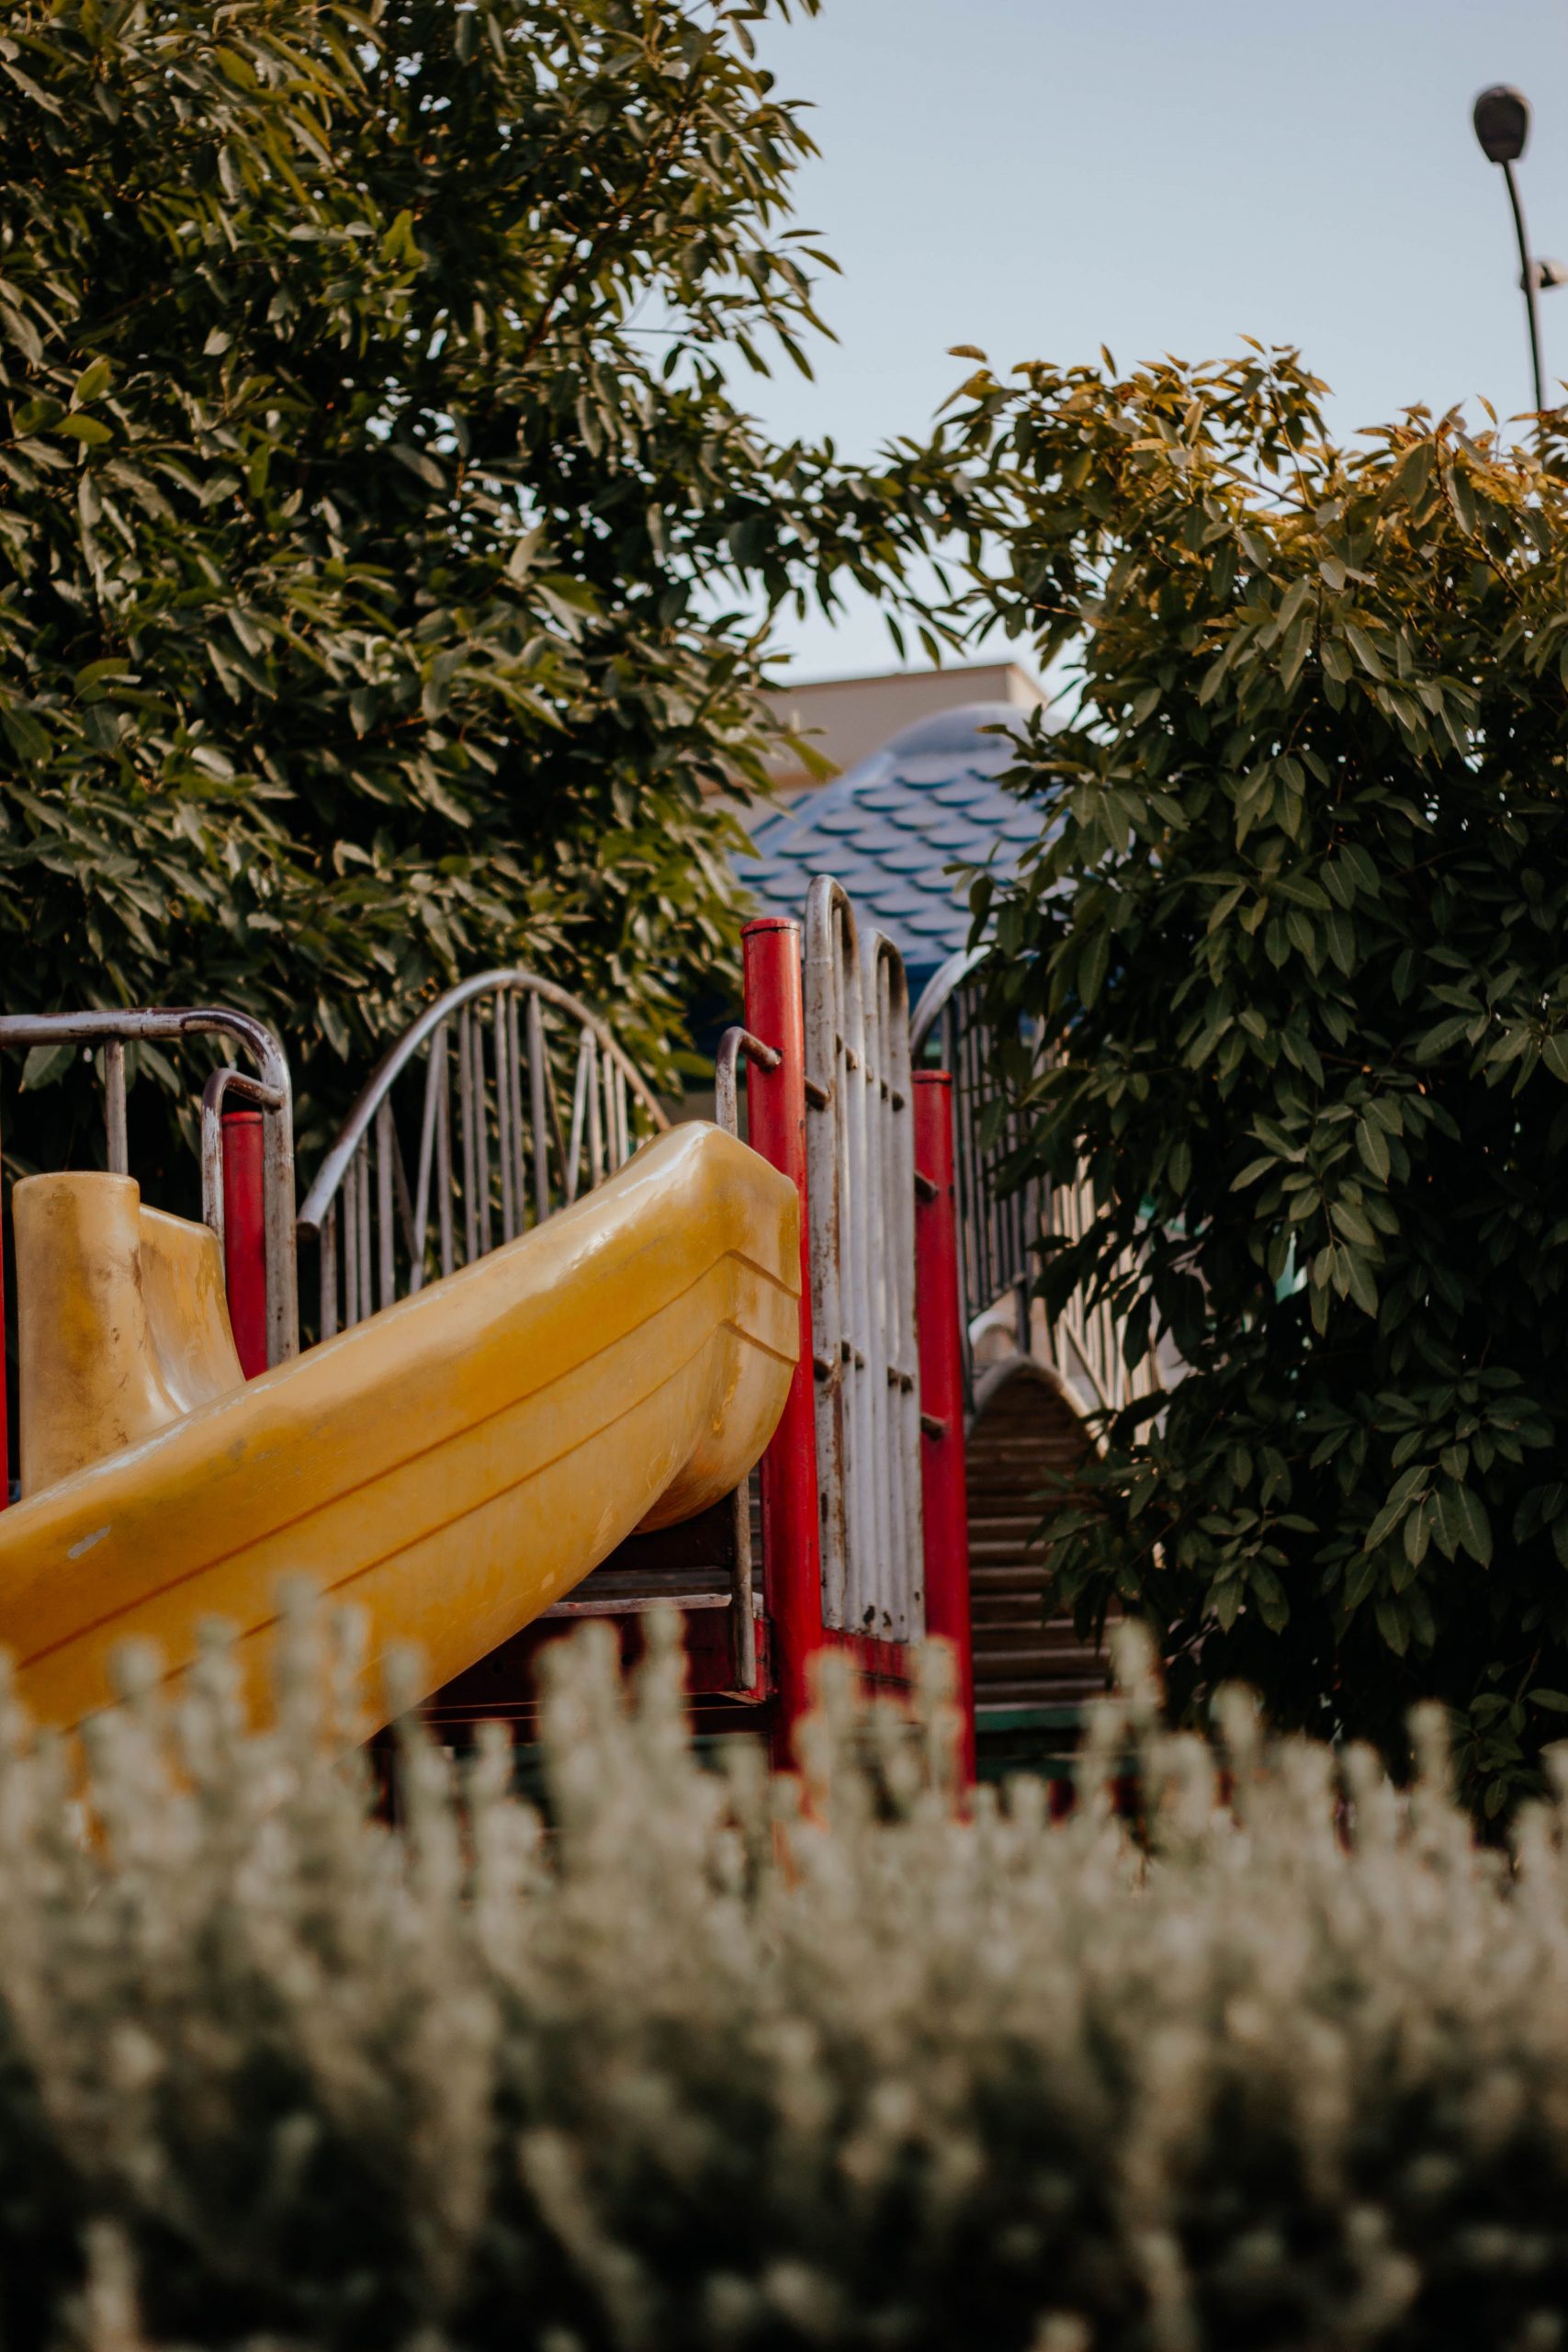
2. Embrace a Lived-In Look with a Weathered Red and Yellow Playset
The single most charming element here is the evidence of use. The slightly weathered paint on the red metal beams and the sun-faded yellow of the slide tell a story of a well-loved play space. In a world of pristine, straight-from-the-box playsets, this one feels authentic and integrated into its natural surroundings. It gives you permission to not worry about every little scuff and scratch, focusing instead on the joy the playground brings.
⚠️ Real Talk
Let’s be honest: achieving this perfectly imperfect, weathered look can be tricky. There’s a fine line between charmingly worn and just plain neglected. If you’re using salvaged materials, be extra vigilant about safety. Check for structural rust on metal parts (not just surface-level) and ensure any wooden components are free from rot and splinters. This look is not ideal for someone who wants a pristine, manicured backyard aesthetic; its beauty is in its imperfection.
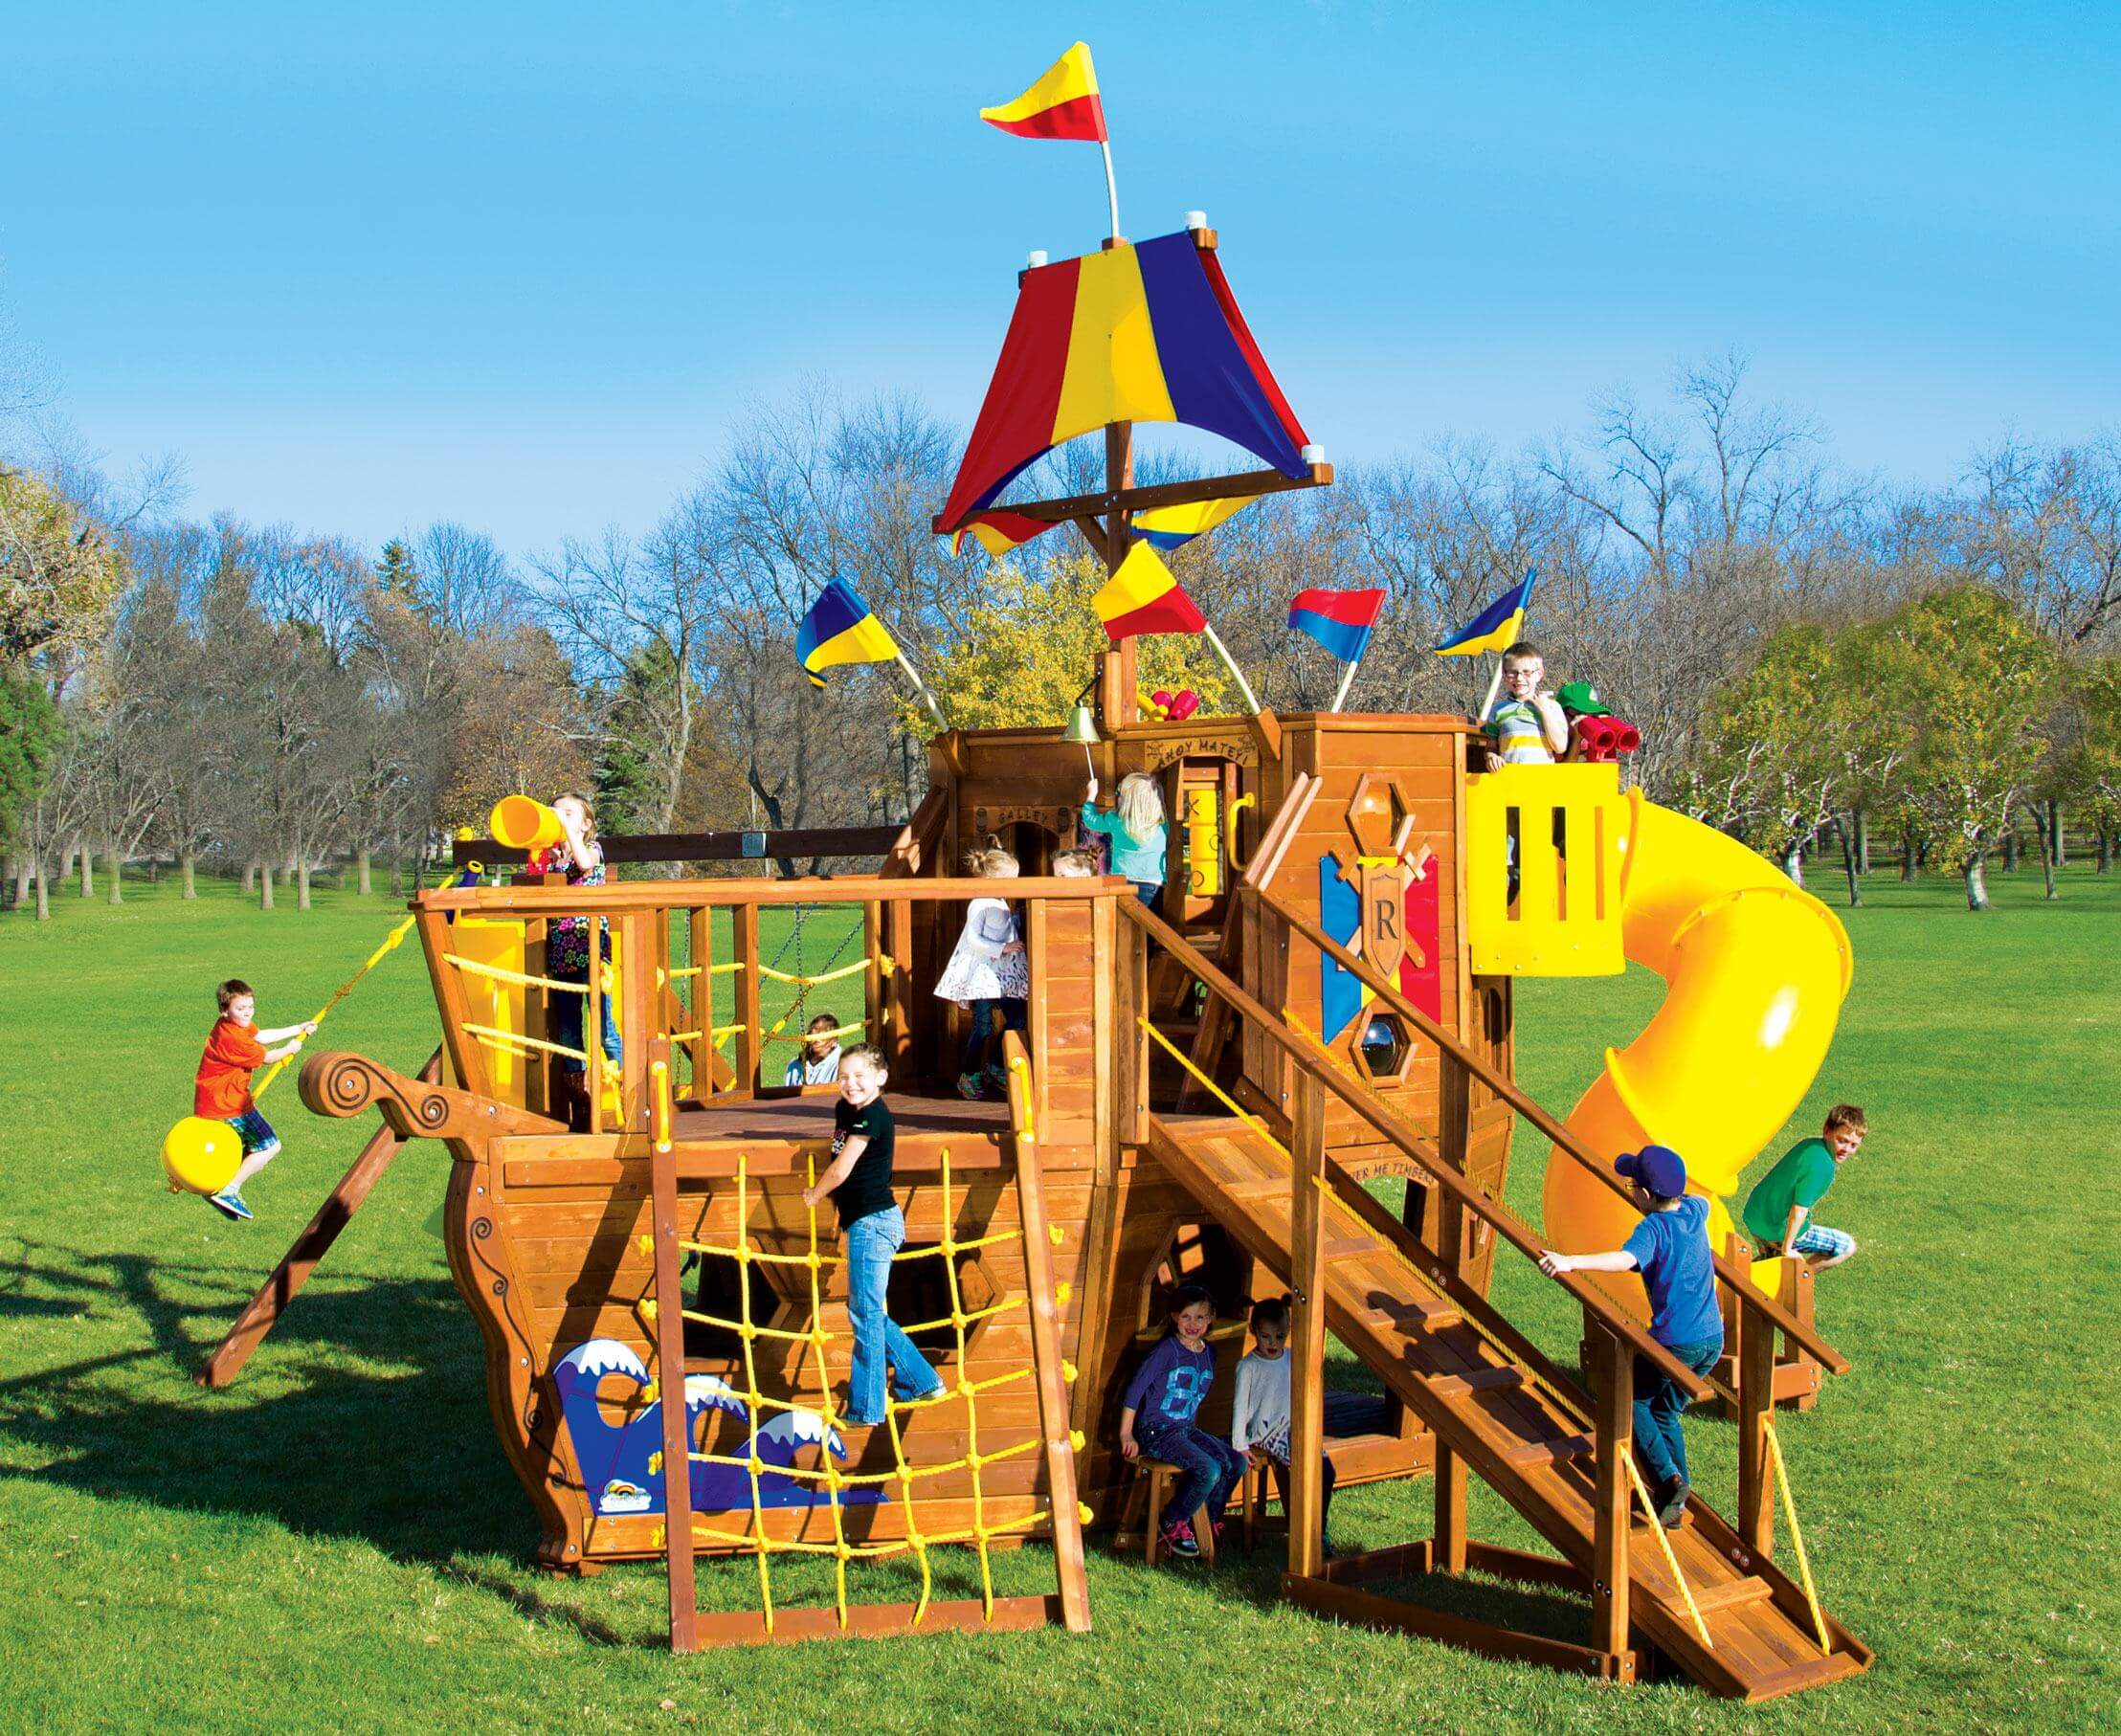
3. Craft an Adventurous Pirate Ship Fort from Weathered Wood
The raw, adventurous spirit of this playground comes from its full commitment to the pirate ship theme. It goes beyond a simple slide and swing, incorporating masts, climbing nets, and arched window details that ignite the imagination. This isn’t just a place to climb; it’s a vessel for countless stories and games, making it a truly special backyard feature that kids won’t quickly outgrow.
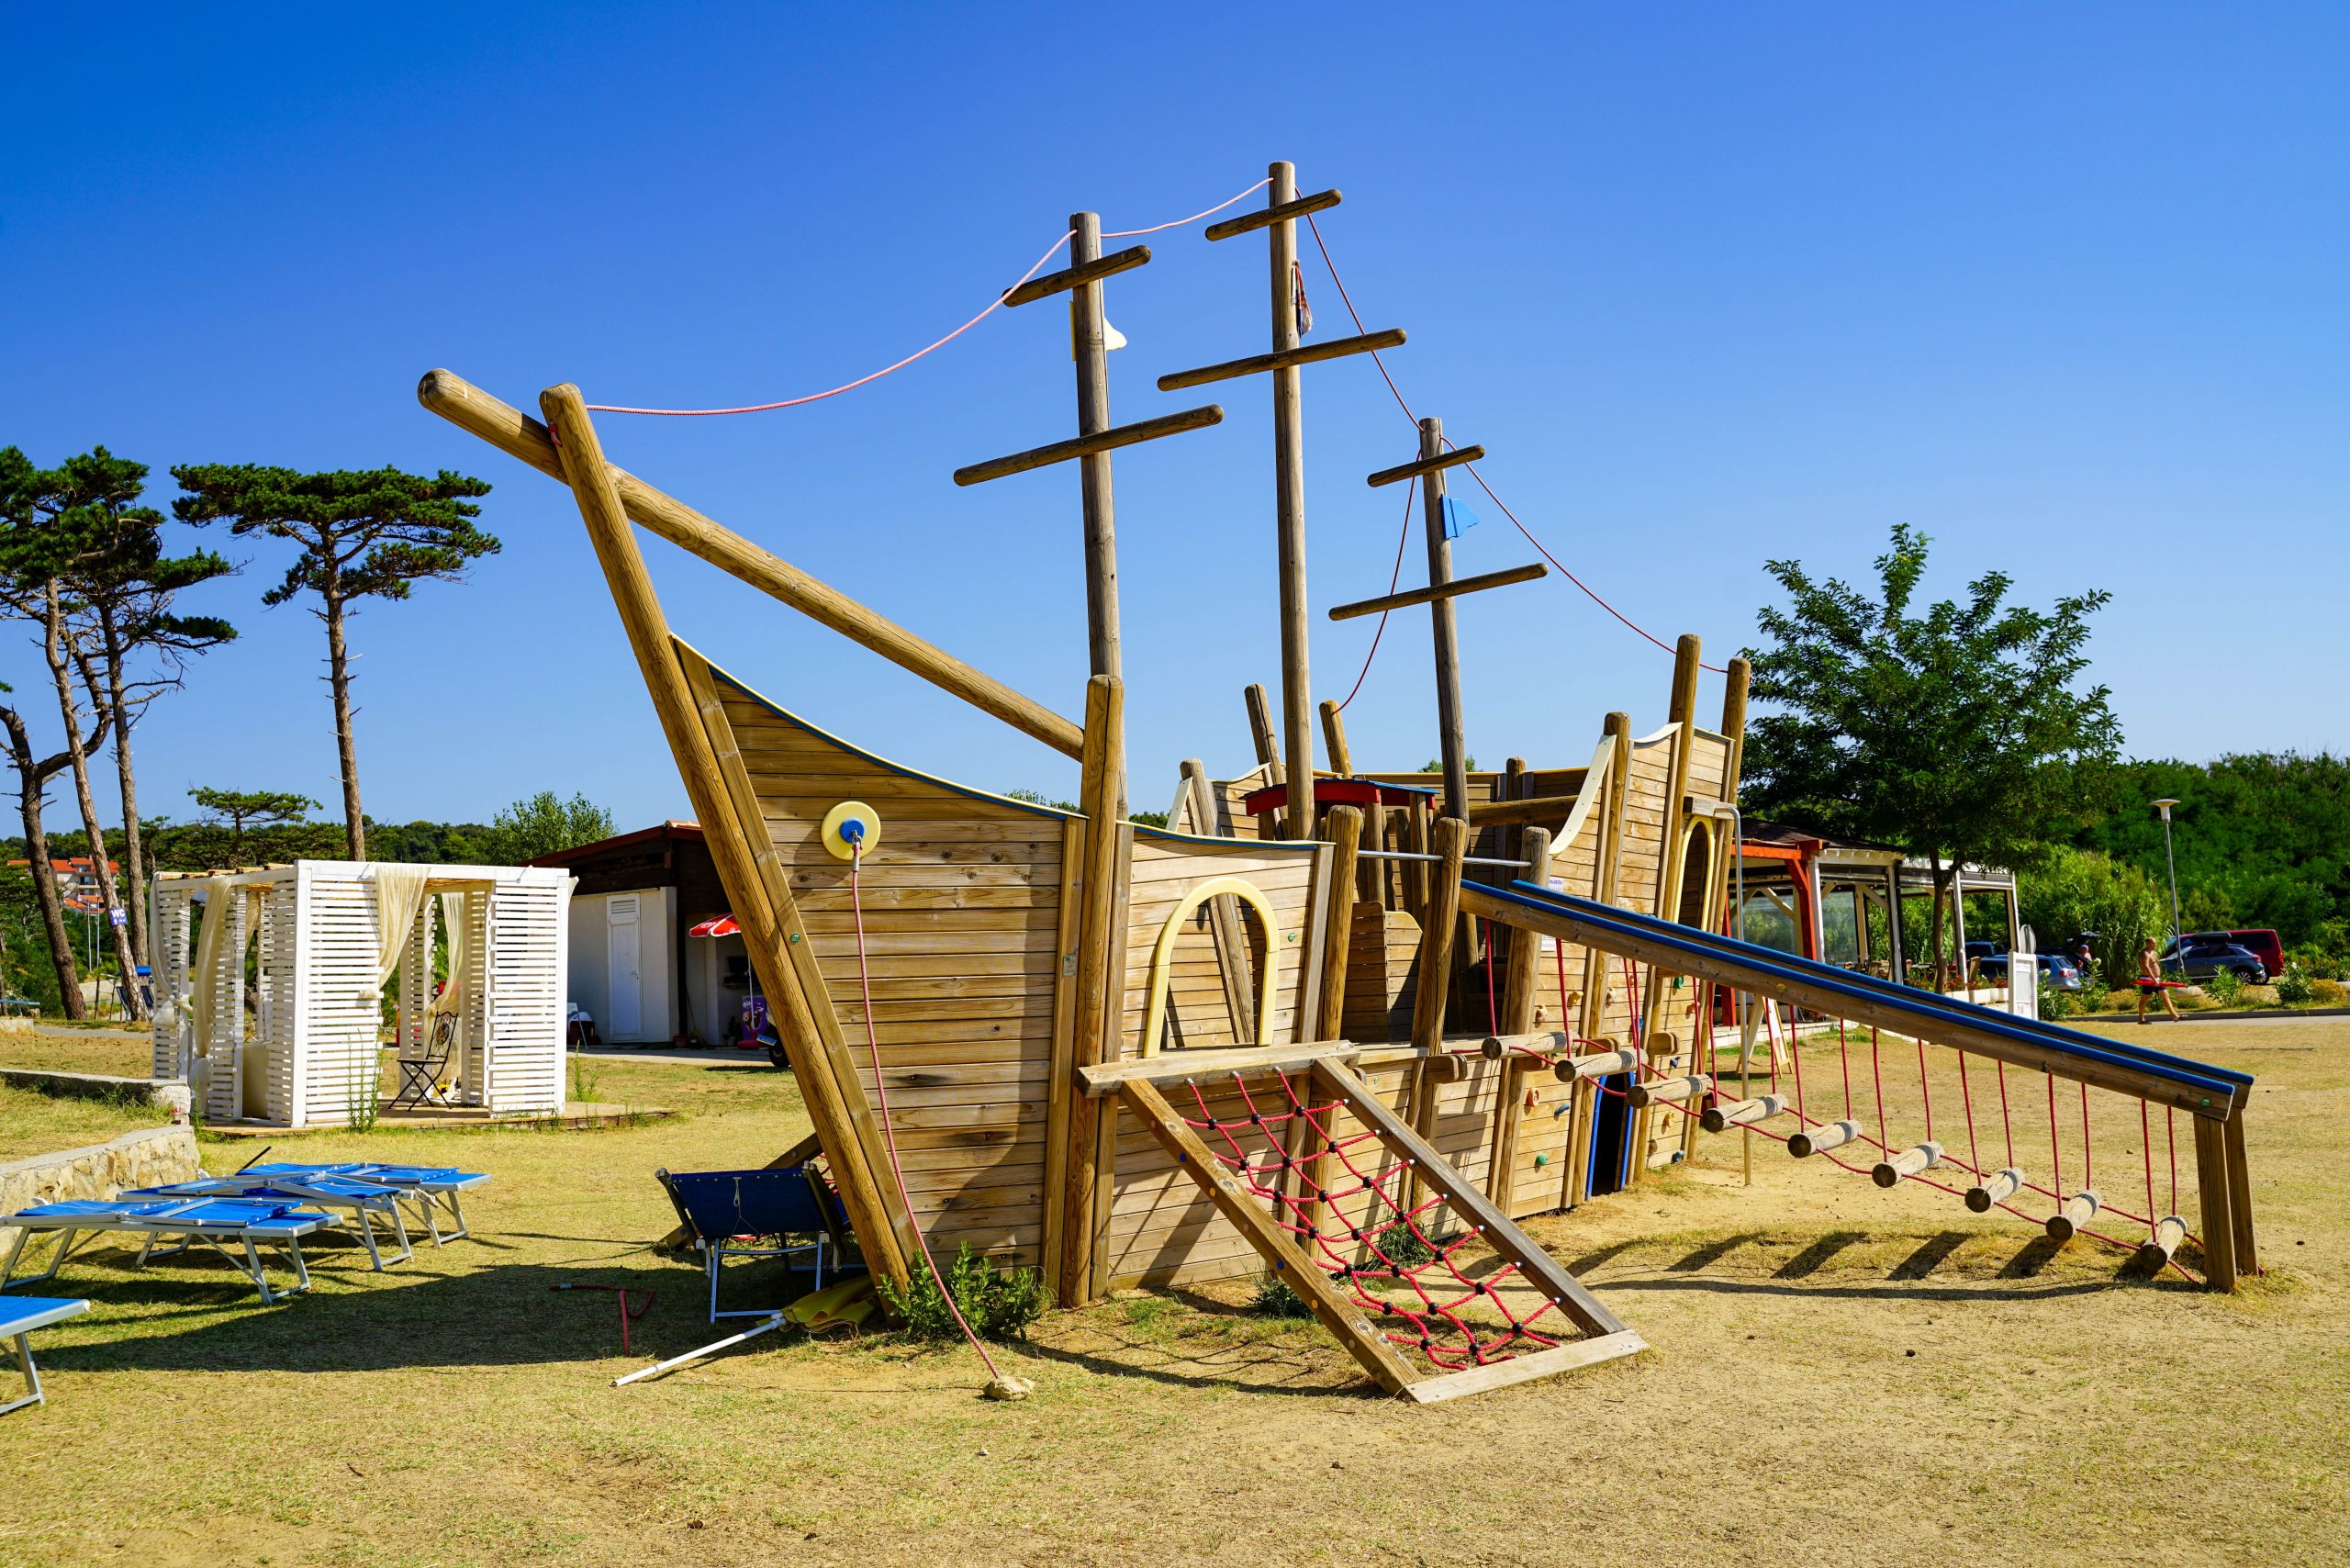
🎯 What Makes It Work
- Lumber & hardware: $1,500 – $3,000
- Slides (2): $400 – $800
- Climbing nets & ropes: $200 – $500
- Accessories (flags, wheel): $100 – $250
- TOTAL: $2,200 – $4,550
- Budget alternative: Use salvaged pallet wood for the main structure and one slide to get a similar look for under $1,200.
4. Design an Expansive Backyard Activity Hub
This sprawling design is a dream for a larger backyard. To accommodate the main structure, the separate slide, the swing set, and the open play areas like the sandbox and tent, you’ll need a relatively flat area of at least 1,200 square feet (e.g., 30′ x 40′). The key is creating distinct ‘zones’ for different activities, which prevents chaos and allows multiple kids to play without getting in each other’s way. For a more compact yard, consider the tower design in Idea #13.
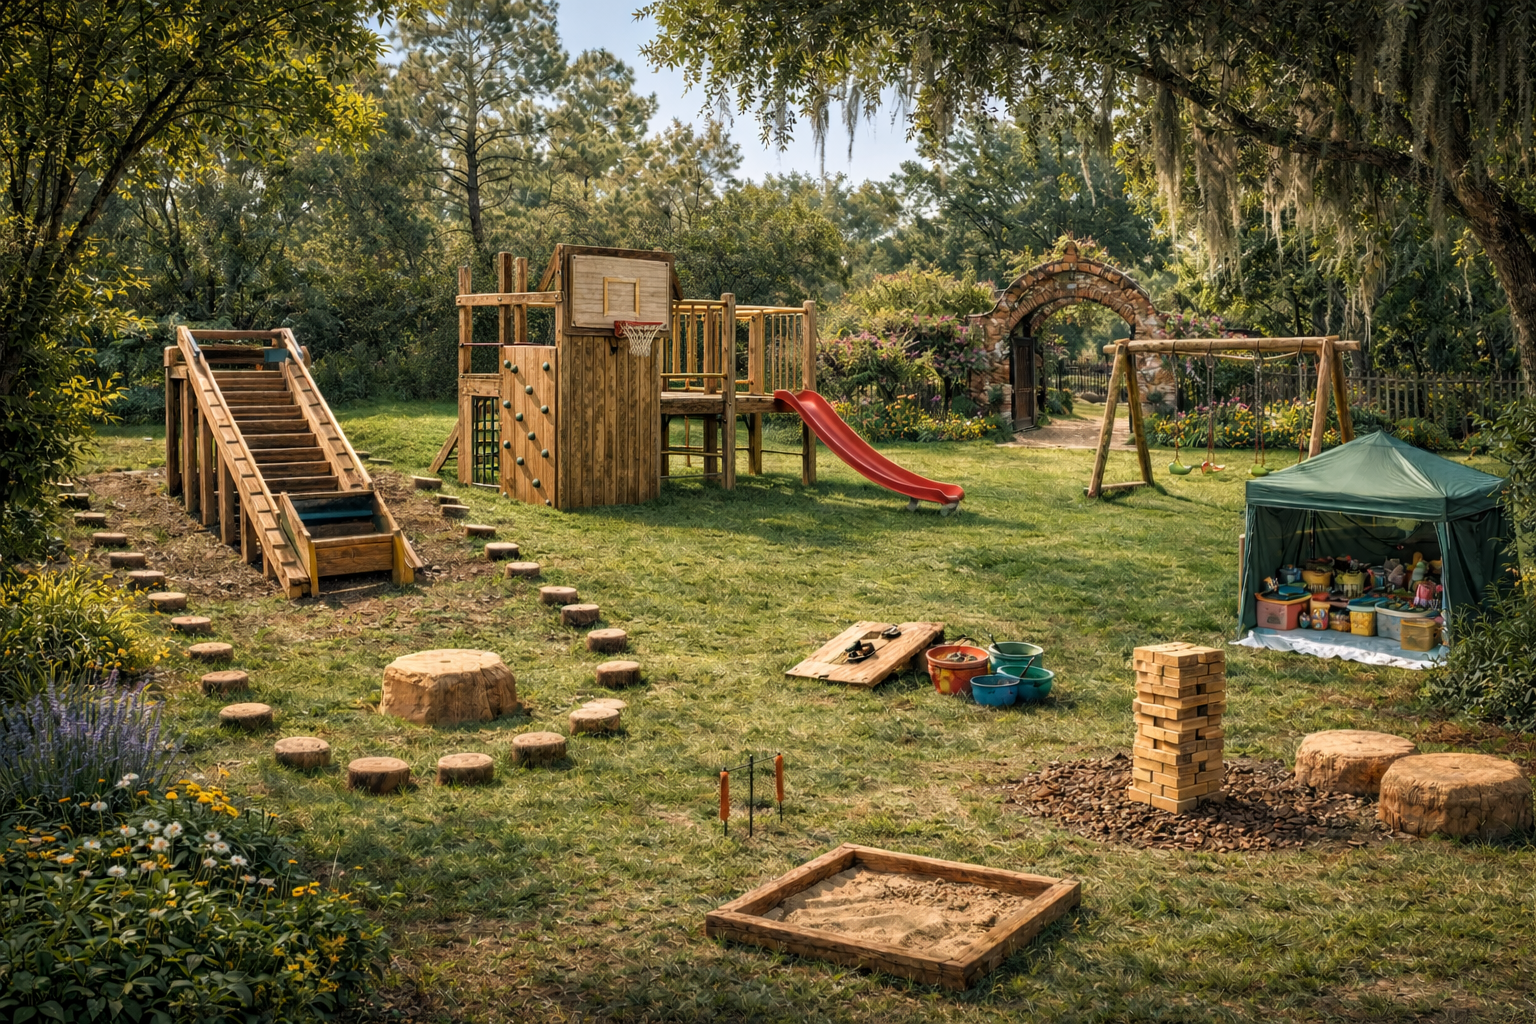
📏 Scale Guide
When creating play zones, use ground cover to define the spaces. Use a soft material like wood chips or rubber mulch in the ‘fall zone’ around the main climbing structure and swings. Use sand for the sandbox area, and keep the natural grass for open play and pathways. This not only improves safety but also visually organizes the space, making a large, busy playground feel more intentional and less cluttered. Define the borders with simple landscape edging to keep the materials from mixing.
5. Embrace Rustic Charm with a Log Climber and Rope Net
A structure made from massive, rough-hewn logs is stunning, but it comes with a reality check: wood requires maintenance. Natural logs, especially in damp climates, will eventually be susceptible to rot and insects. You must use rot-resistant wood like cedar and ensure the logs have been properly sealed. Also, the wood chip ground cover is excellent for safety but will need to be topped up every year or two as it decomposes and compacts. It also gets everywhere, so expect to be sweeping it out of your house.
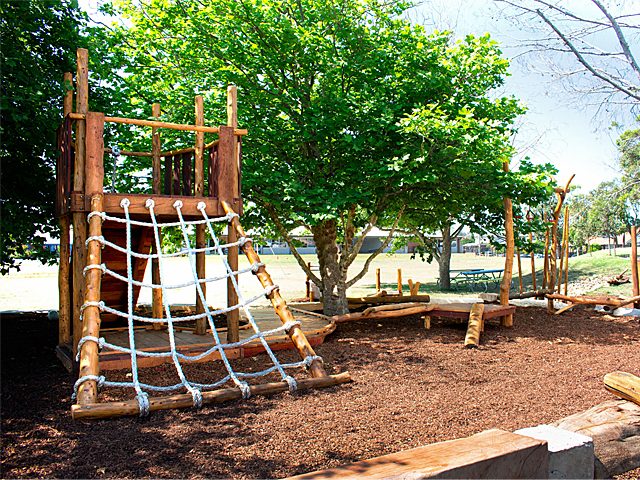
🔧 How-To Brief
You don’t need to be a lumberjack to get this rustic vibe. Visit local tree trimming services; they often have large logs they need to dispose of and may give them to you for free or cheap. For the climbing net, look for industrial surplus stores or online sellers of cargo netting, which is often much cheaper than specialty playground equipment. With some salvaged logs and a cargo net, you could create a smaller version of this for under $400.
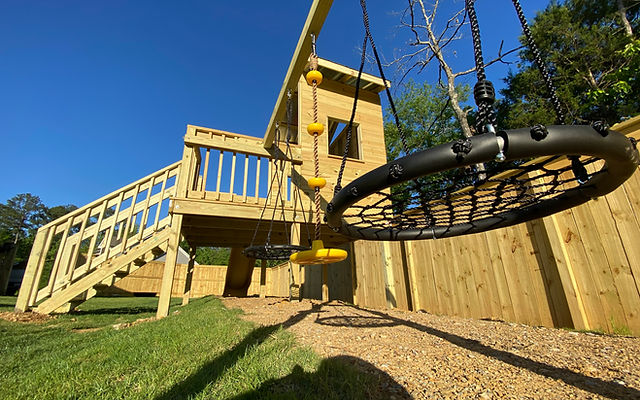
6. Weave a Natural Branch Treehouse with a Bridge and Slide
The woven walls are what set this playground apart. While the slide, bridge, and swings are classic elements, the organic, nest-like texture of the woven branches gives the entire structure a magical, storybook quality. It feels less like a manufactured kit and more like something that grew right out of the ground. This single detail transforms the treehouse from a simple play structure into a piece of landscape art.
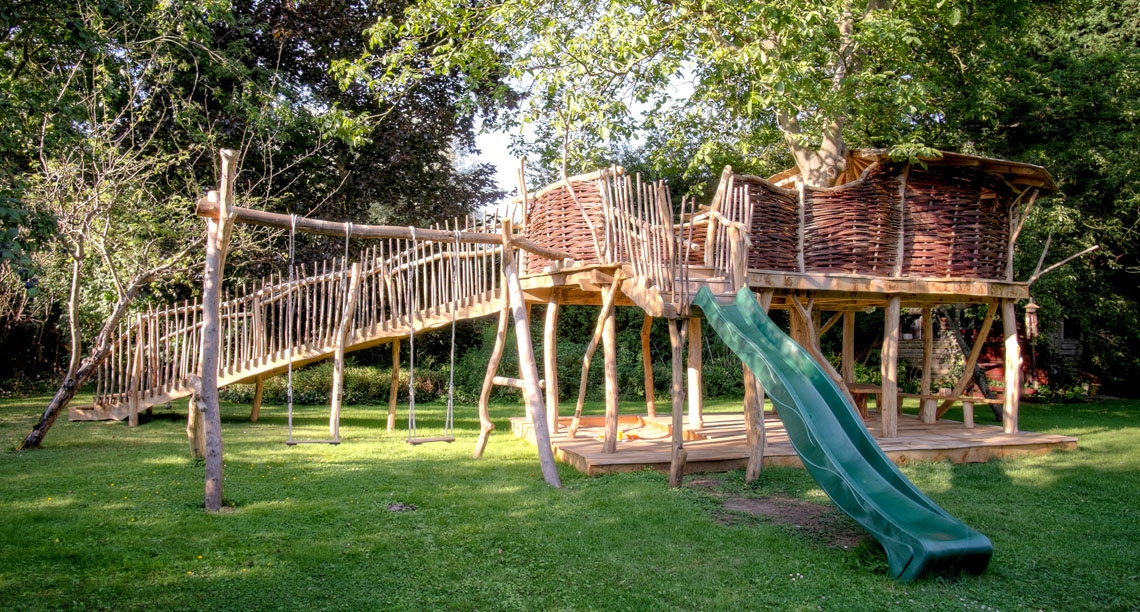
🔥 Trending Context
This design is a masterclass in material harmony. The use of natural wood in multiple forms—smooth support posts, rough woven branches, and clean slatted planks for the bridge—creates a rich visual texture that is cohesive yet dynamic. The organic shapes of the structure contrast beautifully with the clean, straight lines of the lawn, making the playground a clear and inviting focal point. The dark green slide cleverly blends into the background foliage, allowing the woodwork to shine.
7. Build a Backyard Playset with a Playhouse and Net Swing
Creating a stable gravel ground cover area is a great weekend project that keeps mud at bay. Here’s a quick guide:
- Excavate: Dig out the desired area to a depth of 4-5 inches. Make sure the area is level.
- Install Edging: Line the perimeter with wood or plastic landscape edging to contain the gravel.
- Lay Weed Barrier: Roll out landscape fabric across the entire excavated area, overlapping seams by 6 inches. This is crucial to prevent weeds.
- Add Base Layer: Fill the first 2-3 inches with crushed rock and compact it with a hand tamper.
- Top with Pea Gravel: Add the final 1-2 inch layer of pea gravel and rake it smooth.
🧹 Maintenance Reality
Gravel is a durable and relatively low-cost ground cover, but it’s not zero-maintenance. Over time, leaves and debris will collect in it, requiring occasional raking or leaf blowing to keep it clean. Kids will inevitably kick or throw the gravel out of the designated area, so you’ll be sweeping it back in regularly. Finally, while it offers some cushioning, it’s not as soft as rubber mulch or wood chips for falls from a significant height. It’s best used under lower elements like swings and playhouse bases.
8. Create a Cozy Backyard Escape with a Treehouse and String Lights
The magic of this scene comes from a simple formula: 50% natural elements + 30% cozy comforts + 20% playful features. The ‘natural’ is the dominant tree, lush landscaping, and wood/stone materials. The ‘cozy’ comes from the outdoor dining set and, most importantly, the warm glow of the string lights. The ‘playful’ is the treehouse and hammock. You can swap elements easily: replace the stone path with gravel, the dining set with an outdoor sofa, or the hammock with a simple swing, and the enchanting formula still works.
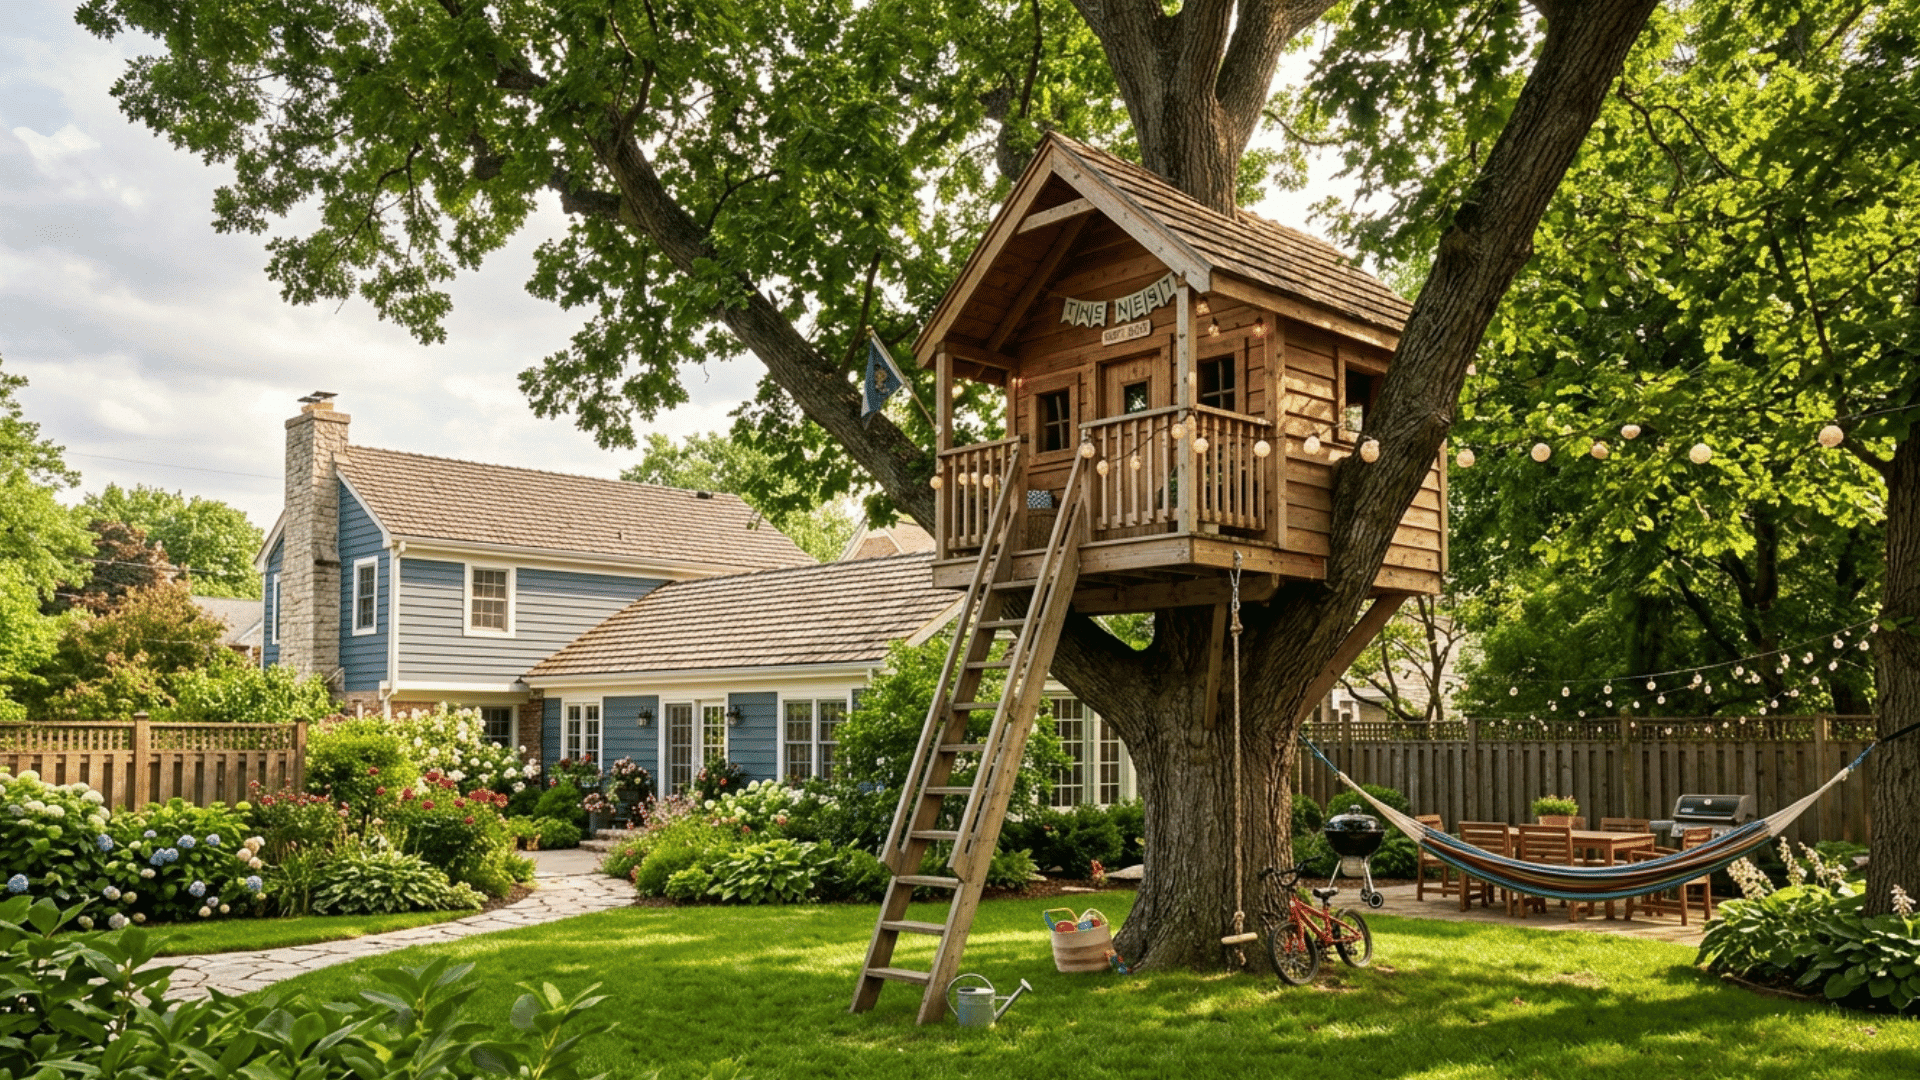
✅ Before You Start
When hanging string lights for a magical, year-round glow, always opt for commercial-grade, weatherproof outdoor lights. Look for ones with shatterproof plastic bulbs, not glass. To get that perfect drape, use a metal guide wire. Secure the wire tightly between two points (e.g., the house and a tree) and then clip the string lights onto the wire. This prevents the lights from sagging too much and protects the electrical cord from bearing the tension, dramatically increasing their lifespan.
9. Construct a Rustic Oak Tree Fort with a Spiral Staircase
Building a structure of this scale directly into a living tree requires serious planning. You absolutely must consult an arborist. Drilling into the main trunk or major limbs can damage or even kill the tree if done improperly. An arborist can advise on the healthiest attachment points and the maximum weight your specific tree can support. This is not a beginner DIY project; a mistake could not only destroy your hard work but also your beautiful mature tree.
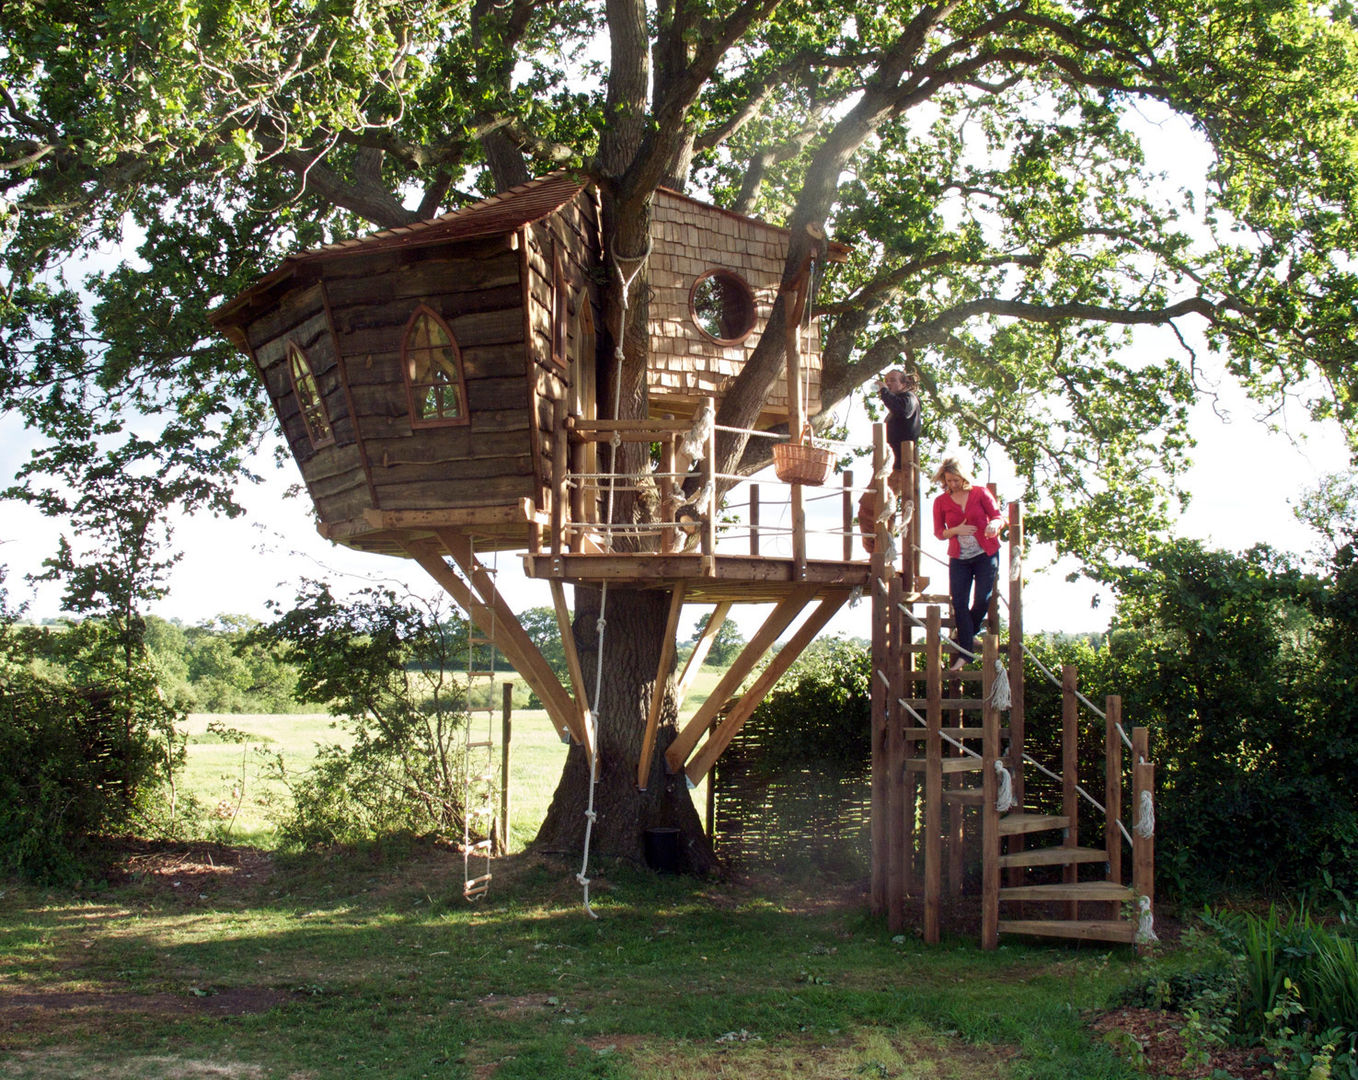
⭐ The One Thing
Before you even sketch a design for a tree-based fort, work through this checklist:
- Tree Health: Is the tree mature, healthy, and free of disease or pests? Look for strong branches and a solid trunk. Oak, maple, and fir are good candidates.
- Site Access: Can you get materials to the tree easily? How will you get large pieces of lumber up into the branches?
- Attachment Plan: Have you researched treehouse attachment bolts (TABs)? These are specialized pieces of hardware designed to support heavy loads while minimizing harm to the tree.
- Local Regulations: Does your city or HOA have rules about treehouses, particularly regarding height or proximity to property lines?
10. Document the Journey of an Unfinished Treehouse Build
There’s a growing movement on social media celebrating the ‘process’ over the ‘reveal.’ This image of an unfinished treehouse taps right into that. It’s a relatable and honest depiction of a large-scale DIY project in progress. In 2026, people are drawn to authenticity; sharing the journey of the build, with all its challenges and milestones, can be just as inspiring as showing off the finished product. It makes the dream of building something amazing feel more accessible.
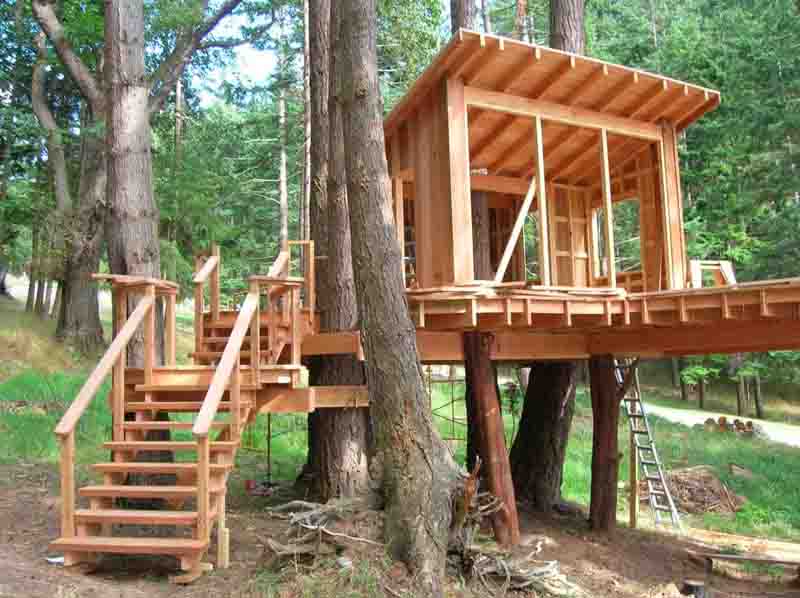
📐 Style Math
The most compelling part of this image is potential. It’s not a finished play space yet; it’s a skeleton of a dream being built. You can see the vision taking shape—the grand staircase, the spacious platform, the house-like frame. It represents the ambition and dedication of a DIY project. This raw, in-progress state is a powerful reminder that the most rewarding things are often those we build with our own hands, step by step.
11. Integrate a Playhouse with a Live Eucalyptus Tree
This design succeeds by an elegant ‘give and take’ between the natural tree and the constructed elements. The structure doesn’t just sit next to the tree; it actively incorporates it, with the main trunk passing directly through the walkway. The unfinished, raw lumber of the playhouse complements the natural, peeling bark of the eucalyptus. This thoughtful integration makes the treehouse feel like an organic extension of the tree itself, rather than an intrusion upon it, creating a harmonious and striking visual.
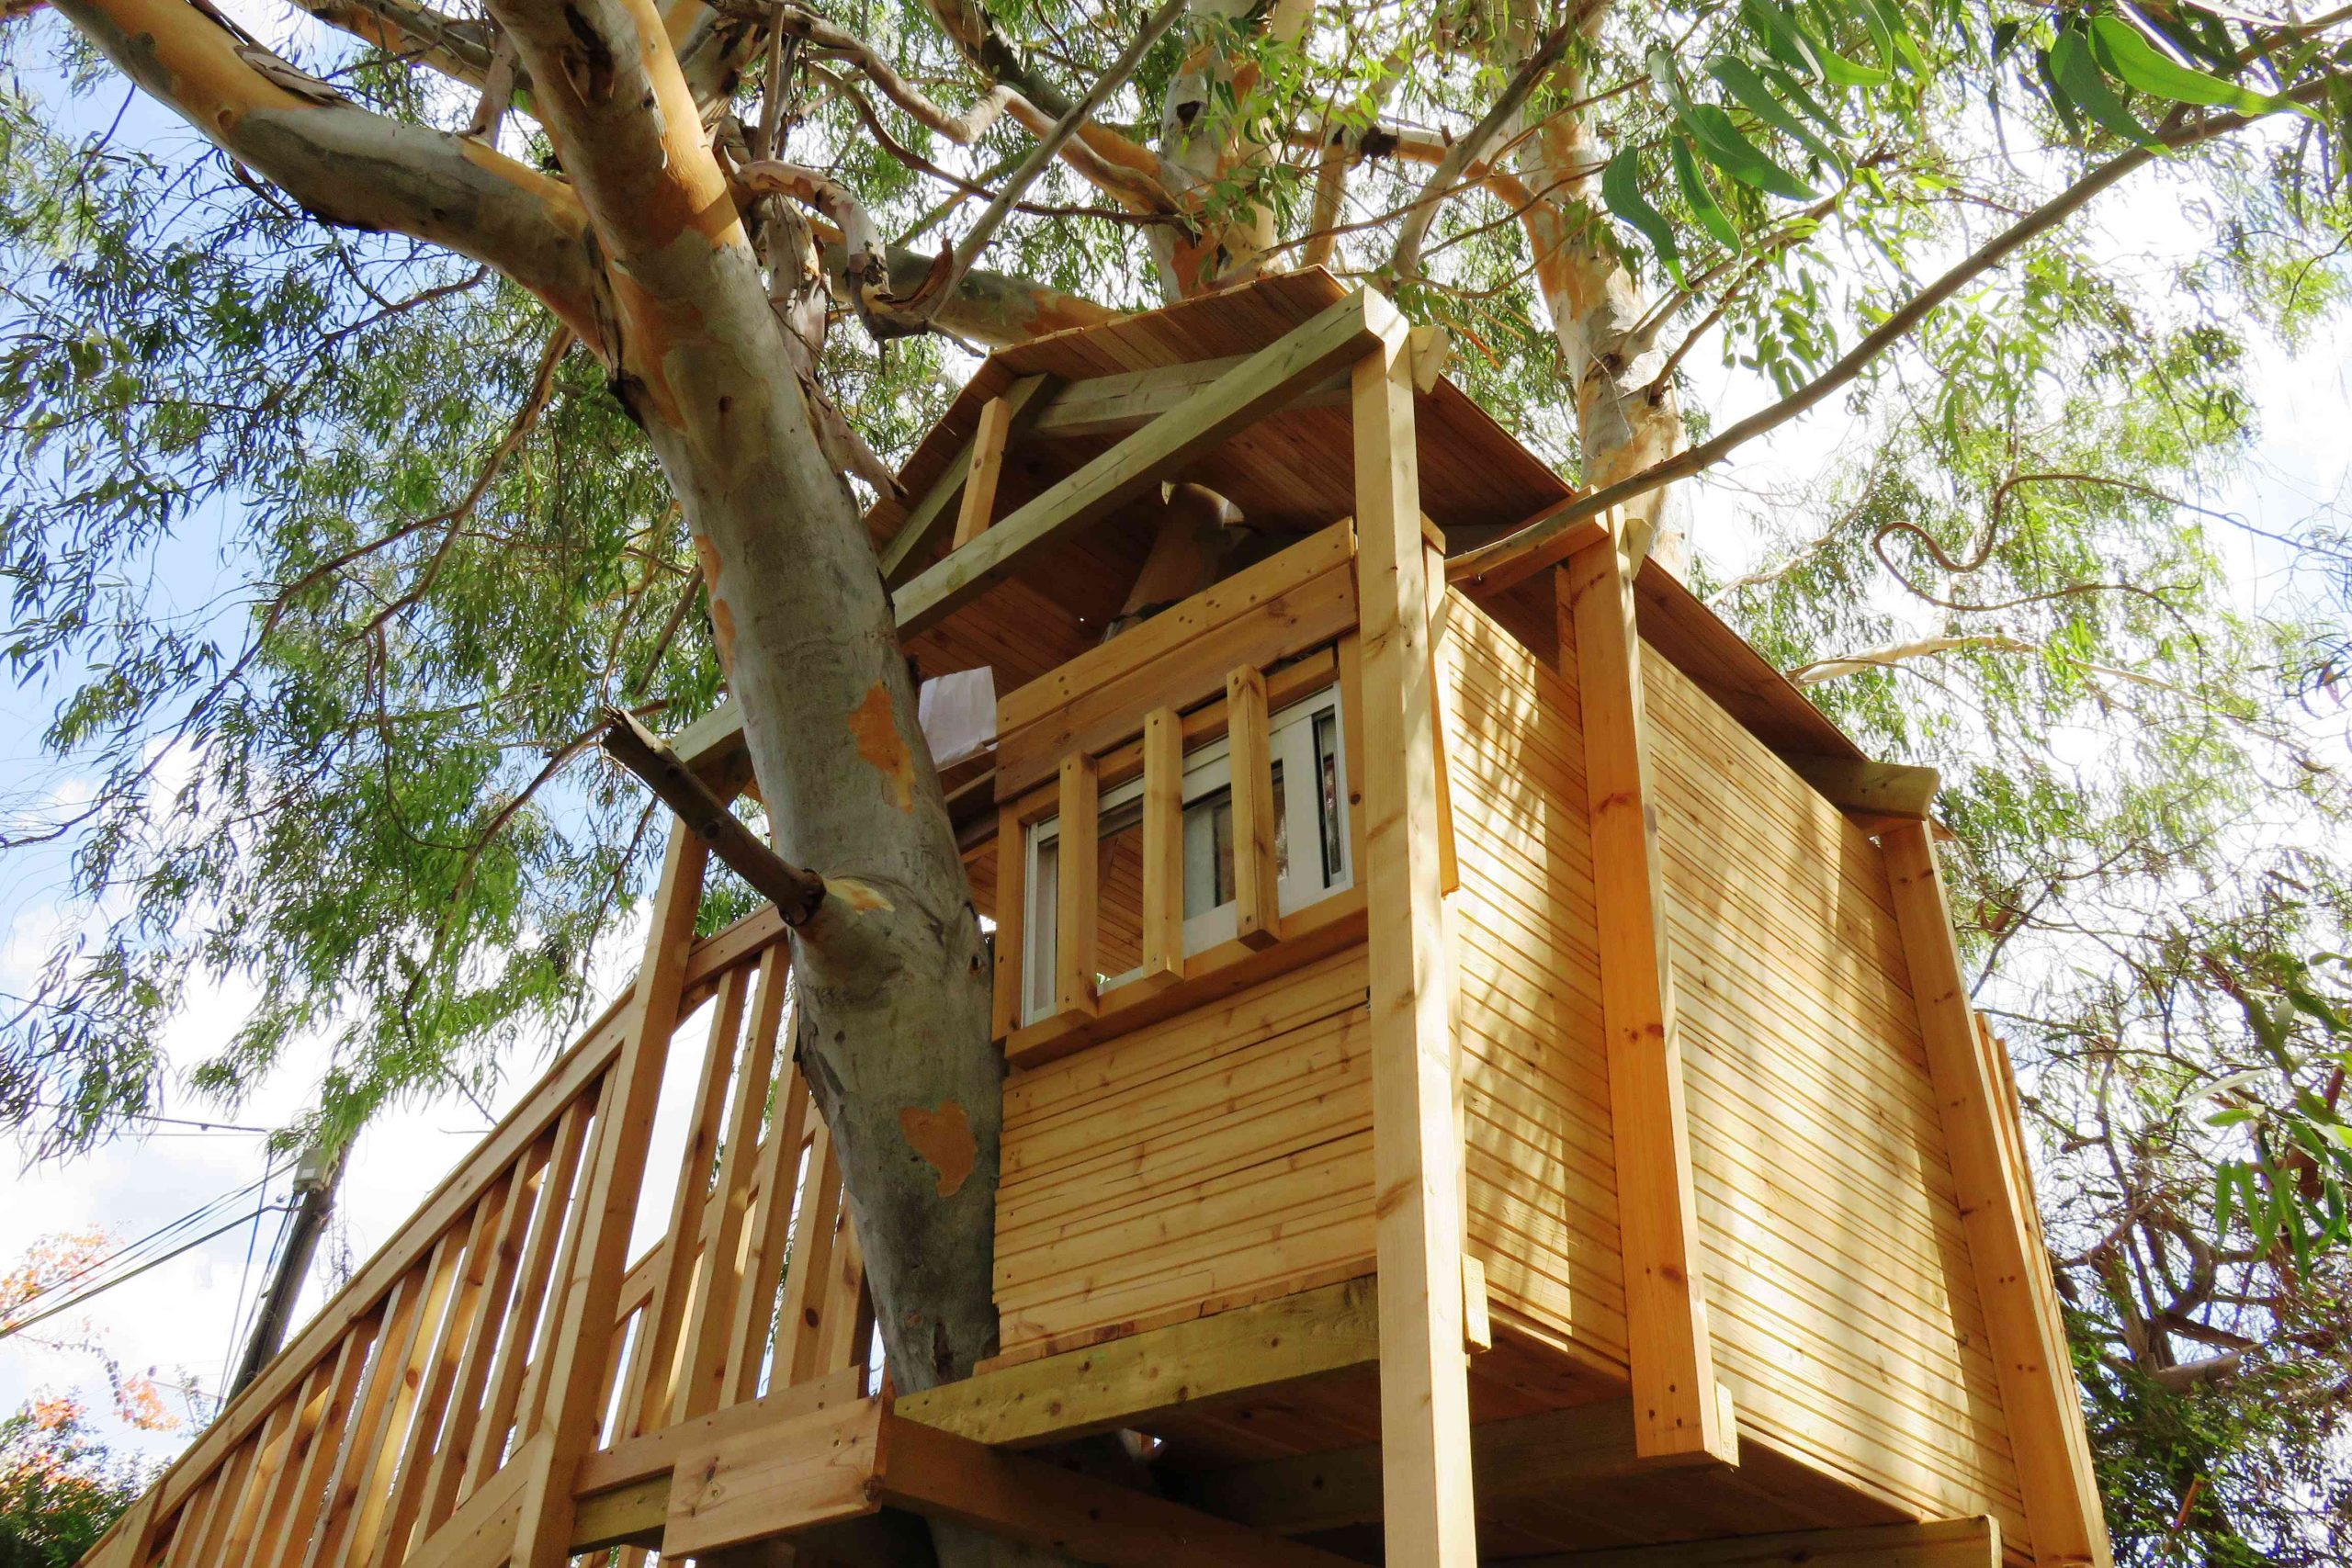
💸 Get This Look For Less
Building this closely around a live tree means you have to plan for its future growth. A tree’s trunk will expand in girth, and its branches will move in the wind. You must leave a gap of at least 2-3 inches around the trunk where it passes through your structure to allow for growth. For branches near the walls or roof, the gap should be even larger (6+ inches) to accommodate swaying. Without this breathing room, the tree can slowly crush your playhouse, or your playhouse could girdle and kill the tree.
12. Assemble a Dark Wood Playset with a Green Spiral Slide
This playground’s sophisticated look comes from a balanced visual recipe: 70% dark, natural tones + 20% vibrant color + 10% textured accents. The dark brown stained wood and deep roofing shingles provide a rich, cohesive base. The bright green of the spiral slide acts as a bold, playful focal point, drawing the eye and adding energy. Finally, the varied textures of the stone-clad pillars and the multi-colored climbing holds add depth and interest. Swap the green for a bold yellow or blue for a different but equally successful look.
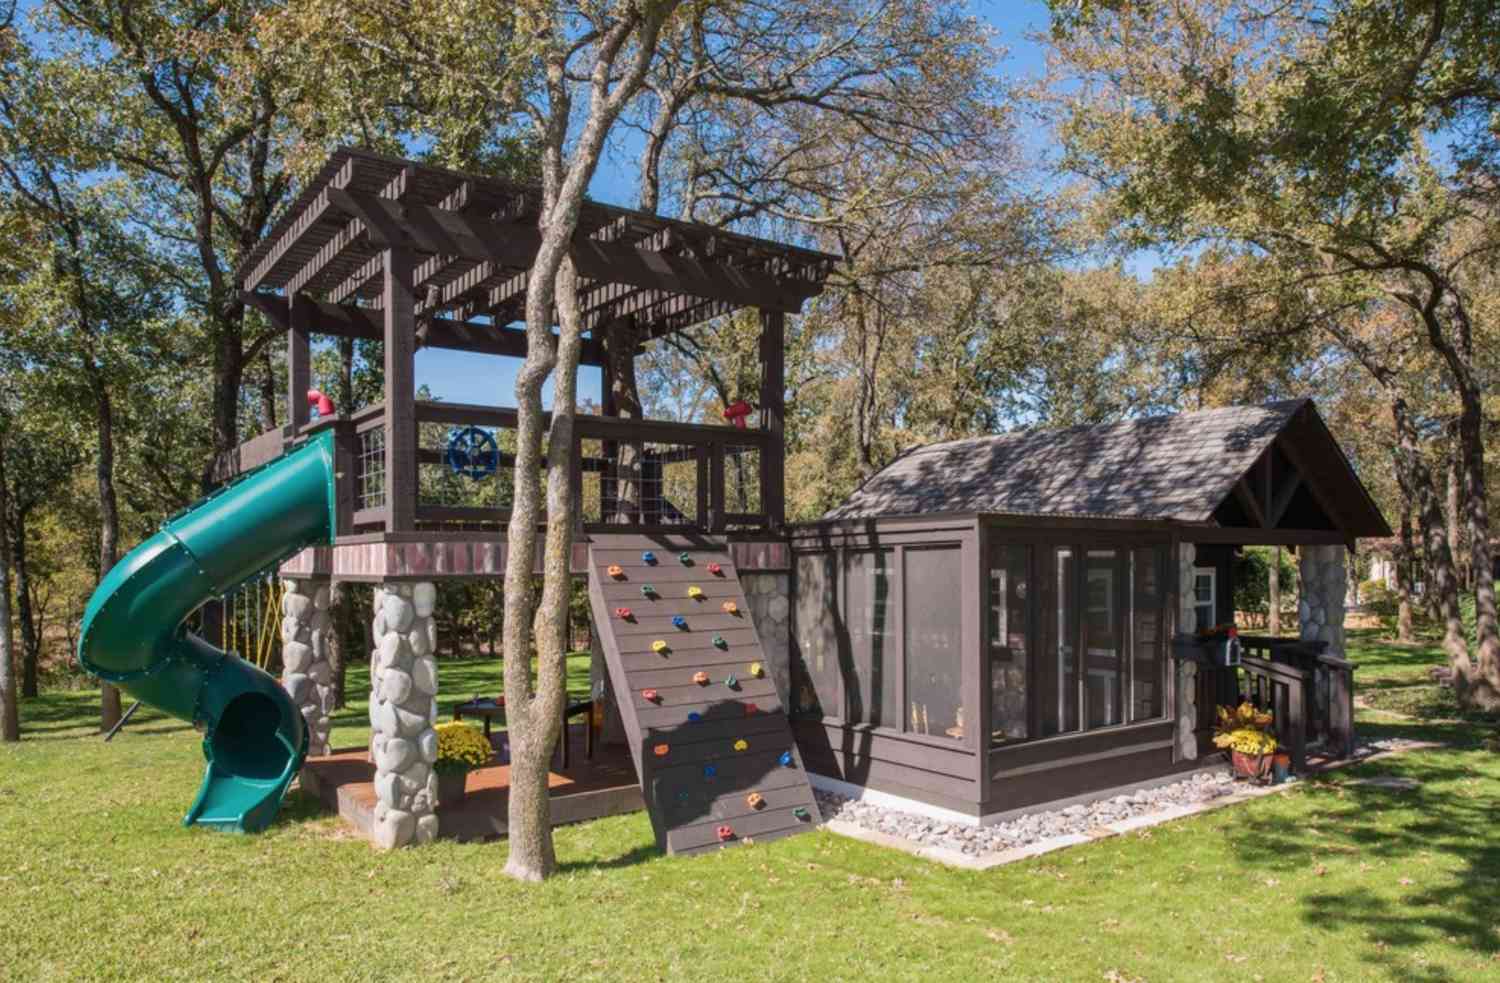
💰 Budget Breakdown
That premium, dark-stained look can be achieved on a tighter budget. Instead of buying a high-end kit, source a more basic, unstained wooden playset from a big-box store or Facebook Marketplace. Then, invest in a quality outdoor wood stain in a dark walnut or espresso finish. A weekend of sanding and staining a less expensive kit can give you the same upscale, robust appearance as this one for a fraction of the cost, often saving you 50% or more. The spiral slide is a splurge, but you can find standard slides for much less.
13. Build a Compact Wooden Tower with a Bright Green Slide
This tower design is a fantastic solution for smaller yards where a sprawling playset isn’t an option. Its vertical footprint maximizes play value in minimal space. For a setup like this, including the slide’s run-out and a safe fall zone around the climbing wall, you’ll want a clear area of about 250 square feet (e.g., 15′ x 17′). The elevated playhouse gives the feeling of a larger structure without eating up the whole lawn. Compare its compact nature to the much larger layout in Idea #4.
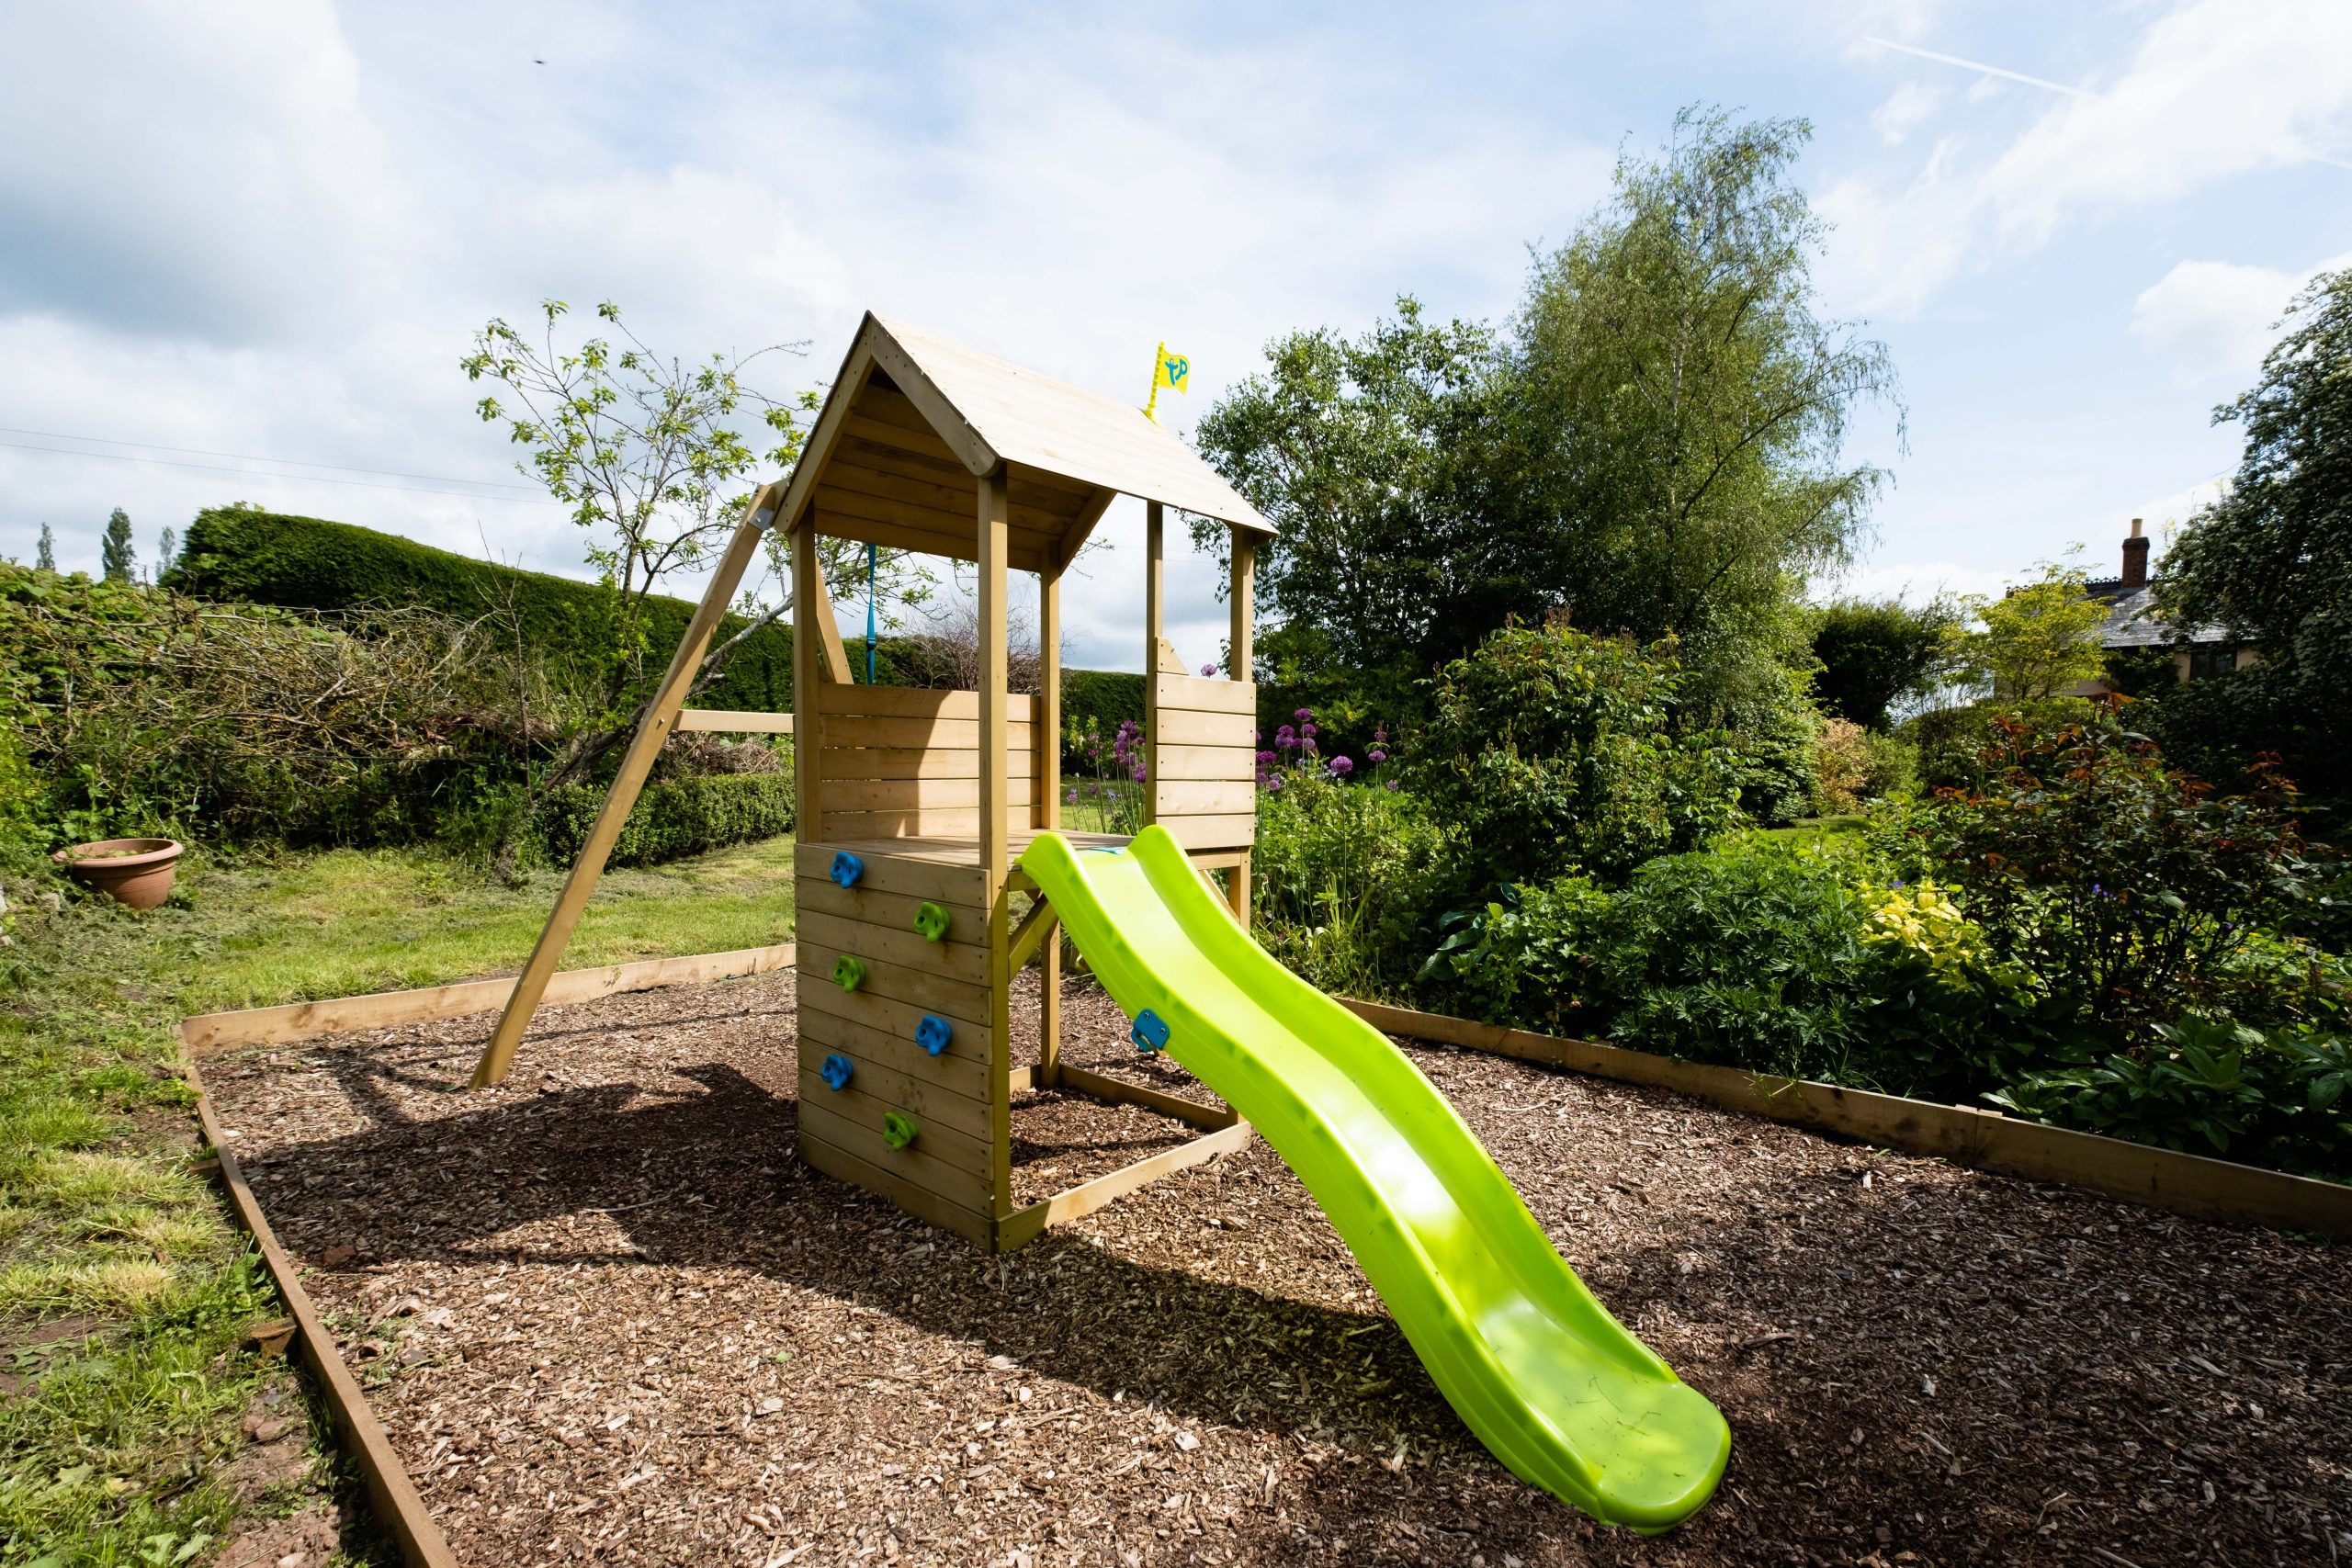
💡 Designer Tip
digging, check these essential points:
- Ground Level: Is the chosen spot perfectly level? A tower structure must be on flat ground to be stable. Even a slight slope can be a safety issue.
- Sun Direction: Where will the sun be during peak play hours (usually midday)? Try to position the structure so the slide isn’t facing directly into the hot afternoon sun, which can make a plastic slide uncomfortably hot to the touch.
- Ground Cover: Have you budgeted for a soft ground covering like wood chips or rubber mulch? Grass will quickly wear away under the slide and ladder, creating a muddy mess.
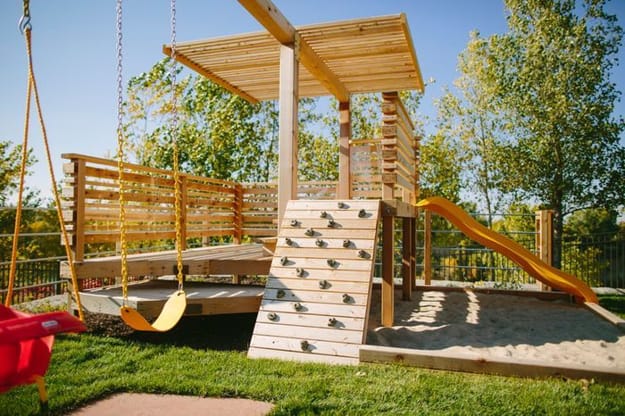
14. Add a Colorful Climbing Wall to a Simple Wooden Playset
The rock climbing wall is the element that elevates this from a standard slide-and-swing combo into a more modern and challenging play space. It introduces a problem-solving aspect to playtime, encouraging kids to plan their route and build strength in a different way than a simple ladder would. The colorful holds provide a great visual pop against the natural wood and are an easy way to customize a basic wooden structure.
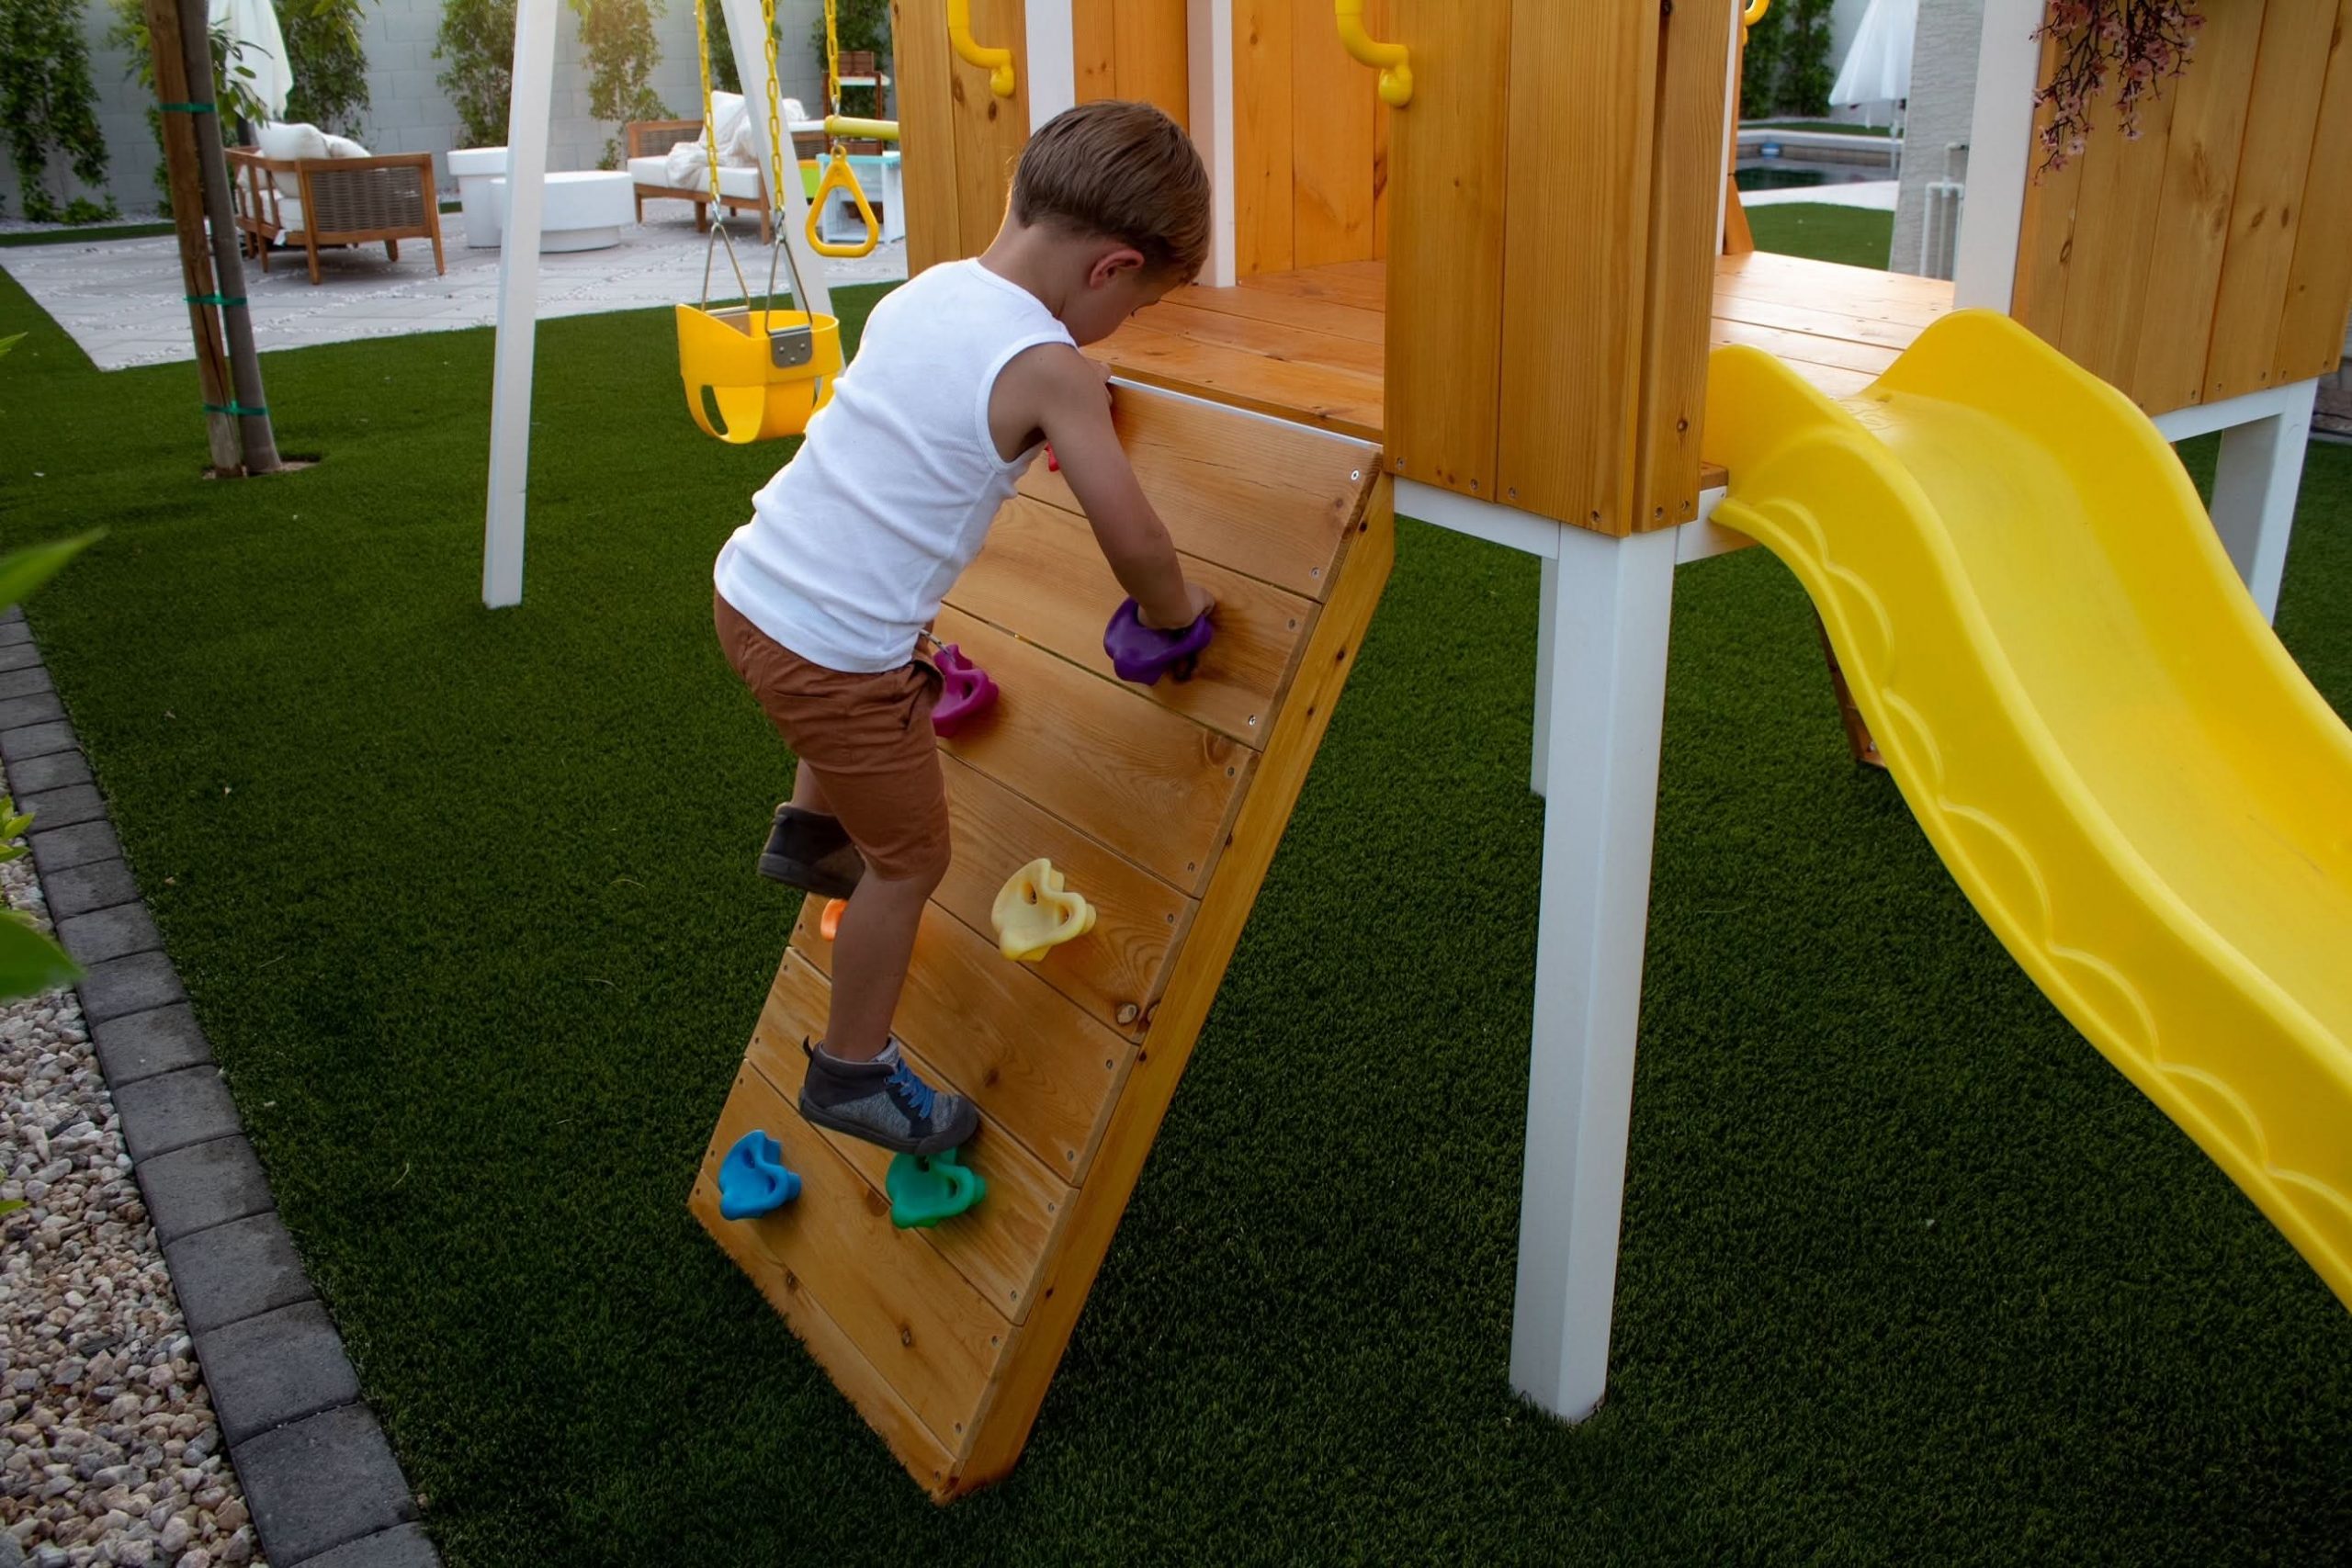
⚠️ Real Talk
Adding a climbing wall to an existing wooden playset is a straightforward upgrade. Time: 2 hours. Cost: $50-$100.
- Measure & Cut: Measure the opening you want to fill and cut a piece of 3/4-inch exterior-grade plywood to size.
- Seal the Wood: Sand and seal the plywood with multiple coats of quality outdoor deck sealant, paying close attention to the edges.
- Plan Your Holds: Lay the plywood on the ground and arrange the climbing holds in a pattern that offers a fun challenge. Mark the bolt holes with a pencil.
- Drill & Attach: Drill the holes and install T-nuts on the back of the plywood. Attach the climbing holds from the front with bolts.
- Mount the Wall: Securely screw the finished wall into the playset’s frame using heavy-duty exterior wood screws.
15. Construct a Whimsical Spherical Treehouse Pod
The key to the magical, nest-like appearance of this spherical pod is the use of wood shingles. To achieve this look, use cedar shingles and cut them into rounded or irregular shapes before applying them. Start from the bottom and overlap each row, just as you would on a normal roof. This layering technique is what creates the beautiful, organic texture. For the sphere’s frame, using laminated plywood ribs is a common and effective method for creating a strong, curved structure.

🎯 What Makes It Work
A spherical treehouse is an ambitious and amazing project, but it is not for the faint of heart. The complex joinery and curved structure require advanced woodworking skills and a lot of patience. This is a project that involves geometry, careful planning, and precise cuts. Also, a structure this unique and heavy absolutely requires professional input from an arborist to ensure it is anchored safely to the tree without causing long-term damage. It’s a significant investment in time and materials.
16. Install an In-Ground Trampoline for a Seamless Look
This design’s brilliance is in its integration. By setting the trampoline flush with the lawn, it removes the visual bulk and safety cage that makes traditional trampolines such an eyesore. It becomes part of the landscape rather than an object sitting on top of it. This creates a clean, uncluttered look that preserves the open feel of the backyard. The dark green color of the jump mat further helps it blend in with the surrounding grass and foliage, making it feel sleek and intentional.
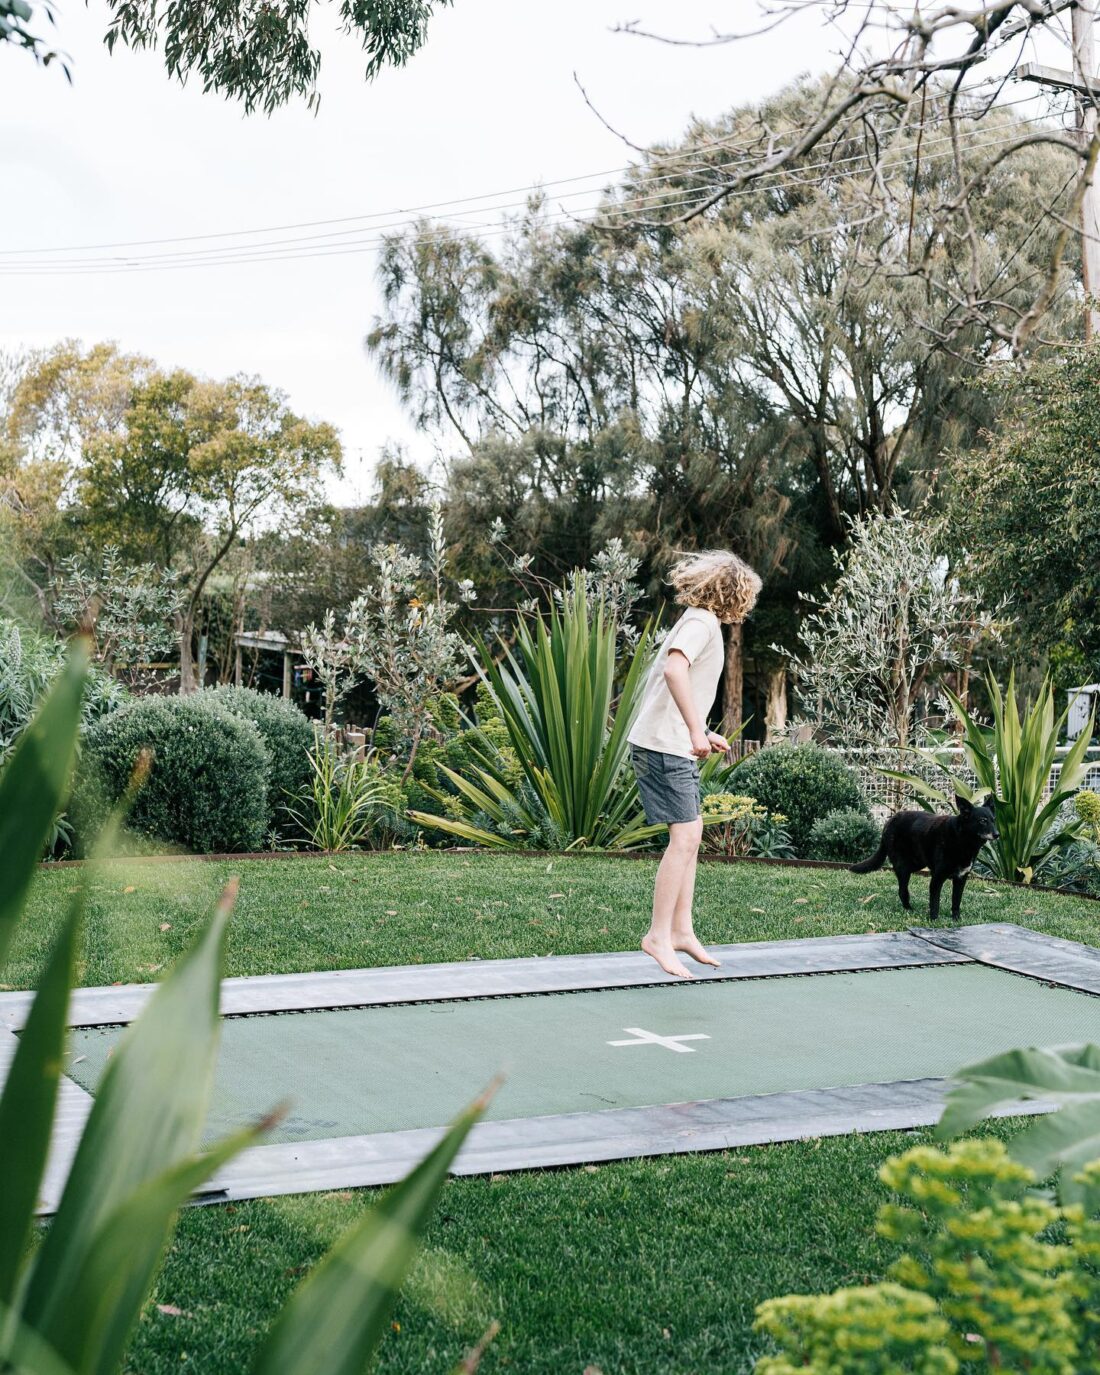
📏 Scale Guide
While an in-ground trampoline looks sleek, it requires more upkeep than a standard one. The pit underneath can collect water, so proper drainage is non-negotiable. You’ll need to dig a deeper pit than you think and add a layer of gravel at the bottom. The pit can also become a home for critters, so you’ll need to periodically check it. Debris like leaves and grass clippings will inevitably fall in around the edges of the mat, so you’ll have to lift the edge and clean it out a few times a year to ensure good airflow and prevent mat decay.
17. Create a Joyful, Eclectic Play Area with Upcycled Items
This vibrant space proves that you don’t need a massive, expensive kit to create a fun playground. Most of this look can be achieved with salvaged and upcycled materials. An old tire from a local auto shop can be cleaned, painted, and filled with sand for just a few dollars. Painting leftover logs or wood scraps in bright colors creates a fun stepping stone path for almost free. Hit up Facebook Marketplace or thrift stores for a used slide or swing set. This entire look could be recreated for well under $300 with some creativity.
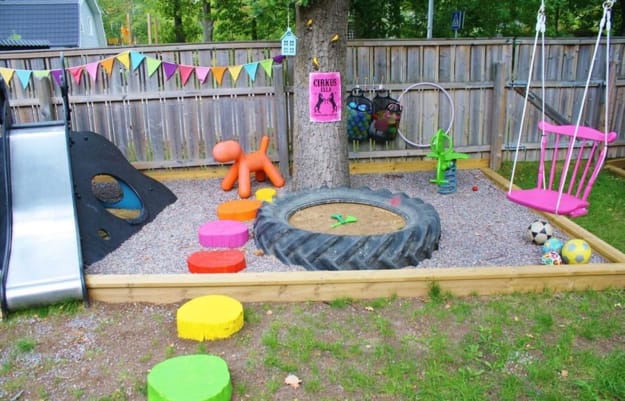
🔧 How-To Brief
The formula here is pure, unadulterated joy: 40% repurposed items + 40% bright, clashing colors + 20% natural textures. The genius is in the confident mix. A metal slide, a wooden swing, a rubber tire, and painted logs all live happily together because they are unified by a riot of color (pink, orange, blue) and a casual, anything-goes attitude. The pebble ground cover and the wooden fence provide a neutral, textural backdrop that keeps the colorful chaos from feeling overwhelming.
18. Build a Classic Wooden Seesaw in a Gray Finish
A DIY seesaw is a classic project that can be built in an afternoon. Time: 3-4 hours. Cost: $70-$120.
- Build the Base: Create a stable A-frame base using 2x4s, joined at the top with a heavy-duty saddle bracket or steel pipe.
- Cut the Beam: Use a sturdy, straight 2×8 or 2×10 board for the main seesaw beam, typically 8 to 10 feet long. Sand all edges smooth to prevent splinters.
- Make the Handles: Cut two pieces of a 1-inch wooden dowel, about 12-18 inches long. Drill holes and attach them securely near each end of the beam.
- Assemble: Find the exact center of the beam and drill a hole to match your pipe/bracket. Assemble the beam onto the base.
- Add Bumpers: Screw a section of an old tire underneath each end of the beam to act as a soft bumper when it hits the ground.
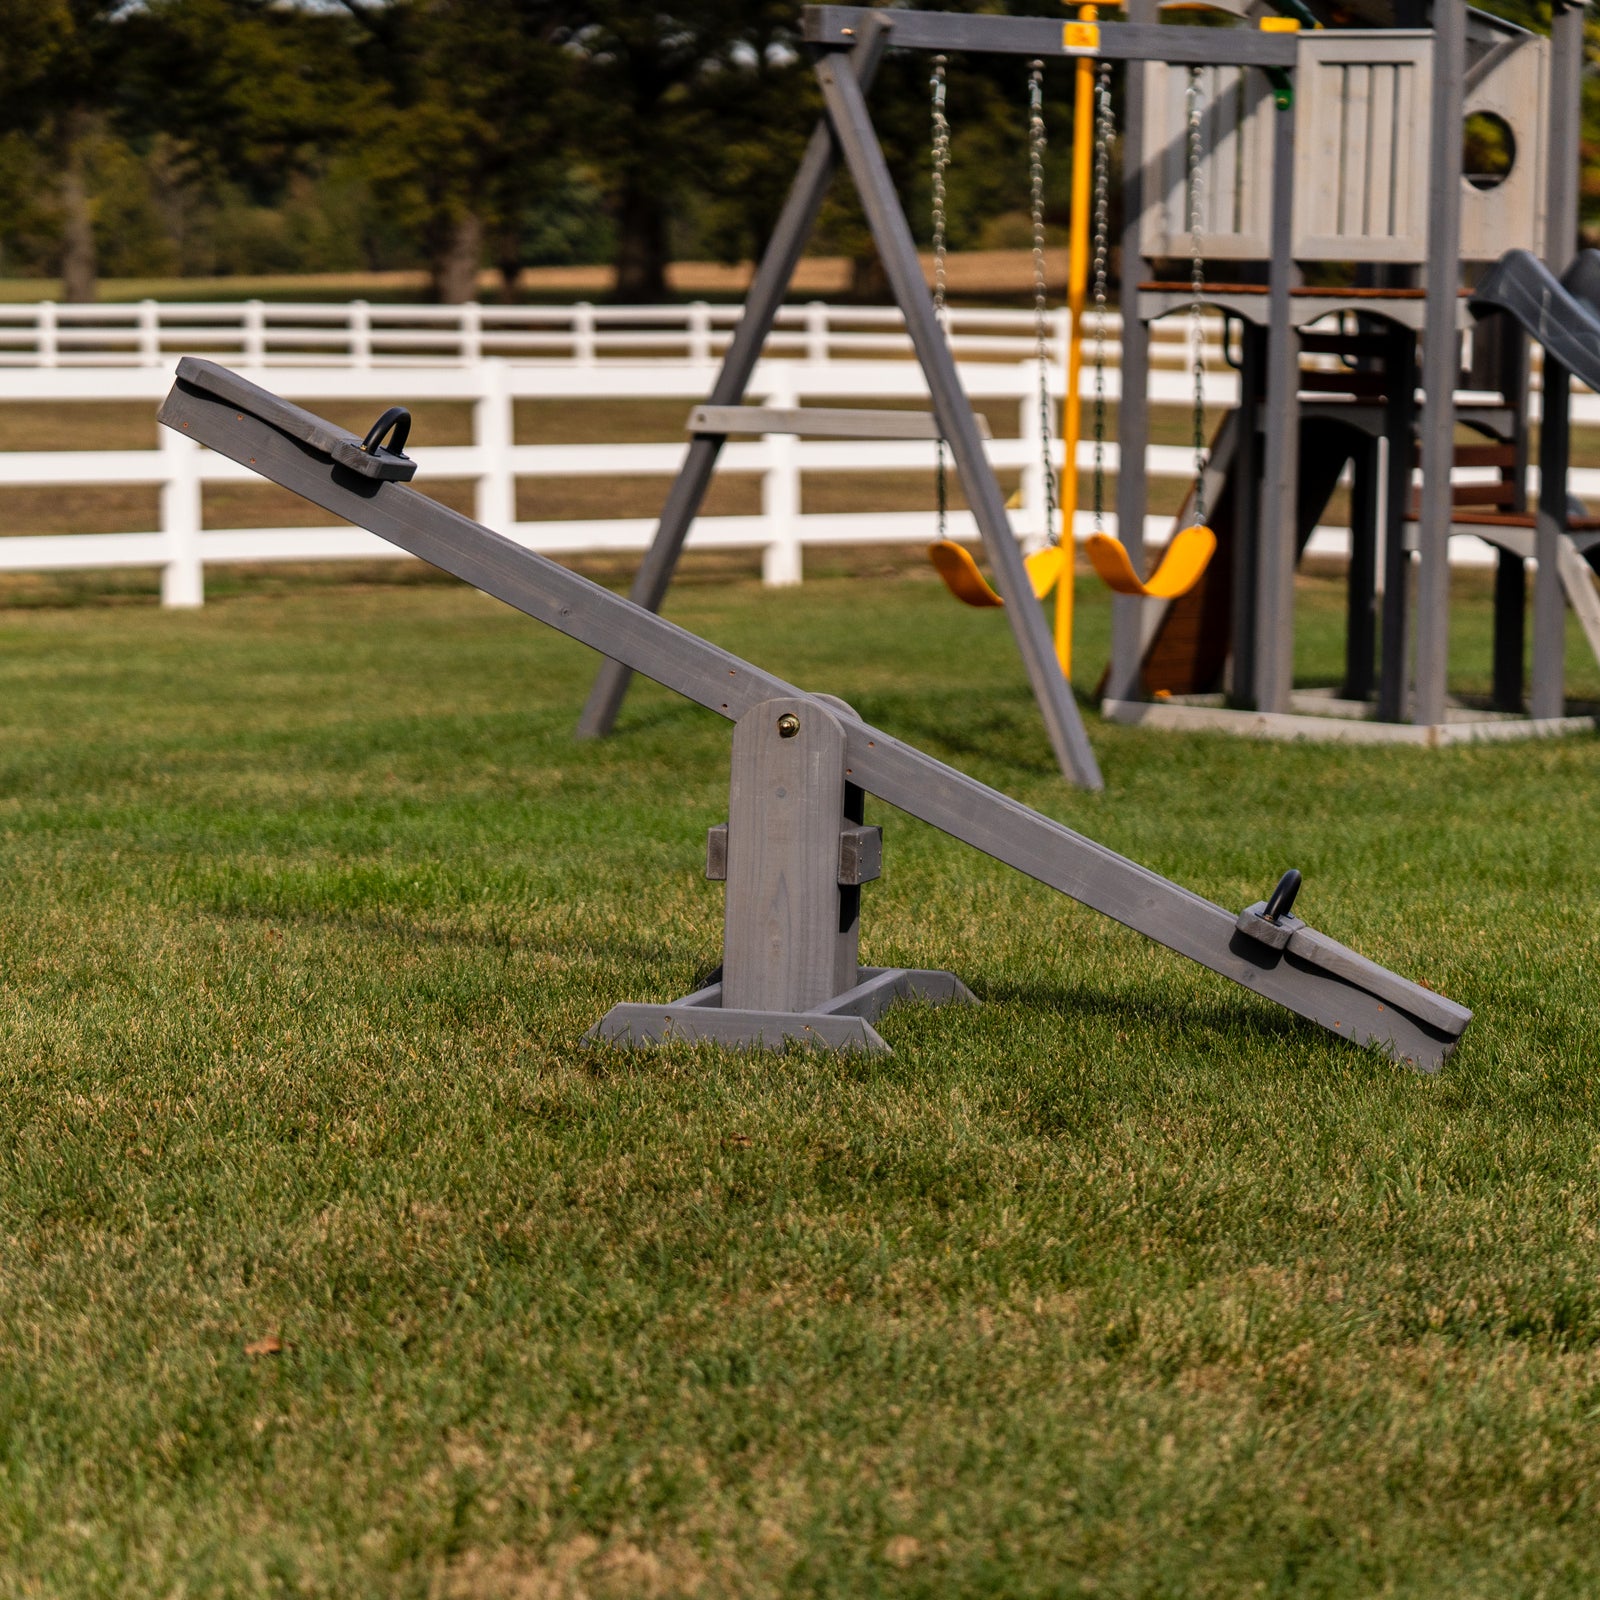
🔥 Trending Context
For a modern, elevated look, don’t just use plain wood. Painting the seesaw a sophisticated, neutral color like this dark gray makes it feel more like a piece of garden furniture and less like a primary-colored toy. Use a high-quality exterior paint with a satin or semi-gloss finish for durability. This simple color choice helps the playground equipment blend more seamlessly into a beautifully landscaped backyard, appealing to adult aesthetics as well as kids’ desire for fun.
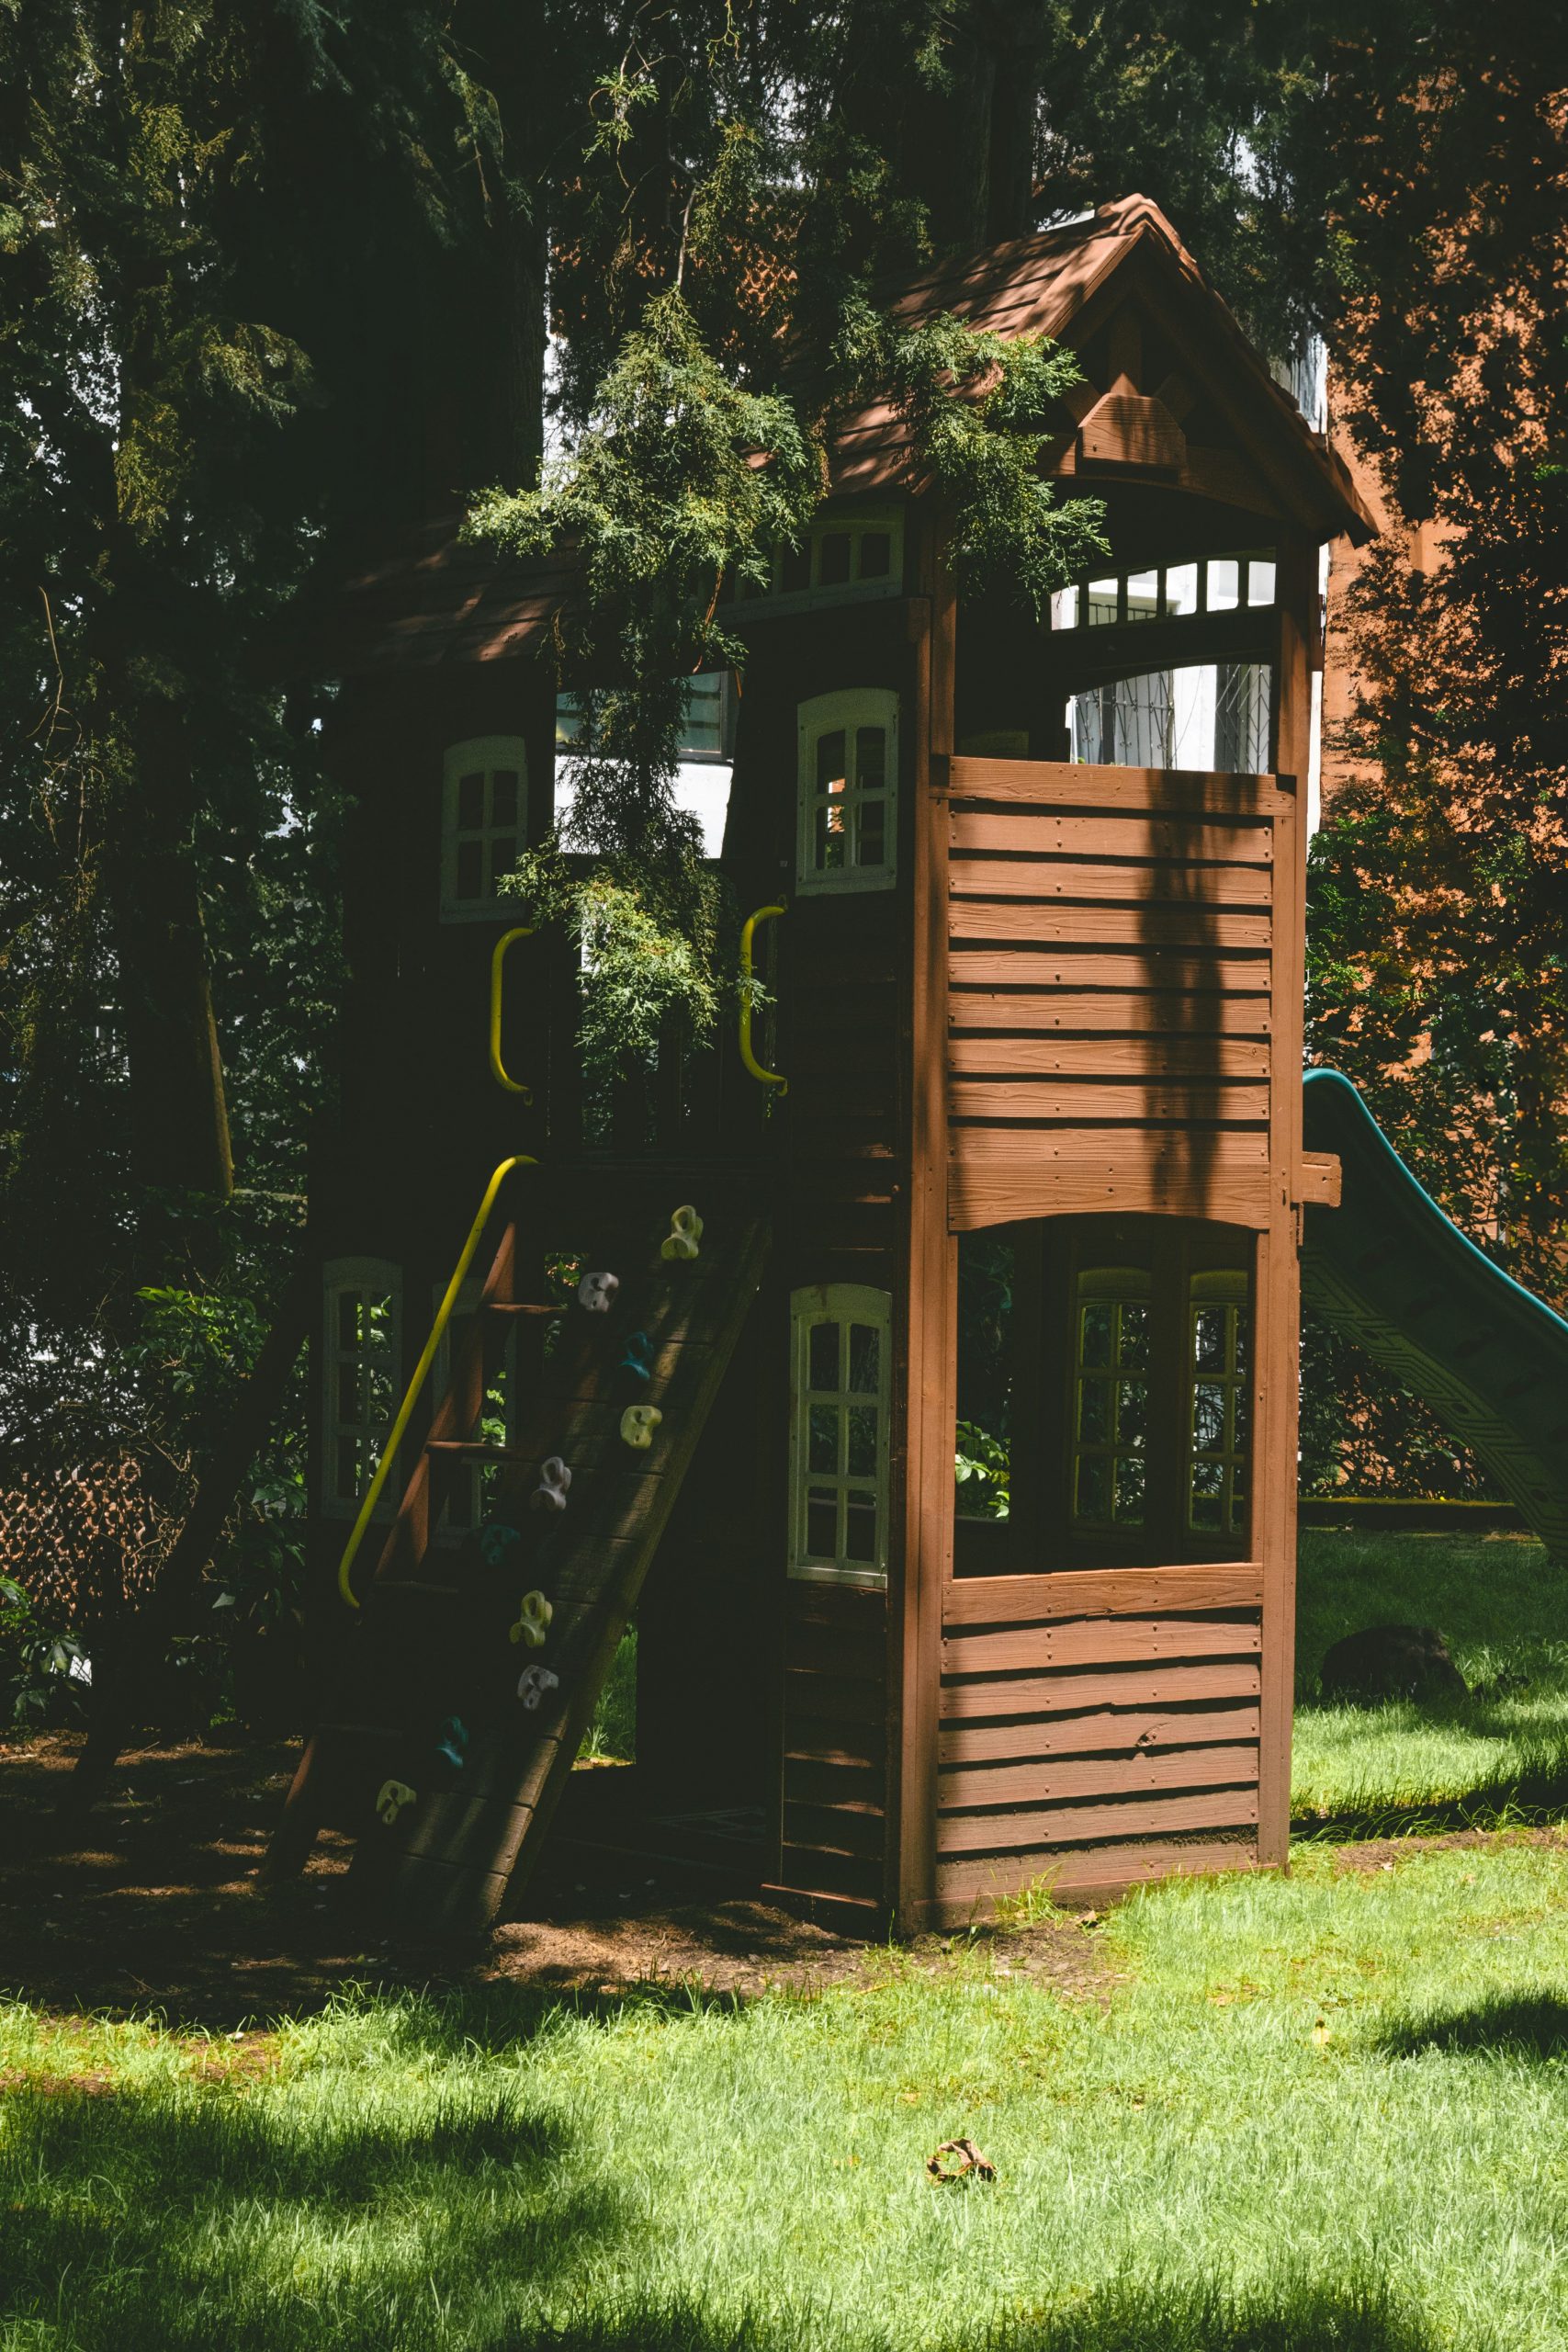
19. Craft a Sturdy Dark-Stained Wood Playset
The single thing that gives this playset its handsome, substantial feel is the dark wood stain. While many DIY playsets are left as natural pine or painted bright colors, this deep brown finish elevates the entire structure. It makes it feel more permanent, more like a rustic cabin or piece of outdoor architecture than just a toy. This sophisticated color choice helps the playground blend beautifully with the surrounding trees and natural environment.
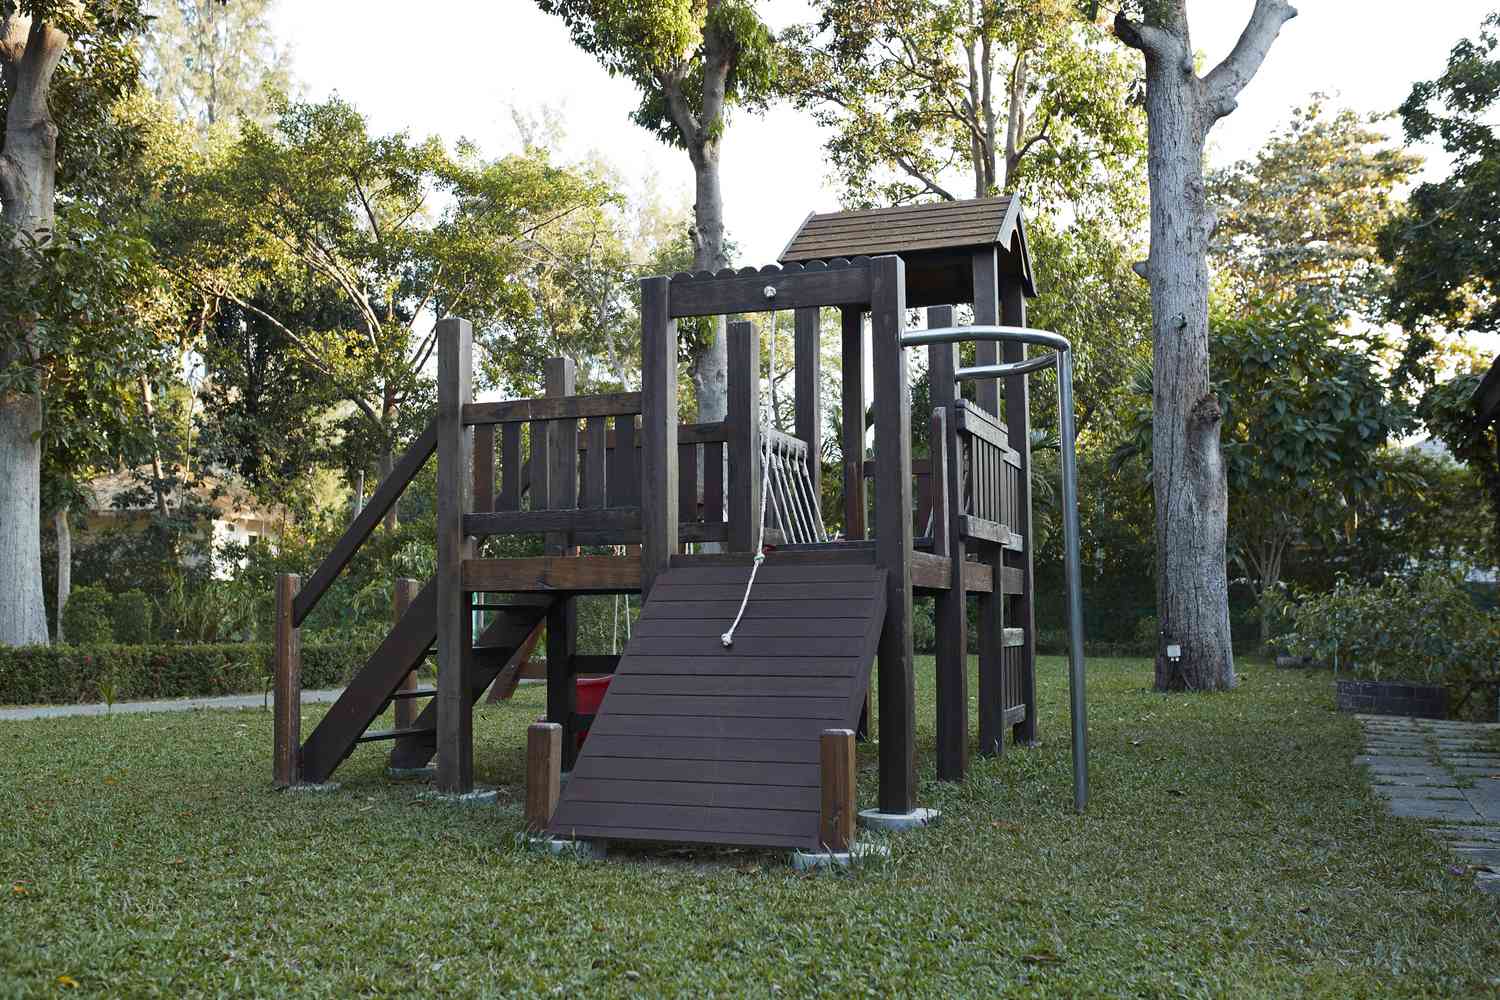
🧹 Maintenance Reality
This design works because of its strong, simple geometry. The A-frame support, the clean lines of the slide, and the pitched roof of the upper level create a sense of classic, sturdy construction. There’s a pleasing contrast between the solid, dark mass of the wooden structure and the light, airy green of the lawn and foliage. The addition of the white rope and curved metal bar adds a touch of playful detail without cluttering the strong overall form.
20. Go All-Out with a Wooden Pirate Ship and Tube Slide
Themed playgrounds are making a huge comeback, and this pirate ship is a prime example of why. In 2026, parents are looking for play spaces that do more than just facilitate physical activity; they want to spark creativity and imaginative, screen-free play. A highly themed structure like this provides a powerful narrative prompt. It’s not just a slide and a climbing net; it’s an escape route from a kraken and the rigging of a grand vessel, encouraging hours of collaborative storytelling.
✅ Before You Start
This is a major project, and the cost reflects its complexity and scale.
- Untreated lumber & hardware: $2,000 – $4,000
- Enclosed tube slide: $1,200 – $2,500
- Climbing nets, ropes, and accessories: $300 – $600
- Fabric for sails/flags: $50 – $150
- TOTAL: $3,550 – $7,250
- Budget alternative: Build a smaller ship ‘bow’ against a fence and use a standard, less expensive slide. Focus on DIY details like a ship’s wheel and fabric sails to sell the theme for under $1,500. This is a more complex version of Idea #3.
21. Combine a Climbing Wall, Slide, and Swings on a Raised Platform
This is a classic, all-in-one design that packs a ton of play value into a reasonably compact footprint. To safely accommodate the swings, the slide, and access to the climbing wall, plan for a total area of about 350-400 square feet, with a significant portion of that being the clear ‘fall zone’ in front of and behind the swings. The structure itself is probably no more than 10′ x 12′, but the activity space it requires is much larger. It’s a great mid-size option.
⭐ The One Thing
A sandpit underneath the play structure seems like a brilliant two-for-one idea, but be warned: it can quickly become the neighborhood litter box for cats. An uncovered sandpit is an open invitation. You absolutely must have a fitted cover that you can put on every single night. It’s an extra step, but it’s crucial for hygiene. Also, sand gets everywhere. Be prepared for sandy feet, sandy pockets, and a fine layer of sand in your laundry room.
22. Create a Split-Level Play Zone with Dual Slides
This playground design is particularly smart because it caters to different age groups simultaneously. The smaller red slide is perfect for toddlers, offering a gentle slope and easy access, while the larger blue slide provides a more thrilling ride for older kids. By having two distinct options integrated into one structure, it prevents squabbles and allows siblings or friends of different ages and confidence levels to play together happily. The shared sandbox area serves as a central hub connecting the two activities.
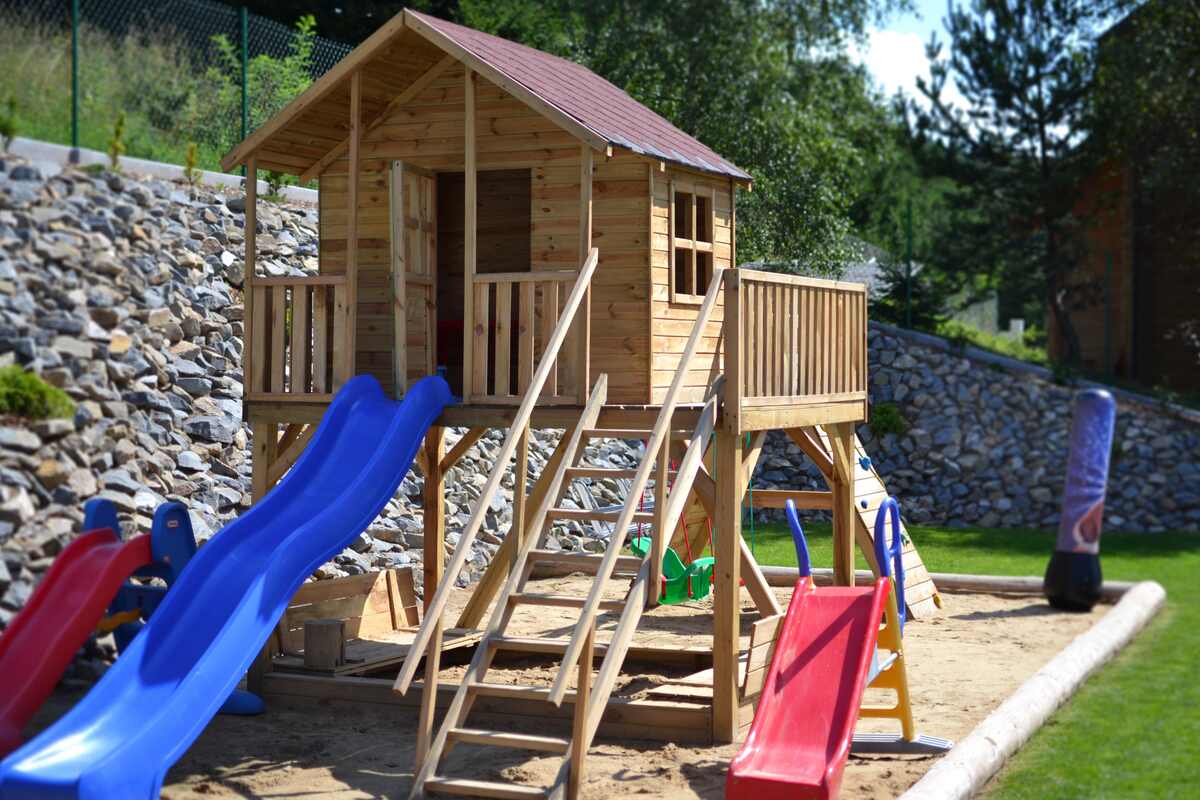
📐 Style Math
When installing plastic slides, the ‘run-out’ area at the bottom is just as important as the top. Make sure there is a clear, level space of at least 6 feet at the end of each slide. Crucially, that space should be covered in a soft material like sand, wood chips, or rubber mulch, extending at least 4-6 feet. This ensures a safe, soft landing and prevents the jarring stop that can happen when a slide exits directly onto hard-packed dirt or grass.
23. Incorporate a Tree Swing into a Multi-Level Concrete Patio
The single element that makes this space truly special is the tree swing. The concrete patio and modern seating are stylish and functional, but they’re also very adult. The simple, classic tree swing injects a necessary dose of playfulness and nostalgia. It’s an unexpected touch that softens the hard lines of the concrete and signals that this is a space for all ages, transforming a chic patio into a family gathering spot.
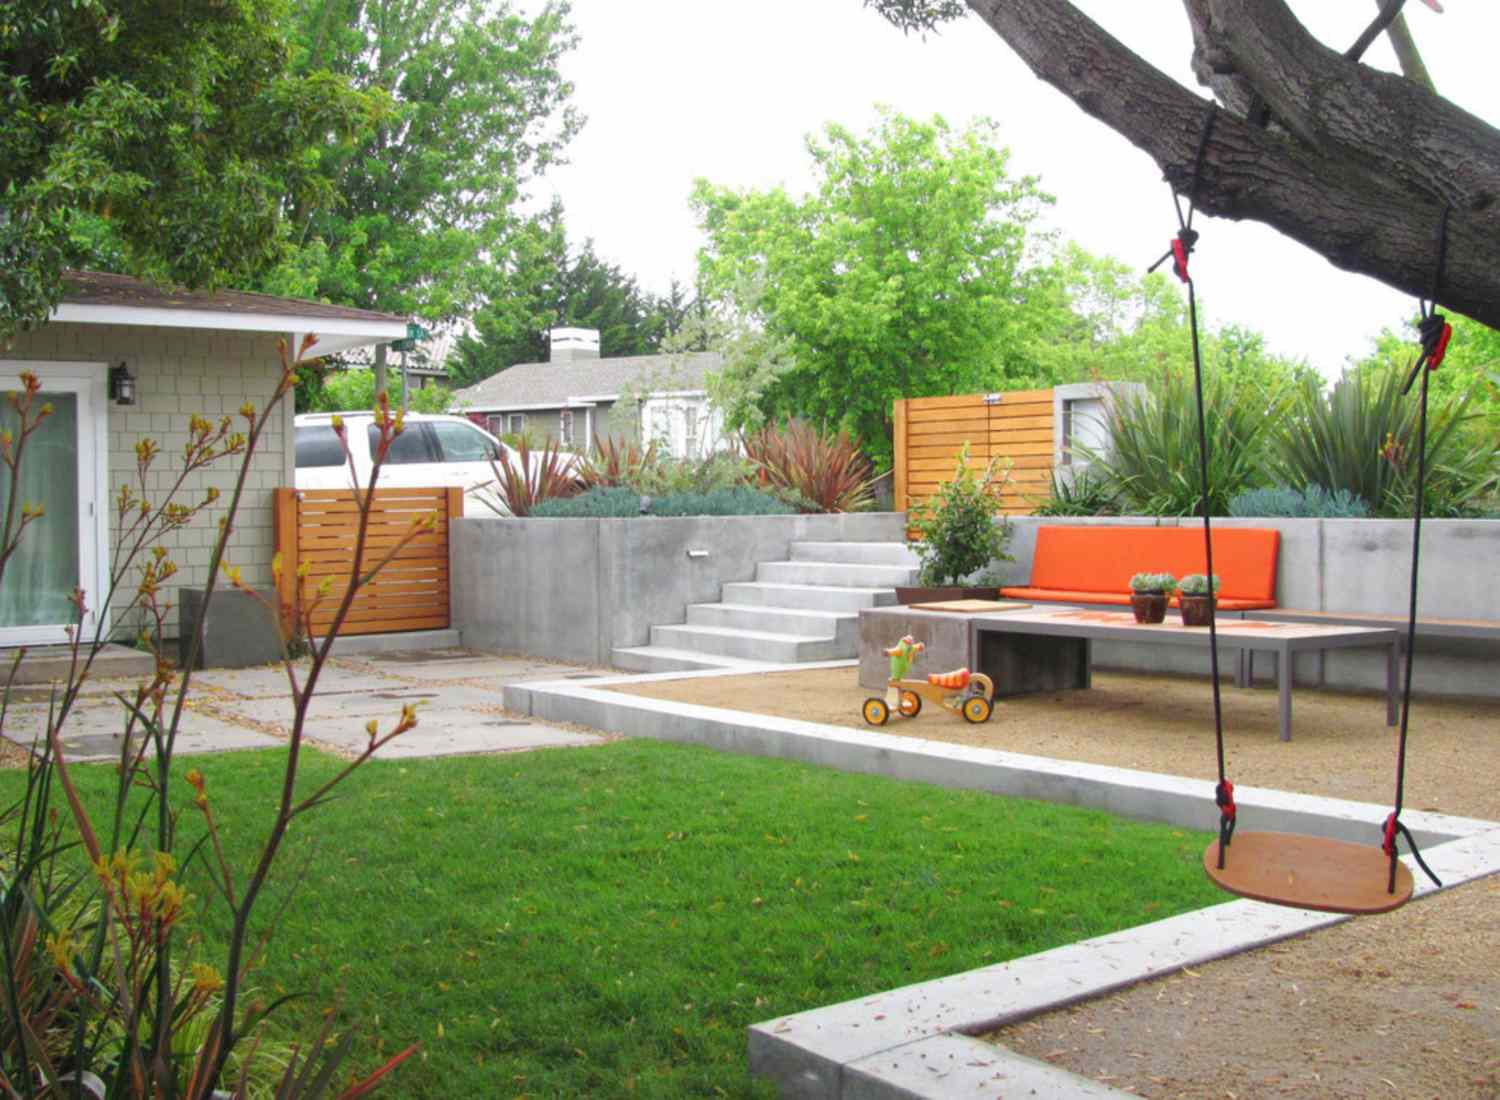
💸 Get This Look For Less
Hanging a swing from a tree branch requires careful consideration to avoid harming the tree or creating a safety hazard. Never just loop a rope over a branch; the friction can rub through the bark and kill the limb. Use wide (at least 2-inch) straps, often called ‘tree savers,’ to distribute the weight. Even better, install permanent, heavy-duty eye bolts directly through the branch. Consult an arborist to ensure the branch you choose is healthy, strong, and at least 8 inches in diameter to support the dynamic load of a swinging person.
24. Build a Dark Wood Playhouse with a Metal Slide and Teal Roof
This playset achieves a cool, contemporary look by following a simple style rule: 60% sophisticated dark base + 30% vibrant accent color + 10% industrial-chic material. The dark brown wood creates a solid, handsome foundation. The teal and green roof panels, along with the electric blue rope net, provide energetic pops of color. The shiny silver metal slide adds an unexpected industrial touch that feels more modern and durable than a standard plastic slide. You could swap the blue and teal for orange and yellow for a warmer, but still modern, vibe.
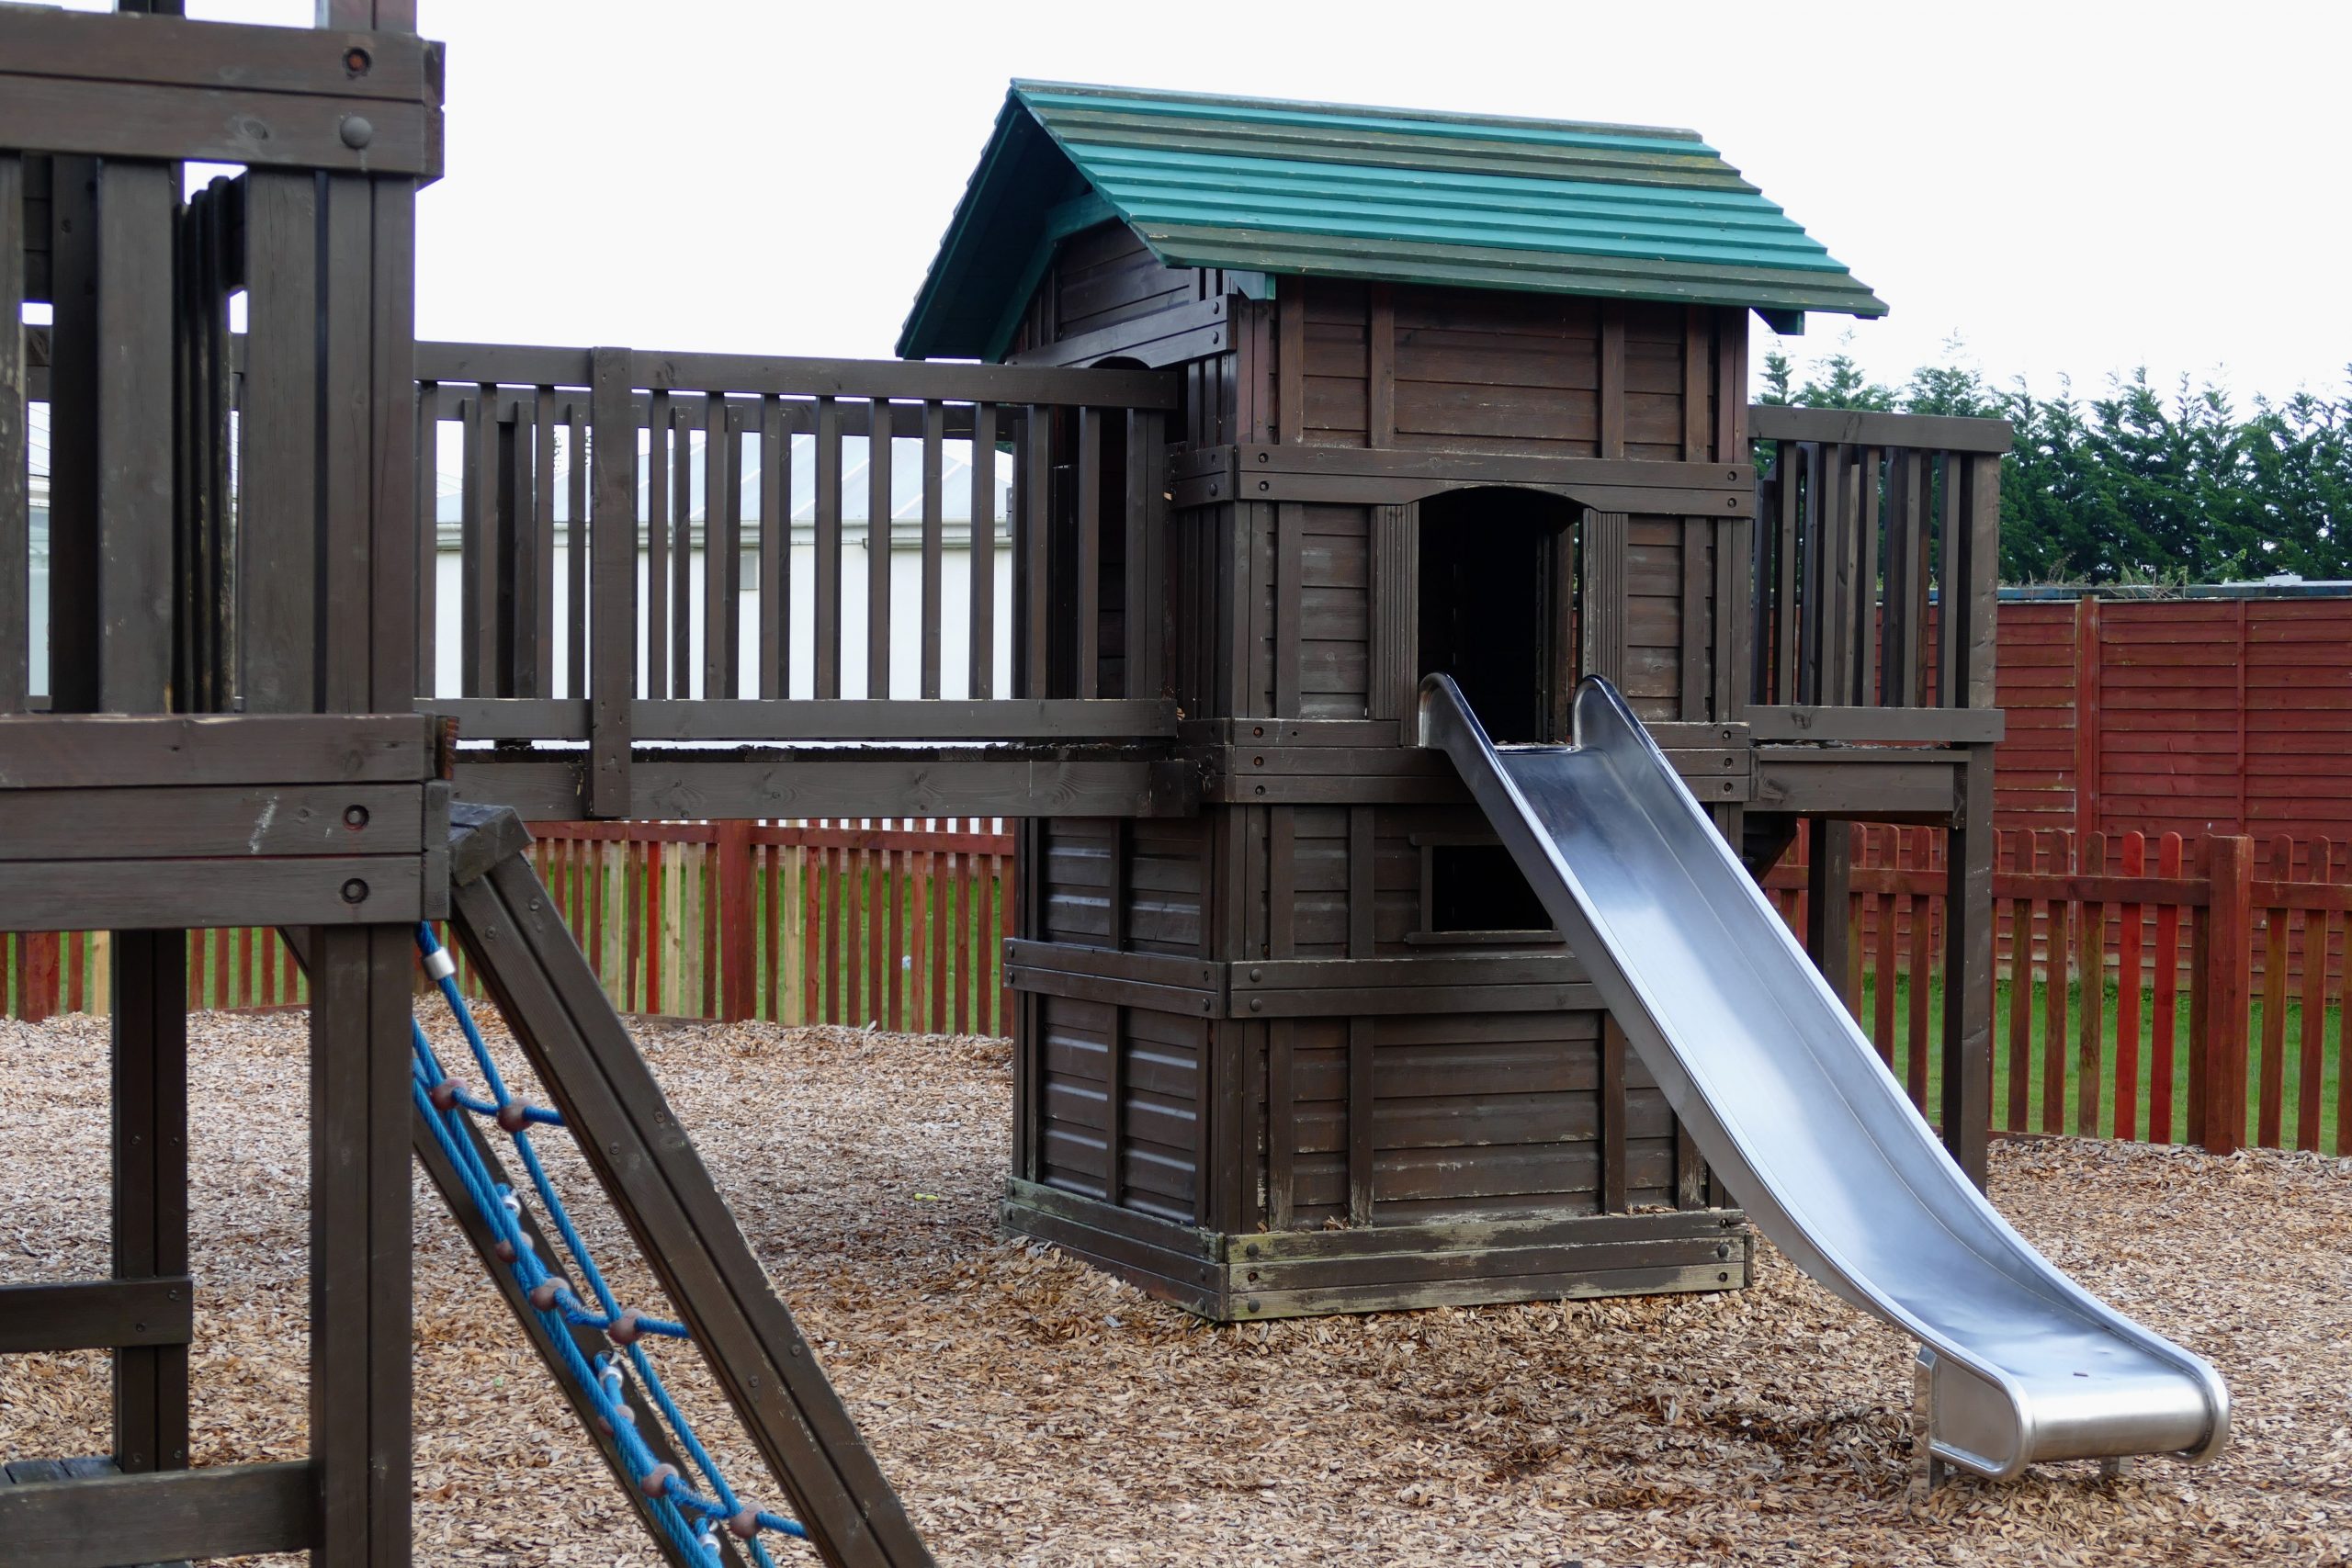
💰 Budget Breakdown
A metal slide is a fantastic, long-lasting choice, but it has one major drawback: it gets incredibly hot in the direct sun. In warmer climates, a south- or west-facing metal slide can become dangerously hot to the touch by mid-afternoon. If possible, position the playset so the slide is in a shady spot or faces north. If that’s not an option, consider building a small roof or canopy over the top half of the slide to keep the sun off it during the hottest part of the day.
25. Design a Serene Lakeside Playset with a White Finish
The choice to paint this playset white is what makes it blend so seamlessly with its serene, lakeside setting. The white wood echoes the white picket fence and the trim on many coastal or country homes, creating a cohesive and classic look. Rather than a burst of primary colors that would compete with the natural beauty of the lawn and lake, the white and dark green palette is calming and complimentary. The brown metal roof adds a touch of rustic texture that keeps it from feeling too sterile.
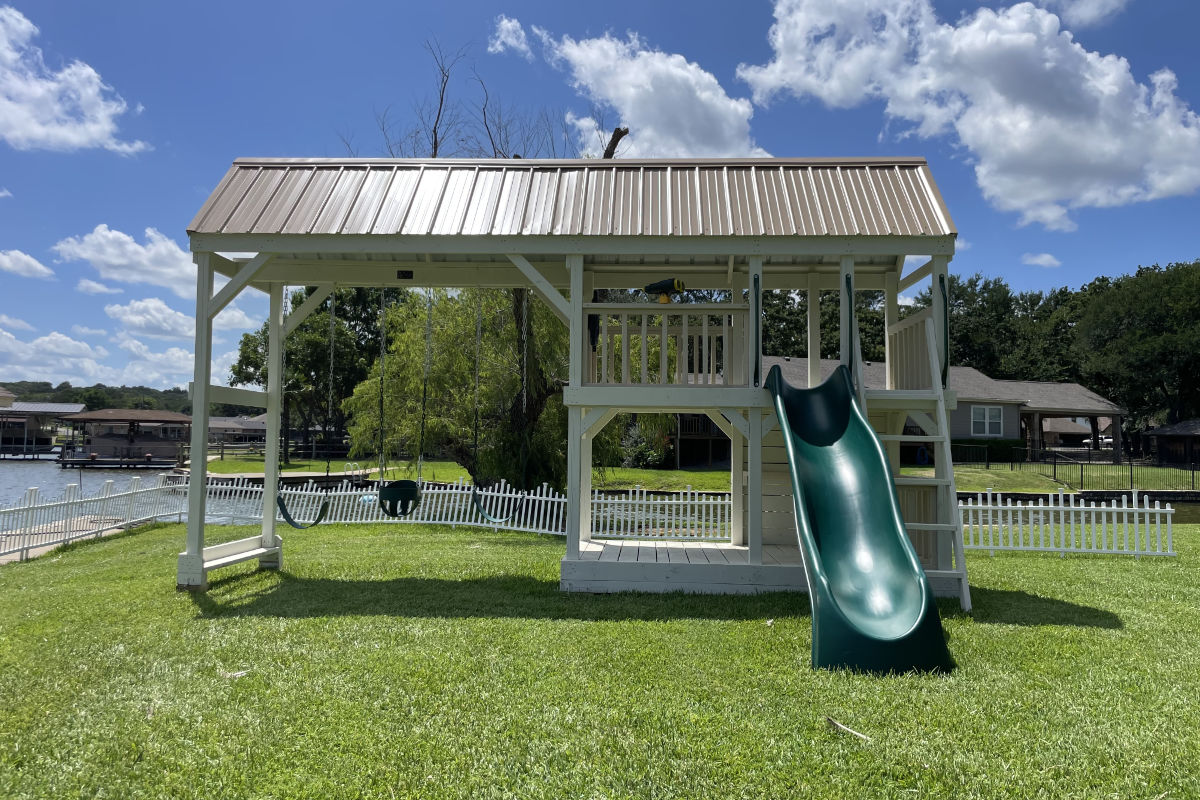
💡 Designer Tip
You can get this clean, coastal look without a brand-new kit. Find a used wooden playset on Facebook Marketplace—even one in a tired, dated wood tone. A good pressure washing and two coats of high-quality exterior white paint can completely transform it. Look for paint designed for porches and floors for maximum durability. Replacing a worn-out fabric canopy with a simple corrugated metal panel from a home improvement store is an inexpensive and durable upgrade that completes the look for hundreds, not thousands, of dollars.
26. Create a Magical Glow with Illuminated Backyard Play Structures
The string lights are undeniably the hero of this scene. By day, this is likely a standard, fun playset. But at night, the warm glow of the incandescent bulbs transforms it into an enchanted, magical fort. The light not only extends playtime past dusk but also creates a captivating focal point in the backyard. It highlights the playful shapes of the structure and casts a soft, inviting ambiance over the entire area, making it a space the whole family can enjoy after dark.
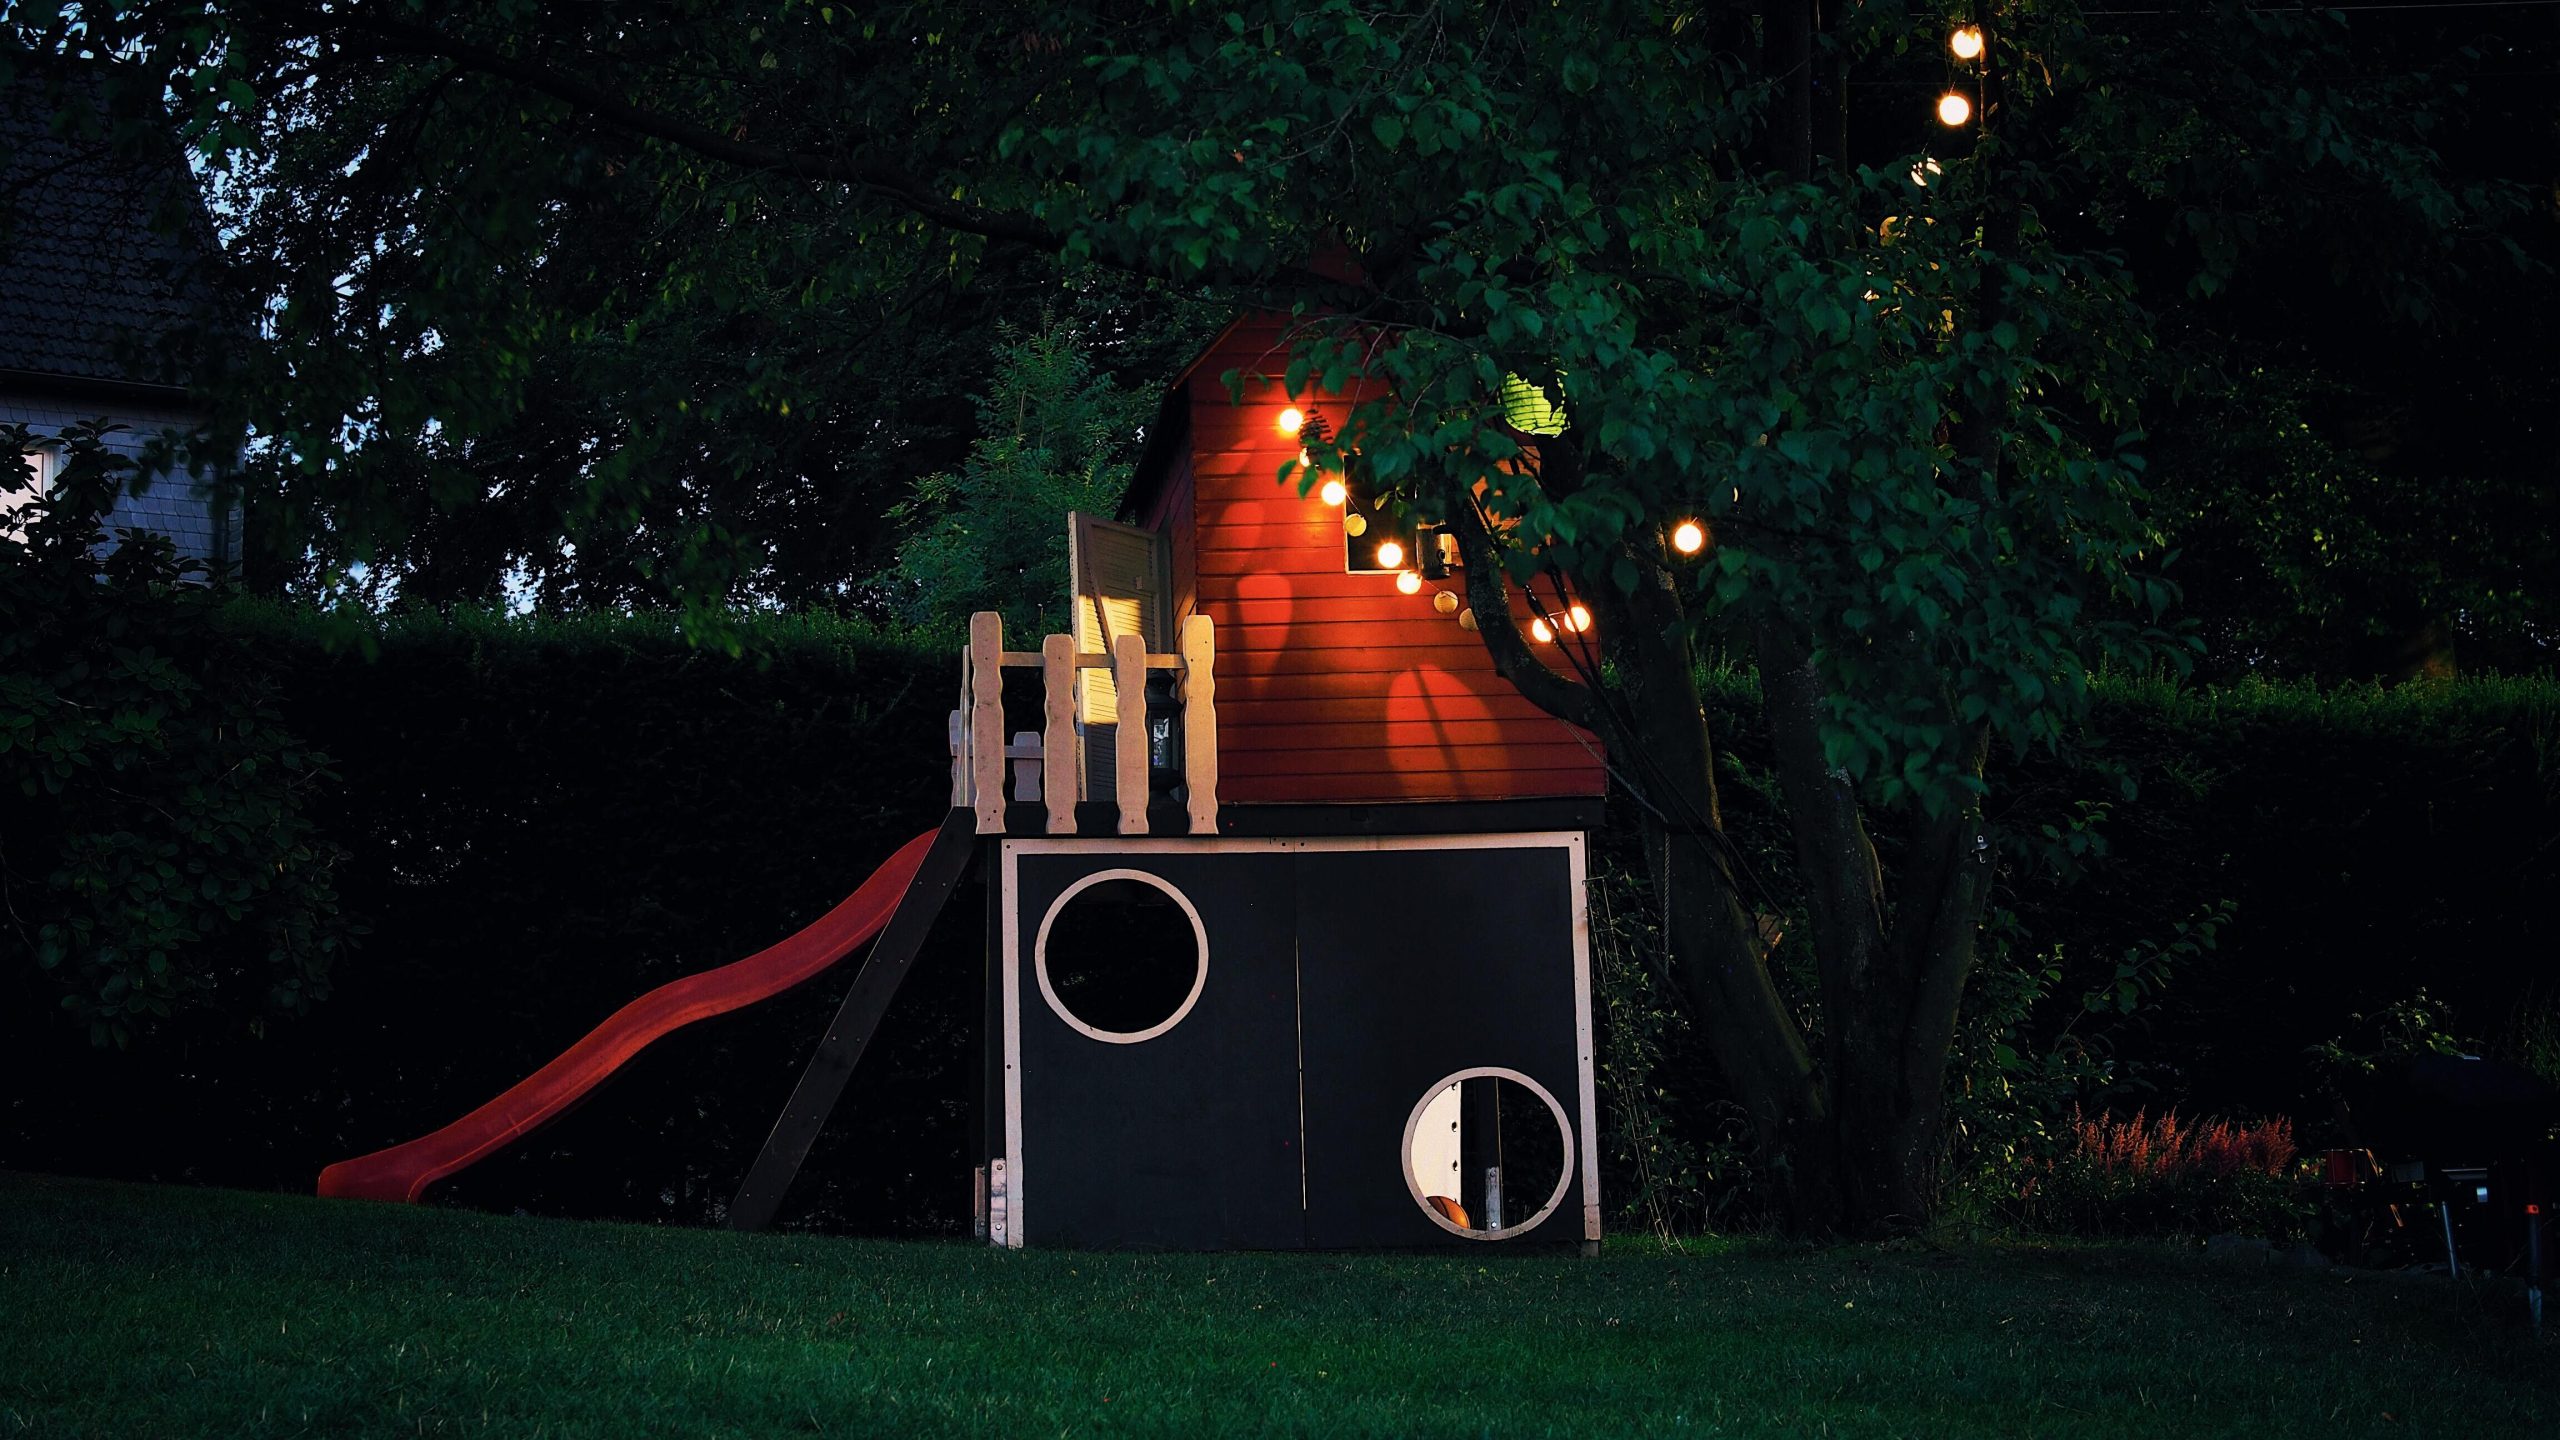
⚠️ Real Talk
When using string lights outdoors, layering is key. Don’t just drape one string over the playset itself. Weave a second or third string through the branches of nearby trees or along a fence line as seen here. This creates depth and makes the lighting feel more integrated and immersive. Use warm white bulbs (around 2700K) for a cozy, incandescent-like glow rather than harsh, blue-toned LEDs. This creates that magical, firefly-like effect that feels truly special.
27. Construct a Multi-Level Clubhouse with a Climbing Wall
A tall, multi-level structure like this is a great way to pack maximum play value onto a smaller footprint. The main structure might only be 8′ x 8′, but it offers multiple levels of play. To accommodate this design safely, you’d need a minimum area of about 20′ x 25′. This allows for a safe run-out for the slide and a fall zone around the climbing wall and ladder. The verticality makes it feel grand and adventurous without eating up your entire lawn, unlike the sprawling layout of Idea #4.
🎯 What Makes It Work
Building a custom clubhouse of this quality requires a significant investment in materials. Here’s a rough estimate:
- Pressure-treated lumber for frame & platform: $800 – $1,500
- Cedar or pine for siding & finishing: $500 – $900
- Slide: $200 – $400
- Climbing wall panel & holds: $100 – $250
- Windows, hardware, and roofing: $200 – $400
- TOTAL: $1,800 – $3,450
- Budget alternative: Build a single-level platform with a simple ladder and slide to get the core function for under $900.
28. Integrate a Playground with a Winding Stone Path and Sand Pit
This backyard design works beautifully because it fully integrates the play area into the overall landscape design. The playground isn’t just plopped on the grass; it’s purposefully set within a large sand pit and connected to the rest of the yard by a thoughtfully laid stone path. The mulch beds and decorative rocks that edge the path create a soft transition. This holistic approach makes the playset feel like an intentional and permanent feature of the garden, not an afterthought.
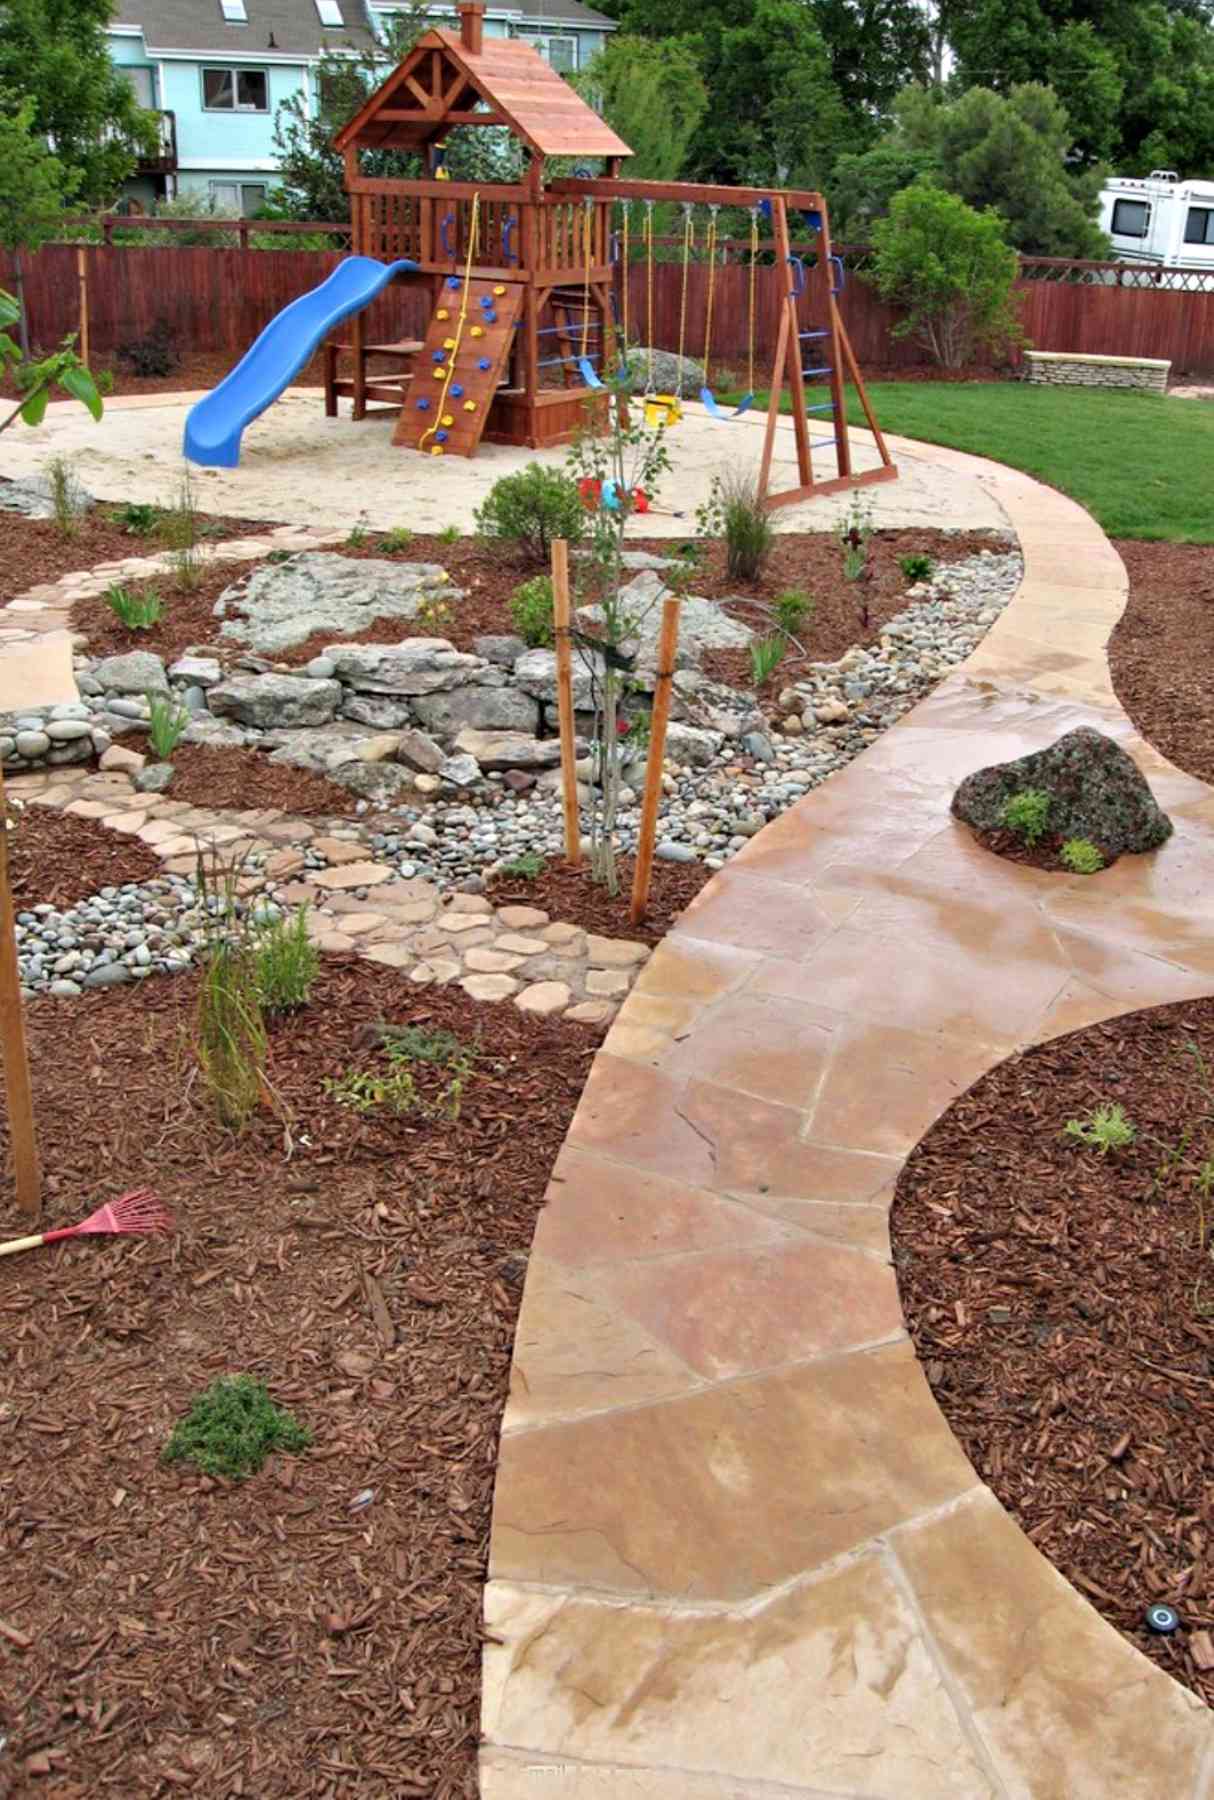
📏 Scale Guide
Before you commit to a full landscape integration like this one, take stock of your yard and your long-term plans.
- Drainage: Does your yard drain well? A large sandpit and stone patio require good drainage to avoid becoming a muddy swamp.
- Future Use: Kids outgrow playgrounds. By integrating it so permanently, will it be difficult to remove or repurpose the space in 10 years? Plan for a future where the sandpit might become a fire pit area or a garden bed.
- Sun/Shade: A sand pit can get very hot in direct sun. Is there a mature tree nearby to provide afternoon shade, or could you plant one?
29. Build a Whimsical Treetop-Style Fort with a Rope Ladder
The standout feature here is the whimsical, slightly wonky architecture. The decorative battlements, the small, mismatched window cutouts, and the heart detail on the door give this fort a ton of personality. It feels like something straight out of a children’s book illustration. This commitment to charming, imperfect details is what elevates it from a generic wooden box to a truly magical play space that sparks the imagination.
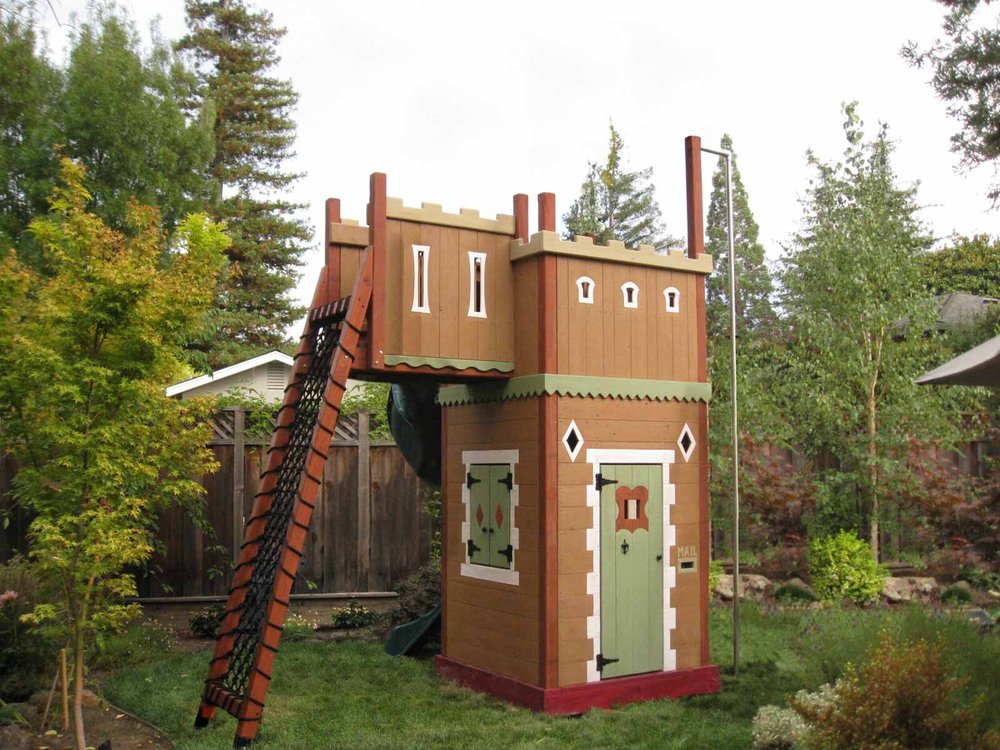
🔧 How-To Brief
The enchanting formula for this fort is: 70% natural wood + 20% storybook details + 10% accent color. The dominant material is the light and dark brown wood, which keeps it grounded and rustic. The storybook charm comes from the castle-like battlements, the rope-net ladder, and the decorative window and door cutouts. Finally, the subtle use of pale green and dark red as accents adds just enough color to make the details pop without overwhelming the natural wood tones.
30. Assemble a Simple Playhouse with a Yellow Slide and Swing
This playset is a great example of a budget-friendly design that still delivers a ton of fun. The structure itself is simple: a basic wooden platform and house frame. The ‘wow’ factor comes from the accessories, not an enormous or complex structure. A bright yellow slide and a matching bucket swing are relatively inexpensive additions that provide a huge pop of color and play value. You could find a basic kit like this, or the plans to build one, for a few hundred dollars, making it a very accessible DIY project.
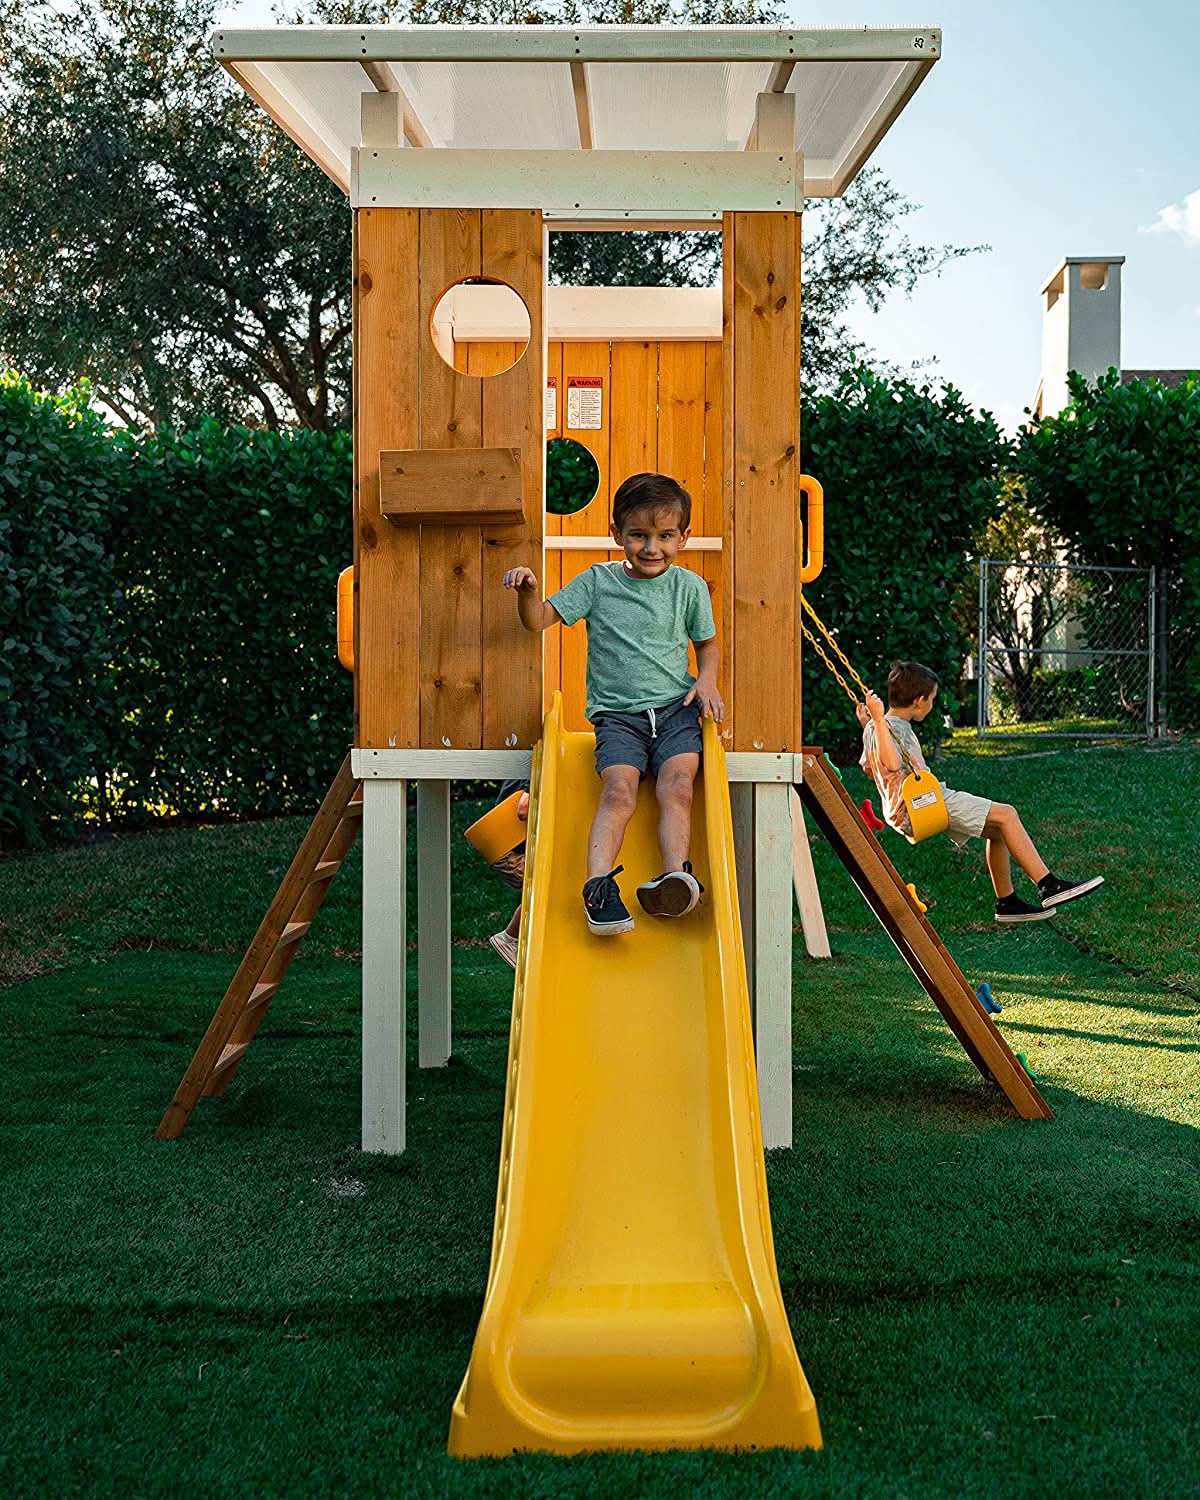
🔥 Trending Context
That clear, corrugated plastic roof is a fantastic and inexpensive way to create a covered, light-filled space. However, be aware that it can create a greenhouse effect on hot, sunny days, making the playhouse underneath uncomfortably warm. It doesn’t offer any shade or UV protection. If you live in a hot climate, you might be better off with a solid wood roof or even a simple canvas sail to provide real shade. This type of roof is best for temperate climates or shady backyards.
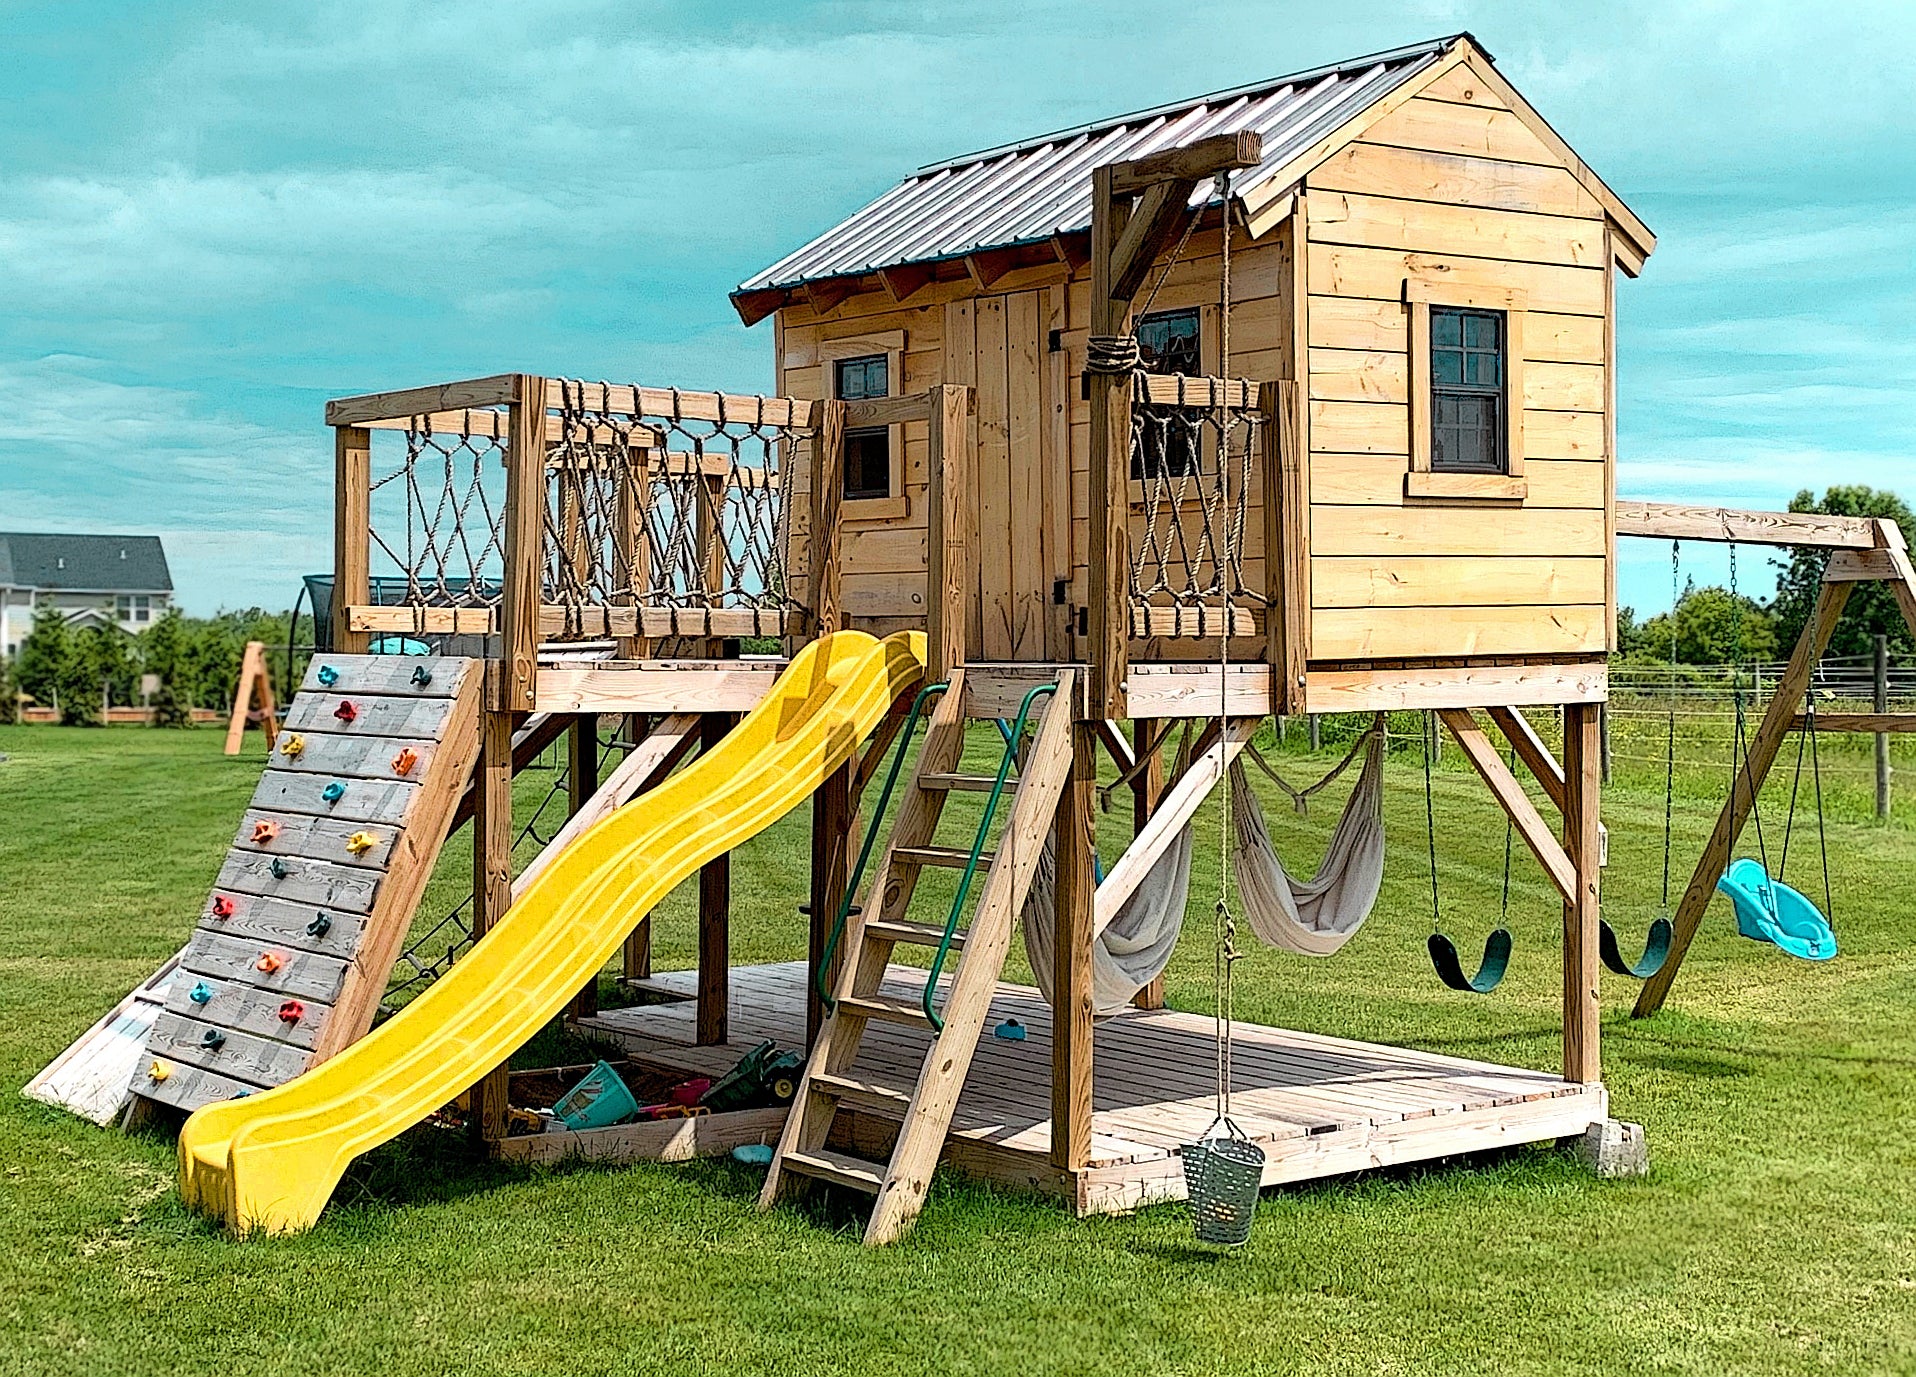
31. Construct an Ultimate Adventure Hub with a Rope Bridge and Hammocks
This is the dream playground, a full-on adventure park in your backyard, and the budget reflects its scale. This is a multi-week project with a serious price tag.
- Lumber for all structures: $3,000 – $5,000
- Rope bridge kit: $400 – $800
- Long yellow slide: $300 – $500
- Swings, hammocks, climbing holds: $400 – $700
- Metal roofing and hardware: $300 – $600
- TOTAL: $4,400 – $7,600
- Budget alternative: Start with the main playhouse structure this year, as seen in Idea #28, and add the rope bridge and other elements in subsequent years to spread out the cost.
🧹 Maintenance Reality
This is an expansive playground for a large backyard. Given the multiple structures, the rope bridge, and the wide berth needed for swings and hammocks, you would need a mostly level area of at least 1,500-2,000 square feet to build this comfortably and safely. The rope bridge alone requires a significant span, and you need clear fall zones around the climbing wall, slide, and swings. This is a statement piece that assumes you have a generous amount of outdoor space to dedicate to play.
Your Backyard Adventure Awaits
Building a playground is so much more than a weekend project; it’s about creating a backdrop for years of memories and imaginative adventures. Don’t be intimidated by the big builds—you can start small with a simple swing or sandbox and add on as your family grows. The most important step is the first one.
Ready to get planning? Pin your favorite ideas from this list to your dream backyard board on Pinterest and make it happen!