You know that feeling when you finally find the hutch makeover that looks exactly right for your space, but you’re not sure how to pull it off? That hunt for the perfect inspiration is over. After filtering through hundreds of options across IKEA, Target, and Facebook Marketplace, we narrowed it down to 27 ideas that actually deliver. Inside, you’ll find 27 curated hutch makeovers covering everything from modern farmhouse to classic traditional, with both budget-friendly DIYs and high-end looks. In 2026, it’s all about telling a personal story with your furniture, and a hutch is the perfect canvas for that. And stay until the end — we break down the most common mistakes that can ruin these looks. 📌 Save this to Pinterest for later — you’ll want to revisit these ideas.
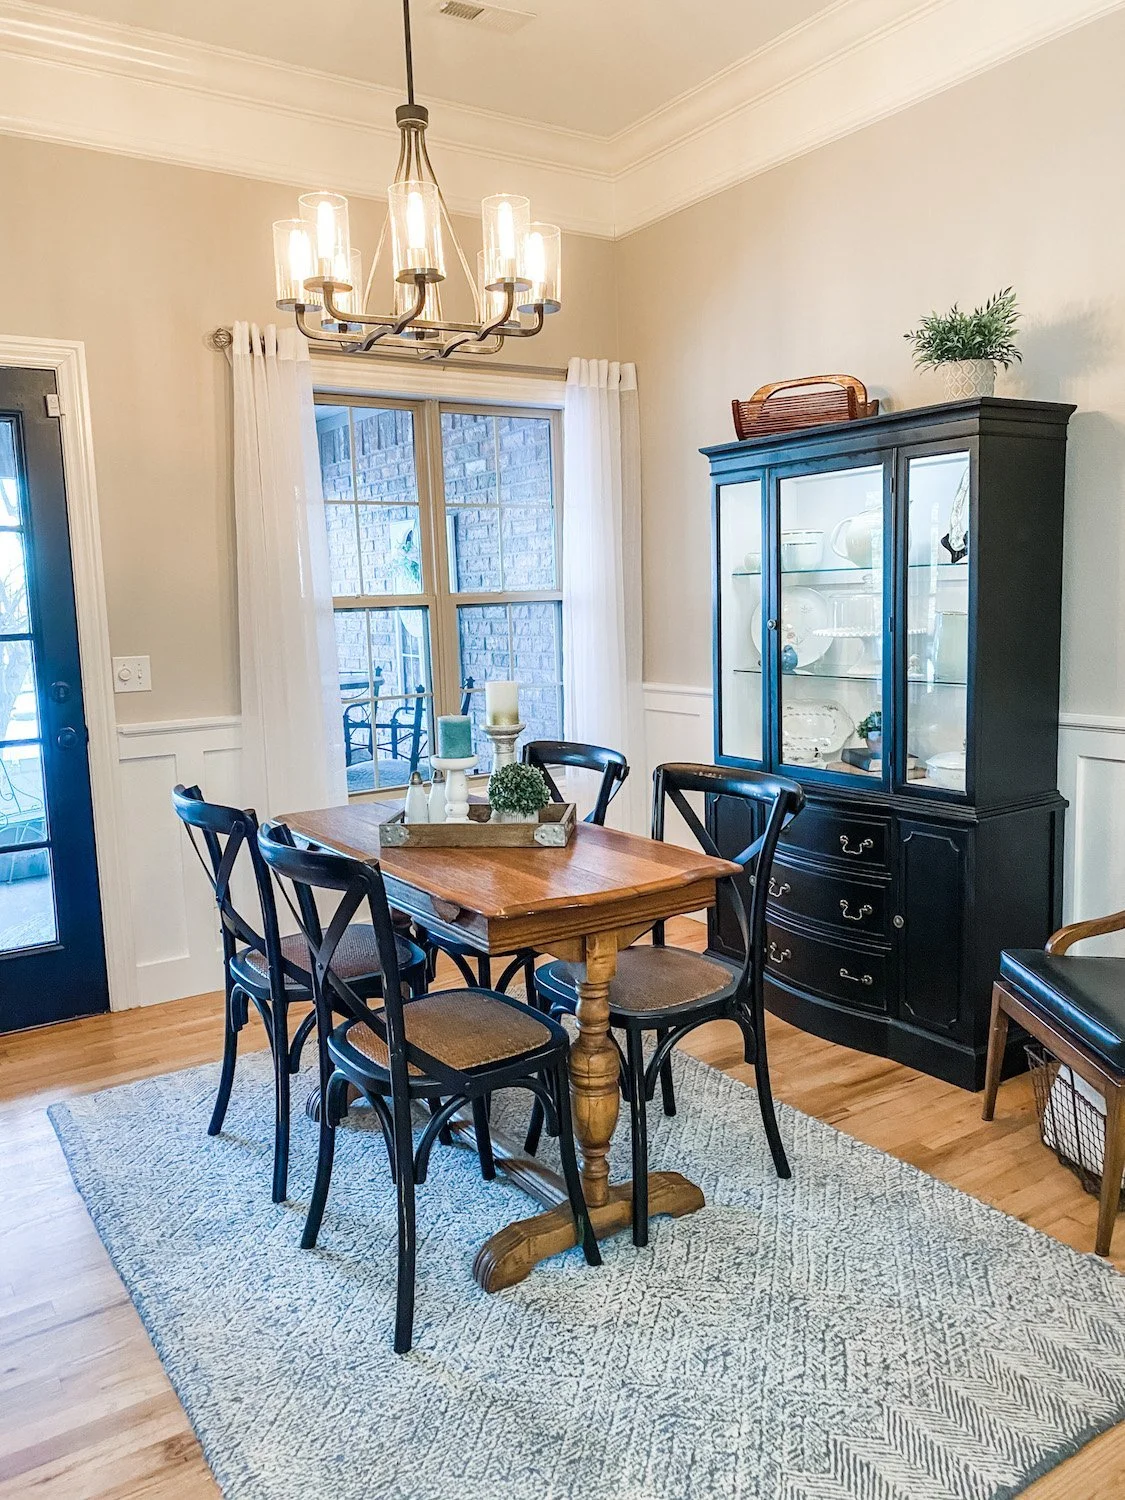
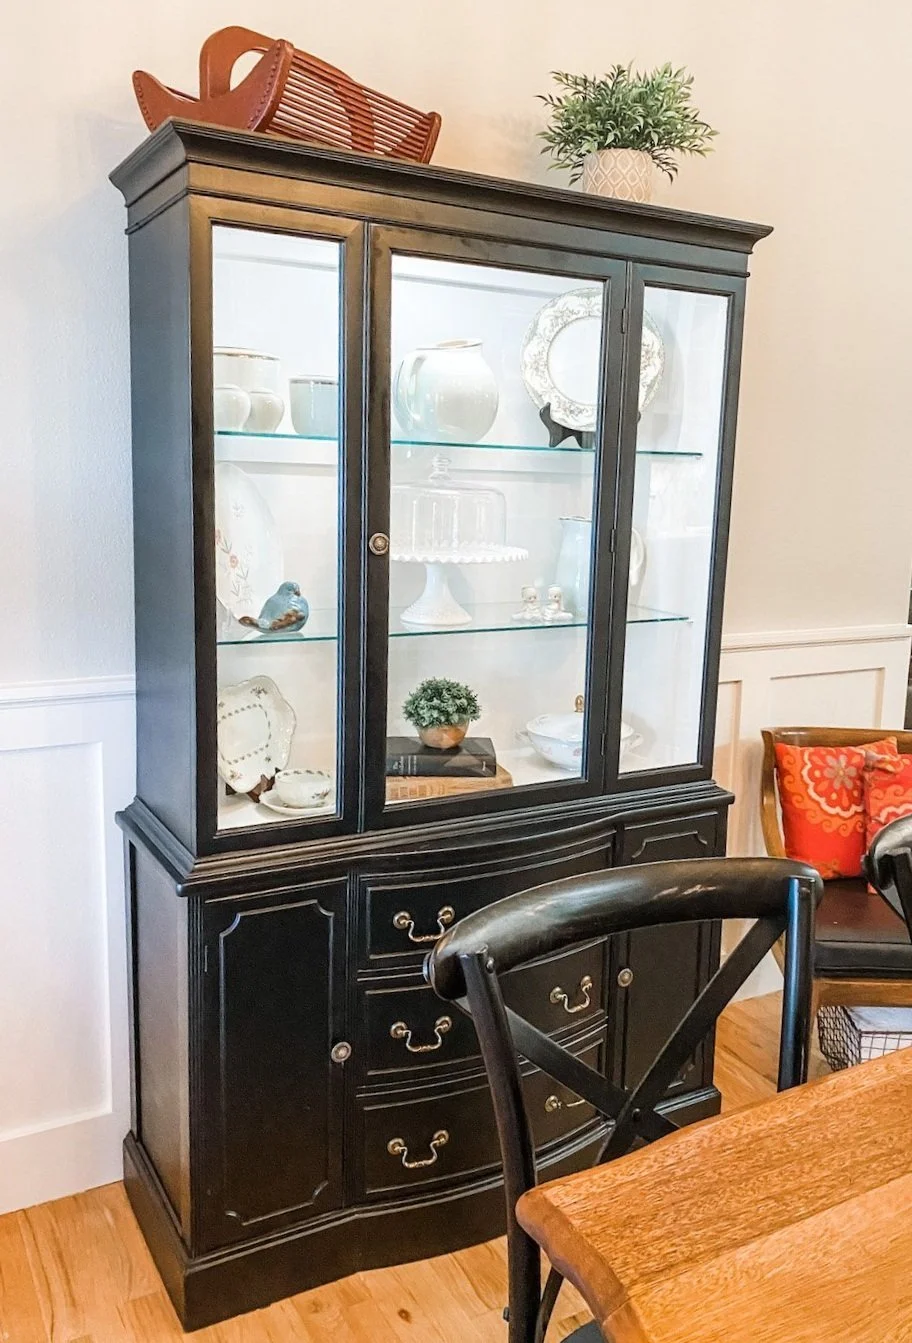
1. Modern Farmhouse Dining with a Black Hutch and Mixed Woods
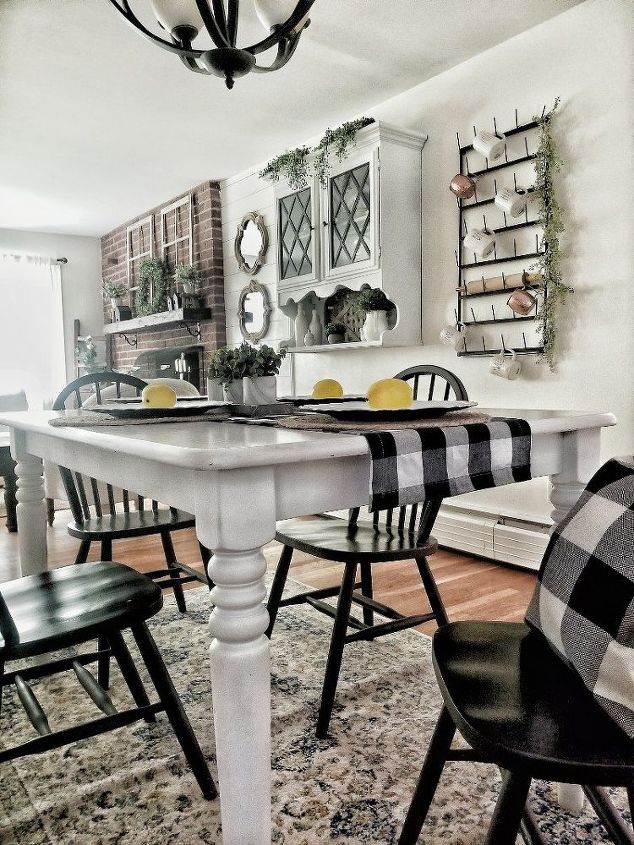
This look is a masterclass in modern farmhouse balance. The bold, black hutch acts as a strong anchor, grounding the room and providing a graphic punch. This contrast is softened by the warm-toned wooden table and the woven seats of the chairs, which add texture and prevent the black from feeling too heavy. The light blue and white patterned rug introduces color and pattern without overwhelming the space, tying the wood, black, and white elements together into a cohesive, inviting whole.
💰 Budget Breakdown
When mixing woods, the secret is to stick to a similar undertone. Here, the warm oak of the table has a golden-yellow base. If you were to bring in another wood piece, like a sideboard, look for something with a similar warm, honeyed, or reddish undertone, rather than a cool, ashy, or grey-toned wood. This creates harmony instead of a chaotic, mismatched look. A good rule of thumb is to keep your wood tones within two shades of each other on a color strip.
2. Showcase Your Collection in a Sleek, Lit Black Hutch
The internal lighting is, without a doubt, the game-changer here. Without it, this would just be a handsome black cabinet. With it, the hutch transforms into a gallery for your favorite things. The light bounces off the glass shelves and illuminates the white ceramic pieces, creating depth, drama, and turning simple dishware into a curated exhibit. It draws the eye, adds a warm glow to the room, and makes the whole setup feel intentional and high-end. Compare this to the unlit hutch in Idea #1 to see the difference.
🔥 Trending Context
Integrated lighting looks fantastic, but be prepared for some wiring. If the hutch doesn’t come pre-lit, you’ll be dealing with adding LED strips, which means managing cords. You’ll need an outlet nearby, and you might have to get creative with hiding the power cord behind or under the hutch. Also, keep in mind that lit displays show every speck of dust, so the glass shelves and all those pretty objects will need frequent, careful cleaning to look their best.
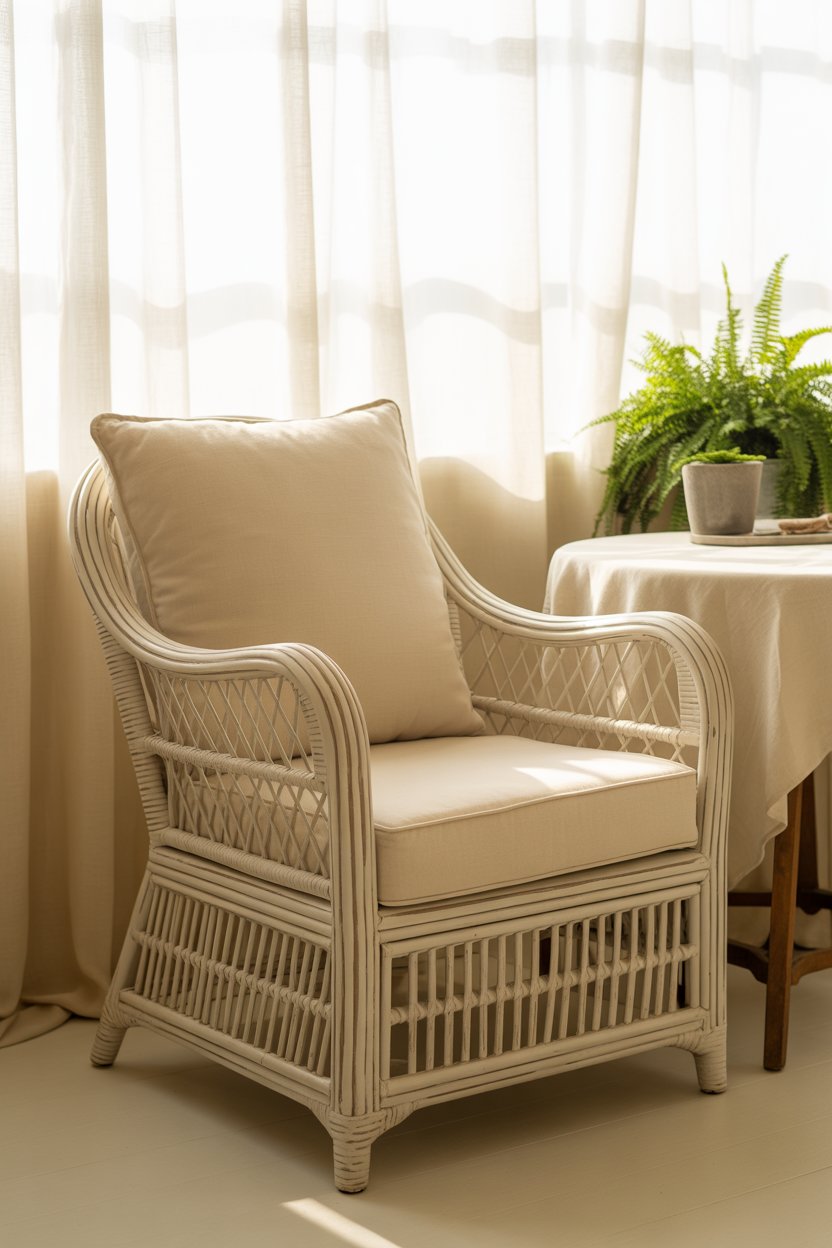
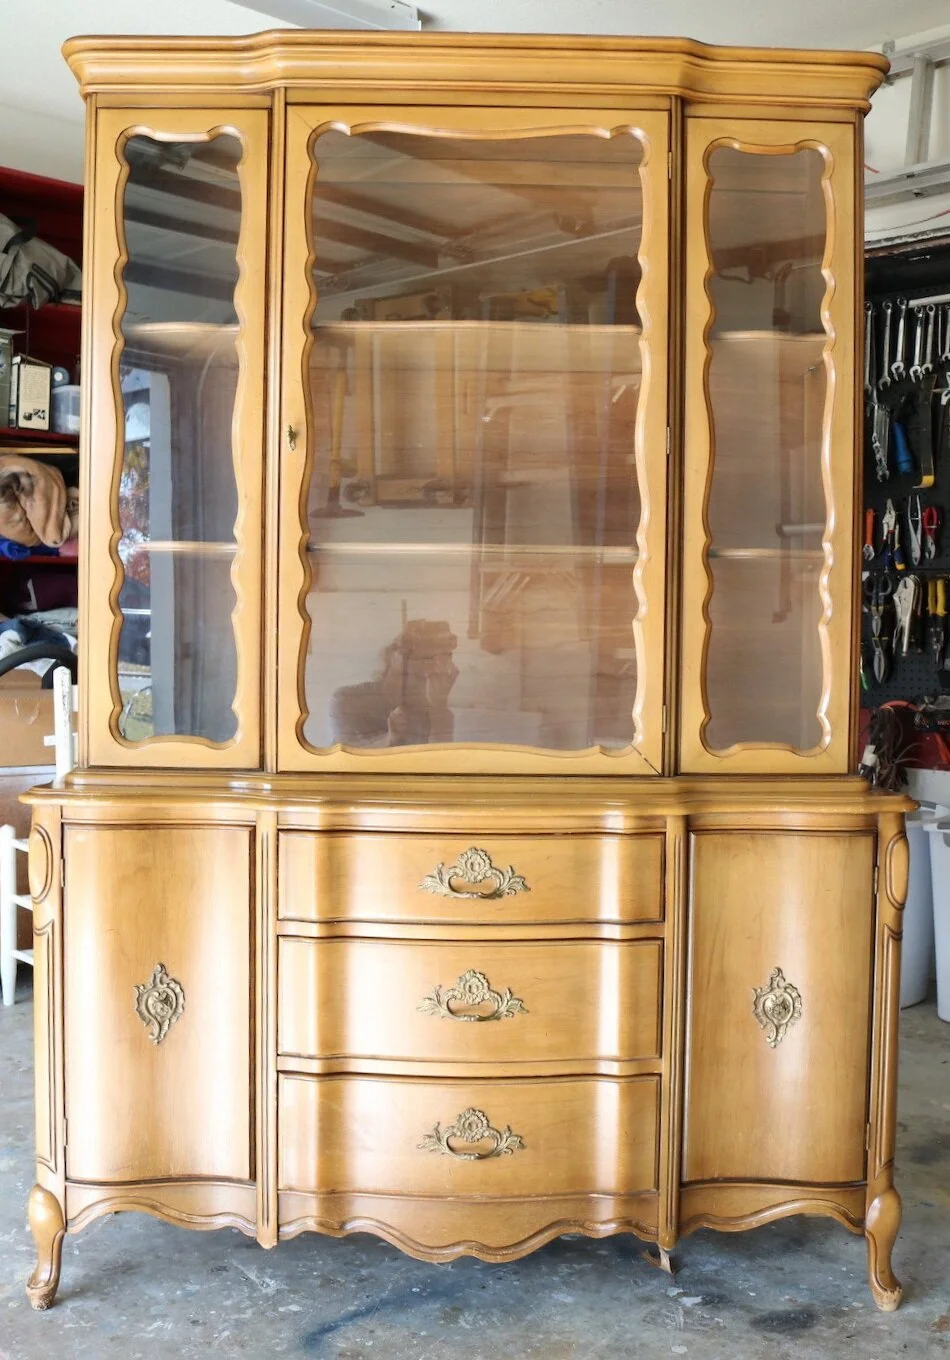
3. Embrace Ornate Detail with a Carved Light Wood Hutch
This look follows a simple formula: 80% traditional form + 20% ornate detail. The core is a classic, functional hutch in a timeless light wood finish. The magic comes from the added 20% of embellishment—the carved frames on the glass doors, the serpentine curve of the front, the cabriole legs, and the decorative gold hardware. You could apply this formula to a different piece by taking a simple bookcase and adding ornate wood appliqués and high-end hardware to achieve a similar, custom-milled feel.
🧹 Maintenance Reality
A piece with this much carving and detail is a magnet for dust. Those beautiful serpentine curves and ornate escutcheons have dozens of tiny crevices that a regular dusting cloth will just skim over. To keep it looking pristine, you’ll need to dedicate time to cleaning it with a soft-bristled brush (like a clean makeup brush or paintbrush) to get into all the nooks and crannies. This isn’t a quick wipe-down piece; expect to spend 15-20 minutes on detailed dusting every couple of weeks.
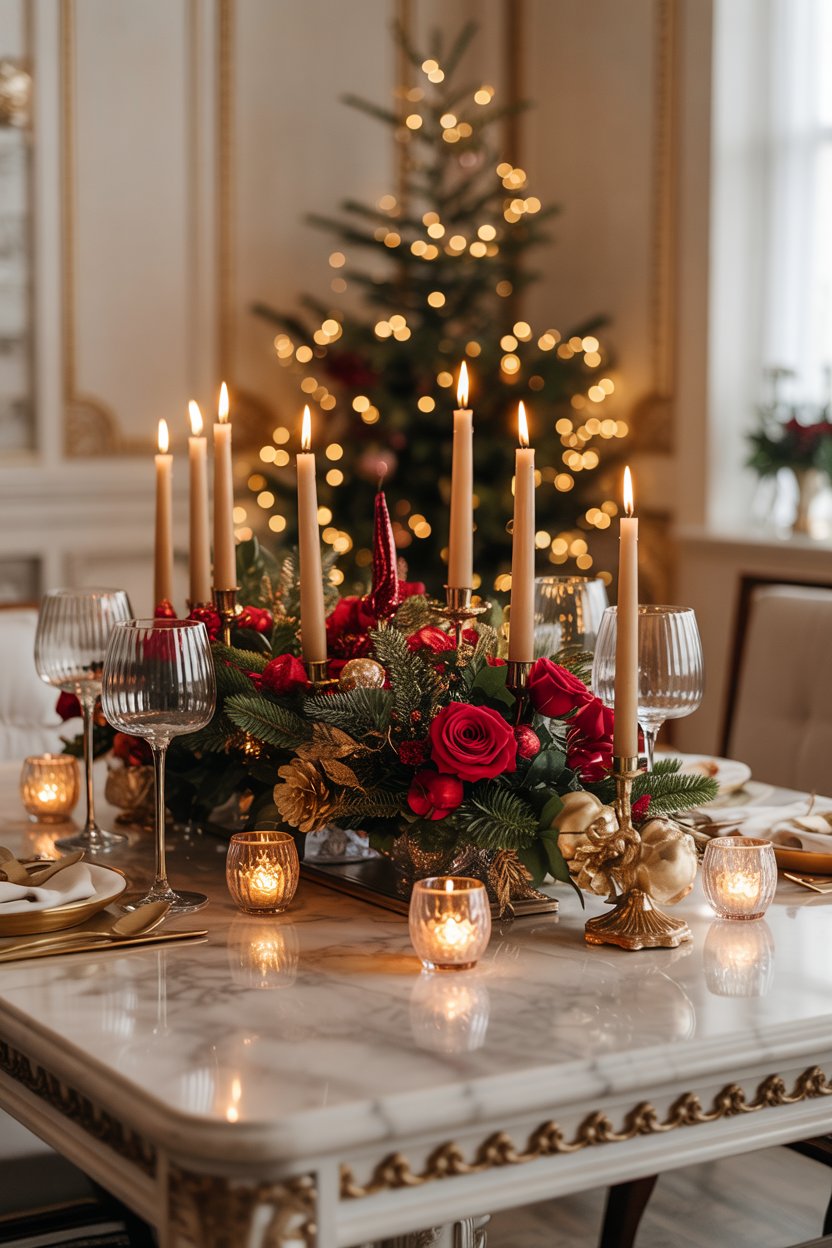
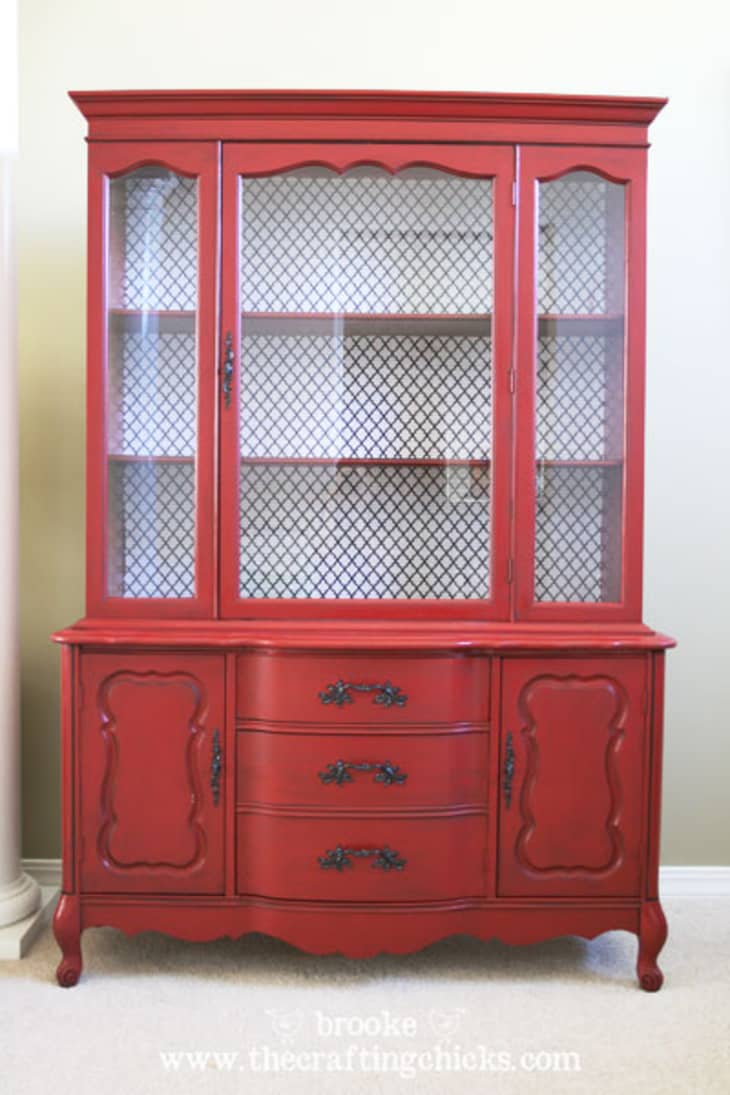
4. Go Bold with a Vibrant Red Hutch and Lattice Doors
What makes this work is the fearless commitment to color. The vibrant red paint transforms a traditional hutch from a stuffy, forgettable piece into a stunning focal point. The choice of dark hardware and lattice inserts adds another layer of visual interest and keeps the red from feeling flat. The slightly distressed finish gives it a sense of history and charm, suggesting it’s a well-loved piece that has been part of the home for years. It’s a statement of personality, proving that formal furniture doesn’t have to be boring.
5. Add Rustic Charm with a Distressed Green Hutch
You don’t need a designer budget to get this rustic farmhouse look. Find a dated, solid wood hutch on Facebook Marketplace for $100-$200. The key is finding one with good bones—solid construction, interesting details. A weekend of work with a sander, some chalk paint in a soft green (like Sage or Eucalyptus), and a dark wax for aging is all it takes. For the top, you can sand down the original and re-stain it dark for about $30, completing the two-tone effect. For a final touch, replace a couple of glass panels with chicken wire from a hardware store for under $20.

📐 Style Math
- Do you have solid wood to work with? Distressing techniques look best on real wood, not laminate or MDF.
- Is the piece structurally sound? Check for wobbly legs or broken drawers before you buy.
- Will the distressed green color complement your existing decor? Bring paint chips home to test in your room’s light.
- Have you allocated a weekend for the project? Proper prep, painting, and distressing takes time!
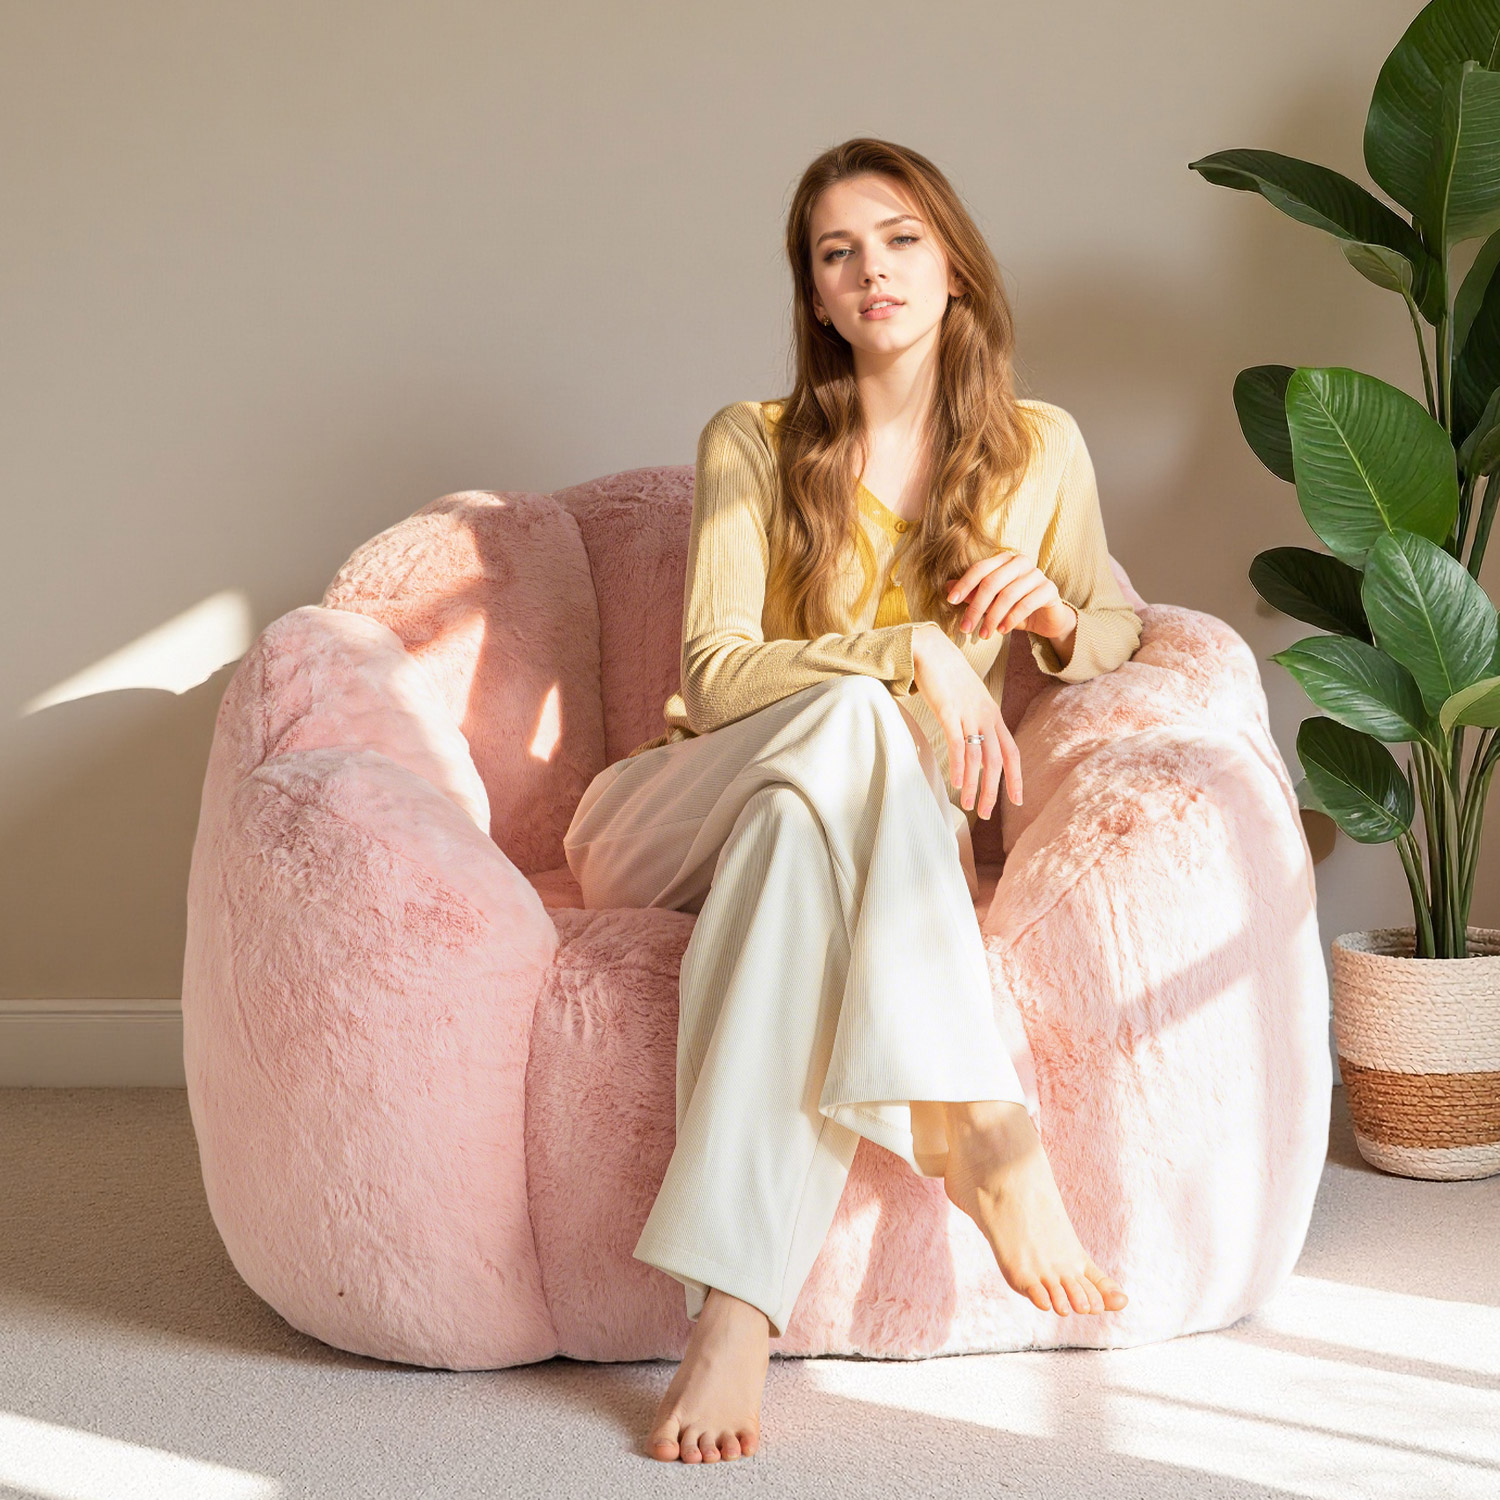
6. Create a Playful Vibe with a Glossy Black Hutch in a Blue Room
Here’s the visual recipe: 50% classic furniture + 30% bold color accents + 20% playful patterns. The glossy black hutch is your classic, grounding element. The light blue walls and orange-and-white striped bean bag provide the big, cheerful color statement. Finally, the floral pattern on the armchair and the mix of colorful decor inside the hutch bring in that layer of pattern and eclectic charm. You could swap the orange for hot pink or the blue for a sunny yellow, and the formula would still work beautifully.

⚠️ Real Talk
A glossy black finish is stunning, but it’s also a high-maintenance choice. It will show every single fingerprint, smudge, and speck of dust. If this hutch is in a high-traffic area or if you have kids or pets, you’ll be wiping it down constantly. To keep that sleek, reflective look, you’ll need to use a microfiber cloth and a gentle cleaner, as harsh chemicals or abrasive materials can scratch the finish and create swirl marks. It’s a look that requires commitment.
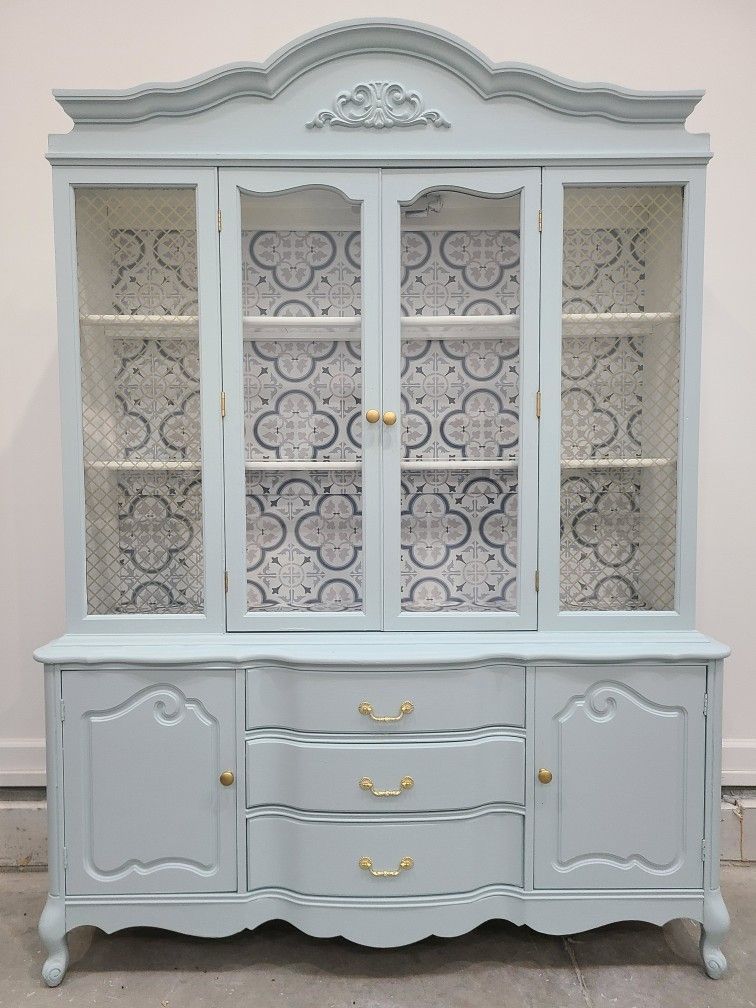
7. Update a Vintage Piece with Powder Blue Paint and Patterned Backing
The single element that elevates this entire piece is the patterned wallpaper backing. The solid powder blue paint is lovely, but it’s the pop of blue and white geometric pattern on the interior that gives it a truly custom, designer feel. It adds depth, personality, and a touch of whimsy, turning the inside of the cabinet into an intentional part of the design. It’s a trick that makes the dishware on display stand out and transforms the hutch from just a painted piece into a curated style moment. A similar effect can be seen with the green wallpaper in Idea #16.
🔧 How-To Brief
Want to add a wallpaper backing to your own hutch? It’s a quick and high-impact update.
Time Estimate: 2 hours.
Material Cost: $30-$80.
- First, carefully remove the back panel of the hutch. If it’s not removable, you’ll have to work inside the cabinet.
- Clean the surface thoroughly so the wallpaper will adhere properly.
- Measure the panel (or internal space) precisely and cut your wallpaper to size, leaving a slight overlap.
- Apply your wallpaper, starting from a top corner and smoothing it down as you go to remove air bubbles. A credit card or squeegee works well.
- If using non-pasted paper, apply paste to the panel, not the paper. For peel-and-stick, it’s even easier.
- Trim any excess paper from the edges with a sharp craft knife for a clean finish. Re-attach the panel if you removed it.
8. Display a Cheerful Collection in a Muted Teal Hutch
This hutch works because it perfectly balances personality with organization. The muted teal color is unique and charming, setting a cheerful tone without being overwhelming. The combination of glass doors, metal mesh panels, and open shelving creates varied display options—some things are clearly visible, others are partially obscured, and some are out in the open. This strategic mix prevents the large collection of colorful Pioneer Woman dishware from looking like clutter, instead turning it into a joyful, curated display of a beloved collection.
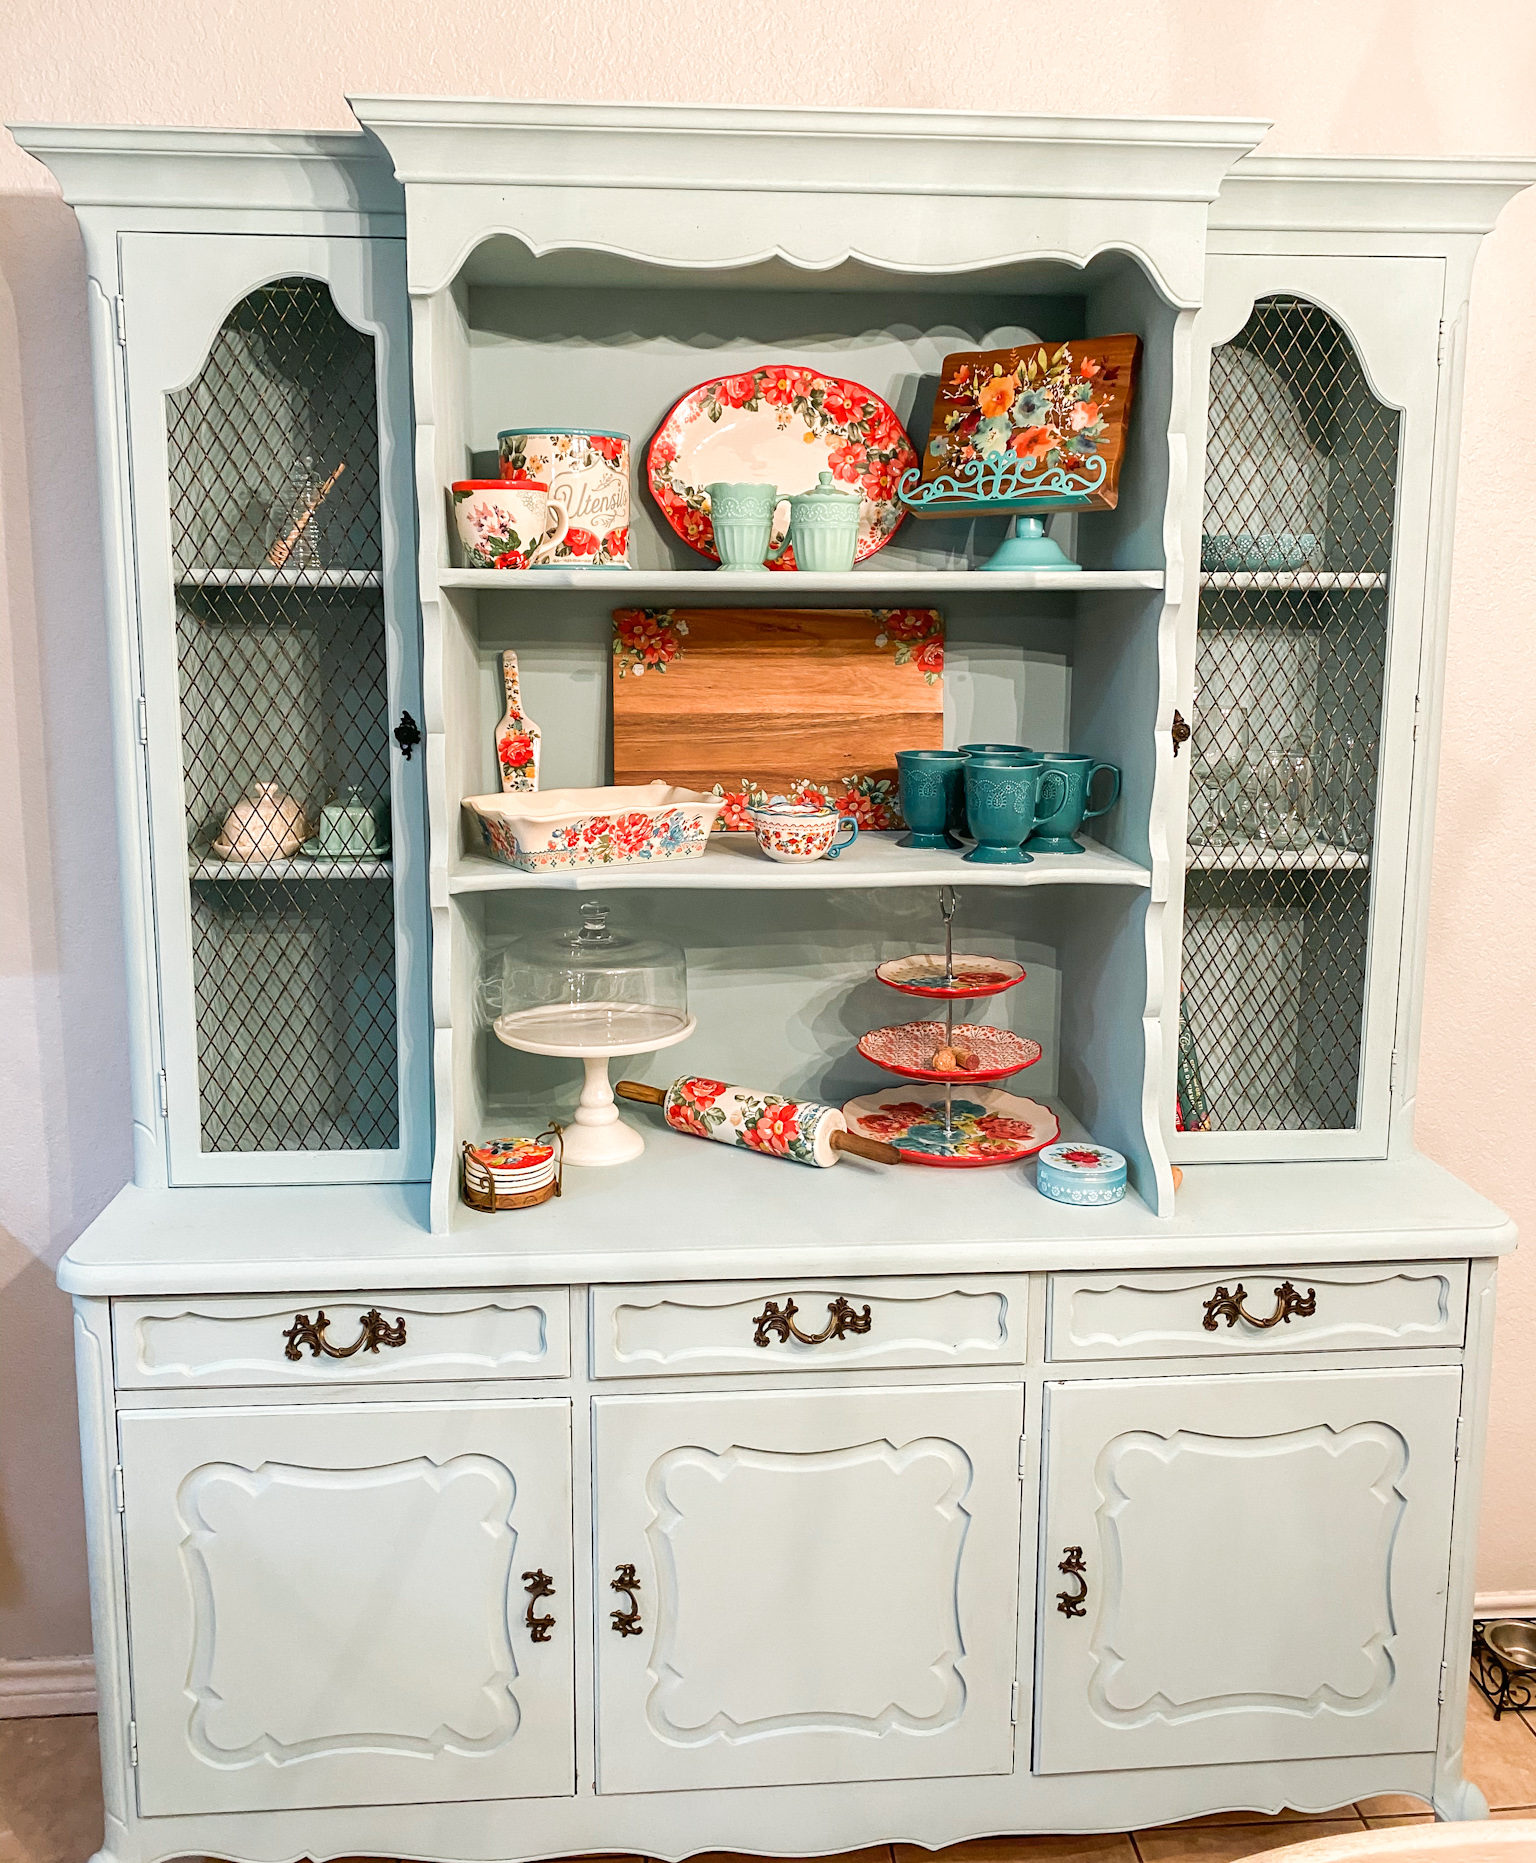
⭐ The One Thing
When displaying a large, colorful collection like this, the key is to create breathing room. Don’t cram every shelf full. Notice how there are small gaps between stacks of plates and space around the mugs. Aim to fill shelves to about 75% capacity. This negative space is crucial; it allows the individual pieces to be seen and appreciated, preventing the overall display from feeling chaotic and overwhelming. It tells your eye that this is a curated showcase, not just storage.
9. Achieve a Cozy, Collected Look with a Distressed White Hutch
The formula here is all about texture and layers: 60% rustic base + 30% soft textures + 10% natural elements. The distressed white hutch with its warm wood countertop provides the rustic foundation. The soft textures come from the damask pattern in the back and the mix of smooth and patterned ceramics. Finally, the small addition of pinecones and feathers brings in an organic, natural touch that makes the whole arrangement feel lived-in and authentic. The balance of finishes feels curated over time. Notice the similarities in styling with Idea #10, which uses a slightly cleaner approach.
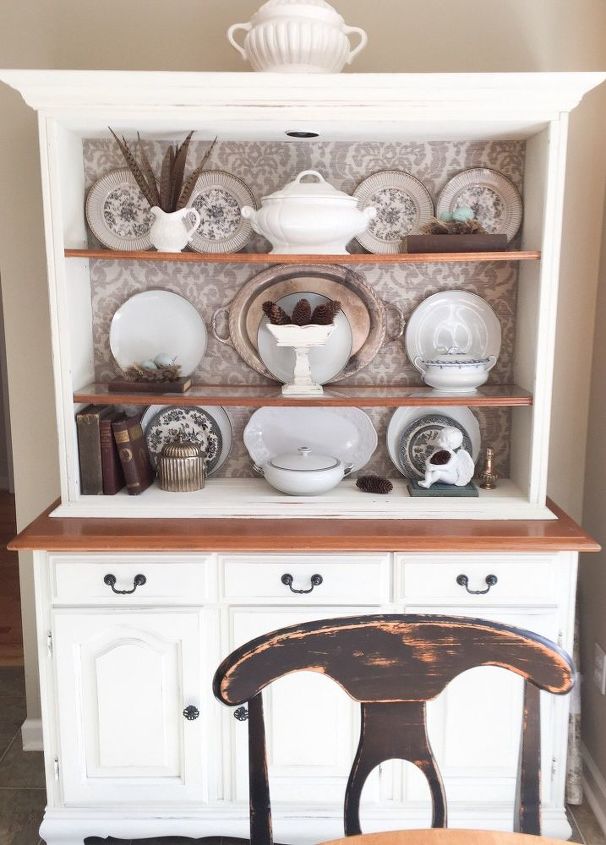
📏 Scale Guide
You can achieve this collected-over-time vibe for very little. Start with a second-hand hutch from a thrift store—the more dings, the better!—for under $150. Use white chalk paint and a sanding block to create the distressed finish yourself. For the damask backing, you can use peel-and-stick wallpaper or even a stencil with a bit of gray paint for under $40. Collect pinecones from a park for free, and source white ceramic dishes from Target or Walmart to complete the display.
10. Style a Farmhouse Hutch with a Natural Wood Countertop
The natural wood countertop is the single element that brings this farmhouse hutch to life. Without it, a fully white-painted hutch could feel a bit flat or one-dimensional. The warm wood tone introduces a crucial layer of contrast, texture, and organic warmth. It breaks up the expanse of white, connects the piece to the natural world, and provides a beautiful, durable surface for display. This two-tone effect is a hallmark of modern farmhouse style, and this hutch executes it perfectly.

💸 Get This Look For Less
While that natural wood countertop is beautiful, it requires more care than a painted surface. It needs to be properly sealed to protect it from water rings or stains, especially if you plan to use it as a drink station or place plants on it. An unsealed or poorly sealed wood top can be easily damaged. You’ll want to re-apply a food-safe sealant or wax every 6-12 months to maintain its luster and protective barrier. It’s a small task, but essential for keeping it looking great.
11. Integrate a Traditional Wood Hutch with a Gray Wall and Artwork
This setup works because it expertly bridges traditional and contemporary styles. The hutch itself is purely traditional, with its warm wood, classic lines, and brass hardware. However, it’s placed against a cool, modern light gray wall. This contrast makes the hutch pop. The choice of a large, abstract landscape painting instead of a more traditional still life or portrait further modernizes the vignette. It shows how to incorporate a classic, inherited piece into a more current design scheme without it feeling dated.
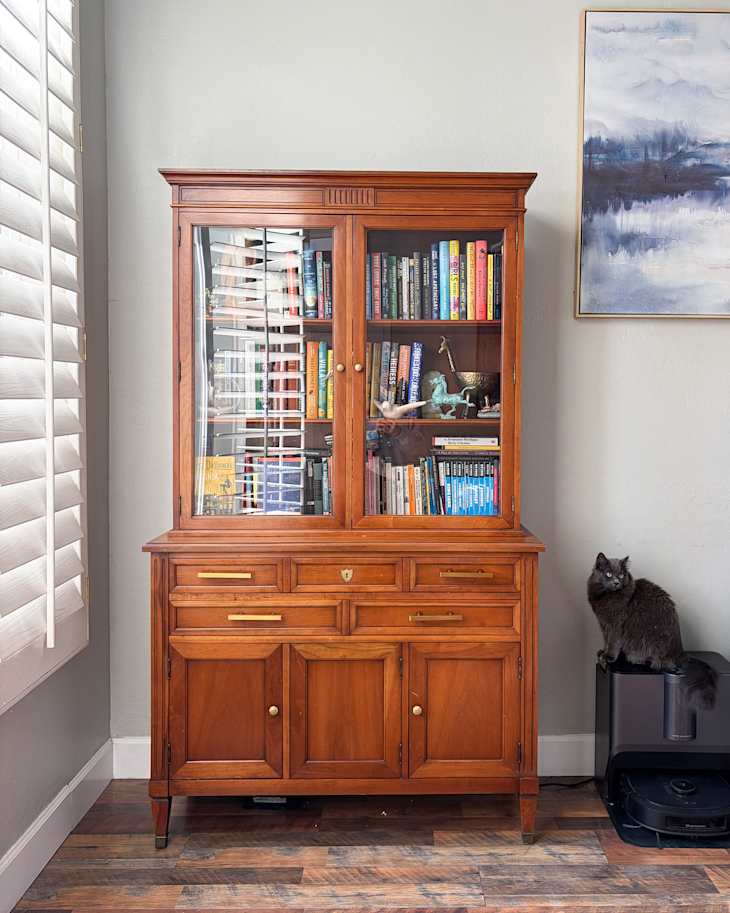
💡 Designer Tip
A tall, traditional hutch like this needs adequate ceiling height to avoid feeling cramped. This idea works best in a room with standard 8-foot ceilings or higher. The minimum width for a setup like this, including the ‘breathing room’ on the side for the painting, is about 6-7 feet of uninterrupted wall space. If your room is smaller, consider a lower buffet or credenza to get a similar feel without overwhelming the space, like the console seen in Idea #15.
12. Display Blue and White Dinnerware in a Classic Brown Wood Hutch
To make a traditional hutch feel current, curate what’s inside with a strict color palette. Notice how sticking to only blue and white pieces inside the glass cabinets creates a crisp, intentional, and almost graphic display. This keeps the eye from getting overwhelmed and modernizes the feel of the dark wood. On the lower surface, the single gold-framed contemporary artwork serves the same purpose, adding a modern touch that contrasts beautifully with the hutch’s formal character. Don’t just fill your hutch; style it.
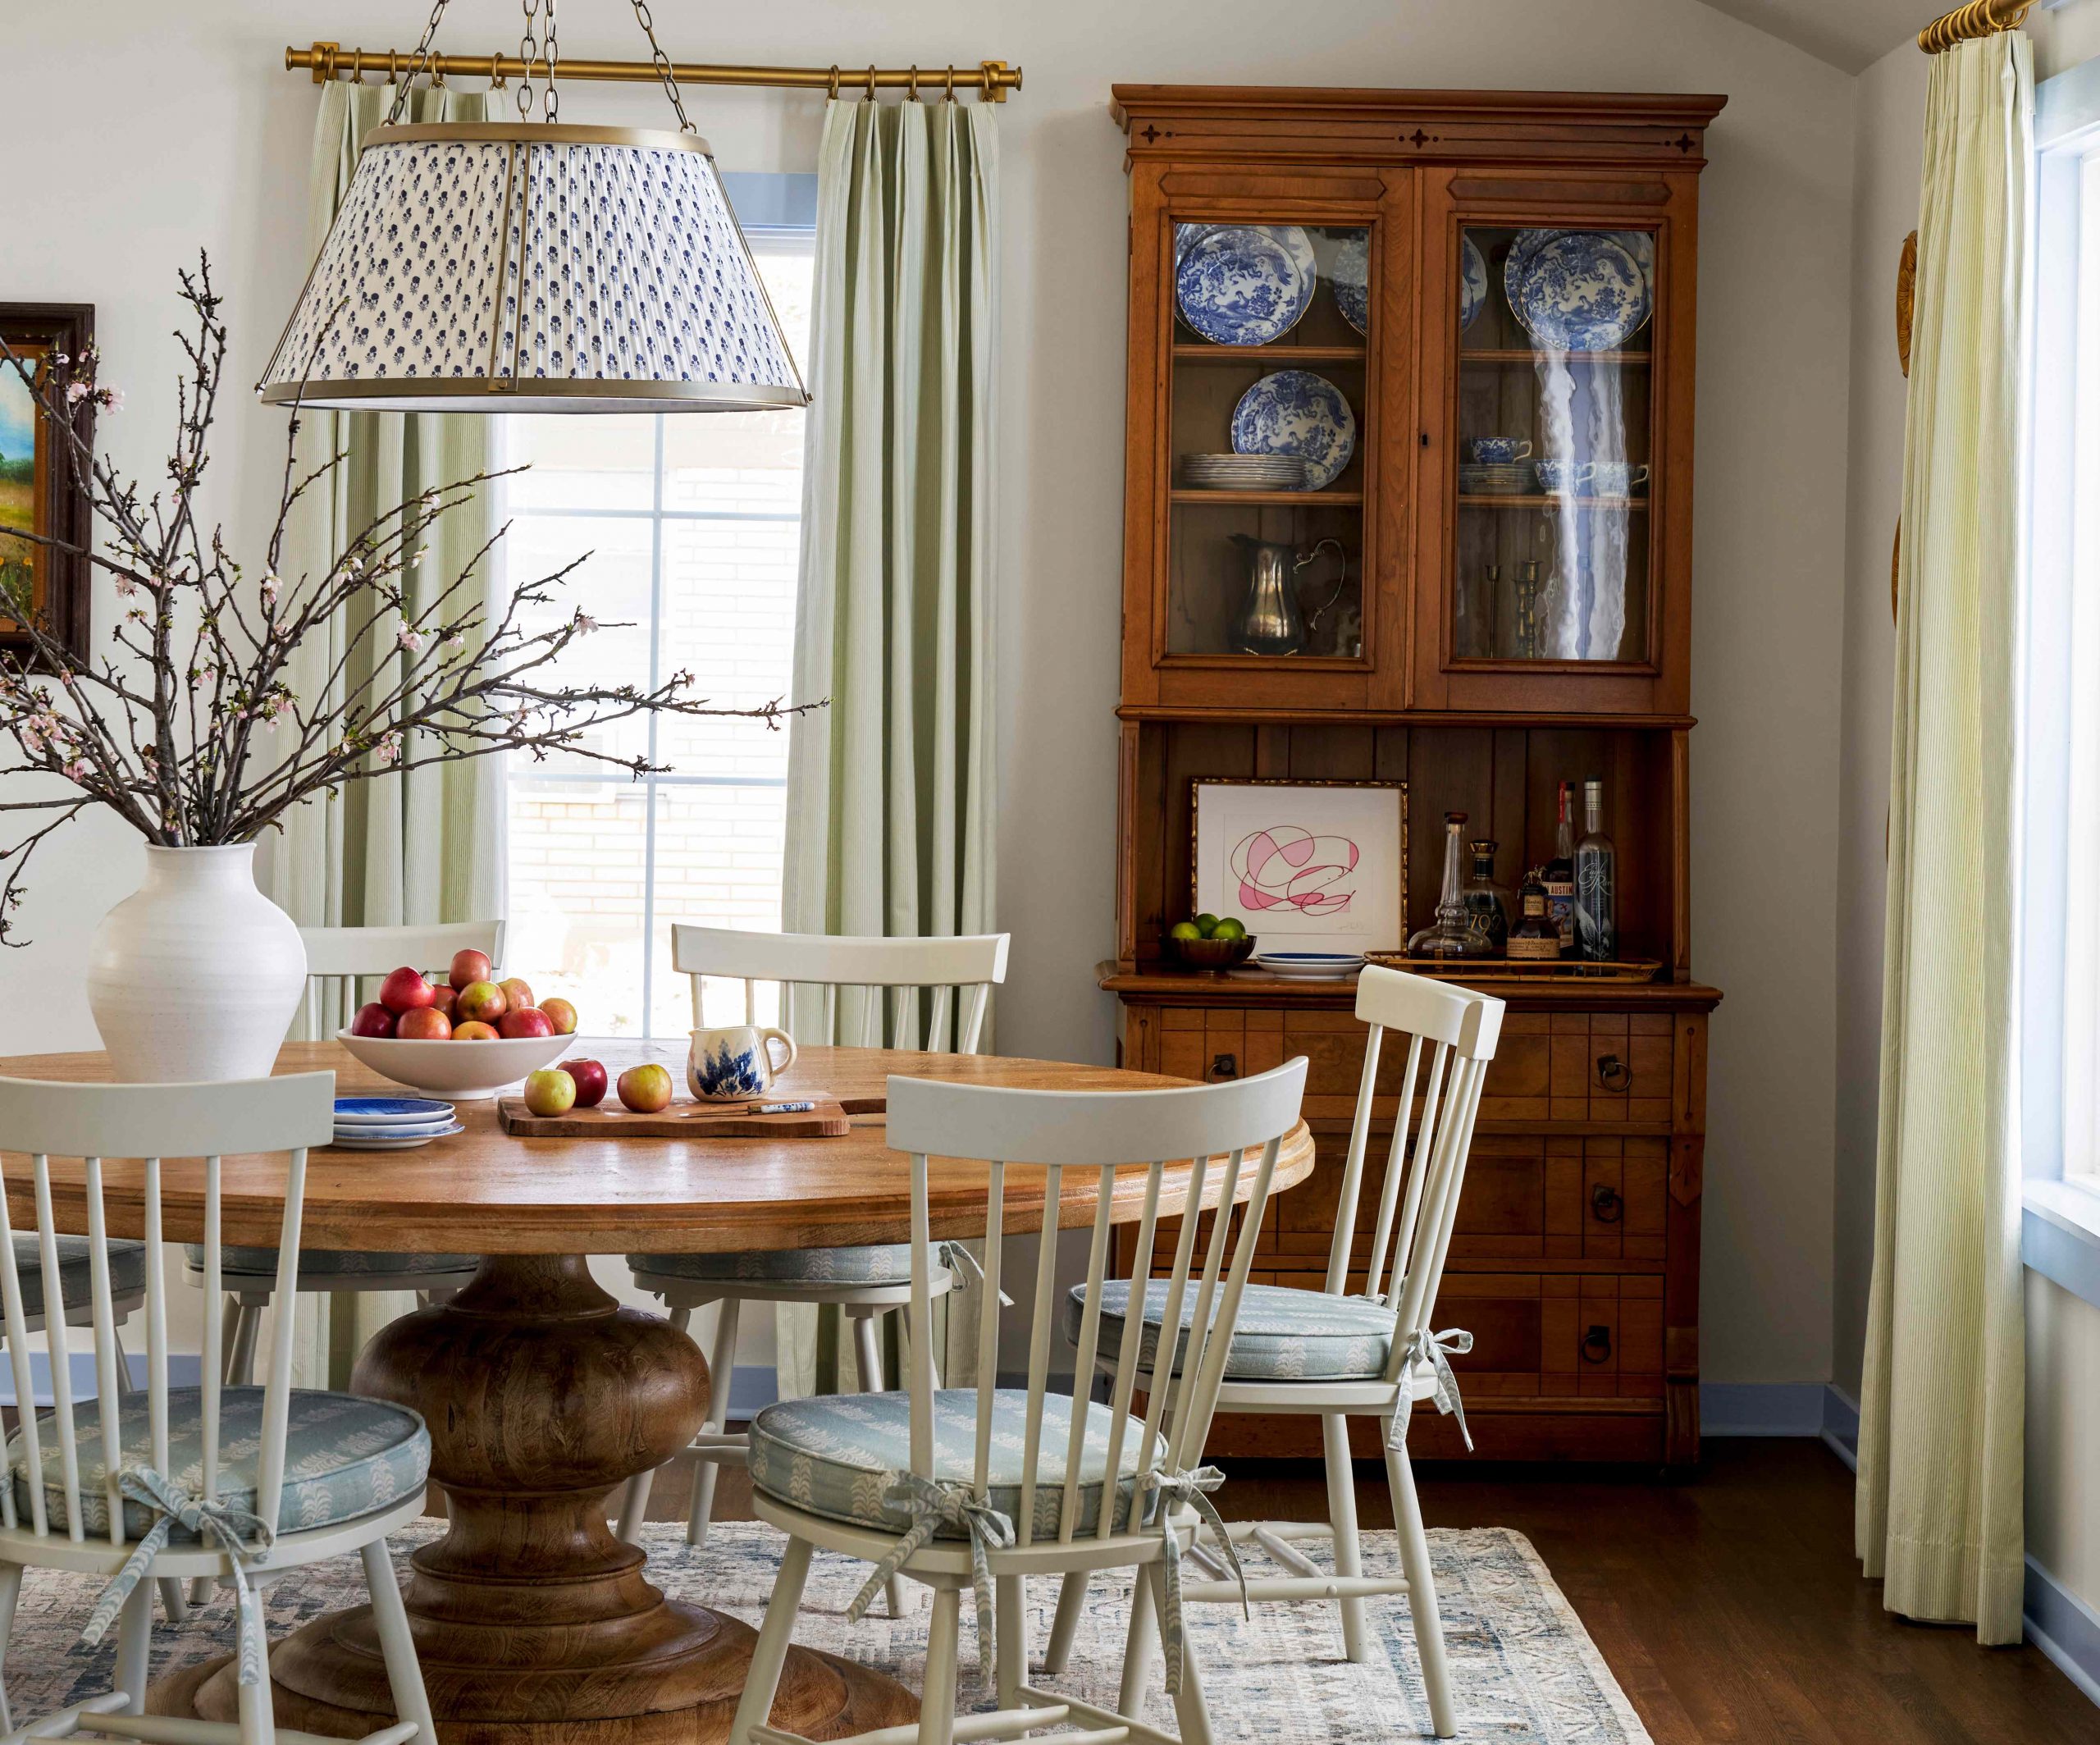
🎯 What Makes It Work
The ‘Grandmillennial’ trend is all about loving and updating these traditional, brown wood furniture pieces that many of us inherited or find in antique stores. Instead of painting them, the 2026 approach is to celebrate the wood grain and classic form, but juxtapose it with modern accents. The combination of classic Chinoiserie-style blue and white plates with a bold, contemporary abstract art piece is the perfect embodiment of this trend: respecting the past while living firmly in the present.
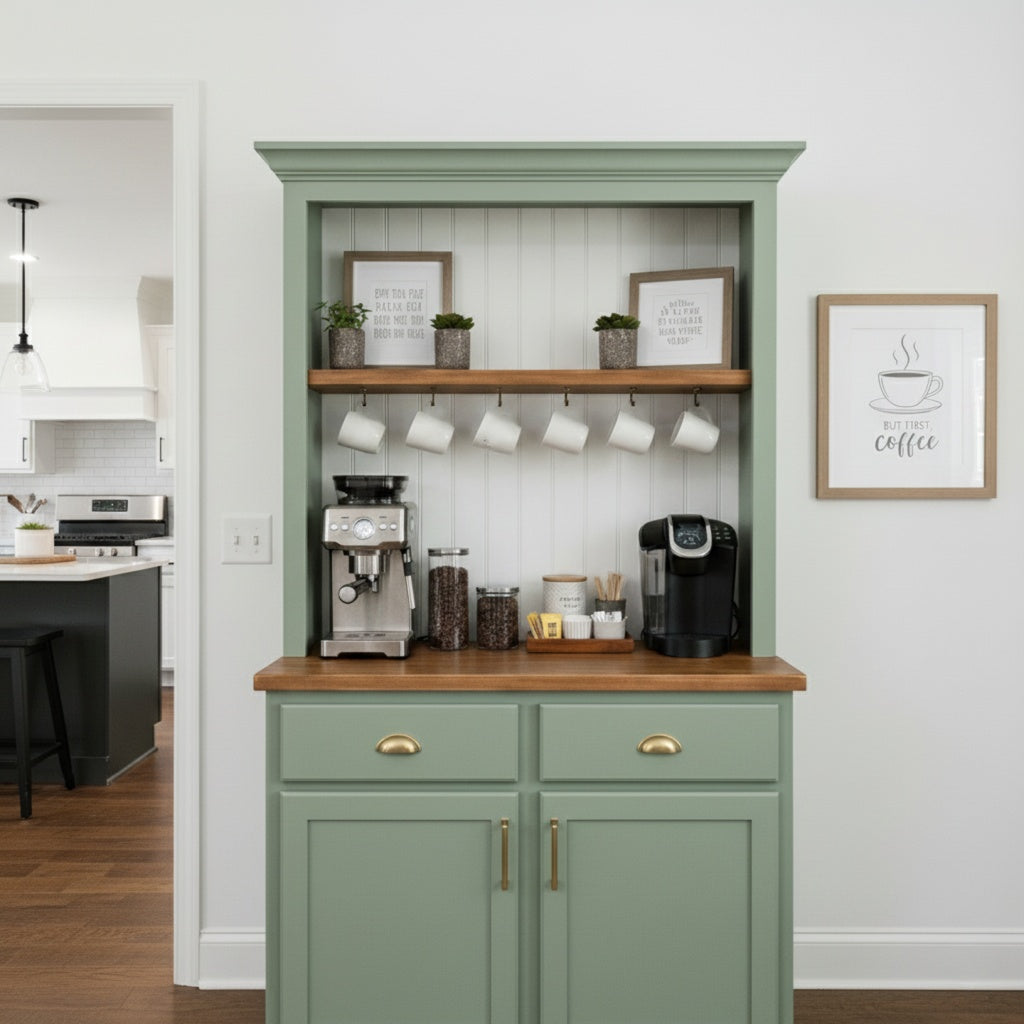
13. Create a Cozy Coffee Bar in a Sage Green Hutch
Transforming the top of a buffet into a functional coffee station is a brilliant use of space. Here’s a quick guide:
Time Estimate: 3-4 hours (plus paint drying time).
Material Cost: $100-$250.
- First, remove the upper hutch section, leaving just the base cabinet. Fill any screw holes with wood filler and sand smooth.
- Scuff sand the entire piece and paint it in your chosen color, like this lovely sage green. Two coats are usually best.
- Add a new top. You can have a piece of butcher block cut to size at a home improvement store, or even use a few stained and sealed pine boards.
- Install your v-groove paneling or peel-and-stick tile on the wall behind the new coffee bar.
- Finally, add your hardware, shelving, and coffee-making essentials!
💰 Budget Breakdown
- Main Furniture: Thrifted hutch base ($75 – $200)
- Lighting: Puck lights or LED strip ($20 – $40)
- Paint/Wall Treatment: Paint, primer, and v-groove paneling ($80 – $150)
- Decor/Accessories: Open shelf, hooks, hardware ($50 – $100)
- TOTAL: $225 – $490
- Budget alternative: Use the existing hutch top instead of buying a new one, and use a peel-and-stick backsplash instead of paneling to save around 40%.
14. Soften a Room with a Distressed Green Hutch and Antiqued Mirrors
The antiqued mirror panels are the standout feature here. By replacing standard glass with aged mirrors, the hutch gains an entirely new personality. The mottled finish adds a layer of vintage charm and texture that glass alone couldn’t achieve. Instead of seeing directly into the cabinet, the mirrors reflect light and color in a soft, distorted way, making the piece feel more like mysterious, decorative furniture and less like simple storage. It’s a sophisticated touch that elevates the entire design. The sage green version in Idea #15 shows a similar vibe but with open display.
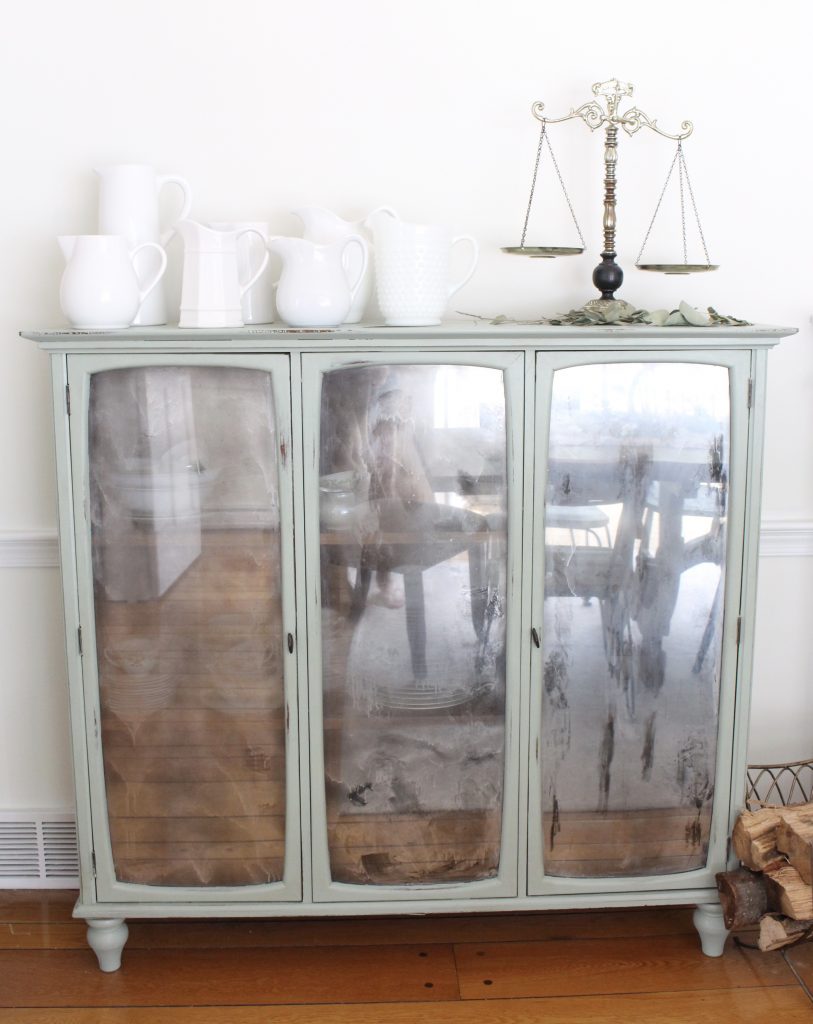
🔥 Trending Context
This design works through the principle of repetition and a monochromatic color scheme. The collection of white ceramic pitchers on top repeats the same form and color, creating a strong, unified statement. This is much more impactful than a random assortment of objects would be. The color palette is intentionally soft and limited—the gentle green of the hutch, the whites of the pitchers and wall, and the warm metallics of the brass scale—creating a serene and cohesive look.
15. Style a Sage Green Console with an Antique Scale and White Ceramics
When styling a surface like this, create a visual triangle to guide the eye. Here, the antique scale is the tallest point, forming the peak of the triangle. The collection of white ceramic pitchers of varying heights creates the downward slopes on either side. This asymmetrical arrangement feels more dynamic and natural than a perfectly symmetrical one. The single sprig of eucalyptus cleverly breaks the line and adds a touch of organic softness. This is a classic styling trick that works on any console, mantel, or shelf.
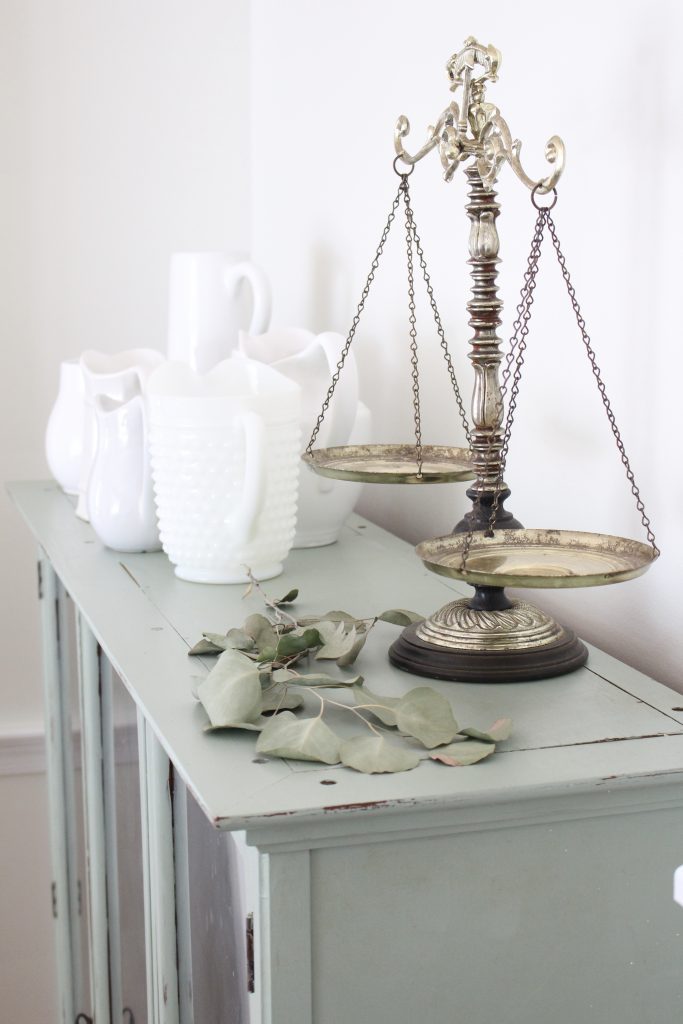
🧹 Maintenance Reality
This look is perfect for a smaller space where a full-size hutch would be overwhelming. The console itself is likely around 48-60 inches wide and 16-18 inches deep. It’s ideal for an entryway, a small dining area, or a hallway that needs a focal point without sacrificing too much floor space. Because the display is entirely on top, it maintains a sense of openness. For a much grander scale, see the carved wood hutch in Idea #3.
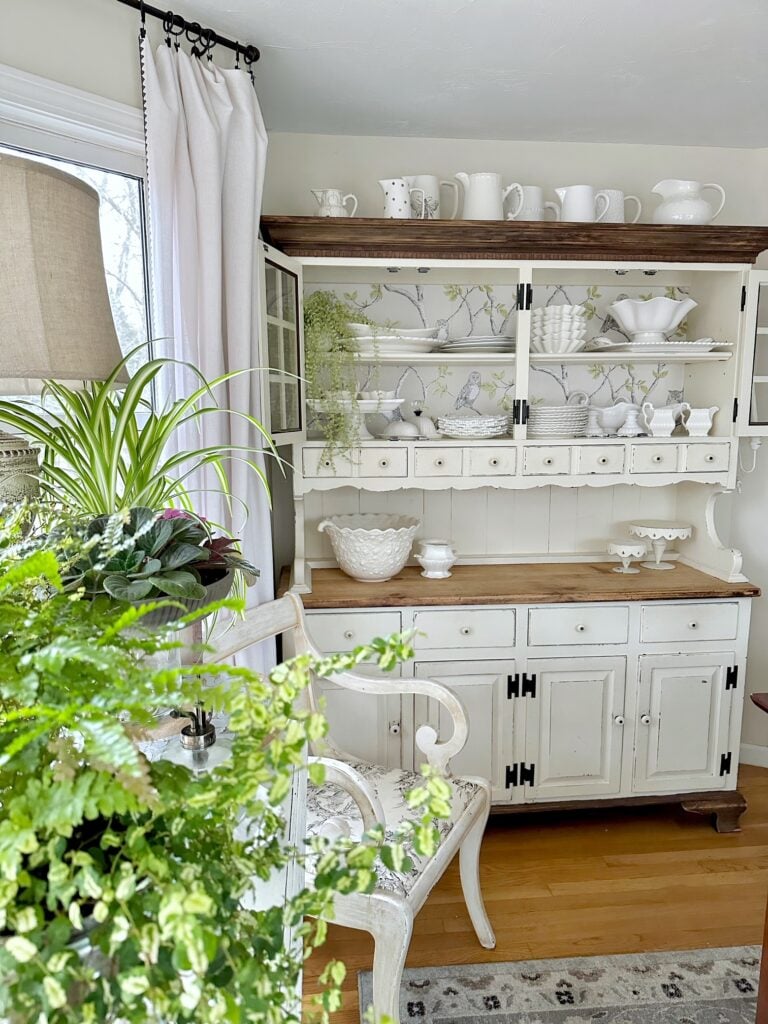
16. Add Personality with Green Tree-Patterned Wallpaper
The success of this makeover lies in the powerful contrast between the rustic exterior and the refined interior. The distressed white paint and exposed woodgrain countertop give the hutch a charming, weathered farmhouse feel. Then you open the doors, and the delicate, light green wallpaper with its tree and bird pattern provides an unexpected touch of elegance and whimsy. This ‘inside-out’ design approach makes the piece feel special and thoughtfully curated, rewarding a closer look. For a slightly different take on wallpaper, see Idea #17.
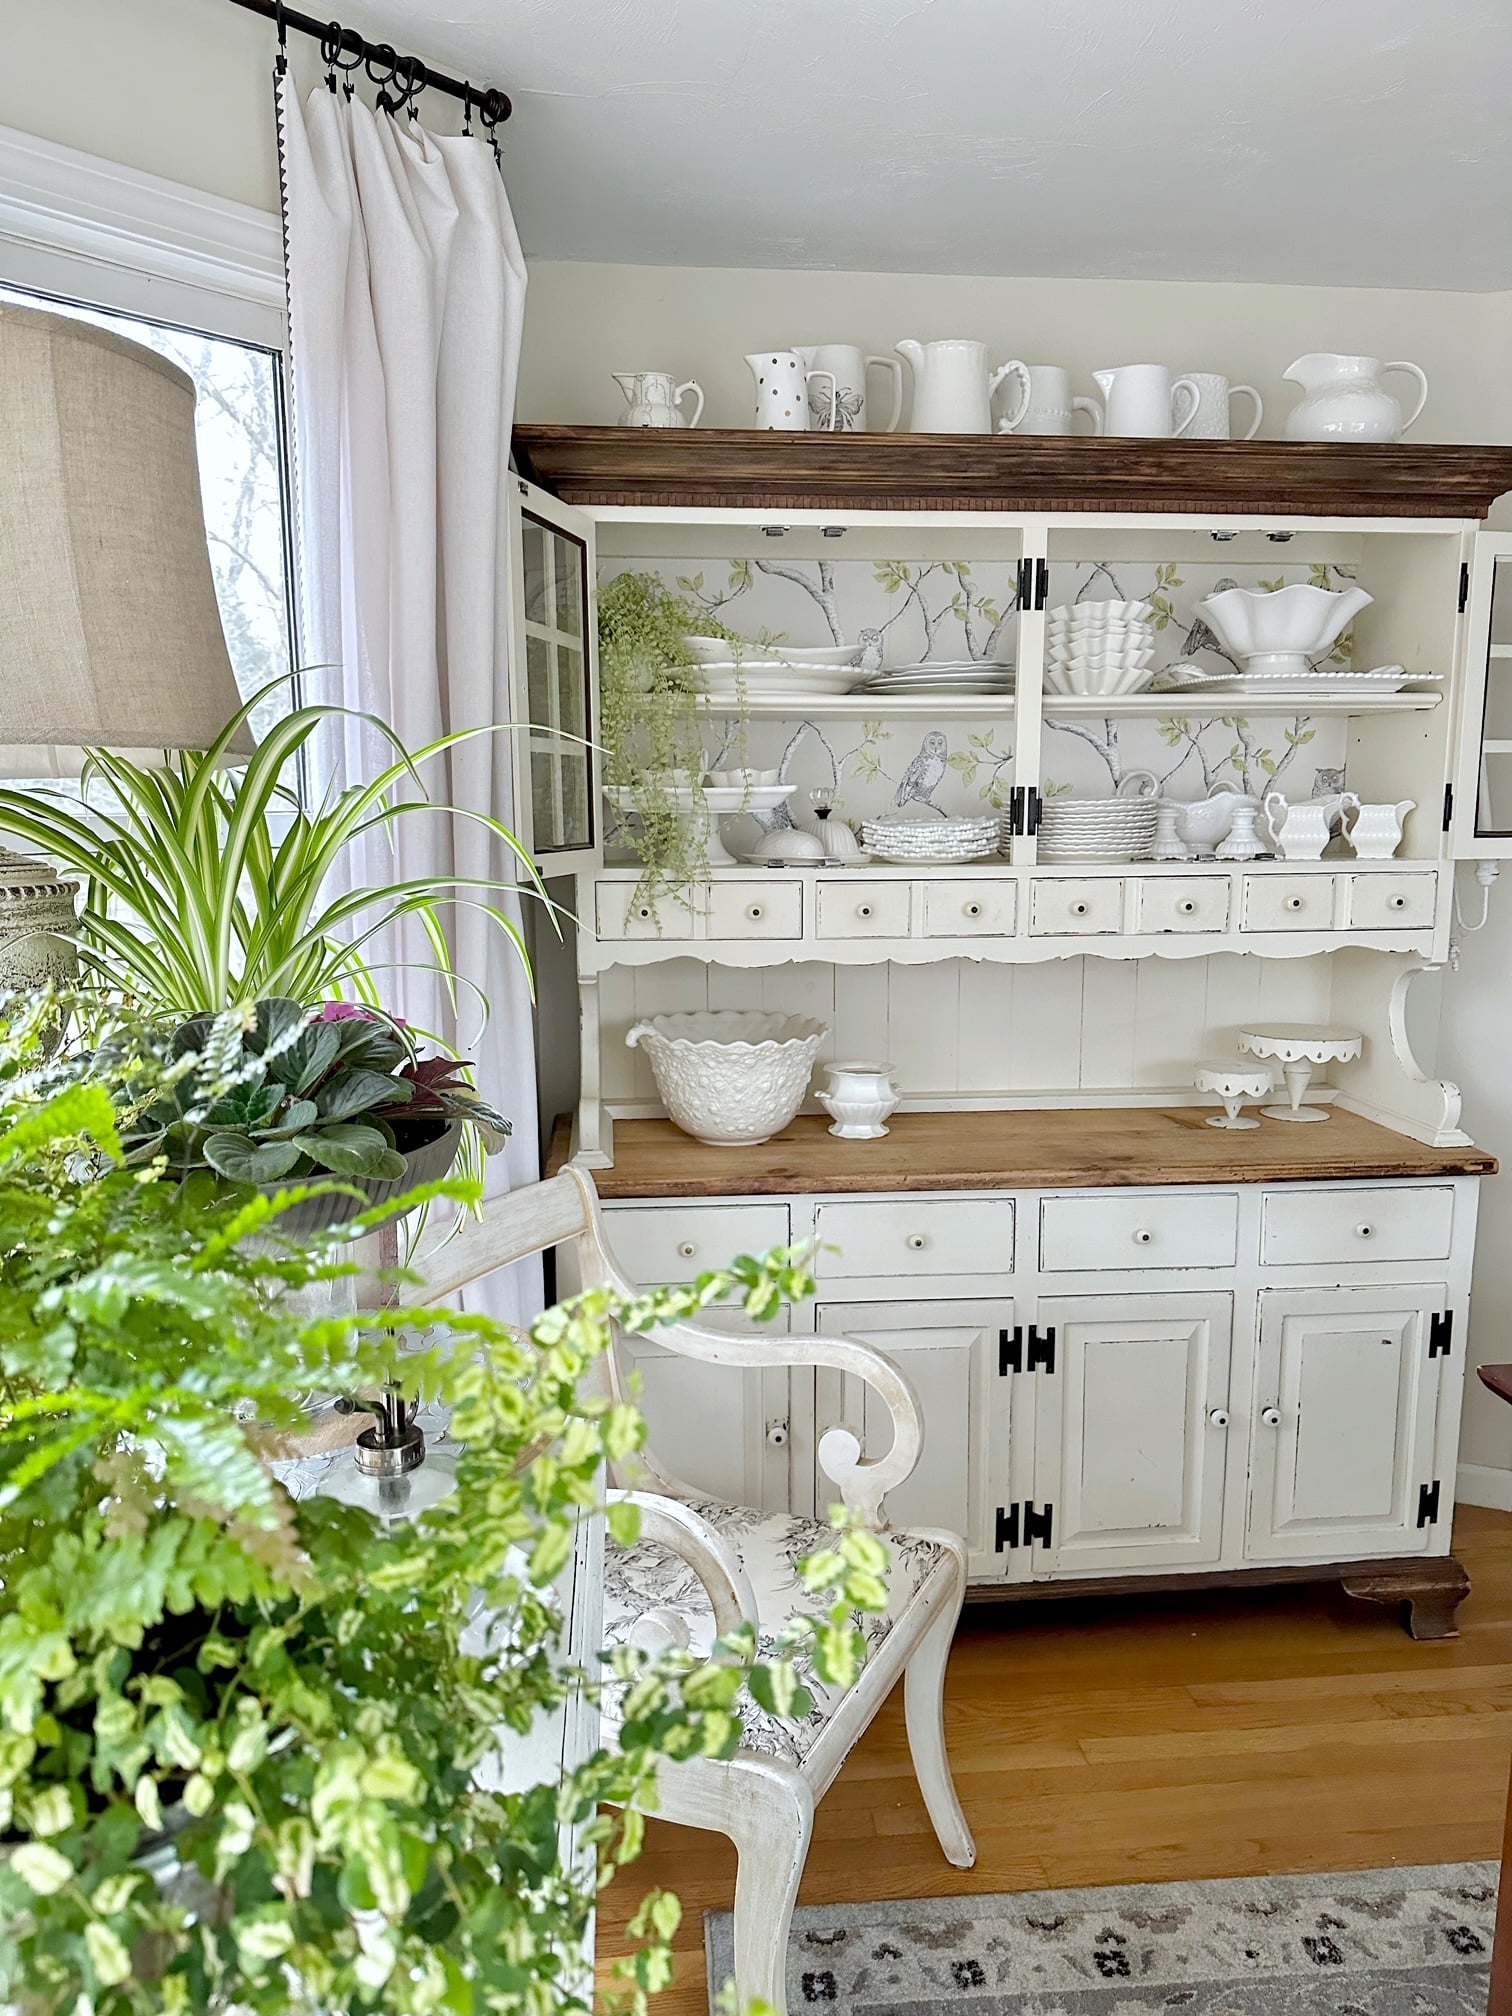
✅ Before You Start
A roll of high-end wallpaper can be expensive, but you only need a small amount for a project like this. To get this look for less, look for wallpaper remnants on Etsy or eBay, where you can often buy a few yards for a fraction of the price. Another fantastic option is to use high-quality wrapping paper or even fabric, applied with spray adhesive or mod podge. For $20-$30, you can get a very similar effect.
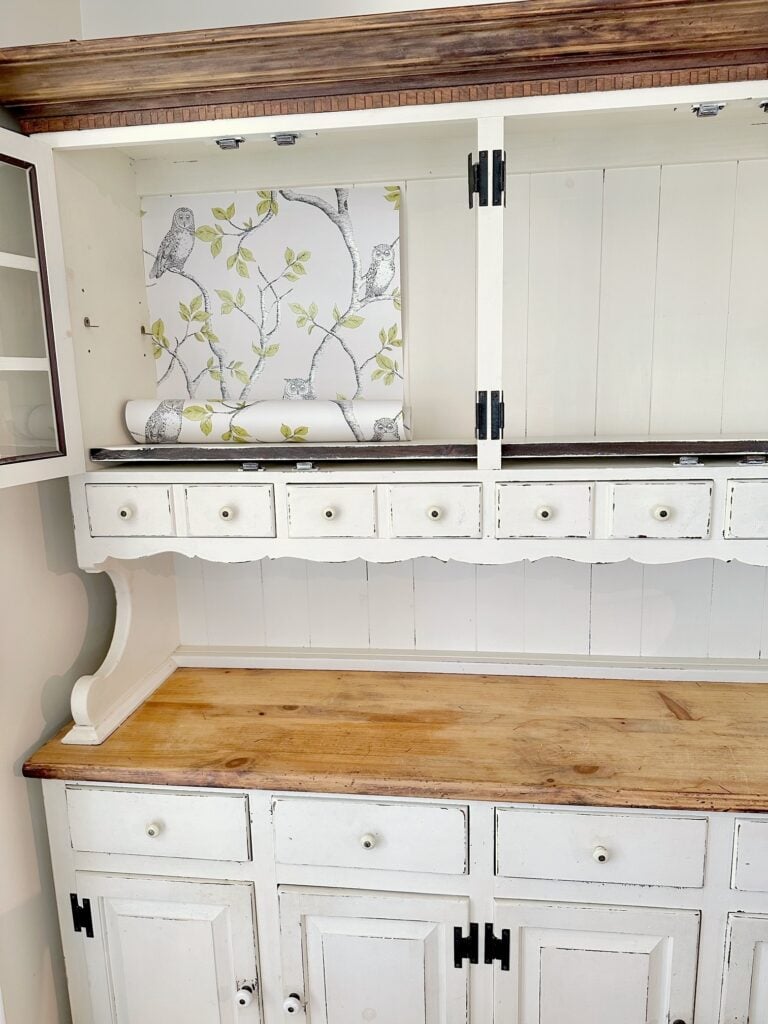
17. Use Whimsical Wallpaper for a Playful Hutch Accent
The small, partially-rolled-up section of owl wallpaper is the singular detail that infuses this entire piece with personality and tells a story. It’s quirky, unexpected, and utterly charming. By not applying it perfectly to the entire back, it feels like a work-in-progress or a peek into the creative process. This intentional imperfection is what makes it so special. It stops the hutch from being just another rustic white piece and turns it into a conversation starter that reveals the homeowner’s playful side.
📐 Style Math
Want to test a wallpaper look before committing? This ‘partially applied’ style is a great way to do it.
Time Estimate: 30 minutes.
Material Cost: $10-$20 (for a sample roll).
- Order a large sample or a single roll of a wallpaper you love. Peel-and-stick is ideal for this.
- Cut a section that’s about two-thirds the height of your cabinet interior.
- Peel off the top few inches of backing and stick it to the top of the hutch’s back panel, off to one side.
- Loosely roll the bottom of the paper up towards the adhered section.
- Use a small piece of double-sided tape or a decorative clip to hold the ‘roll’ in place, creating that casual, unfurled look.
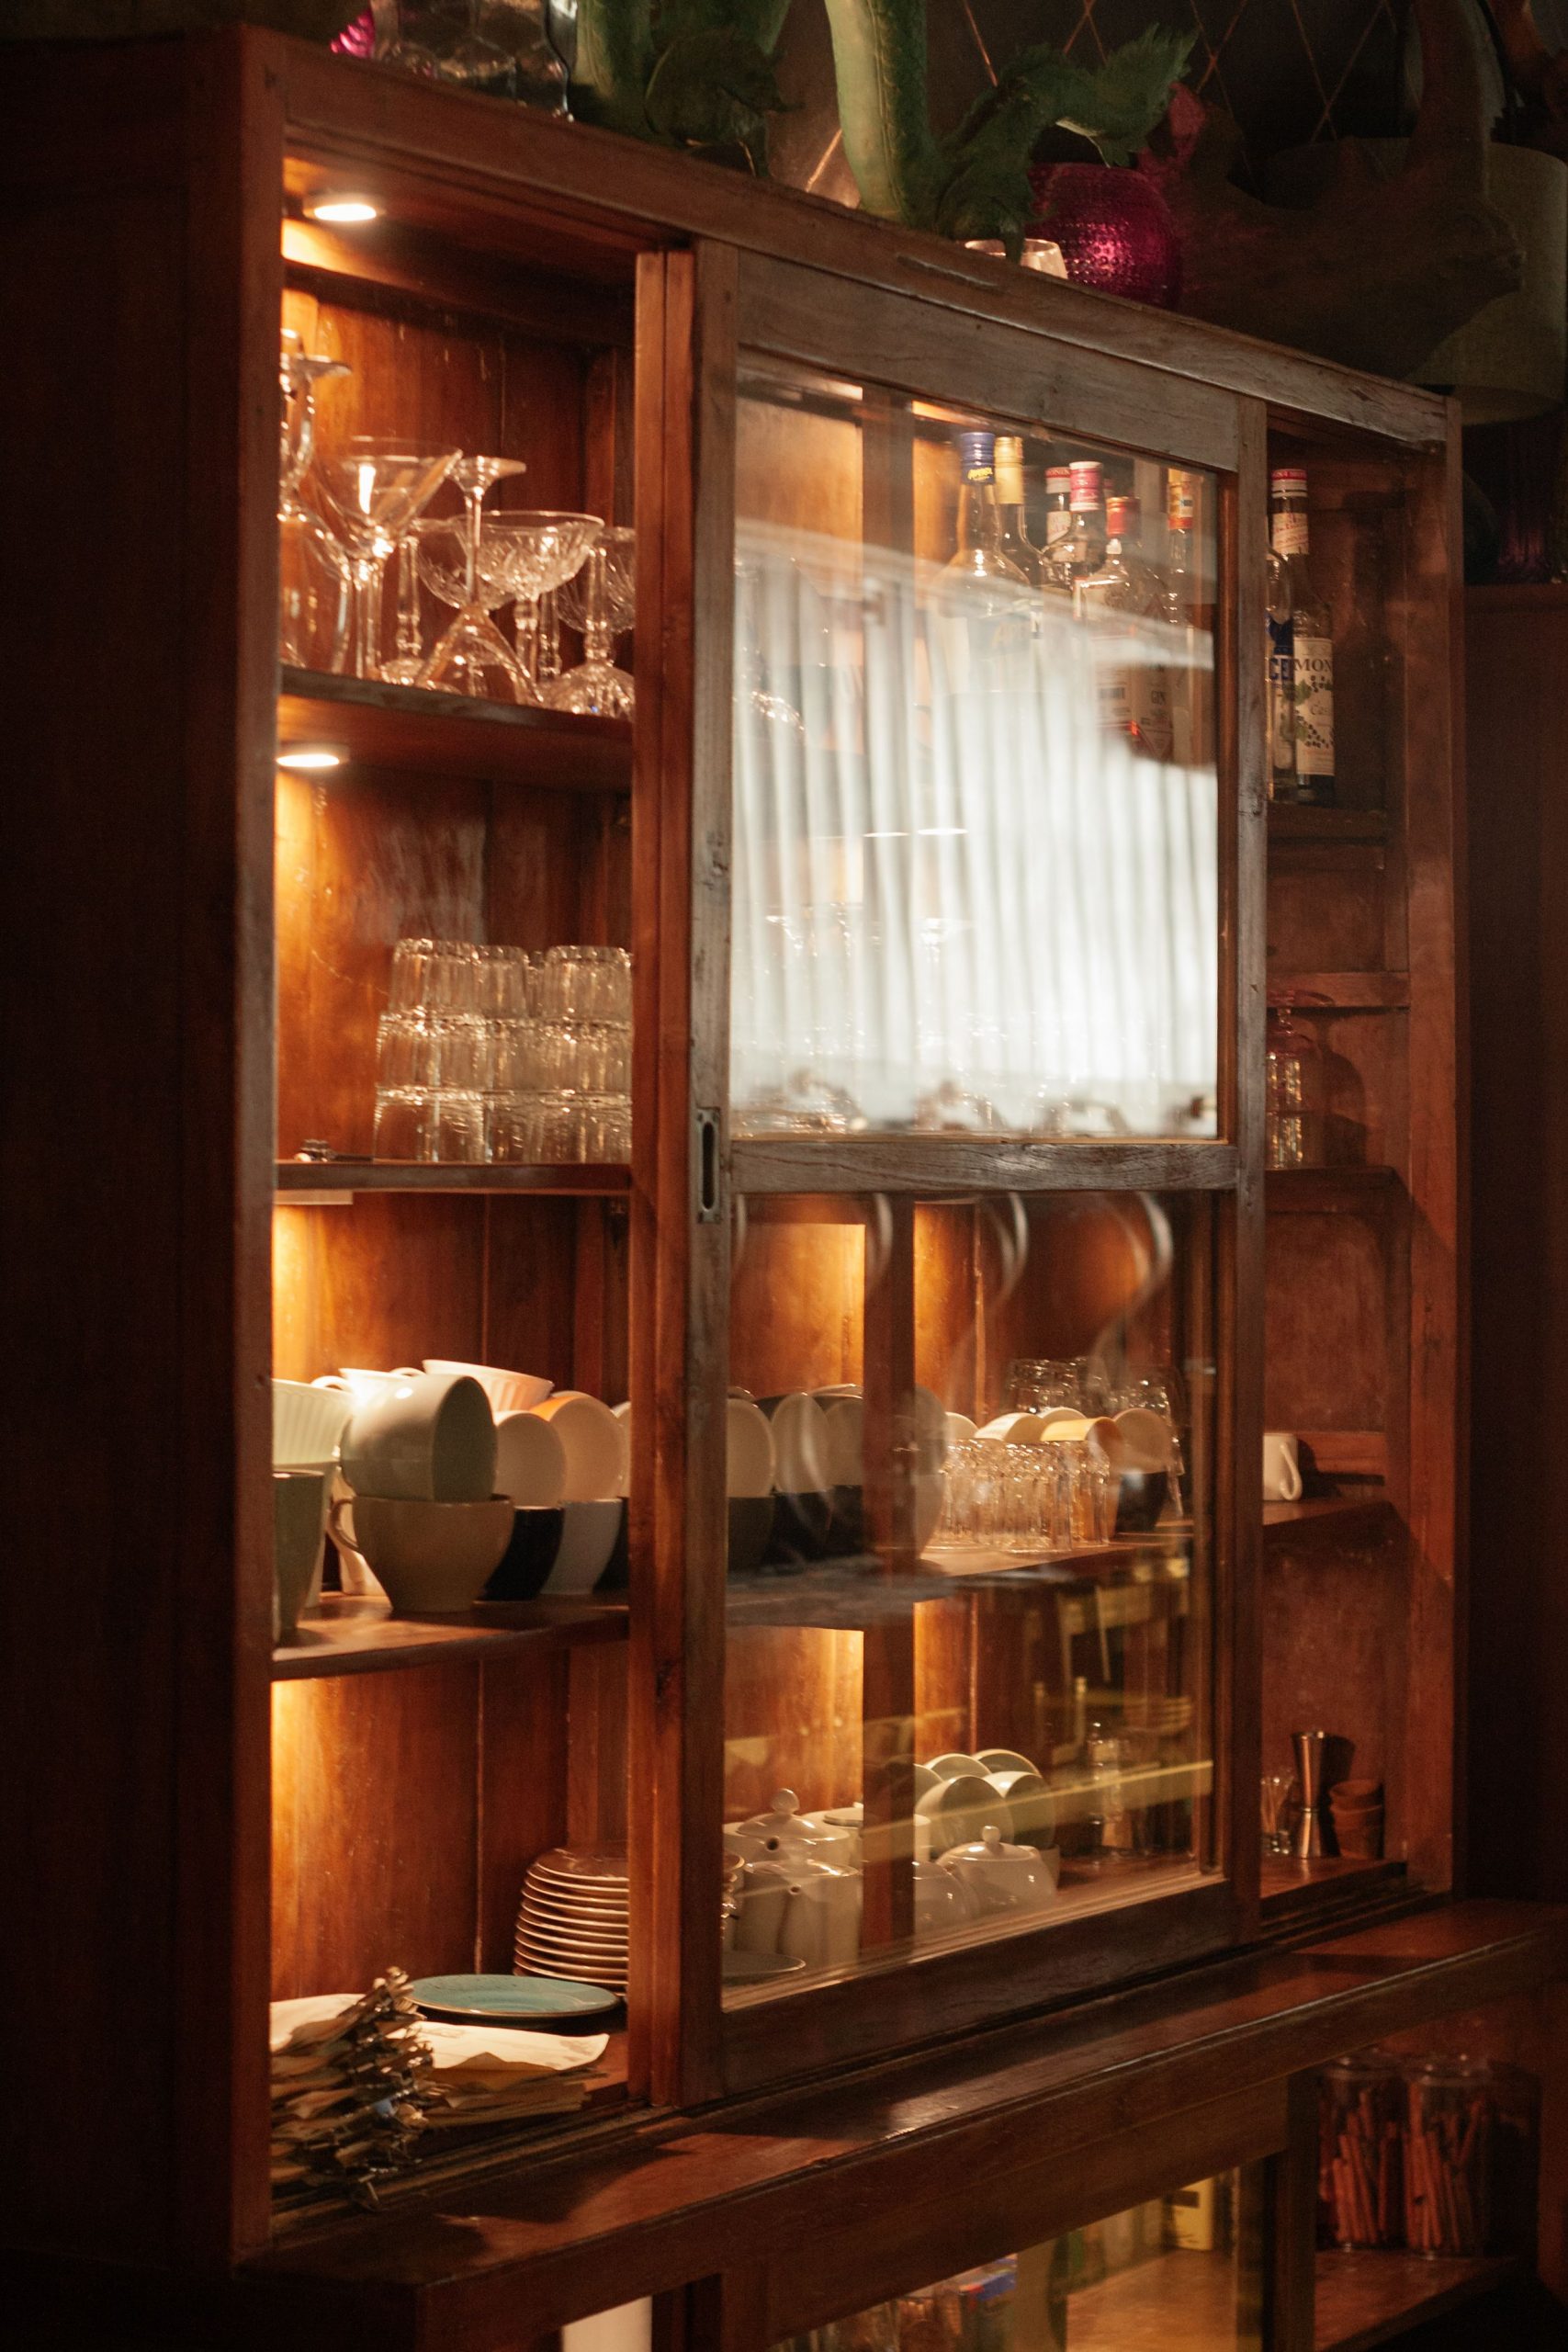
18. Add Warmth and Function with an LED-Lit Dark Wood Hutch
This setup works so well because the warm, recessed lighting transforms the hutch from a purely functional storage unit into a significant source of ambient light for the whole room. The glow from within highlights the beautiful textures of the glassware and ceramics, creating depth and visual interest. At the same time, the dark wood frame keeps it from being overwhelmingly bright, containing the light and creating a cozy, inviting atmosphere. The sliding glass doors further enhance this by adding a reflective quality, bouncing that warm light back into the space.
⚠️ Real Talk
For the most professional look, use warm white LED strip lighting with a color temperature between 2700K and 3000K. Anything higher (cooler) will look stark and clinical, like a commercial refrigerator. Place the strips along the front interior edge of the shelves, pointing downwards and slightly back. This illuminates the front of your items without causing a harsh glare or spotlight effect on the back panel of the hutch. This technique is also used to great effect in Idea #19.
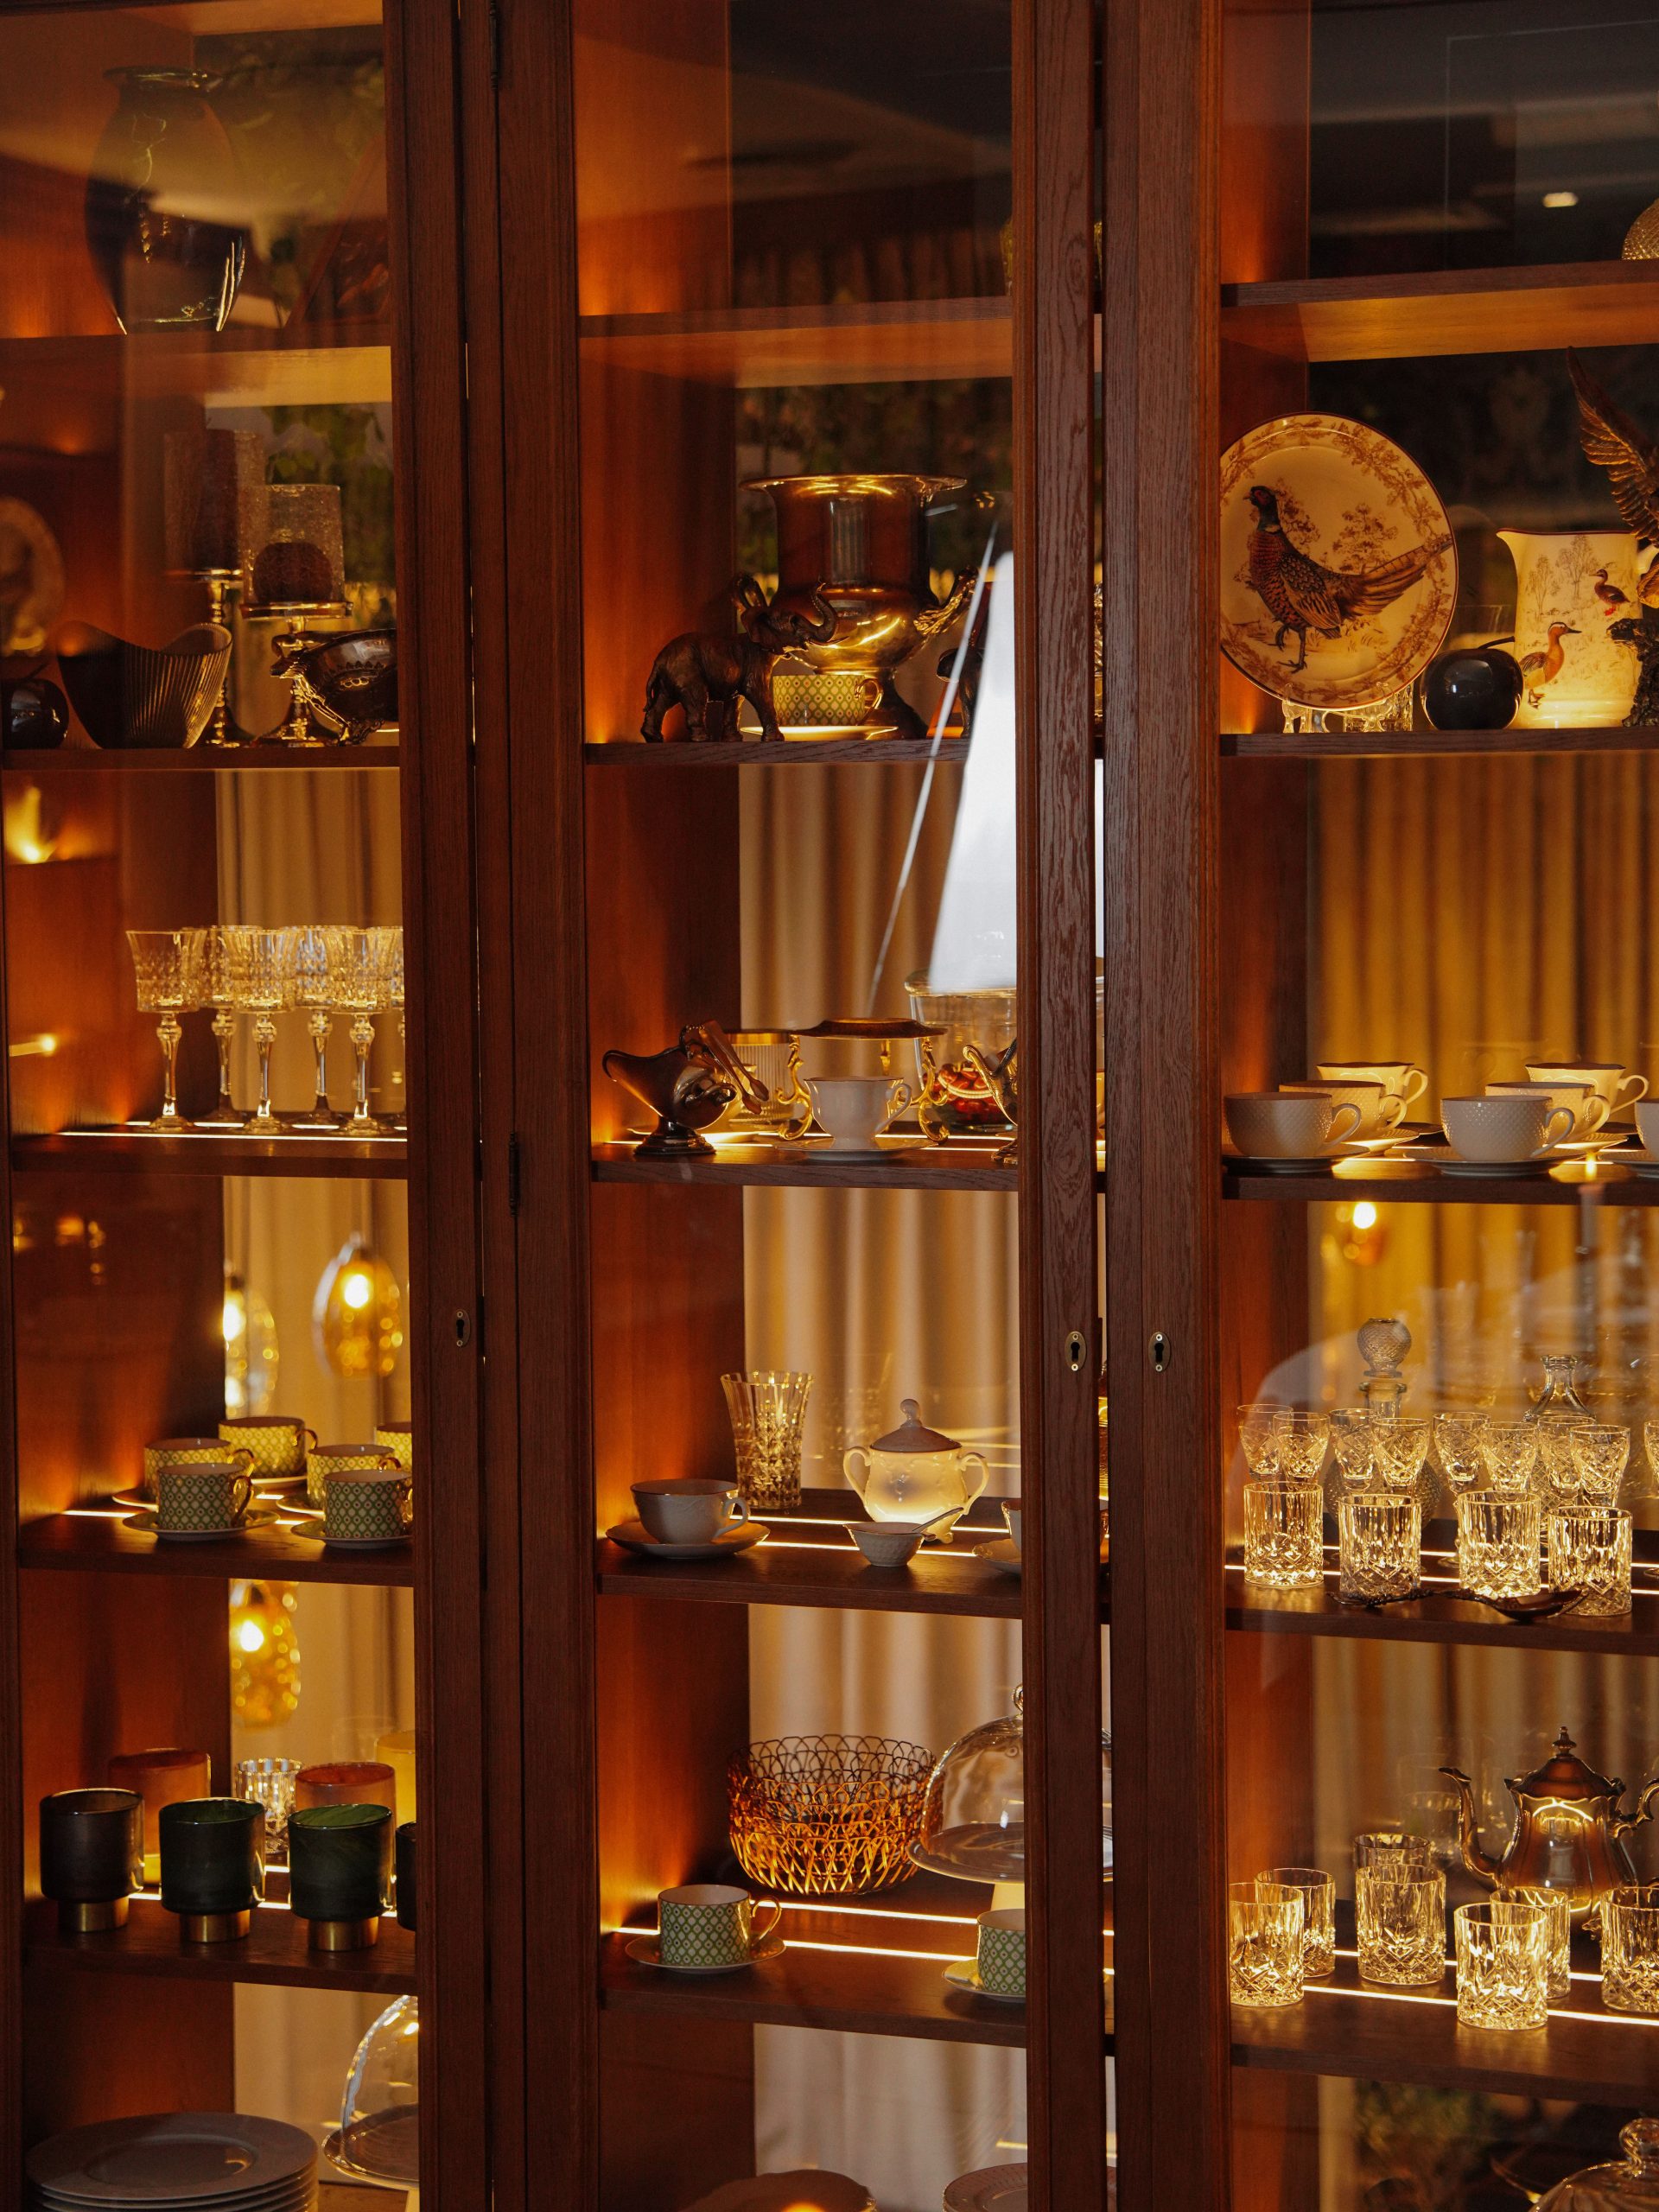
19. Individually Lit Shelves for a Dramatic Hutch Display
The key element that makes this hutch so captivating is the use of individual LED strips for each shelf. Unlike a single light at the top that casts shadows on lower shelves, this approach gives every level its own spotlight. It ensures that every single object, from the patterned glass drinkware to the decorative plates, is perfectly illuminated. This technique creates a much more luxurious, gallery-like feel, turning the entire hutch into a glowing tower of beautifully displayed items. This is how you make your display feel truly high-end.
🔧 How-To Brief
- Main Furniture: Existing Hutch ($0 or ~$250 from marketplace)
- Lighting: Kit of 4-6 LED light strips with power supply ($60 – $120)
- Textiles: N/A
- Decor/Accessories: Your existing dishware collection ($0)
- Paint/Wall Treatment: N/A
- TOTAL: $60 – $370
- Budget alternative: A battery-powered, motion-activated LED puck light on each shelf can give a similar, though less integrated, effect for about half the cost and no wiring required.
20. Update Oak Cabinets with a Modern Tile Backsplash
This kitchen refresh follows a proven formula for updating golden oak: 70% existing cabinets + 20% modern backsplash + 10% contemporary hardware. The key is to not fight the oak, but to complement it with modern touches. The multi-tone mosaic tile in shades of cream, beige, and gray cools down the warm wood, while the matte black hardware provides a much-needed graphic punch. It’s an effective facelift that doesn’t require the massive undertaking of painting all the cabinets.

⭐ The One Thing
A mosaic tile backsplash can look dated quickly if the wrong pattern is chosen. While this multi-tone mix works with the 90s/2000s oak, it’s not a look that feels fresh or modern in 2026. A simple, solid-colored tile, like a cream subway tile or a solid gray glass tile, would be a more timeless choice that would still effectively neutralize the orange tones of the oak. Before committing to a busy mosaic, consider if you’ll still love it in five years.
21. A Charming Farmhouse Hutch with Green Patterned Wallpaper
This look is pure farmhouse charm, and it works because of the careful layering of rustic and refined elements. The distressed white paint and simple round knobs are classic rustic touches. The natural wood countertop adds warmth and an organic feel. But the star is the patterned wallpaper inside, which elevates the whole piece. It adds a pop of color and sophisticated pattern, creating a delightful surprise when you look closer. It’s the perfect backdrop for simple white dishware, making everything on display feel more special. A similar, but bolder, green is used in the hutch in Idea #5.
📏 Scale Guide
- First, take stock of your dishware. This look works best with a mostly-white collection that allows the wallpaper to shine.
- Test wallpaper samples inside the hutch. The color can look very different in the shadows of a cabinet.
- Decide on your level of distressing. Do you want just a light sanding on the edges, or a more heavily weathered look?
- Check that your hardware is compatible. The simple black hinges and small white knobs are key to this specific farmhouse aesthetic.
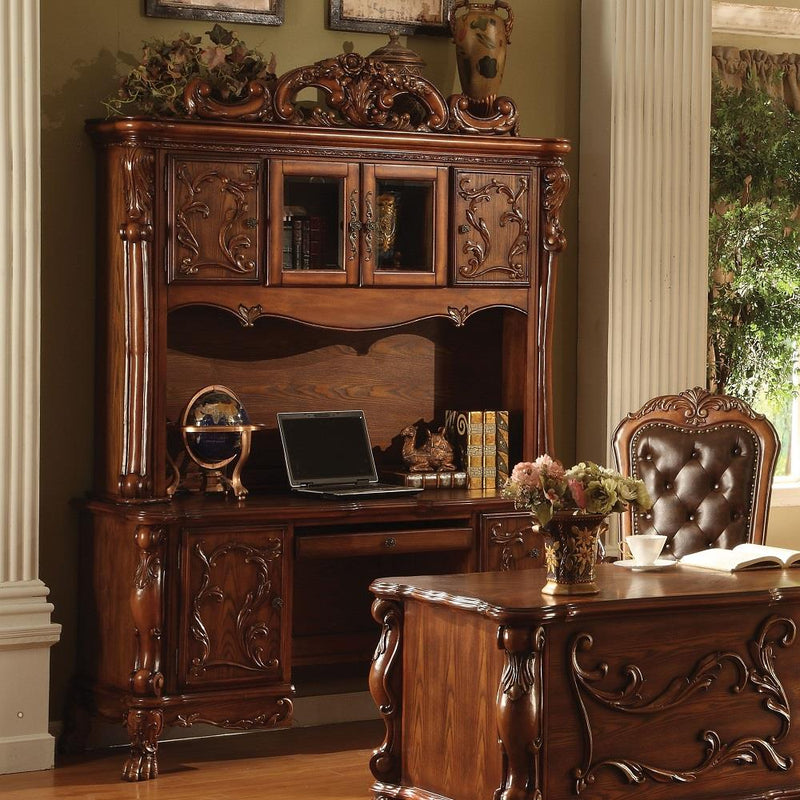
22. Go Grand with an Ornate Dark Wood Hutch and Desk
This is not a style for the faint of heart or the small of room. An ornate, traditional system like this demands a grand space. You’ll need a minimum ceiling height of 9 to 10 feet to accommodate the decorative crown molding without it feeling like it’s crashing down on you. The full wall unit with the matching desk requires a significant footprint, likely 10-12 feet of wall width and a room depth of at least 15 feet to allow the tufted leather chair to pull back comfortably. This is a commitment to a formal, old-world aesthetic that defines the entire room.
💸 Get This Look For Less
Let’s be honest: while beautiful, this integrated hutch-and-desk system might not be practical for modern work habits. The keyboard tray is often too low for proper ergonomics, and the built-in cubbies and shelves may not accommodate larger monitors or modern tech. Before you fall in love with the look, consider how you actually work. You might find a separate, more ergonomic desk paired with a beautiful hutch for storage to be a more comfortable and functional long-term solution.
23. Layer a White Farmhouse Hutch with Shiplap and Gold Mirrors
This look is successful because it’s a masterclass in texture-on-texture layering. The base is the smooth, white hutch. Behind it, the horizontal lines of the shiplap add linear texture. On top of that, the three ornate gold mirrors add a layer of metallic shine and intricate shape. Finally, the faux greenery introduces an organic, soft texture. Even though the primary color is white, the layers of different textures (smooth, linear, metallic, organic) make the vignette feel rich, complex, and visually interesting.
💡 Designer Tip
When hanging a grouping of small mirrors or art above a piece of furniture, treat the entire grouping as one single unit. The bottom of the lowest mirror should be 6-8 inches above the hutch surface. The space between each mirror should be consistent, usually 2-3 inches. This makes the collection feel cohesive, rather than like three random objects floating on the wall. The overall width of the grouping should be about two-thirds the width of the hutch below it.
24. Create a Glamorous Bar with a White and Gold Ornate Hutch
Turning a vintage hutch into a glamorous bar is a fantastic DIY project. Here’s a simplified guide:
Time Estimate: 2-3 days.
Material Cost: $150-$400.
- Find a vintage hutch with ornate details—cabriole legs and carvings are a plus!
- Prep and paint the hutch. A crisp white semi-gloss is a great base. This is the most time-consuming step.
- Carefully paint the carved details with gold metallic paint. Use a small artist’s brush for precision.
- Have a mirror cut to size for the back panel at a local glass shop and install it with adhesive or clips.
- Install under-cabinet stemware racks to the ‘ceiling’ of the hutch. These are readily available online.
- Style with your favorite glassware and spirits!
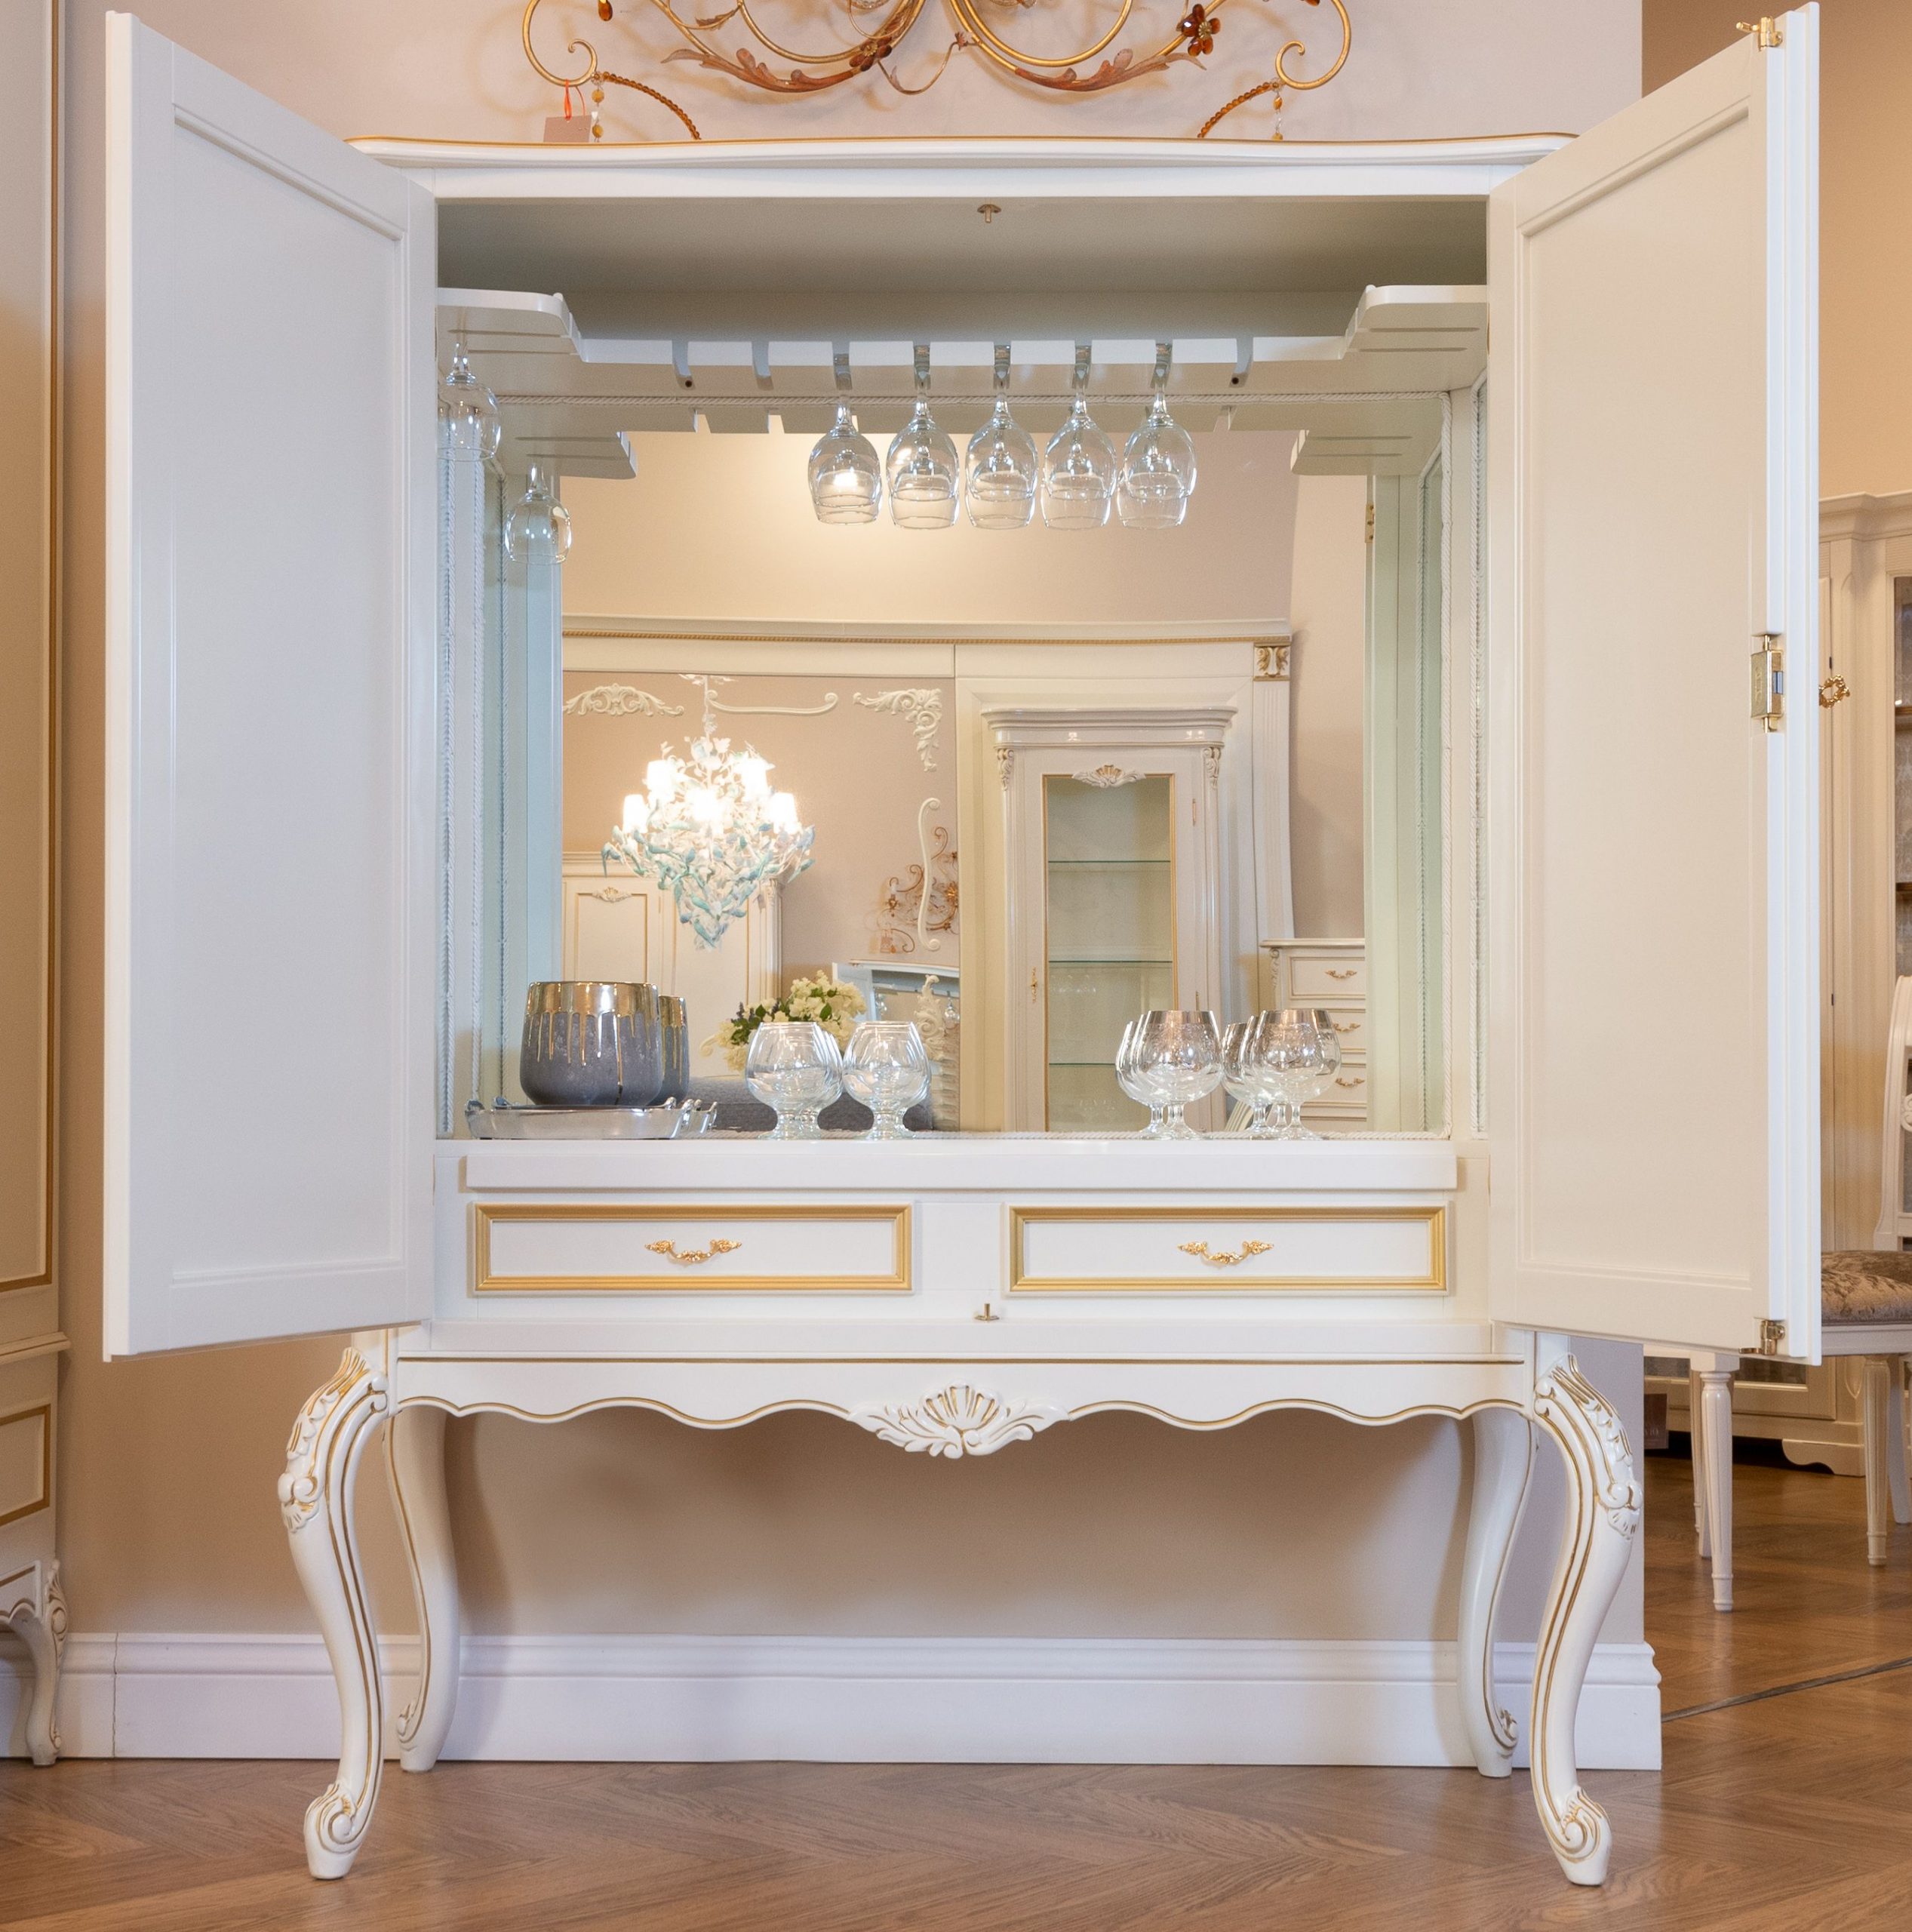
🎯 What Makes It Work
A bar hutch, especially a white one, requires diligent upkeep. Spills from red wine, coffee liqueur, or colorful mixers can easily stain a white painted surface if not wiped up immediately. The mirrored back will show every splash and fingerprint, requiring frequent cleaning with glass cleaner. Dust will also be very visible on the glassware and mirrored surface. To keep it looking its best, you’ll want to give it a quick wipe-down after every use and a more thorough cleaning weekly. Using decorative trays can help contain potential messes.
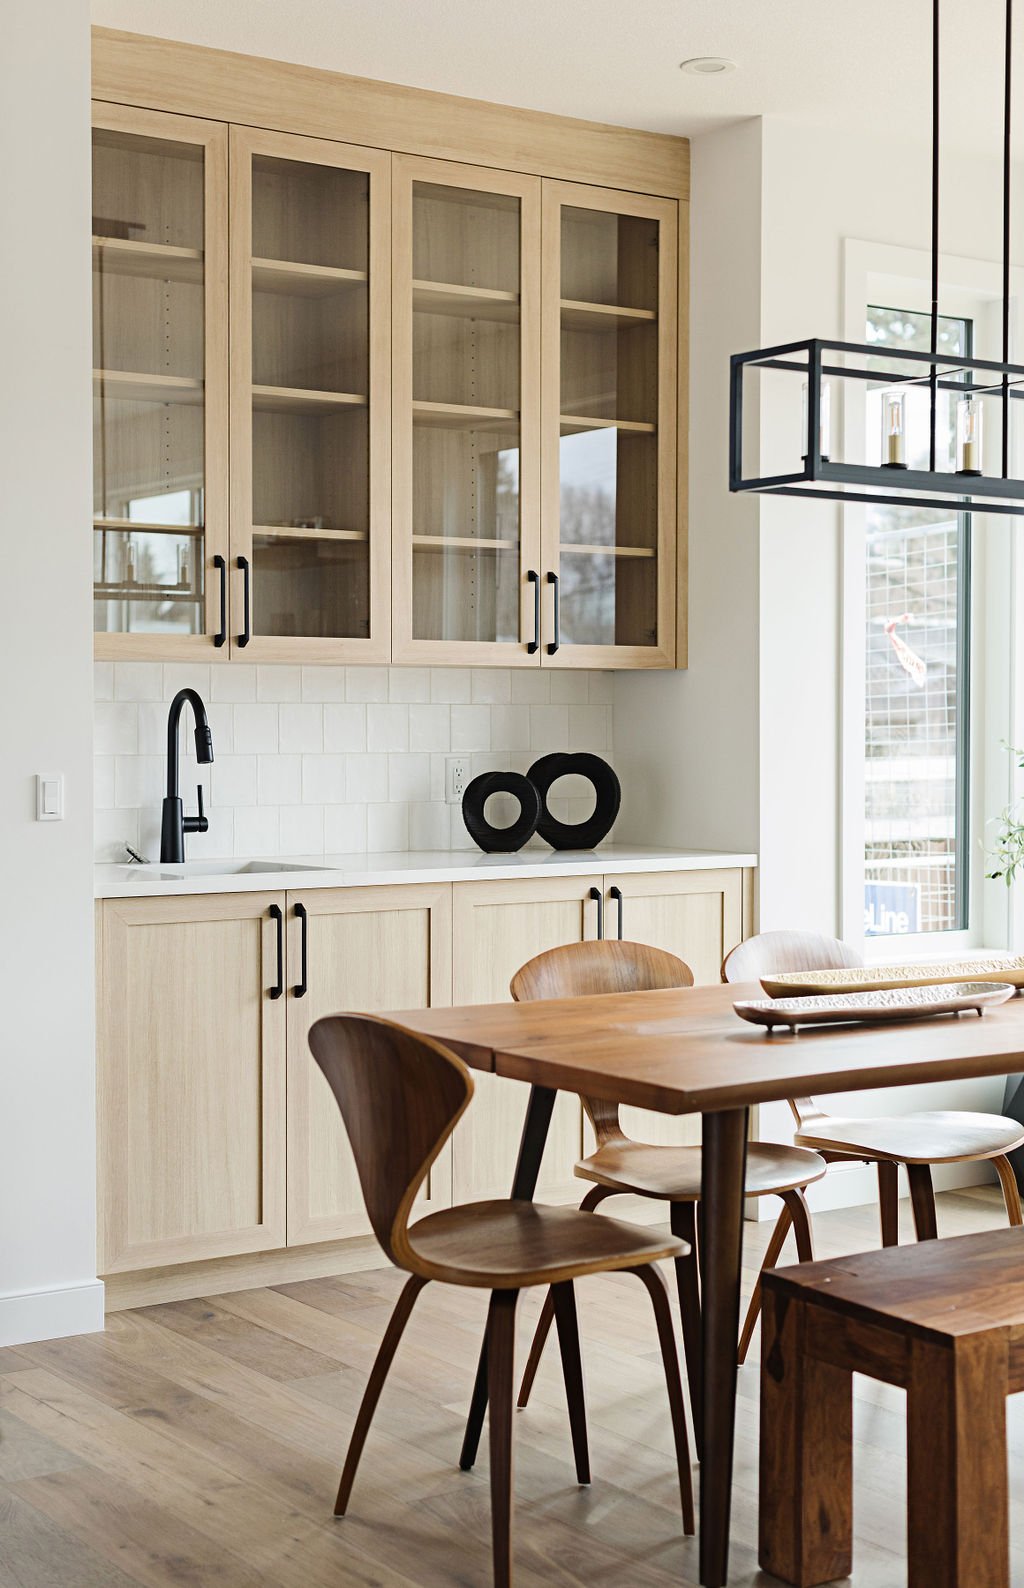
25. Build a Modern Wet Bar with a Light Wood Hutch and Subway Tile
This design nails the warm minimalist aesthetic by balancing three key elements: natural texture, clean lines, and high contrast. The light oak cabinetry brings in natural warmth and texture. The white subway tile backsplash and clean countertop provide a bright, clean-lined surface. Finally, the matte black hardware and faucet act as sharp, graphic accents that cut through the softness and add a modern edge. The result is a space that feels both organic and sleek, perfectly blending form and function. It feels cleaner and more modern than the version in Idea #25.
💰 Budget Breakdown
- Do you have access to plumbing? Turning a hutch area into a true wet bar requires running water and drain lines, which is a significant project.
- Is your wall space sufficient? This built-in look requires precise measurements and installation.
- Have you chosen a grout color? The choice between white, gray, or black grout for the subway tile will dramatically change the final look.
- Is there electrical for potential under-cabinet lighting or a mini-fridge? Plan your power needs in advance.
26. Mix White, Wood, and Black for a Modern Farmhouse Kitchen
The visual recipe for this popular look is straightforward: 50% light natural wood + 40% crisp white + 10% matte black. The light wood on the lower cabinets grounds the space in warmth and nature. The white upper cabinets, countertops, and backsplash make the room feel bright, open, and clean. The critical 10% comes from the black accents—the window frames, hardware, and pendant lights—which provide a graphic punch that keeps the design feeling modern and sharp. This ratio is the backbone of the modern farmhouse style we see everywhere.
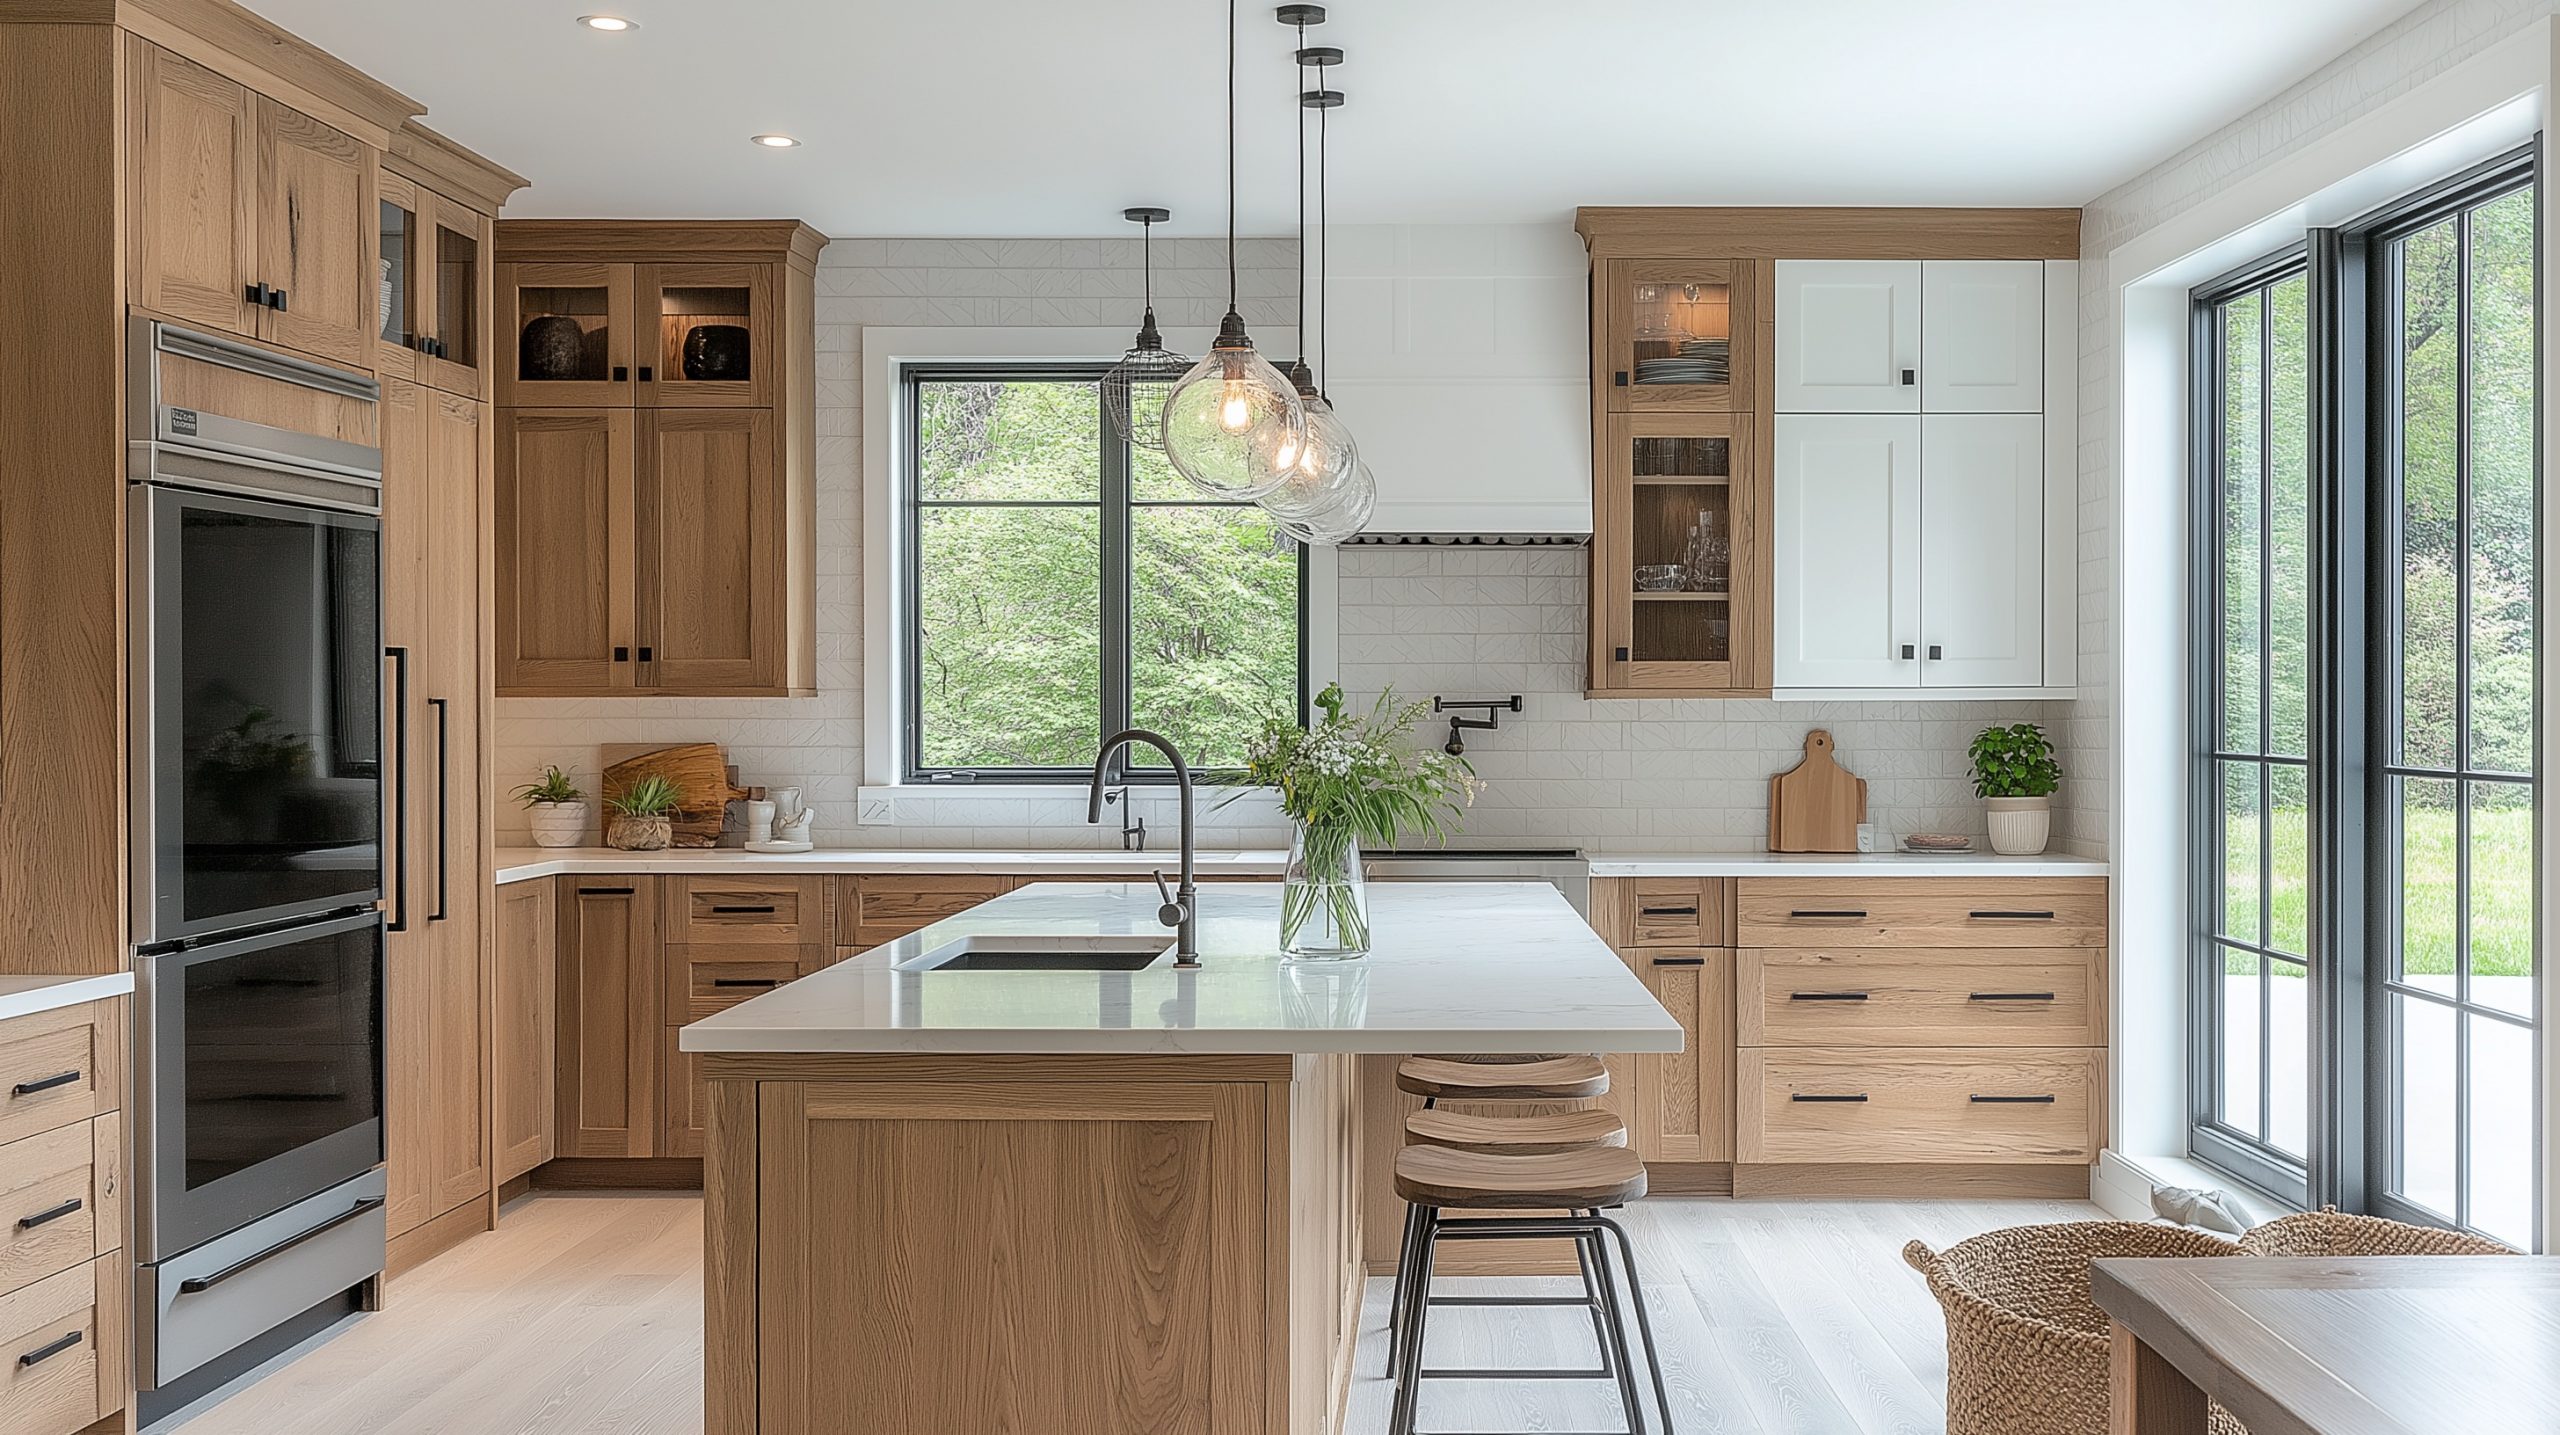
🔥 Trending Context
For years, the go-to look was all-white kitchens. This evolution, which took hold on Pinterest and Instagram around 2024-2025, reintroduces natural wood to bring back warmth and personality that was missing from stark white spaces. It reflects a broader design shift towards more organic, biophilic-inspired interiors. The continued use of black accents keeps it feeling current and prevents it from looking like a repeat of the 1990s oak kitchen. This version feels much warmer than the pure modernism of Idea #25.
27. Design a Utilitarian Beverage Station with Open Shelving
that defines this space is its unabashed, form-follows-function utility. This isn’t trying to be a cute, curated coffee bar; it’s a serious beverage station. The large, commercial-style machine is the clear workhorse, and the open shelving provides immediate, no-fuss access to a large quantity of glassware. The decorative wall tiles and patterned vent hood add aesthetic interest, but the core of the design is about pure, unadorned function. It feels like a real, working space, not a staged vignette.
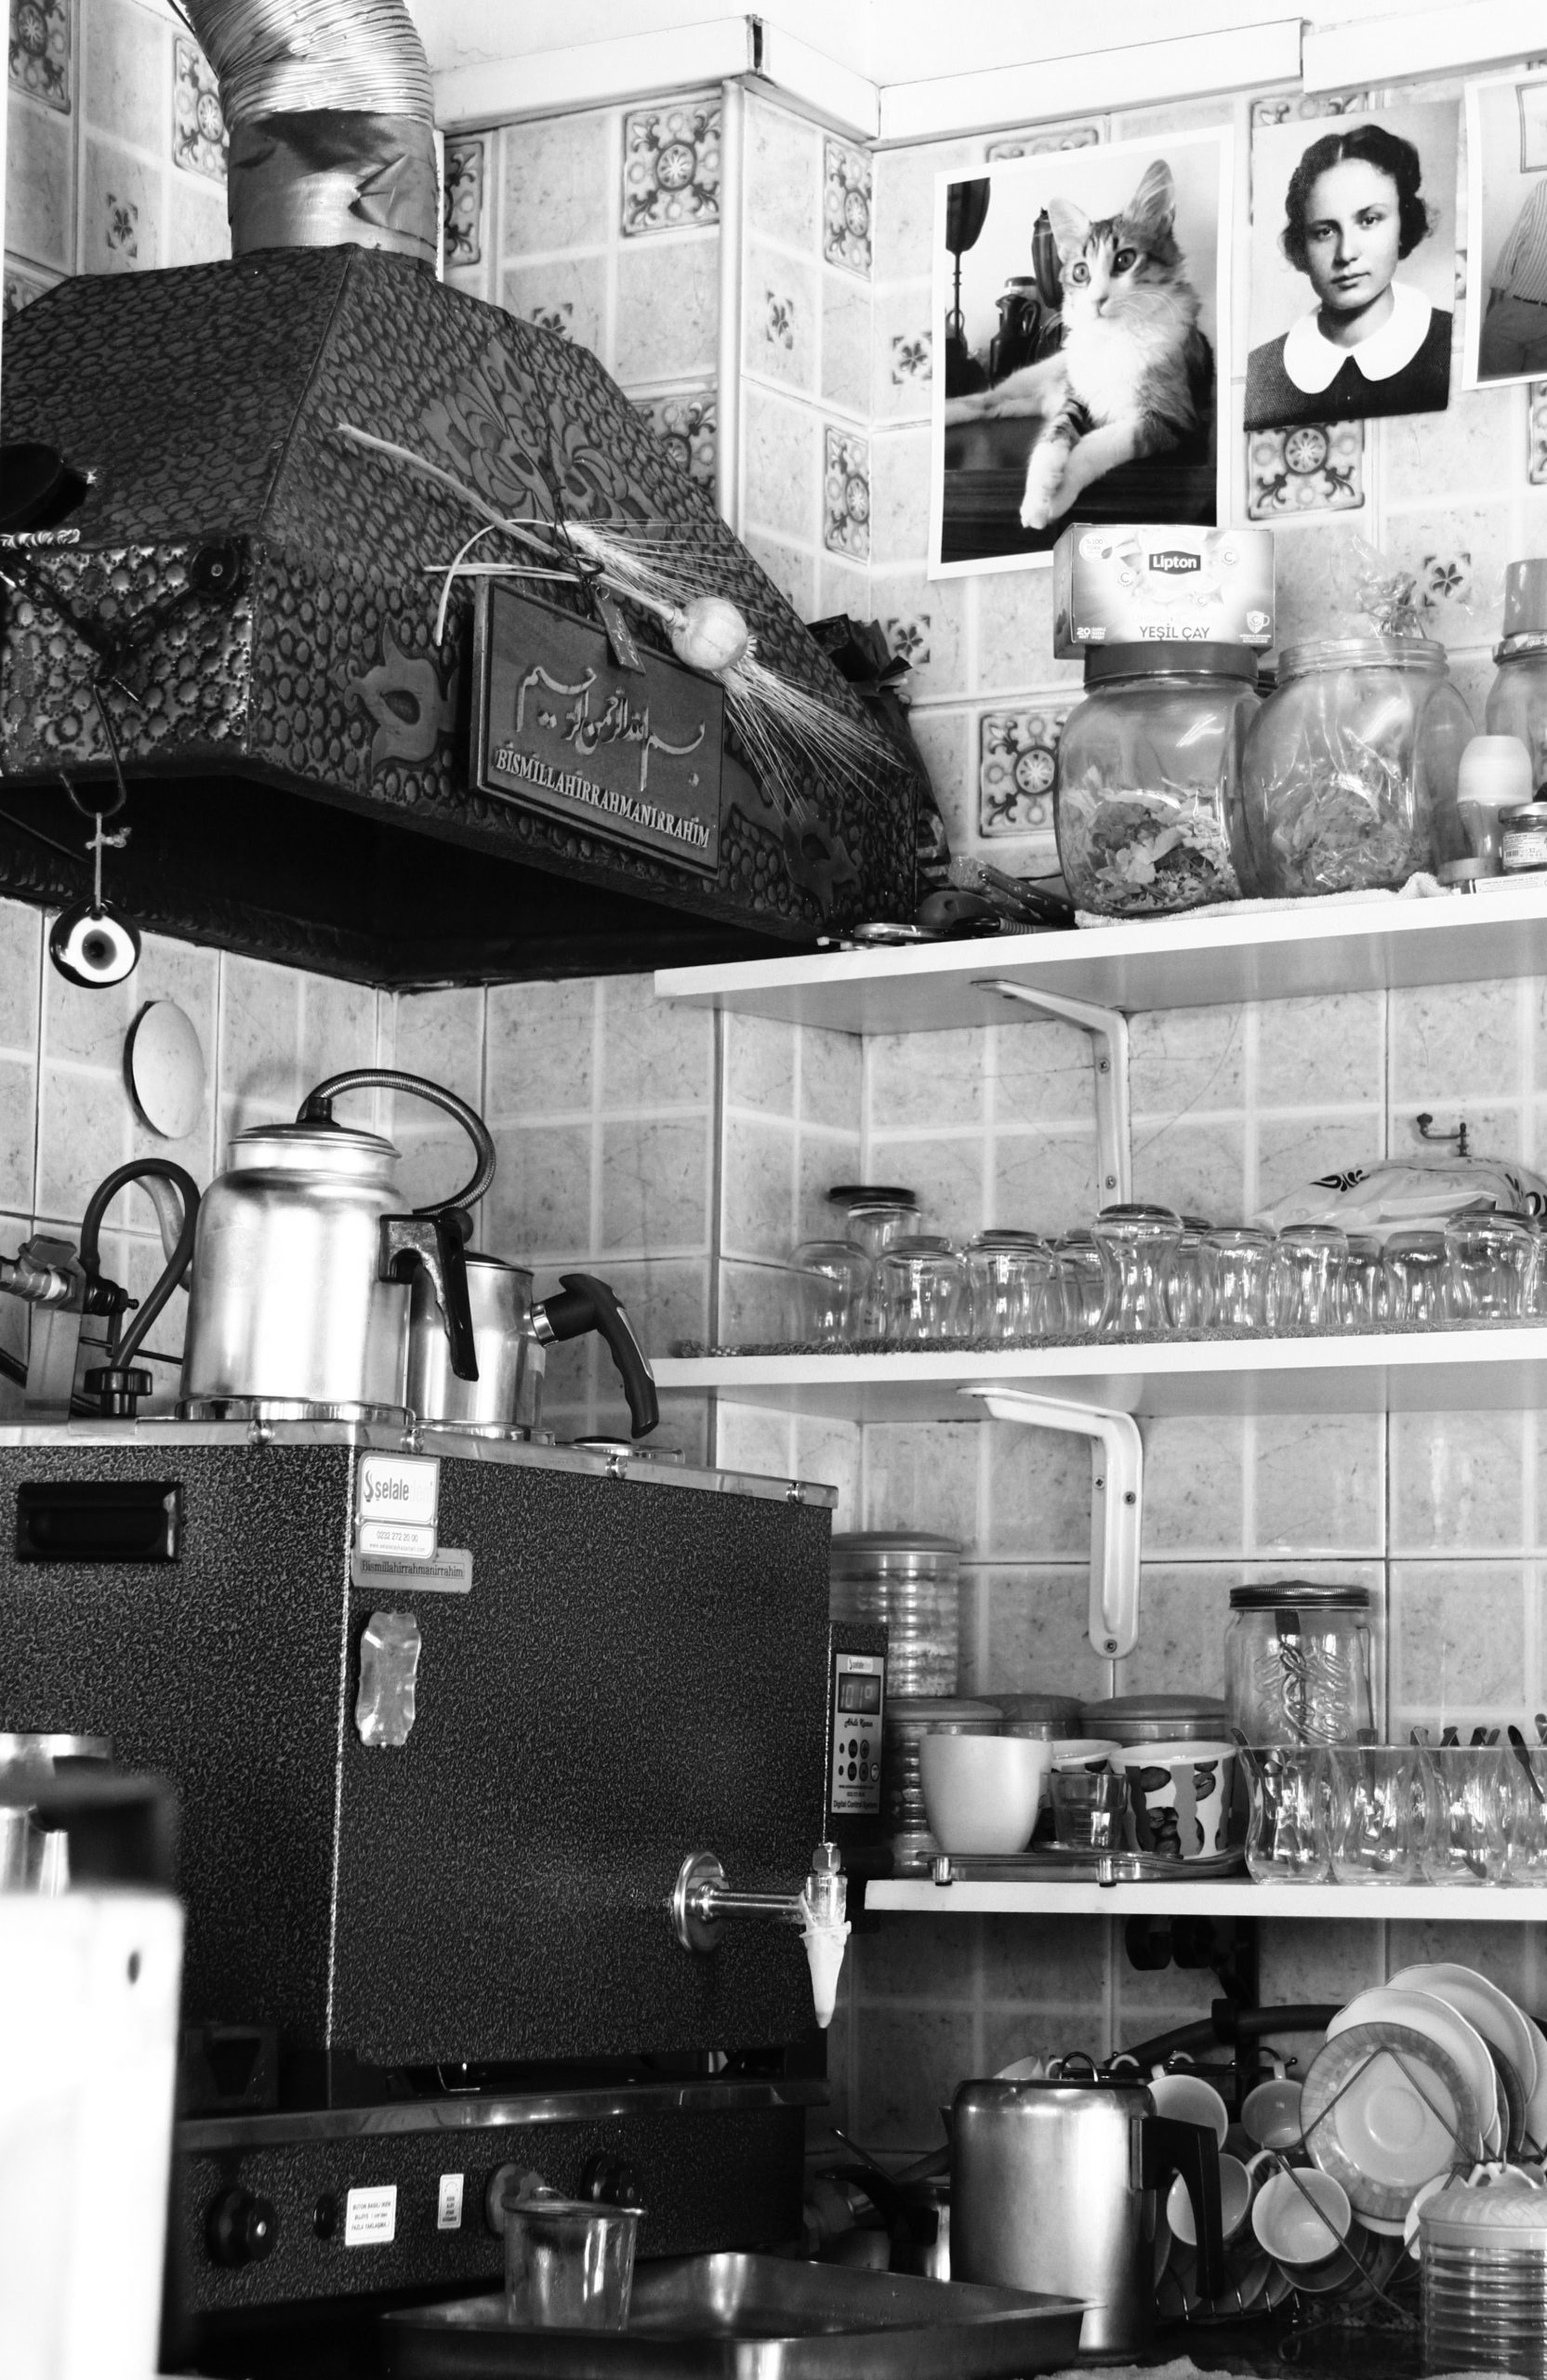
🧹 Maintenance Reality
Open shelving in a kitchen or beverage area looks amazing in photos, but it requires a commitment to tidiness and cleaning. Everything on display—every jar, every glass—becomes part of your decor, so it needs to be organized and visually appealing. More importantly, items on open shelves, especially those near a cooking or prep area, will collect dust and a fine layer of greasy film from the air. You’ll need to wash the items and wipe down the shelves far more often than you would with enclosed cabinets.
Your Hutch’s Next Chapter Awaits
That old, overlooked hutch in the corner doesn’t have to be an eyesore. With a little paint, some clever styling, or a full functional makeover, it can become the most talked-about piece in your home. We hope these 27 ideas have sparked your imagination for what’s possible. Now, head over to your Pinterest boards and start planning your project!