31 Jaw-Dropping Winter Porch Pot Ideas That Will Instantly Elevate Your Home’s Curb Appeal This Season

You know that feeling when you finally find the one winter porch pot arrangement that looks exactly right for your space, but you don’t know where to start making it happen? We spent serious time browsing Target, Home Depot, and Etsy to bring you what’s worth your attention this year. Inside you’ll find 31 ideas spanning rustic farmhouse, classic traditional, natural woodland, and modern minimalist, with budget-friendly DIY versions compared right alongside splurge-worthy designer looks. In 2026, the trend is toward layered, collected arrangements that feel personal rather than perfectly uniform. And stay until the end — we break down the most common mistakes that can ruin these looks. 📌 Pin this guide for later — your future self will thank you when it’s time to actually do this.
1. Rustic Metal Planter with Jute Bow and Frosted Pinecones
Recreating this look is totally doable without a huge spend. Here’s a rough estimate:
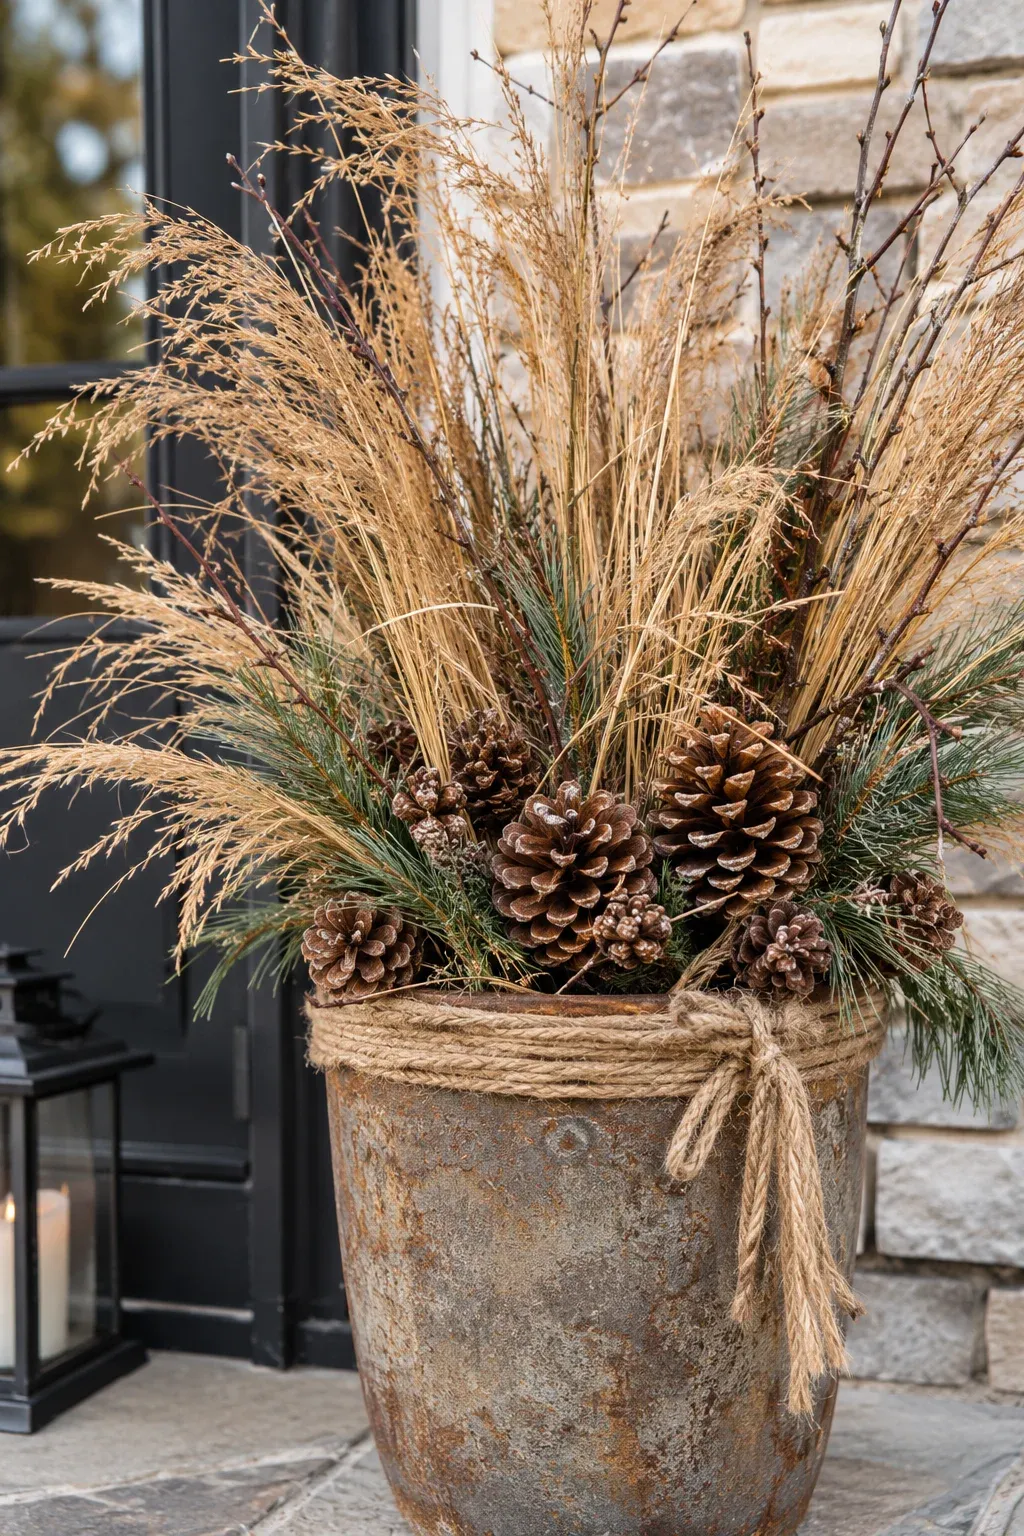
- Main planter: $35–$80
- Dried grasses & branches: $0–$15 (free if you forage!)
- Frosted pinecones: $5–$10
- Jute rope: $3–$6
- Lantern: $20–$40
It’s the jute rope bow. Without it, this rustic metal planter just looks like a found object (and not in a good way). That simple, tactile wrap turns the whole thing from ‘I found this in the woods’ to ‘I designed this for my front porch.’ It adds warmth, texture, and a deliberate handcrafted feel that makes the dried everything else feel intentional.
Here’s how to wrap your planter in jute in under 20 minutes:
- Starting at the bottom, apply a thin line of hot glue and press the rope end in.
- Wrap the rope tightly around the planter, keeping rows flush.
- Every 4–5 rows, add a dab of glue to keep it from shifting.
- When you reach the top, cut the rope and secure the tail with glue.
- Tie a separate piece of rope into a bow and hot-glue it to the front.
Time: 15–20 minutes. Cost: under $6 for rope.
2. Rustic Brown Urn with Birch Logs and Magnolia Leaves
Here’s a pro move for making birch logs and magnolia leaves look polished together: cluster the birch logs in a tight bundle toward the center of the urn and let the magnolia leaves fan out around the base. This creates a natural ‘column’ effect that draws the eye upward, while the broad, velvety magnolia leaves anchor the arrangement and hide the mechanics beneath. The contrast between the smooth birch bark and the matte magnolia texture adds serious depth without adding extra clutter.
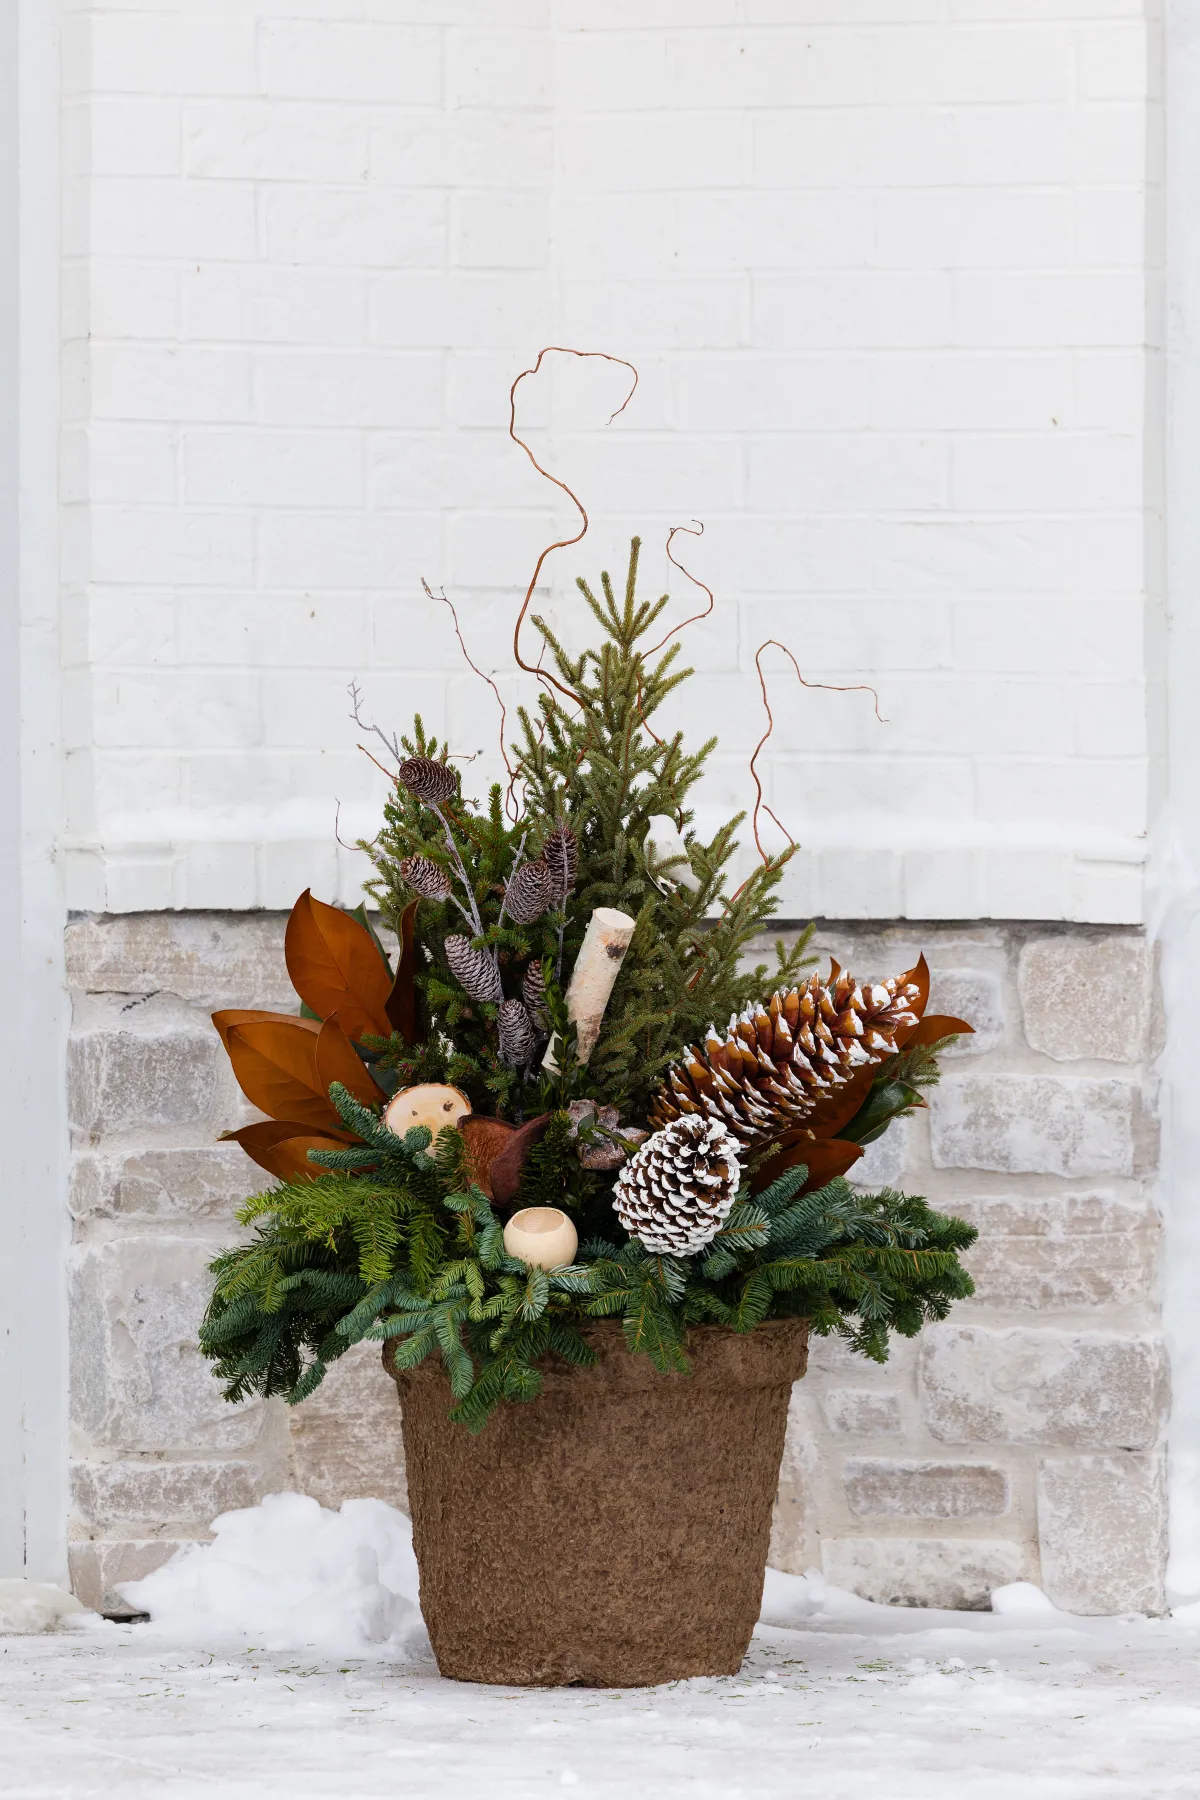
Magnolia leaves are gorgeous, but they’re not immortal. In winter weather, they’ll gradually curl and turn brown around the edges, especially if they’re exposed to wind or hard freezes. You can extend their look by giving them a quick spritz with anti-transpirant spray (yes, that floral sealant works on cut branches too). Plan to replace or refresh the magnolia leaves every 3 to 4 weeks if you want them looking pristine through the holidays. Compare the warmth of this arrangement with the cooler palette of Idea #12 for a totally different mood.
3. Silver and White Winter Glam with Lotus Pods and Ribbon
Here’s the visual formula that makes this arrangement sing: 40% forest green evergreen base + 30% matte silver ornaments and white mesh ribbon + 20% tall white painted branches + 10% brown dried lotus pods. The silver and white do the heavy lifting for the festive feel, but it’s the lotus pods that keep it from looking like a craft store exploded. Swap the olive tones for warm berry reds and you have Idea #5‘s bolder, more traditional cousin. Keep the formula, change the accents.
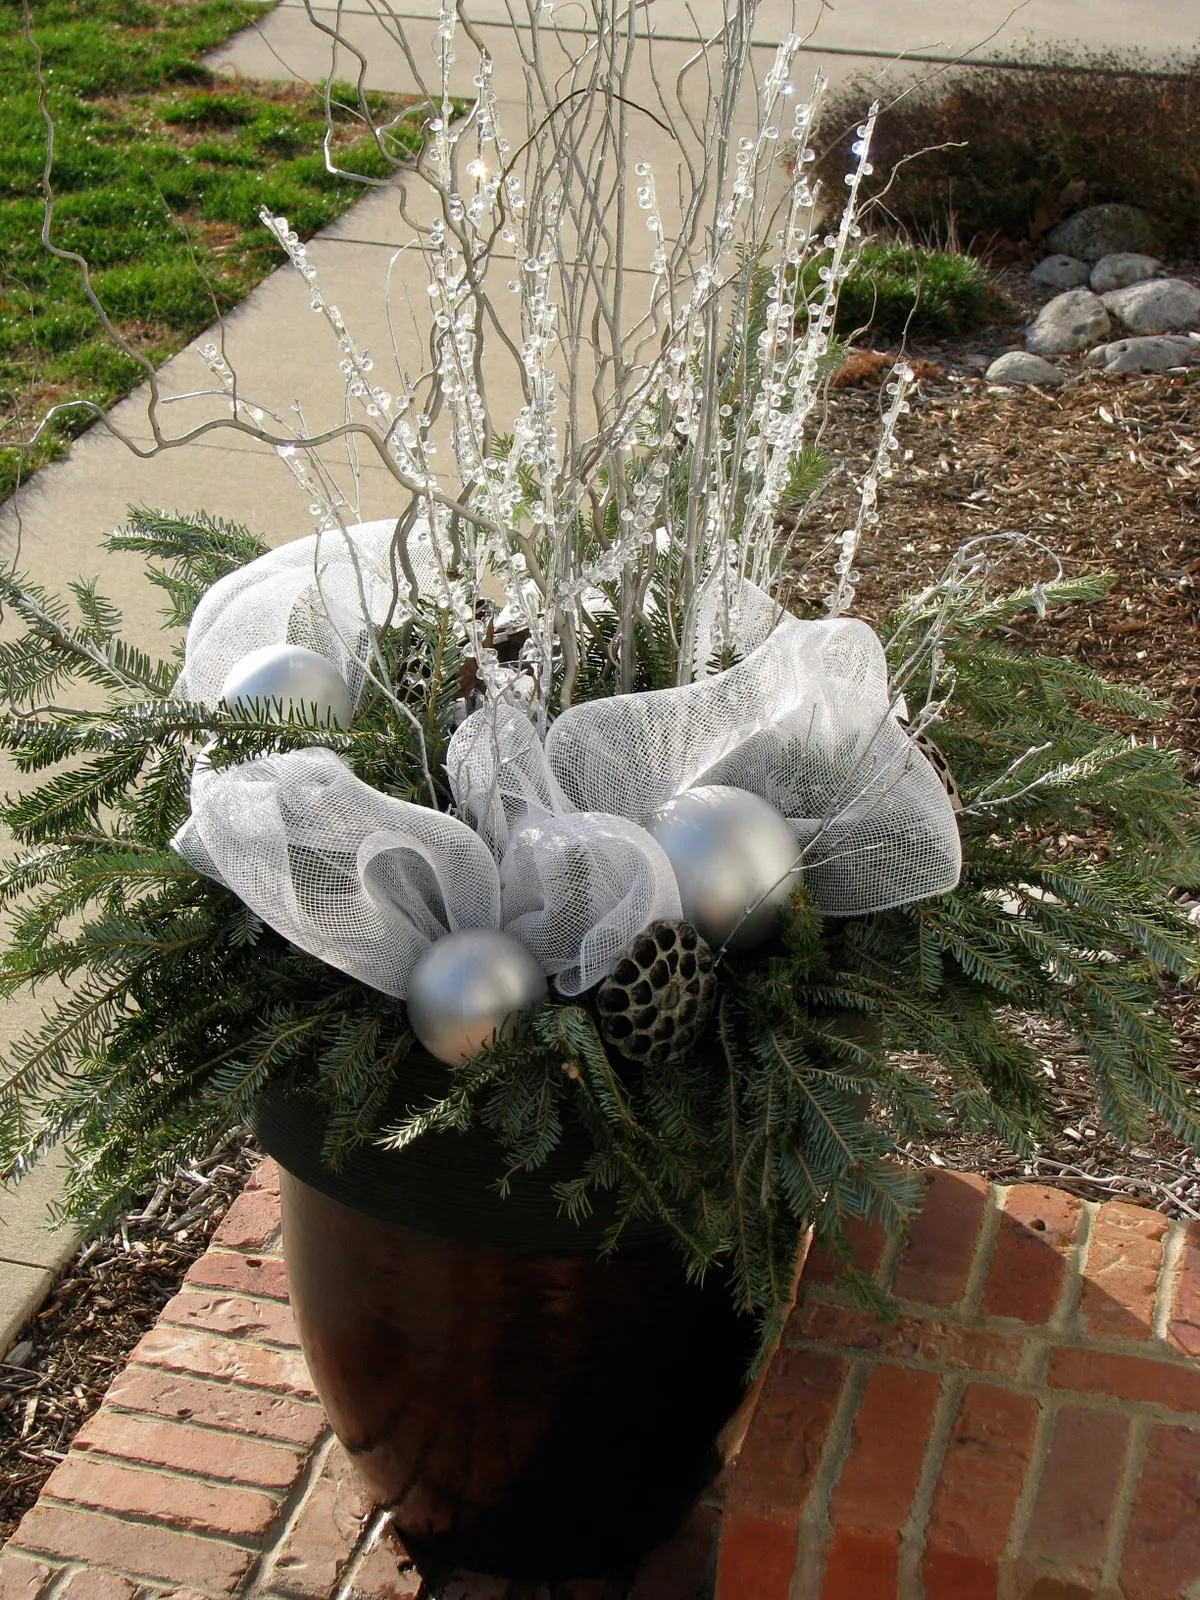
You can get this full look for under $65. Hit the thrift store for a set of matte silver ball ornaments ($4) and a can of white spray paint for the branches ($6). Grab lotus pods from a craft store or online ($8 for a bag). Use cheap spindly branches from your yard instead of buying decorative picks. Suddenly your $150 influencer-worthy pot is a $45 weekend project.
4. Cool Concrete Urn with Faux White Berries
The ‘winter whites’ trend is huge in 2026, moving away from primary reds and into serene, monochromatic snowscapes. This urn, with its blue-green fir and fluffy white seed heads, captures that icy elegance perfectly. It’s a direct response to the warmer, cozier palettes that have dominated for years — a cooler, more architectural take on winter that pairs beautifully with modern homes and minimalist decor. Think of it as the design equivalent of a snow-covered meadow.
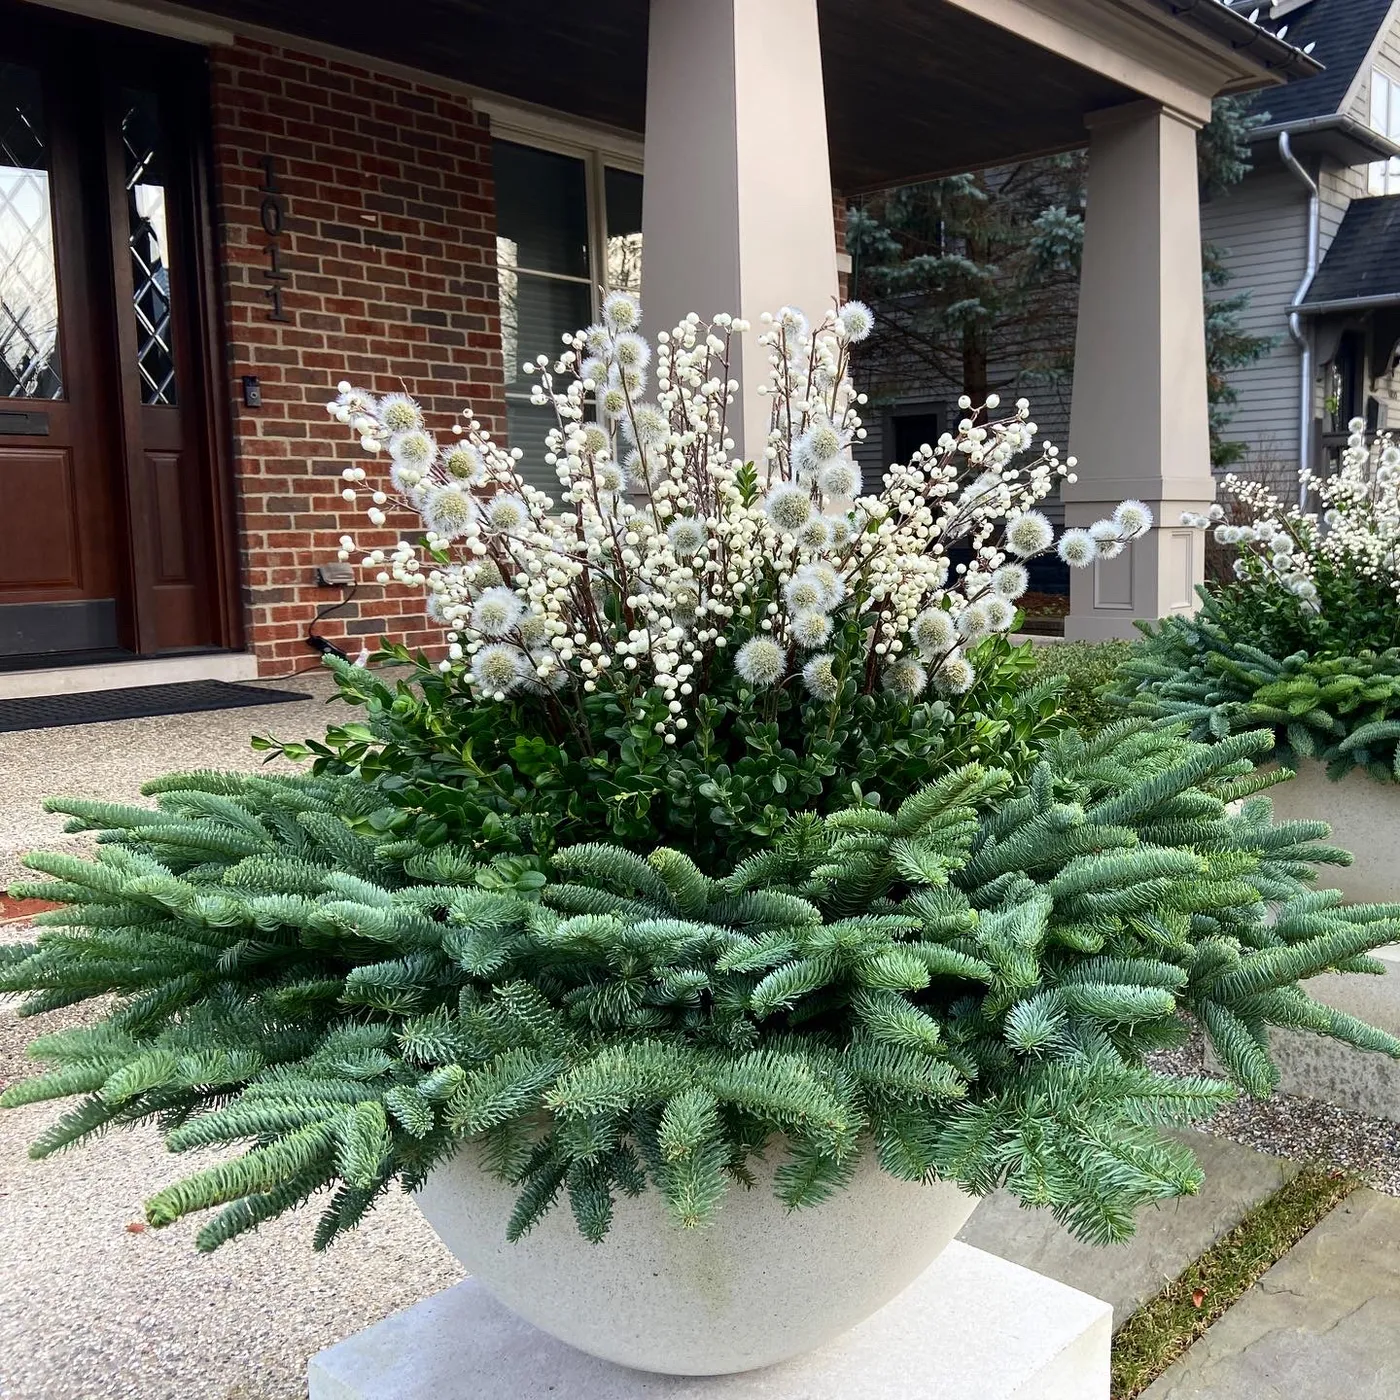
- This arrangement needs a wide, heavy base to anchor the tall seed heads. Minimum urn diameter: 20 inches.
- It works best on a porch or landing that isn’t fully enclosed, as the cool color scheme can feel stark in a small, warm-toned space.
- For a standard 4ft wide stoop, keep the arrangement height to around 36–48 inches to avoid overwhelming the entry.
5. Fluted Pot with Red Poinsettias and Gold Ornaments
This arrangement nails the ‘traditional festive’ look because it hits three distinct height layers perfectly. The tall eucalyptus provides a dramatic arching frame, the poinsettias deliver a solid block of color at the center, and the small gold ornaments nestle in to add a scattered sparkling rhythm. The repetition of the round ornaments echoes the string lights on the railing, creating a cohesive visual story from the pot to the porch.
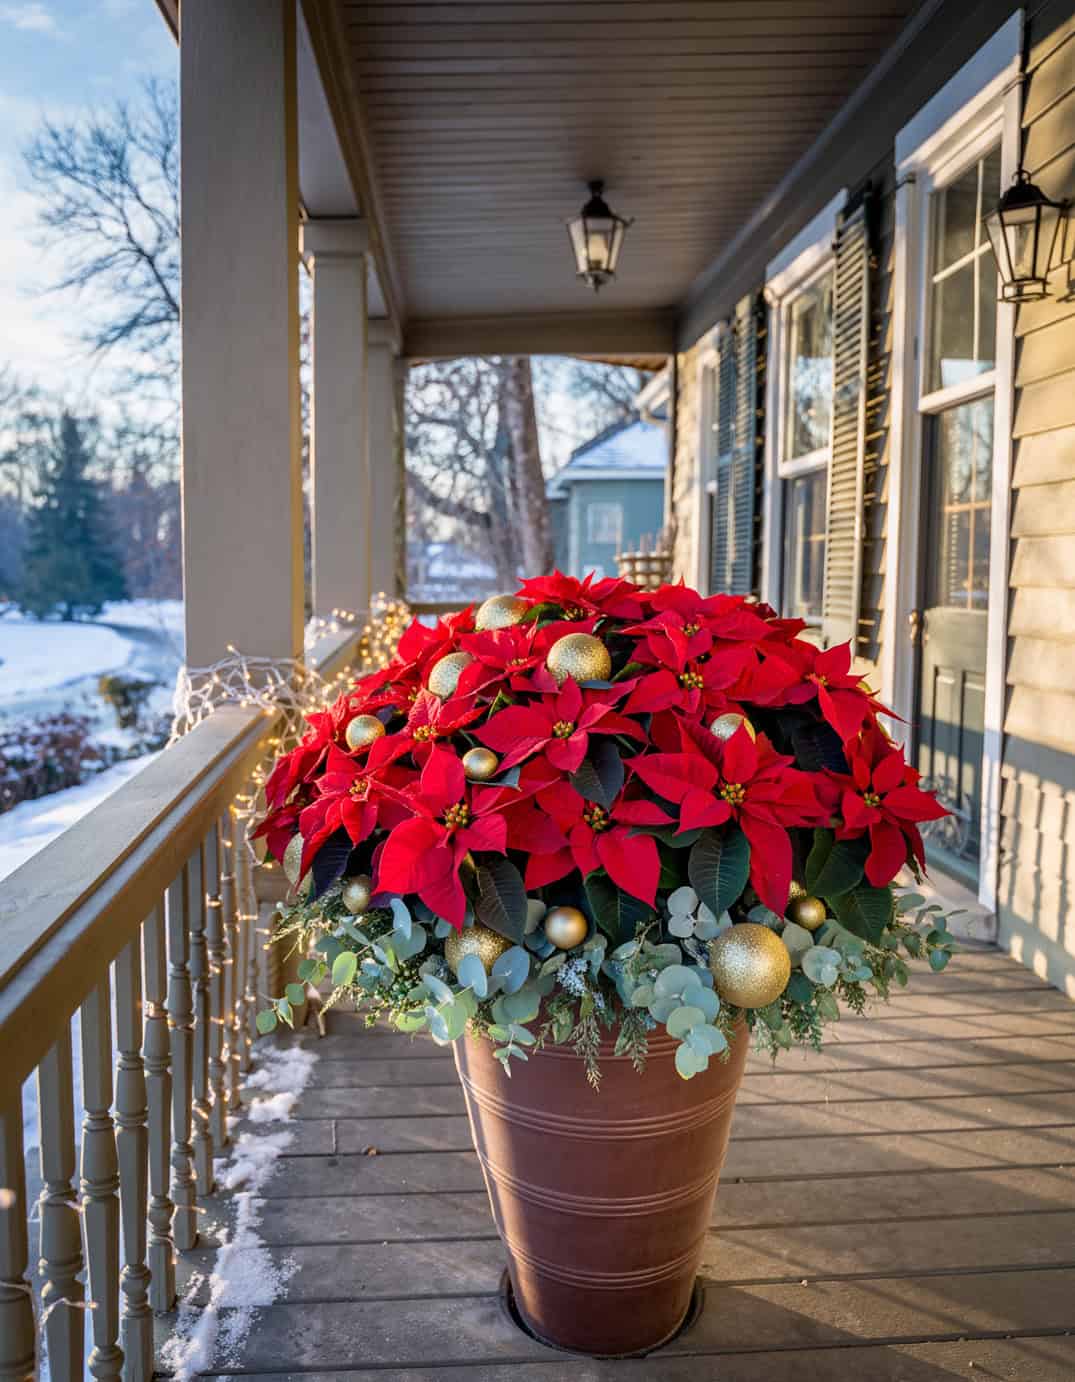
Poinsettias are tropical plants, and they will absolutely drop every single leaf if they are shocked by a hard freeze. If your porch is exposed to strong winds or temperatures below 50°F, this is a high-maintenance look. Bring the pot inside on the coldest nights, or budget to replace the poinsettias mid-season. The eucalyptus will survive just fine, but the red show is fragile.
6. Urn with Birch Branches and Bright Red Berries on Snow
building, check these boxes:
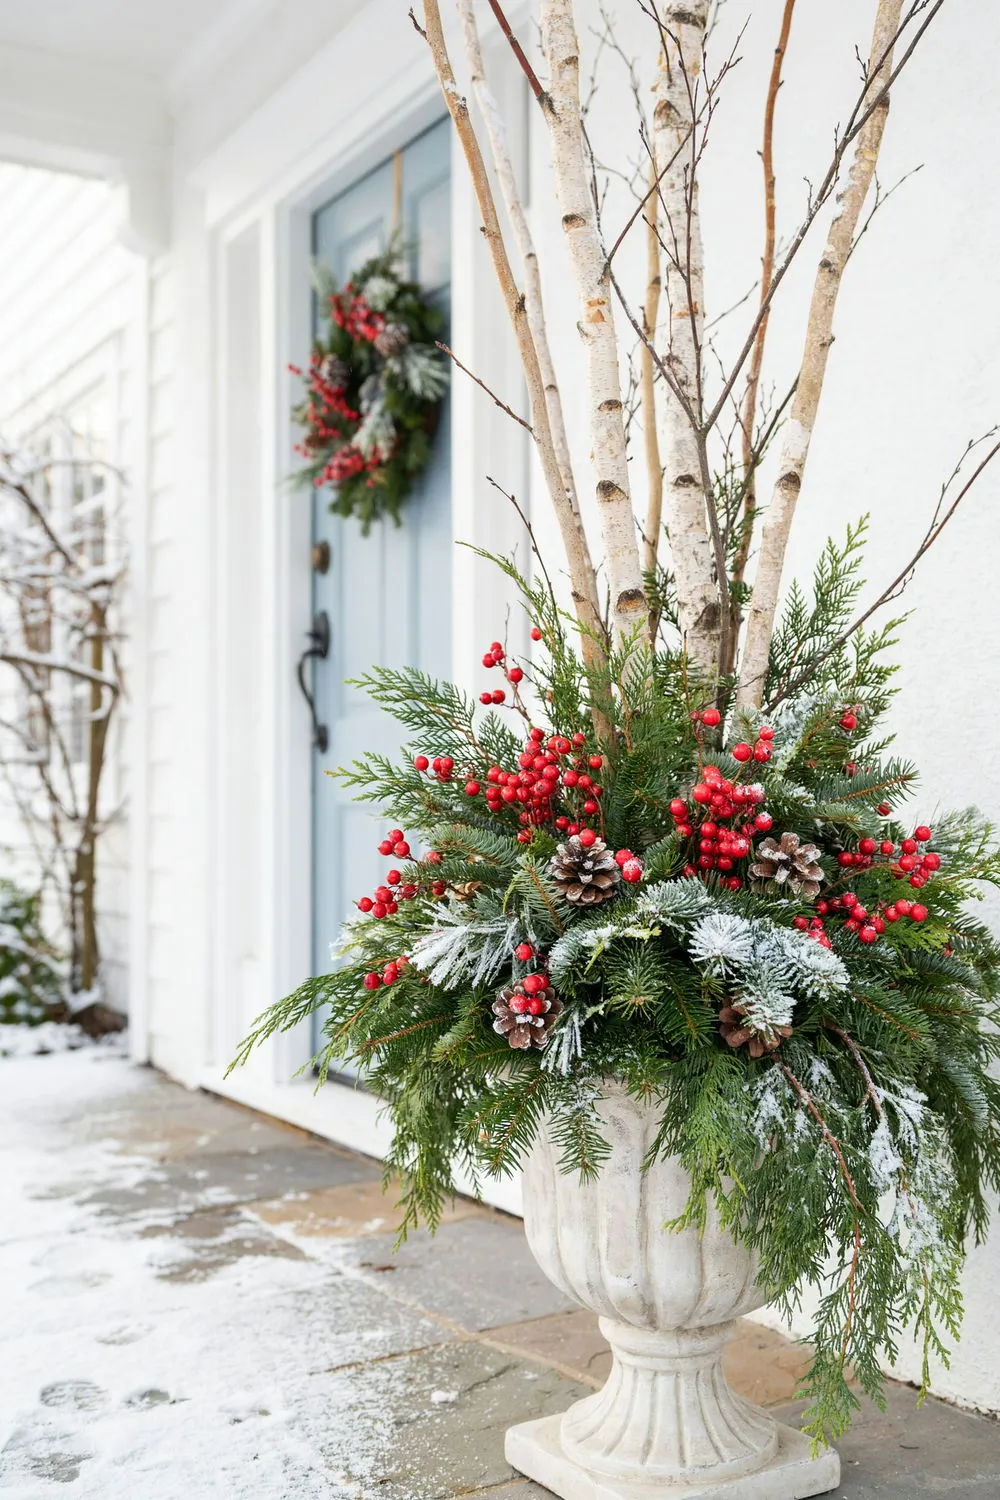
- Measure your urn height against your front door. The total arrangement should be no more than 2/3 the height of your door opening.
- Make sure the birch branches are long enough to stand tall above the evergreens — look for 48-inch stems.
- Test the stability of your urn. Tall branches + wind = a tipped pot. Weigh the urn down with bricks or sandbags at the base.
- Check if the red berries are UV resistant. If not, they’ll fade to pink in a week in direct sun.
Here’s what you’re looking at price-wise for this whole display:
- Large urn planter: $60–$150
- Birch branch bundle: $15–$30
- Mixed evergreens: $30–$50
- Red berry picks: $10–$18
- Frosted pinecones: $6–$12
7. Frosty Tapered Planter with Warm White String Lights
It’s the warm white string lights. In this arrangement, the frosted evergreens and red berries are lovely, but it’s the tiny glow of the lights woven through the foliage that turns a nice pot into a genuine evening welcome. Without them, it’s a static display. With them, it’s a glowing beacon that makes your porch feel alive in the dark depths of January. This single choice is what separates a daytime decoration from a nighttime destination.
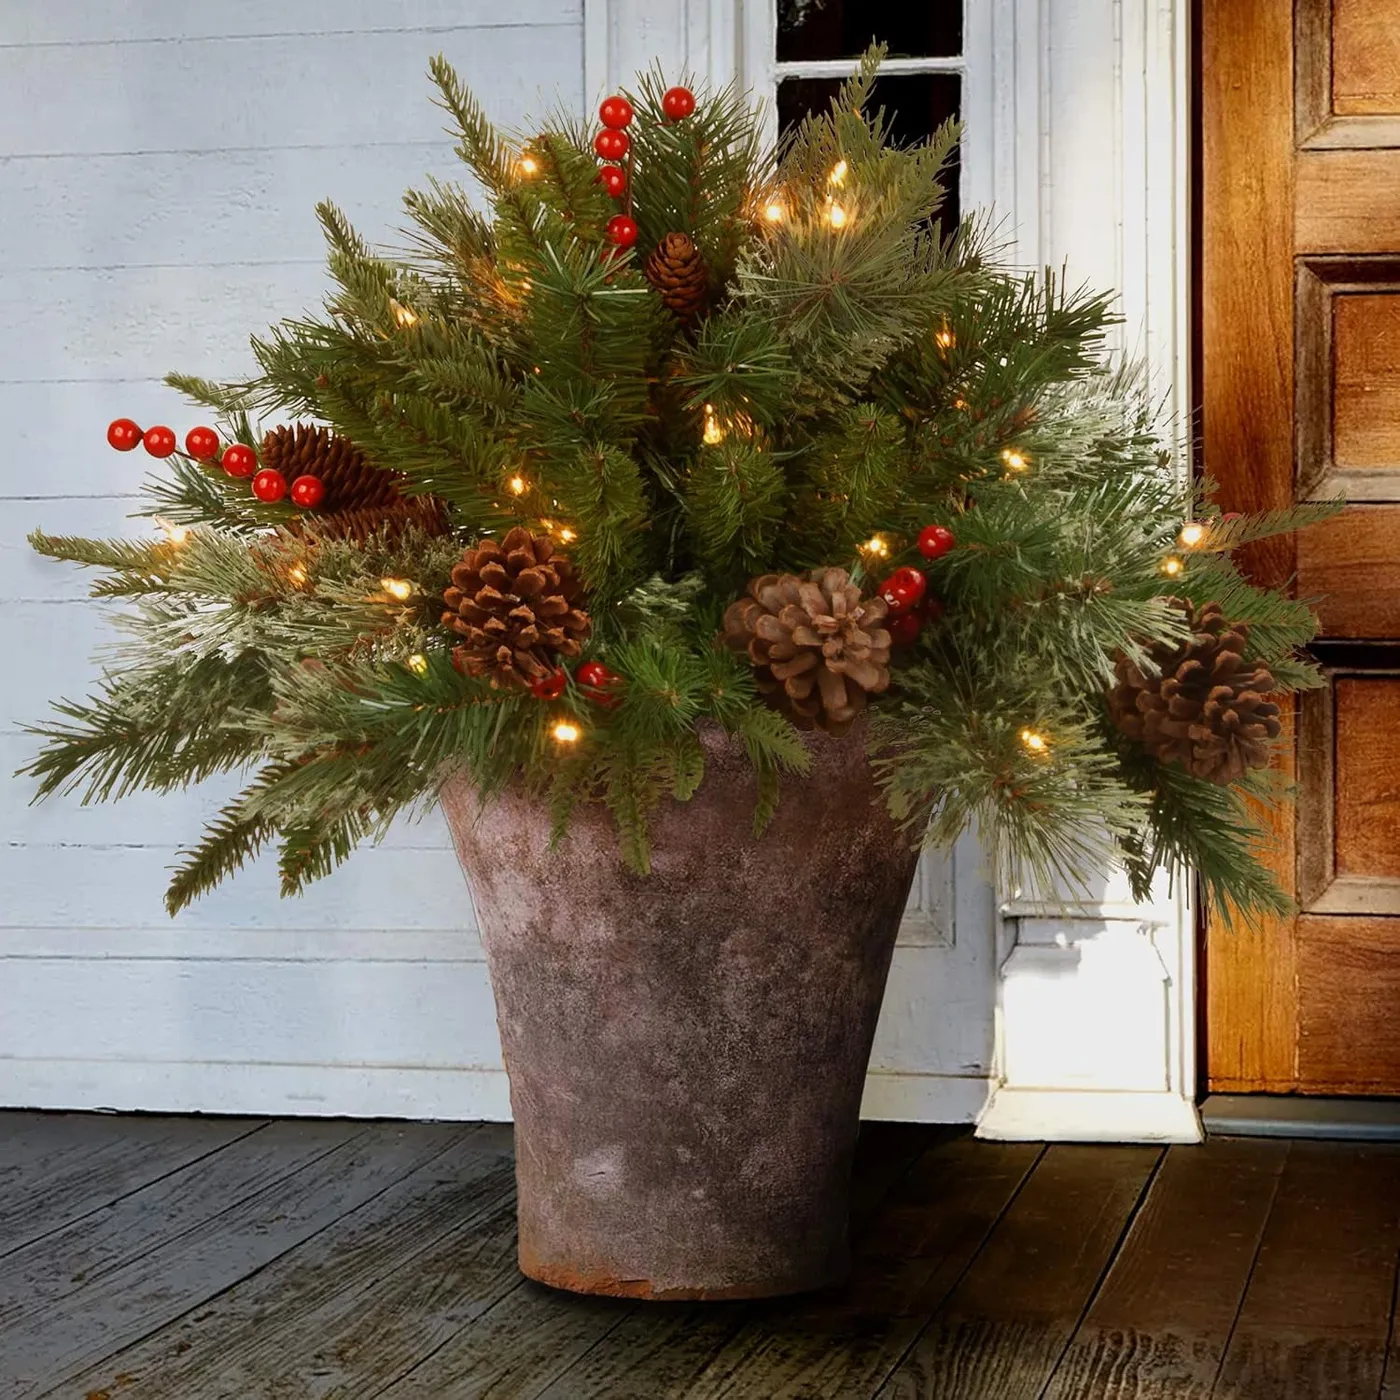
Outdoor-rated string lights are a non-negotiable here. Look for a set rated for wet locations with a silicon-coated bulb. The cheap indoor sets will short out the first time it snows or rains. Also, be prepared to untangle and pull the string lights out every time you want to refresh the greenery. It’s a 10-minute annoyance, but the payoff is huge. Compare the cozy glow here with the icier, more chic vibe of Idea #3.
8. Rust Urn with Dried Hydrangeas and a Lighted Metal Ring
Dried hydrangeas are delicate — they crumble at the slightest touch. To extend their life outdoors in a winter arrangement, give them a spray with a clear UV-protective sealant or a mix of water and a few drops of glycerin. This keeps the petals from shattering in the wind and helps them hold their shape and color for weeks longer. It’s a tiny step that keeps a $20 bag of dried hydrangeas looking like a $50 investment.
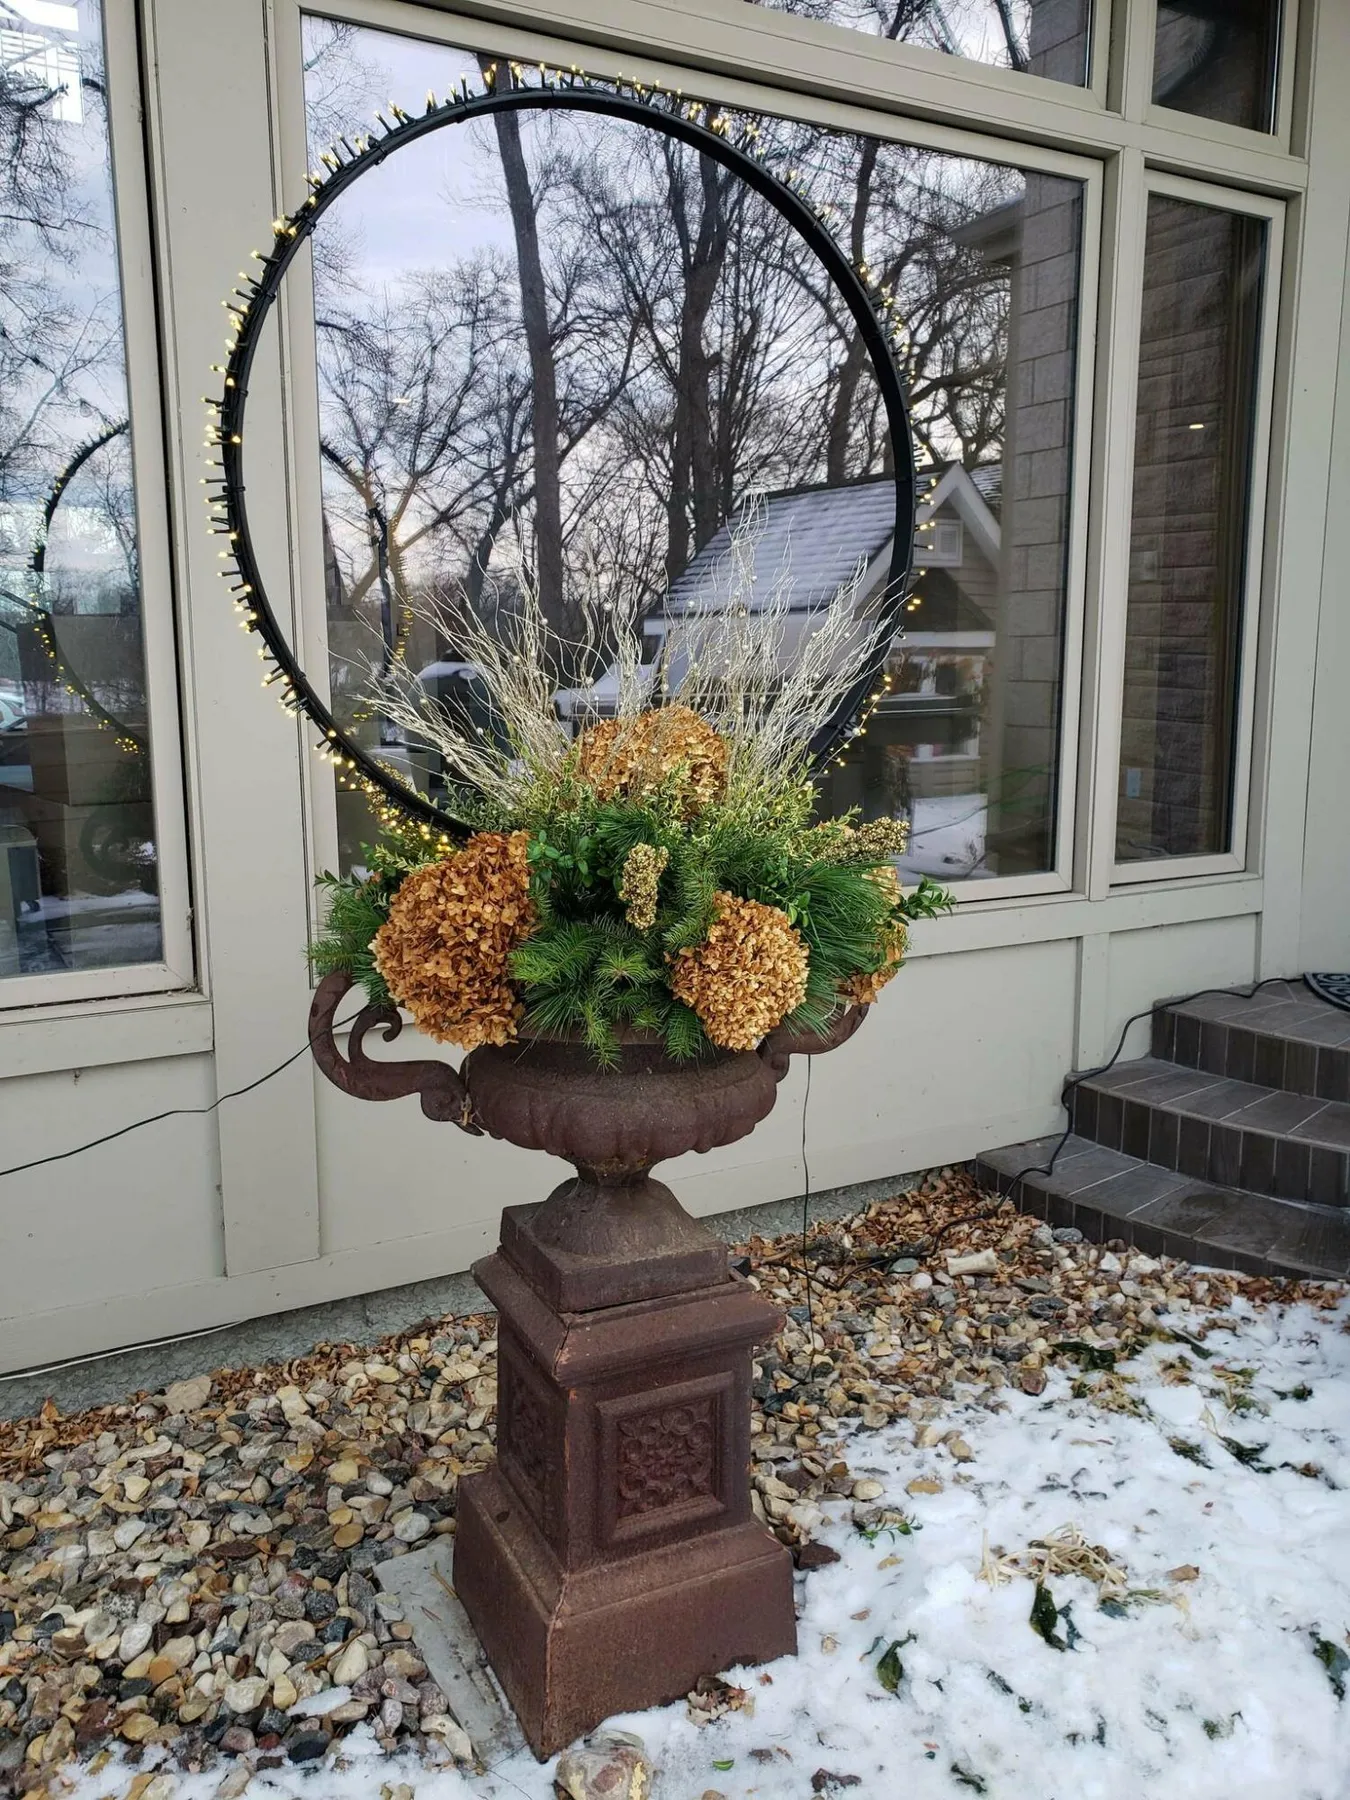
The large black metal ring behind the urn is the secret weapon here. It acts as a halo, framing the arrangement and creating a distinct visual boundary that separates the pot from the window behind it. In design terms, this is ‘framing the focal point.’ It gives the entire display a sense of weight and intentionality. Without the ring, the arrangement would feel smaller and less anchored against the large glass pane.
9. Classical Urn with Red Branches and Blue Spruce
Don’t have $150 for a giant bundle of red twig dogwood? Same. Here’s the budget hack: grab a few branches from a neighbor’s overgrown red-twig dogwood bush (ask first!). Failing that, buy a bundle of cheap curly willow from a craft store and spray paint it a matte cranberry red. It takes one can ($8) and 20 minutes and gives you that same shot of vibrant color at a fraction of the cost. The texture is different, but the visual impact is nearly identical from the street.
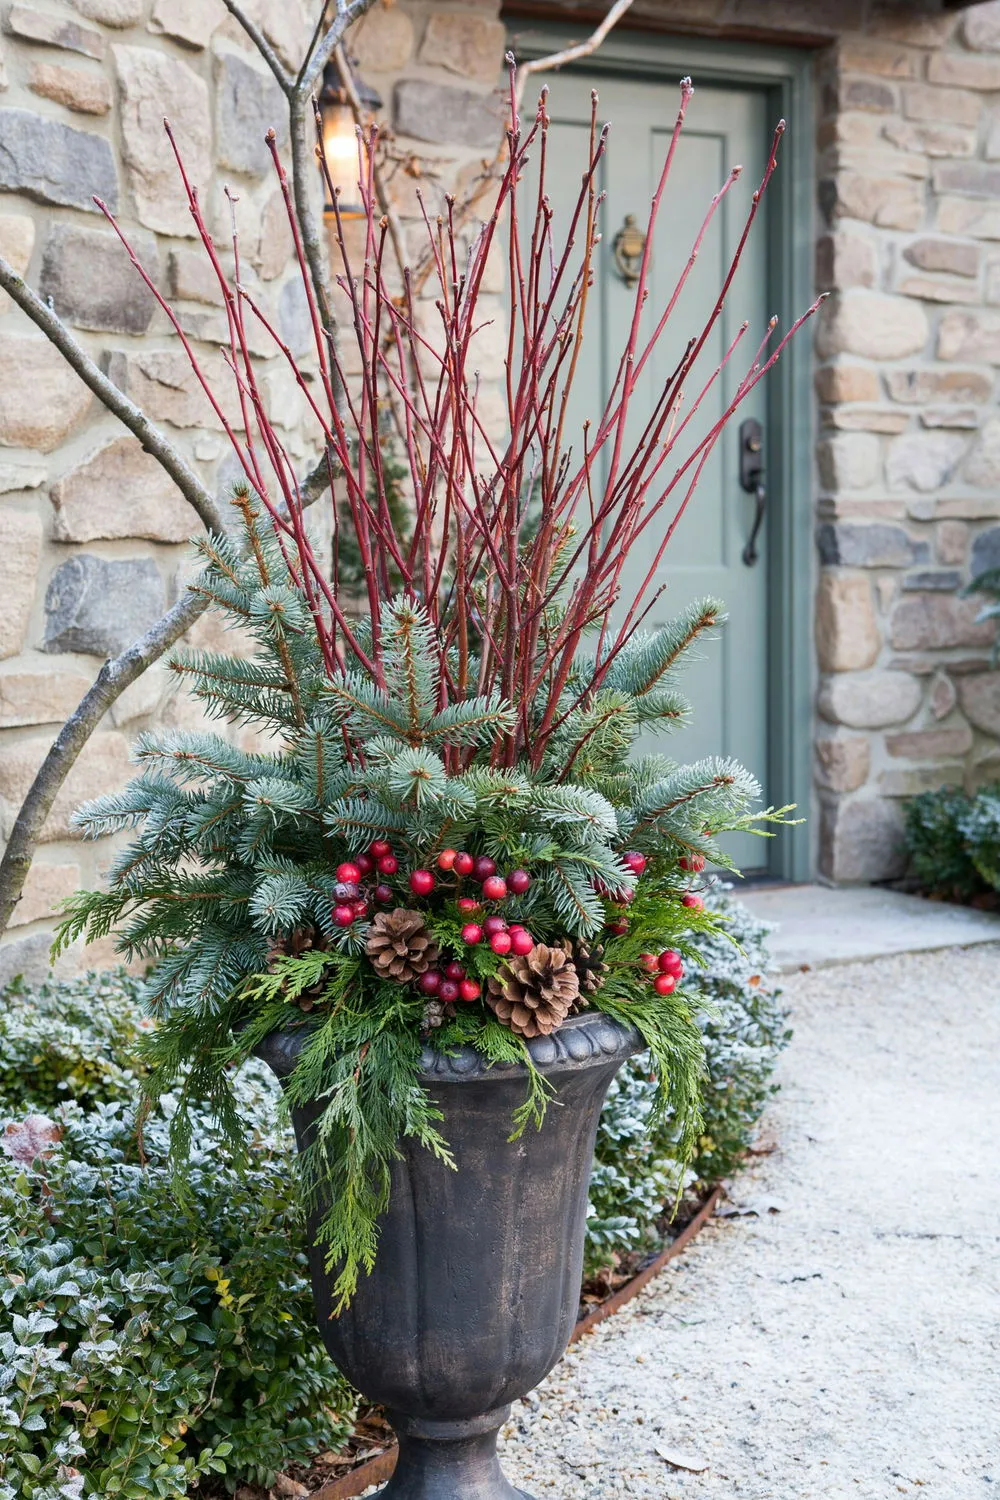
Those gorgeous red branches will fade to a dusty brown if left in full, direct sunlight for the whole season. It’s not a defect — it’s how sun works on pigmented branches. If you want them blazing red all winter, rotate the pot every couple of weeks so the sun hits different sides, or place the pot in a spot that gets strong morning light but afternoon shade. The blue spruce and trailing cedar will be fine either way.
10. Hammered Copper Planter with Variegated White Foliage
This arrangement needs a serious container to balance the lush, sprawling foliage. You’ll want a copper planter that’s at least 18 inches in diameter and 16 inches tall. The trailing ivy and caladiums spread outward, so give it a porch or step that’s at least 3 feet wide. On a smaller stoop, this look can feel overwhelming. Scale everything down by choosing a 12-inch plant pot and fewer caladium bulbs.
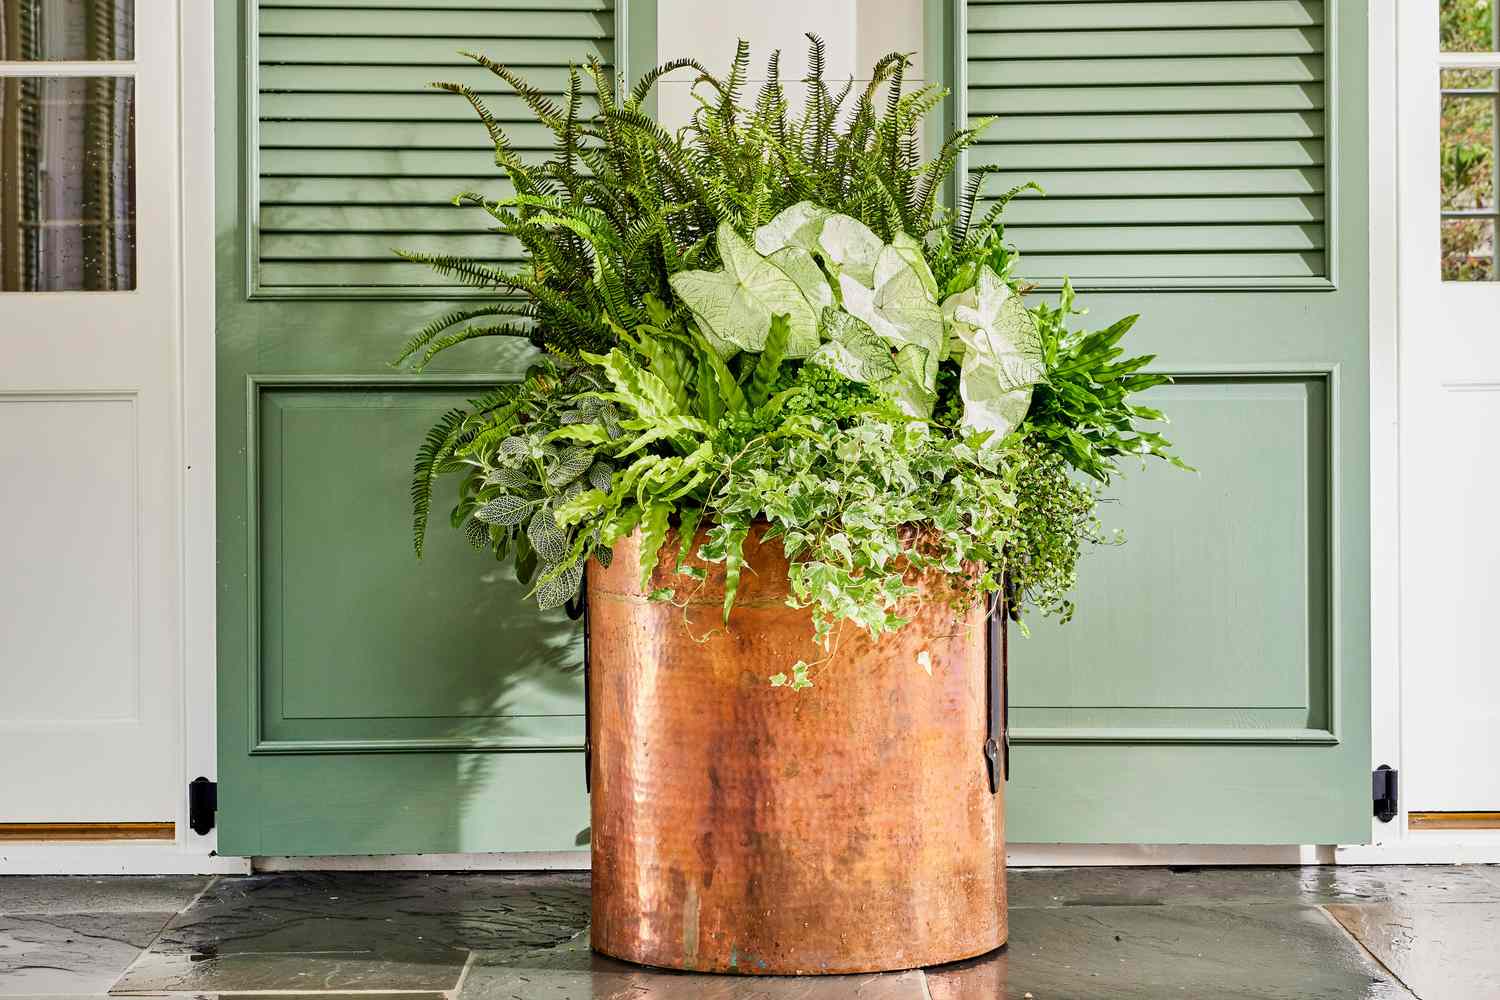
Copper paired with sage green is the color combination of 2026–2027. We’re seeing it everywhere — from textile collections at Target to high-end pottery glazes. It bridges the warmth of traditional metals with the cool, organic green that’s replacing the stark whites of previous years. This planter is a perfect example of that trend done right: the copper warms up the cool blue-green of the door and the white veins in the leaves.
11. Light Urn with Tall Evergreen and Purple-Yellow Violas
Here’s the 4-step recipe for this perfect ‘thriller-filler-spiller’ pot:
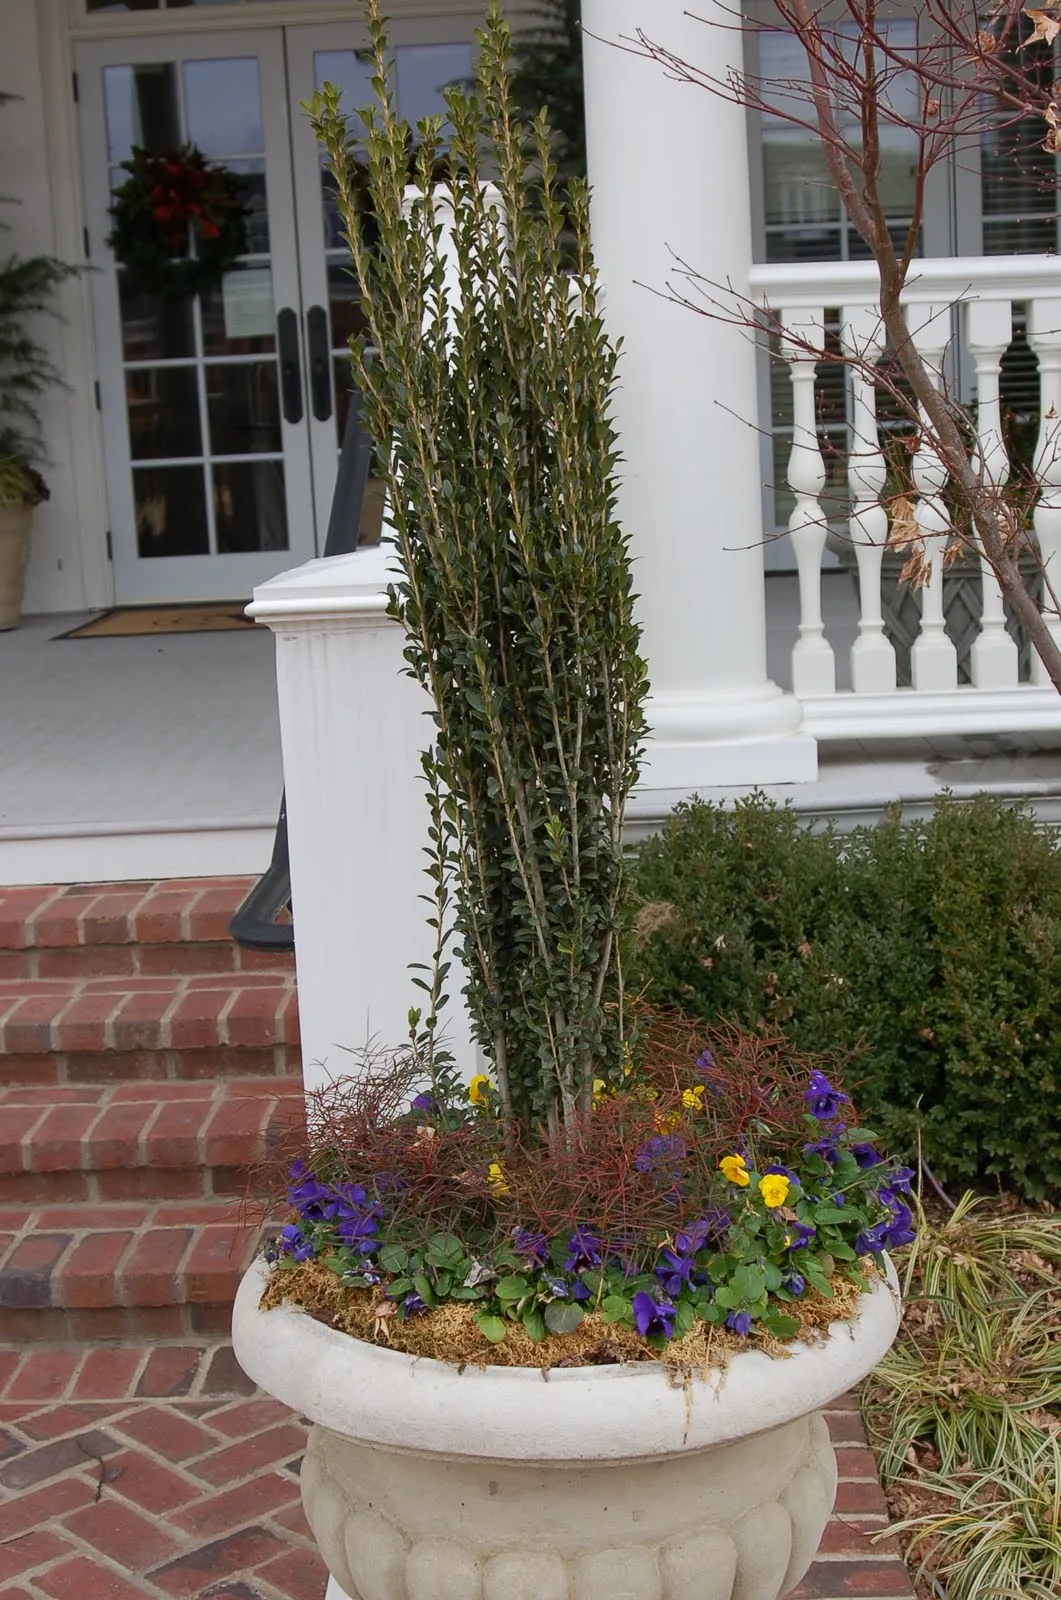
- Start with the thriller: Plant the tall, narrow evergreen right in the center of the urn.
- Add the filler: Tuck the purple and yellow violas in a ring around the base of the evergreen, leaving space for the moss.
- Layer the texture: Press the light brown moss and dried reddish grasses into the gaps between the violas to cover the soil.
- Placement: Set the urn on the highest step of your porch so the violas are visible from the street.
The visual formula here is 60% structured evergreen + 25% warm seasonal flowers + 15% textural dried elements. The proportions let the tall evergreen dominate while the tiny violas provide a cheerful, colorful anchor at eye level. Swap the purple and yellow for all white violas and use silver moss to match a monochrome entrance.
12. Teal Textured Pot with Birch Logs and Icy White Branches
Here’s a rough estimate to recreate this cool-toned centerpiece:
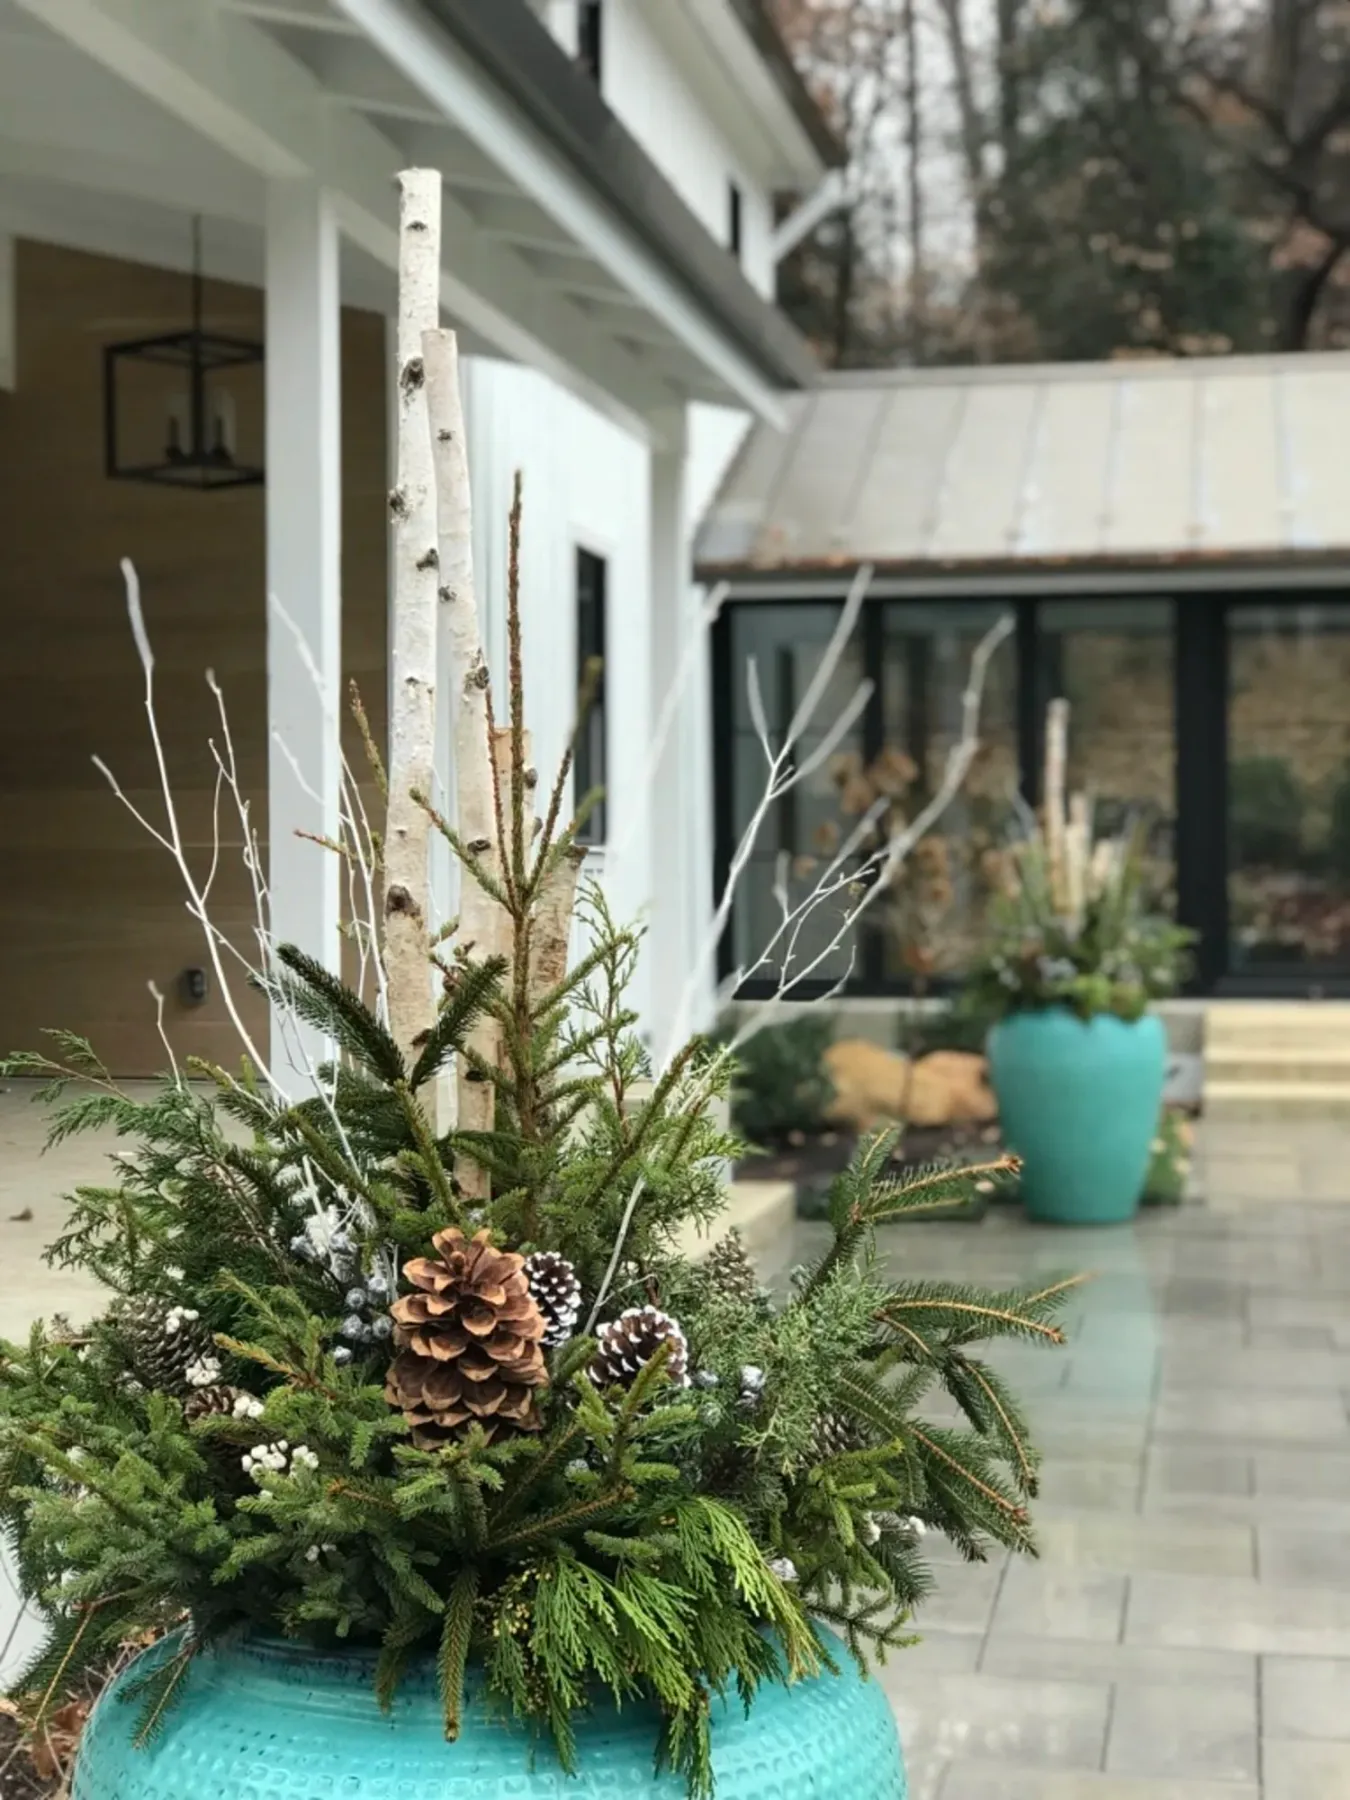
- Teal textured pot: $45–$90
- Birch logs bundle: $12–$25
- Mixed evergreen stems: $20–$40
- Frosted white berry picks: $8–$15
- Thin white branches: $6–$12
A word of caution: teal is a bold pot color that clashes with warm-toned surroundings. If your porch is red brick or your door is stained wood, this cool blue-green pot will fight with every other tone in your view. It thrives against white, grey, black, or deep navy backdrops. Also, the ‘frosted’ finish on the branches can look dusty and cheap under direct sun. Check the finish in person before buying, and don’t be afraid to add your own spray-on snow for a more natural look.
13. White Conical Pot with Curly Red and Yellow Willow
It’s the curly willow. Without those twisting, vibrant red and yellow branches shooting out of the top, this pot would be a pleasant but forgettable green arrangement. The willow gives it drama, height, and a wild, organic energy that feels like it was pulled straight from a winter hedgerow. It’s the sole element that makes this pot memorable. Everything else in the pot is there to support and ground those crazy, beautiful branches.
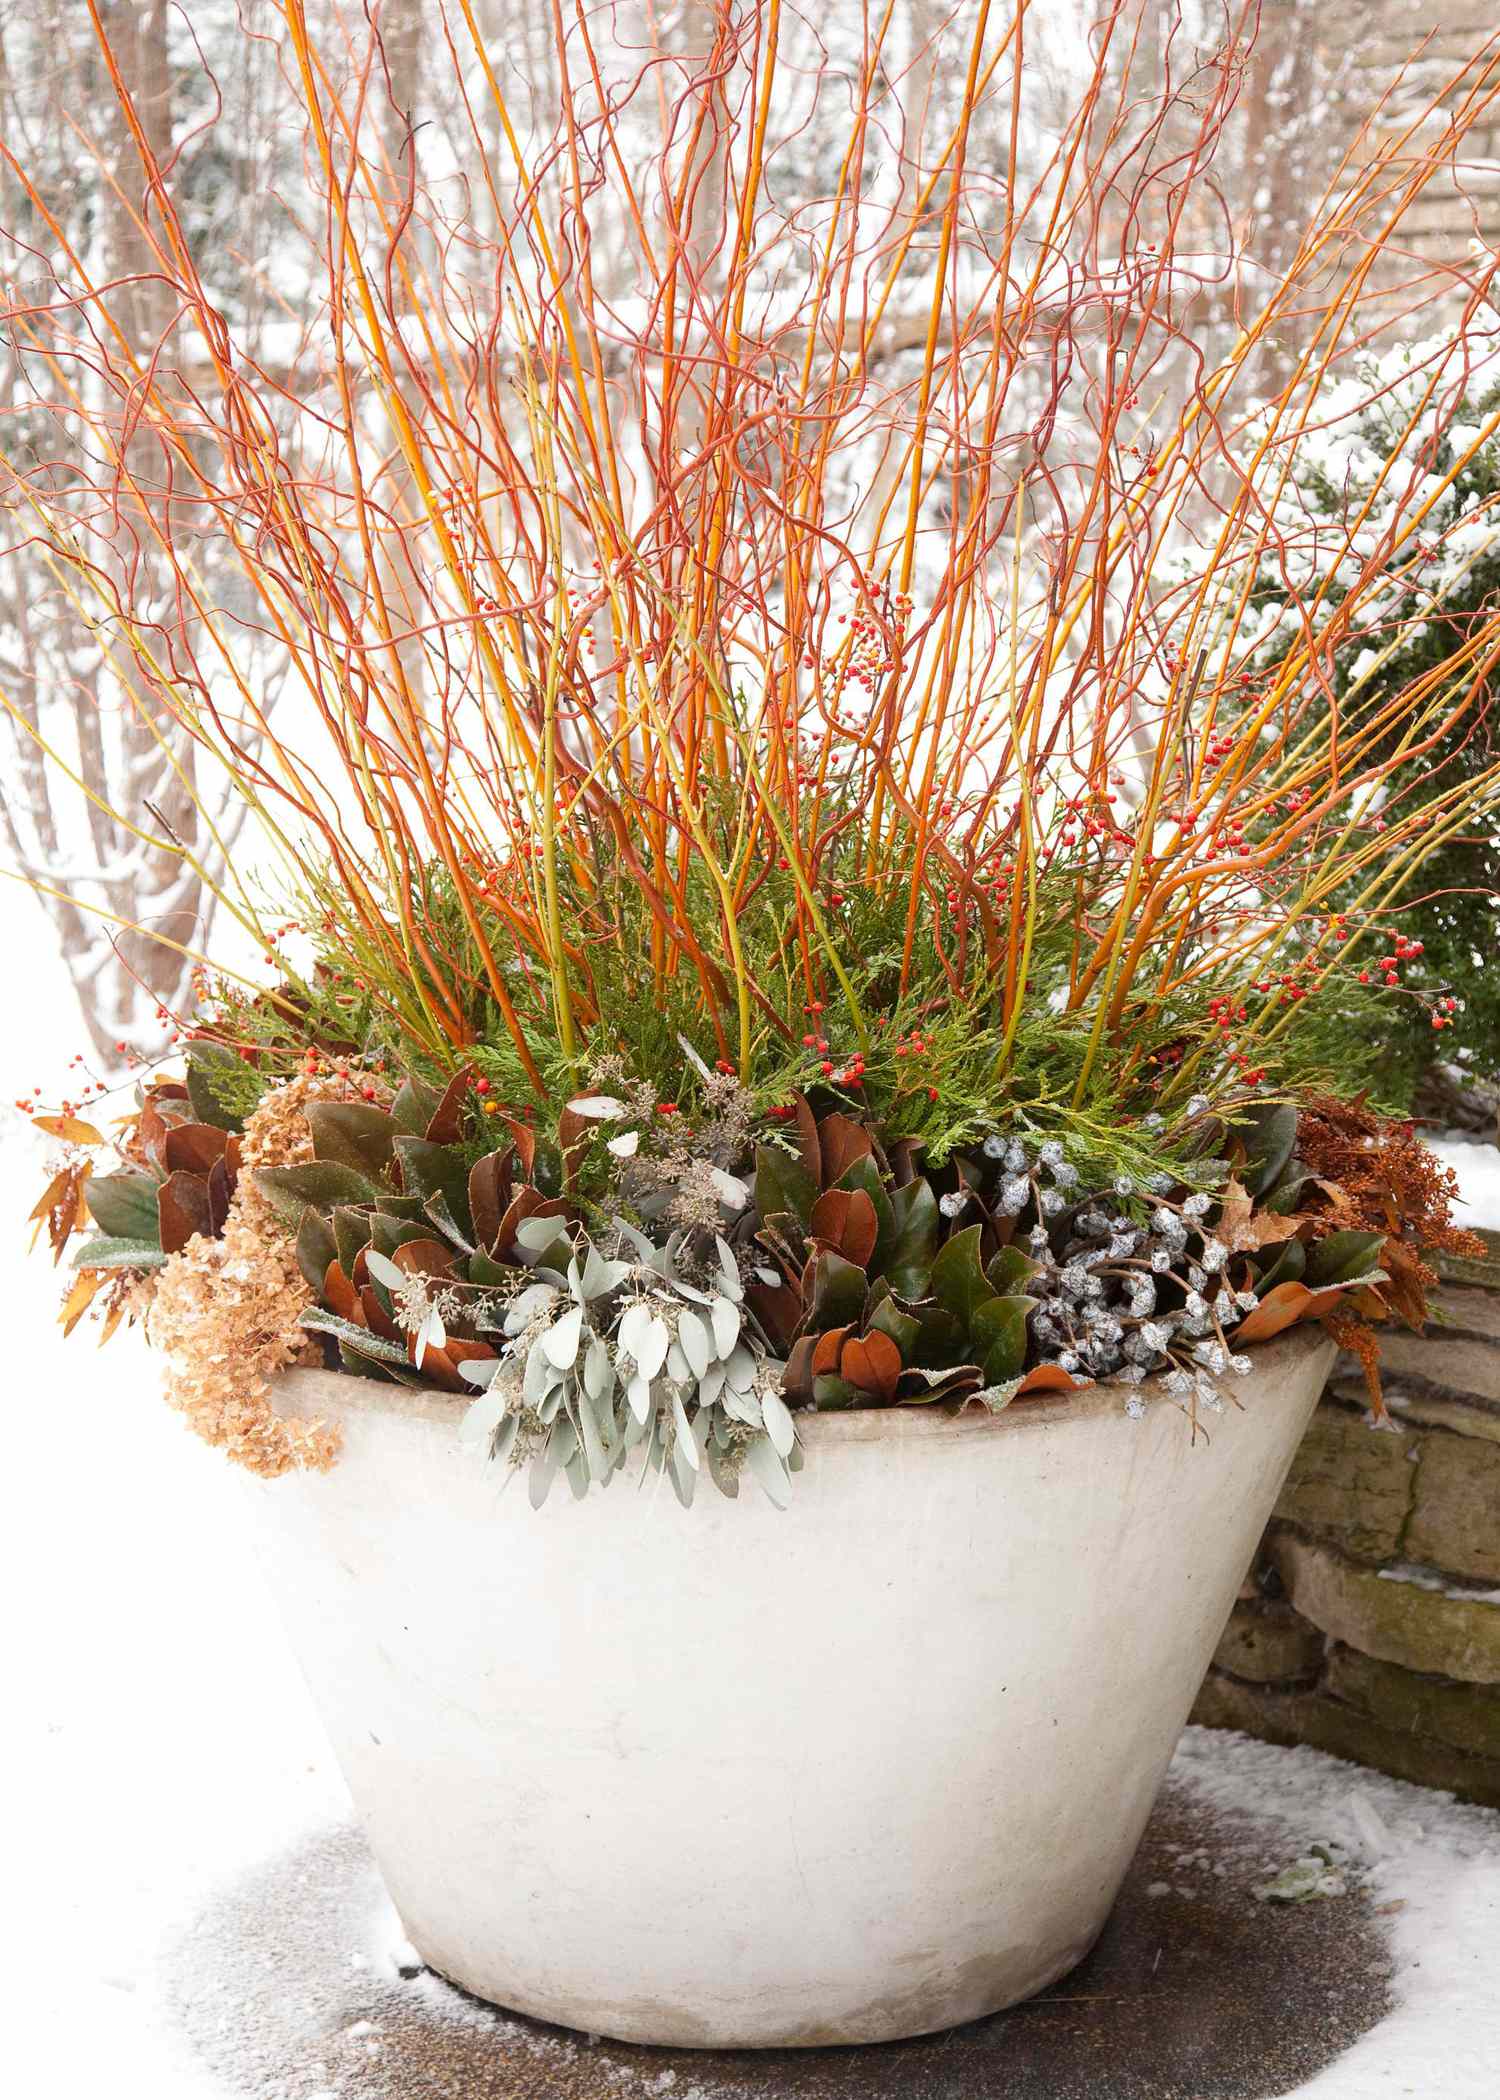
Curly willow is experiencing a huge resurgence in 2026 after being dismissed for years as a clunky 90s trend. Designers are rediscovering it because it’s one of the most affordable ways to add height and a sculptural quality to a winter pot. A bundle of curly willow branches costs about $8 to $15 — a fraction of what you’d pay for tall evergreens or decorative branches. It’s proof that smart, budget-friendly choices can create the most striking results.
14. Rustic Woven Pot with Red Berries and Lotus Seed Pods
Woven planters are charming and they look natural, but here’s the catch: they rot. Snow and rain will soak into a woven pot in a single storm, and freeze-thaw cycles will break it apart. If you love this look, you absolutely must line the interior with a heavy-duty plastic pot or garbage bag. Cut a few drainage slits in the bottom of the bag, but keep the sides sealed. This will keep your beautiful woven pot looking good for several seasons instead of just one.
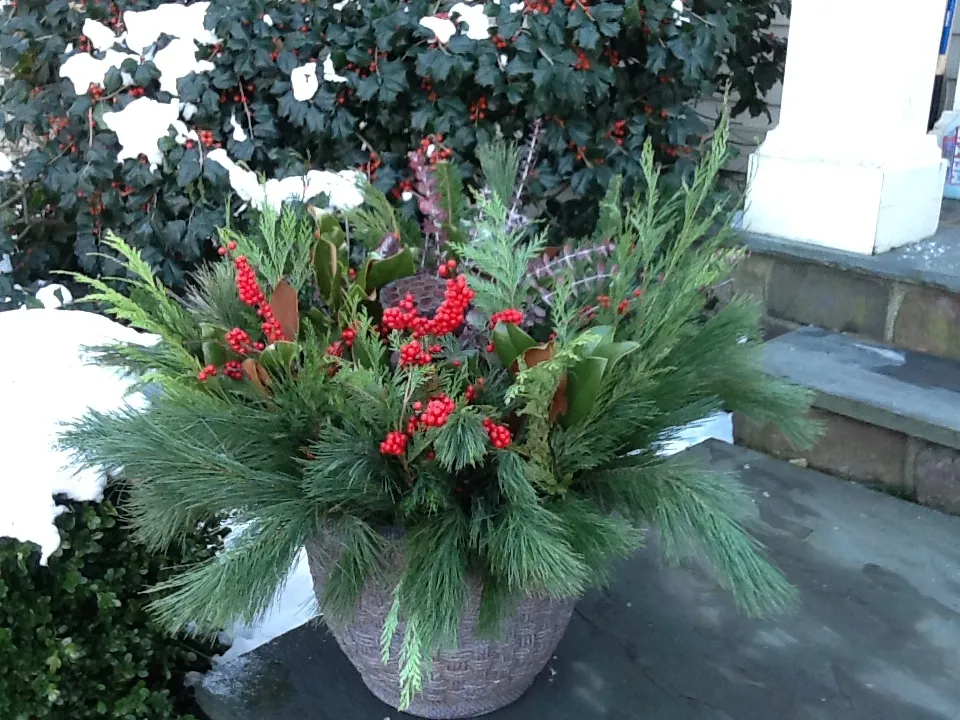
This arrangement works because of the repetition of the bright red berries. They are scattered throughout the deep green and light green branches, creating a visual rhythm that guides your eye around the entire pot. The lotus seed pods provide an unexpected textural surprise — they break up the softness of the greenery and the foliage, adding a structural, almost alien interest that keeps the arrangement from being too ‘fluffy.’ It’s a masterclass in balancing soft and hard textures.
15. Grouped Winter Pots: Dark Urn, Stone Urn, and Rustic Box
This triple-pot display looks expensive, but the rustic wooden box is your budget-friendly entry point. Grab a simple window box from IKEA or a thrifted wooden crate ($10–20), line it with a plastic bag, and fill it with eucalyptus and a set of battery-operated fairy lights ($8). Skip the expensive light stone urn and replicate the look by spray painting a thrifted plastic urn with stone-texture spray paint ($9). Suddenly you have a $300 look for under $50.
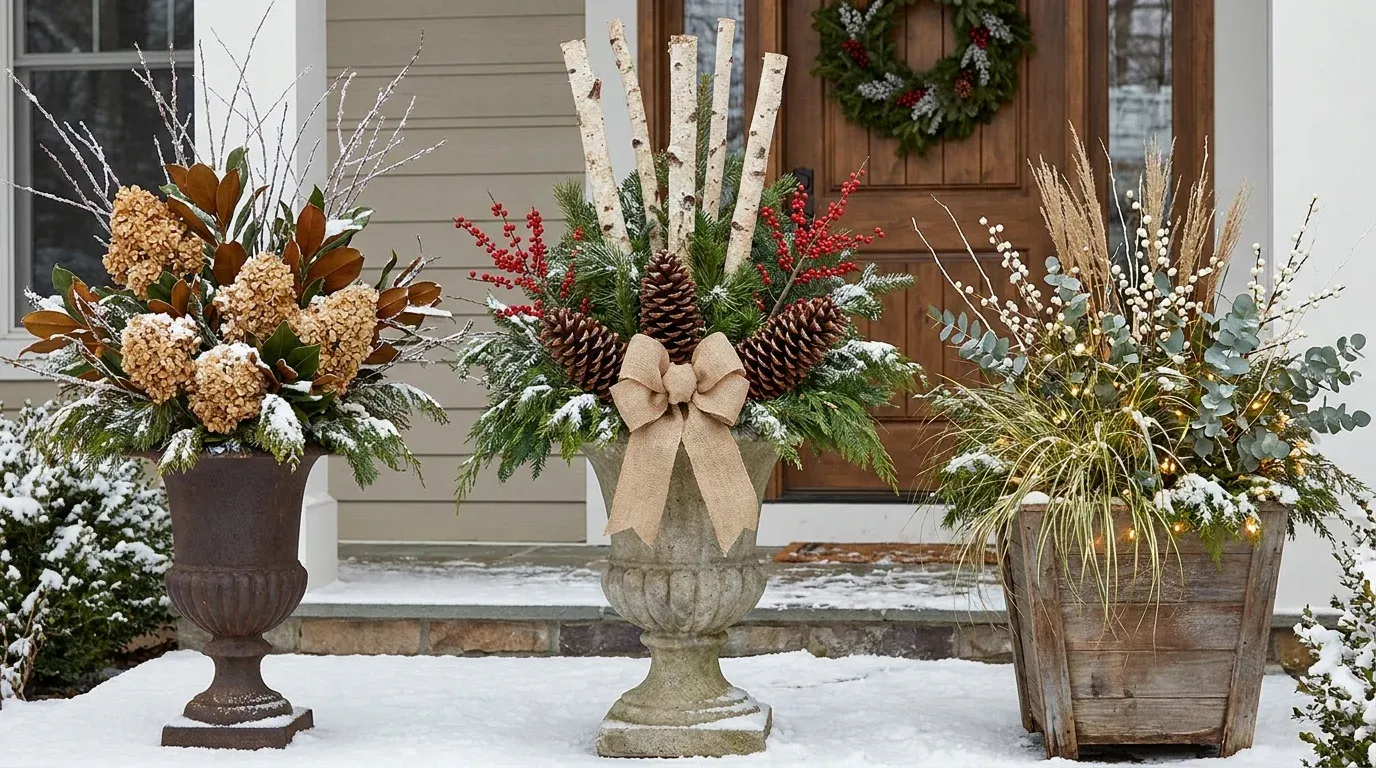
This grouping needs a porch or landing that’s at least 6 feet wide to stage these three distinct heights properly. If your space is tighter, pick your favorite two. The dark metal urn (with dried hydrangeas) and the rustic wooden box (with the fairy lights) create a beautiful duo that reads as intentional. For a smaller stoop, scale down all three pots by choosing shorter stems and smaller containers. It works at 4 feet—just dare to edit.
16. Grey Ornate Pot with Vibrant Red Dogwood Branches
Red dogwood branches need consistent hydration to stay vibrant. If the cut ends dry out, the red bark will fade to a dusty brown and the tiny buds along the stems will shrivel. Plan to recut the stems and change the water (or wet floral foam) every 5 to 6 days. If you’re using a pot without a water reservoir, this arrangement is essentially a 2-week display. For a longer look, invest in a pot that holds water or use a plastic liner filled with wet floral foam.
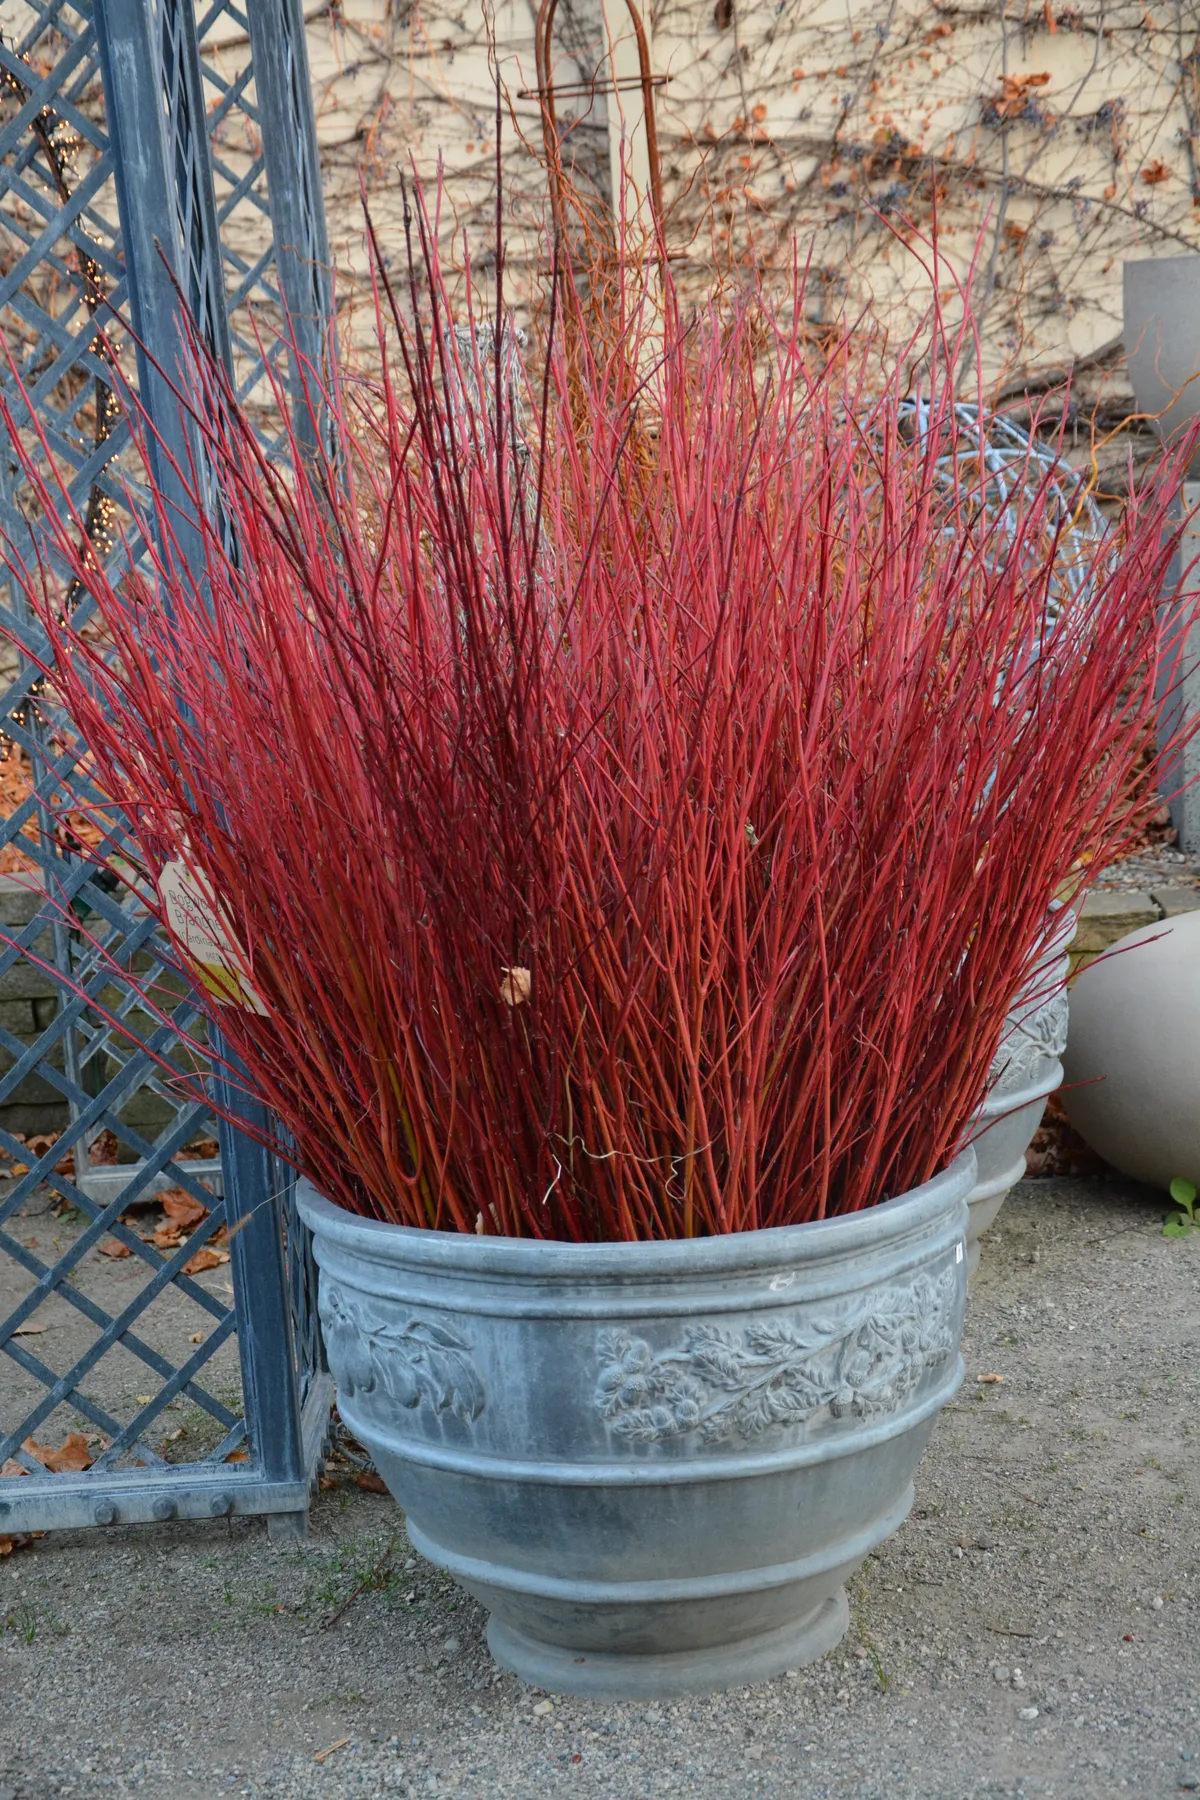
What makes this pot sing is the sheer audacity of the color contrast. The muted grey of the ornate pot with its detailed acorn and floral relief is quiet, refined, and architectural. Against that, the raw, wild energy of the red dogwood branches is a visual explosion. It’s the perfect example of the ‘restraint vs. rebellion’ design principle. The pot provides the structure; the branches provide the soul. Without one, the other would be incomplete.
17. Dark Woven Pot with Whimsical North Pole Signpost
This is a more involved DIY than you might think. Here’s the breakdown:
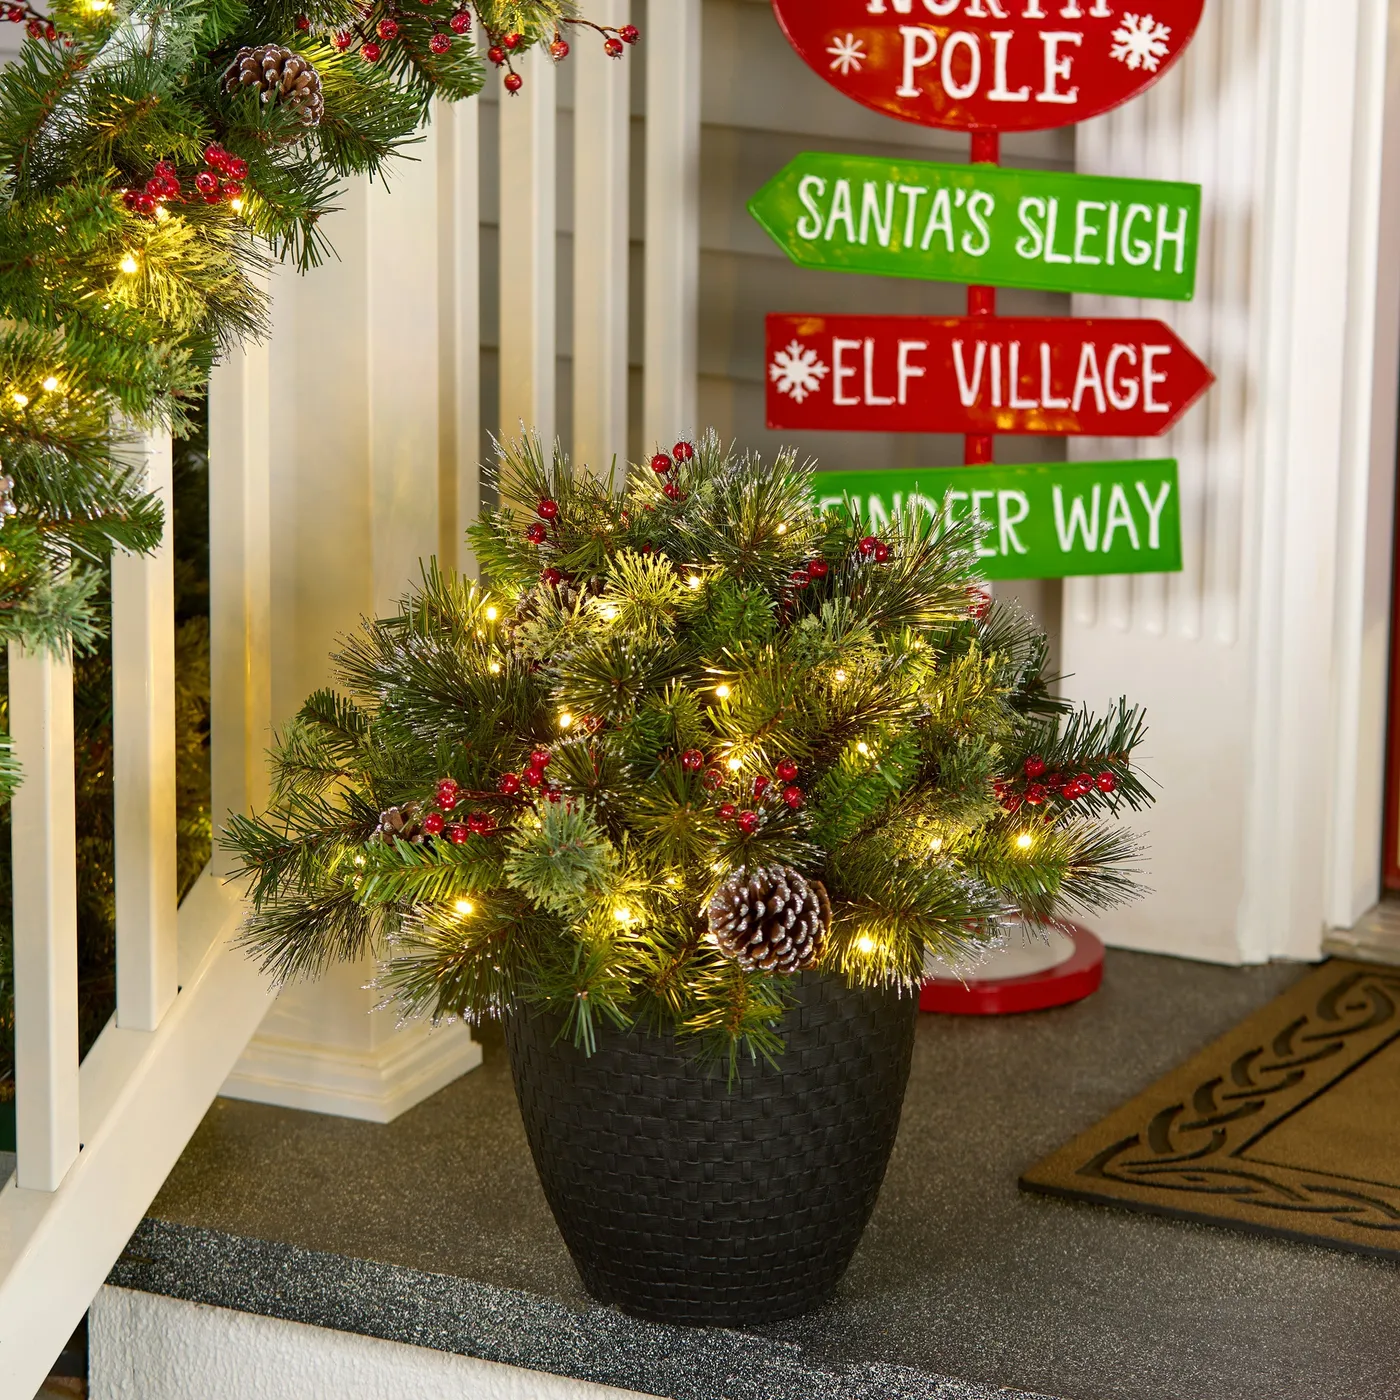
- Dark woven pot: $30–$60
- Artificial pine and spruce branches: $25–$45
- Small warm string lights: $10–$15
- Red berries and frosted pinecones: $8–$14
- North Pole signpost (or DIY kit): $20–$35
For whimsy to feel charming and not cluttery, the base pot needs to be grounded and neutral. A dark, heavily textured woven pot like this one does the job perfectly. It keeps the eye from bouncing everywhere and lets the brighter elements — the red berries, the lights, the signpost — be the stars. If you used a bright red pot here, the whole look would shout too loud and feel less collected.
18. Terracotta Pots with Dark Blue Door and Brass Lantern
Here’s the visual math that makes this British-inspired entry so inviting: 50% neutral stone wall + 30% deep blue door + 15% warm terracotta pots + 5% glowing brass accents. The terracotta pots aren’t the dominant element — they’re a supporting player that adds warmth to a cool stone-and-blue composition. Swap the terracotta for icy blue pots and you’d have a cold, sterile entry. The warmth of the orange clay is what makes the blue feel rich instead of cold.
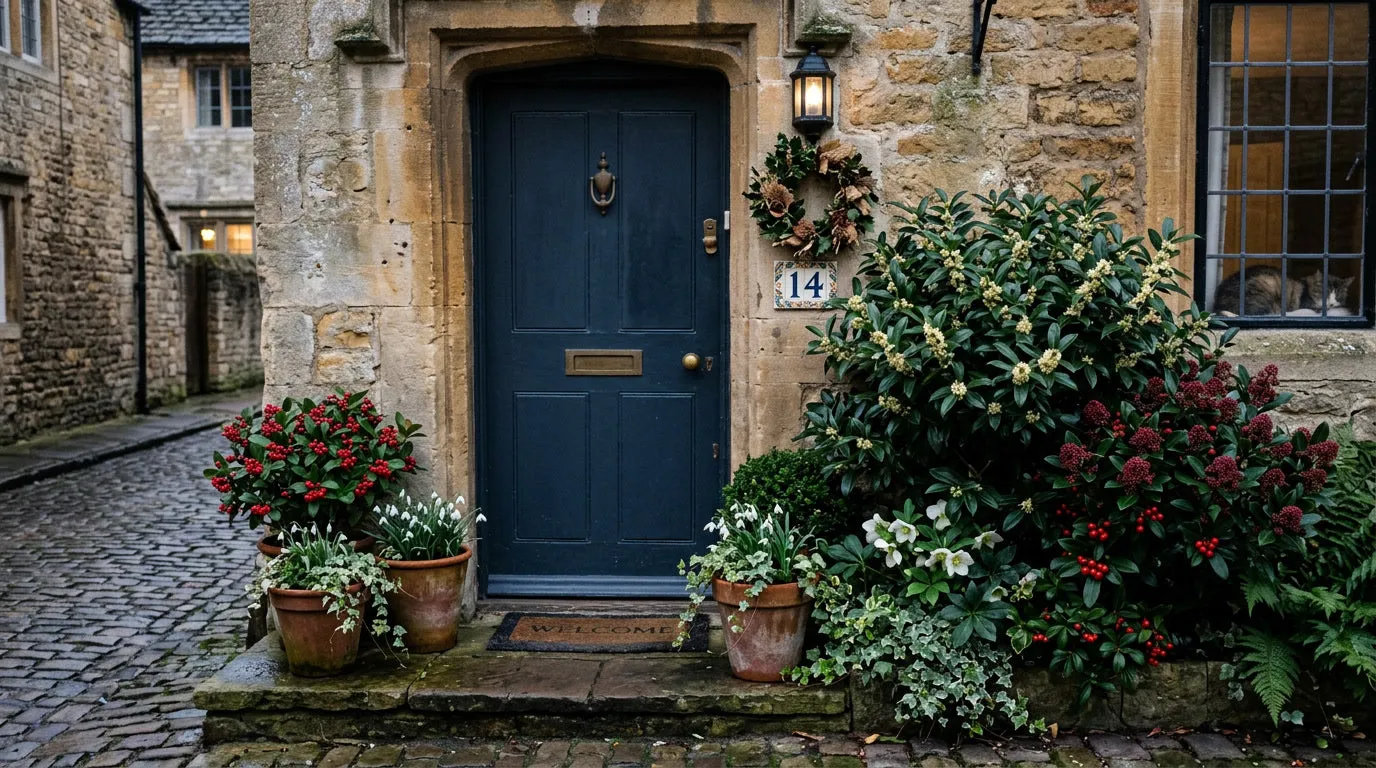
Before you run out and buy a dark blue door, consider your brick. If your house is warm orange-red brick, a navy door and terracotta pots are a beautiful, classic combination. If your house is grey stone or painted white, the same formula gives a cottage feel. Never pair terracotta with pink-toned brick. It creates a muddy, unappealing warm-on-warm look. Terracotta needs cool neighbors to make its strongest statement.
19. Ornate Terracotta Pot with Snow-Covered Boxwood
It’s the snow. Without that layer of white powder resting on the leaves and the rim of the pot, this is simply a boxwood in a pot — a perfectly nice but totally forgettable front entry plant. The snow is what makes it a winter pot. It creates a soft, high-contrast focal point that draws your eye and tells the story of the season. In this arrangement, nature did the hard work. Your job is just to provide the perfect canvas.
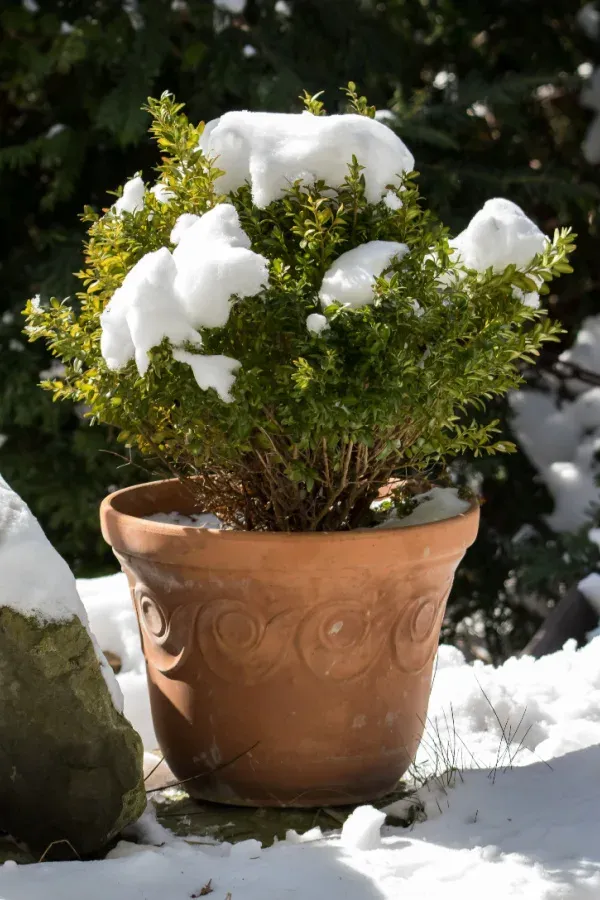
Boxwood is one of the lowest-maintenance winter plants you can choose. It needs very little water in the cold months — overwatering is actually the most common way to kill it in a pot. Check the soil once a week; if it’s dry an inch down, give it a drink. That’s it. No deadheading, no pruning, no fuss. It’s the ultimate ‘set it and forget it’ winter container plant, perfect for anyone who wants a beautiful entrance without a chore list.
20. Terracotta Pot with Red Dogwood and Variegated Foliage
Terracotta is porous and will wick moisture away from the soil, which means your plants will dry out much faster than they would in a plastic liner. In windy winter weather, you can literally watch the water evaporate. If you want to keep your dogwood branches and evergreens hydrated through the cold months, you must use a plastic liner inside the pot. Also, terracotta will crack in a hard freeze if it’s saturated with water. Bring it under a porch overhang during extreme cold snaps to protect your investment.
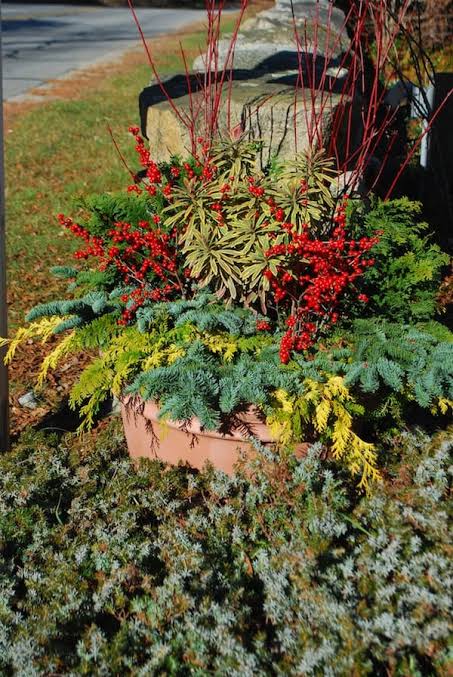
Good news: variegated foliage cuttings are basically free. If you have a neighbor with a pachysandra, ivy, or any variegated shrub, just ask if you can take a few stems for your pot. They’ll spread in a season, so you’ll actually be helping them with a small trim. For the red dogwood, buy one good bundle ($12) and strip it, using thin branches from your yard as the structural filler. You can get this pot looking full and lush for under $30.
21. White Woven Basket on a Stool with Twinkling Lights
Elevating a pot on a stool is a deliberate design move that creates a tiered display. It lifts the arrangement to eye level, making the tiny details — the string lights, the golden berries — more visible from the street or sidewalk. The magic number here is 8 inches. You want the top of the arrangement to sit right around curtain sill height if it’s near a window. Any taller, and it blocks the interior view. Any lower, and it looks like it’s just floating without purpose.
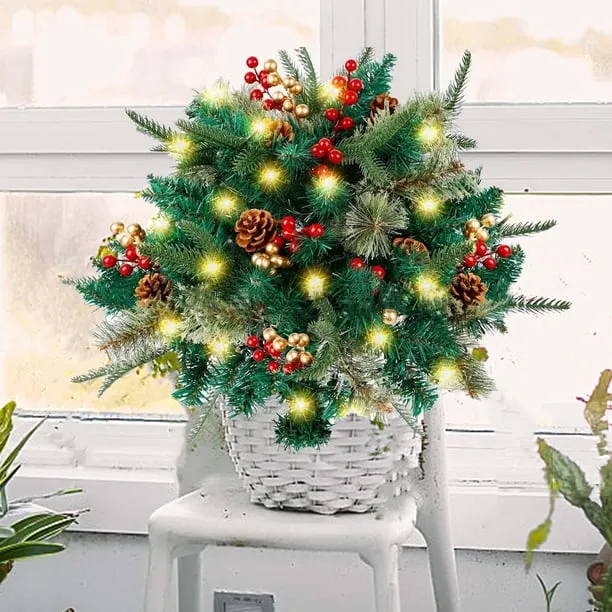
This look is best suited for a compact porch, landing, or even a small balcony where you can’t fit a large urn. The total footprint is roughly 3 feet by 3 feet. It works because the stool and the basket create two distinct horizontal lines, giving the arrangement a sense of structure that a single pot on the ground would lack. For a wider porch, scale up the basket and use a larger, sturdier stool, but keep the overall height window-appropriate.
22. Dried Floral Transition Pots with Mums and Cabbage
Seasonal-bridging pots are big in 2026. Instead of staging a full holiday swap, designers are building ‘transitional’ containers that bridge fall and winter. The tall dried stalks here are the genius move — they provide winter structure that lasts long after the mums and cabbages fade. It’s a sustainable, budget-savvy approach that saves you from buying an entirely new pot for every single holiday. You just swap out the seasonal flowers at the base as the months pass.
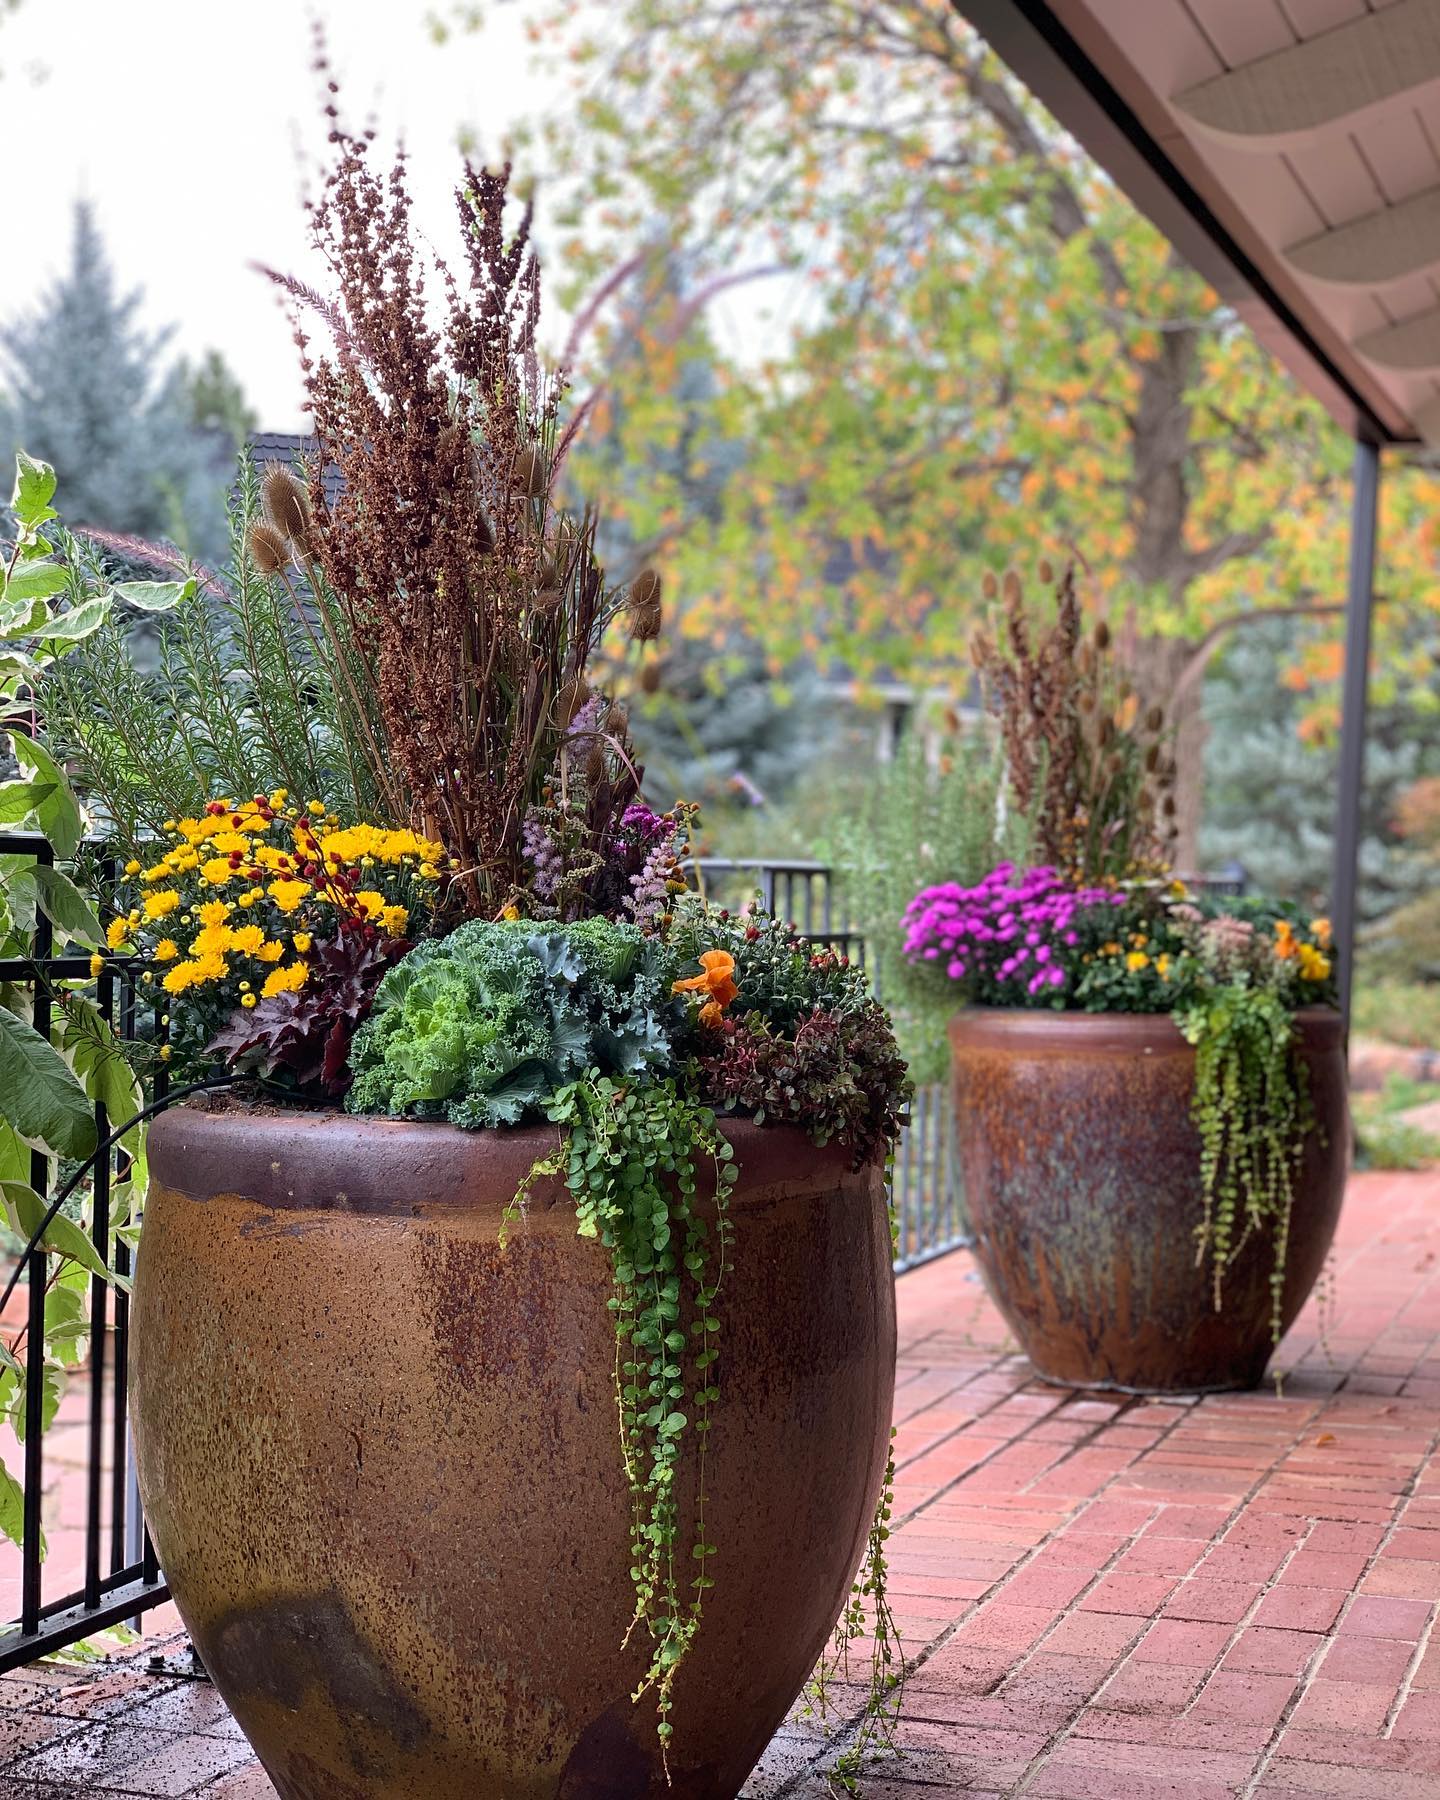
- The tall dried stalks act as a natural structural anchor, drawing the eye upward within the brick entryway.
- The vibrant yellow and purple mums create a warm color bridge between the brown dried stalks and the green trailing foliage.
- The ornamental cabbage adds a textural focal point at the rim level, tying the pot into the overall brick-and-plant composition.
23. Red Burlap Ribbon-Wrapped Greenery with Frosted Pinecones
Here’s how to make a show-stopping burlap bow for your pot, the trick that instantly upgrades a bunch of branches into a curated design:
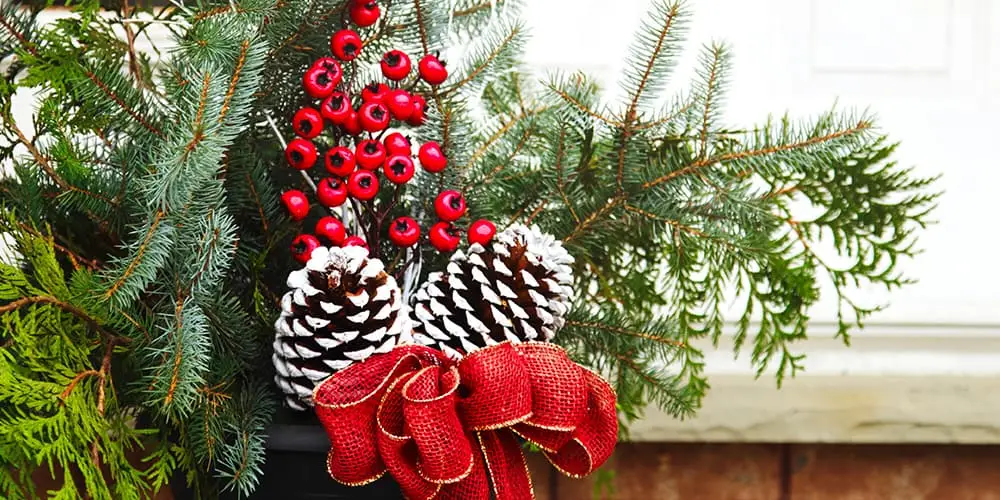
- Cut a 4-ft strip of red burlap ribbon with gold edges.
- Fold the ribbon into 8-inch loops, pinching the center.
- Wrap a green garden wire tightly around the pinched center of the loops.
- Fluff each loop individually to create volume, then attach the bow to a long wire stem.
- Insert the wire stem deep into the center of your greenery arrangement.
Here’s what you’re looking at for this polished, festive arrangement:
- Mixed evergreen branches: $15–$25
- Bright red berry clusters: $6–$10
- Frosted pinecones: $4–$8
- Red burlap ribbon: $5–$8
- Dark pot (partially visible): $20–$40
24. Dark X-Pattern Planters with Crotons and Ornamental Cabbage
The visual formula for these bold planters is: 40% deep charcoal structured pot + 30% vibrant multi-colored croton foliage + 20% pale green textural cabbage + 10% trailing green vines. The dark pot is the anchor. Without it, the wild, tropical colors of the crotons would just look messy. The cabbage provides a surprisingly architectural center, while the crotons bring the party. It’s a controlled explosion of color.
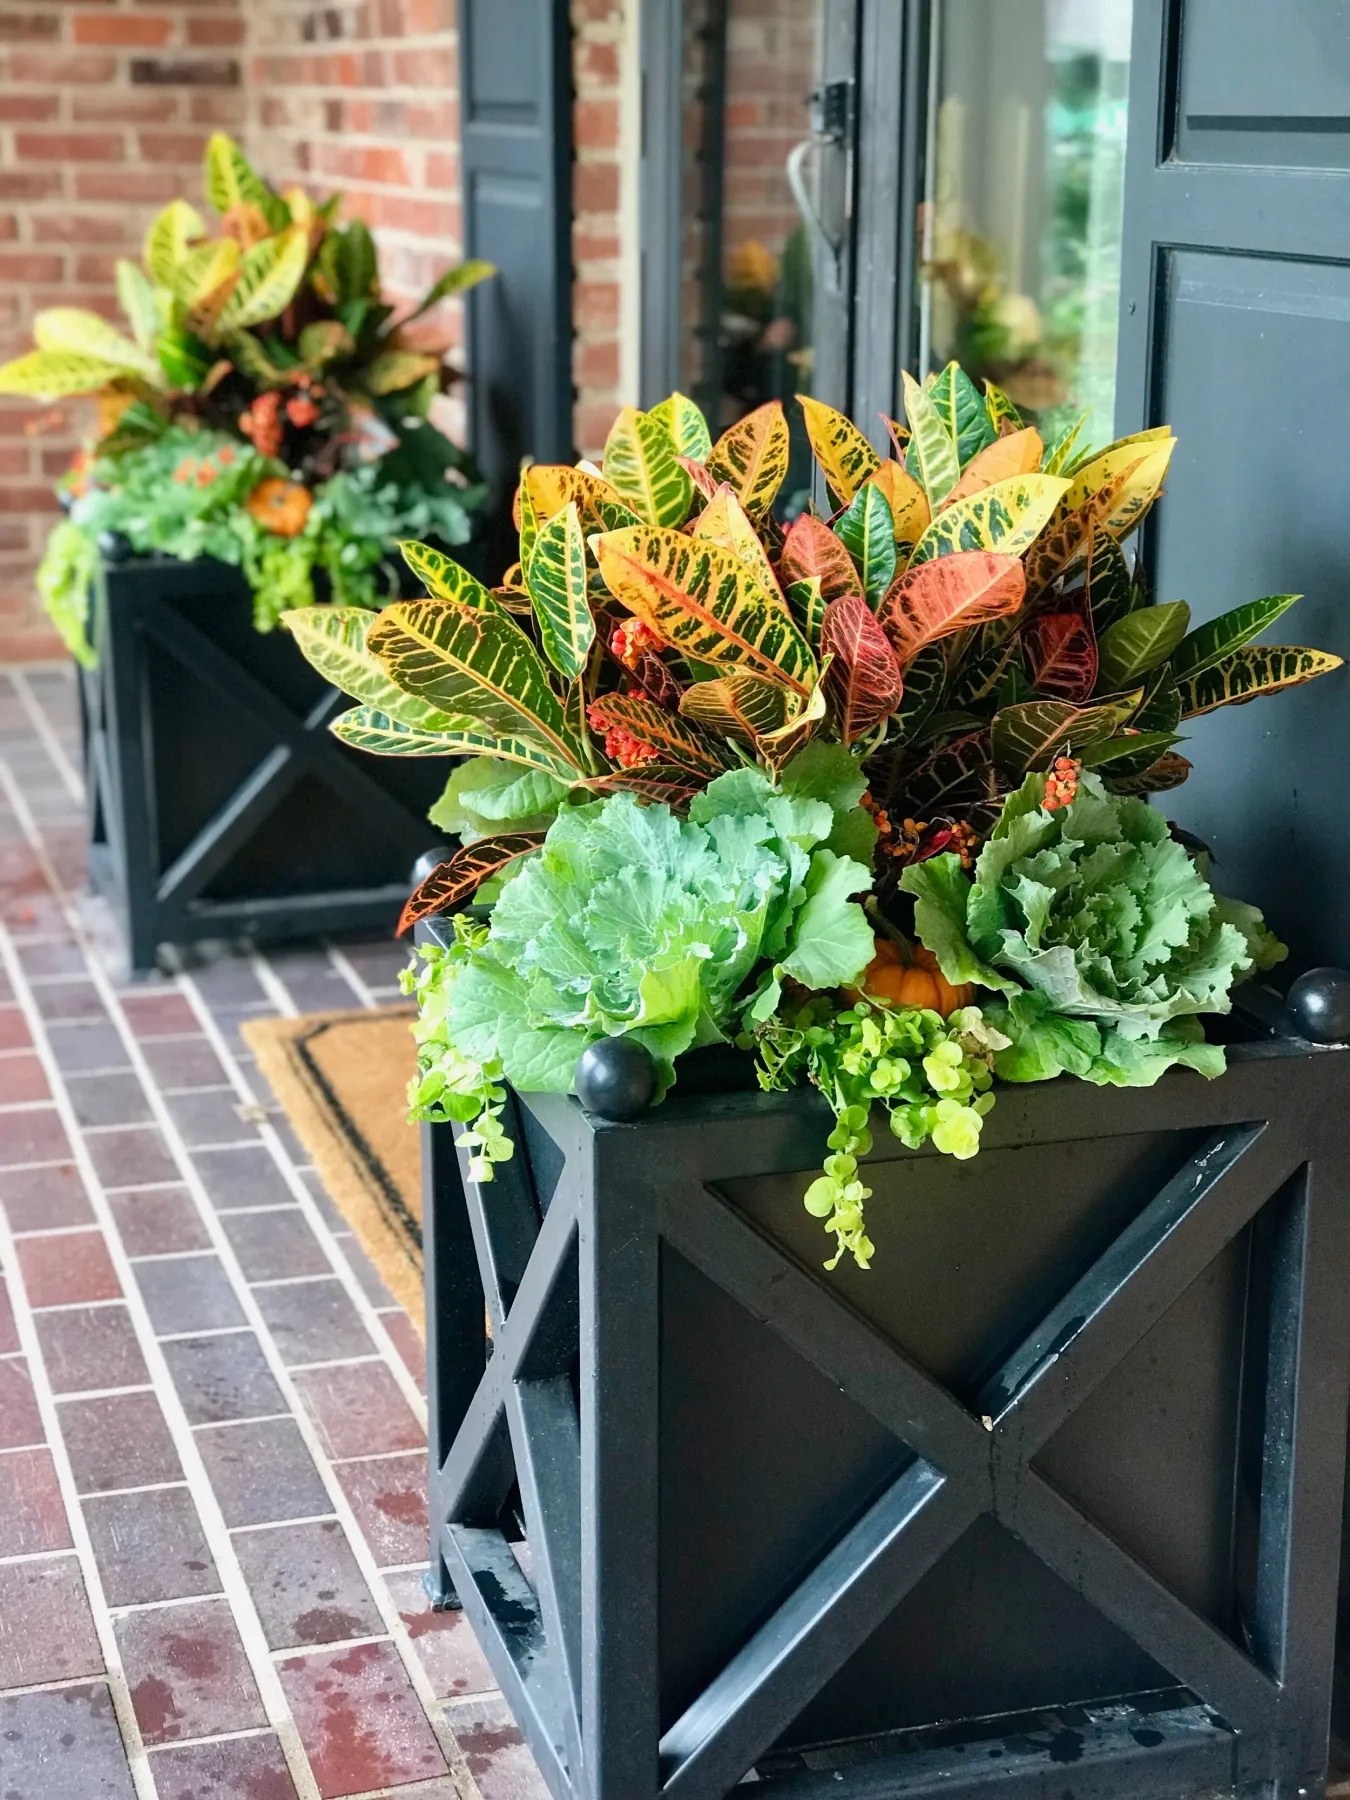
Crotons are tropical plants that need bright, indirect light to keep their vibrant colors. If you place them in too much shade, the leaves will turn a uniform green, and you’ll lose the stunning yellow, orange, and red variegation. Place these pots in a sunny, sheltered spot on your porch where they’ll catch the morning light but be protected from harsh afternoon rays. In cold climates, these are temporary summer-to-fall plants; bring them inside before the first frost or budget to replace them.
25. Conical Evergreen with Chartreuse Trailing in Dark Pot
It’s the chartreuse trailing plant. A tall conical evergreen on its own is a very structured, almost formal element — think government building entrance. But that soft, lime-green spill of trailing foliage over the edge of the dark gray pot completely transforms the personality of the arrangement. It adds a relaxed, organic counterpoint to the strict geometry of the tree. This one plant is what saves the look from being stiff.
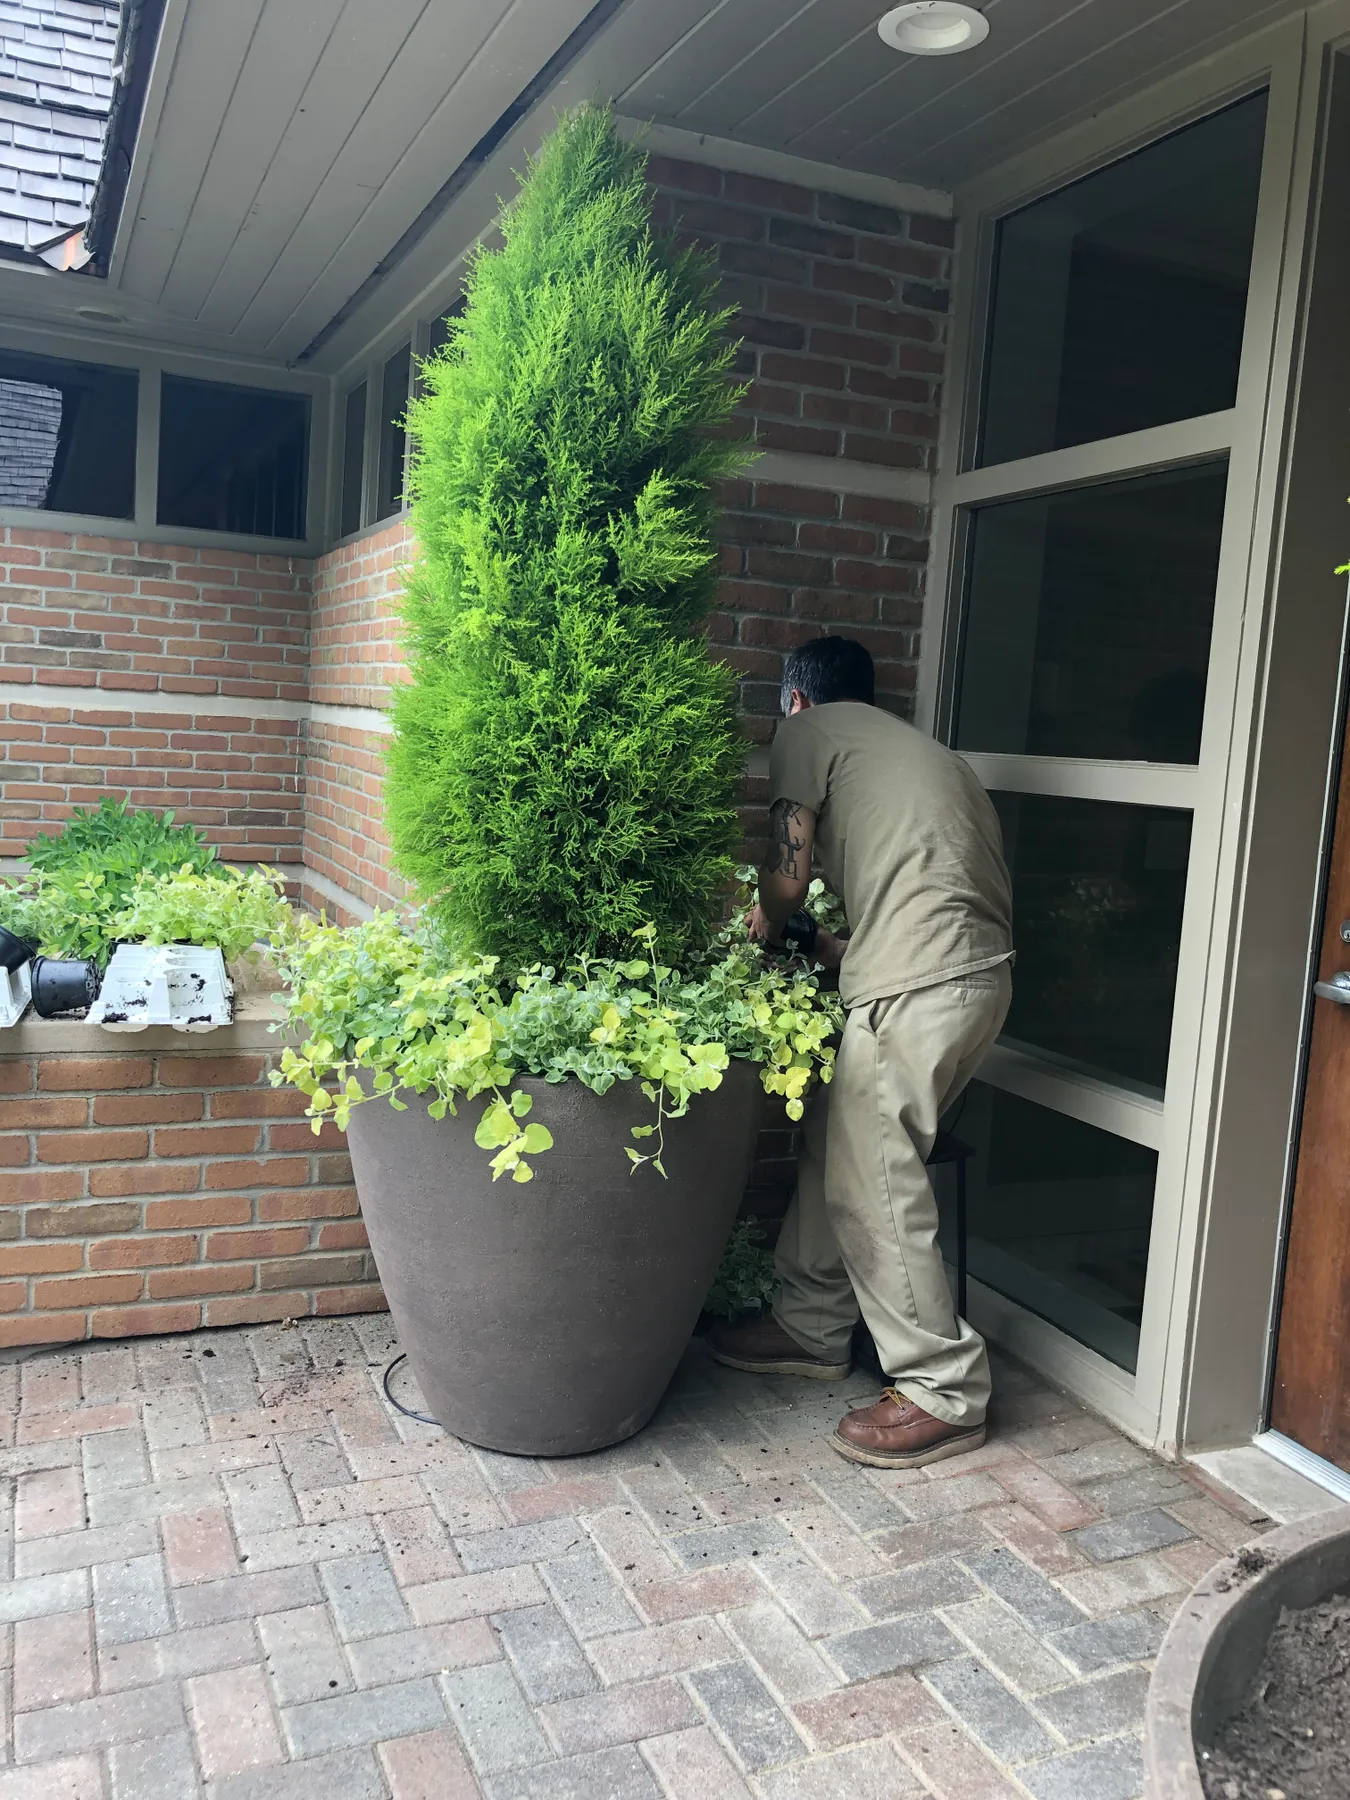
This planting works best in a wider, shallower pot rather than a deep urn. The roots of the conical tree need depth, but the trailing plant needs room to spread horizontally. Look for a pot that is at least 20 inches in diameter but no more than 14 inches tall. This combination will create a beautiful ‘short and wide’ profile that is incredibly satisfying to look at from an approaching angle. It’s a classic foundation planting style scaled for container life.
26. Painted Two-Tone Pot Collection with Trailing Greens
Painted pots are the easiest and cheapest way to refresh your entryway for 2026. You can create this entire collection (black, white, and brown geometric patterns) by buying plain terracotta pots from any garden center ($2–$6 each) and hitting the craft store for a roll of painter’s tape and a few spray paints. The striped pot is just tape and spray. The geometric pattern is a bit more involved but doable with a steady hand or stencil. Total cost for the pot collection: under $30.
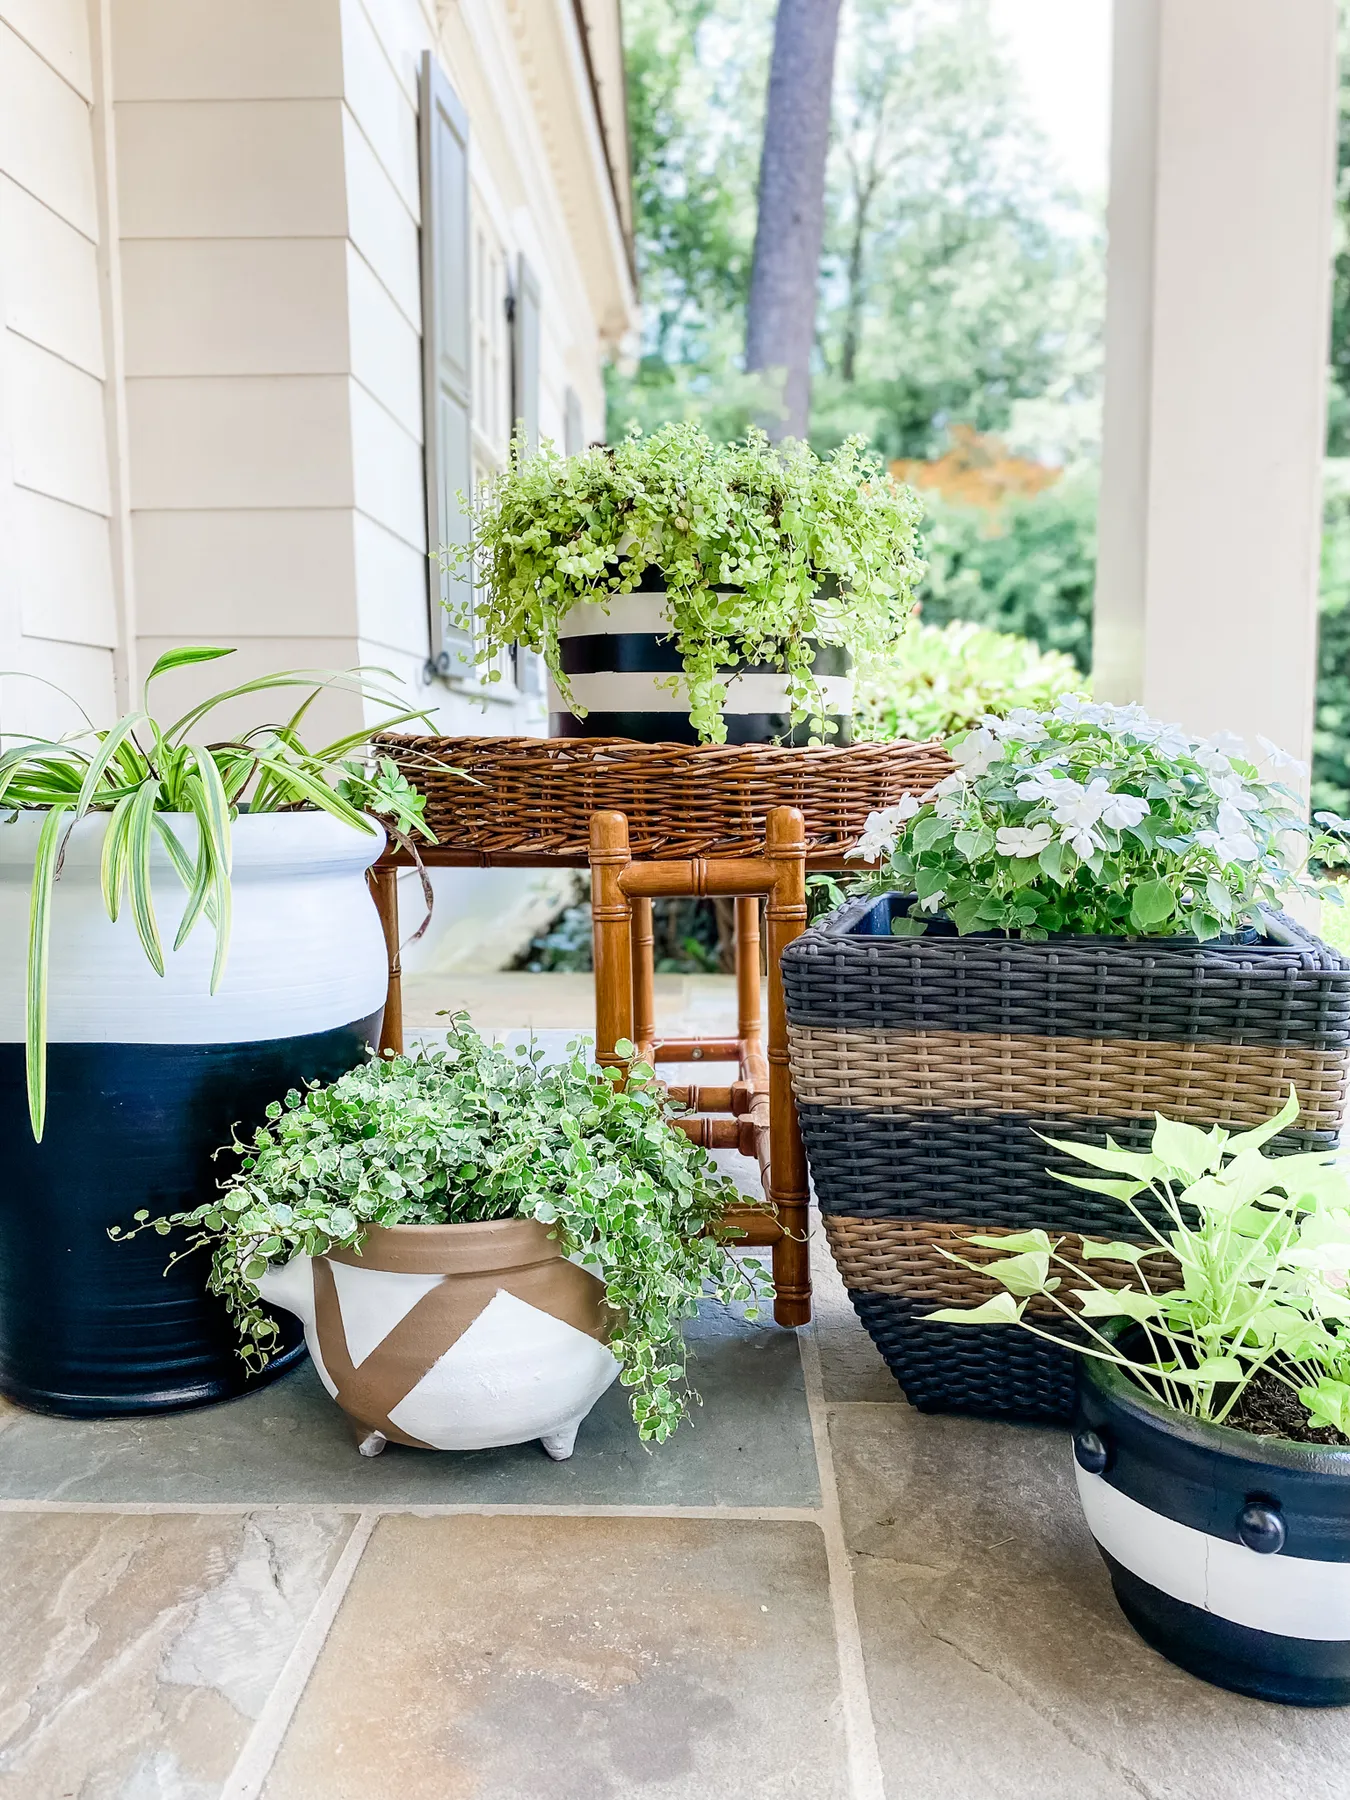
When painting pots, always use a spray paint that is labeled for both plastic and clay, and apply a sealer. More importantly, leave the bottom inch of the pot unpainted so the terracotta can still breathe and wick moisture. If you paint the entire pot, moisture gets trapped and the paint will peel in a single season. The plants themselves are a bonus — the real design here is the pot collection. Choose full, trailing houseplants that will spill over the painted rims to soften the geometry.
27. Weathered Teal Pot with Yellow Bell Flowers and Grasses
This arrangement works because of a masterful application of color contrast. The weathered teal green of the pot is a cool tone that sits opposite the warm yellow of the bell flowers on the color wheel. This complementary contrast creates a natural vibration that makes both colors look more vibrant. The variegated grasses add a neutral third party that gives the eye a place to rest. It’s a sophisticated painterly palette that feels straight out of an English cottage garden.
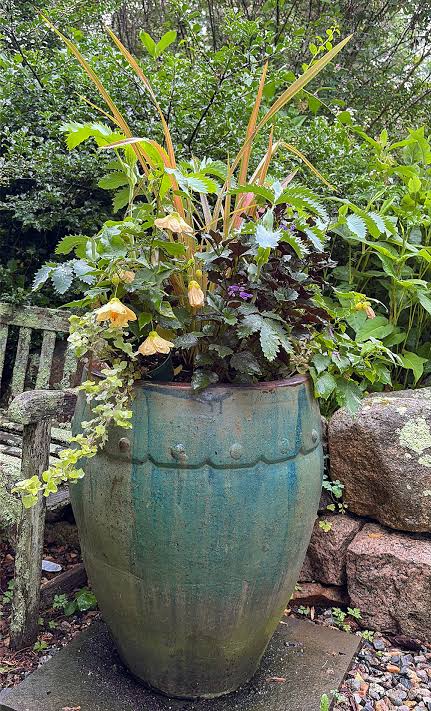
Teal glazed pots look best when they show some weathering. Don’t panic if the finish starts to craze or fade in the sun. This ‘antiqued’ look is exactly what makes a teal pot feel expensive and established rather than bright and cheap. To speed up a weathered patina, you can gently rub the pot with fine-grit sandpaper in a few spots before planting. This mimics years of natural wear and tear.
28. Dark Textured Pot with Gold Spheres and Red Branches
Here’s the budget to recreate this full, lush arrangement:
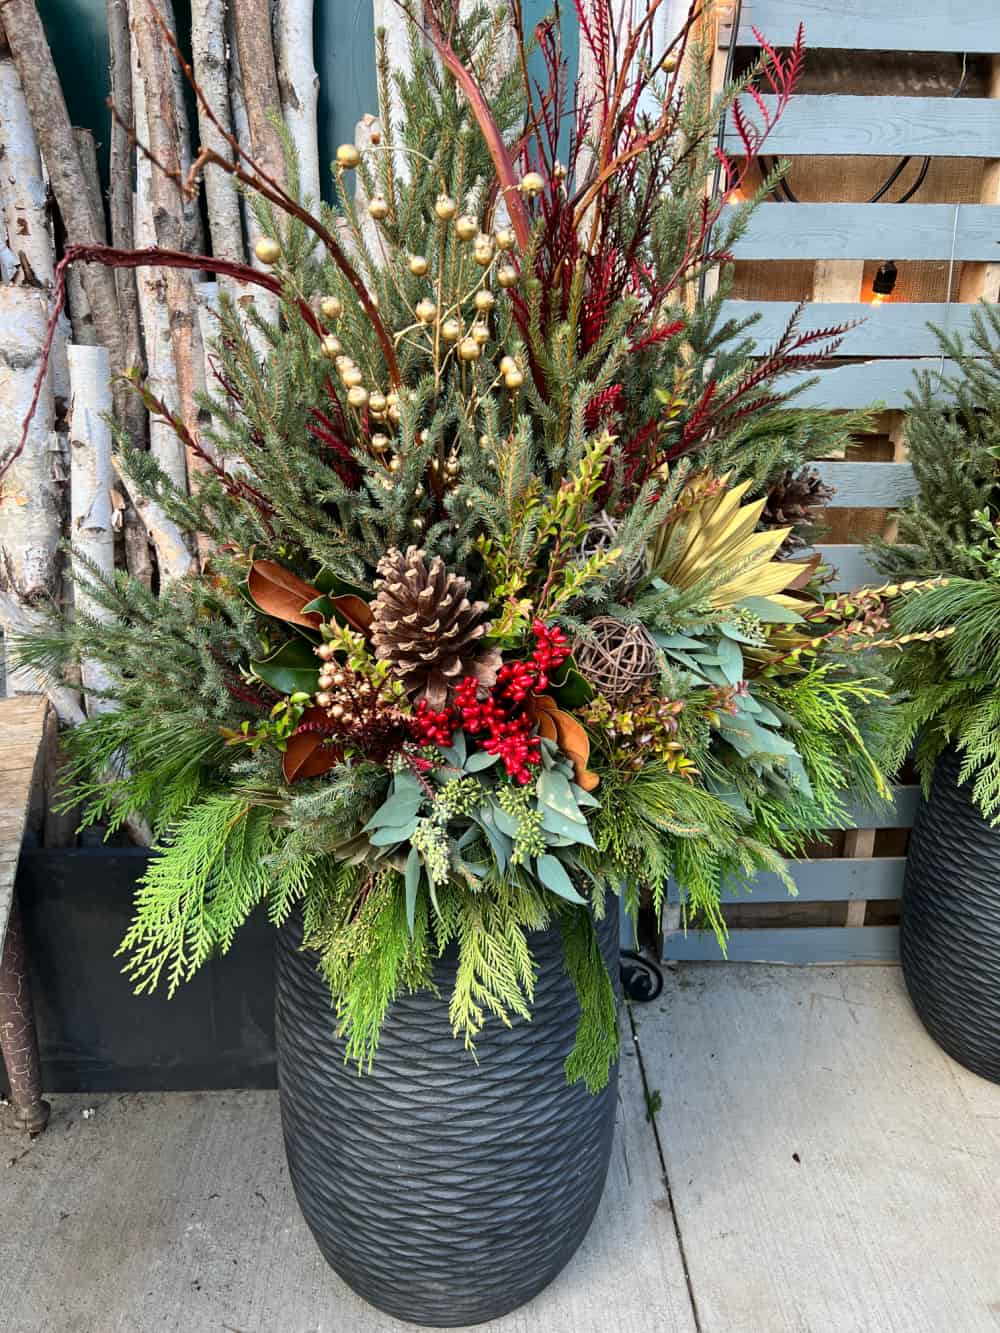
- Dark textured planter: $40–$100
- Mixed evergreen branches: $25–$40
- Red branches and red berries: $15–$25
- Gold decorative spheres (set of 6): $10–$18
- Pinecones: $6–$10
The gold spheres are the first thing to show wear. Gold paint on budget ornaments flakes off in cold, damp weather, leaving you with ugly brown spots. To avoid the ‘shedding glitter’ disaster, seal your gold spheres with a clear matte sealer before placing them in the arrangement. Also, stick with matte gold rather than high-shine. The matte finish looks more like real metal, is far less reflective, and hides scratches and scuffs much better over the course of a long winter season.
29. Turquoise and Blue Glazed Pots with Diverse Textures
Glazed ceramic pots look their best when grouped in odd-numbered clusters of three. The varying heights of the spiky grasses, broad leaves, and compact evergreens in this collection create a miniature landscape. For this to read as intentional, the largest pot should be at least 14 inches tall, the middle pot around 10 inches, and the smallest around 6 inches. Place them on a wooden bench or slate surface that contrasts with the glossy glaze to make the colors pop.
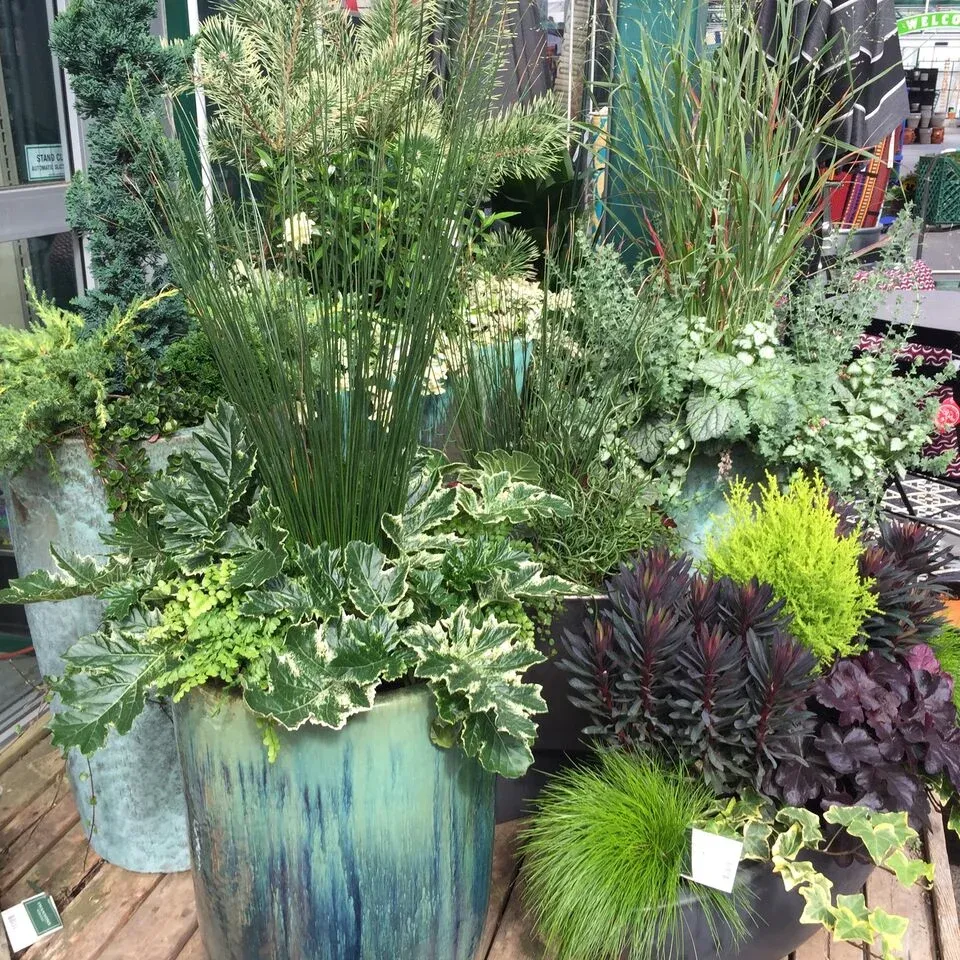
The visual formula that makes this collection sing is: 30% spiky upright grasses + 30% broad variegated leaves + 20% trailing or groundcover elements + 20% compact evergreen shrubs. This ensures there is a dramatic range of heights and textures in every pot. Even if your pots are different colors, sticking to this texture formula will make them read as a cohesive collection instead of a mismatched jumble.
30. Terracotta and Green Glazed Pot Mix with Early Spring Flowers
Early spring bulbs like crocus and miniature daffodils need a cold stratification period. If you keep these pots in a warm garage all winter, they will just grow leaves and no flowers. They need to feel the chill of winter to trigger spring bloom. Also, terracotta is porous and can crack in freezing winters. If you live in Zone 6 or below, bring your terracotta treasures inside or wrap them in insulating bubble wrap during hard freezes. The green glazed pot is much hardier, but still check for hairline cracks after a frost.
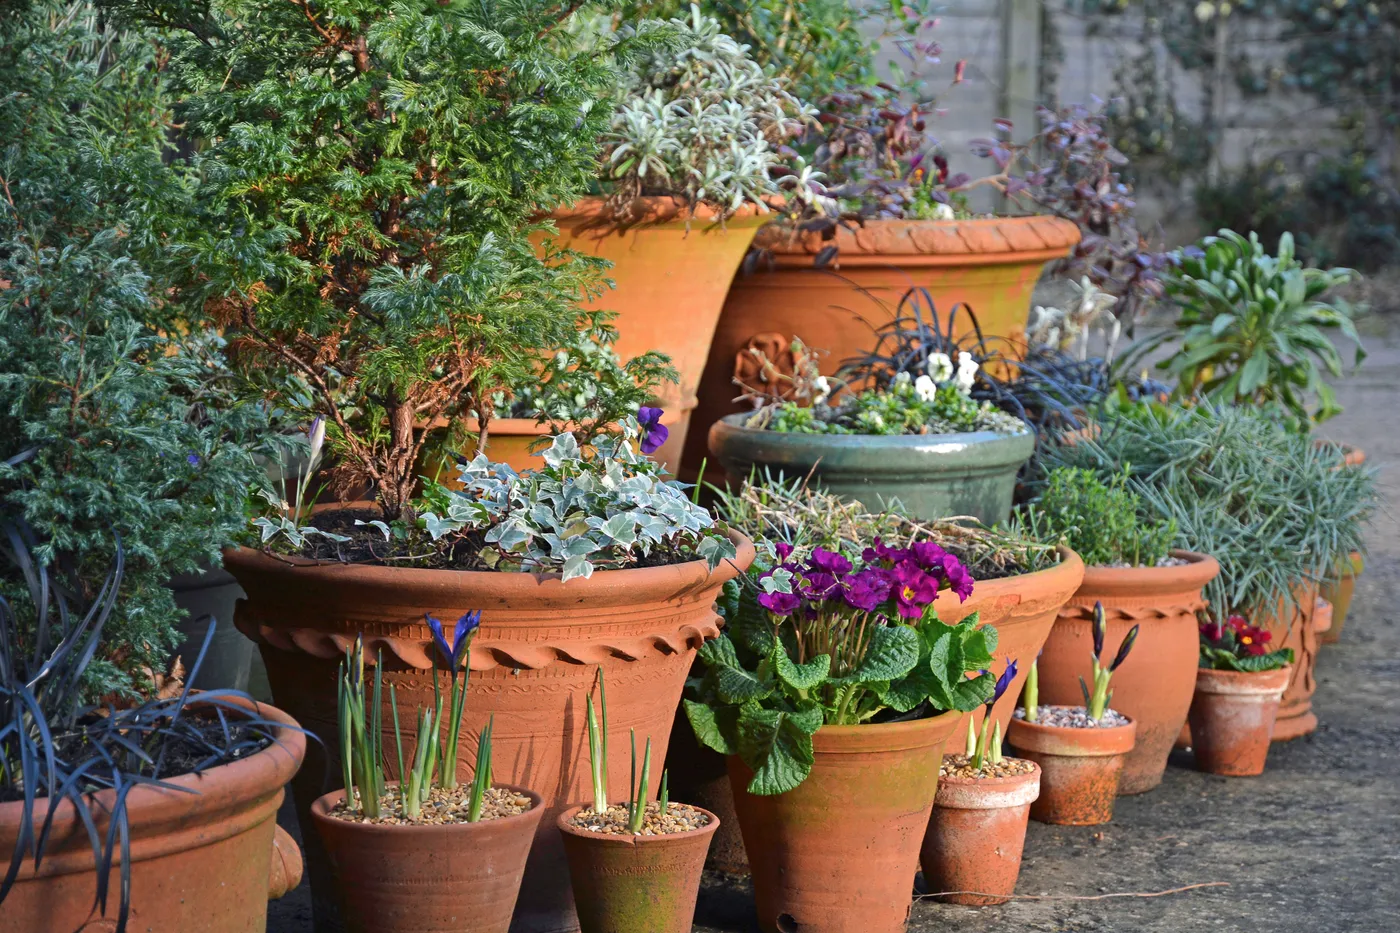
Check these off before committing to this mixed-pot look:
- Know your hardiness zone. These blooms work best in Zones 4–8 if left outside.
- Have a protected spot (like an unheated garage) if a deep freeze is forecast.
- Confirm the green glazed pot has a drainage hole — many don’t, and bulbs will rot.
- Group the pots closely together so they create a microclimate and look intentional.
31. The HGTV-Inspired Foundation Seasonal Pot
Building the perfect foundation pot is simple with the ‘Thriller, Filler, Spiller’ method. Here’s how to apply it:
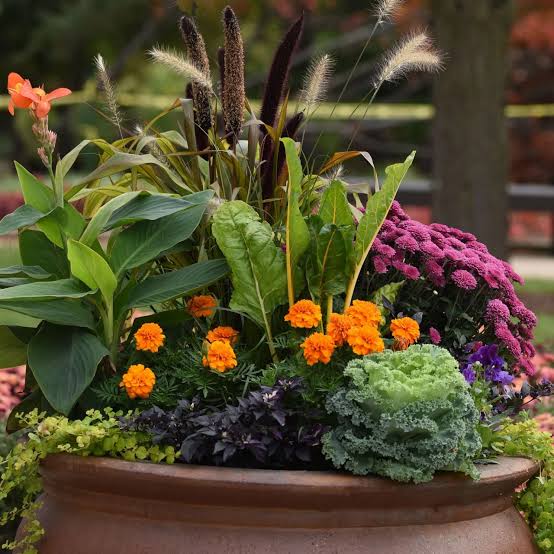
- Thriller: Start with a tall, dramatic element in the center — a compact evergreen, a bundle of curly willow, or tall dried stalks.
- Filler: Surround the thriller with rounded, mounding plants or branches — mums, evergreens, ornamental cabbage.
- Spiller: Add trailing plants or cascading branches (ivy, licorice vine, eucalyptus) around the edge of the pot.
- Seasonal Accents: Tuck in pinecones, berries, or ornaments into the gaps, always in odd numbers.
gathering your materials, check these boxes:
- Measure the height of your empty pot. Your thriller should be 1.5 to 2 times the height of the pot.
- Know your sun exposure. The pot’s location (full sun, full shade) determines which plants will thrive.
- Have a plan for water. Does your pot have drainage? Are you using fresh cut branches that need water or tolerant succulents?
Your Winter Porch Pot Story Starts Here
Whether your style leans toward whimsical signposts or restrained sculptures of birch and magnolia, the 31 ideas in this guide prove that winter porches don’t have to be a wasteland. The best arrangement is the one that makes you smile every time you pull into the driveway. 📌 Pin this guide to your favorite ‘Winter Porch Decor’ board on Pinterest — it’s the one you’ll come back to every single season when inspiration runs dry.