You know that feeling when you find a pin-worthy DIY project, but the materials list costs a fortune? What if we told you the most stylish home decor finds for 2026 are waiting for you right at the Dollar Tree? After filtering through hundreds of options, we’ve found the best and brightest projects that look shockingly high-end. We’ve pulled together 29 genuinely chic DIY ideas covering everything from rustic farmhouse charm to elegant holiday decor. In 2026, it’s all about sustainable style and personalizing your space without the massive budget, and these projects prove you can have a beautiful home for less. And stay until the end — we break down the most common mistakes that can ruin these looks.
📌 Save this to Pinterest for later — you’ll want to revisit these ideas.
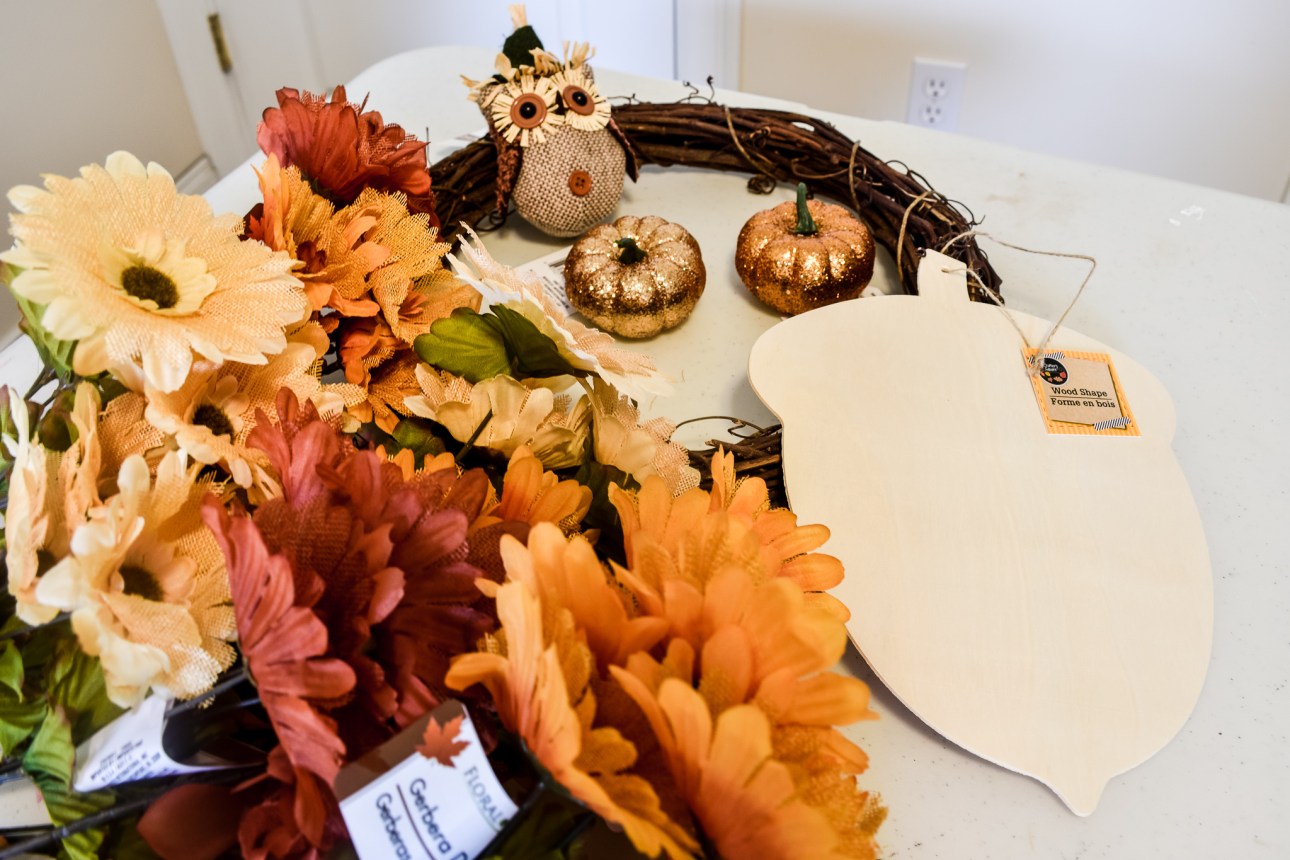
1. Craft Your Own Autumnal Wreath with Faux Flowers and a Wood Acorn
This project is the perfect way to welcome fall, and it comes together in under an hour. It’s all about layering simple, affordable pieces to create a rich, textured look that feels personal and handmade.
⚠️ Real Talk
How-To Brief
- Start by separating your faux gerbera daisy stems. Plan their placement on the grapevine wreath form before gluing anything down.
- Using a hot glue gun, secure the largest flowers first, spacing them out evenly around the wreath.
- Fill in the gaps with the smaller flowers, the burlap owl, and the glitter pumpkins. This is where you create depth!
- Finally, find the perfect spot for your wooden acorn cutout—it serves as a lovely focal point. Let everything dry for 20 minutes before hanging.
Budget Breakdown
- Grapevine Wreath: $1.25
- Faux Gerbera Daisy Stems (3): $3.75
- Wooden Acorn Cutout: $1.25
- Glitter Pumpkins & Burlap Owl: $2.50
- Hot Glue Sticks: $1.25
- TOTAL: $10.00
- Budget alternative: Forage for a natural grapevine wreath and pinecones to bring the cost down to around $6.
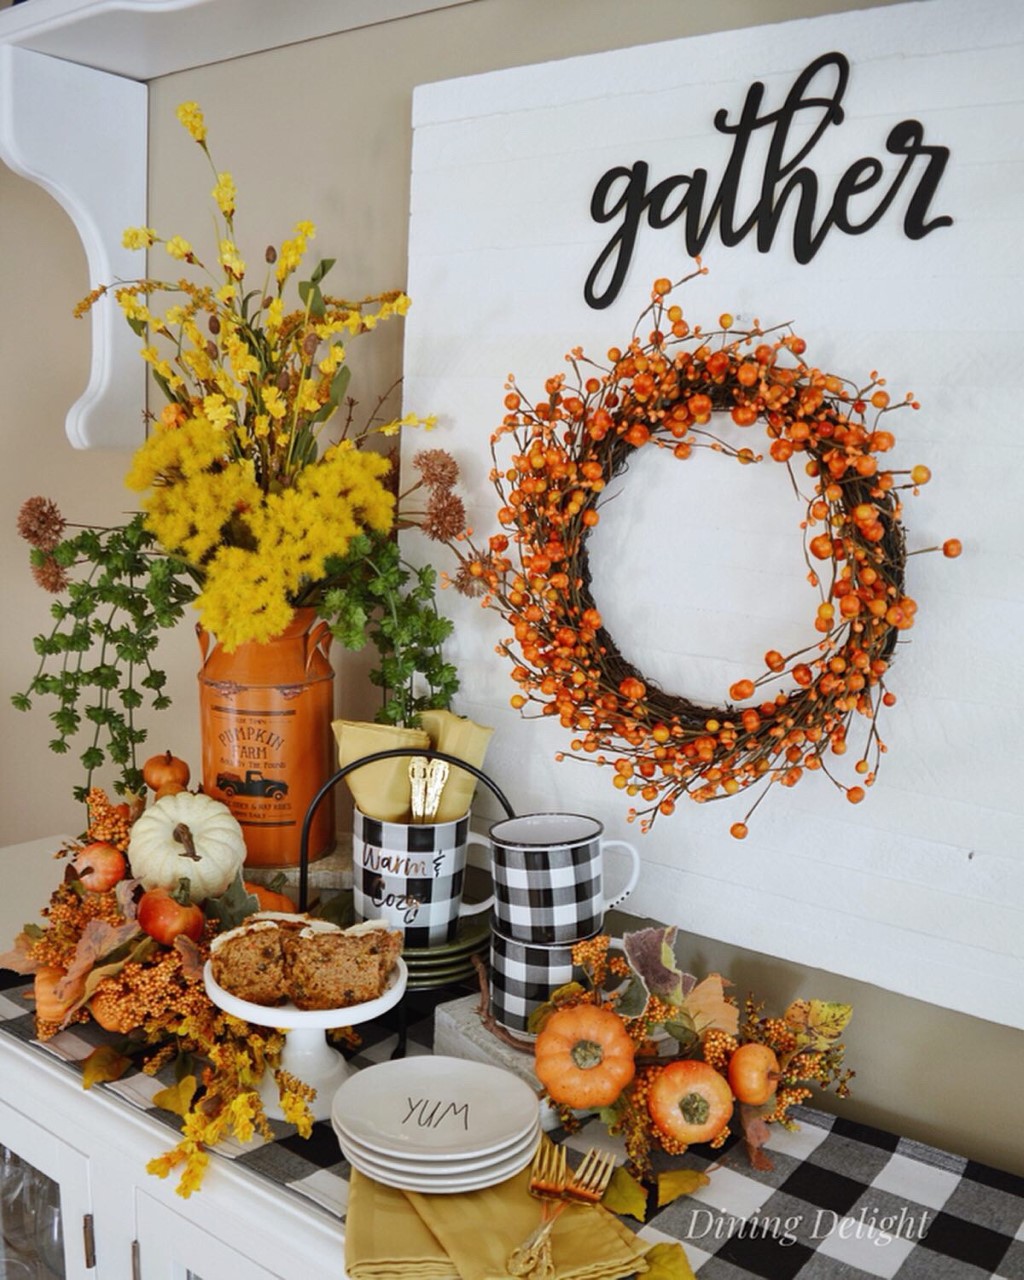
2. Style a Farmhouse Buffet with Plaid, Pumpkins, and a ‘Gather’ Sign
This setup is pure autumn coziness. It’s a masterclass in layering patterns and textures to create a welcoming, festive vibe on a buffet or sideboard. The balance between the rustic elements and the clean, graphic patterns is what makes it feel both homey and stylishly curated for the fall season.
⭐ The One Thing
What Makes It Work
The success here lies in repetition and contrast. The bold black from the ‘gather’ sign is repeated in the black and white plaid of the runner and mugs, creating a cohesive visual thread. The vibrant orange of the berry wreath sings against the crisp white slatted background, providing a pop of color that feels intentional and cheerful. The mix of natural textures (pumpkins, florals) with graphic patterns (plaid) adds depth and interest.
Designer Tip
To avoid a cluttered look on a busy surface, use the ‘rule of three.’ Group items in threes a large object (the milk can vase), a medium object (the stack of mugs), and a small object (a pumpkin). Also, hang your wall decor (like the wreath and sign) about 6-8 inches above the surface of the buffet. This gives the items on the table breathing room while still feeling connected to the wall display.
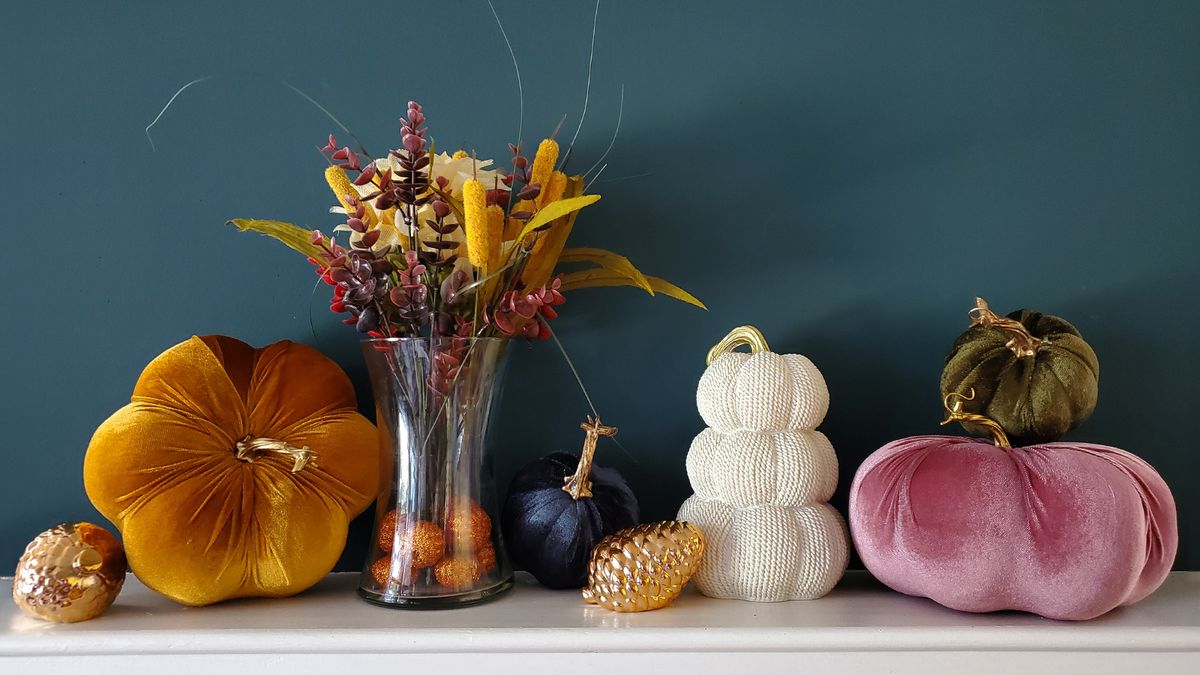
3. Create a Rich, Moody Vibe with Velvet Pumpkins on a Teal Wall
This isn’t your typical fall color scheme. The combination of deep teal with mustard, olive, and blush pink creates a sophisticated and modern take on autumnal decor. Arranging these luxe-feeling pumpkins on a simple white shelf makes the colors and textures the undeniable stars of the show.
✅ Before You Start
The One Thing
The deep teal wall is the game-changer here. Without it, this would be a lovely but standard collection of fall decor. The dark, moody backdrop makes the velvet and yarn textures of the pumpkins pop, turning simple decorative objects into a stunning visual statement. It proves that a can of paint is often the most transformative tool in your design kit, providing a high-impact foundation for your seasonal accessories.
Style Math
Think of this look as a formula: 60% dramatic background color (the teal wall) + 30% soft, varied textures (the velvet and yarn pumpkins) + 10% natural elements (the artificial foliage in the glass vase). You could easily swap the palette while keeping the formula. Imagine a deep charcoal wall with rust, cream, and forest green pumpkins for a more rustic feel, or a navy wall with silver, white, and iced blue pumpkins for a wintery version.
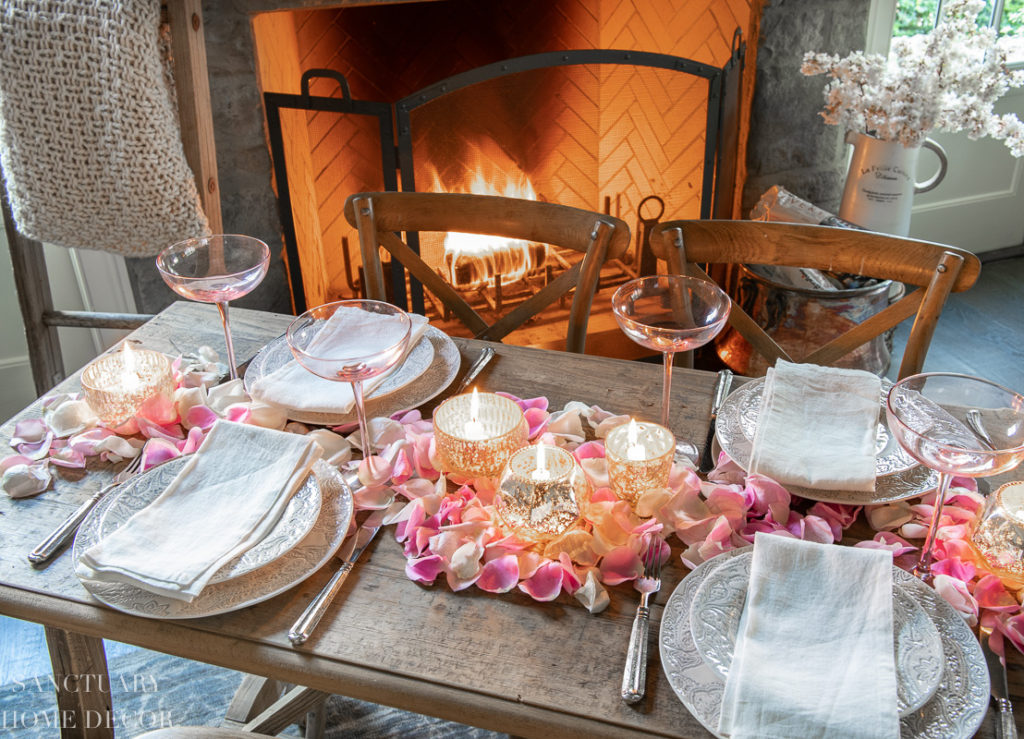
4. Set a Romantic Table with Rose Petals and Mercury Glass Candlelight
Nothing says romance quite like a candlelit dinner, and this setup takes it to the next level. The combination of rustic, natural elements with a soft, feminine touch creates an atmosphere that feels both special and effortless. The warm glow of the fire in the background stone fireplace ties it all together beautifully.
📏 Scale Guide
Real Talk
While undeniably beautiful, fresh rose petals can be tricky. They can wilt under the heat of candles and may stain a porous wooden table if they get wet. Also, open flames require vigilance. Never leave lit candles unattended, especially when surrounded by flammable items like petals. For a lower-stress version, use high-quality faux silk petals and a handful of battery-operated LED votives. You’ll get the same romantic glow without any of the worry.
What Makes It Work
This tablescape works because of its masterful mix of textures and light. The rough, rustic wood of the table provides a grounding contrast to the delicate softness of the rose petals. The mercury glass votives are key; they don’t just hold the light, they multiply and scatter it, creating a magical, shimmering effect that plain glass wouldn’t achieve. The simple white plates prevent the look from becoming too busy, allowing the romantic elements to shine.
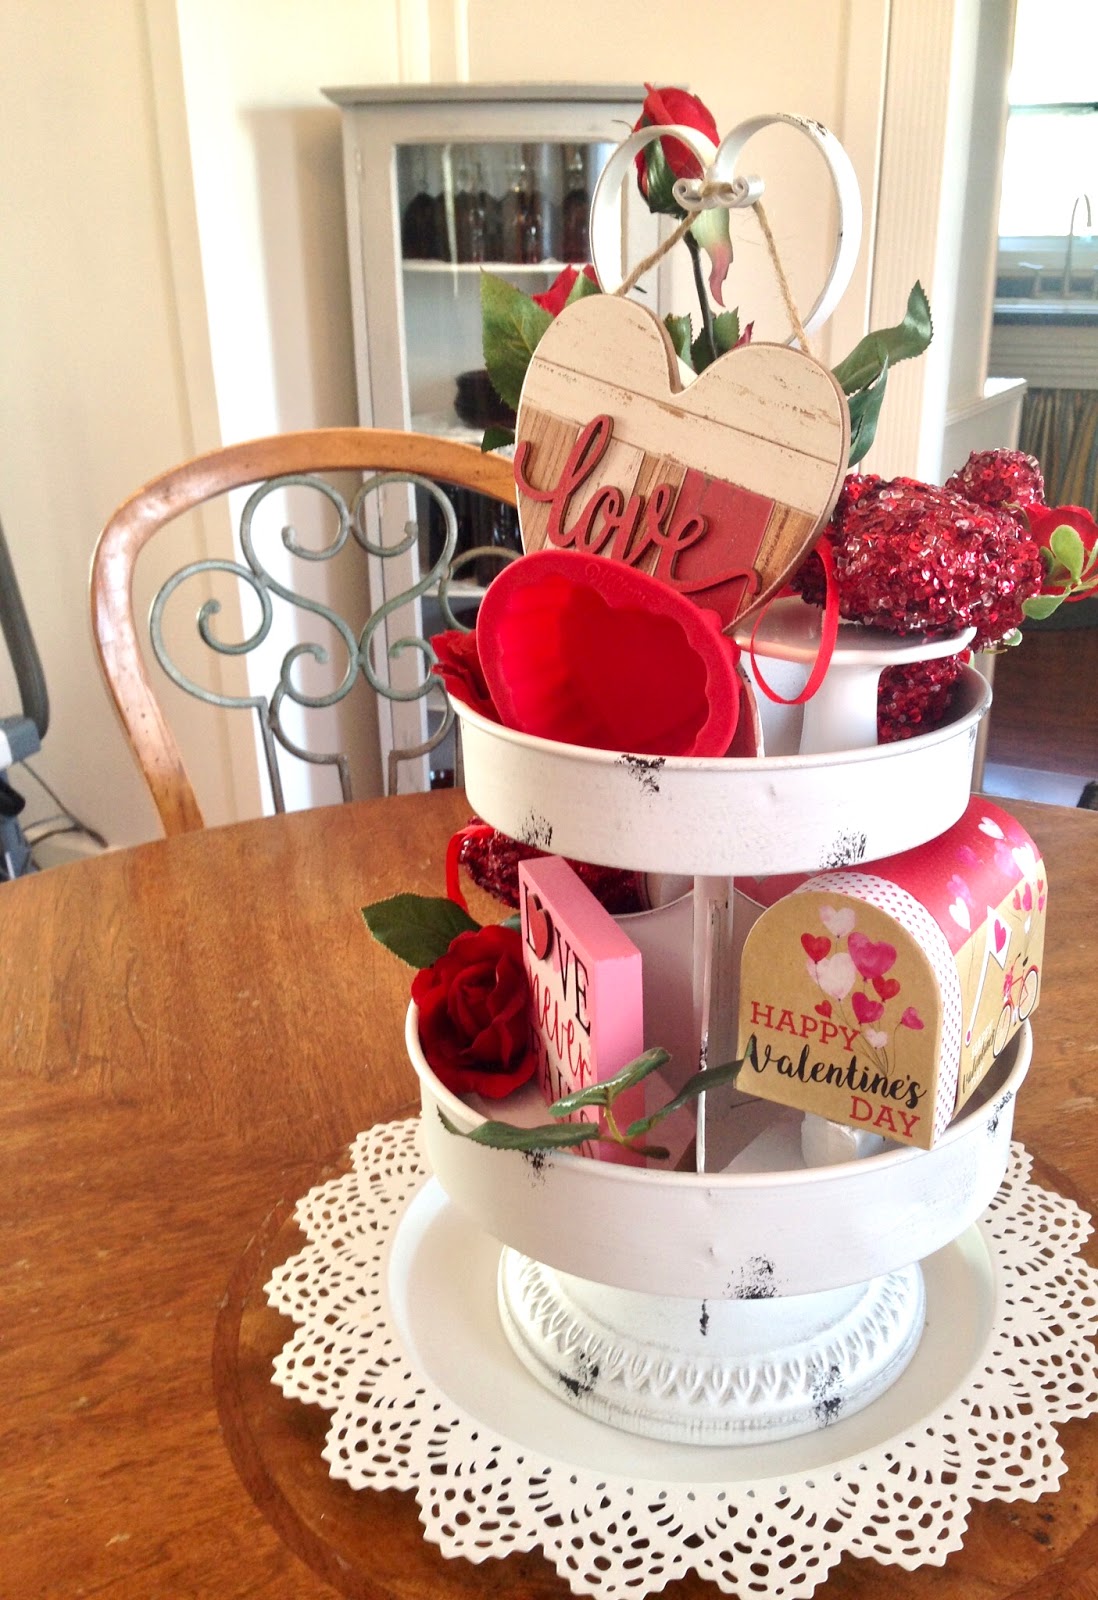
5. Assemble a Sweet Valentine’s Day Tiered Tray
A tiered tray is the perfect canvas for holiday decorating, allowing you to create a concentrated burst of festive cheer. This Valentine’s display uses classic colors and motifs, but the distressing on the white tray keeps it from feeling overly sweet, adding a touch of farmhouse charm.
🧹 Maintenance Reality
Designer Tip
The key to a successful tiered tray is varying the height, shape, and texture of your objects. Notice the mix of round (sequined hearts), rectangular (the ‘love’ signs), and organic shapes (the faux roses). Start by placing your largest anchor items first—like the wooden heart sign—then fill in around them with medium-sized pieces. Use the smallest items, like sequined hearts, to fill any remaining gaps and add a final touch of sparkle.
Get This Look For Less
While the distressed tray is the star, you don’t need to buy one. You can often find old tiered dessert stands at thrift stores for under $5. A quick coat of white chalk paint (about $8 for a bottle that will last) and some light sanding on the edges will give you the exact same distressed look. The decorative fillers are all classic Dollar Tree finds, so the entire project can easily be assembled for under $15.
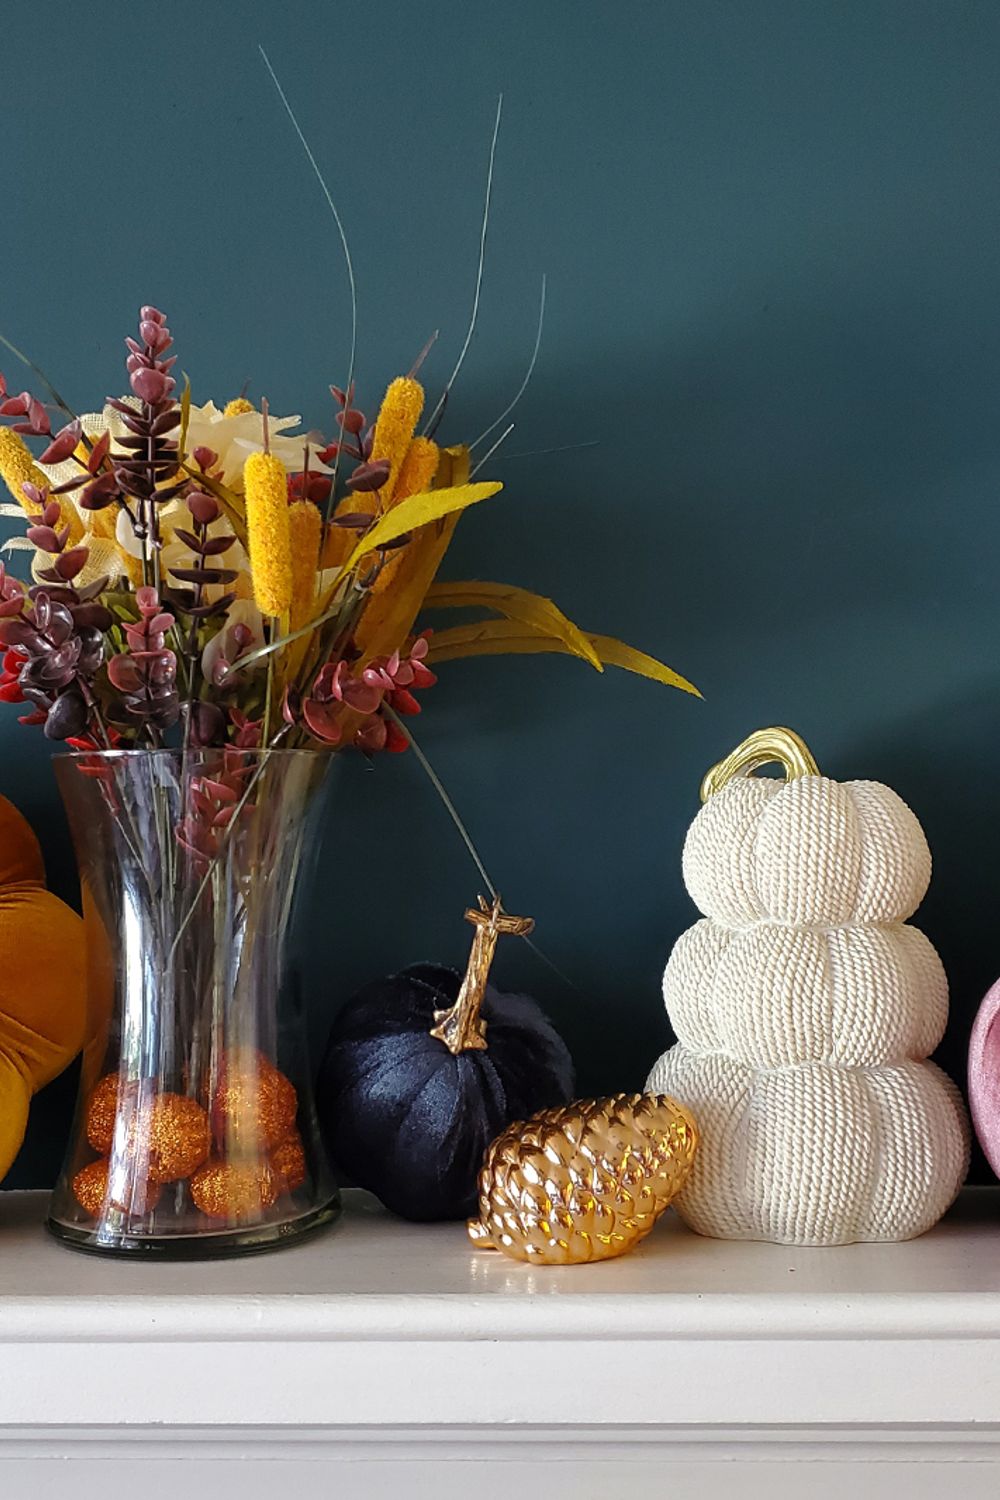
6. Style a Shelf with Velvet Pumpkins and a Gold Pinecone
Here’s another stunning example of how a dark wall can elevate simple decor. The drama of the deep teal backdrop makes the rich autumnal colors and textures feel incredibly luxurious. It’s a sophisticated palette that feels both on-trend and timeless. Compare this with the similar setup in Idea #3 to see how small changes in objects can shift the mood.
🎯 What Makes It Work
Style Math
This look is all about balance: 50% moody color (the wall) + 30% rich texture (the velvet and rope pumpkins) + 20% sparkle and shine (the gold pinecone and sparkly orbs in the vase). The formula creates a dynamic tension between dark and light, soft and hard, matte and metallic. It’s a recipe for a high-end look using budget-friendly pieces.
Trending Context
Moody interiors, particularly with deep greens and blues, have been a huge trend for the past few years, and it shows no sign of slowing down. This look taps right into that desire for cozy, enveloping spaces. Pairing these dark walls with seasonal decor in contrasting jewel tones and metallics is a very 2026 way to do holidays—it’s less about overt themes and more about creating a rich, layered feeling in your home.
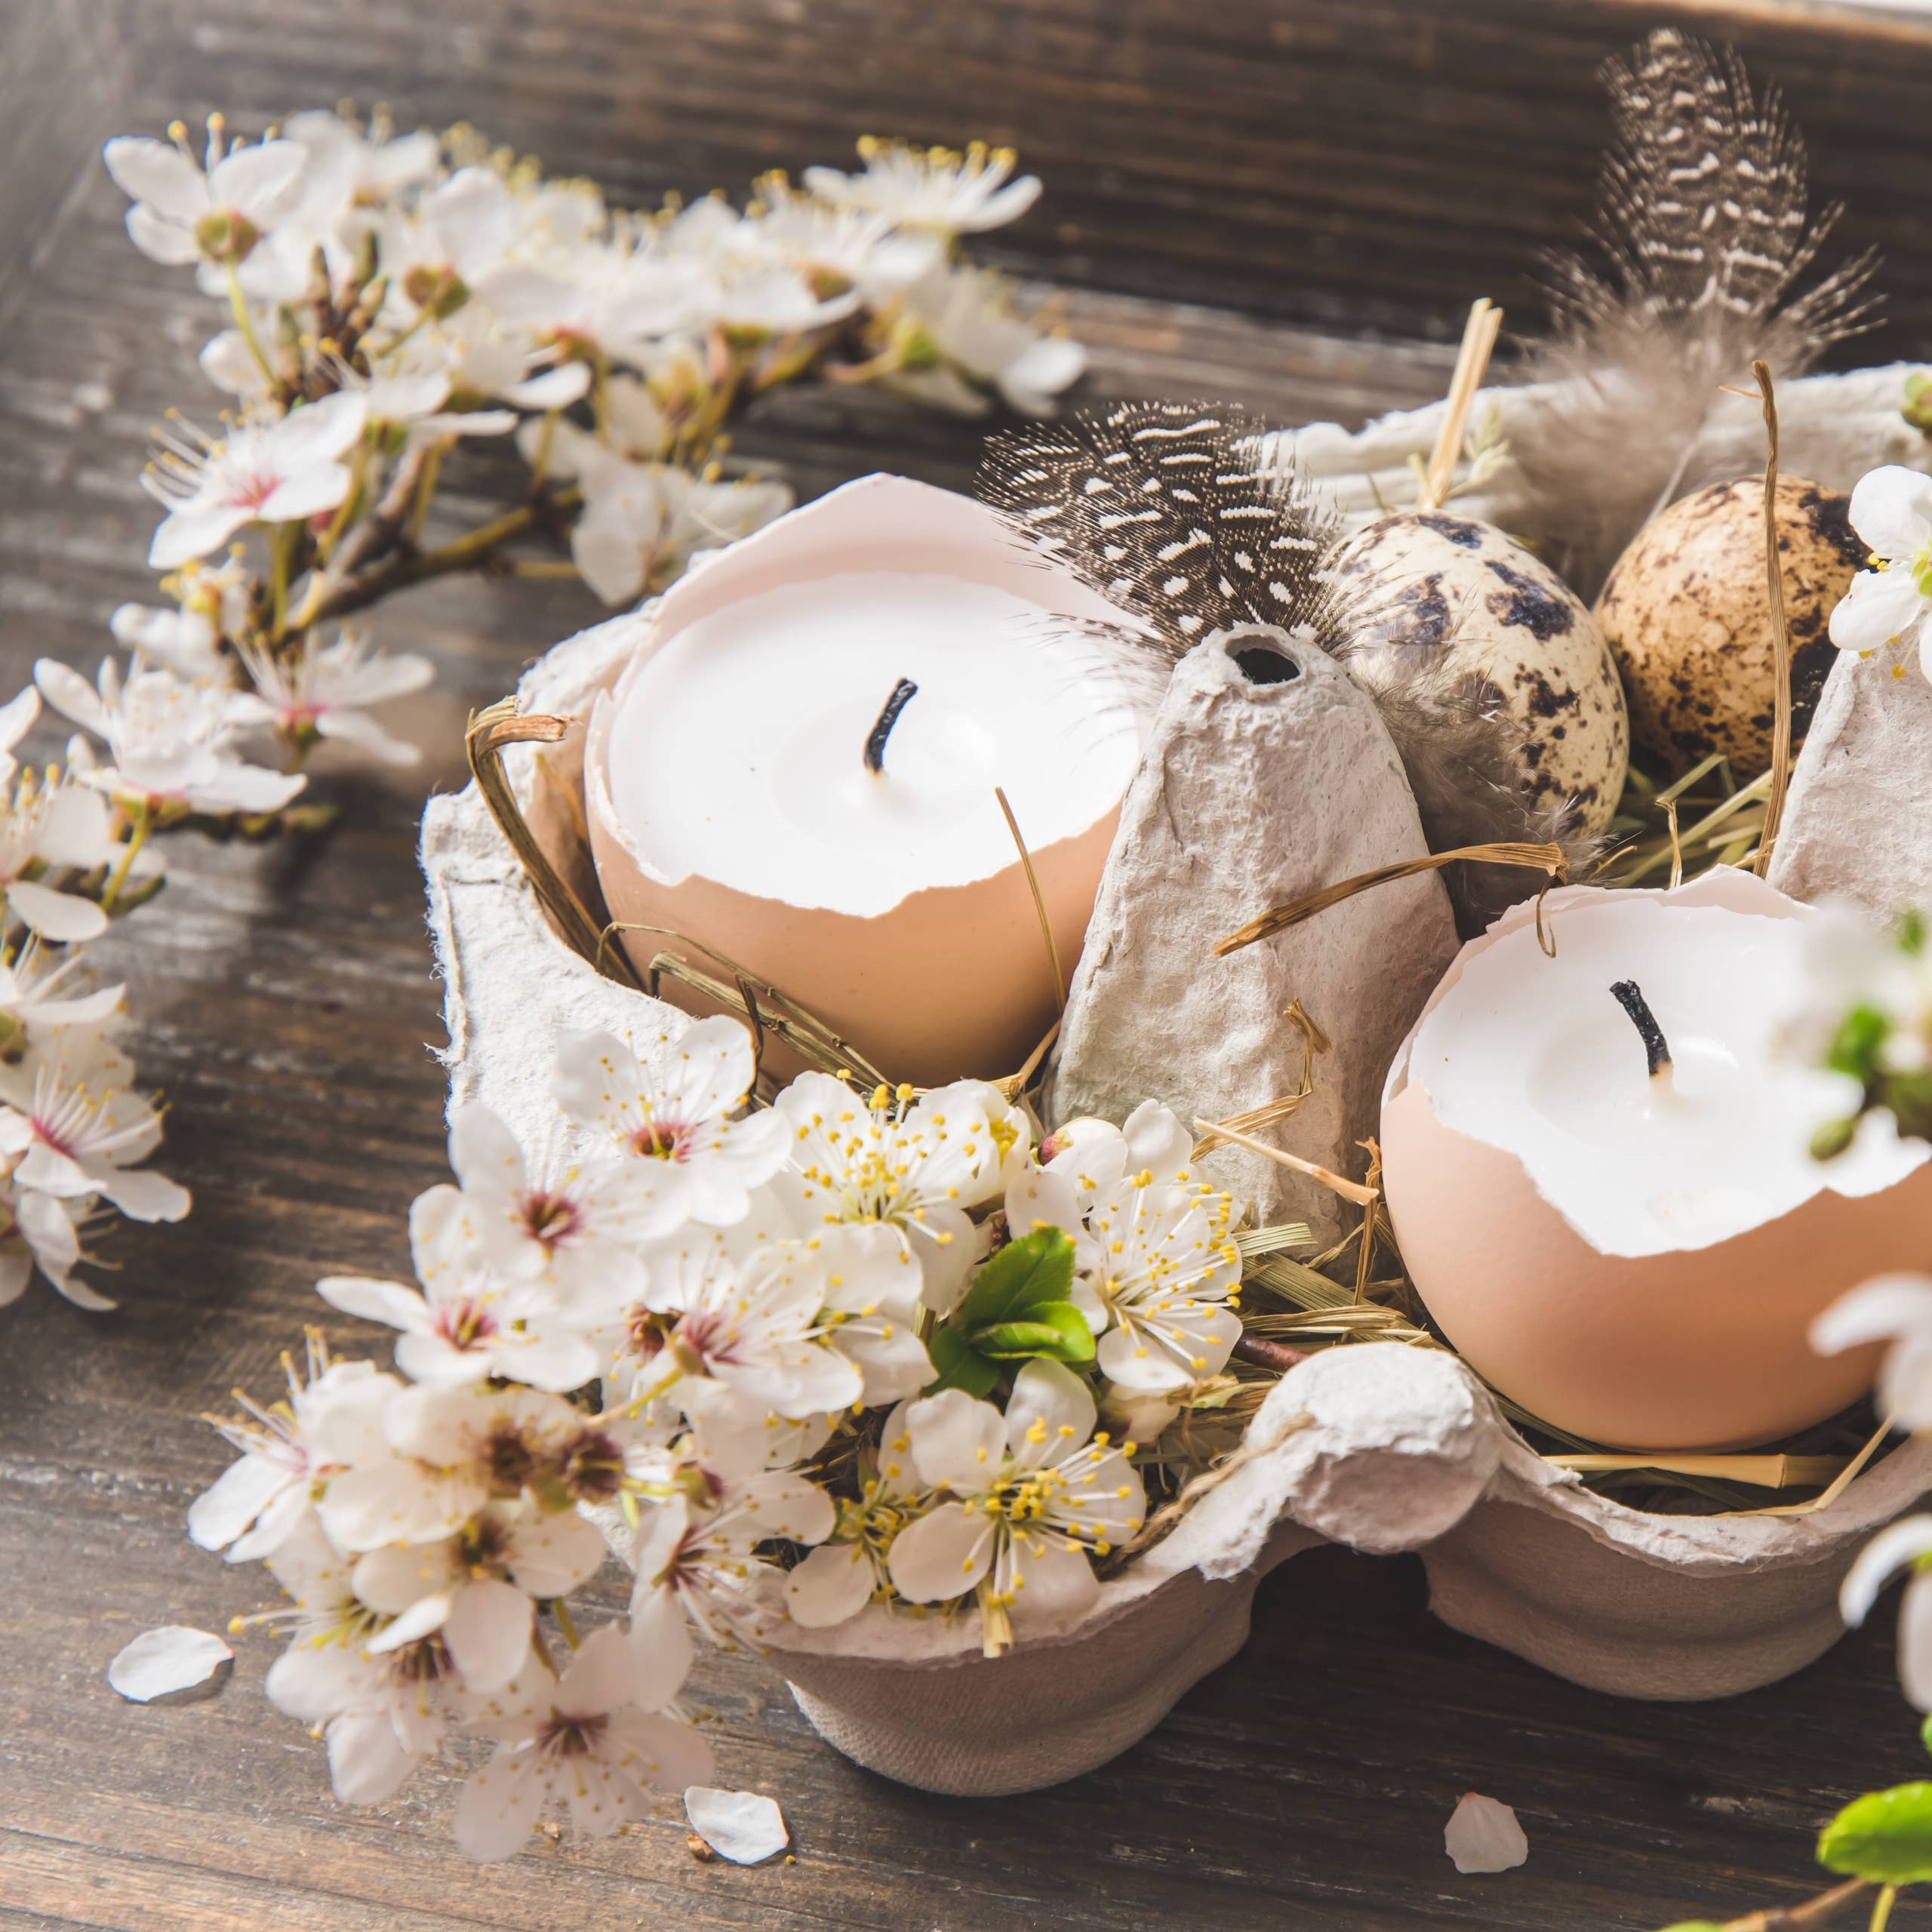
7. Craft Delicate Eggshell Candles for a Rustic Spring Display
This is such a breathtakingly delicate and creative idea for spring or Easter. It transforms a humble egg carton and some leftover wax into a centerpiece that feels like a tiny, magical garden. The mix of textures—smooth eggshells, rustic cardboard, soft feathers, and papery blossoms—is what makes it so special.
💡 Designer Tip
The One Thing
The use of real, cracked eggshells as candle vessels is the undeniable heart of this project. It’s an unexpected and genius bit of upcycling that immediately signals creativity and a connection to nature. It’s this single choice that elevates the entire arrangement from a simple collection of spring items into a piece of art. Without the eggshell candles, you’d just have a carton of decorations; with them, you have a story.
Maintenance Reality
These candles are more for atmosphere than for long-term lighting. The small amount of wax means they will burn down very quickly, likely in under 30 minutes. The eggshells themselves are fragile and can easily crack further or tip over in the carton. Treat these as a ‘one-time-use’ decorative accent for a special brunch or dinner, and never leave them burning unattended. The beauty is fleeting, and that’s part of their charm.
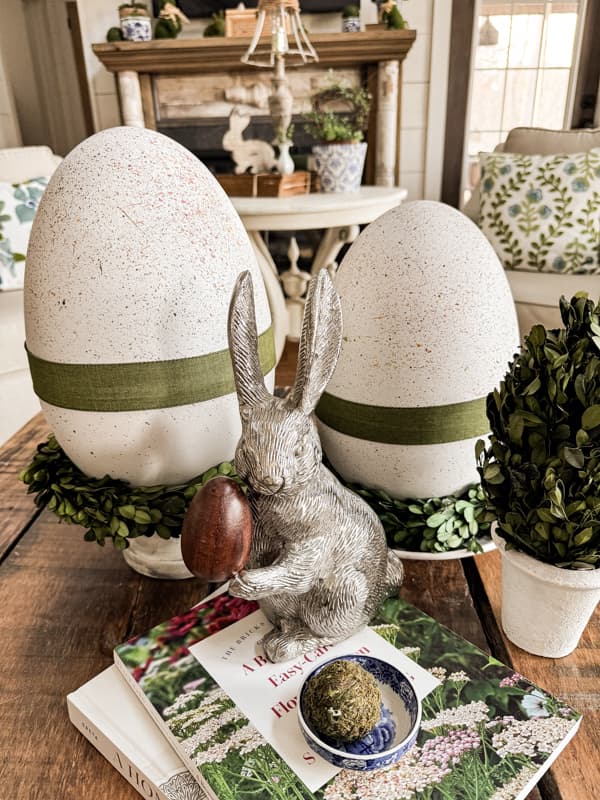
8. Style a Coffee Table with Large Speckled Eggs and a Silver Bunny
This spring coffee table vignette feels traditional and earthy. The decor is festive without being loud, relying on natural textures and a muted color palette to signal the season. The key is in the careful selection and arrangement of just a few high-impact items on the dark wood table.
🔥 Trending Context
What Makes It Work
This arrangement nails the concept of scale. The two large speckled eggs are substantial enough to make a statement and their size provides a pleasing contrast to the miniature moss balls and the delicate silver bunny figurine. Stacking the decor on books is a classic designer trick to create varying heights and prevent everything from looking flat. The sage green ribbons tie into the green of the topiary, creating a subtle color story.
Scale Guide
This type of centered vignette works best on a square or round coffee table that is at least 30 inches wide. On a long, narrow rectangular table, the arrangement might feel lost. A minimum ceiling height isn’t a concern here, as the decor is low-profile. The key is leaving enough negative space around the arrangement—at least 8-10 inches of clear table surface on all sides—so it feels intentional and not cluttered.
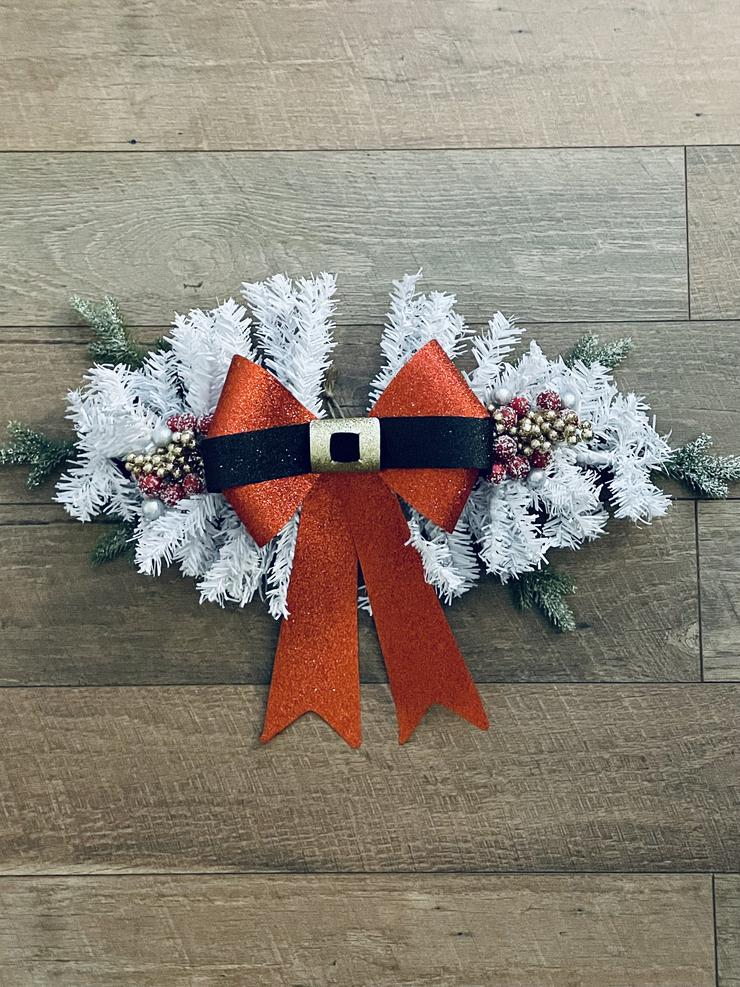
9. How to Make a Classic Winter Swag Wreath from Dollar Tree Finds
A winter swag is a fantastic alternative to a traditional round wreath, perfect for hanging on doors, walls, or over a mantelpiece. This classic Christmas craft is a staple for a reason: it’s quick, incredibly inexpensive, and easy to customize with your favorite ribbons and ornaments.
💸 Get This Look For Less
How-To Brief
- Start with a basic faux pine swag from Dollar Tree. Use floral wire to bundle two or three together if you want a fuller look.
- Fluff and bend the branches to create a pleasing, natural shape.
- Choose your main ribbon. Create a large, multi-loop bow and secure it to the top of the swag with floral wire.
- Add smaller decorative elements like pinecones, faux berries, or shatterproof ornaments, attaching them with hot glue or wire.
- Create a hanging loop on the back with a sturdy piece of floral wire.
Get This Look For Less
While this project is already incredibly budget-friendly, you can make it for practically free if you have access to evergreen clippings from your yard. Pair found greenery with a foraged pinecone and a scrap of leftover holiday ribbon for a completely natural and no-cost decoration. You can often find bags of used ribbons and bows at thrift stores after the holidays for a dollar or two.
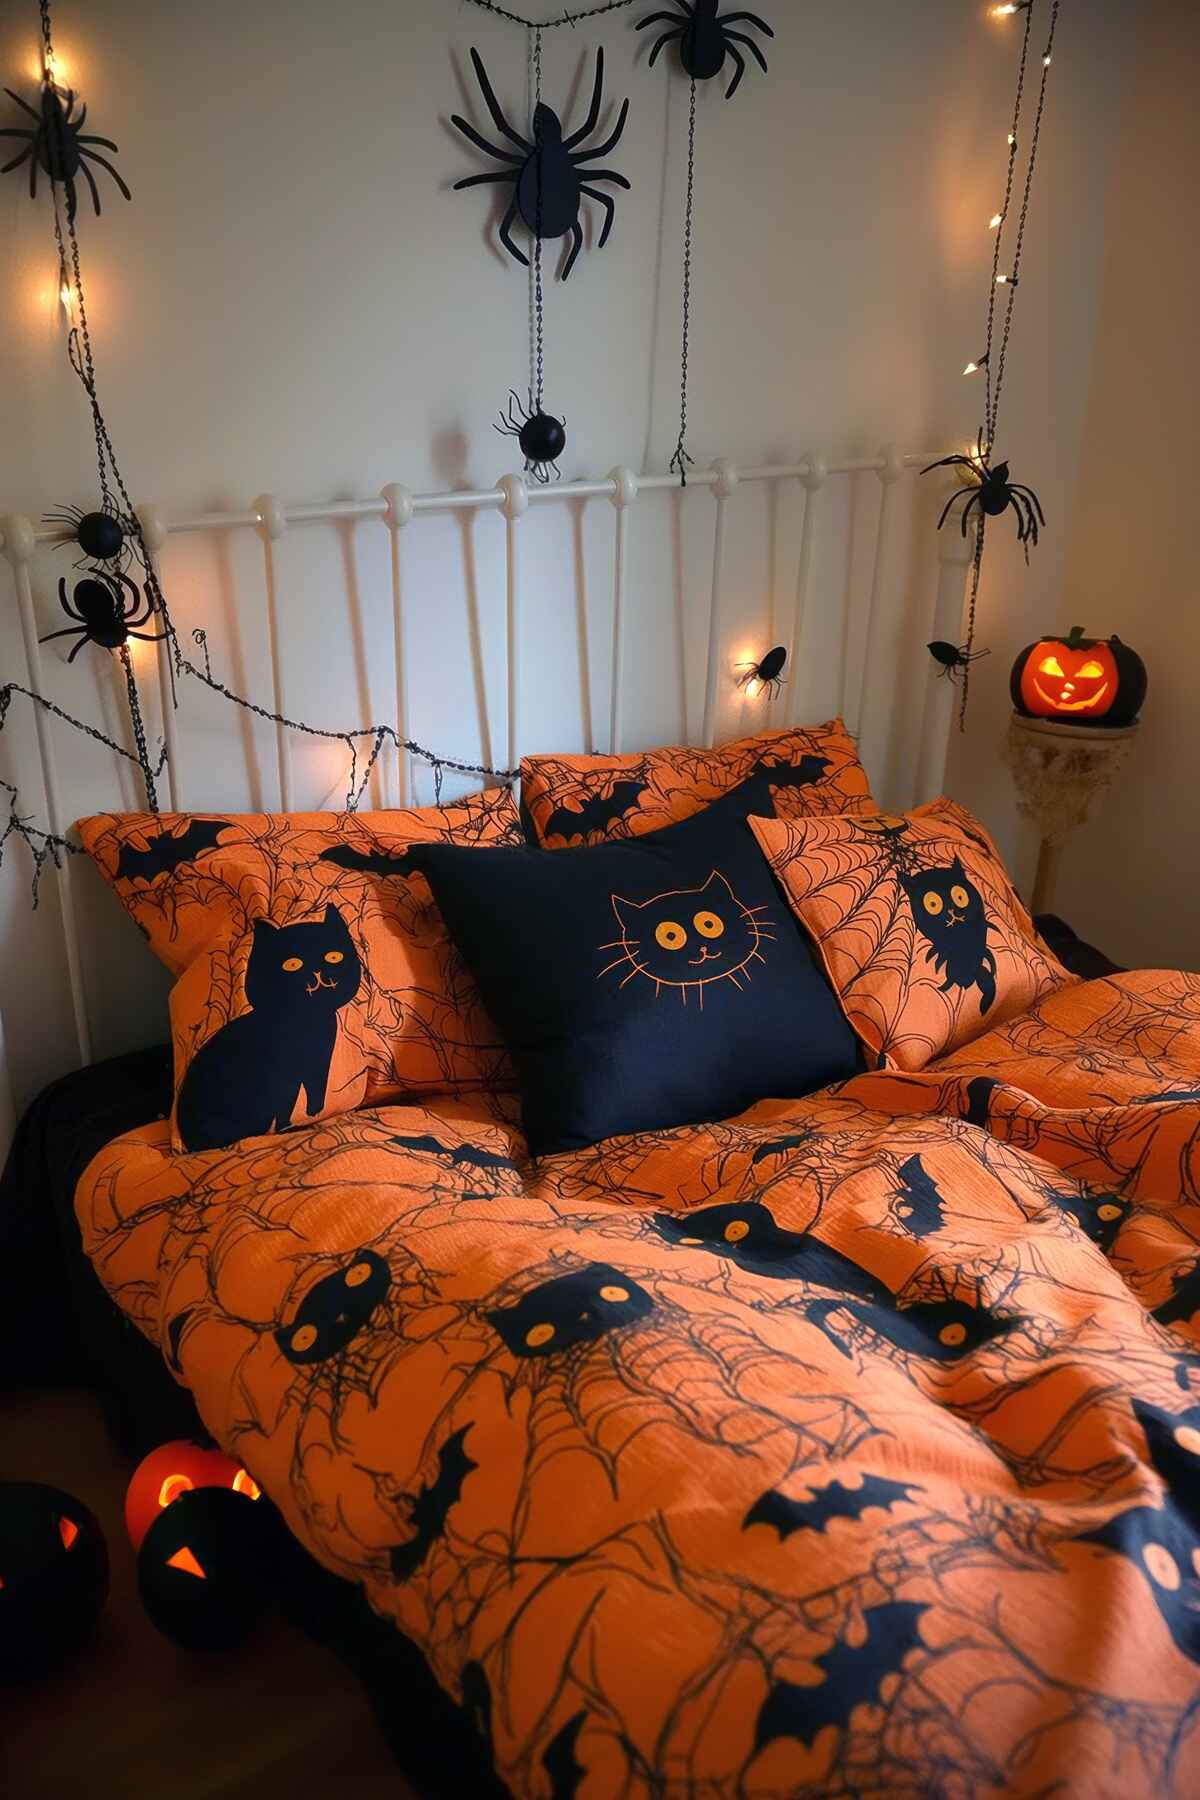
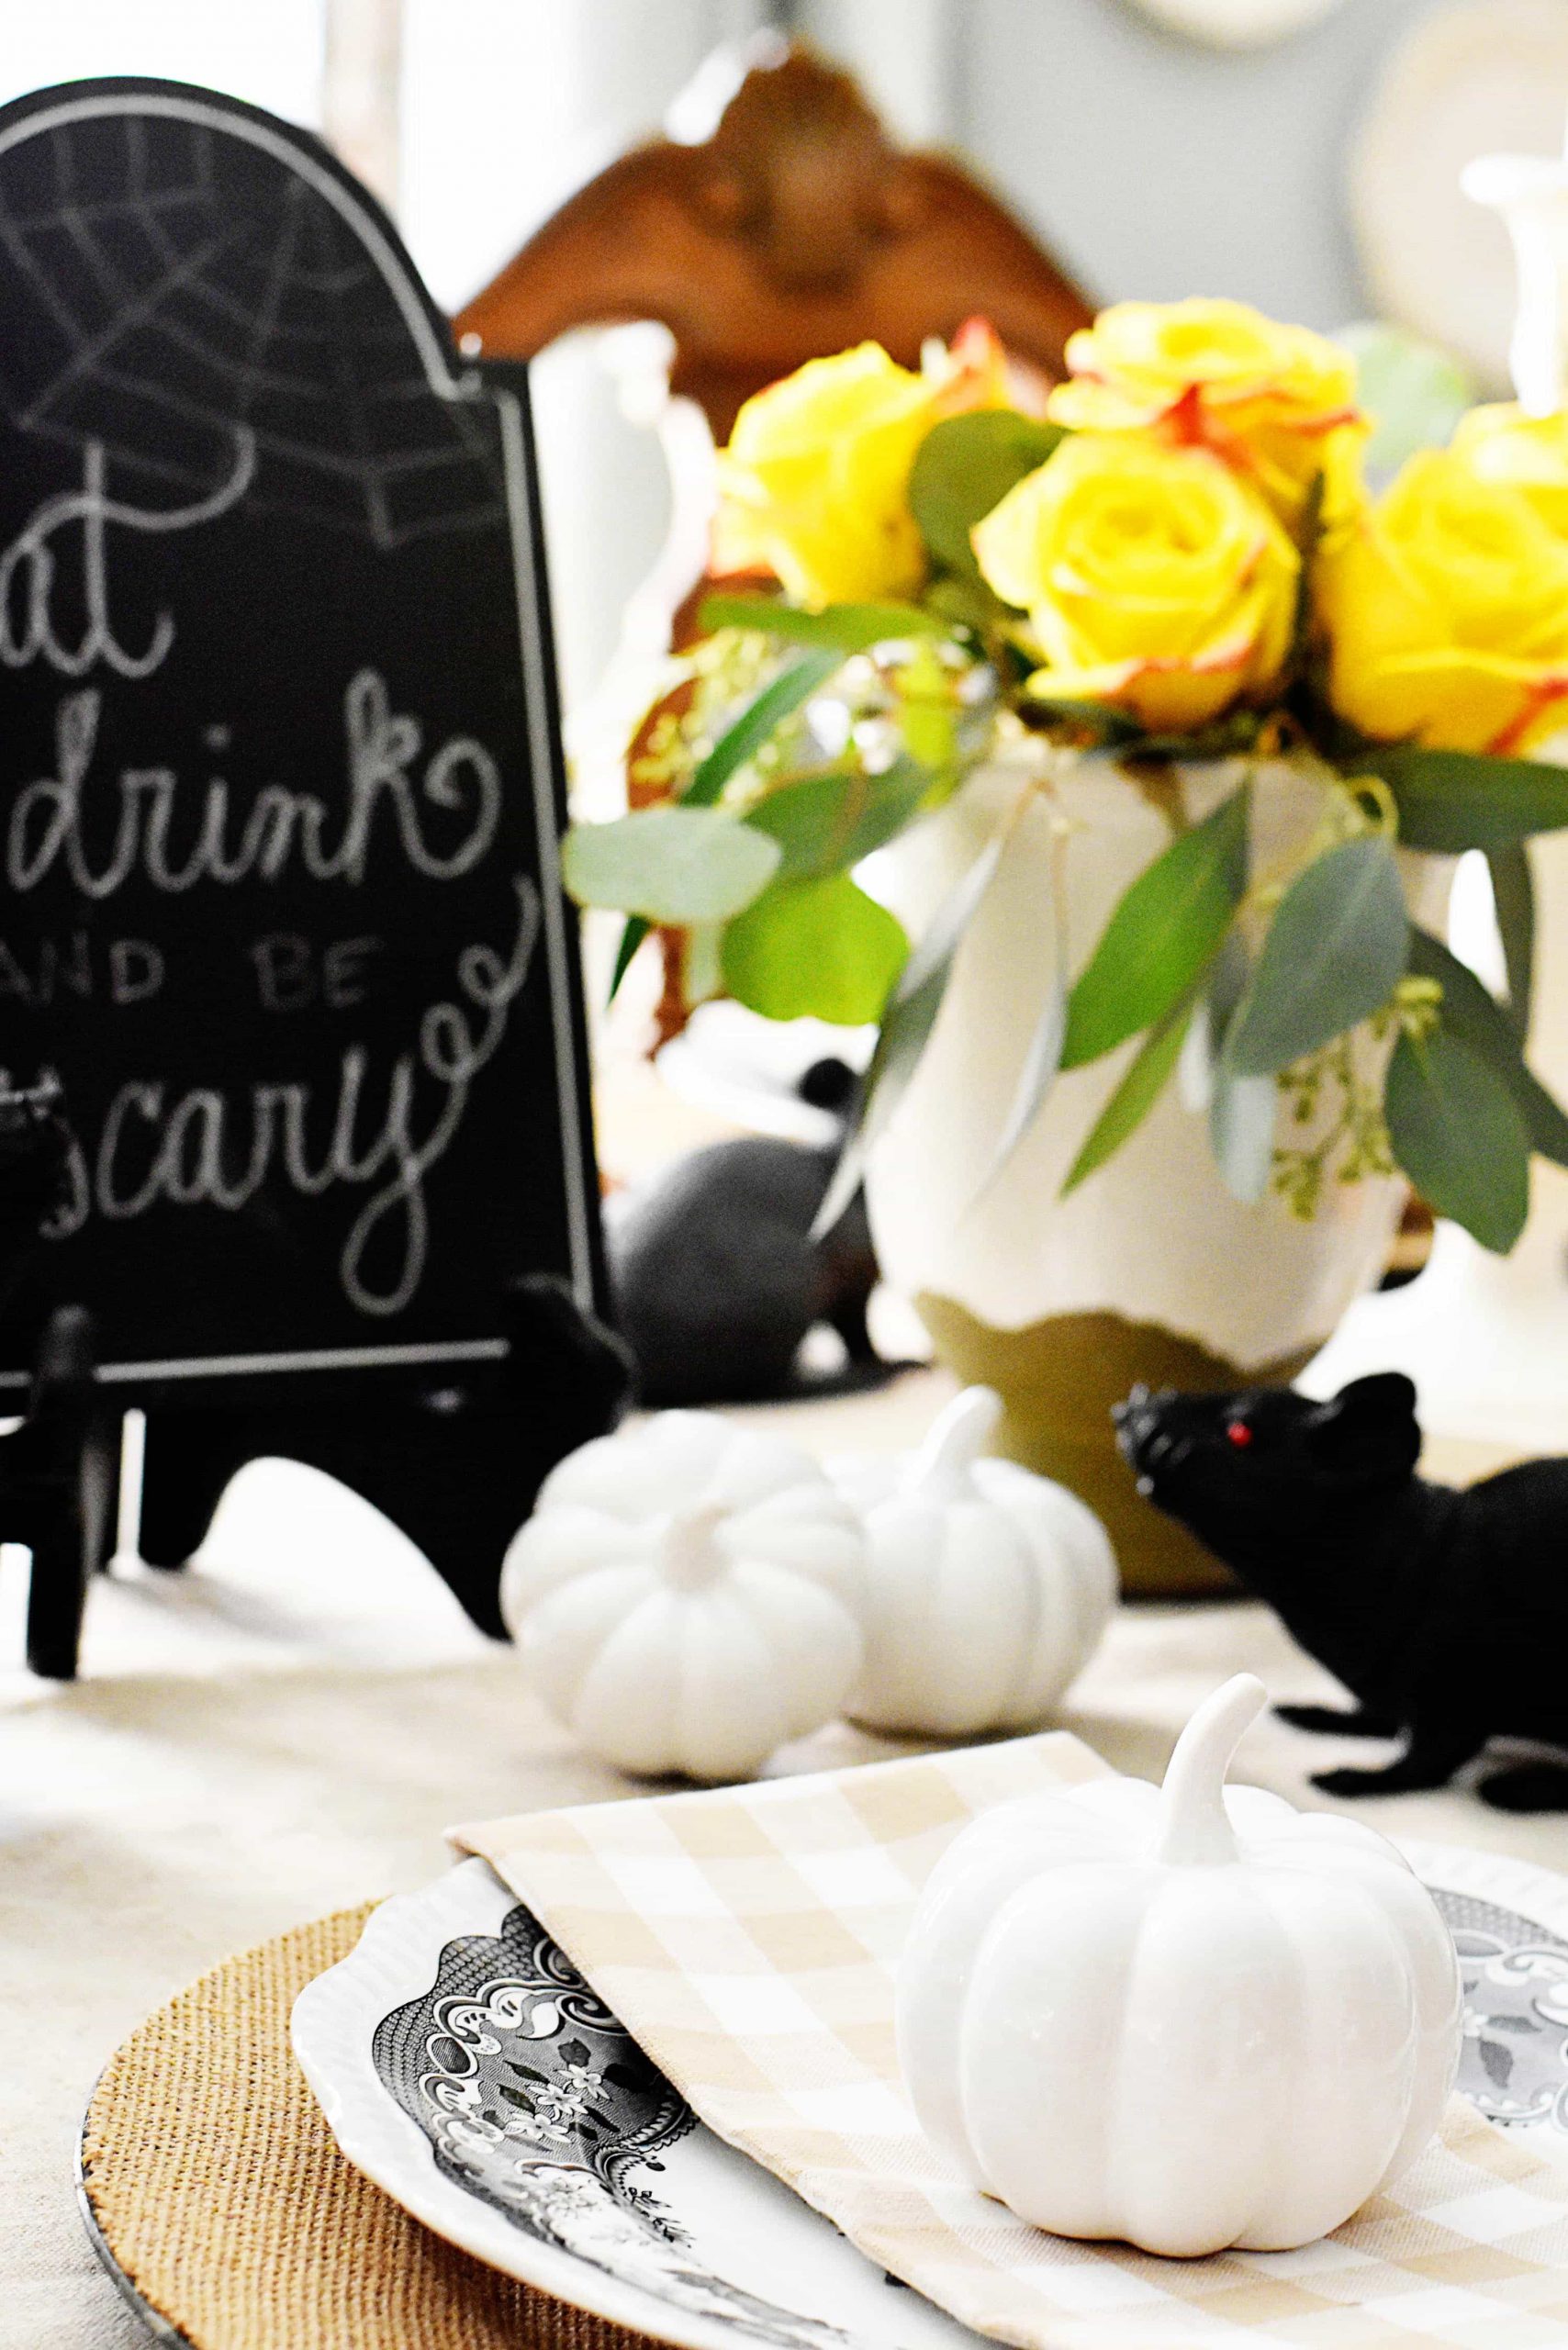
10. Create a Spooky & Chic Halloween Table with Yellow Roses
Who says Halloween has to be all orange and black? This charming table setting proves that a pop of unexpected color can make your decor stand out. The bright yellow roses provide a sophisticated and cheerful contrast to the spooky black rat figurines and chalkboard sign, creating a look that’s more stylish than scary.
💰 Budget Breakdown
What Makes It Work
It’s the brilliant use of color theory. Yellow and black are a high-contrast pair that naturally grabs attention. The fresh, vibrant yellow of the roses feels energetic and lively, which creates a fun, playful tension against the classic spooky elements. The neutral textures of the burlap placemat and gingham napkin ground the look, preventing the bold colors from feeling overwhelming.
Real Talk
Fresh flowers are a beautiful touch, but they can be an expensive one-day decoration. To get a similar vibe that lasts the whole season, opt for high-quality artificial yellow roses. Also, be mindful of where you place those little black rat figurines—make sure they are clearly part of the decor and not going to actually frighten an unsuspecting guest or get knocked into someone’s food!
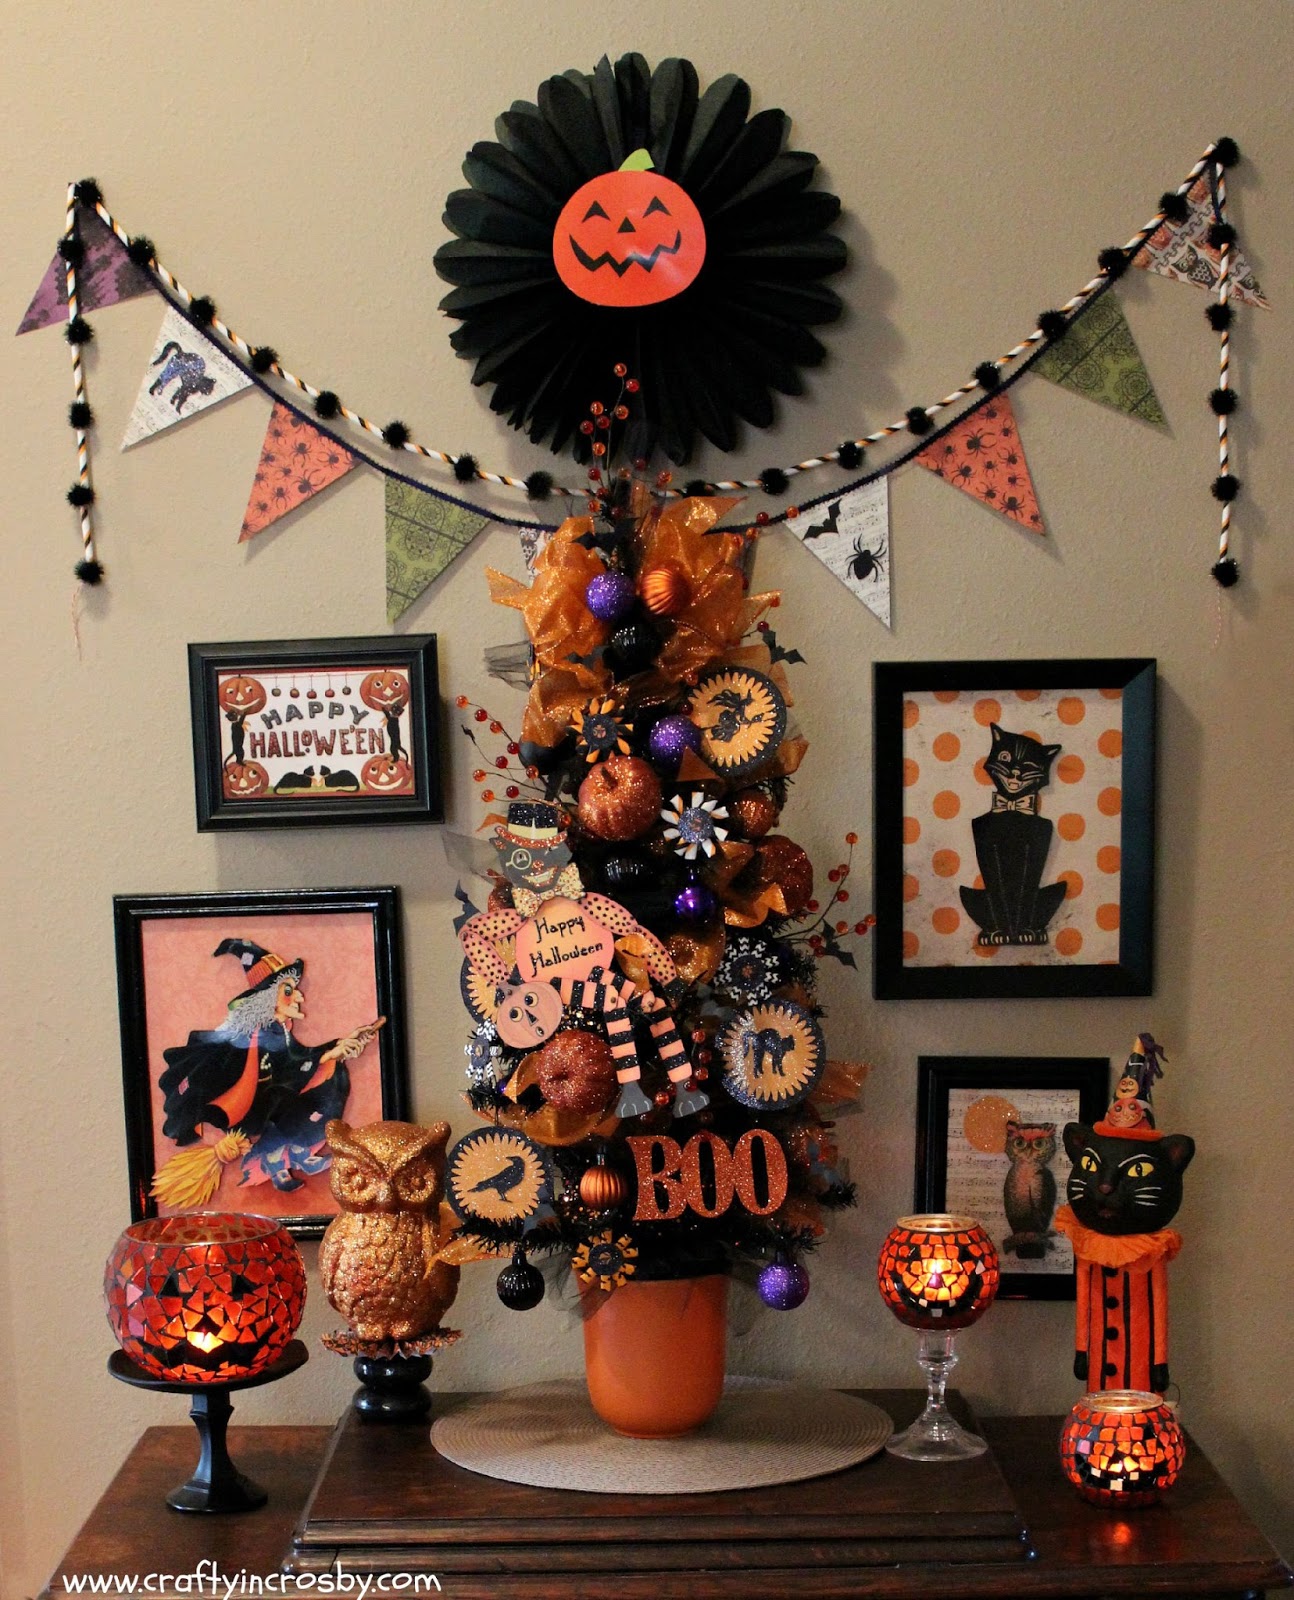
11. Build a Playful, Layered Halloween Mantel Display
This Halloween display is a perfect example of ‘more is more’ done right. It’s a joyful, eclectic mix of store-bought decor and DIY touches that feels personal and fun. The key to this layered look is using the wall space behind the mantel or cabinet to create a full, immersive festive scene.
🔧 How-To Brief
Designer Tip
To create a layered gallery wall effect like this, start with your largest item first (the paper fan) to anchor the arrangement. Then, place your other framed art and garlands around it, radiating outwards. Use varying frame sizes and orientations (horizontal and vertical) to create visual interest. A good rule of thumb is to keep the space between items to about 2-3 inches for a cohesive look.
The One Thing
The decorated faux mini Christmas tree is the most unexpected and playful element in this entire vignette. Repurposing a Christmas item for Halloween is a clever and budget-savvy move. It adds height, texture, and a quirky personality that sets this display apart from a standard collection of spooky objects. It’s the piece that tells you the person who created this doesn’t take decorating too seriously and loves to have fun with it.
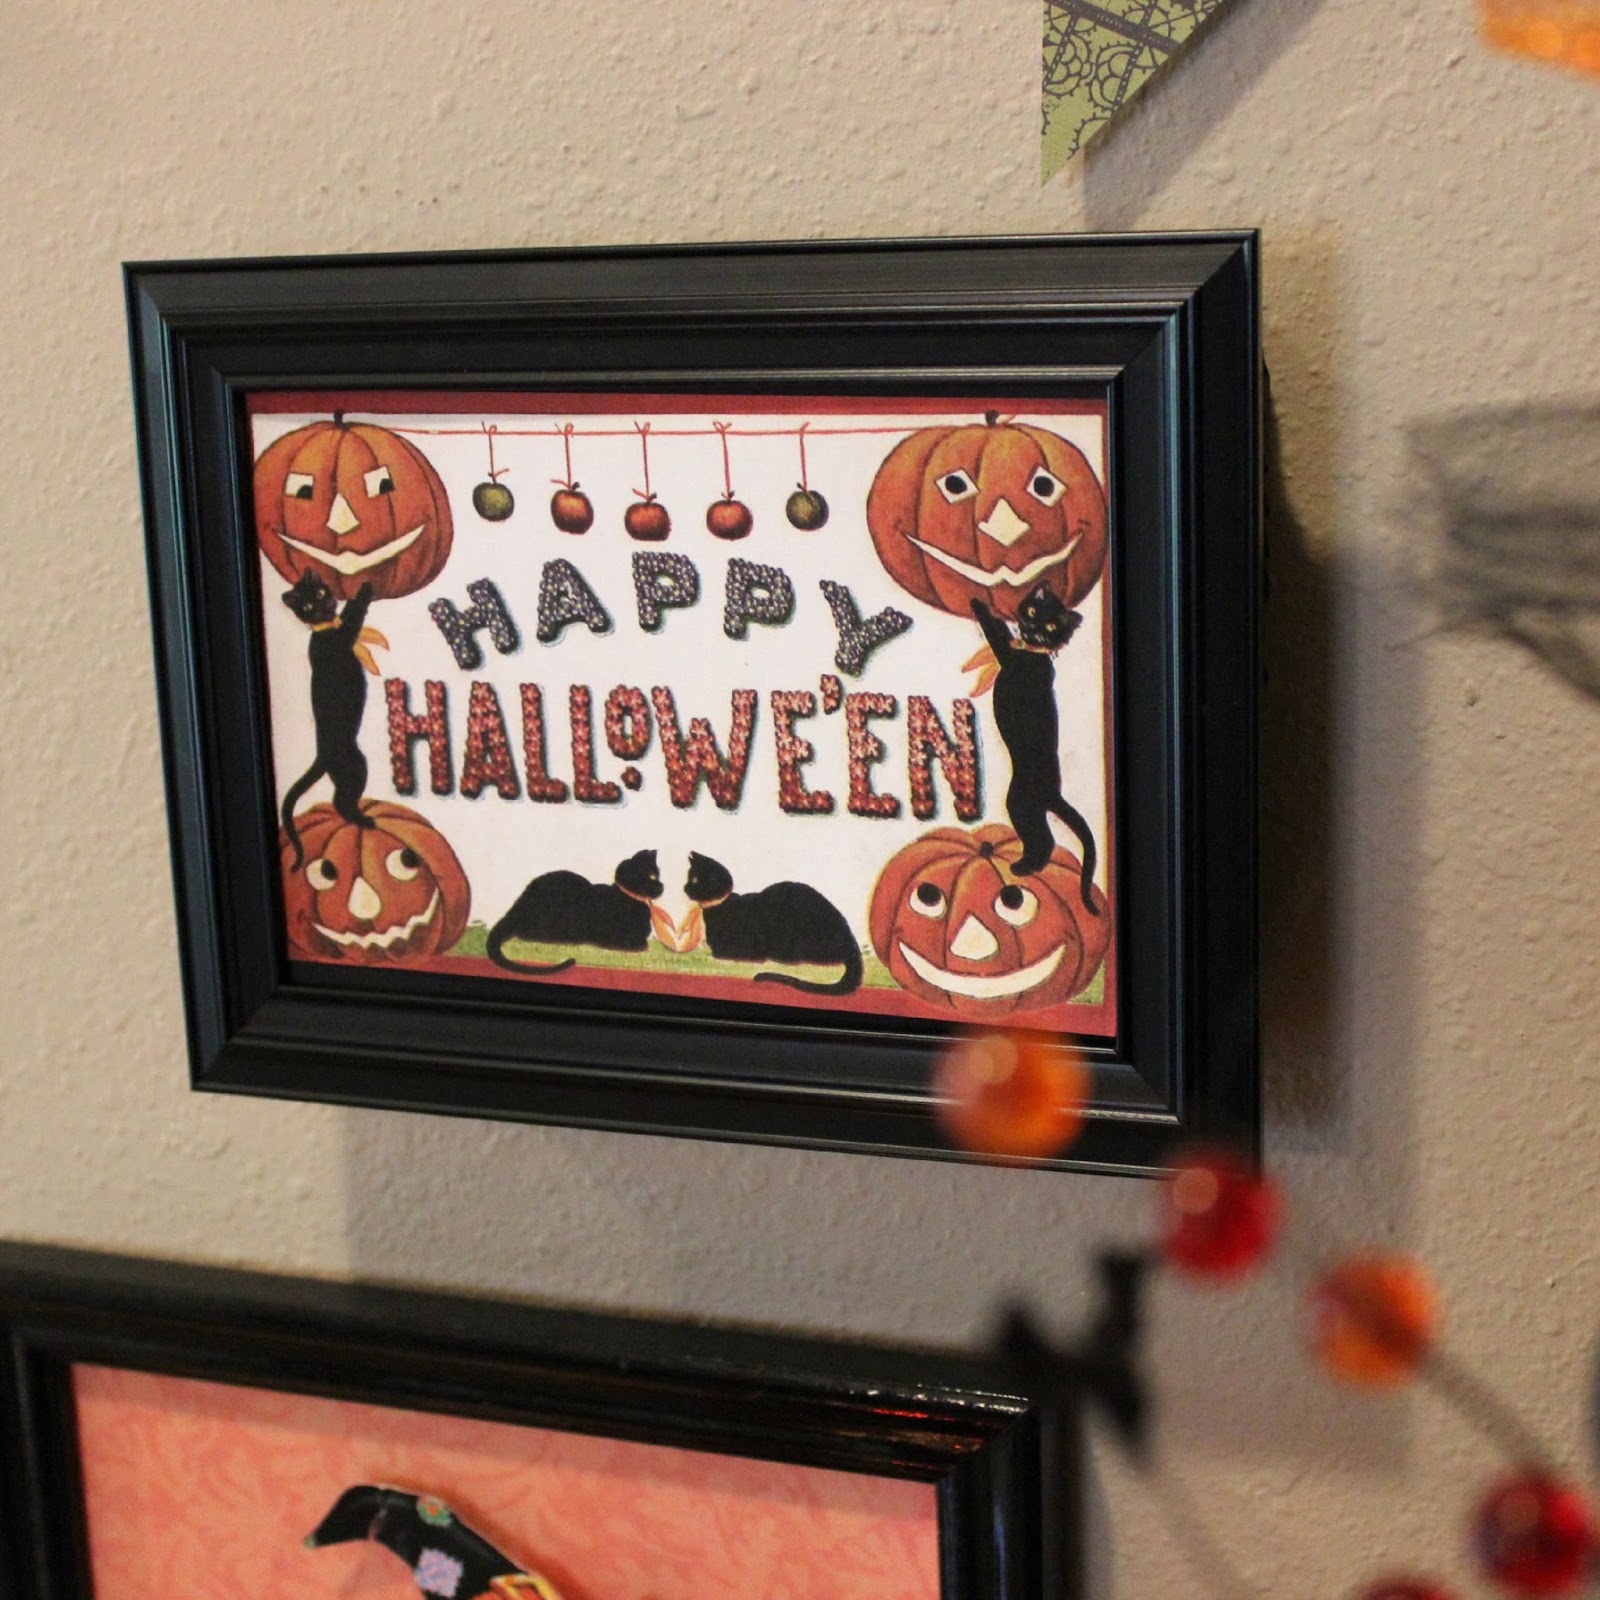
12. Frame a Vintage-Style ‘Happy Halloween’ Print for a Nostalgic Touch
Sometimes the simplest decorations are the most effective. A single, well-chosen piece of art can instantly set the mood for a holiday. This vintage-inspired Halloween print is charming and playful, offering a dose of nostalgia that feels more sweet than spooky hanging on the cream-colored wall.
📐 Style Math
Get This Look For Less
You don’t need to buy pre-made holiday art. Websites like Etsy are full of affordable digital download prints for just a few dollars. You can also find tons of free, public-domain vintage Halloween illustrations with a quick search on Pinterest or museum websites. Print your favorite design at home and pop it into a basic black frame from the Dollar Tree. For a total cost of about $3, you have custom art.
What Makes It Work
This works because of its simplicity. The clean lines of the black frame provide a strong graphic border that makes the artwork pop against the light-colored wall. The cream color of the wall is a perfect neutral backdrop, allowing the orange, black, and red in the print and garland to be the focus. By keeping the surrounding decor minimal, the print becomes the undisputed star of the show.
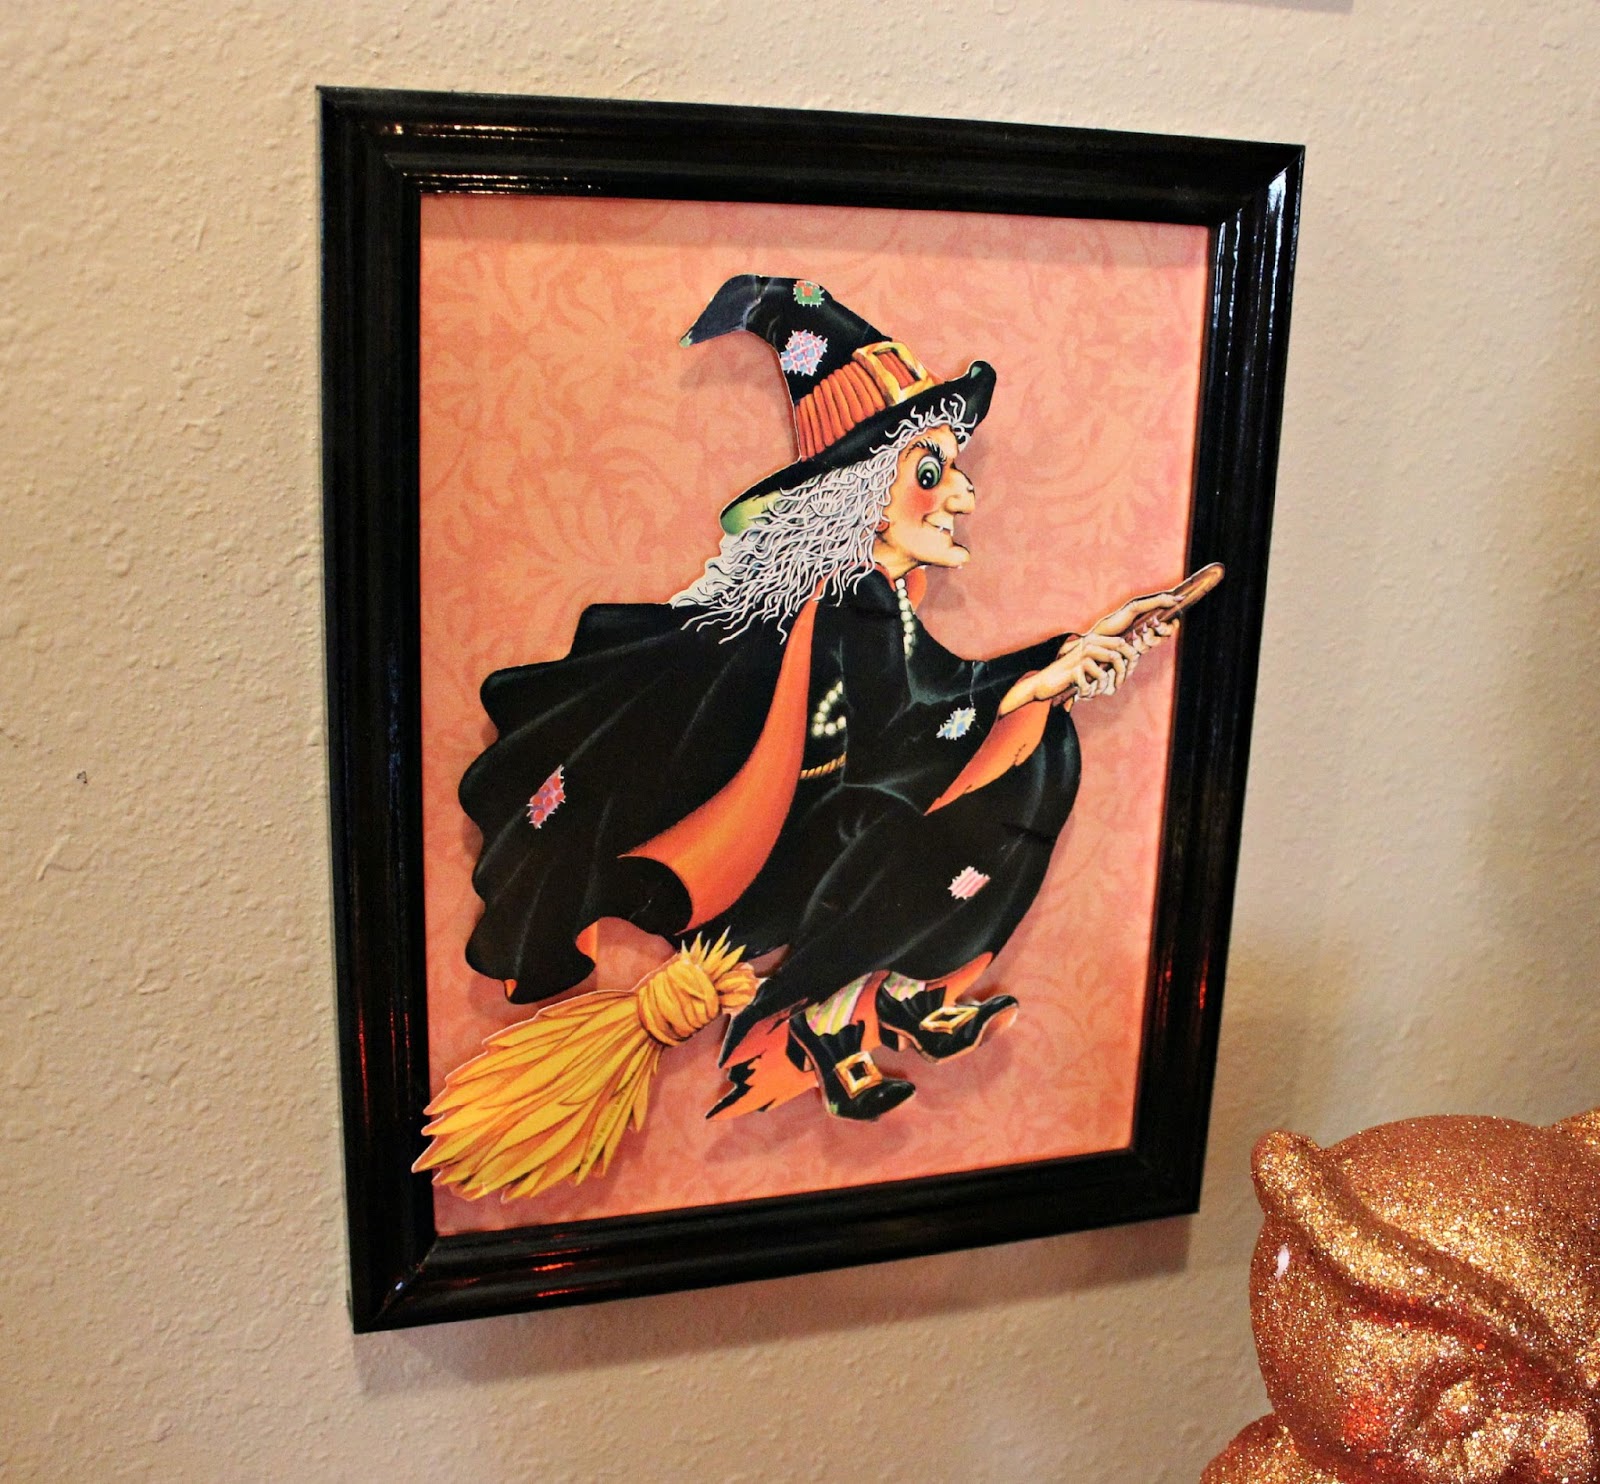
13. Craft a 3D Layered Witch Art Piece with a Fuchsia Background
This is not your average piece of Halloween wall art. The use of a vibrant, unconventional color like fuchsia and the clever 3D layering make this a standout craft project. It’s a modern, punchy take on Halloween decor that feels handmade in the best way possible.
⚠️ Real Talk
The One Thing
The multi-layered, three-dimensional construction is what makes this piece truly special. By cutting out the witch, her hat, and cape as separate pieces and mounting them with foam dots, the artist creates literal depth and shadow. This pop-up effect turns a simple illustration into a dynamic object that catches the eye from across the room. It’s a technique that looks complicated but is surprisingly achievable.
How-To Brief
- Start with a glossy black frame. Cut a piece of fuchsia patterned scrapbook paper to fit inside.
- Print or draw your witch design on black cardstock. You’ll need separate pieces for the body, the cape, and the hat details.
- Carefully cut out each element.
- Assemble the base layers first, gluing the main witch silhouette onto the broomstick.
- Use small foam adhesive squares to attach the layered elements, like the orange cape and hat band. This creates the 3D effect.
- Mount the finished witch onto the fuchsia background within the frame.
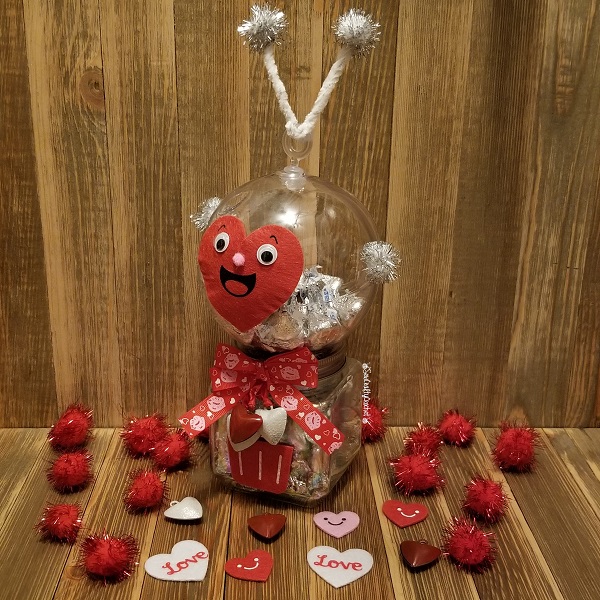
14. DIY a Cheerful Valentine’s Gumball Machine Character
This might be one of the cutest and most creative Valentine’s DIYs we’ve ever seen. Transforming a simple gumball machine into a playful character is pure genius. It’s a whimsical, lighthearted project that’s perfect for a kid’s room, a teacher’s desk, or just bringing a little smile to your kitchen counter. This is a great companion piece to the tiered tray in Idea #5.
⭐ The One Thing
What Makes It Work
The charm is in the personification. By adding a simple felt heart face and some pom-pom ‘earmuffs,’ the gumball machine is given a personality. The limited color palette of red, white, and silver keeps the look cohesive and festive. Filling the machine with silver-wrapped candies instead of multicolored gumballs was a smart choice, as it maintains the clean, graphic look and lets the red accents pop.
Before You Start Checklist
- Make sure the gumball machine is clean and dry, especially if you plan to use unwrapped, edible candy inside.
- Gather all your materials: a gumball machine, red and white felt, silver pom-poms, ribbon, hot glue, and your choice of filler candy.
- Decide if you want the decorations to be permanent or removable. Use hot glue for a permanent bond or double-sided tape for a temporary decoration you can swap out next holiday.
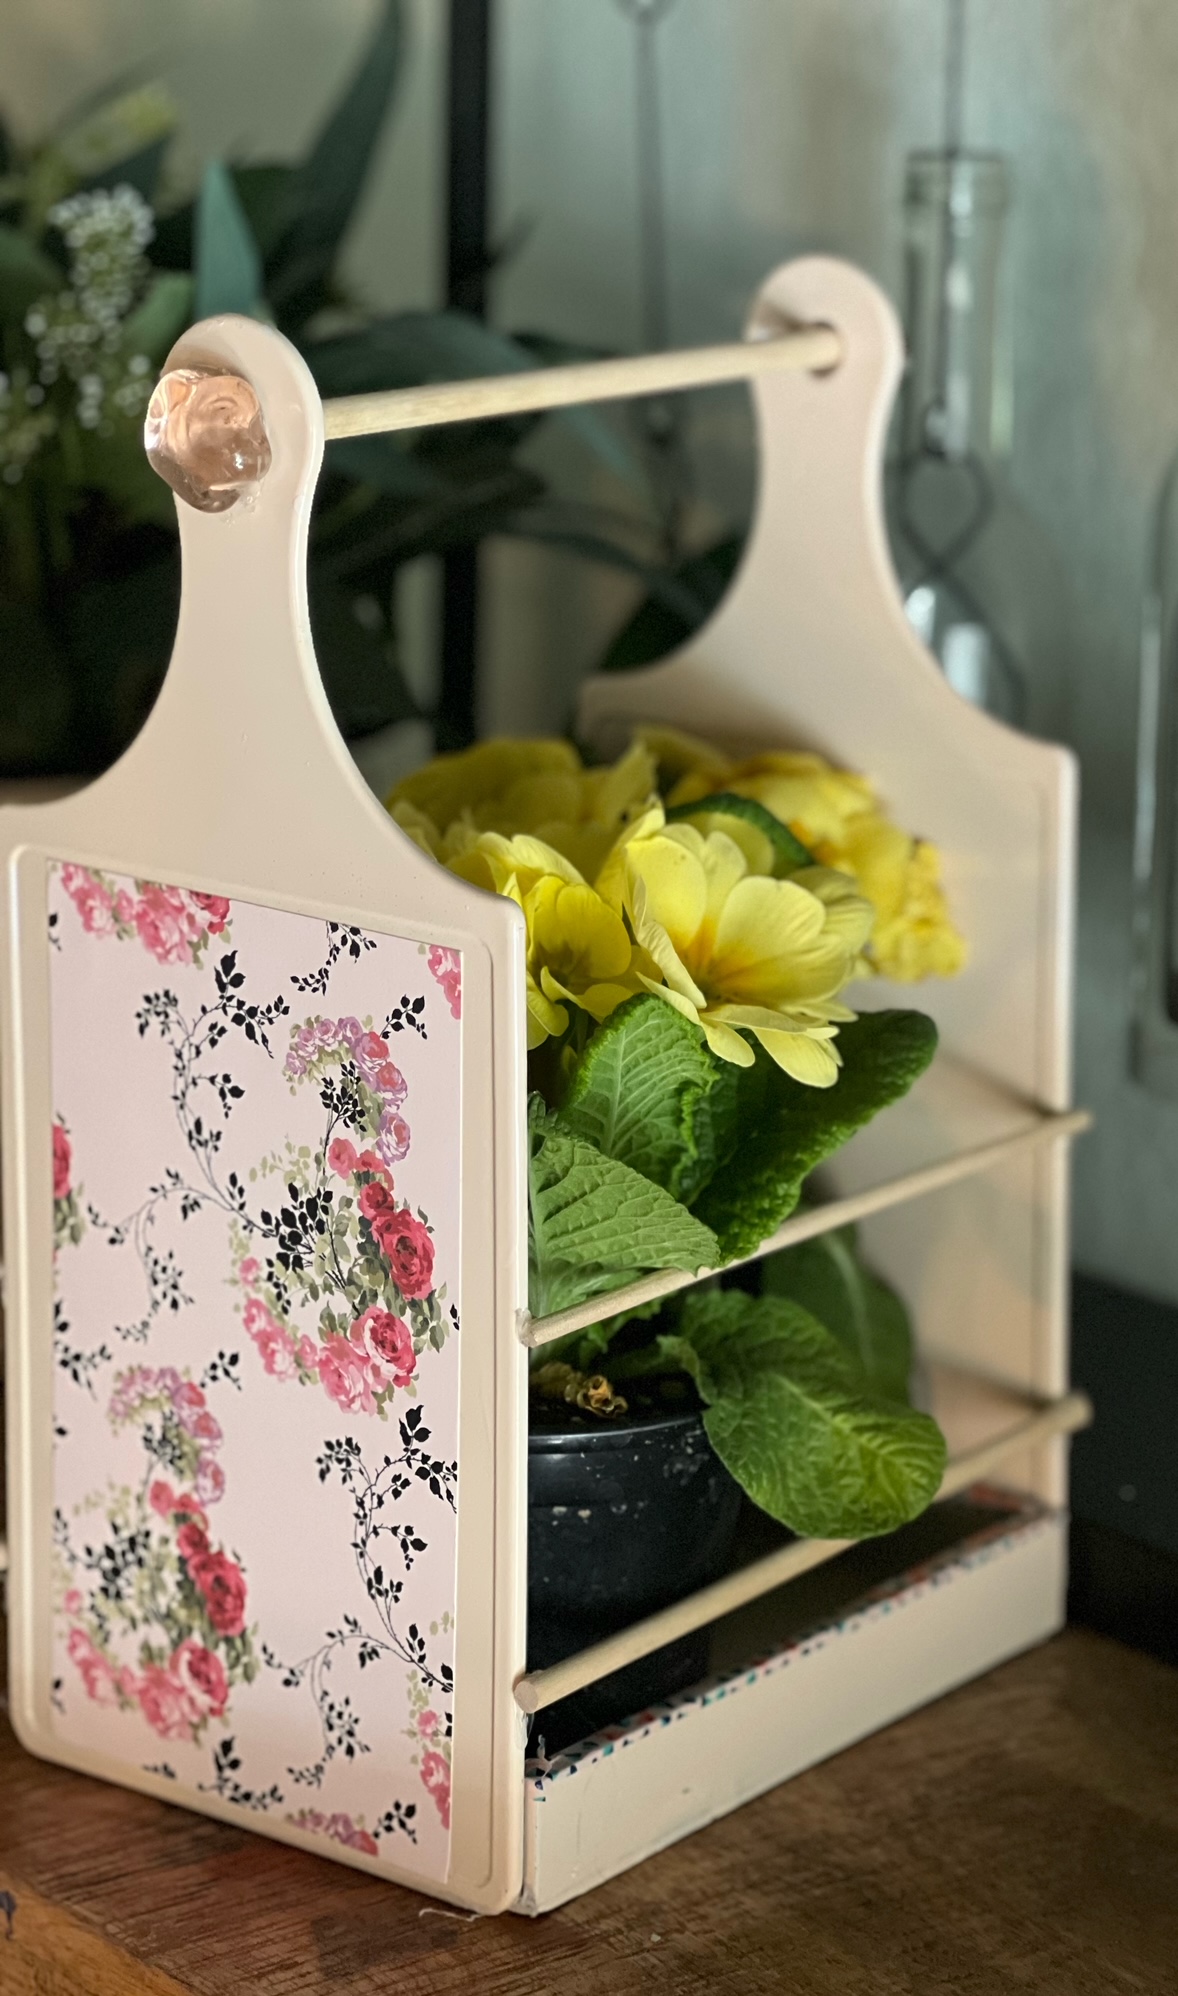
15. Decoupage a Wooden Caddy with a Pink Floral Pattern
This is a beautiful way to add a touch of custom, feminine charm to a plain wooden caddy. Decoupage is a classic craft that can elevate an inexpensive item into something that looks like a boutique find. The combination of the pink and red floral pattern with the vibrant live yellow flowers is absolutely lovely.
✅ Before You Start
Designer Tip
For a seamless decoupage finish, use a good quality medium like Mod Podge. Apply a thin, even layer to the wood surface, then press down your paper, smoothing out any bubbles from the center outwards. To make the piece durable and water-resistant (important if you’re using it as a planter), apply two or three thin topcoats of your decoupage medium, letting it dry completely between each coat.
Maintenance Reality
Even with a sealant, a decoupaged wooden piece isn’t fully waterproof. Do not plant directly into the caddy. Notice how the flowers are in their own separate black pot. This is crucial to prevent water from warping the wood and ruining the paper finish. Always use a liner or keep plants in a plastic container that you can remove for watering.
16. Achieve Farmhouse Chic with Distressed Candlesticks and Plaid
This vignette is the epitome of modern farmhouse style. It expertly blends rustic textures with graphic patterns and a touch of greenery to create a look that feels both cozy and current. It’s a simple formula that can be adapted for a mantel, an entryway table, or a bookshelf.

📏 Scale Guide
The One Thing
The framed ‘THIS IS home’ sign is the heart of this display. Specifically, it’s the black and white plaid background that makes it work. The pattern is bold enough to draw the eye and provides a graphic punch that keeps the arrangement from feeling too rustic or old-fashioned. It connects to the black font and provides a crisp, modern contrast to the distressed white candlesticks and brown wood surface.
What Makes It Work
This arrangement works because of its strong sense of balance. The two tall, bright white candlesticks on the left are visually balanced by the darker, shorter potted plant on the right. The framed sign sits in the middle, anchoring the composition. The soft texture of the faux succulent garland winding through the display connects all the separate elements and adds a layer of softness.
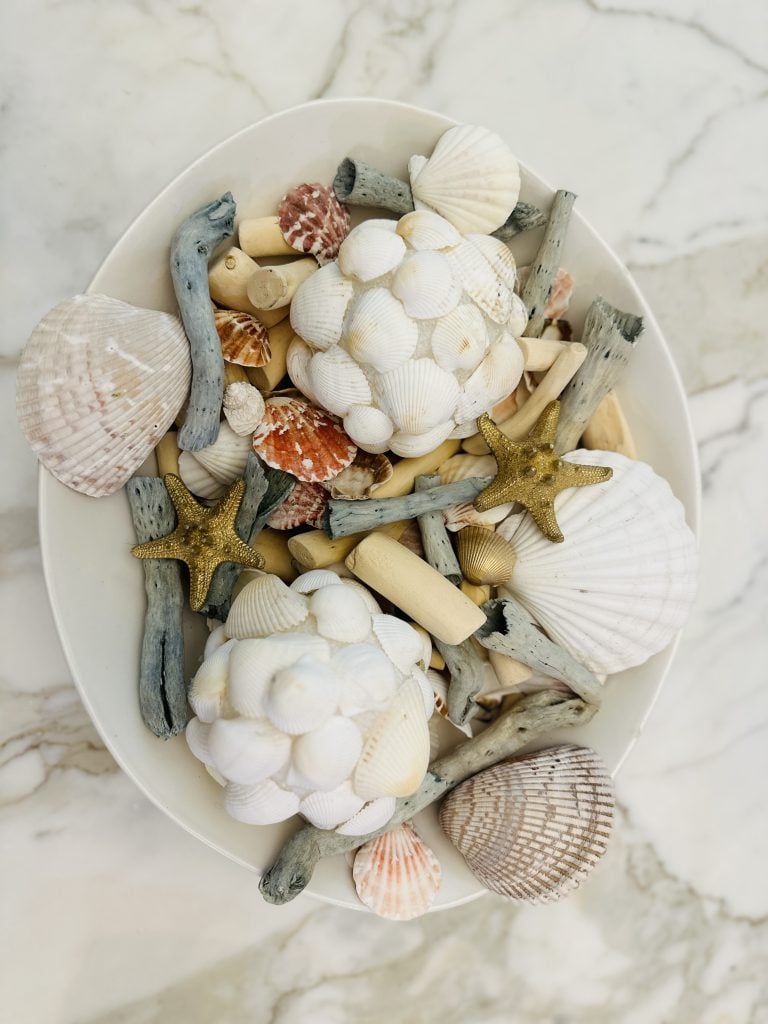
17. Create a Coastal Vibe with a Shell-Filled Decorative Bowl
This is a perfect example of how to create a sophisticated coastal theme without resorting to kitschy clichés. The arrangement feels collected and natural, like treasures gathered from a walk on the beach. The simple white bowl provides a clean, modern frame for the organic shapes and textures within.
🧹 Maintenance Reality
Style Math
The formula for this serene look is: 50% natural textures (seashells, driftwood) + 30% clean base (the white oval bowl) + 20% metallic accent (the gold starfish). The gold starfish are crucial; they add a touch of warmth and glamour that elevates the display from a simple bowl of shells into a curated decorative moment. The contrast between the weathered grey driftwood and the pop of gold is particularly effective.
Designer Tip
To make an arrangement like this feel more dynamic, vary the scale of your items. Notice the mix of large, smooth shells, small textured ones, and chunky pieces of driftwood. The shell-covered spheres also add a unique, uniform shape to contrast with the organic ones. When placing your items, start with the largest pieces (like the driftwood) and then fill in around them with the smaller shells, tucking the gold starfish in last as your ‘jewelry’.
18. Assemble a Warm and Festive Holiday Wall Display
This is a lovely way to create a holiday focal point, especially if you don’t have a traditional fireplace mantel. A simple wall-mounted shelf becomes the perfect stage for a festive arrangement of candles, garland, and a statement wreath. The warm glow of the lights creates a wonderfully inviting atmosphere.

🎯 What Makes It Work
Scale Guide
For a display like this to have impact, the scale of the wreath and shelf need to be in harmony with the wall. A good rule is to have the shelf be about two-thirds the width of the wreath. The shelf itself should be at least 24-30 inches long to comfortably hold the garland and candles without looking cramped. Hang the wreath so there are about 8-12 inches of space between the bottom of the wreath and the shelf.
Real Talk
Safety is key when mixing lighting and greenery. If you’re using a real or faux garland that isn’t pre-lit, be sure to use flameless, battery-operated candles. The combination of open flame from real candles and potentially flammable foliage is a serious fire hazard. The good news is that modern LED candles provide a very realistic warm flicker without any of the risk, making them the perfect choice for a display like this.
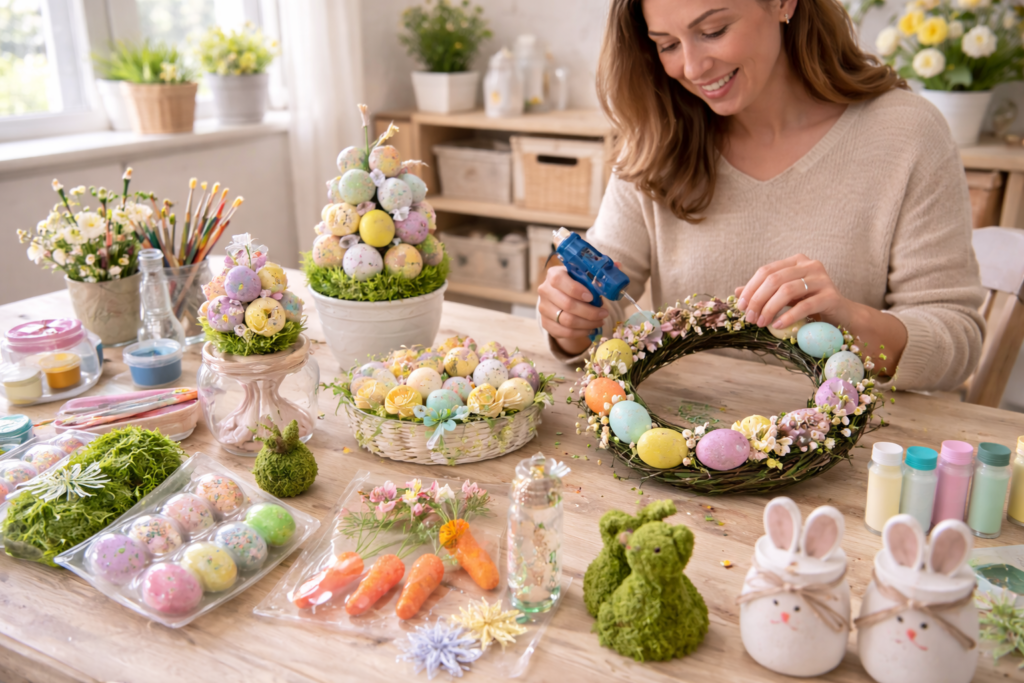
19. Get Creative with Pastel Easter Egg Crafting Projects
This image is a crafter’s dream, capturing the joyful process of creating pastel-perfect Easter decor. The scene is brimming with inspiration, from topiaries to wreaths, all tied together with a cohesive palette of soft spring colors and charming motifs. It’s a testament to how a few simple craft supplies can be transformed into a whole season’s worth of decoration.
💡 Designer Tip
The One Thing
The consistent use of the pastel speckled mini eggs is the single element that unifies this entire collection. They appear on the wreath, in the topiaries, and are ready for the next project. This repetition is what turns a collection of different crafts into a coordinated set of decor. It’s a smart strategy: by choosing one key element and using it across multiple projects, you create a powerful and cohesive visual story.
What Makes It Work
This scene is a masterclass in controlled chaos. While there are many items on the table, it feels creative and inspiring, not messy. This is achieved through a strict color palette—almost every item is a variation of pastel pink, yellow, blue, green, and purple, grounded by white and natural green moss. This color control allows for a wide variety of shapes and textures (ceramic bunnies, foam eggs, fuzzy moss) to coexist harmoniously.
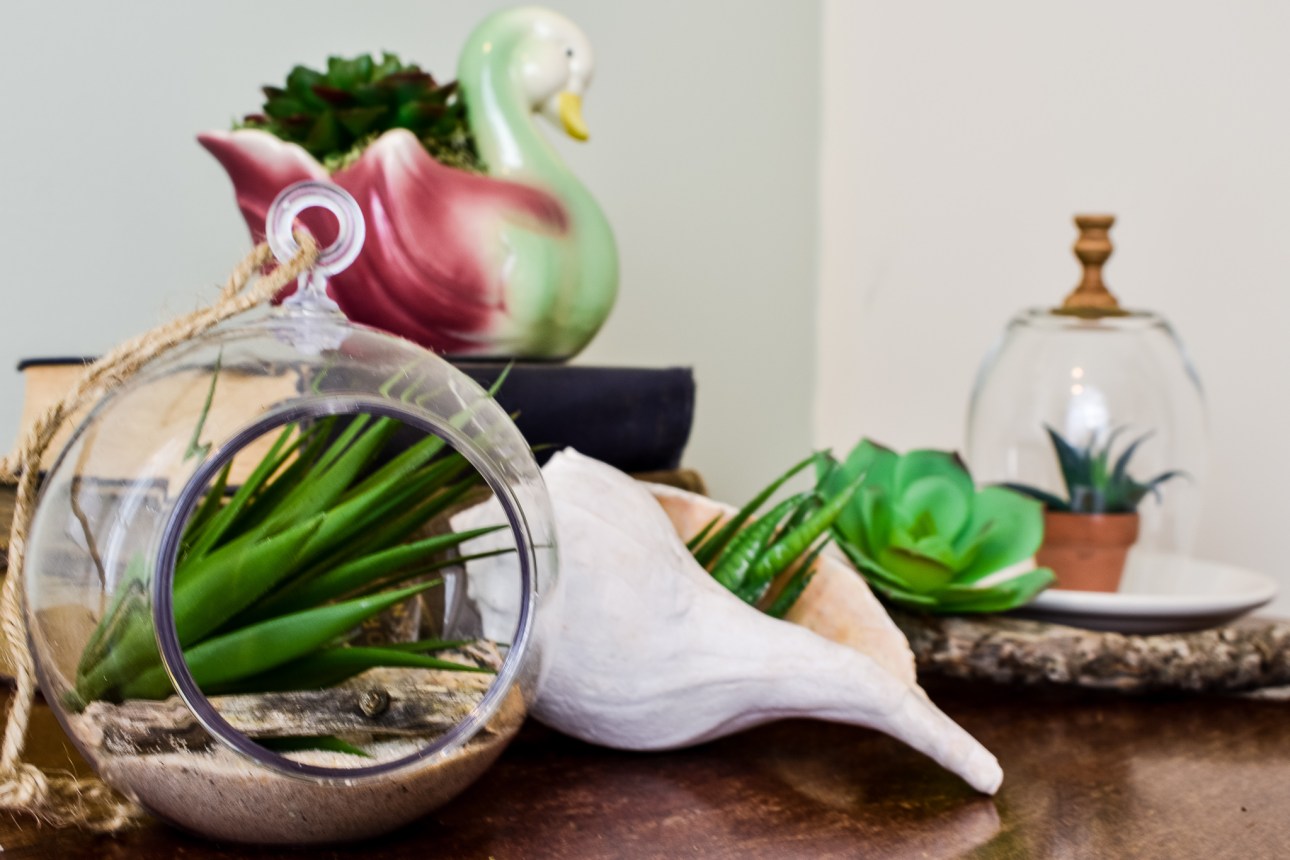
20. Arrange a Natural Vignette with Faux Succulents and a Conch Shell
This beautiful, tranquil arrangement brings the outdoors in, without the need for a green thumb. The combination of different containers—a hanging terrarium, a glass cloche, a glazed planter, and a natural conch shell—creates a visually interesting collection. It feels curated and peaceful, perfect for a side table or bookshelf.
🔥 Trending Context
Designer Tip
When creating a vignette with multiple objects, think in triangles. Notice how the hanging terrarium, the tall cloche, and the low conch shell form a rough triangle. This creates a composition with varied heights that guides the eye through the display. Arranging items at different heights and depths, rather than in a straight line, is key to making a collection feel natural and effortless.
Scale Guide
A vignette like this works well in a dedicated corner or on a surface that’s at least 18-24 inches deep to allow for layering. The hanging terrarium needs vertical space, so this is ideal for a spot with at least 2 feet of clearance above the surface. If you lack vertical space, you could achieve a similar feel by placing all the items on a decorative tray to unify them, as seen in Idea #5.
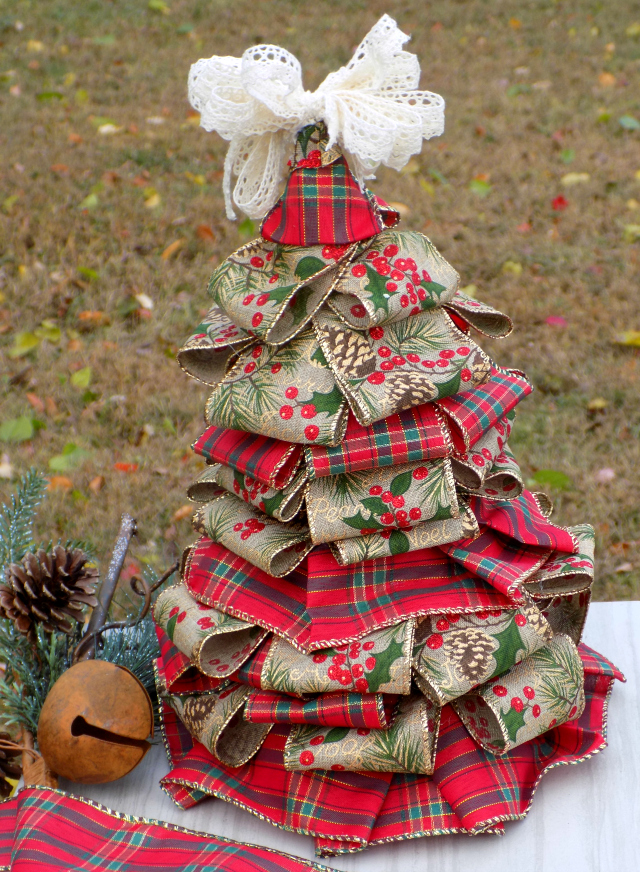
21. Craft a Mini Christmas Tree from Layered Ribbons
This is a wonderfully charming and rustic DIY Christmas decoration. Using layered, patterned ribbons to form the shape of a tree is a clever way to play with texture and color. It’s the perfect small accent for a tiered tray, a mantelpiece, or as part of a larger festive centerpiece.
💸 Get This Look For Less
How-To Brief
- Start with a small foam cone from a craft store as your base.
- Cut your various ribbons into strips of graduating lengths. You’ll want multiple pieces of each length.
- Fold each ribbon strip in half to form a loop, and pin or hot glue the cut ends to the foam cone, starting with the longest strips at the bottom.
- Continue layering rows of ribbon loops, working your way up the cone with progressively shorter strips.
- Once you reach the top, conceal the foam point with a decorative white lace bow.
Budget Breakdown
- Foam Cone: $1.25
- Spools of Ribbon (3-4 different patterns): $3.75 – $5.00
- Lace for Bow: $1.25
- Pinecone & Bell Accents: $1.25
- Hot Glue or Pins: $1.25
- TOTAL: $8.75 – $10.00
- Budget alternative: Use scrap fabric or old clothing cut into strips instead of buying new ribbon spools to bring the cost down significantly.
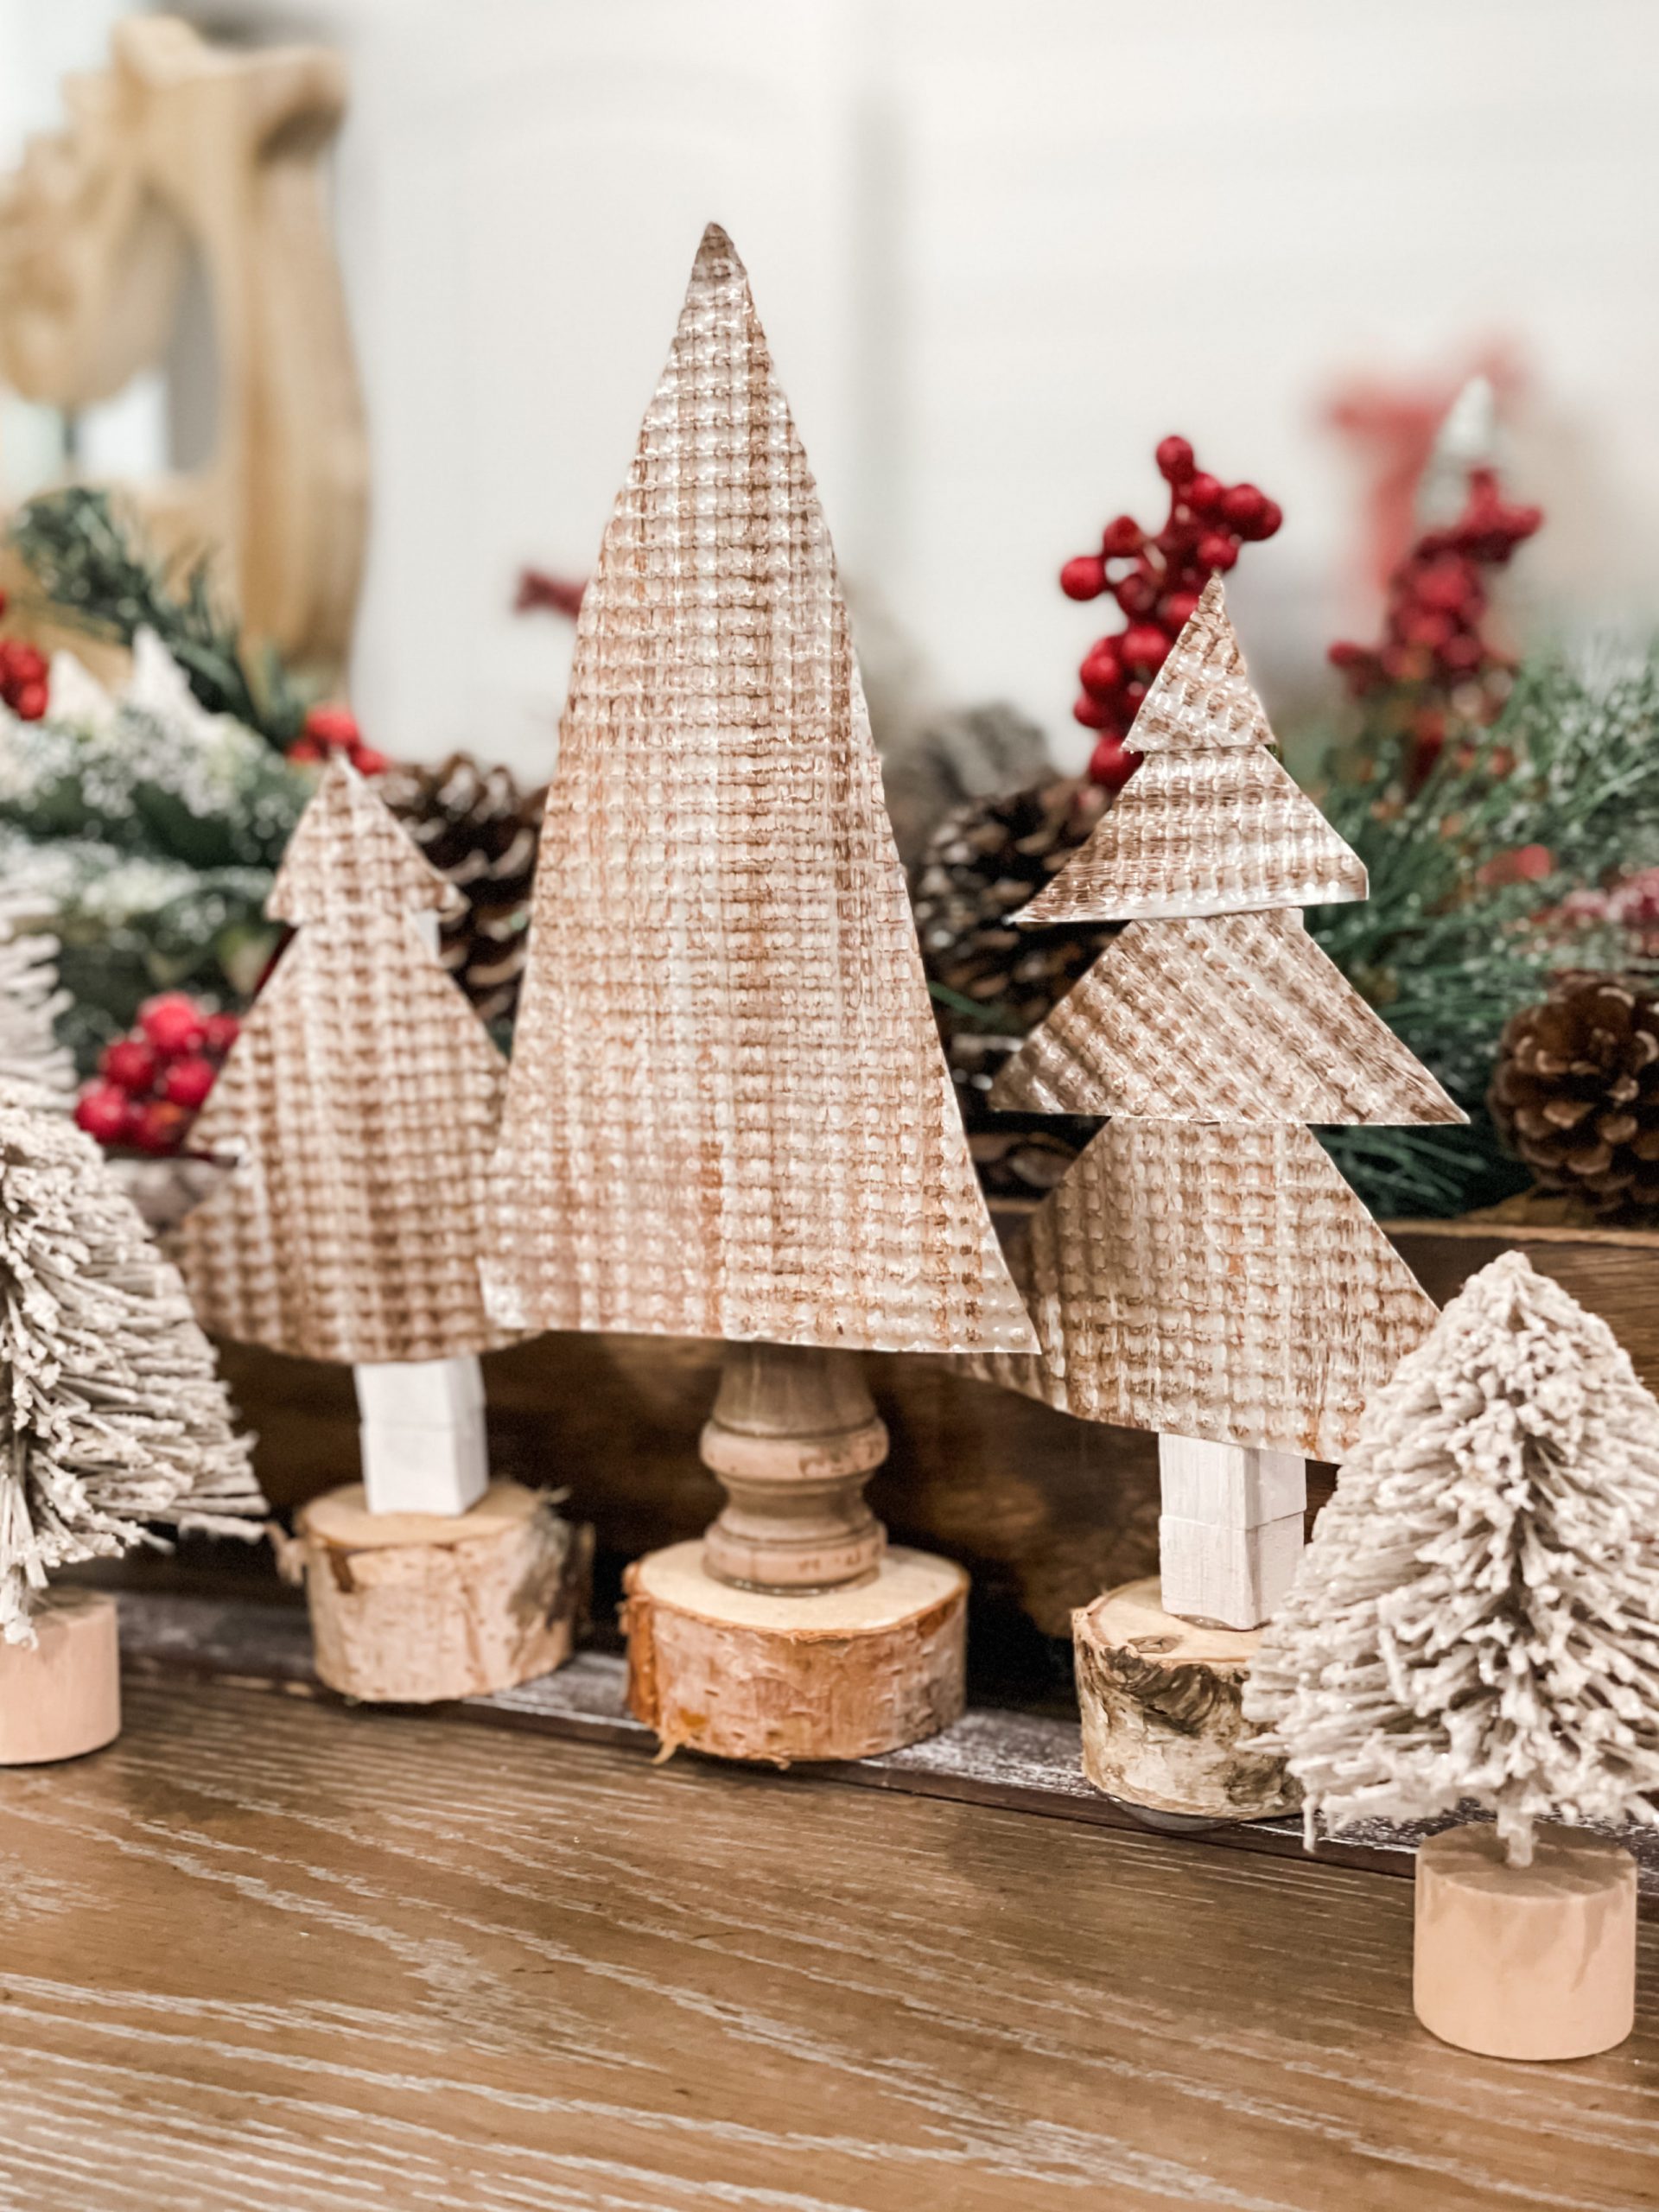
22. Display a Rustic Forest of Wooden and Bottle Brush Christmas Trees
This festive arrangement creates a miniature winter wonderland that feels both rustic and chic. The mix of materials—distressed wood, bristly bottle brushes, natural pinecones—creates a rich textural landscape. It’s a perfect example of how grouping similar objects of different sizes and materials can create a powerful decorative statement.
💰 Budget Breakdown
What Makes It Work
The success of this display lies in its monochromatic-with-a-pop color scheme and its repetition of a single shape. The palette is almost entirely warm browns, whites, and natural wood tones. This allows the various textures to stand out. The repetition of the conical Christmas tree shape, interpreted in different materials, makes the collection feel cohesive and intentional. The scattered pops of red from the berries add just enough festive color to brighten the scene.
The One Thing
The distressed wooden Christmas trees are the stars of this show. Their handmade, slightly imperfect quality provides a warmth and character that mass-produced decorations often lack. Sitting on their natural wood slice bases, they anchor the entire arrangement in a rustic, back-to-nature aesthetic that feels authentic and cozy. They are the element that gives this display its unique, homespun personality.
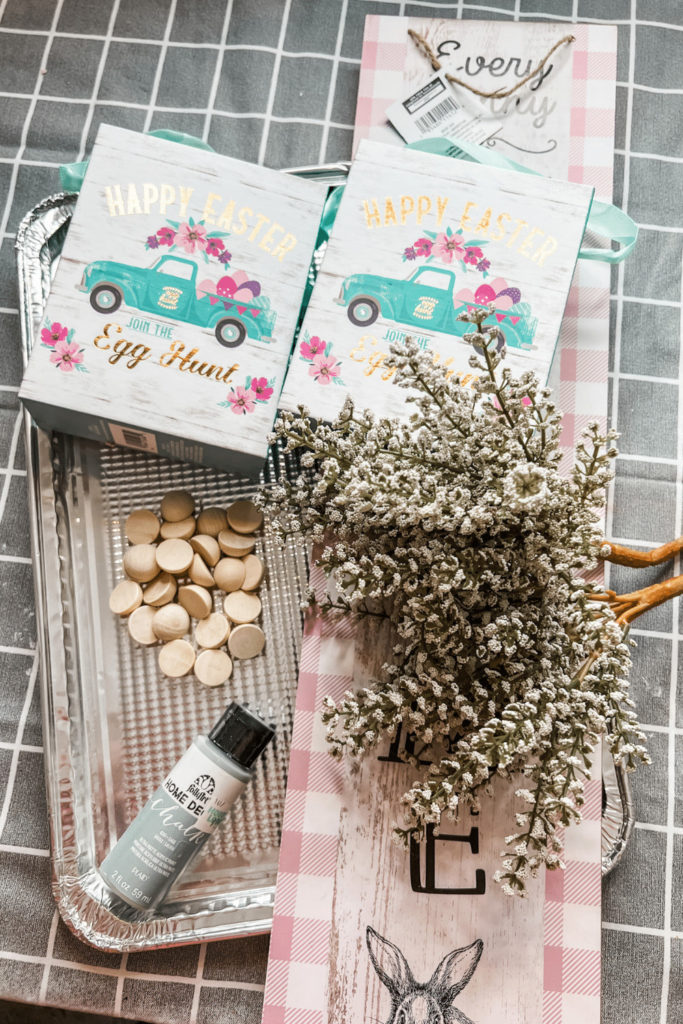
23. Gather Your Supplies for a Rustic Easter DIY Project
This image perfectly captures the satisfying moment before a DIY project begins, when all the creative possibilities are laid out. The collection of rustic signs, wooden elements, and plaid patterns points to a charming, farmhouse-style Easter crafting session. It’s a great flat-lay of affordable finds that can be combined in endless ways.
🔧 How-To Brief
Before You Start Checklist
- Protect your work surface! A checkered tablecloth like the one shown is a great way to add to the aesthetic while also catching any paint splatters or glue drips.
- Decide on your color palette. This one is clearly defined by teal, pink, white, and gray. Sticking to a few key colors will make your finished projects look coordinated.
- Have a plan for your pieces. Are you making ornaments from the wood discs? A gallery wall with the signs? Knowing your end goal helps you use your supplies efficiently.
Trending Context
The ‘vintage truck’ motif has been a massive trend in seasonal farmhouse decor for the past several years, and this image shows it’s still going strong for Easter. The teal truck filled with eggs is a playful, nostalgic image that resonates with the desire for simpler, more rustic celebrations. Paired with classic patterns like plaid and bunny illustrations, it hits all the right notes for the popular modern farmhouse aesthetic that continues to dominate Pinterest feeds.
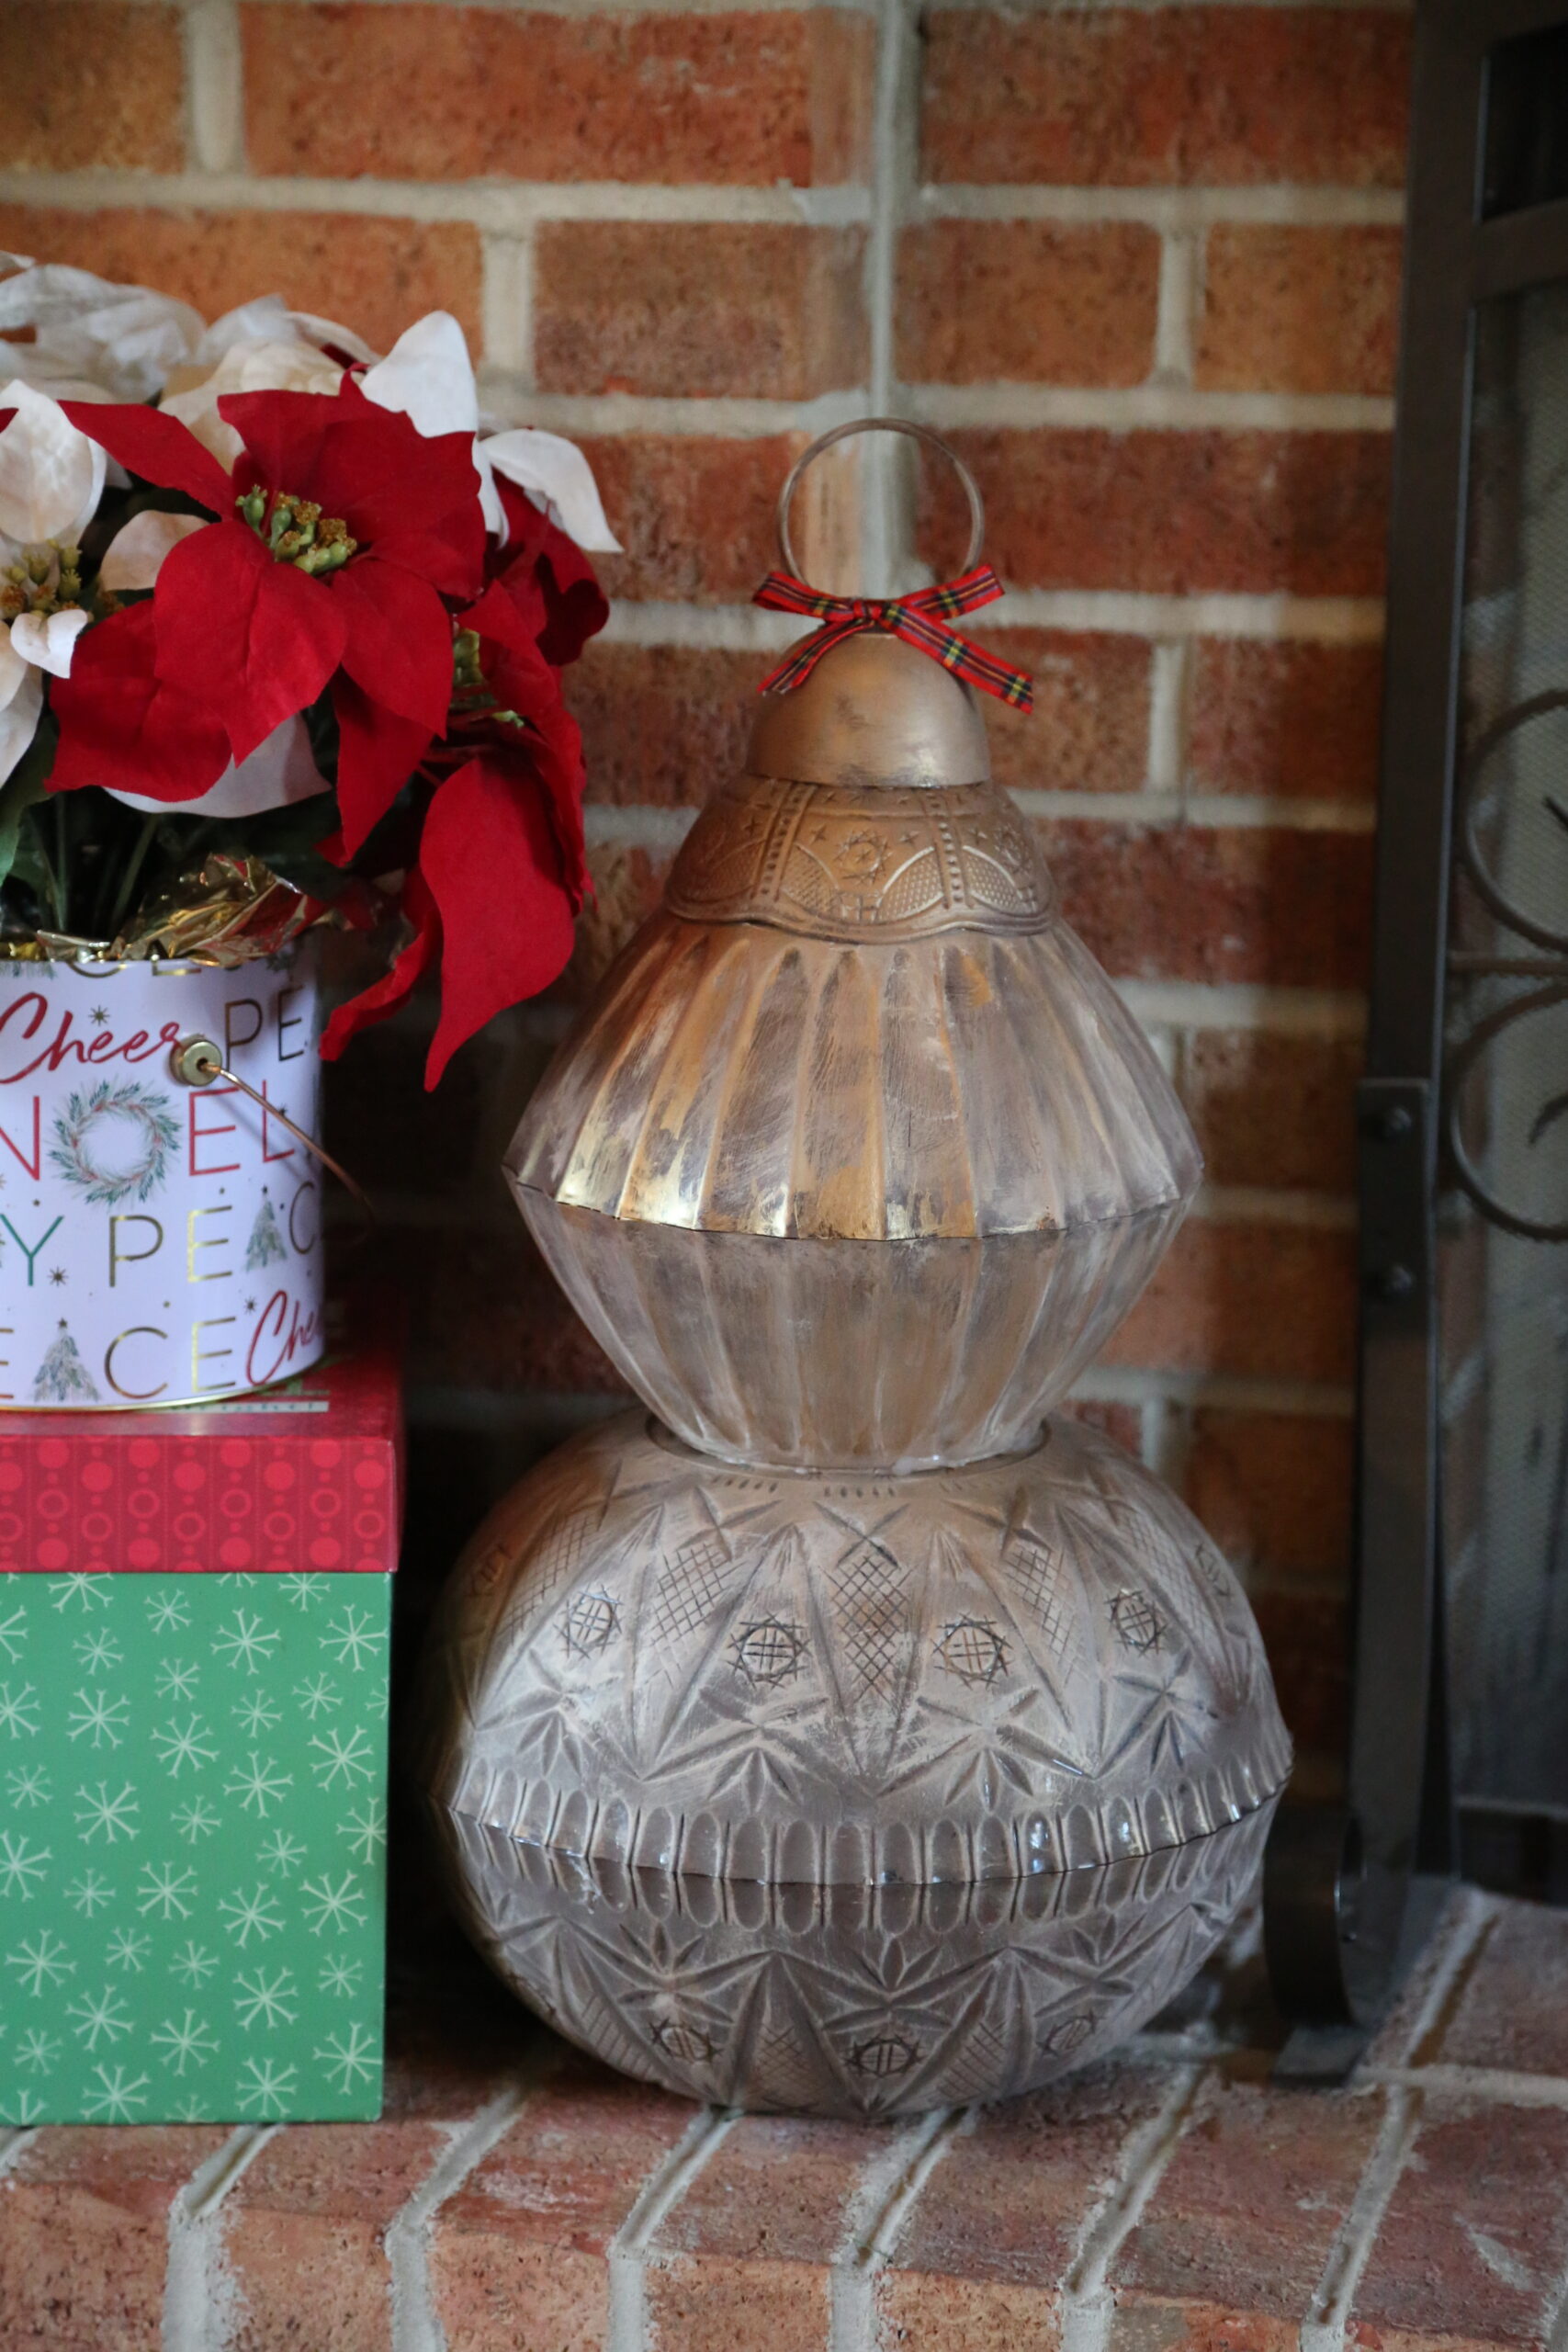
24. Decorate a Holiday Mantel with Poinsettias and a Metallic Ornament
This Christmas mantel display against a classic red brick backdrop is festive, traditional, and cozy. It uses a few large, high-impact items rather than a clutter of small ones to make a bold statement. The mix of textures—metallic ornament, plaid ribbon, faux florals, and rustic brick—creates a rich and inviting holiday look.
📐 Style Math
What Makes It Work
This arrangement nails the principle of scale. The oversized metallic ornament is substantial enough to hold its own against the rugged texture of the brick fireplace. Stacking the poinsettia container on top of gift boxes gives it the height it needs to balance the tall ornament. The limited, traditional color palette of red, white, green, and metallic tones feels cohesive and timelessly Christmas.
Designer Tip
When decorating a mantel, especially one with a strong texture like brick, don’t be afraid to go big with your decor. Small, delicate items can get lost visually. Choose 3-5 large statement pieces and arrange them asymmetrically for a more modern, dynamic look. Allowing some of the brick to show through between items helps the decor feel integrated with the architecture, not just sitting on top of it.
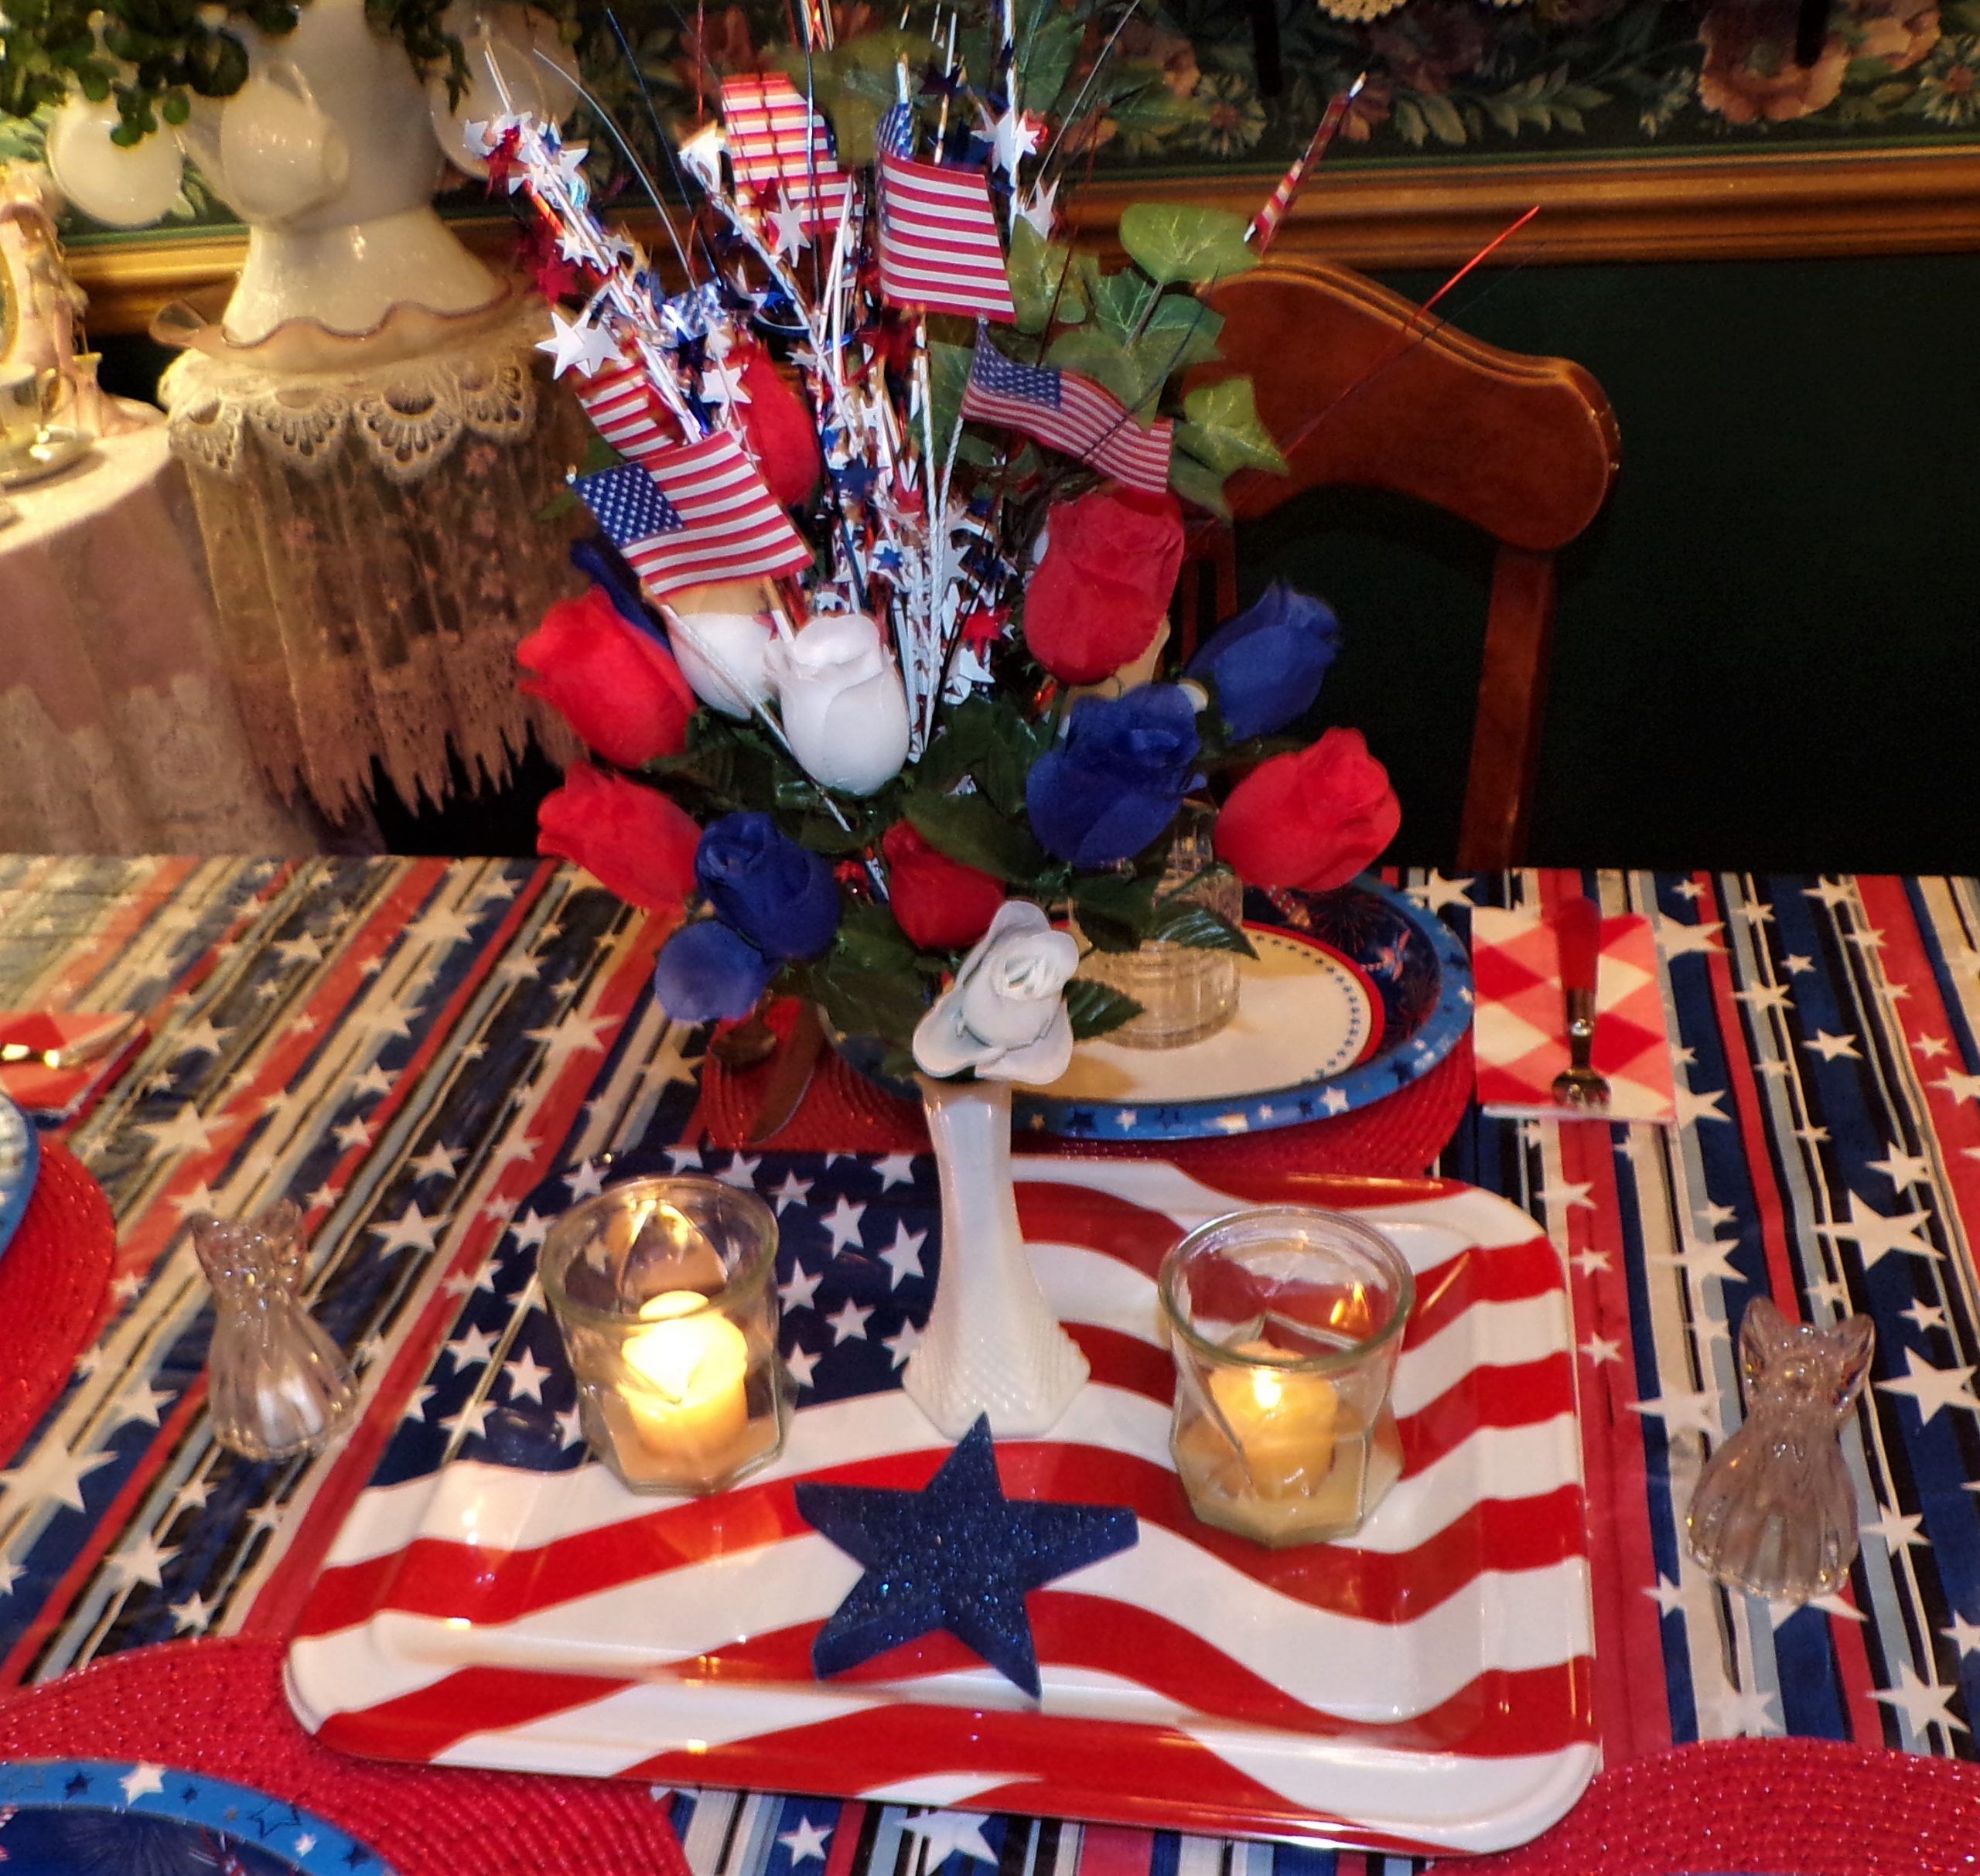
25. Set a Celebratory Patriotic Table with American Flags and Roses
This table setting is bursting with celebratory, patriotic spirit. It goes all-in on the red, white, and blue theme, using layers of pattern and festive accessories to create a look that’s perfect for the 4th of July or Memorial Day. The floral centerpiece softens the bold graphics of the flags and stars.
⚠️ Real Talk
Style Math
This look is a formula for maximum festive impact: 40% bold pattern (the tablecloth and tray) + 30% solid color blocks (the red placemats) + 20% soft texture (the faux roses) + 10% playful accents (the mini flags and star picks). The solid red placemats are key; they provide a place for the eye to rest and keep the multiple patterns from becoming overwhelming. For a similar look, try the festive wreath in Idea #27.
Real Talk
When using this much pattern and color, it’s important to choose simple dinnerware. Plain white plates would be ideal here. Using patterned plates on top of the busy tablecloth and placemats would create visual chaos. The goal is a fun, layered look, not a headache-inducing one! Let the table linens and centerpiece be the stars, and keep the functional items like plates and flatware simple and classic.
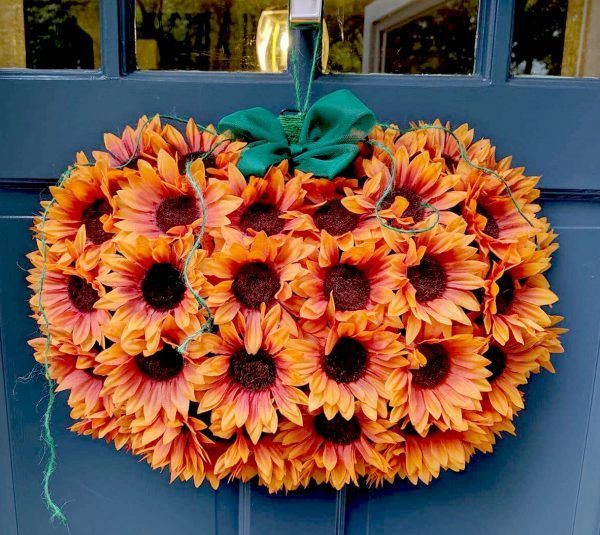
26. Hang a Pumpkin-Shaped Sunflower Wreath on a Blue Door
This is such a clever and creative twist on a traditional fall wreath. By arranging vibrant orange sunflowers into the shape of a pumpkin, it becomes a truly unique and eye-catching piece of door decor. The contrast with the dark blue door makes the colors pop, creating a warm and welcoming entrance.
⭐ The One Thing
The One Thing
The pumpkin silhouette is everything here. A simple round wreath of orange sunflowers would be pretty, but shaping them into an iconic fall object elevates the entire concept. It’s a playful, imaginative idea that instantly brings a smile. The simple green ribbon bow at the top acts as the ‘stem,’ completing the clever illusion and making it a standout piece.
What Makes It Work
Color theory is doing the heavy lifting. Orange and blue are complementary colors, meaning they sit opposite each other on the color wheel. This creates the strongest possible contrast, making the orange of the sunflowers appear even more vibrant and radiant against the deep blue of the door. The dark brown centers of the flowers also add depth and tie into the natural, rustic feel of autumn.
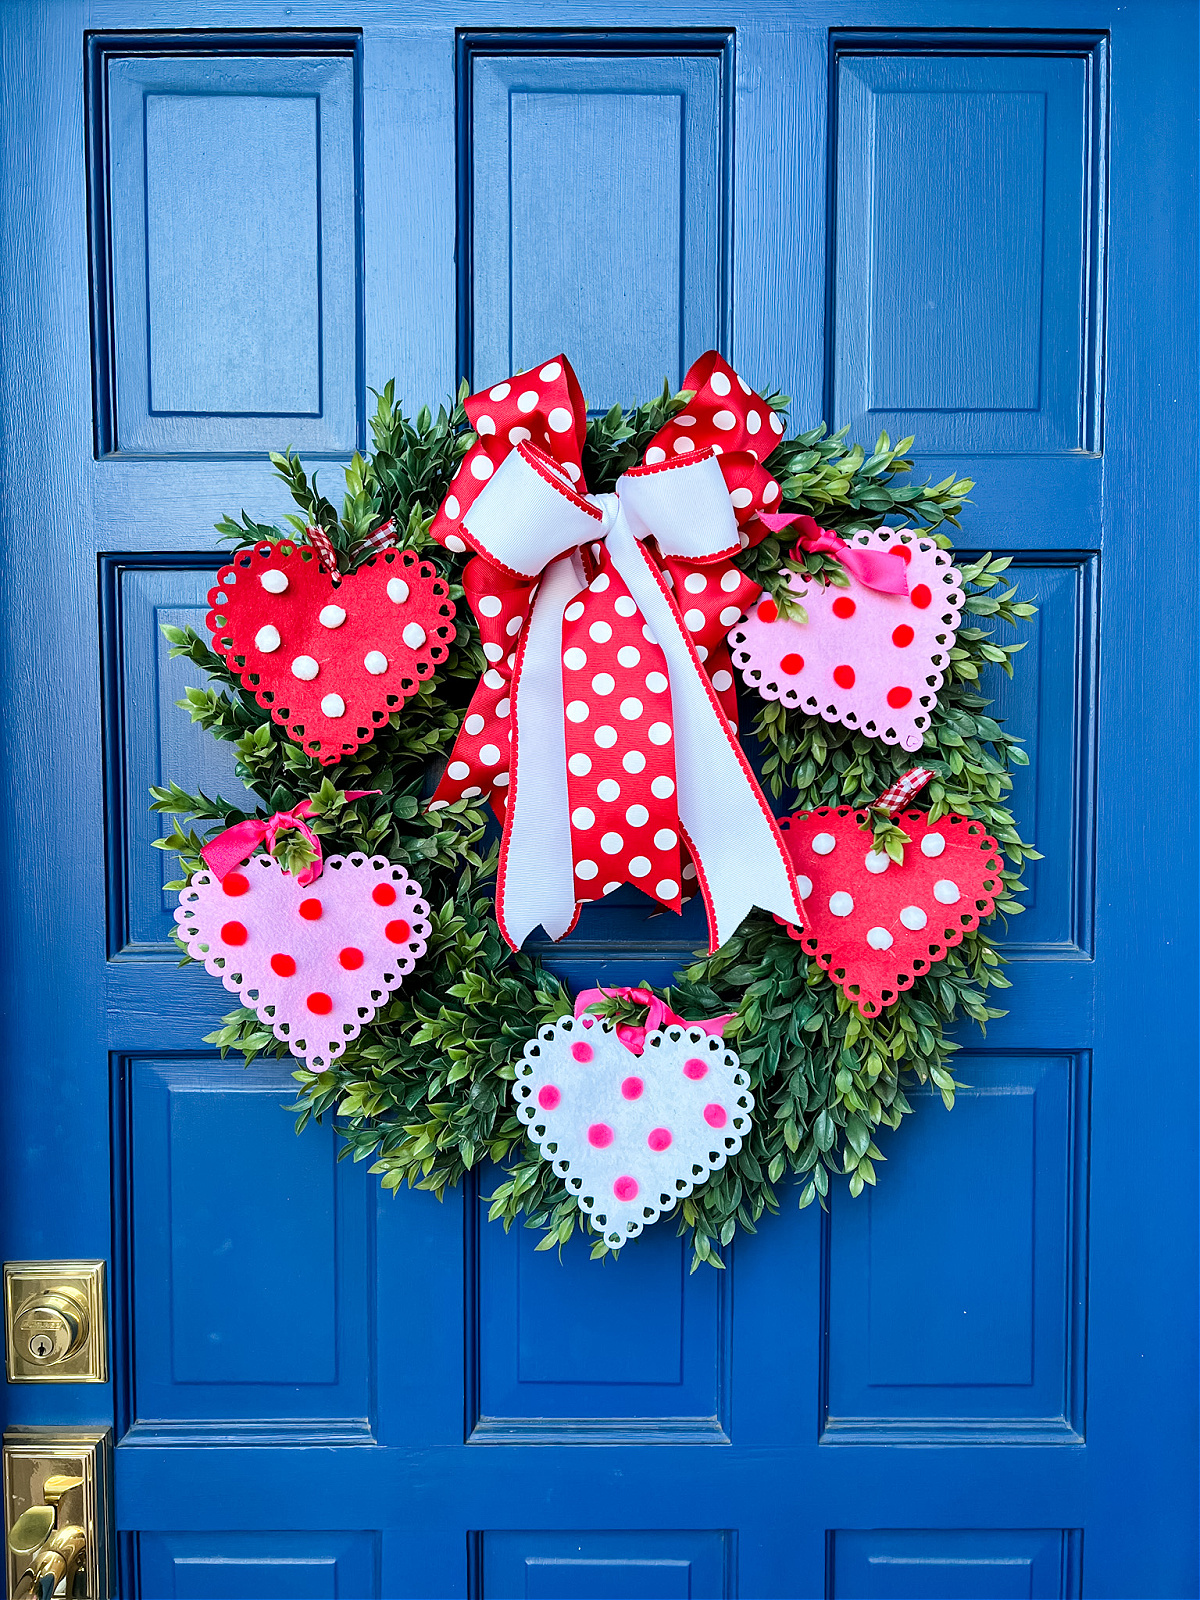
27. Decorate a Boxwood Wreath with Polka Dot Hearts for Valentine’s Day
This is a cheerful and charming way to dress up a standard green wreath for Valentine’s Day. The playful polka dot bow and matching felt hearts add a whimsical touch that feels sweet and celebratory. It’s an easy, non-permanent way to add a splash of seasonal fun to your front door.
✅ Before You Start
Designer Tip
To make a wreath like this feel balanced, distribute your decorative elements evenly. Notice how the red, pink, and white hearts are scattered around the entire wreath, not just clustered in one spot. To easily attach and remove the hearts for the next season, use floral pins or simply tuck their stems securely into the dense boxwood foliage rather than using permanent hot glue.
What Makes It Work
This design succeeds because of the smart contrast in both color and pattern. The vibrant red and white of the polka dot bow pops beautifully against the deep, uniform green of the boxwood wreath. The blue door provides another layer of stunning color contrast. The playful, graphic polka dot pattern on the bow and hearts adds a lighthearted, fun energy that perfectly suits the Valentine’s theme.
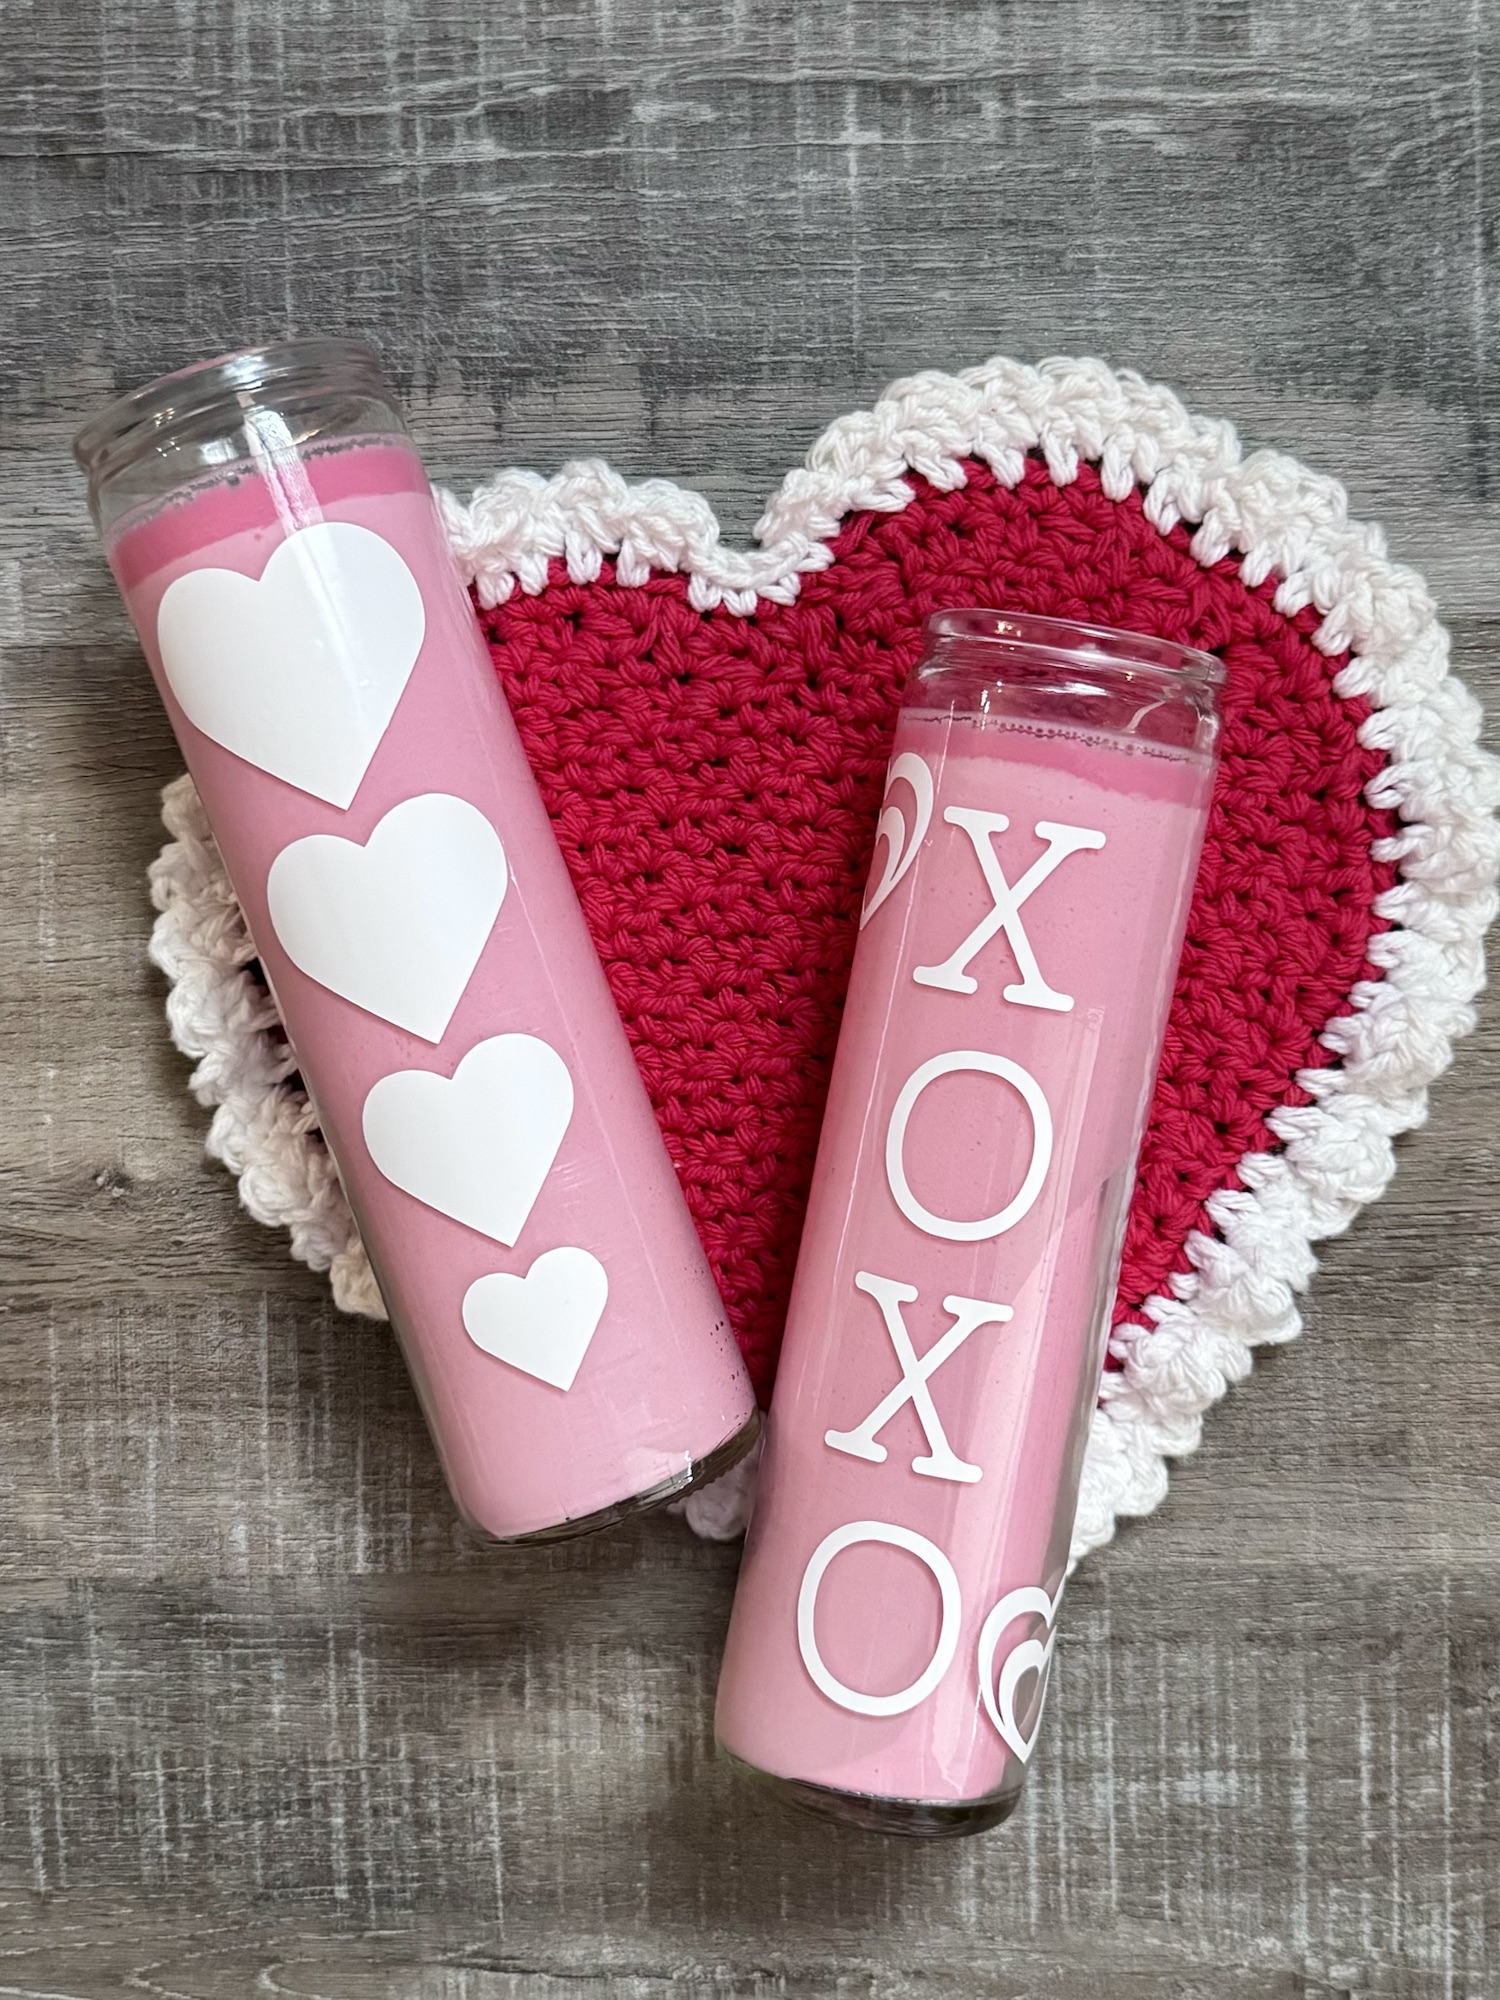
28. Craft Romantic Valentine’s Candles with ‘XOXO’ Decals
This is a super simple yet incredibly sweet DIY for Valentine’s Day. It transforms plain glass candles into custom, themed decor with just a few craft supplies. Placed on the charming crocheted heart trivet, they make a lovely vignette for a bedroom dresser or a romantic dinner table.
📏 Scale Guide
How-To Brief
- Start with plain glass jar candles in a light pink color. You can find these at most dollar or craft stores.
- Using a Cricut or other cutting machine, cut out your ‘XOXO’ and heart shapes from white permanent vinyl. Alternatively, you can buy pre-made letter and shape stickers.
- Carefully clean the glass surface of the candle to ensure the decals will adhere properly.
- Apply the vinyl decals, using a scraper tool or credit card to smooth out any bubbles. Arrange them in a pattern you like.
- Place them on a festive trivet and you’re done!
Get This Look For Less
If you don’t have a vinyl cutting machine, don’t worry! You can get the same look using a white paint pen. Simply draw your hearts and X’s directly onto the glass. It gives it a more personal, hand-drawn feel. For the trivet, you can cut a heart shape from a piece of red felt for a no-sew, no-crochet alternative that costs pennies.
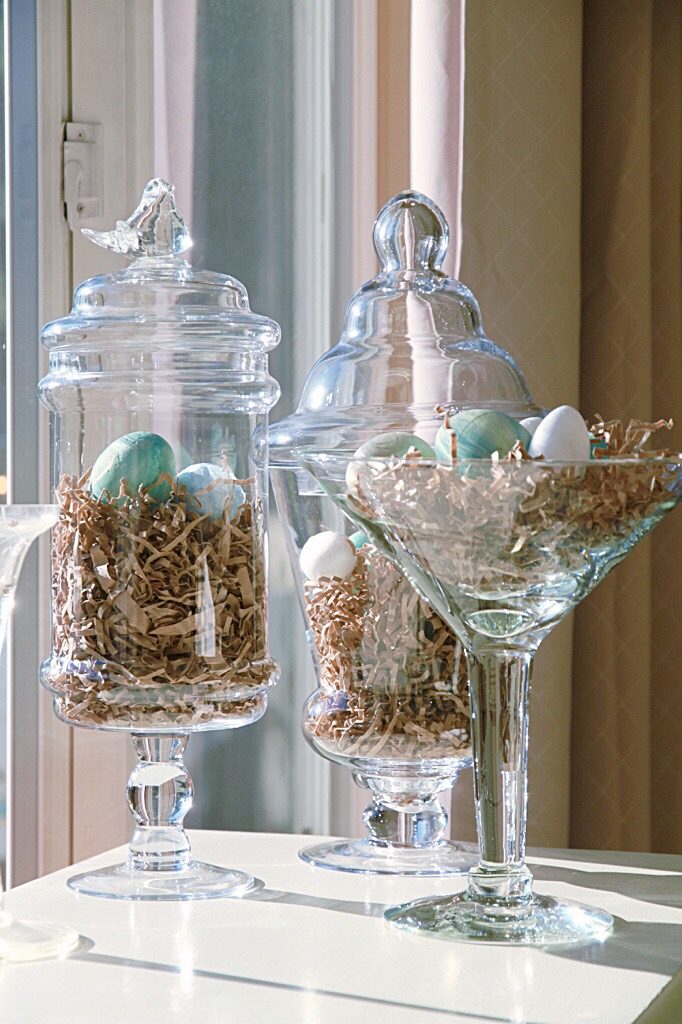
29. Use Apothecary Jars for a Light and Airy Easter Egg Display
This Easter decoration idea is all about elegance and simplicity. Using clear glass apothecary jars allows the contents to be the star. The arrangement feels light, airy, and sophisticated, making it a perfect centerpiece for a dining table or a beautiful accent on a console or mantel.
🧹 Maintenance Reality
The One Thing
The light brown shredded paper filler is the crucial element here. It provides a natural, nest-like texture that makes the pastel eggs pop. Without the filler, the eggs would just sit sadly at the bottom of the jars. The paper adds volume, texture, and a soft, rustic element that holds the entire ‘eggs in a nest’ concept together. It’s an inexpensive material that does a ton of design work.
Scale Guide
This look relies on a trio of containers with varying heights and shapes. To replicate this, choose one tall jar (12-15 inches), one medium jar (8-10 inches), and one shorter, wider-mouthed vessel like the martini glass. Grouping them together works well on a surface that’s at least 36 inches long, like a sideboard or entry table. This gives the arrangement room to breathe and feel like an intentional, curated collection rather than just a random assortment of jars.
Your Home, Your Masterpiece
See? A stylish home doesn’t require a huge budget, just a little creativity and a trip to the Dollar Tree. These ideas are just a starting point—the best part of DIY is making it your own. So grab that glue gun, pick a project, and start creating a home that feels uniquely you.
Don’t forget to save your favorites to your Pinterest boards for your next crafting weekend!