29 Jaw-Dropping Pull Out Storage Ideas for Your Bathroom in 2026 You Need to See

You know that feeling when you finally find the pull-out storage idea that looks exactly right for your bathroom? It feels like you’ve unlocked a new level of home organization. But with so many options, turning that inspiration into reality can feel overwhelming. We spent serious time browsing IKEA, Target, and specialty cabinet stores to bring you only what’s worth your attention this year. After filtering through hundreds of options, we narrowed it down to 29 ideas that actually deliver on both style and function.
Inside, you’ll find 29 curated pull-out concepts covering modern, traditional, and rustic styles. We’re exploring everything from full-height pantry-style cabinets to clever under-sink solutions. In 2026, the focus is on “functional luxury”—making every square inch work harder without sacrificing aesthetics. It’s about creating a space that feels effortlessly tidy and personalized. And stay until the end — we break down the most common mistakes that can ruin these looks.
📌 Save this to Pinterest for later — you’ll want to revisit these ideas.
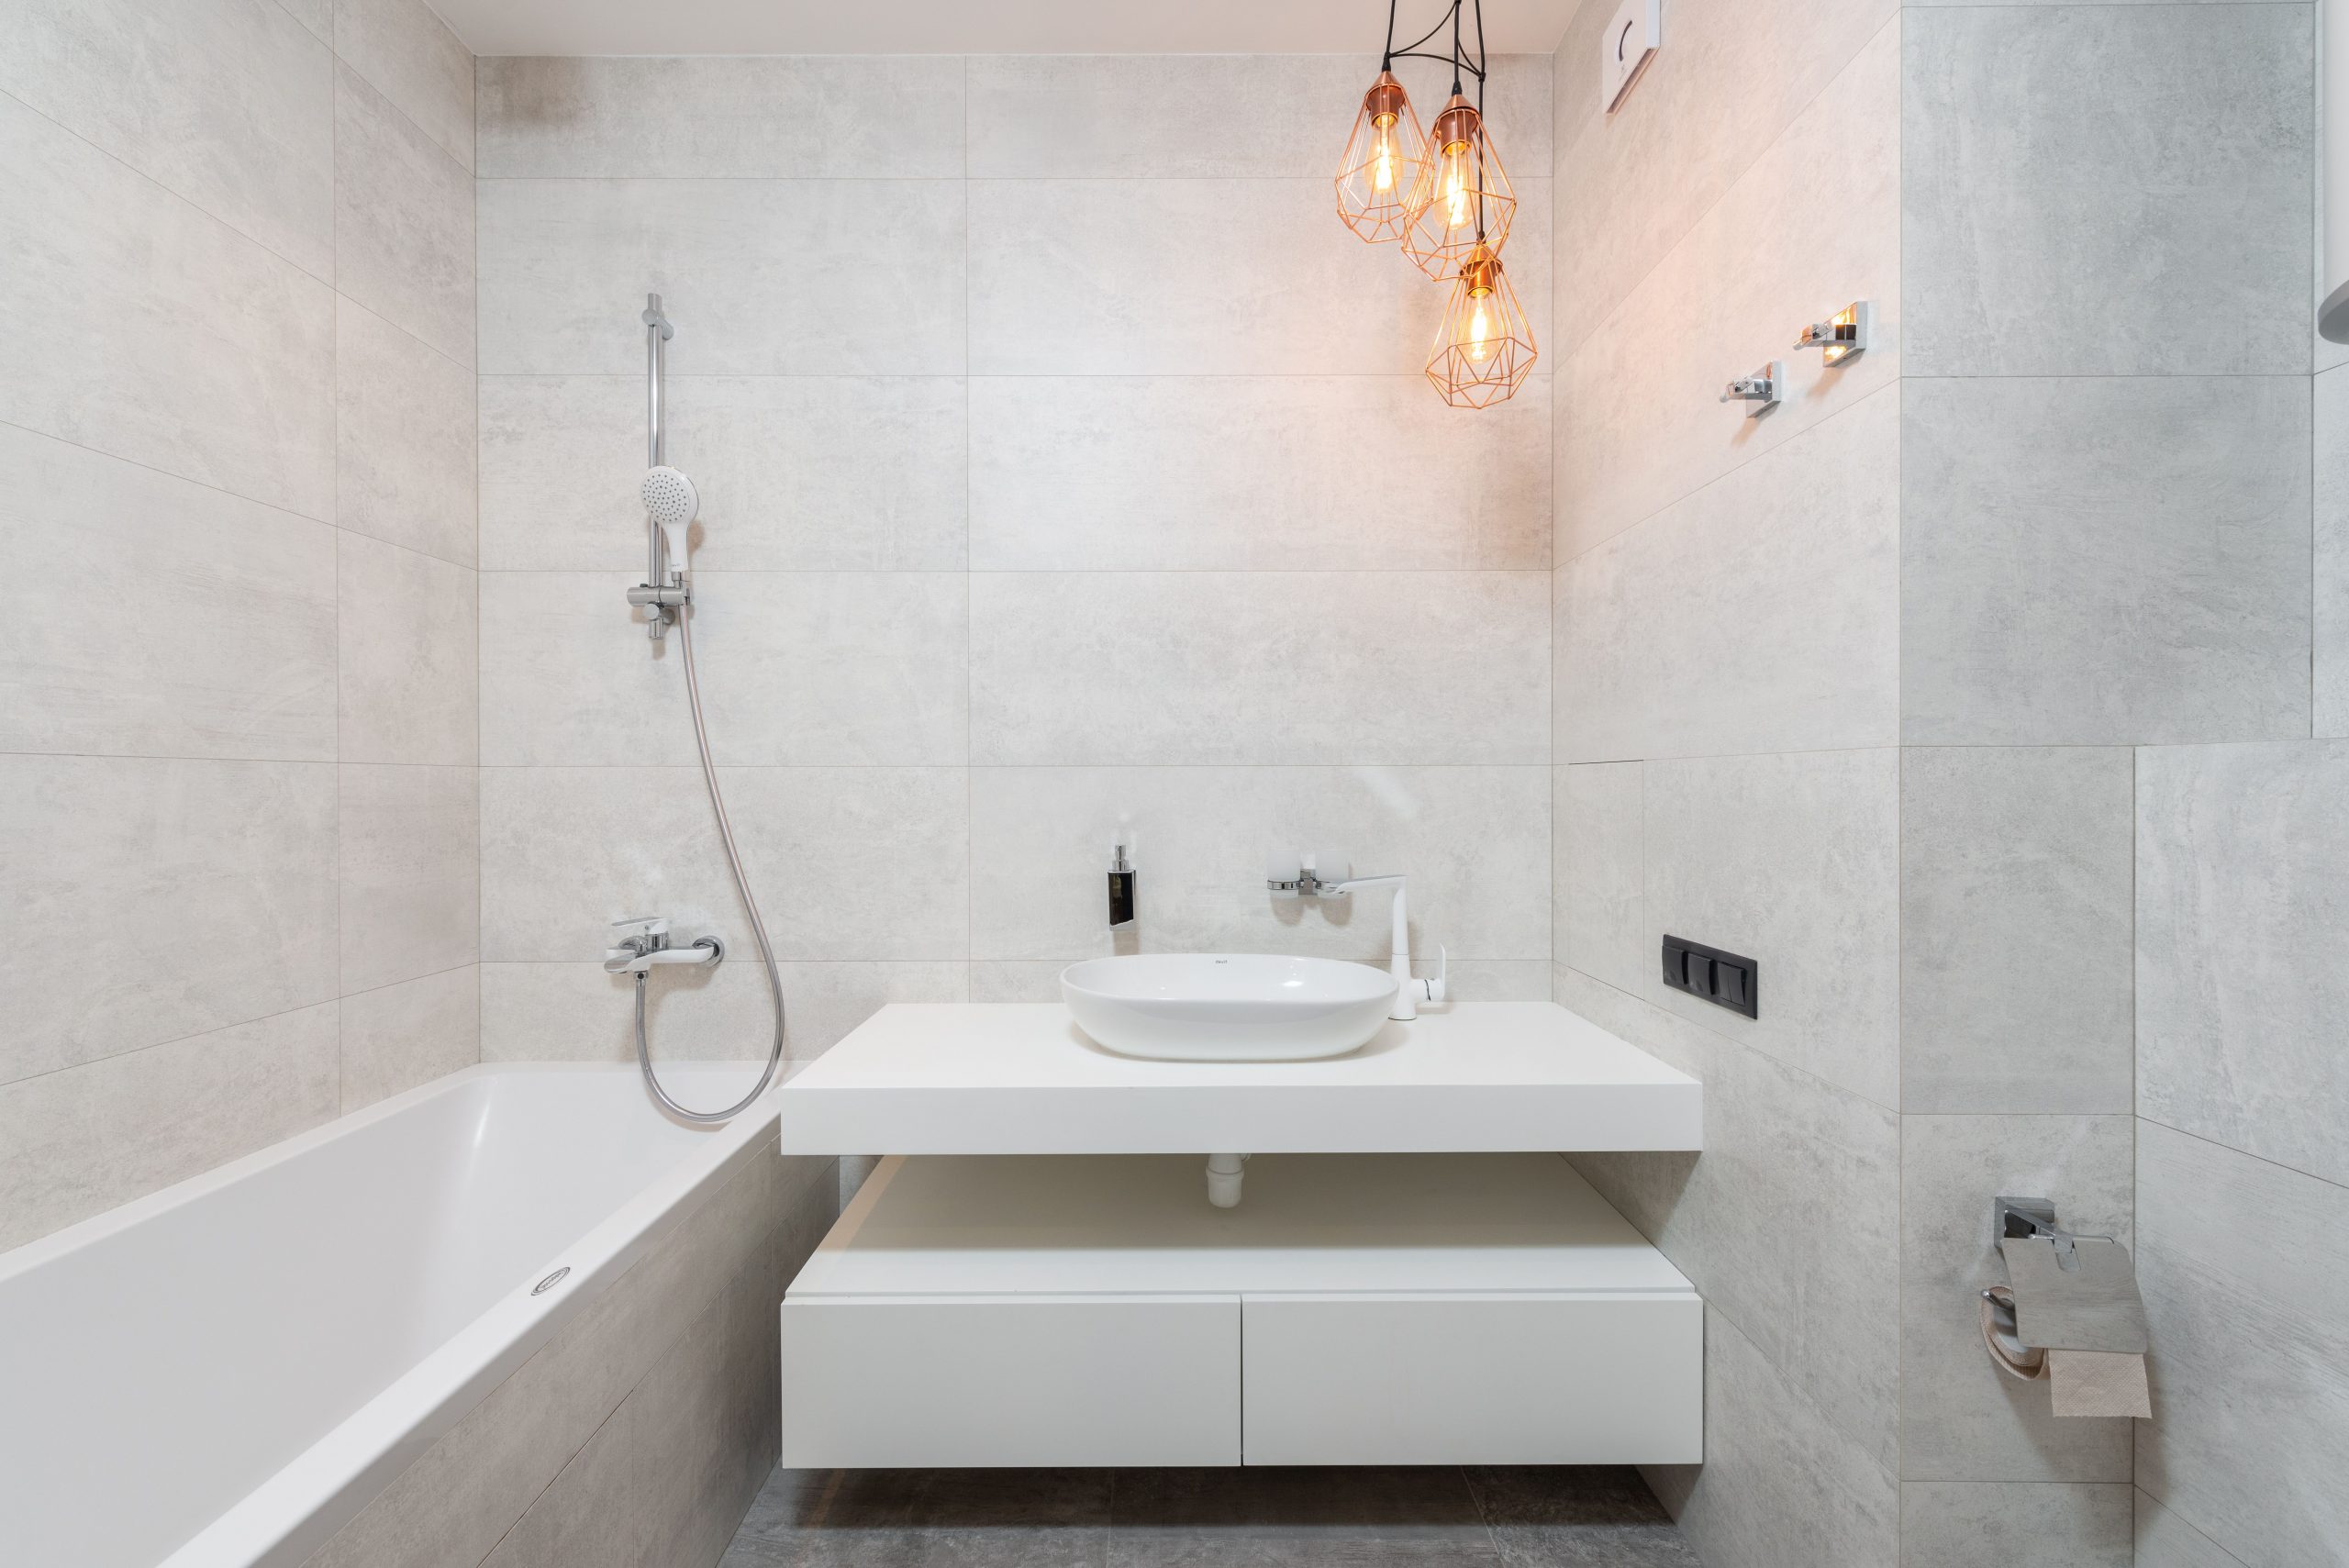
1. Float Your Vanity with Accent Lighting
This look is all about creating visual space. By floating the white vanity, the floor continues uninterrupted beneath it, making the entire room feel larger. The choice of a simple, handle-free design on the two pull-out drawers maintains a clean, minimal line. The real magic, however, comes from the hanging geometric pendant lights. Their warm, coppery glow contrasts beautifully with the cool grey tiles and chrome fixtures, adding a touch of drama and drawing the eye upward.
💰 Budget Breakdown
A floating vanity is a fantastic choice for small to medium-sized bathrooms, typically from 40 to 100 square feet. The key is ensuring your wall has adequate blocking to support the weight. This design requires a standard 8-foot ceiling, but the pendant lights work best with ceilings 9 feet or higher to allow for proper hanging length without becoming a head-bumping hazard. For a more compact space, consider the narrow pull-out shown in Idea #17.
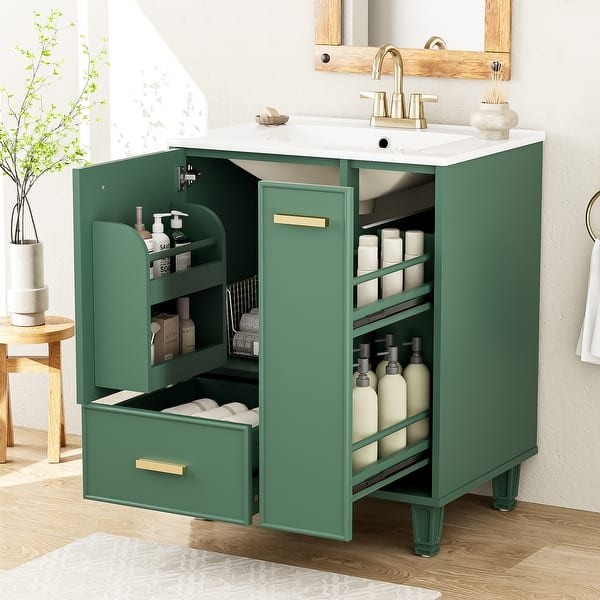
2. Use Every Inch with a Forest Green Corner Pull-Out
When dealing with a corner vanity, don’t accept a “dead space.” Install a hinged, multi-part pull-out system. These units, often called blind corner optimizers, attach to the door and swing out, bringing the contents of the entire corner into easy reach. Look for models with adjustable shelf heights to accommodate everything from tall shampoo bottles to smaller jars. The key is a robust hinge mechanism that can handle the weight and motion smoothly. This is a total game-changer for usability.
⭐ The One Thing
that makes this entire design sing is the bold, confident use of forest green. Without it, you’d have a perfectly functional but much less memorable vanity. The deep, nature-inspired color provides a sophisticated anchor for the gold hardware and a beautiful contrast against the light wood floor. It proves that utility and personality can absolutely go hand-in-hand. Removing the green would sap all the life out of this otherwise practical setup.
3. Organize Drawers with Built-in Dividers
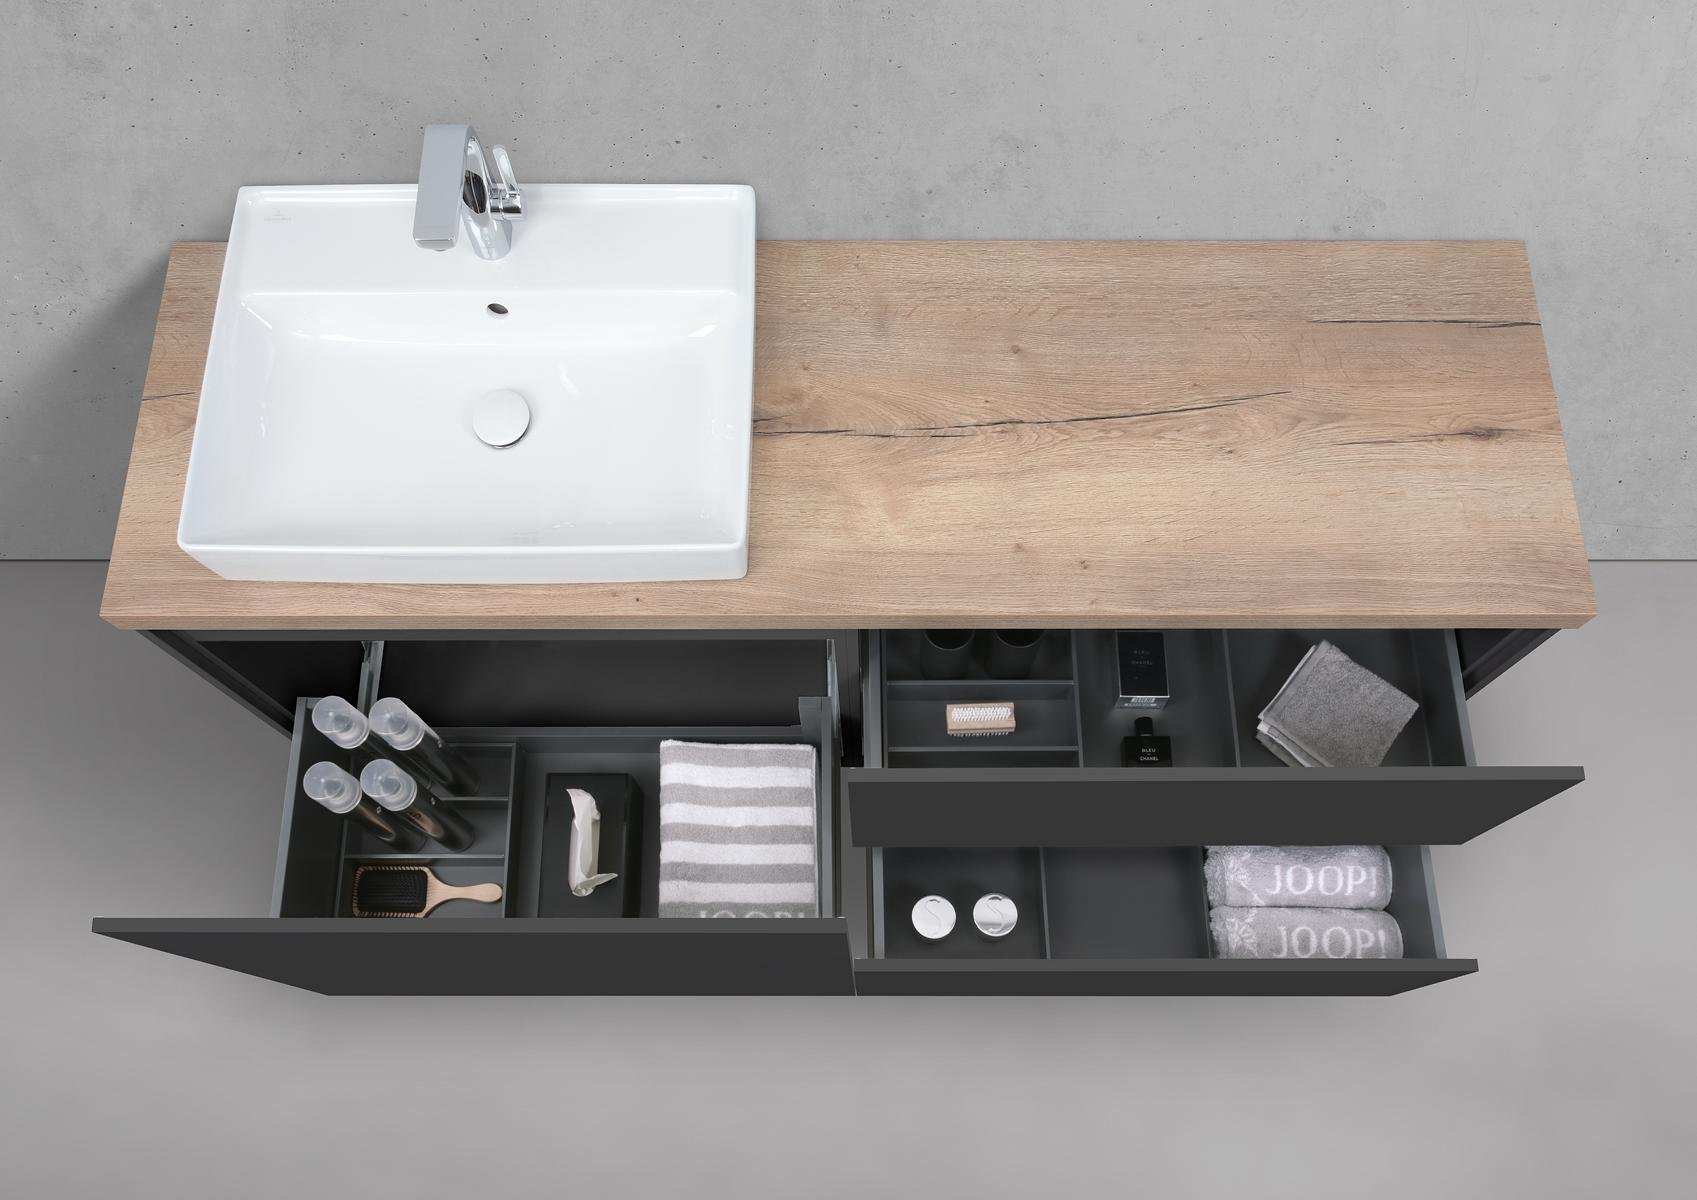
Recreating this sleek, organized vanity involves a few key investments. The custom look of integrated organizers within the drawers is where the magic happens. Here’s a potential cost breakdown for a similar setup:
📐 Style Math
- Vanity Cabinet (pre-fab with similar finish): $600 – $1,200
- Integrated Sink & Countertop: $400 – $800
- Faucet: $150 – $400
- Custom Drawer Inserts/Organizers: $200 – $500
- TOTAL: $1,350 – $2,900
- Budget alternative: Get a basic vanity and use off-the-shelf acrylic drawer dividers for about 50% less.
Let’s be honest: while these built-in drawer dividers look incredible, they can be limiting. You’re locked into the specific layout, which might not work if you change products or need to store a bulky item that doesn’t fit the pre-sized compartments. Before committing to a fully custom internal layout, map out everything you plan to store. Measure your most-used bottles, tools, and containers to ensure the design will truly work for your daily routine, not just look good on Pinterest.
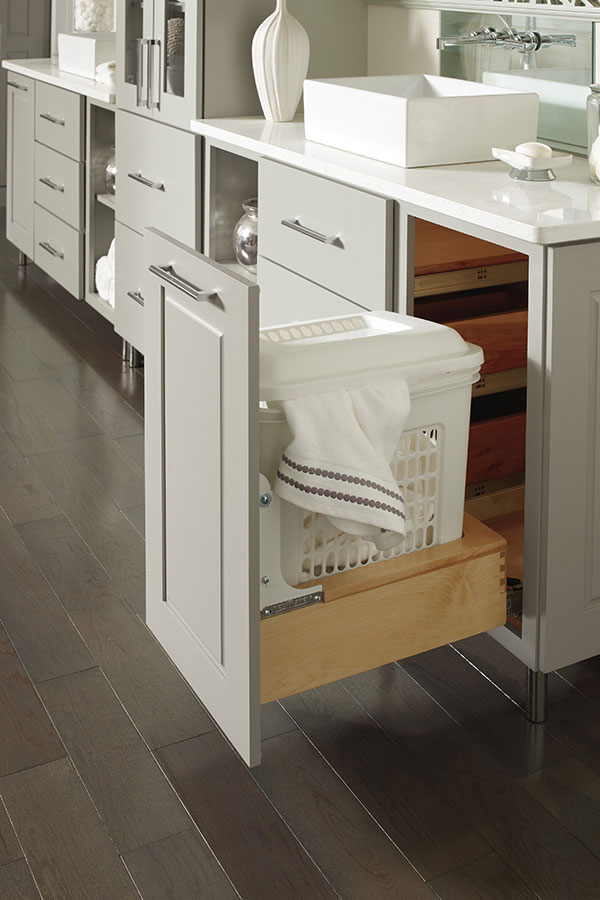
4. Hide Your Hamper in a Shaker-Style Pull-Out
Integrating a laundry hamper is a surprisingly simple DIY project. Here’s how to do it in an existing base cabinet: (Time: 2 hours, Cost: $80-$150)
📏 Scale Guide
- Measure the interior dimensions of your cabinet to find a compatible pull-out hardware kit and basket.
- Install the drawer glides to the bottom of the cabinet, ensuring they are level and parallel.
- Assemble the pull-out frame and attach it to the glides, following the manufacturer’s instructions.
- Mount your cabinet door directly to the front of the pull-out frame. This is the trickiest part; measure carefully to ensure it aligns perfectly with the adjacent doors.
- Place the basket in the frame and enjoy your hidden hamper!
A hidden hamper is a dream for keeping the bathroom tidy, but it requires discipline. Because it’s out of sight, it’s easy to forget about, which can lead to damp towels sitting for too long inside a closed cabinet—a recipe for mildew. Plan to empty it on a regular schedule, at least twice a week. Also, be sure to wipe down the interior of the cabinet and the plastic hamper itself with a disinfectant cleaner monthly to prevent odors from building up.
5. Conceal a Waste Bin in a Classic White Vanity
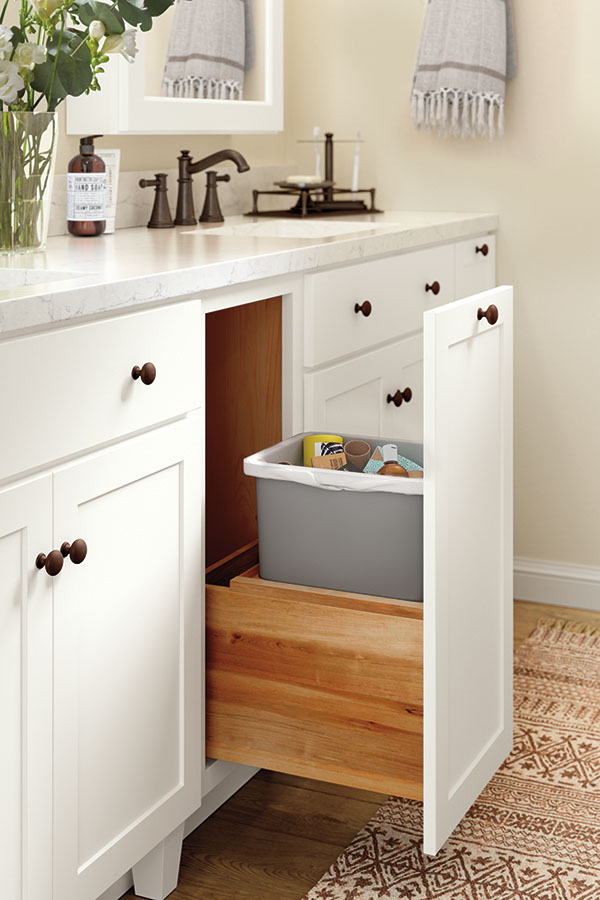
This look achieves a clean, classic feel by following a simple formula: 70% crisp white + 20% warm wood + 10% dark metal accents. The dominant white shaker cabinets and veined countertop create a bright, timeless base. The wooden interior of the pull-out drawer adds a touch of organic warmth and quiet luxury. Finally, the dark bronze hardware provides just enough contrast to give the vanity a custom, high-end feel. You could swap the dark bronze for matte black or polished nickel and still maintain the chic balance.
✅ Before You Start
You don’t need a custom cabinetmaker to get this look. Start with a standard white shaker vanity from a big-box store like Home Depot or Lowe’s ($400-$700). Then, purchase a pull-out trash kit, like those from Rev-A-Shelf, for around $100. Simply install it inside one of the vanity doors. This simple DIY gives you the exact same functionality and integrated look for a fraction of the cost of a fully custom piece. The key is matching the cabinet style, then adding the function yourself.
6. Adapt a Kitchen Waste-Bin Pull-Out for the Bathroom
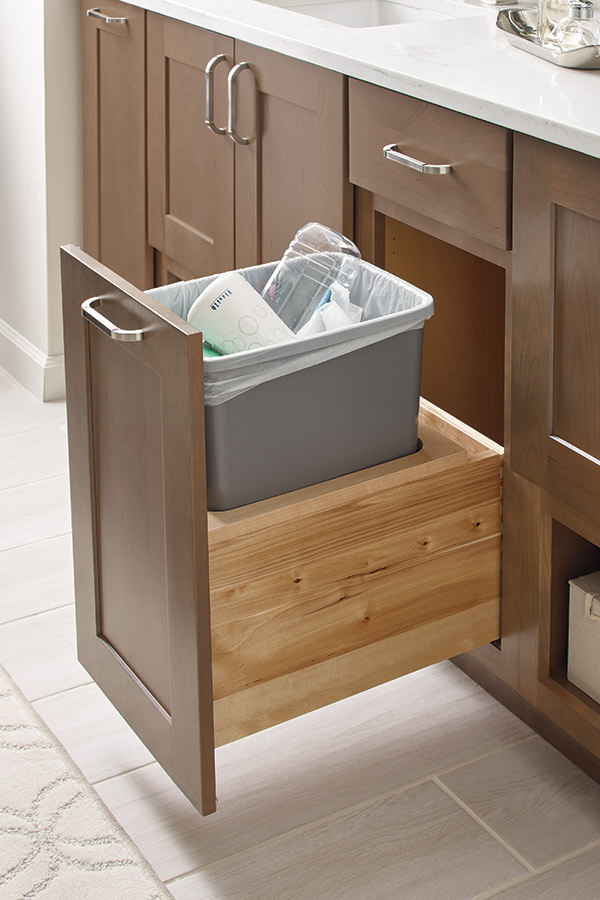
This setup, though shown in a kitchen, is brilliant for a bathroom because of its seamless integration. The pull-out mechanism is attached directly to the cabinet door, making it a single-motion action. There’s no fumbling with opening a door and then pulling out a separate bin. This fluid functionality is what makes it feel so upscale and practical. The use of a standard drawer pull on the front completely hides its purpose, maintaining a clean, cohesive look across the entire bank of cabinetry.
🔥 Trending Context
A word of caution for bathroom applications: humidity is your enemy. While a plastic bin is no problem, the pull-out mechanism itself is metal. Opt for high-quality glides with a good finish (stainless steel or a thick powder coating) to prevent rust over time. Cheaper glides can start to stick or corrode from the steam of a shower. Also, ensure the bin you choose has a lid to contain any odors, which can be more noticeable in a smaller, enclosed bathroom.
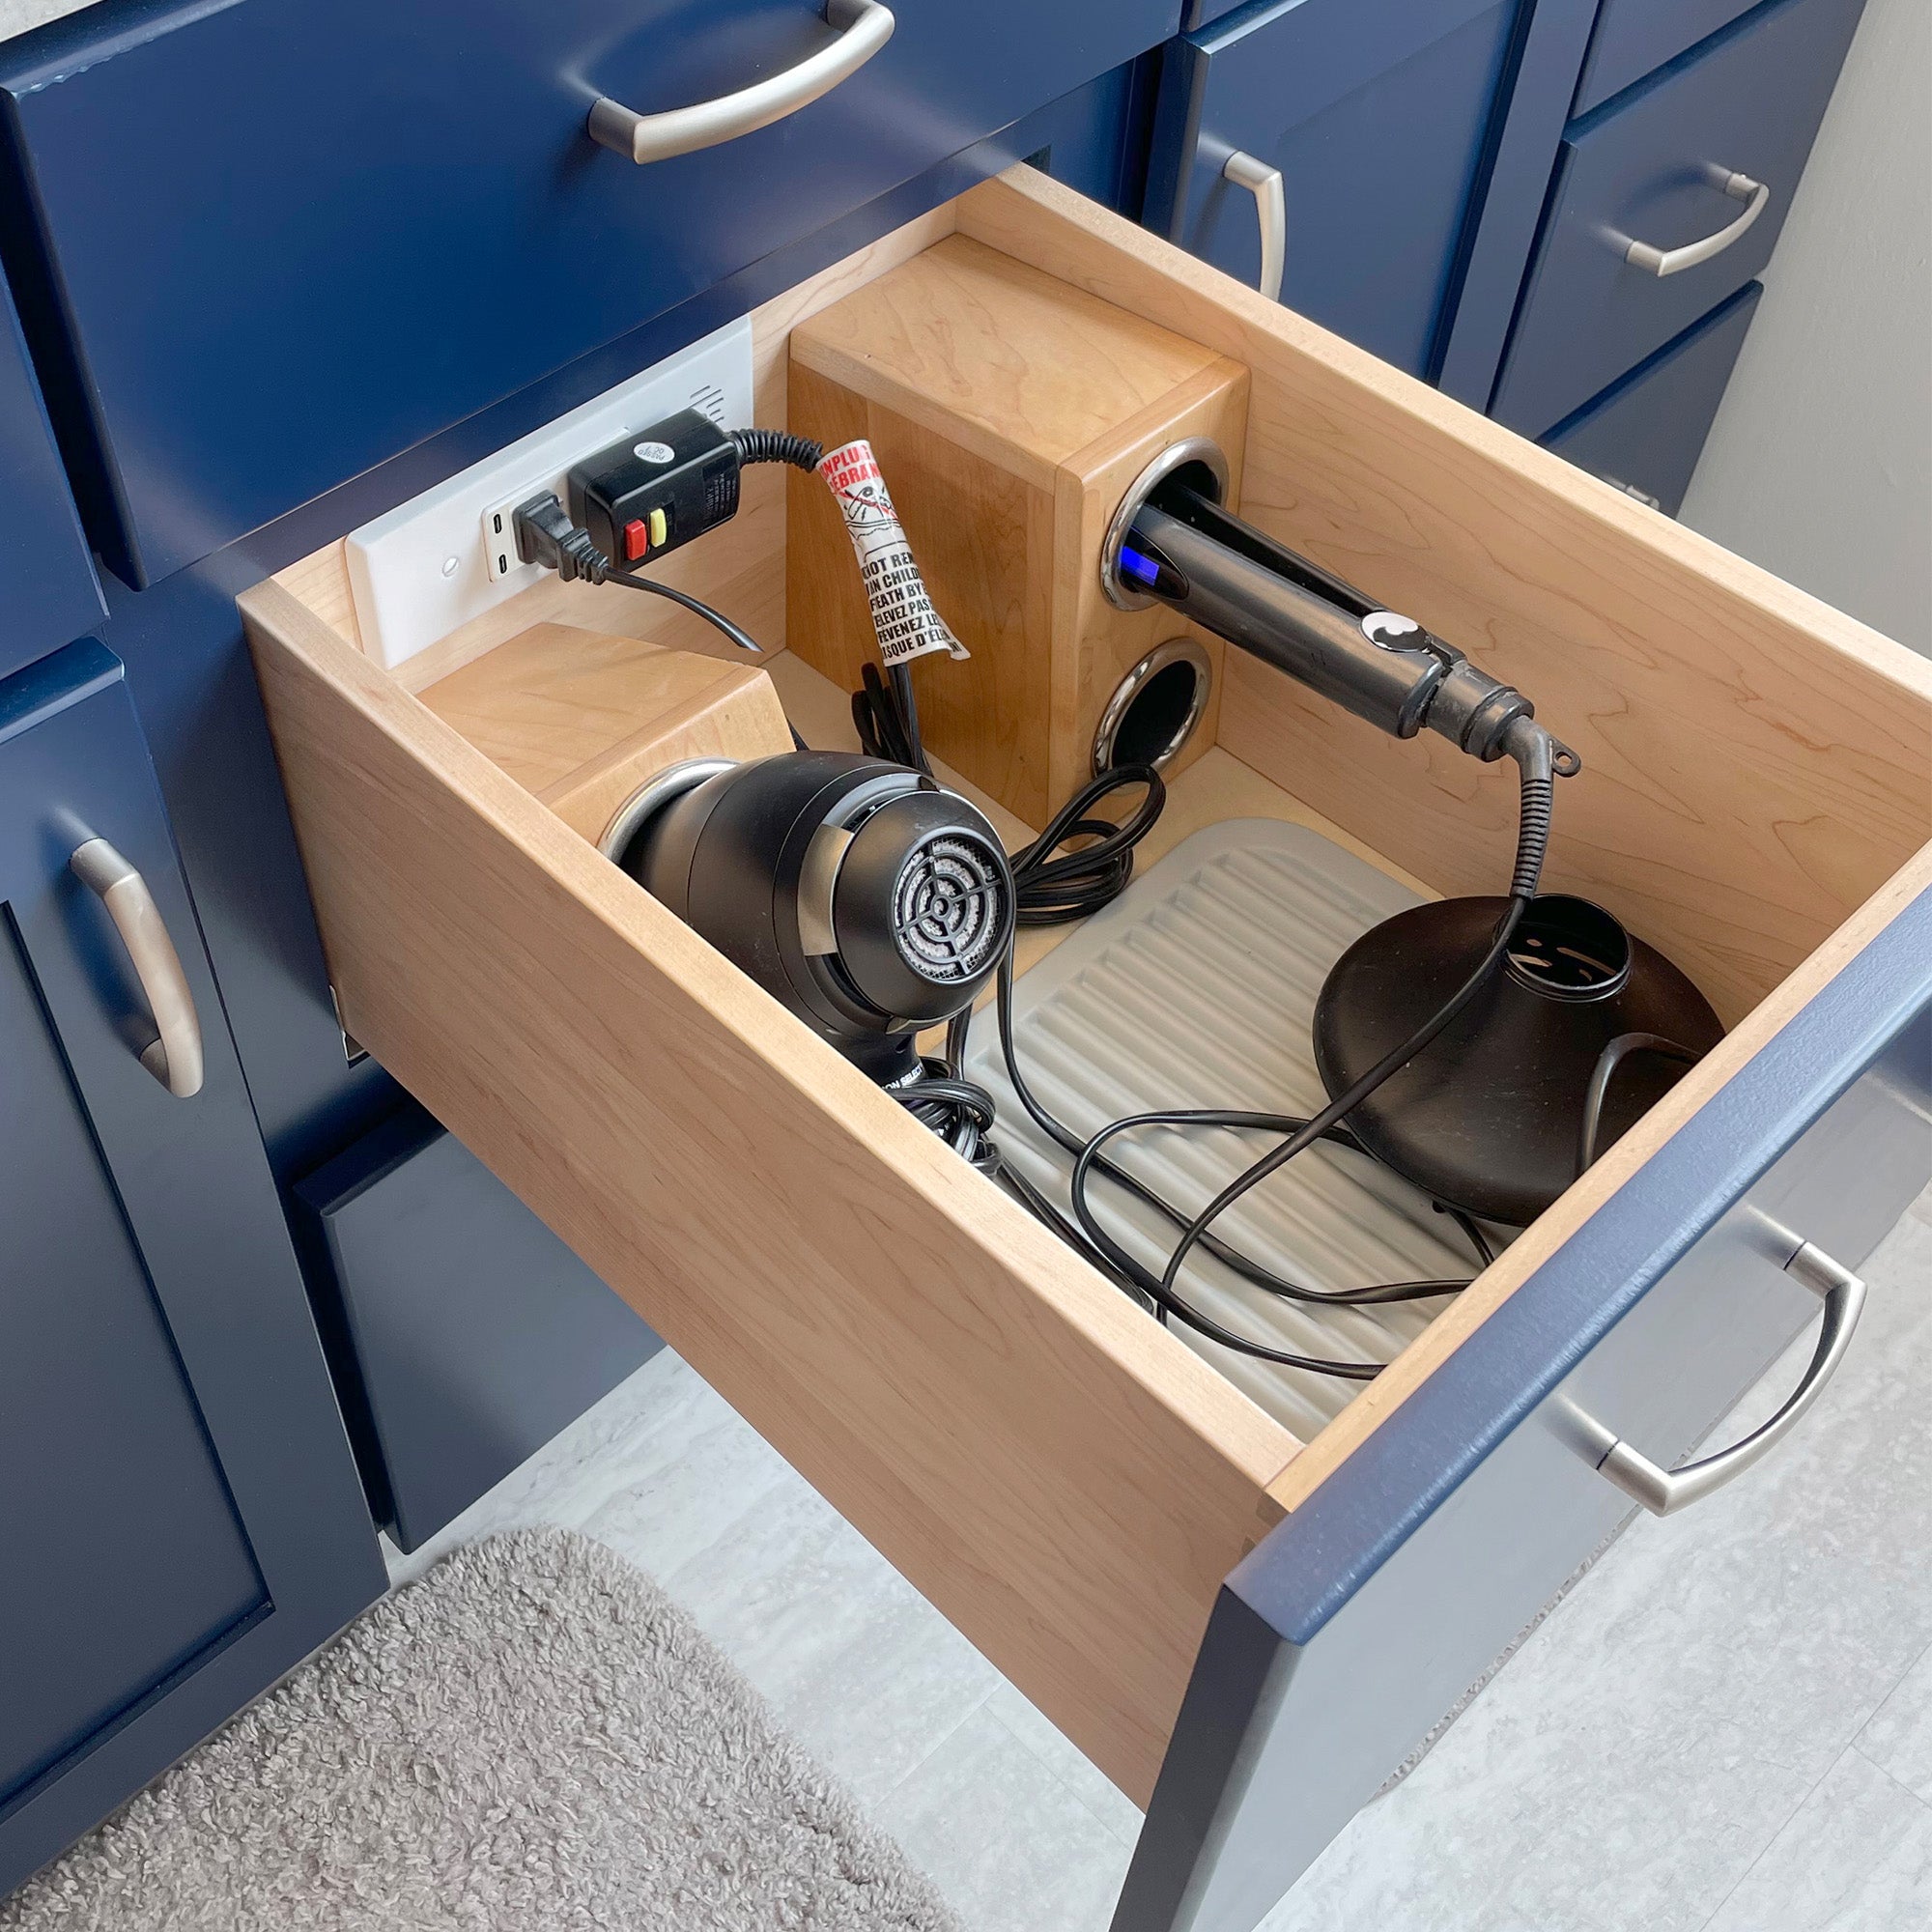
7. Integrate Power Outlets into a Deep Navy Drawer
When installing a powered drawer for styling tools, safety is paramount. Use a UL-listed drawer outlet kit specifically designed for this purpose. These kits feature a coiled or flexible cord and an automatic shut-off switch that cuts power when the drawer is closed, preventing tools from being left on accidentally. For maximum utility, have your electrician wire it to a GFCI-protected circuit, which is mandatory for bathroom outlets and provides critical protection against electric shock in a wet environment.
💸 Get This Look For Less
The single element that elevates this from a simple storage drawer to a luxury feature is the integrated power. Without the outlets, it’s just a nicely organized drawer. With the outlets, it becomes a fully functional, self-contained styling station. It eliminates the daily tangle of cords on the countertop and the need to plug and unplug tools, streamlining the morning routine. This small addition transforms the entire experience of getting ready.
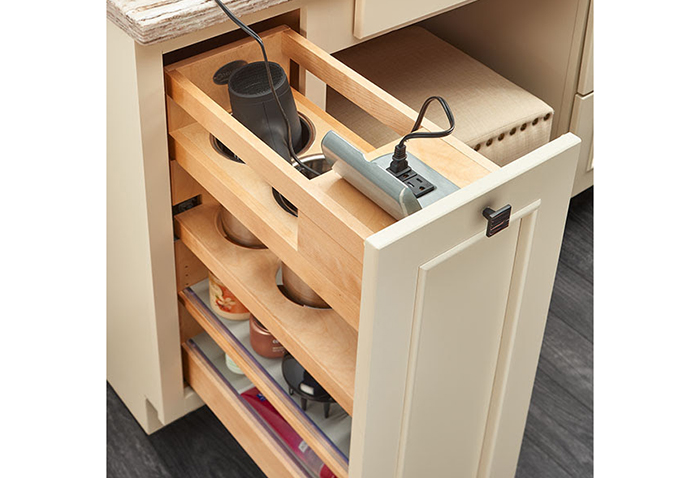
8. Opt for a Pull-Out Styling Tool Organizer
Before you commit to a built-in styling station, run through this quick checklist:
🔧 How-To Brief
- Measure your tools! Will your specific hair dryer and straightener actually fit in the provided holders?
- Check your electrical code. Does your municipality allow power strips inside a cabinet? You may need a specific type of hardwired unit installed by an electrician.
- Confirm cabinet depth. These organizers require significant depth to function. Ensure your vanity can accommodate the unit and the door will close fully.
While wonderfully convenient, these units can get messy. Hair products can leave a sticky residue, and the heat from tools can discolor wood or plastic over time. Wipe down the interior surfaces and the tool holders with a damp cloth every couple of weeks. For the metal inserts, a quick polish will remove any smudges or heat marks. Also, be mindful of wrapping cords loosely; tightly wound cords can get stressed and eventually fray, creating a safety hazard.
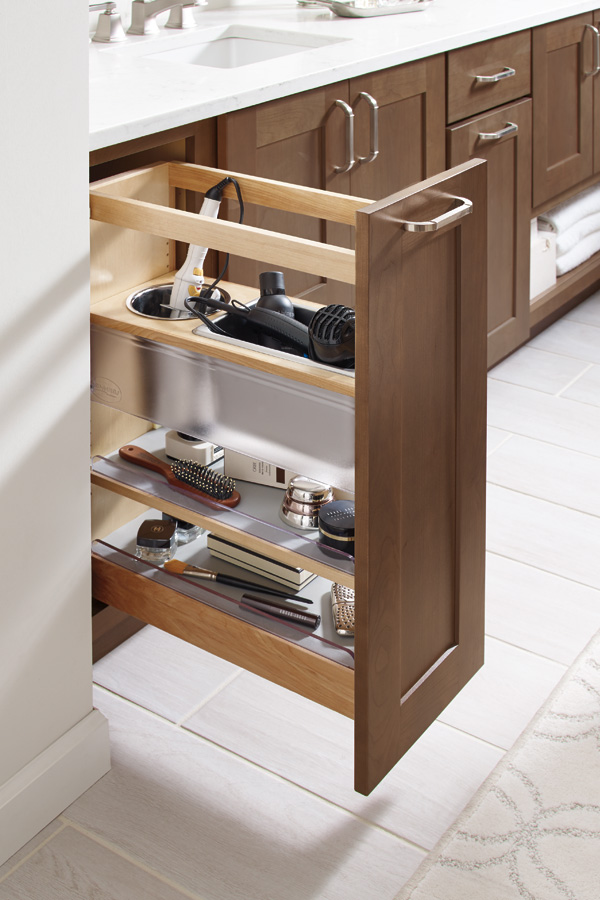
9. Go Vertical with a Tall, Tiered Styling Caddy
A tall, narrow pull-out like this is a perfect solution for bathrooms where floor space is limited but you have some vertical height to work with. It works best when integrated into a larger vanity unit or a linen tower. The minimum width required is typically around 9 inches, but the magic is in the height—it can run from 30 inches (standard vanity height) up to 60 inches or more in a tall cabinet. It’s an ideal way to add massive amounts of storage without increasing the vanity’s footprint, as seen in Idea #24.
🎯 What Makes It Work
What makes this so effective is the principle of “storage zoning.” Each tier has a dedicated purpose. The top zone is for hot tools, with proper ventilation and power access. The middle zone is for daily-use cosmetics, kept visible and accessible on lined shelves. The bottom zone can be for backstock or less-frequently used items. This tiered approach prevents a tall, narrow space from becoming a jumbled mess where everything gets lost at the back.
10. Consider Basic Under-Cabinet Pull-Out Organizers
If a full vanity replacement isn’t in the cards, you can get 90% of the benefit by retrofitting your existing cabinets. Companies like Rev-A-Shelf, The Container Store, and even Amazon offer a huge variety of base cabinet pull-out organizers. For a simple two-tier wire unit, you can expect to pay between $80 and $200. These are typically DIY-friendly and can be installed in under an hour with just a drill, giving you that easy-access functionality without a major renovation.
💡 Designer Tip
The reality of these aftermarket organizers is that they are never a perfect fit. You will always have some “wasted” space around the unit—an inch on either side, a few inches at the back. This can be frustrating if you’re trying to maximize every last bit of storage. It’s a trade-off: you gain accessibility, but you lose a bit of raw volume compared to a custom-built solution. Measure carefully to get the largest unit that will fit, but accept that it won’t be a wall-to-wall solution.
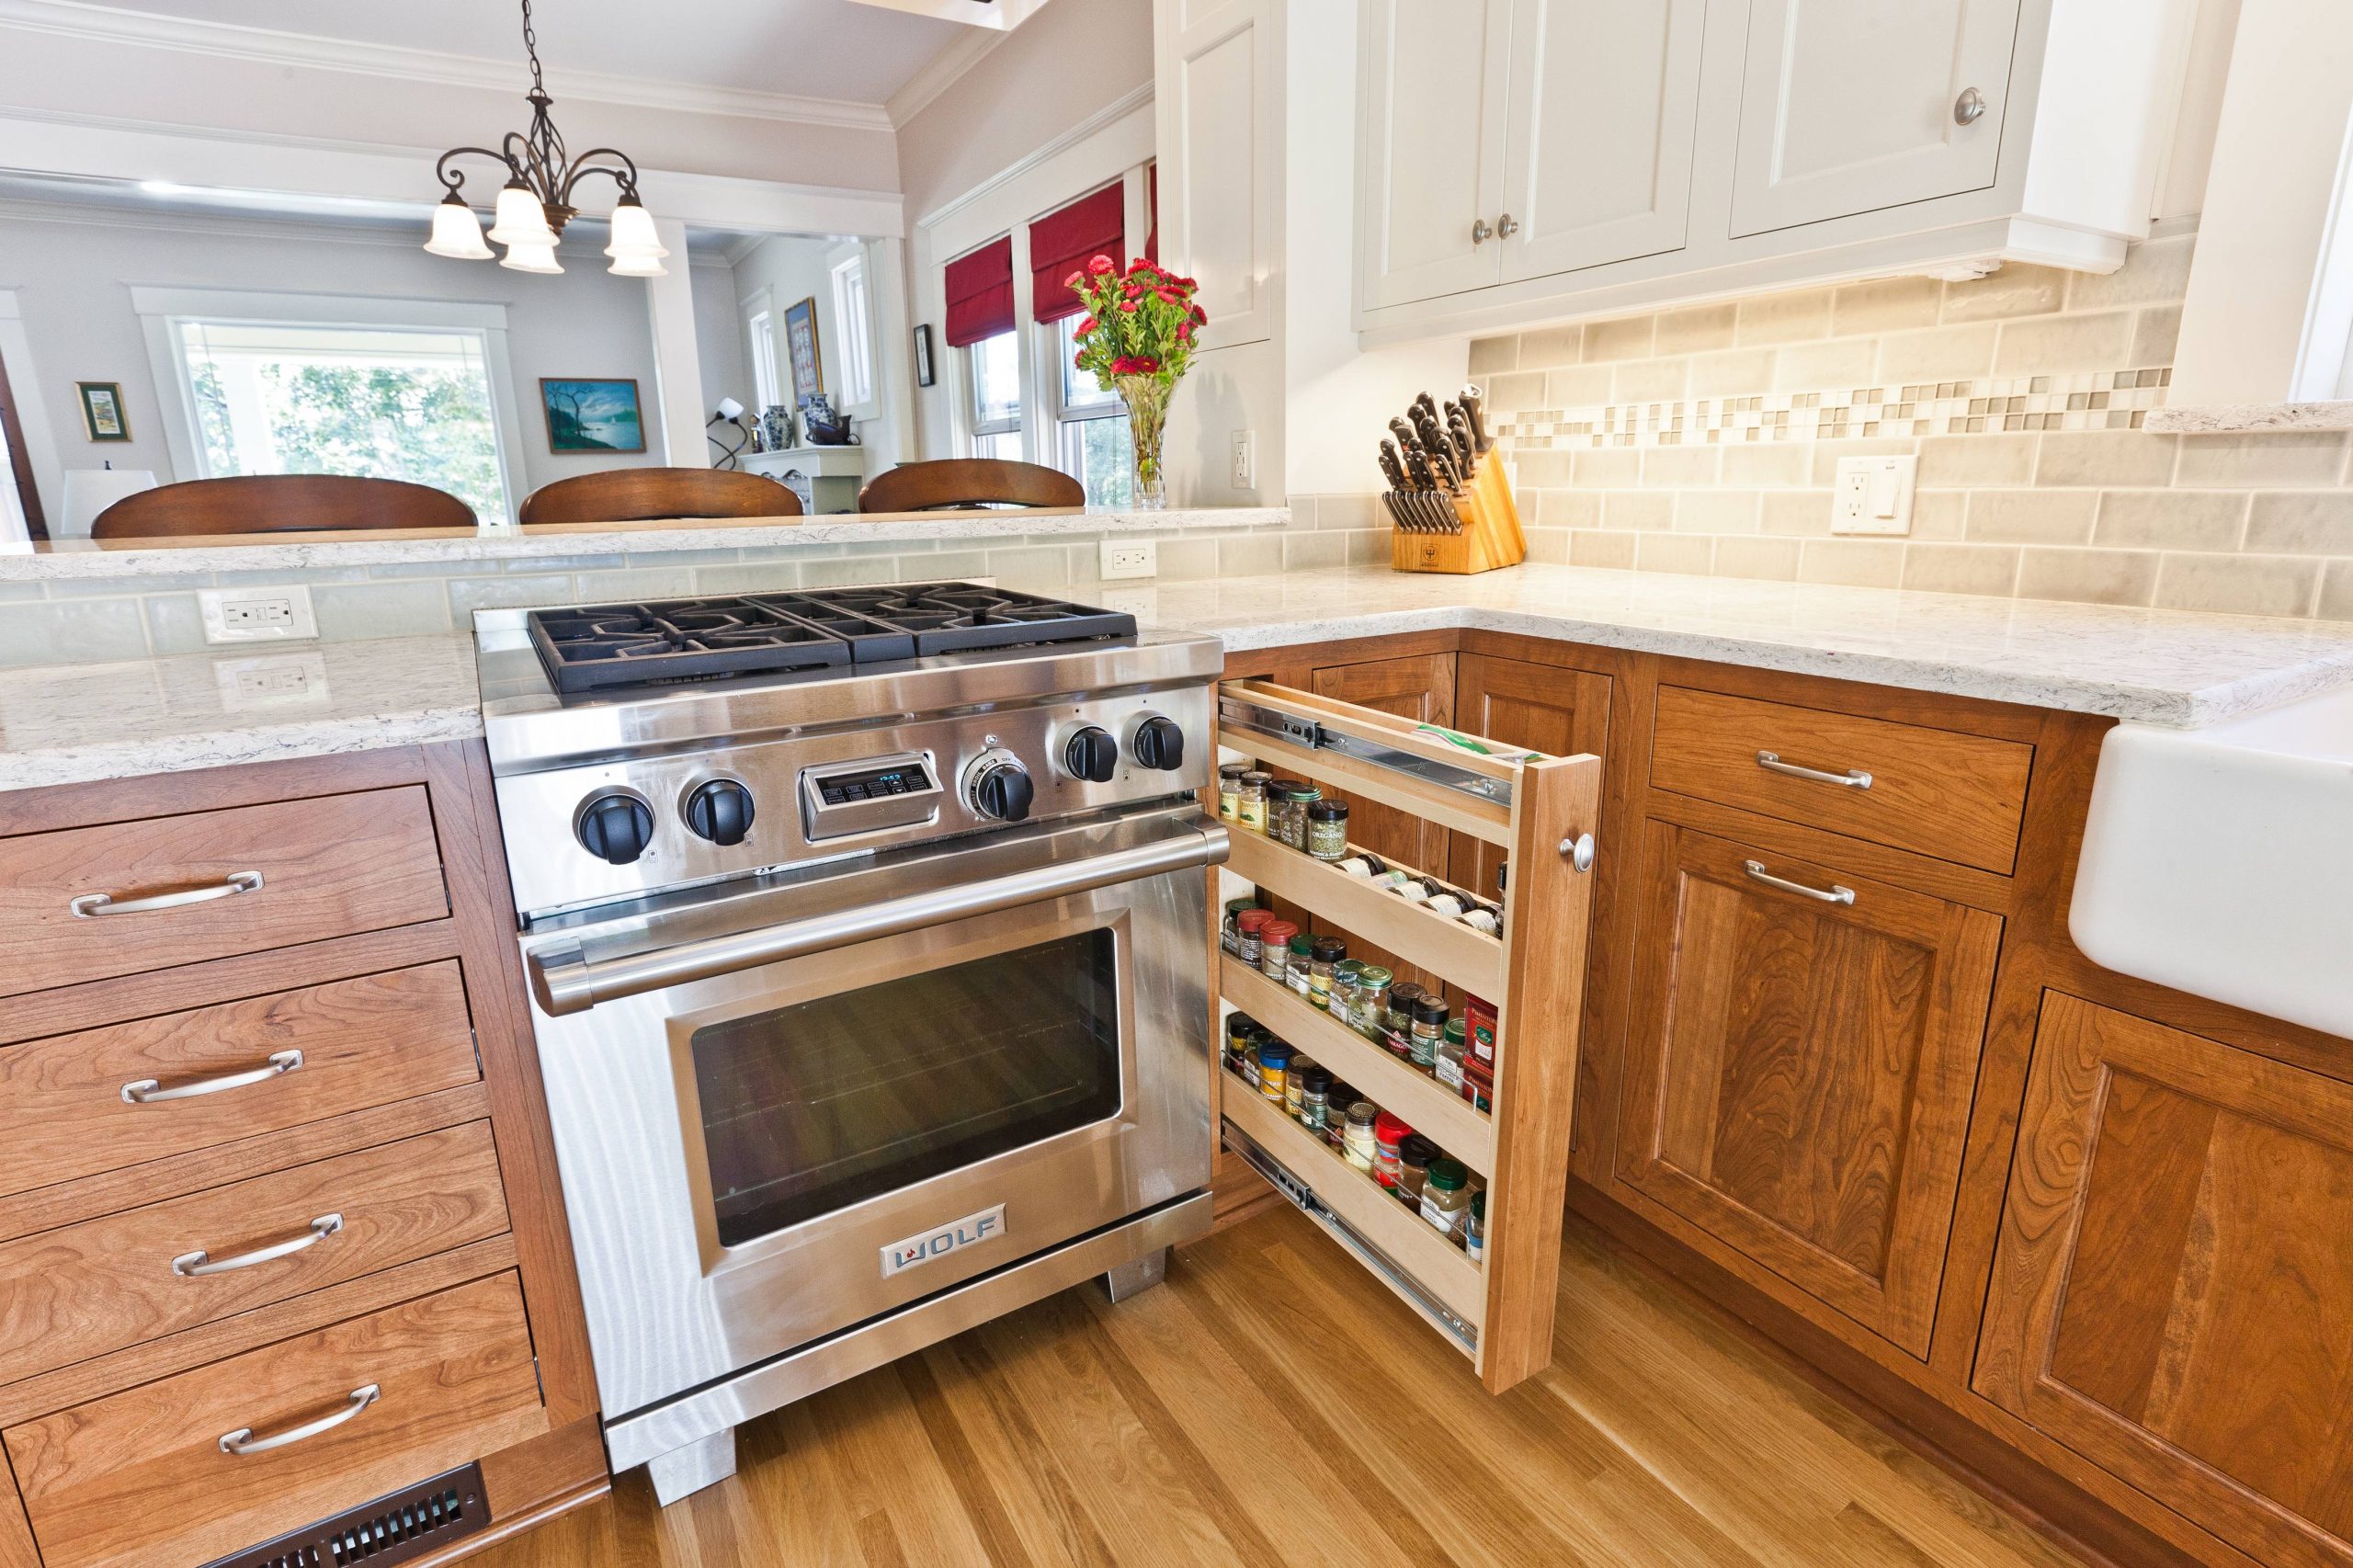
11. Use a Kitchen Spice Rack for Bathroom Toiletries
This idea, borrowed from the kitchen, is brilliant for the bathroom because it tackles the exact same problem: how to organize a multitude of small, narrow items. A pull-out spice rack is perfectly scaled for things like foundation bottles, serums, nail polish, and medicine vials. The tiered design ensures nothing gets lost at the back, and the railings on each shelf prevent items from toppling over when the unit is in motion. It’s a masterclass in using vertical space efficiently.
🧹 Maintenance Reality
This trend has serious staying power because it’s rooted in pure functionality. As bathroom products become more specialized (think serums, oils, and targeted treatments), our storage needs to evolve beyond the simple medicine cabinet. People are looking for “pro-level” organization in their own homes, a shift driven by countless viral pantry and fridge organization videos. Applying that same satisfying logic to the bathroom is a natural next step, making overlooked spaces like the gap next to the toilet or sink highly functional.
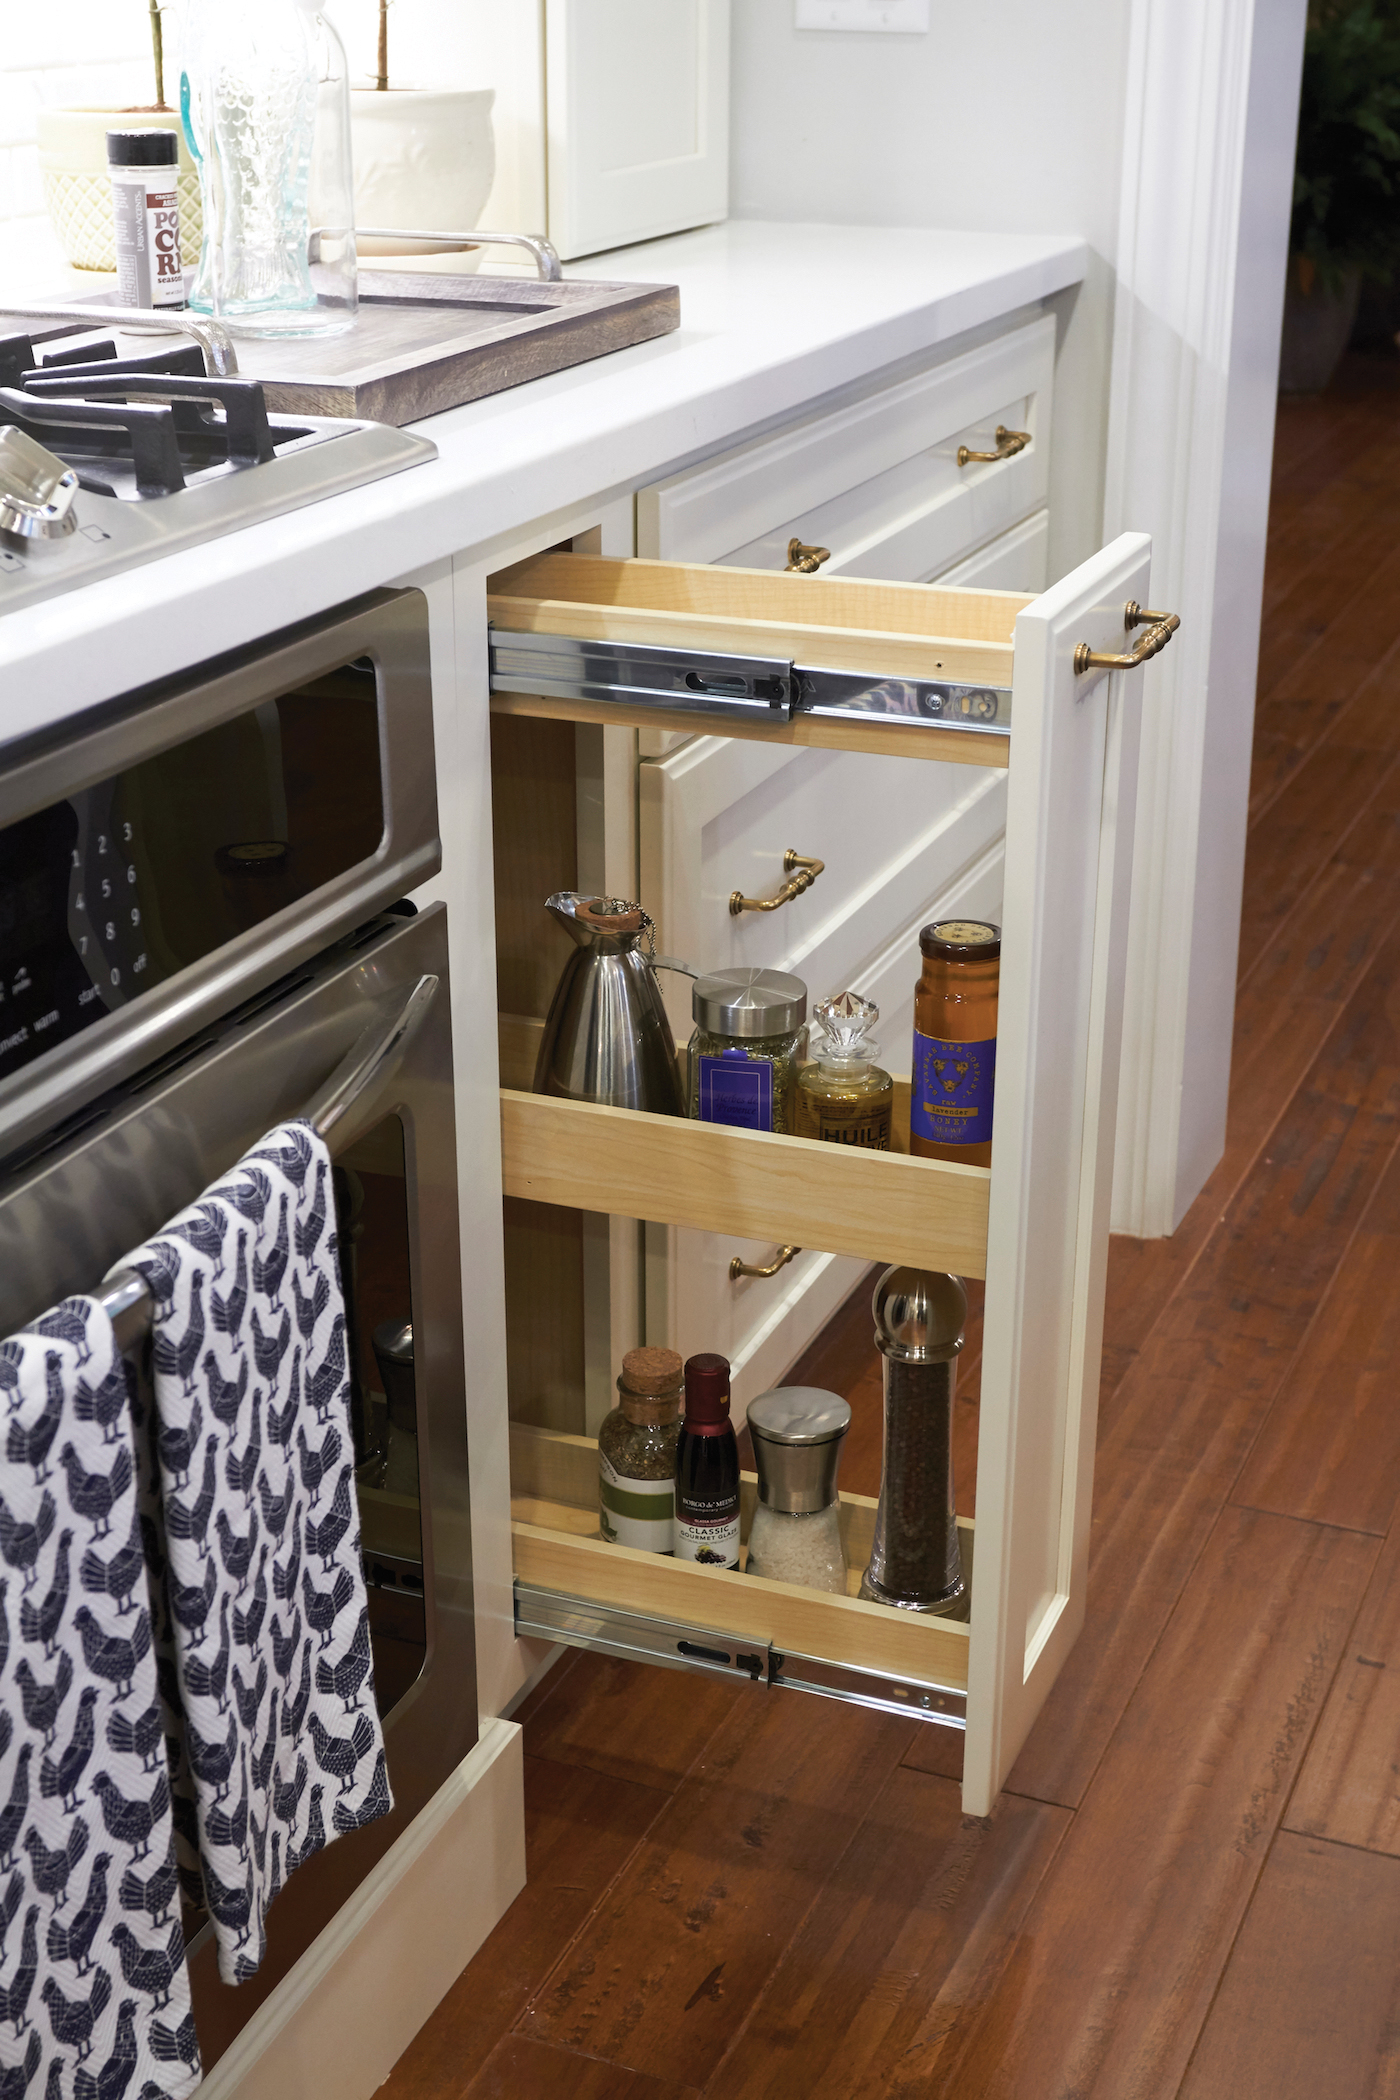
12. Install a Narrow Cream Pull-Out Beside the Sink
For a truly integrated look, order an extra “filler” panel or door from your cabinet manufacturer that matches your vanity fronts exactly. Instead of using it as a static filler piece between a cabinet and a wall, mount it to the front of a narrow pull-out spice rack mechanism. This makes the pull-out completely disappear when closed, looking like a deliberate part of the overall design rather than an afterthought. It’s a small detail that makes a huge difference in creating a high-end, custom appearance.
⚠️ Real Talk
Check these things before you start on a project like this:
- Is there at least 4 inches of clear, open space next to your vanity? Most narrow pull-outs require a 3-inch internal cabinet, plus the cabinet walls.
- Can you get a front panel that perfectly matches your existing vanity finish and style? A mismatch will look jarring.
- Do you have enough clearance for the pull-out to extend fully without hitting a toilet, wall, or door frame?
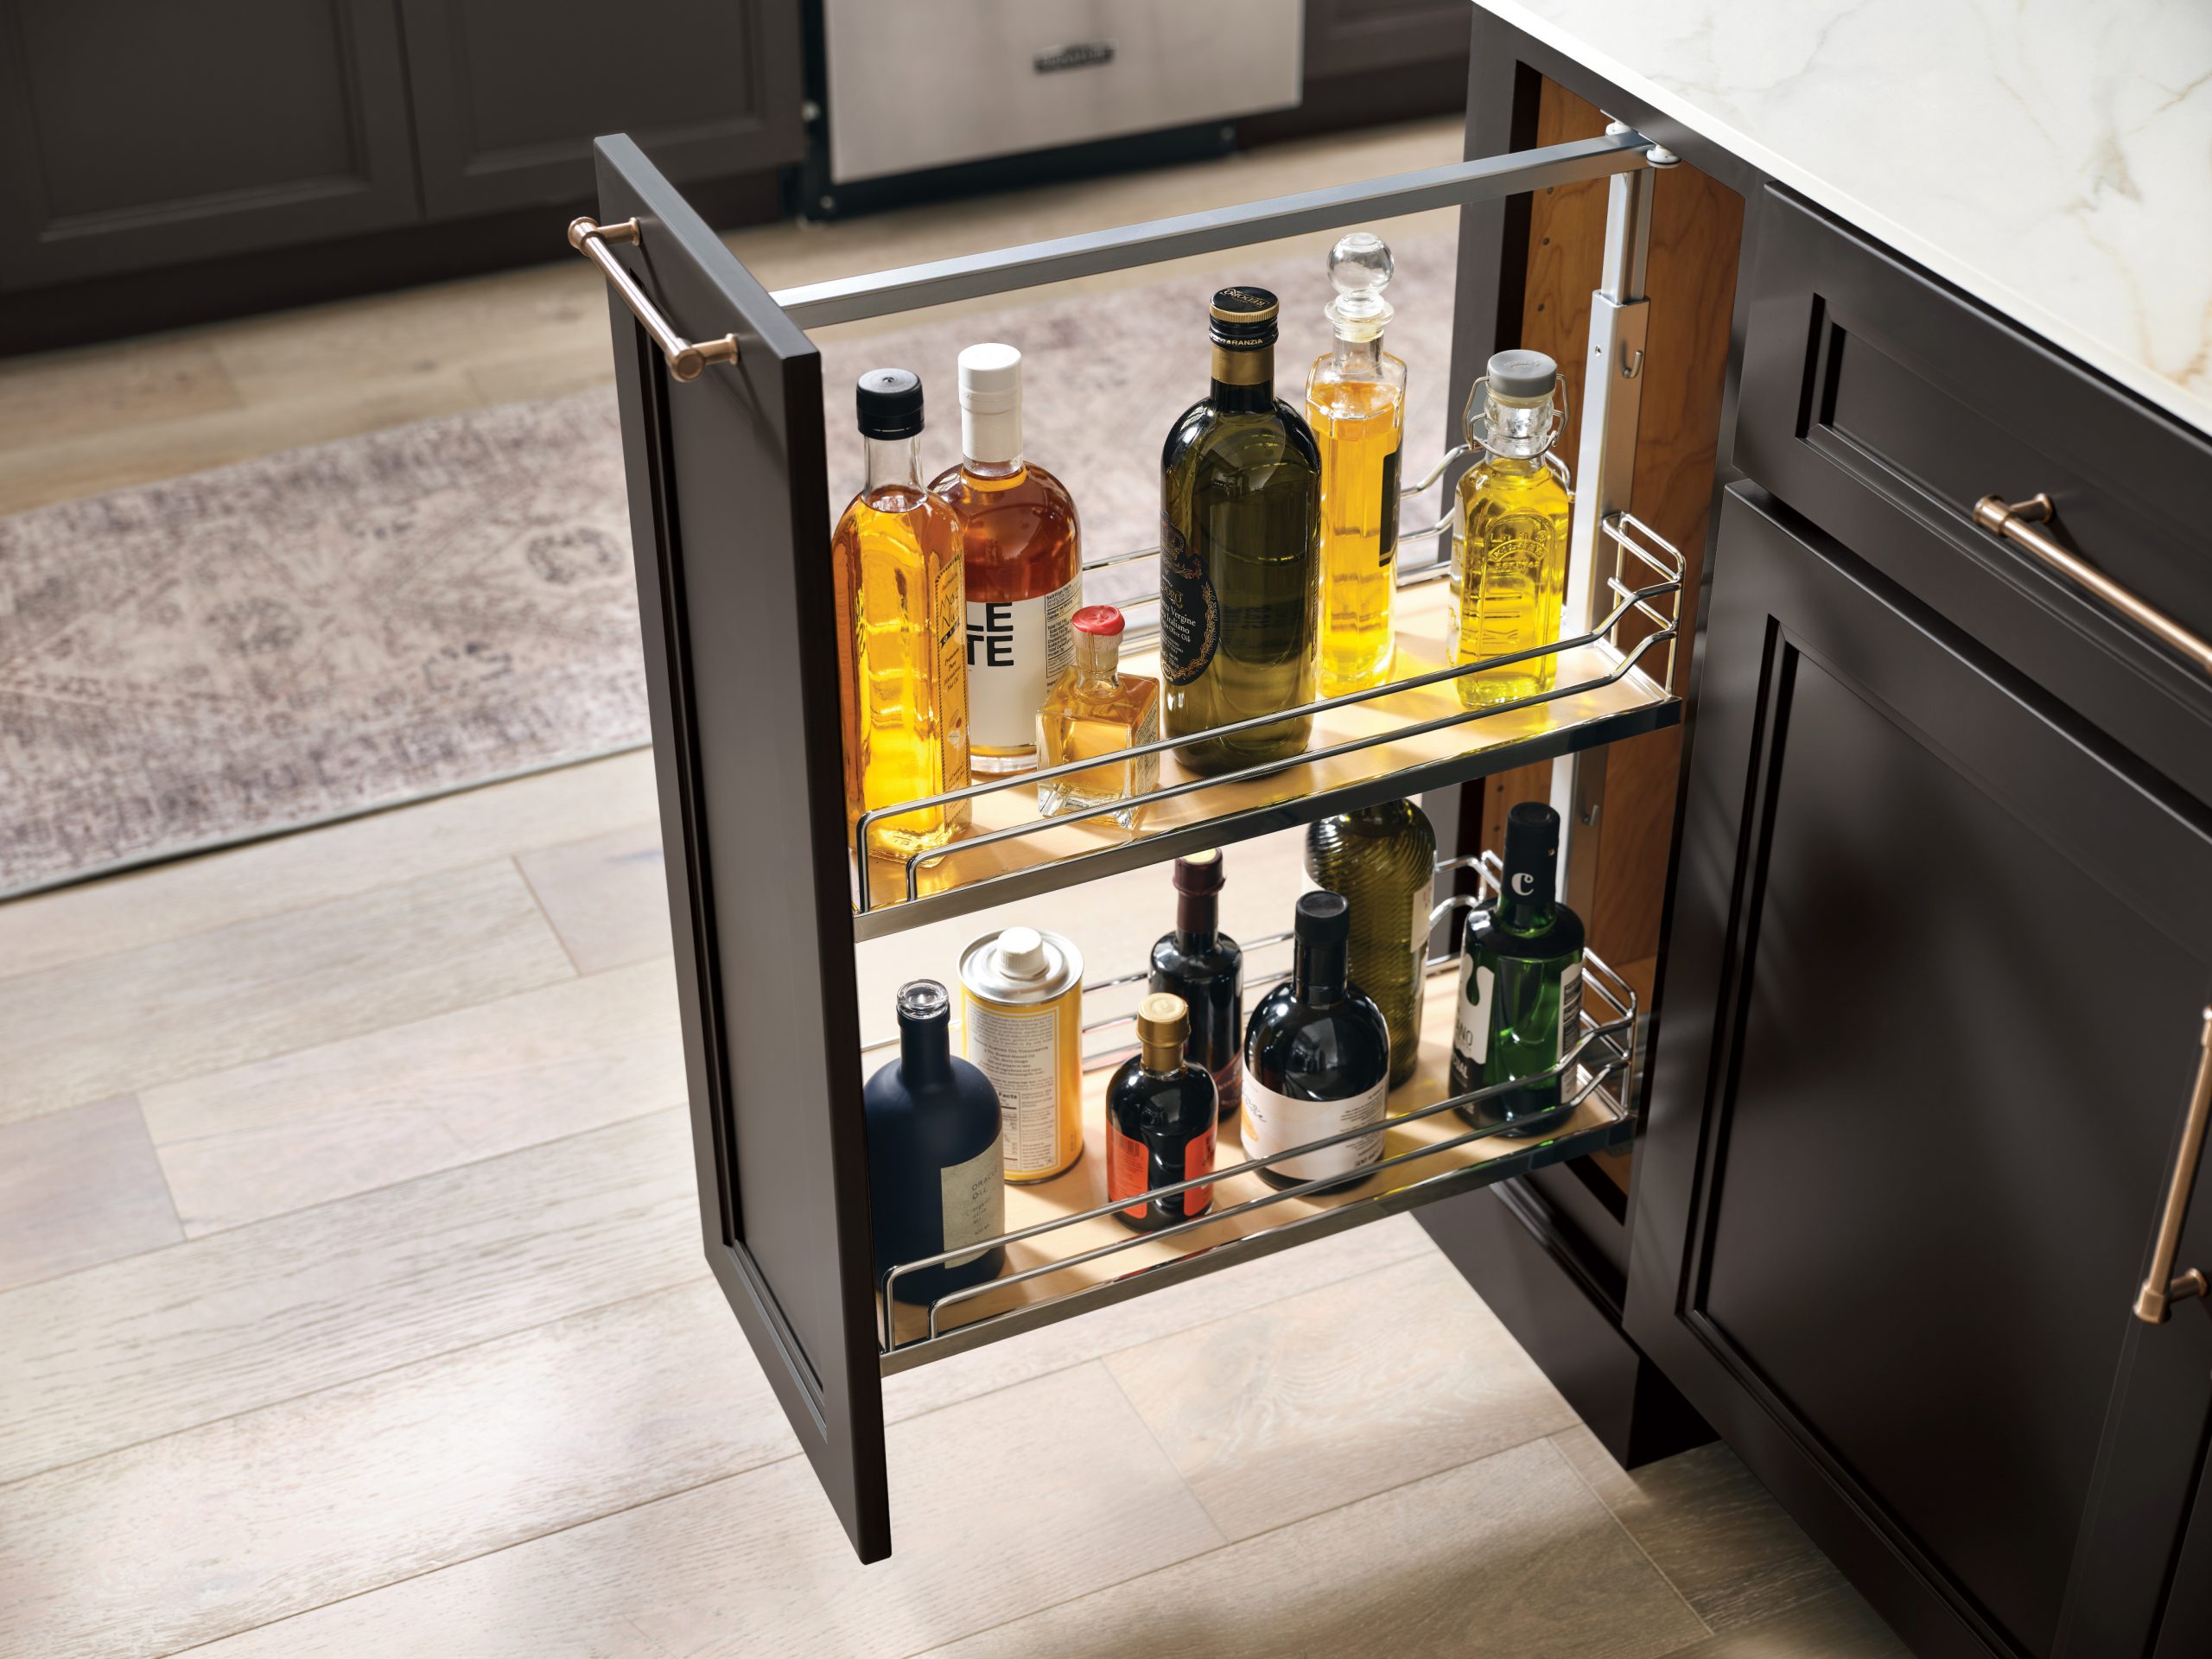
13. Contrast Dark Wood with Light Wood Pull-Out Shelves
The visual success here is a game of tonal contrast. The formula is approximately: 60% dark espresso wood + 30% light natural wood + 10% warm metallic. The deep, rich tone of the shaker-style cabinet front provides a dramatic, modern base. The light, natural wood of the interior pull-out shelves creates a bright, surprising pop when opened, making it easy to see the contents. The brushed gold handles add a layer of warmth and luxury that ties it all together. This isn’t just storage; it’s a design statement.
💰 Budget Breakdown
The single element that makes this feel so luxurious is the brushed gold hardware. Imagine this same dark wood cabinet with standard chrome or brushed nickel pulls. It would be perfectly fine, but it wouldn’t have the same warmth or intentionality. The gold pulls elevate the entire piece, turning it from a simple utility cabinet into a piece of furniture. They bridge the gap between the dark exterior and the light interior, proving that hardware is never just an afterthought.
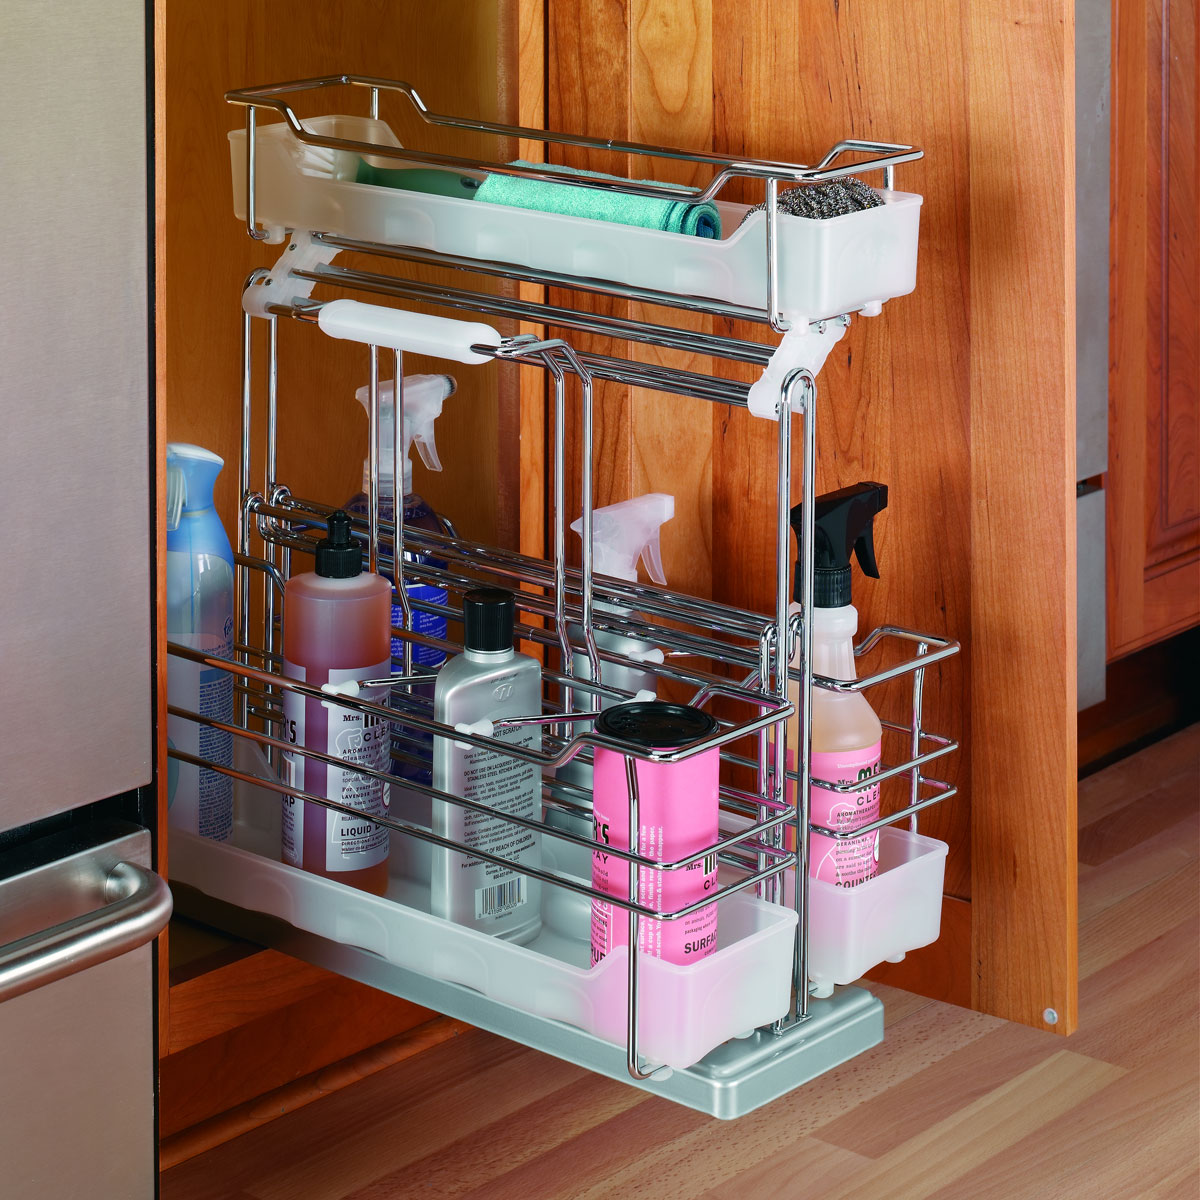
14. Retrofit with a Two-Tier Chrome Pull-Out
You can find this exact style of two-tier chrome organizer at almost any home improvement store, including Walmart and Target, for between $60 and $120. They are designed for easy DIY installation inside existing cabinets. The clear plastic trays are a fantastic feature, making cleanup a breeze and preventing small leaks from damaging the wood cabinet below. It’s a cost-effective way to get the functionality of a pull-out shelf without replacing your whole vanity. This is a much smarter investment than the similarly priced but less practical fixed-shelf options.
⭐ The One Thing
Installing one of these is a quick weekend win. (Time: 45 minutes, Cost: $60-$120)
- Start by clearing out your under-sink cabinet completely. Give it a good cleaning.
- Place the bottom frame of the organizer inside, positioned where you want it. Mark the screw holes with a pencil.
- Remove the frame and drill small pilot holes on your marks. This prevents the wood from splitting.
- Place the frame back in and secure it with the provided screws.
- Slide the top basket onto its track until it clicks into place.
- Drop in the plastic liners and load it up!
15. Choose a Dark Grey Rack in a Modern White Cabinet
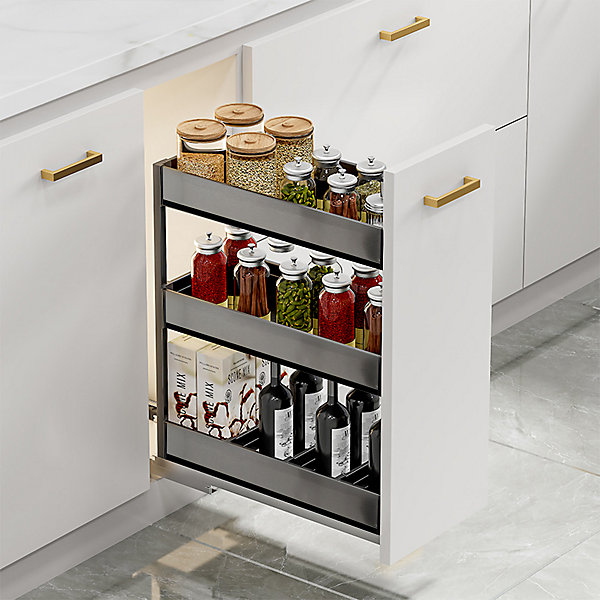
This combination works so well because of the high contrast and clean lines. The stark white of the cabinet doors creates a bright, minimalist backdrop. When opened, the dark grey pull-out rack provides a dramatic reveal. This is much more visually interesting than a standard white or chrome interior. The choice of gold finger-pulls adds a touch of warmth and sophistication, preventing the black-and-white scheme from feeling too cold or clinical. It’s a very intentional and curated color and material palette.
📐 Style Math
A narrow pull-out like this is the perfect solution for that awkward 6-to-9-inch gap that often ends up next to a vanity or between the toilet and the wall. It transforms what would be a dust-collecting dead zone into hyper-functional storage. This idea is specifically for very narrow spaces, under 12 inches wide. If you have a wider area, consider a double-hamper pull-out like Idea #3 or a wider drawer unit.
16. Mix Materials with Wood Grain, Black, and White
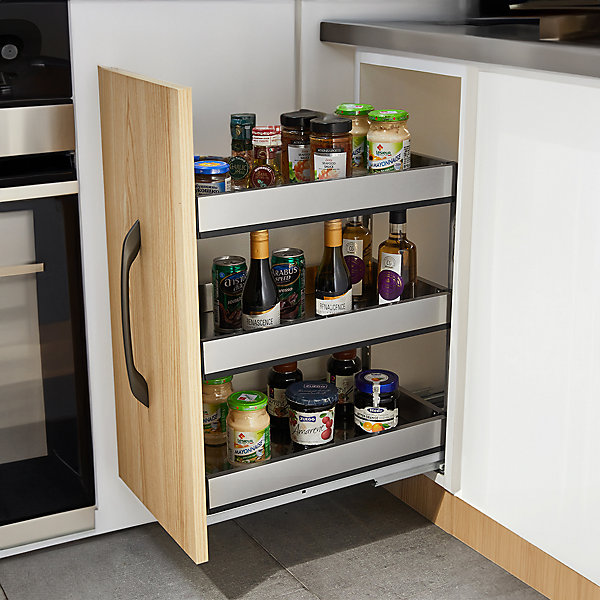
The modern aesthetic of this unit comes from a balanced material equation: 50% light wood grain + 30% matte black + 20% crisp white. The wood grain front panel brings warmth and texture. The matte black handle and shelf frames provide a graphic, industrial edge. The surrounding white cabinetry keeps the look bright and clean. This specific combination feels very current and design-forward. You could swap the light wood for a dark wood, but you would lose the airy, Scandinavian feel.
📏 Scale Guide
A pull-out pantry, even a narrow one like this, is heavy when fully loaded with jars and bottles. This is not a place to skimp on hardware. Ensure the sliding mechanism is high-quality and rated for at least 100-150 pounds. Cheaper glides will sag, bind, and fail over time, making the unit difficult to open and close. Pay for the upgrade to heavy-duty, full-extension, soft-close glides. It will double the lifespan and usability of the feature.
17. Contrast a Dark Wood Top with a White Pull-Out
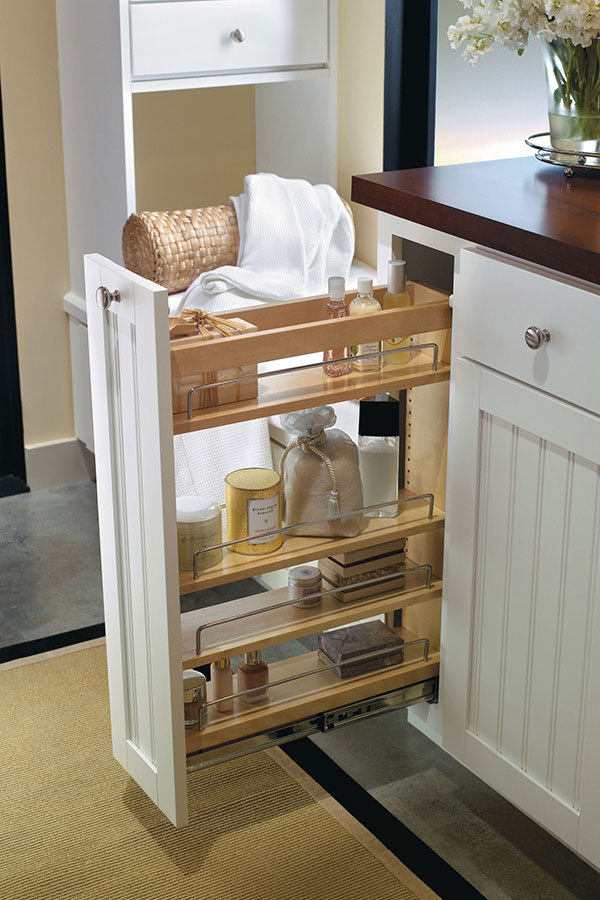
When mixing wood tones, the key is to make it look intentional. A good rule of thumb is to ensure there is a significant contrast between the two tones. Here, the very dark wood countertop and the bright white cabinet are far apart on the color spectrum, so it reads as a deliberate design choice. What ties them together subtly is the light wood tone of the pull-out shelves, which acts as a bridge between the dark top and the white base. The silver hardware also helps to unify the cool white and the warm wood.
✅ Before You Start
that makes this design feel special is the dark wood countertop. It’s an unexpected choice against all-white cabinetry, and it adds a rich, custom feel to what might otherwise be a standard bathroom vanity. It provides a beautiful, warm surface that grounds the entire piece and prevents it from feeling too sterile. The contrast it creates is everything; without it, the visual interest would be cut in half.
18. Add Rustic Texture with a Shaker Pull-Out and Woven Basket
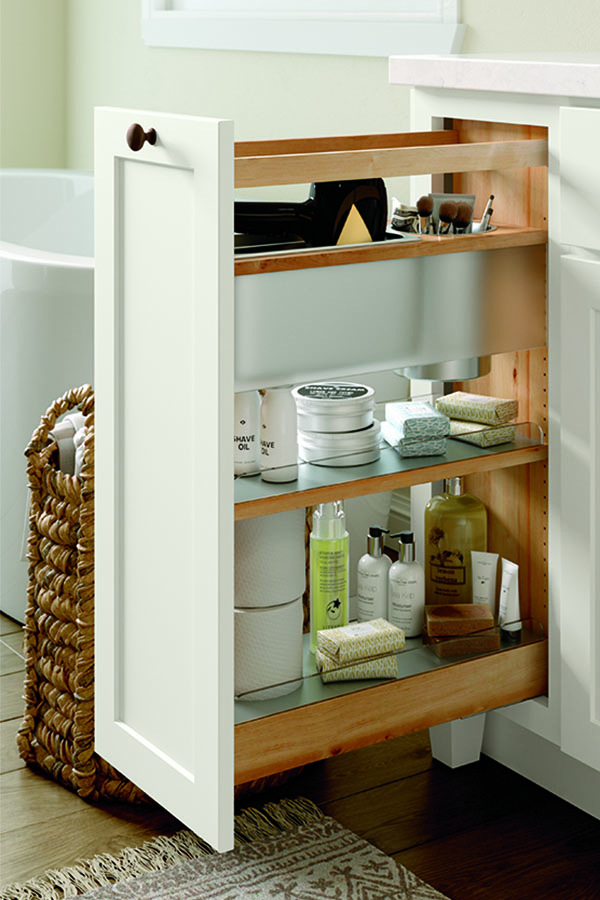
This look successfully blends clean, modern lines with rustic, natural textures. The crisp white of the shaker-style pull-out cabinet provides a clean, functional base. The dark wood floor offers a rich, grounding contrast. But the key elements are the light wood interior of the pull-out and the chunky woven basket next to it. These organic touches add warmth and softness, preventing the room from feeling stark. Mixing these different materials—smooth painted wood, rough woven fibers, and natural grain—creates a layered, inviting space.
🔥 Trending Context
A white shaker vanity is timeless, but it requires a bit of upkeep to stay pristine. The recessed panels of the shaker door are notorious for collecting dust and grime. Plan to wipe them down weekly with a damp microfiber cloth. The light wood interior of the pull-out should be sealed with a water-resistant polyurethane finish to protect it from moisture and product spills, which are inevitable in a bathroom setting. This is much easier to keep clean than the budget version seen in Idea #28.
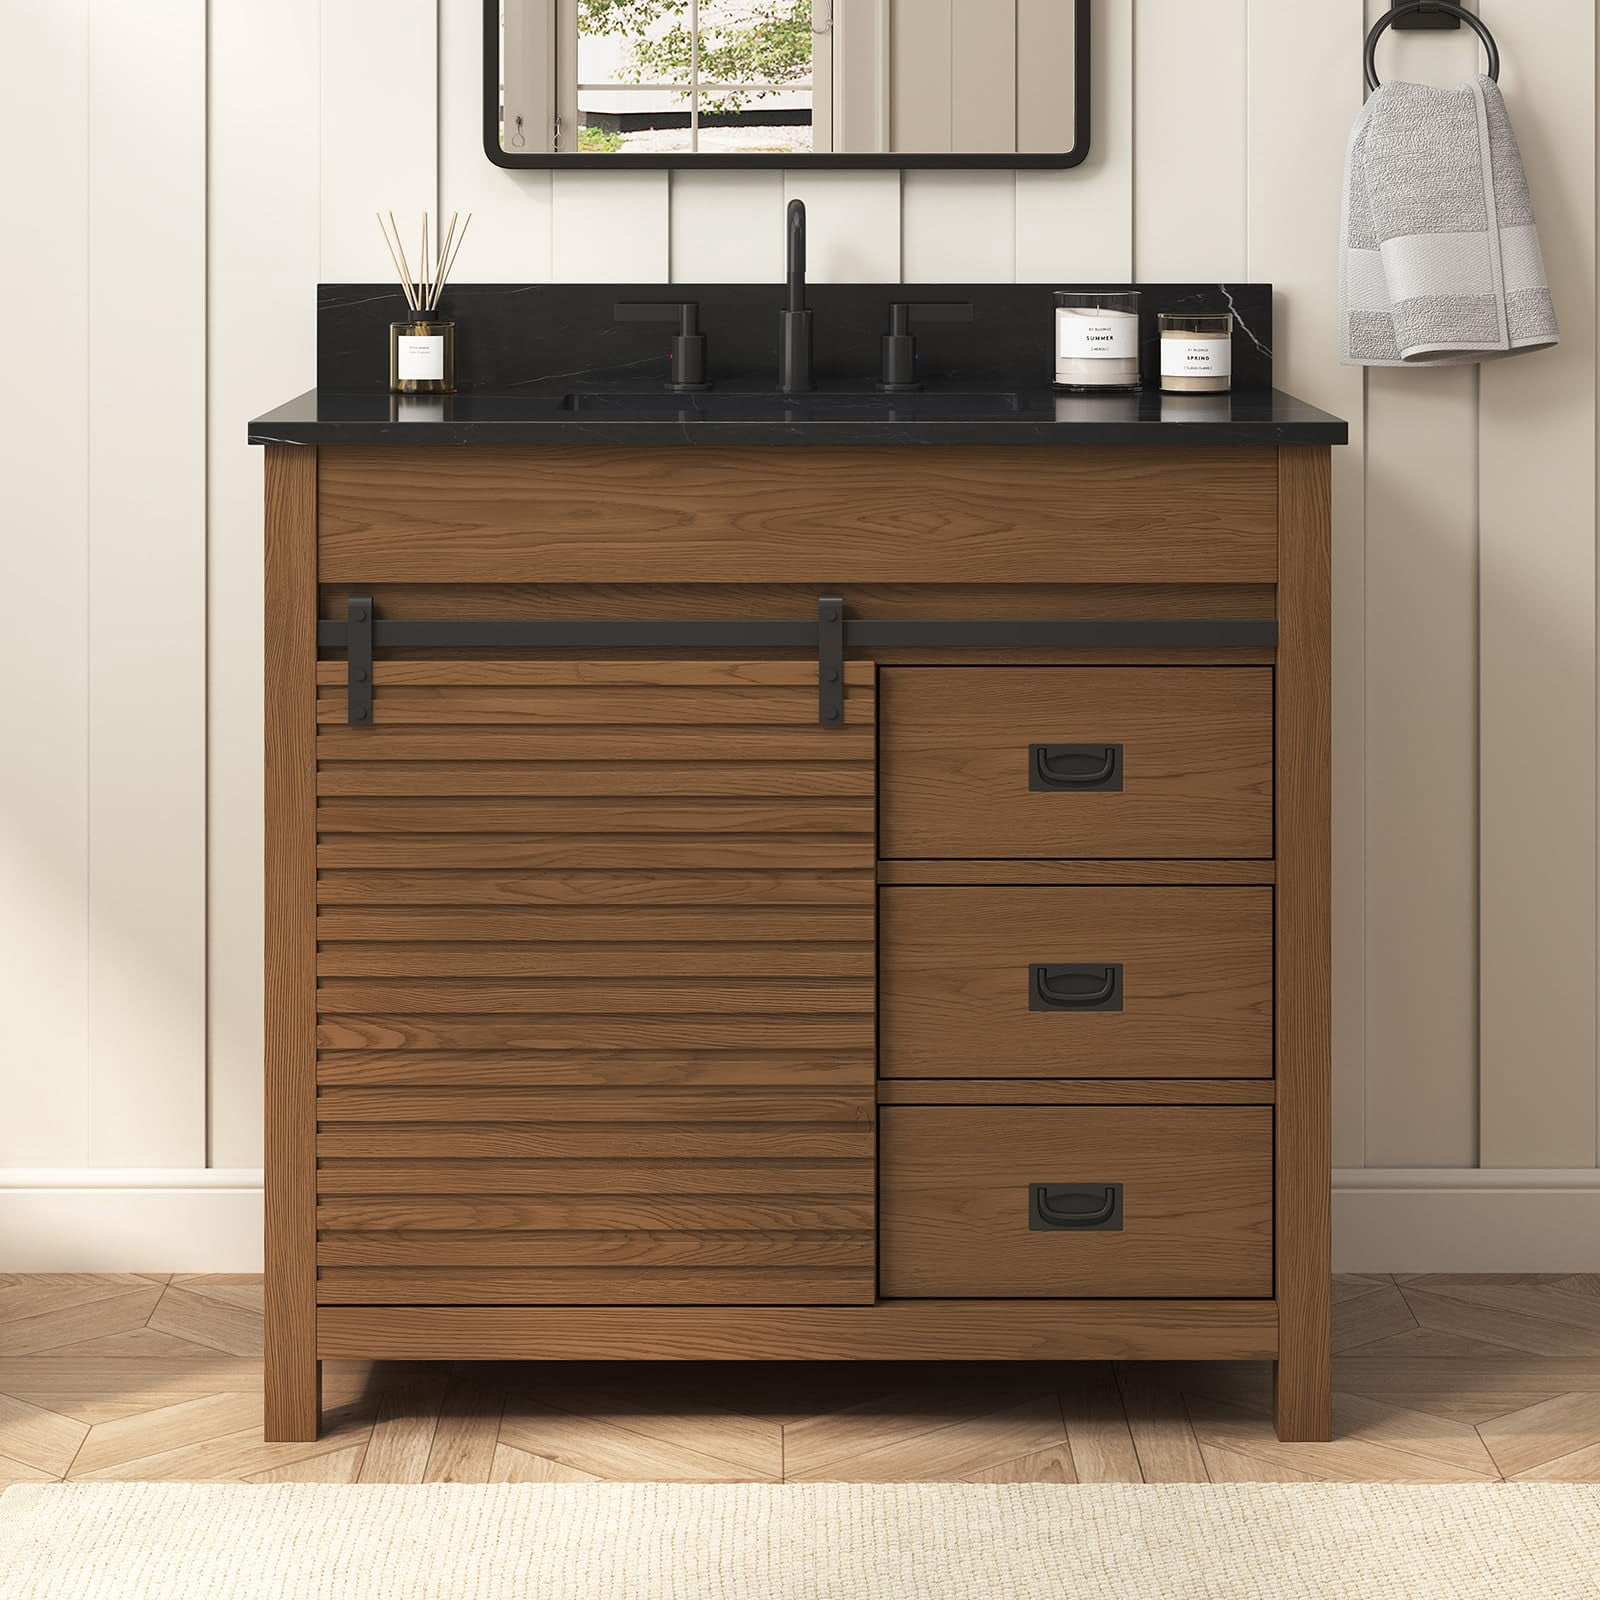
19. Slide a Louvered Barn Door for a Modern Rustic Vibe
This vanity nails the modern rustic aesthetic with a clear formula: 50% textured wood + 40% matte black + 10% crisp white. The medium-toned wood with its horizontal louvered detail and barn door hardware brings in the rustic, tactile element. The matte black sink, faucet, hardware, and mirror frame provide a strong, modern, industrial contrast. Finally, the white vertical plank walls keep the space feeling bright and prevent the wood and black from becoming too heavy. It’s a perfectly balanced trio of textures and finishes.
💸 Get This Look For Less
While a sliding barn door looks great, it has a major functional drawback: it doesn’t seal. This means you will never have a fully closed cabinet. One side of your vanity will always be exposed. This is fine for storing towels or pretty baskets, but it’s not ideal for hiding clutter or things you want to keep dust-free. Before choosing this style, be honest with yourself about how tidy you can keep the open-shelf side of the equation.
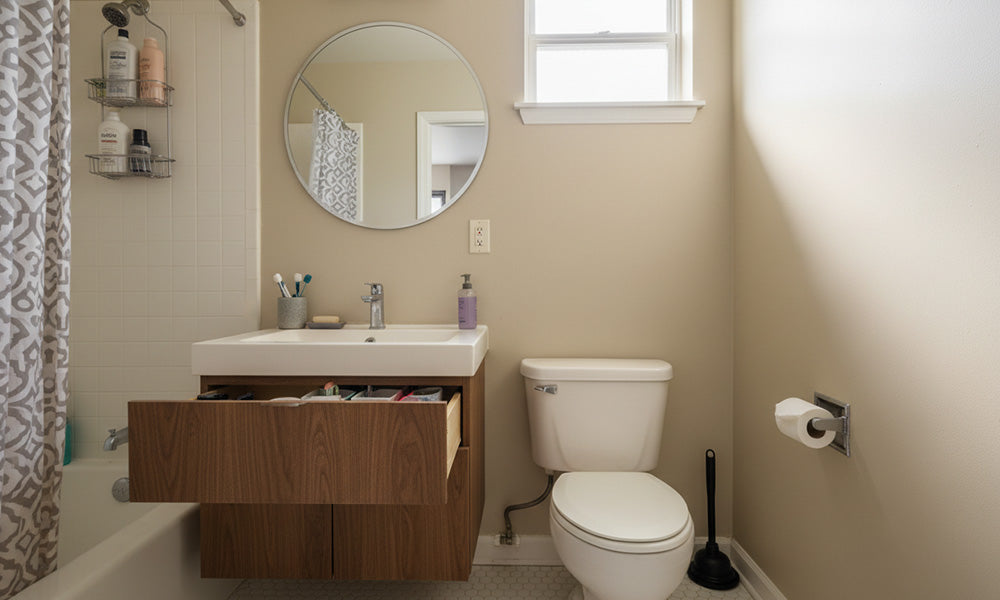
20. Maximize a Small Space with a Floating Drawer Vanity
Getting this airy, modern look is more accessible than it seems. The key is a simple floating vanity with a large, functional drawer.
🔧 How-To Brief
- Floating Vanity (light wood finish): $350 – $700
- White Rectangular Basin & Faucet: $250 – $500
- Round Mirror: $80 – $200
- Hexagon Floor Tile (per sq ft): $5 – $15
- TOTAL (excluding tile installation): $680 – $1,400
- Budget alternative: IKEA’s GODMORGON series offers a very similar floating vanity look for around $300-$500, including the sink.
This idea is practically made for powder rooms or guest baths, typically in the 30-50 square foot range. The floating design creates the illusion of more floor space, which is critical in a tight footprint. The minimum practical width for a vanity like this is about 24 inches. Anything smaller and the basin becomes comically tiny. The single wide drawer is also more space-efficient than two small side-by-side drawers, giving you more usable, uninterrupted storage space.
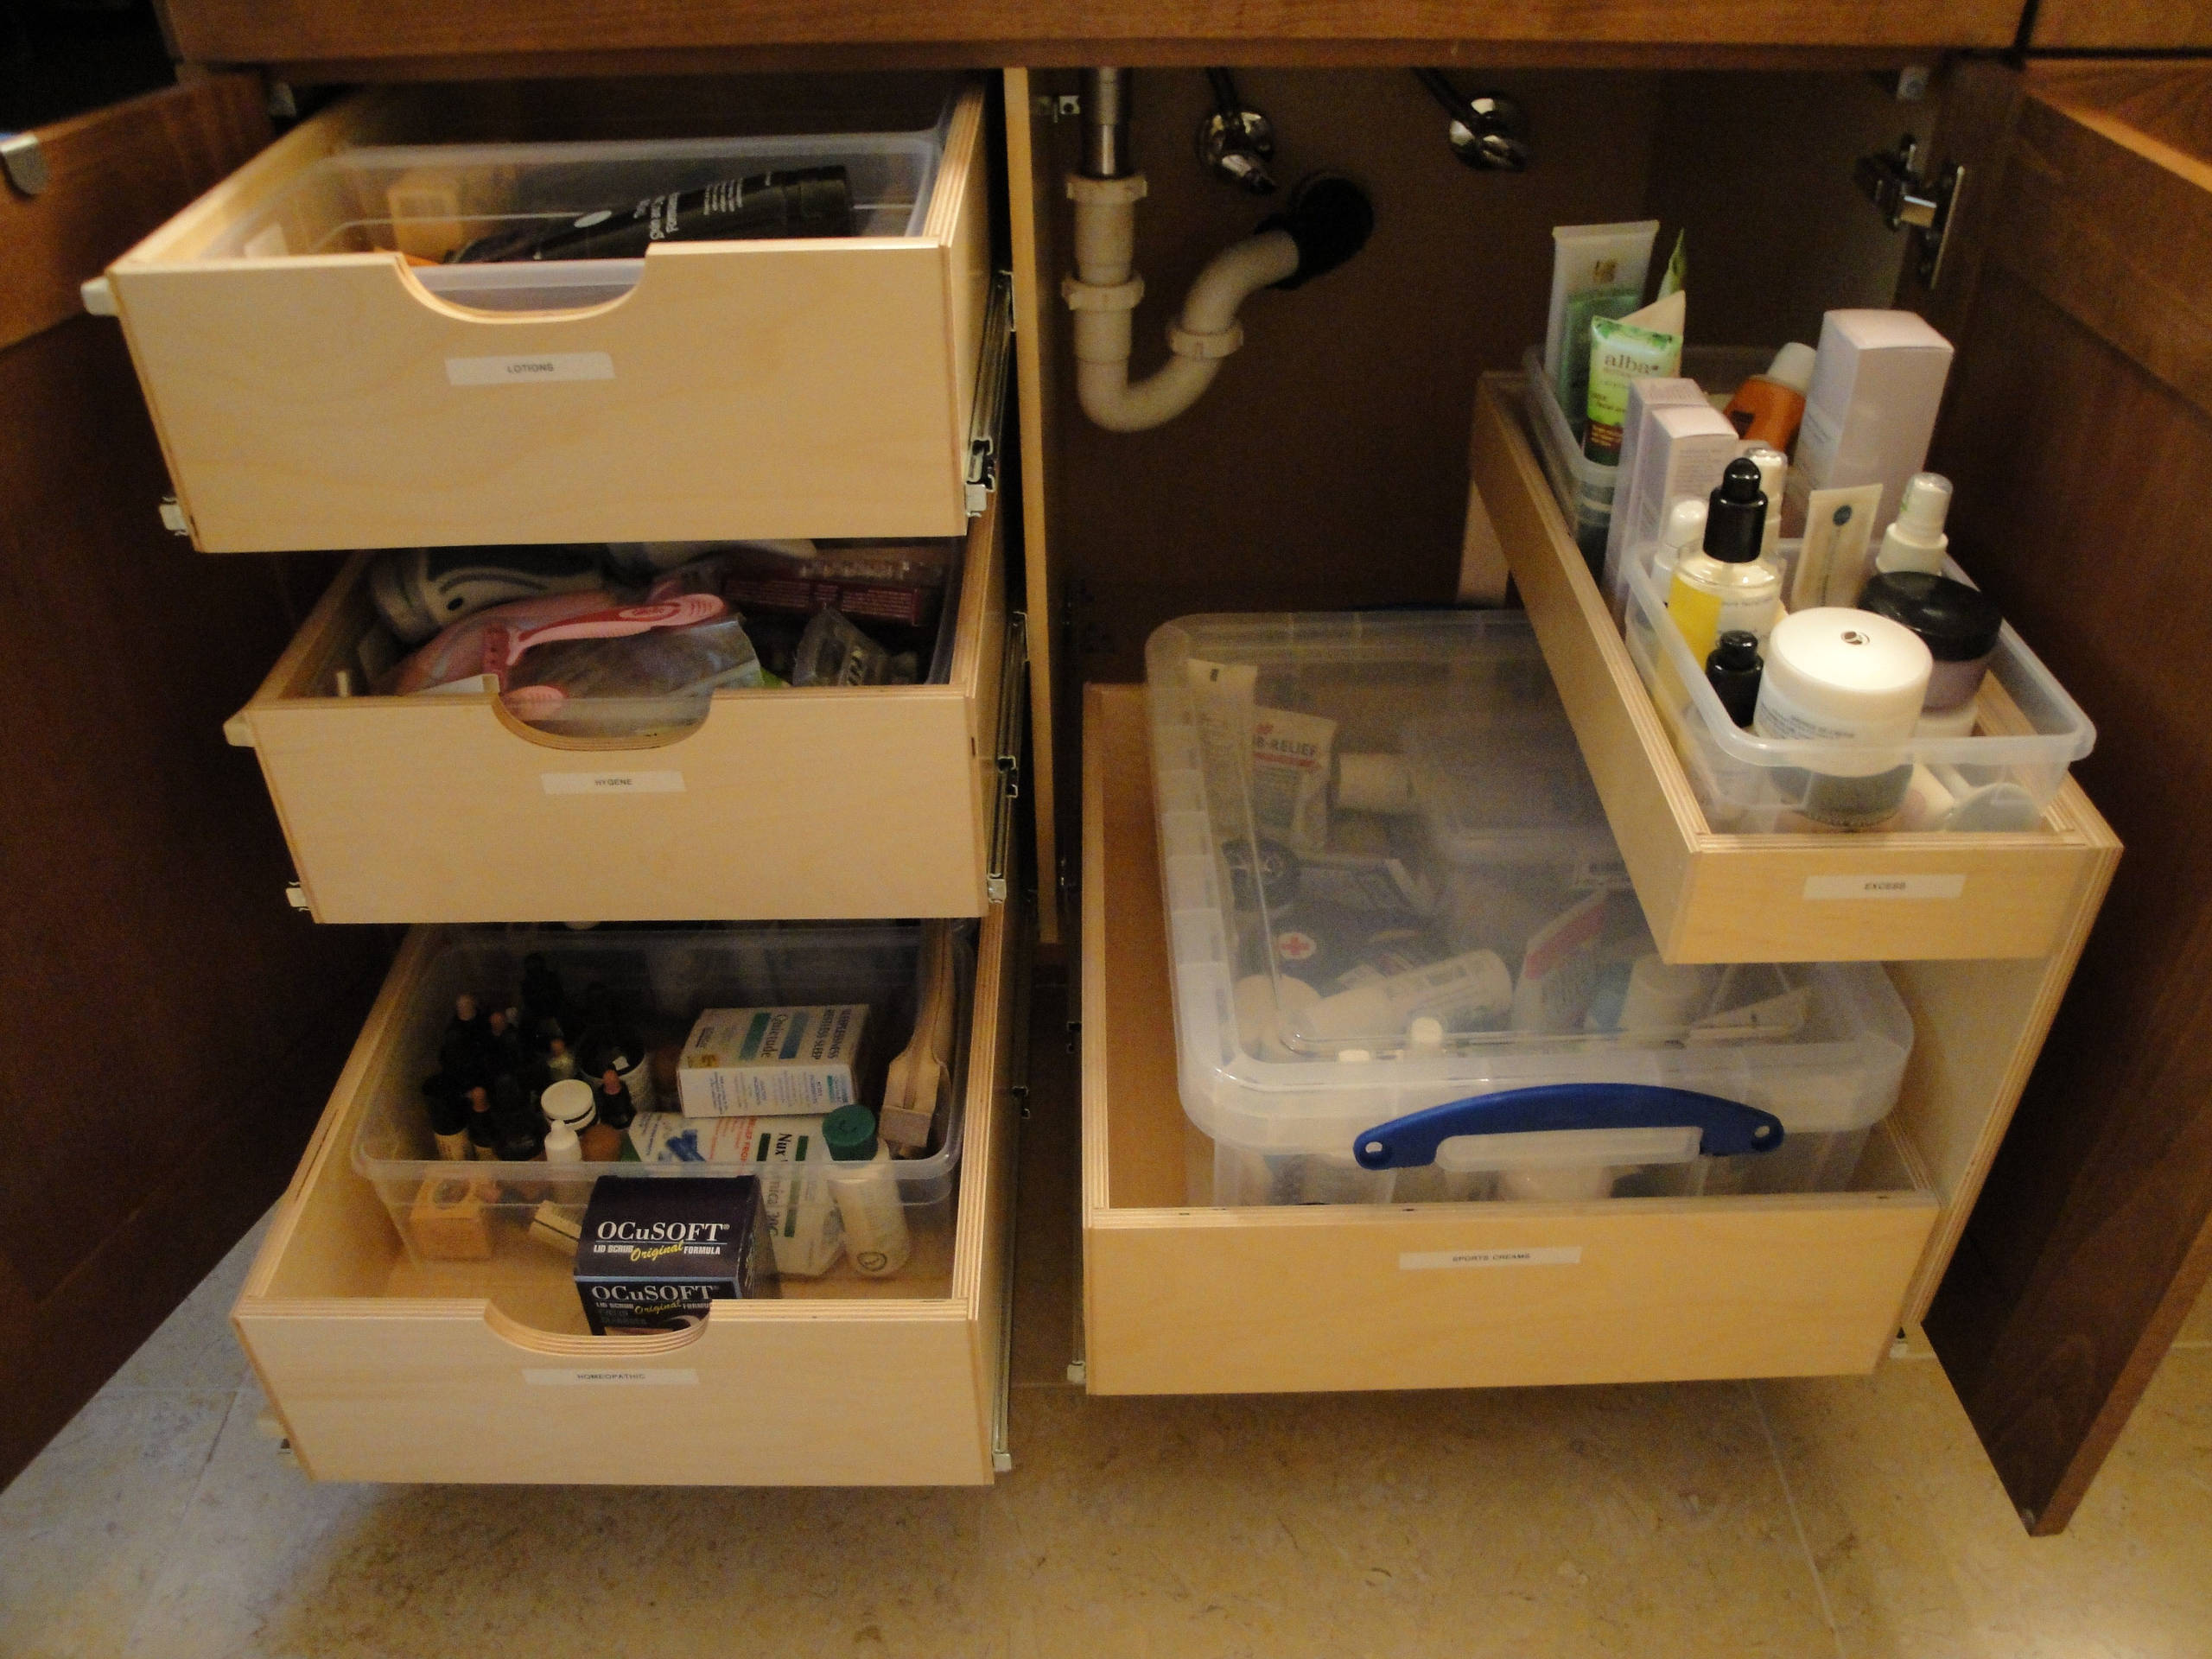
21. Create a Custom Under-Sink Pharmacy with Labeled Pull-Outs
The single element that transforms this from simple storage into a masterpiece of organization is the labels. Without them, you would still have to pull out each drawer and search through the clear containers to find what you need. With the labels, you can identify the contents instantly. It’s a small, inexpensive detail that saves time and mental energy every single day. It reflects a commitment to a truly functional system, not just a tidy appearance. Compare this to Idea #28, which is functional but lacks this next-level organization.
🎯 What Makes It Work
You can build a simple version of these pull-out trays yourself. (Time: 3 hours, Cost: $50-$90)
- Measure the width and depth of your cabinet interior.
- Cut a piece of 1/2″ plywood to be 1″ narrower than the cabinet width. This will be your shelf.
- Attach a “face” piece of 1×2 wood to the front of the plywood shelf.
- Install a pair of full-extension drawer glides to the bottom of the cabinet, ensuring they are level.
- Attach the corresponding part of the glides to the bottom of your new shelf.
- Slide the shelf in, add your containers, and enjoy the access!
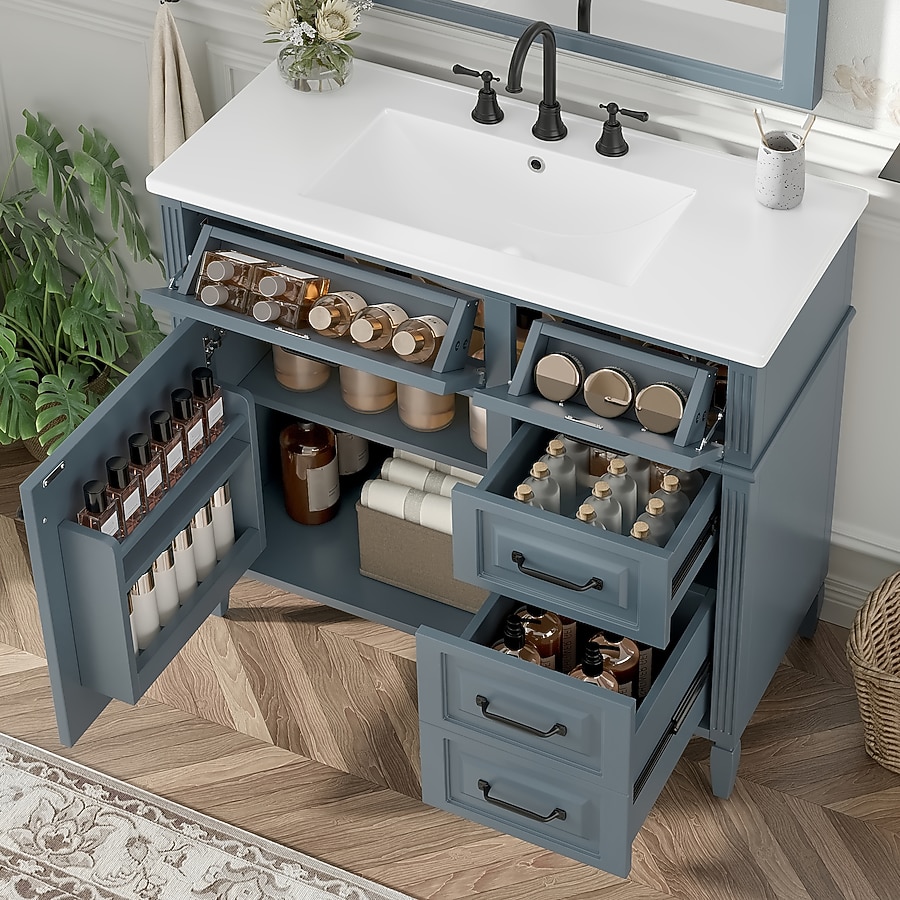
22. Opt for a Blue Vanity with Swing-Out Door Storage
This vanity is a masterclass in diverse storage types. It works because it doesn’t rely on a single solution. It combines shallow pull-out drawers for small items, deep drawers for bulkier things, and swing-out shelves on the doors for frequently used bottles. This variety ensures that every item has a perfectly sized home. The use of black hardware against the dusky blue cabinets adds a sharp, graphic contrast, while the light wood herringbone floor brings warmth and prevents the blue and white from feeling cold.
💡 Designer Tip
Don’t underestimate the power of door storage. Those little swing-out caddies are perfect for the things you reach for every day, like contact lens solution, face wash, or toothpaste. Mounting storage here keeps the most essential items at your fingertips the moment you open the door, without you having to rummage through a deep drawer. When buying them aftermarket, choose slim-profile options to ensure your cabinet door can still close properly.
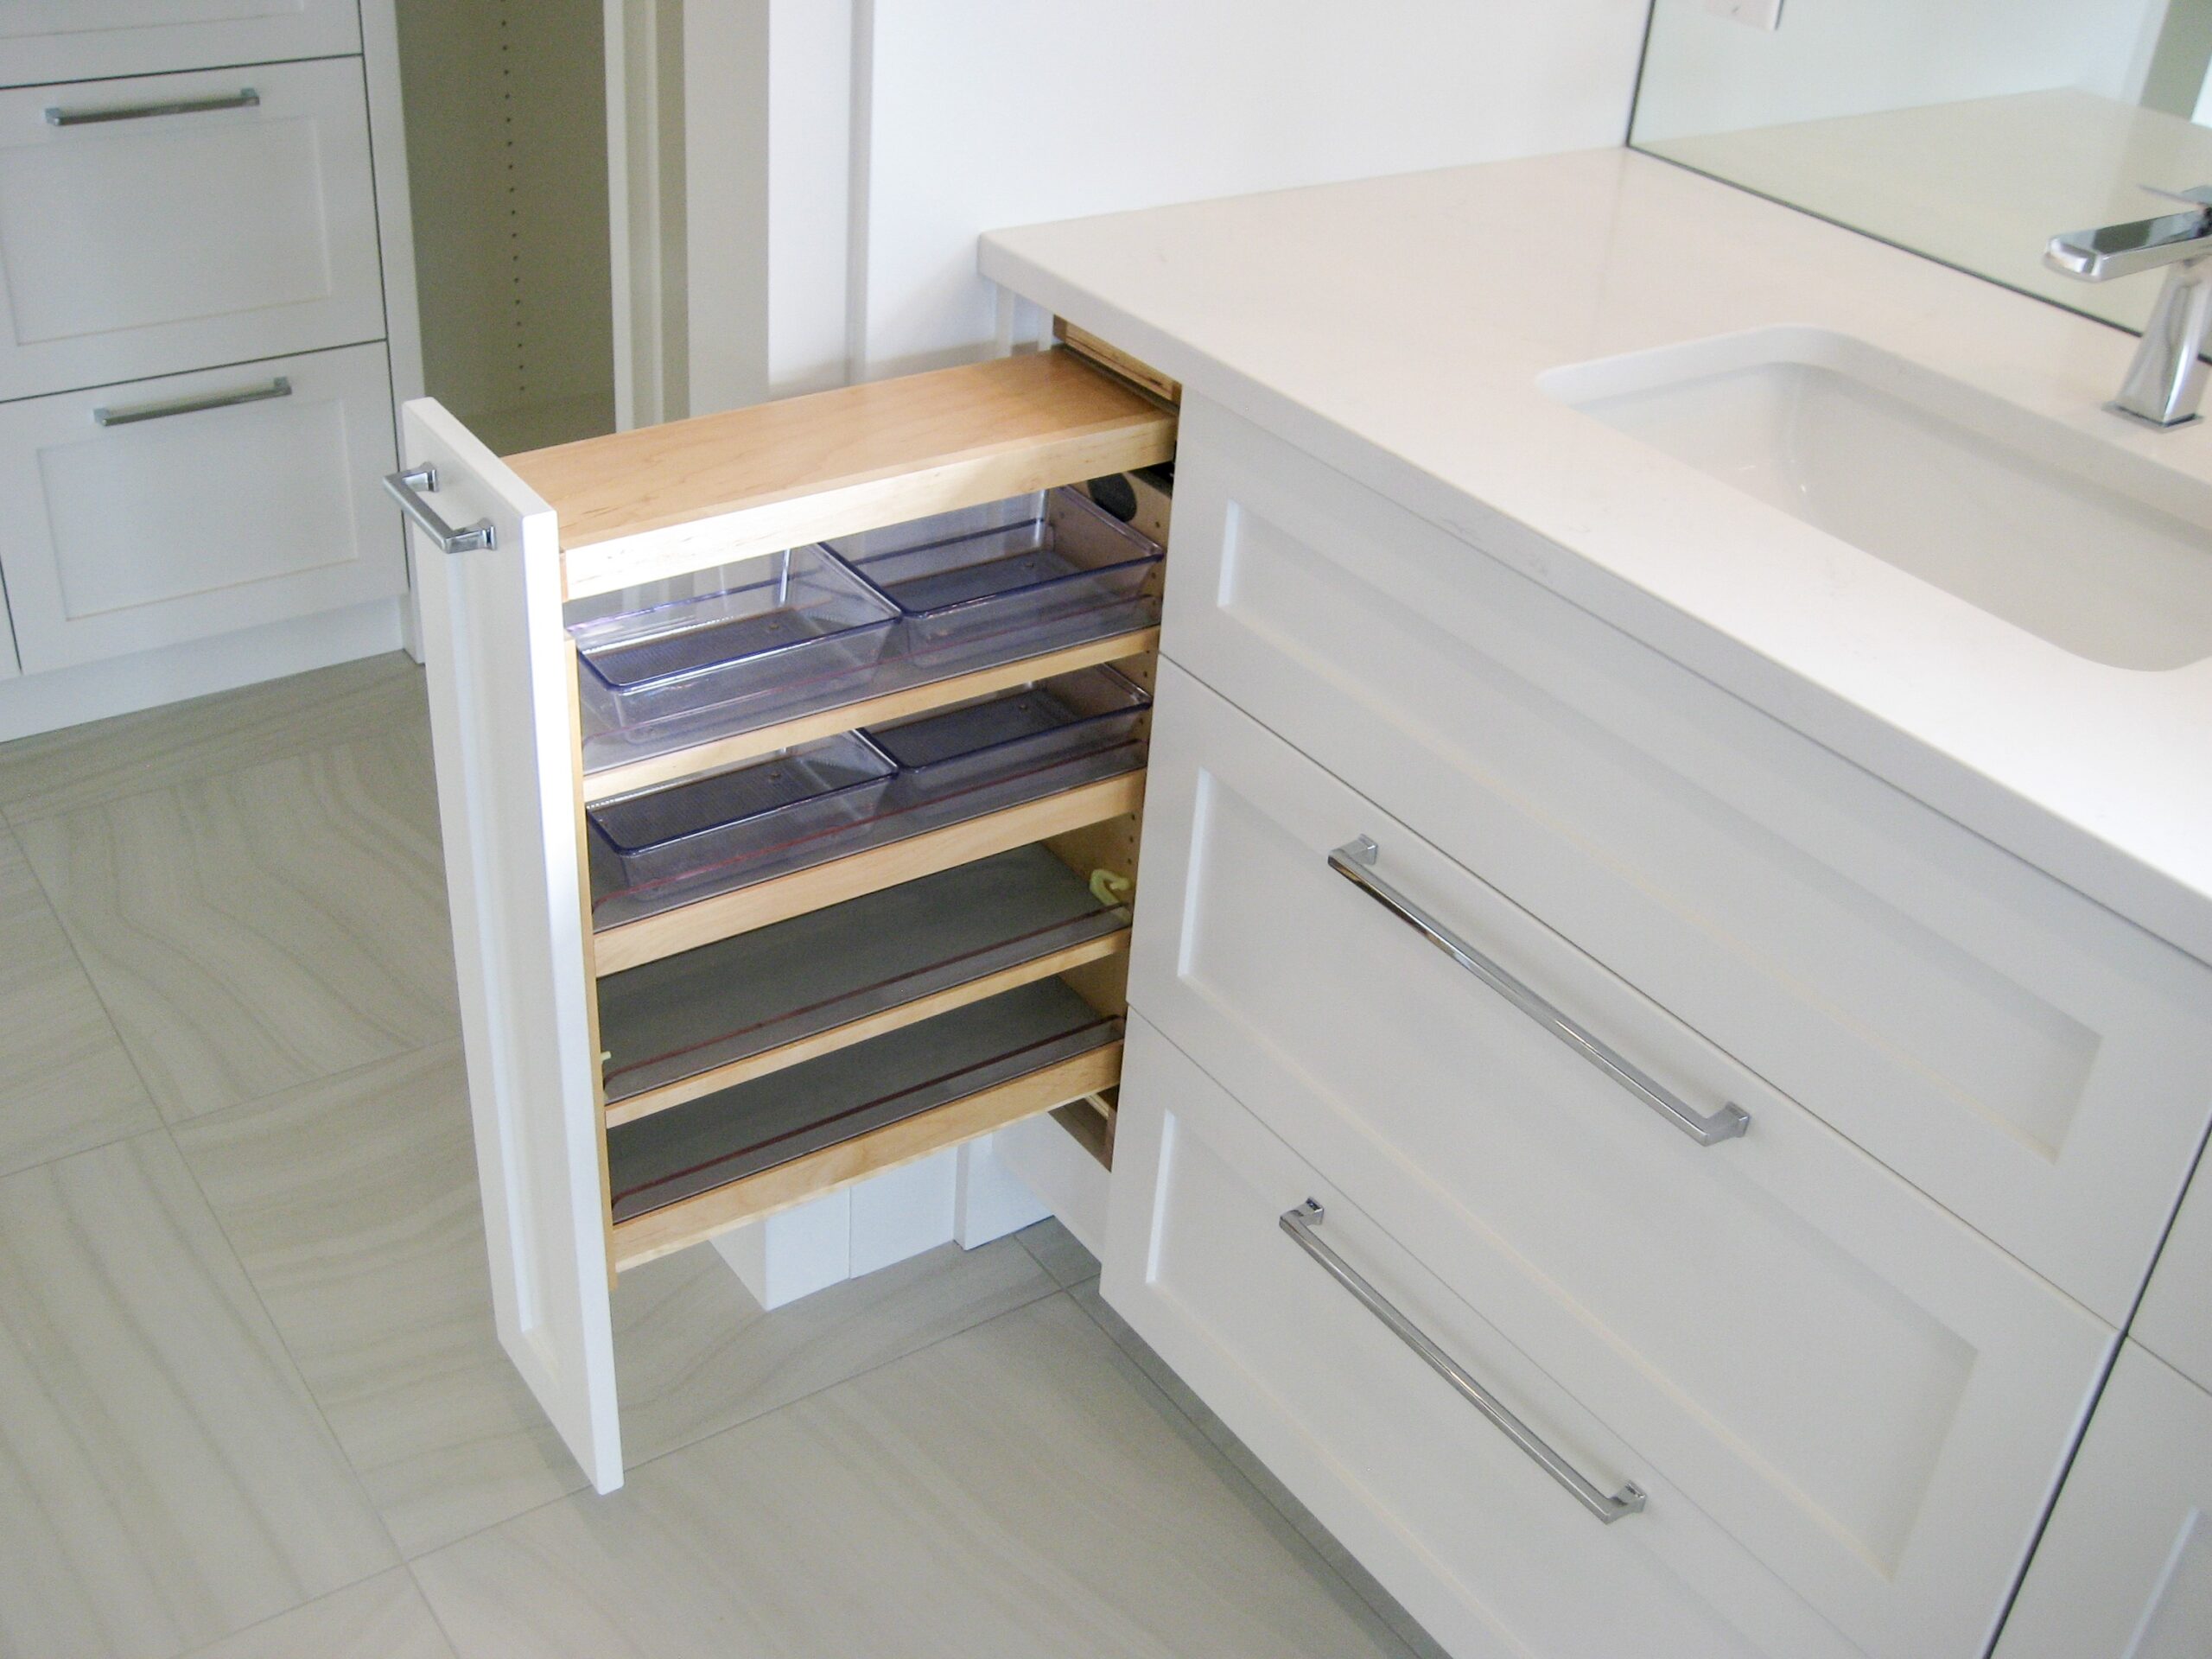
23. Integrate a Narrow Pull-Out into a White Shaker Vanity
You can recreate this high-end custom look on a budget. Start with a standard white shaker vanity. Then, purchase a narrow pull-out cabinet organizer kit (around $150-$250). The trick is to install it in the space between the vanity and a wall, then attach a matching cabinet door panel to the front of it. This gives the illusion of a fully integrated unit. Use clear plastic bins from The Container Store or Amazon to organize the shelves, giving you the exact functionality for a fraction of the custom cabinetry price.
🧹 Maintenance Reality
While these narrow pull-outs are fantastic space-savers, they can be a cleaning nightmare if not managed well. Spills and dust can easily get trapped at the back of the slim shelves. Using removable, washable clear bins (as shown here) is not just good for organization—it’s critical for maintenance. You can simply take the whole bin to the sink to wipe it down, rather than trying to contort your hand to clean the fixed shelf in a tight space.
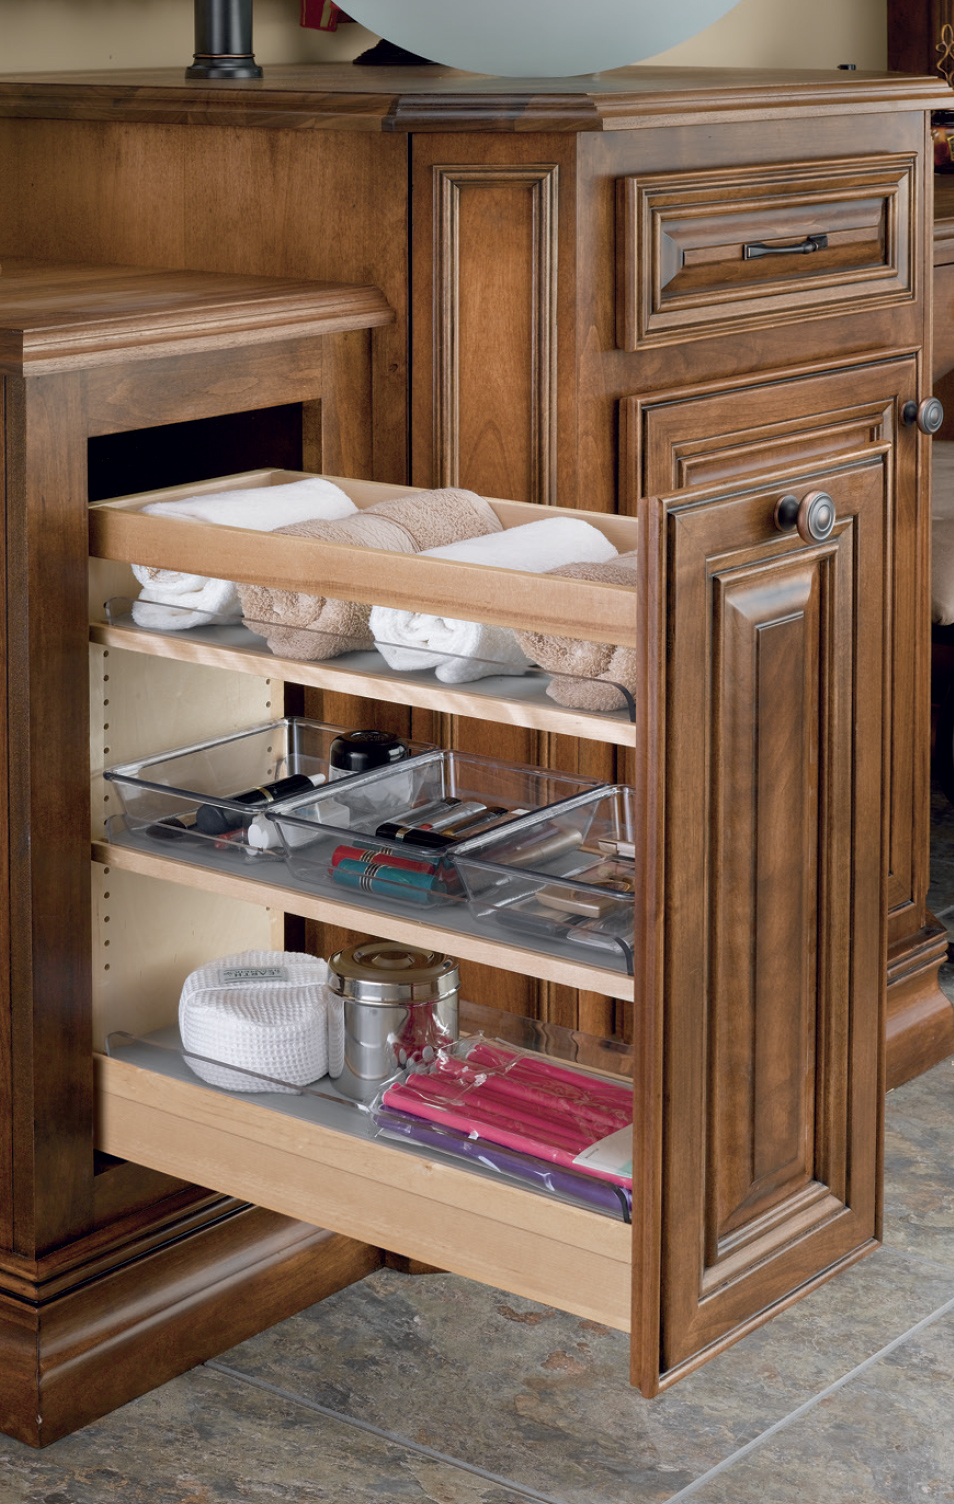
24. Hide Towels and More in a Dark Wood Vertical Pull-Out
that makes this design so successful is its seamless integration. This isn’t just a pull-out unit; it’s a piece of the overall furniture design. The dark stained wood of the pull-out perfectly matches the adjacent cabinet doors and frame, making it look like a single, cohesive piece. When closed, you wouldn’t even know it was a pull-out. This level of architectural integration is what separates a good storage solution from a truly great one.
⚠️ Real Talk
A full-height vertical pull-out like this is best suited for master bathrooms or larger spaces (80 sq ft and up) where you can incorporate a taller linen cabinet or a full wall of joinery. It requires a minimum width of about 12 inches to be substantial enough for rolled towels. For smaller bathrooms, a half-height version installed within a standard vanity, like the one in Idea #8, is a more practical application of the same principle.
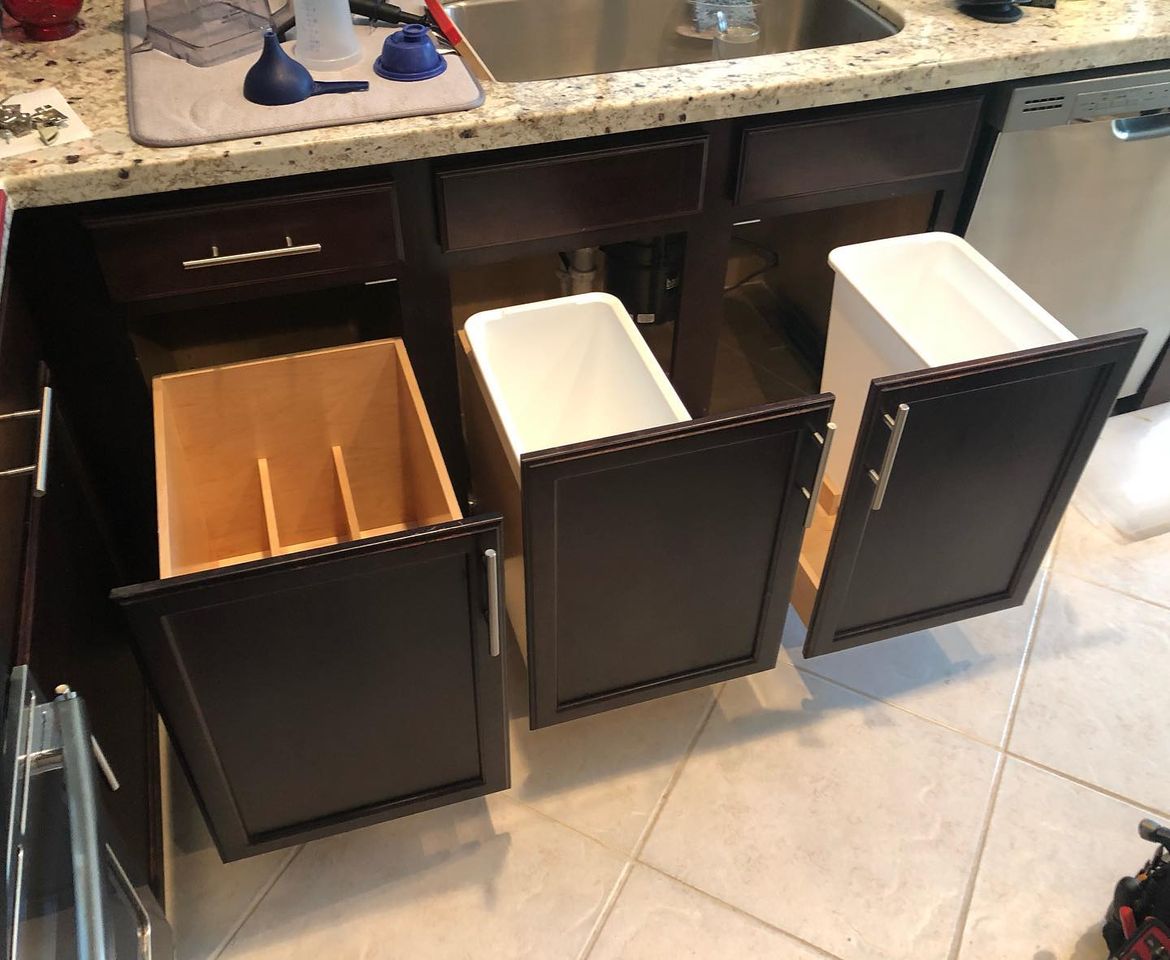
25. Mix and Match Bins and Organizers Under the Sink
This setup works because it acknowledges that not all under-sink storage needs are the same. Instead of one uniform solution, it combines different types of pull-outs to meet specific needs. A double-bin pull-out handles trash and recycling. A single, larger bin could be for cleaning supplies. A drawer with wooden dividers is perfect for dish soap, sponges, and brushes. This “à la carte” approach ensures that each storage unit is perfectly suited to its contents, maximizing efficiency and organization in a notoriously awkward space.
💰 Budget Breakdown
You can achieve this exact multi-functional setup using off-the-shelf components from IKEA. Their SEKTION kitchen cabinet line includes a variety of pull-out trash sorters and drawer organizers. You can buy the dark brown LERHYTTAN drawer fronts to get a similar look. A combination of a trash pull-out ($60) and a deep drawer with MAXIMERA organizers ($80) will give you a highly functional under-sink area for under $200, which is dramatically less than a custom build.
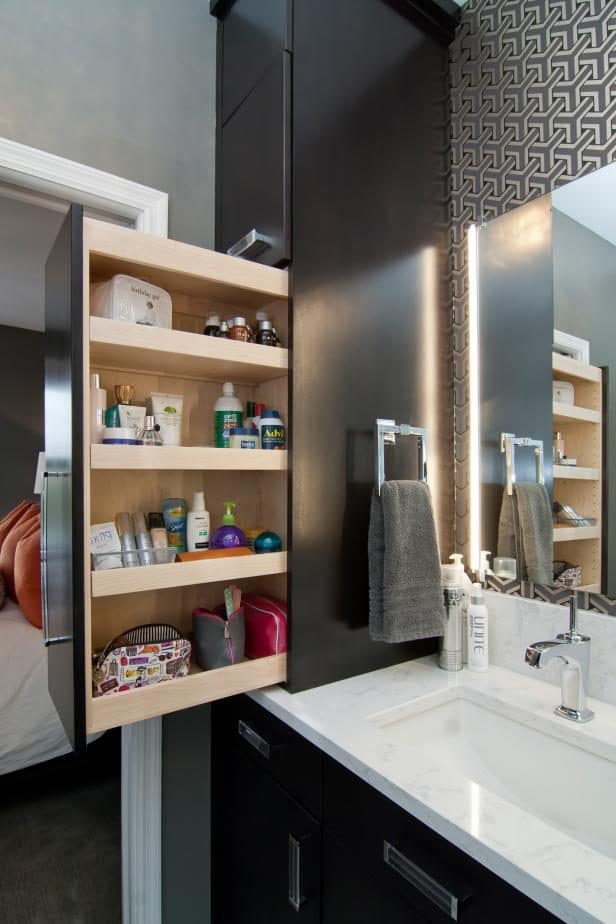
26. Contrast a Sleek Black Cabinet with Natural Wood Shelves
This look is right on trend for 2026, hitting the sweet spot of what designers are calling “Japandi” style—a hybrid of Japanese minimalism and Scandinavian function. The matte black exterior is sleek and modern, while the natural light wood of the pull-out shelves adds warmth and an organic element. The combination feels both serene and sophisticated. It’s a move away from the all-white kitchens and baths of the past decade towards spaces with more depth, contrast, and natural texture.
⭐ The One Thing
The single element that makes this design feel utterly luxe is the tall, vertical orientation. A standard-height pull-out is functional, but a full-height one feels architectural. It draws the eye up, elongates the space, and provides an incredible amount of storage on a tiny footprint. When pulled out, it creates a “wow” moment, revealing the warm wood interior. It’s a statement piece that also happens to be wildly practical.
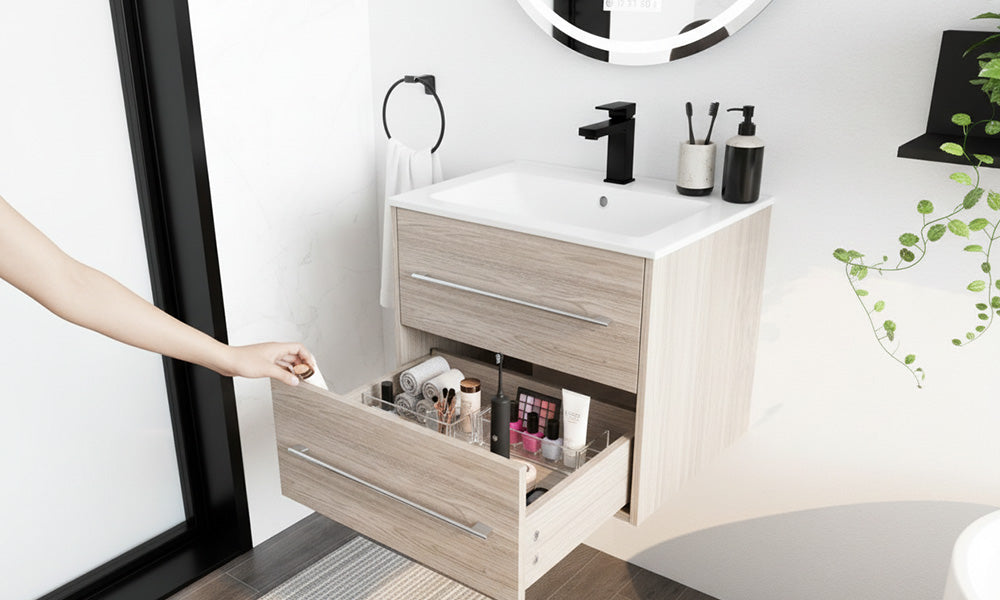
27. Organize a Floating Vanity Drawer with Acrylic Dividers
When using acrylic drawer organizers, buy a set with adjustable or modular pieces rather than a single fixed tray. Your products and needs will change over time, and a modular system allows you to reconfigure the layout without having to buy a whole new set. For deep drawers like this one, look for stackable trays to take advantage of the vertical space. You can put less-used items on the bottom layer and daily essentials on top. This is the secret to keeping deep drawers from becoming a jumbled pit.
📐 Style Math
Clear acrylic organizers look amazing when they are clean, but they show every speck of dust, makeup powder, and lotion drip. To keep them looking pristine, you’ll need to commit to a quick wipe-down once a week. The best way to clean them is to take them all out and wash them in the sink with warm, soapy water. It’s an extra step, but it’s much easier than trying to clean them while they’re still inside the drawer.
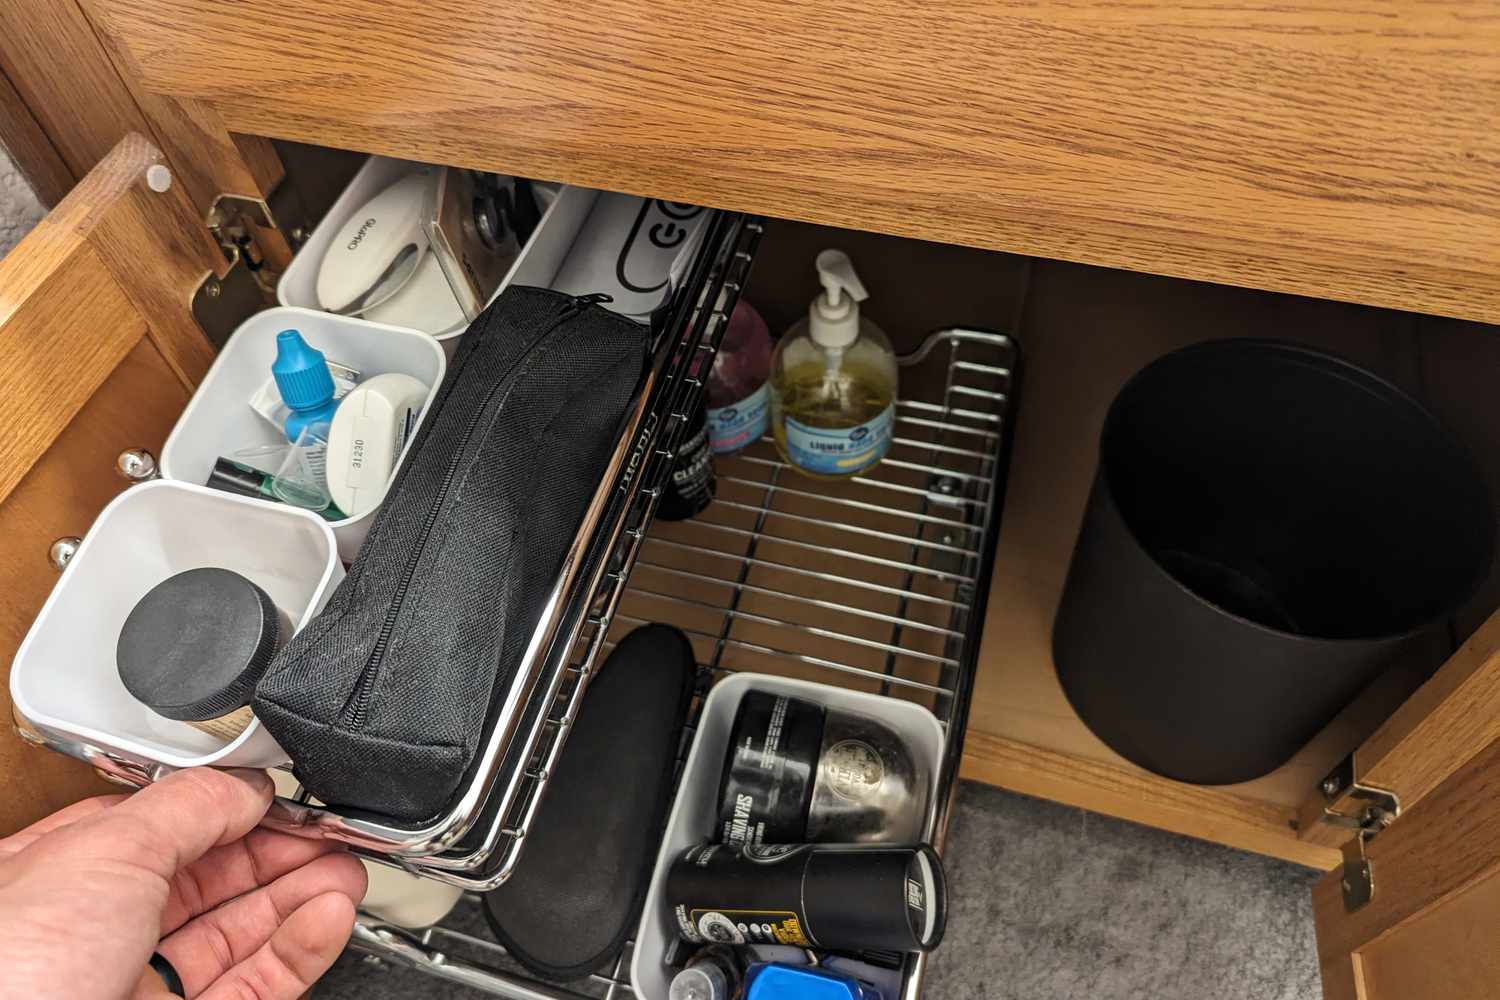
28. Install a Simple Chrome Pull-Out Rack for Essentials
This is one of the most affordable and effective upgrades for a bathroom vanity. Here’s a typical cost breakdown:
📏 Scale Guide
- Chrome Wire Pull-Out Rack: $50 – $100
- White Plastic Organizer Bins (set of 4-6): $20 – $35
- Small Waste Bin: $10 – $20
- TOTAL: $80 – $155
- Budget alternative: Honestly, this IS the budget alternative. For even less, you could use simple plastic bins on the cabinet floor, but you’d lose the incredible convenience of the pull-out access for just a $50 saving.
Let’s be real: wire racks can be annoying. Small items tend to fall through the gaps or tip over on the uneven surface. That’s why the white plastic organizer bins shown here are not just a suggestion—they are essential. They create a stable, flat bottom and contain any potential spills. Without the bins, you will constantly be frustrated by bottles toppling over every time you slide the rack in or out. Don’t skip the bins!
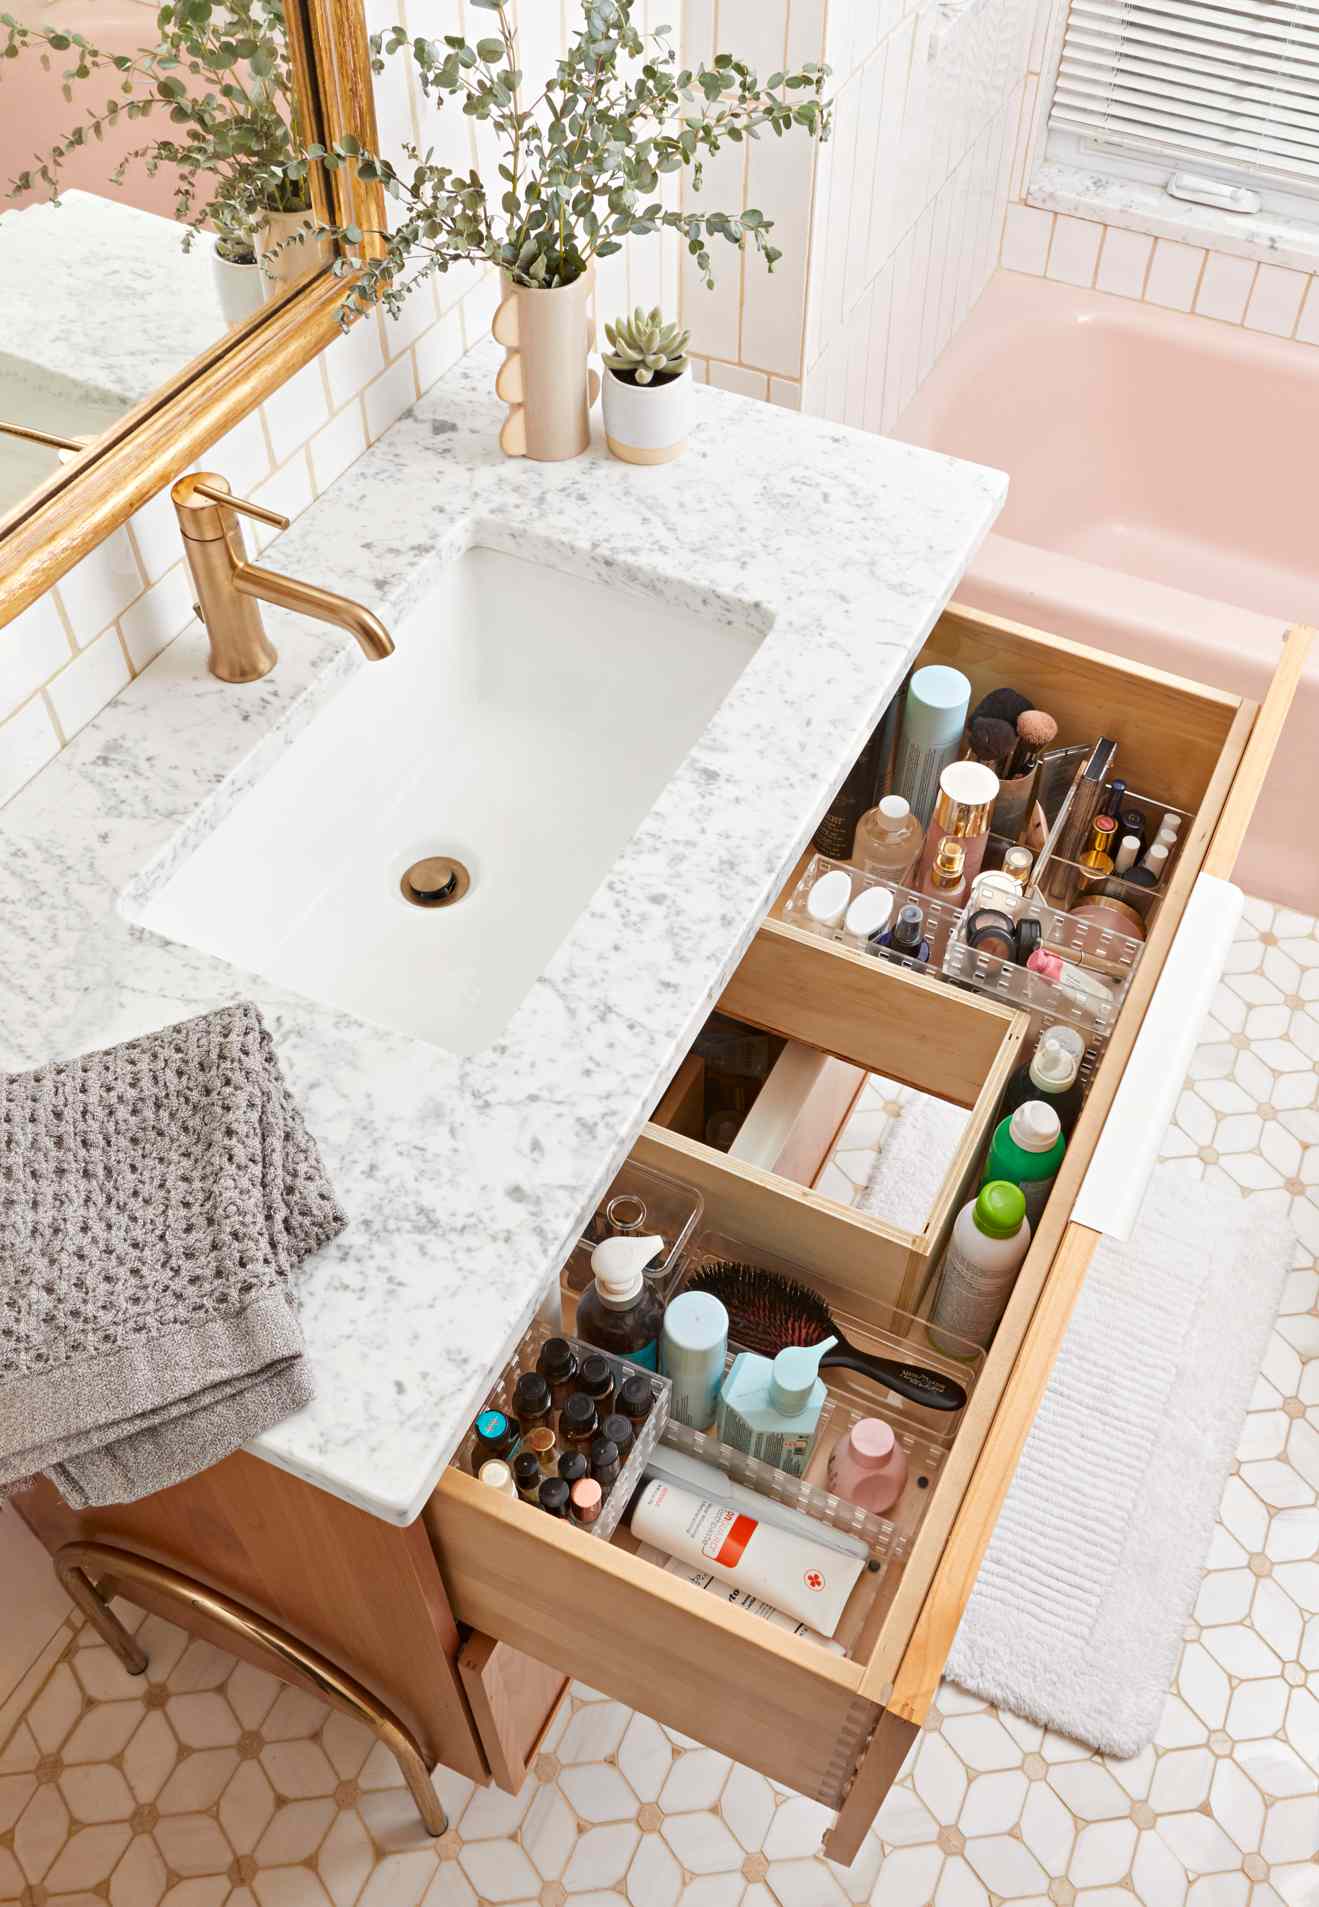
29. Go All-In with Dividers in a Deep Wooden Drawer
This drawer is a triumph of “a place for everything, and everything in its place.” It works because it uses a combination of different organizer types to suit different items. The fixed wooden dividers create large zones for palettes and tubes. The drop-in clear acrylic bins are perfect for smaller, messier items like foundation bottles and essential oils. This mix-and-match approach is far more effective than a single, one-size-fits-all organizer tray. The brass faucet and framed mirror add a warm, vintage touch to the modern organization.
✅ Before You Start
The style here is a beautiful balance of materials: 40% warm wood grain + 30% crisp white + 20% clear acrylic + 10% brass/gold accents. The wood drawer provides a natural, organic base. The white marble countertop and subway tile backsplash keep the look bright and clean. The clear organizers add a layer of modern functionality without adding visual clutter. Finally, the brass hardware acts as the jewelry, tying the warm tones together and adding a touch of glamour.
Your Most Organized Bathroom Awaits
Pull-out storage isn’t just about hiding clutter; it’s about making your daily routine smoother and your space more joyful to be in. Whether you’re drawn to a sleek, modern powered drawer or a rustic, towel-filled vertical pantry, the right solution is all about matching your storage to your lifestyle. We hope these 29 ideas have sparked some serious inspiration for your own bathroom project.
Feeling ready to plan your upgrade? Go save your favorites to your bathroom inspiration board on Pinterest. When you’re ready to start, you’ll know exactly where to find them!