You know that feeling when you finally find the perfect bathroom makeover on Pinterest, but it feels completely out of reach? Most before-and-after galleries show stunning transformations without explaining *how* they happened. We spent serious time decoding the best makeovers to bring you only what’s worth your attention this year. After filtering through hundreds of options, we narrowed it down to 29 ideas that actually deliver results, with inspiration for every budget.
Inside, you’ll find 29 curated before-and-afters, breaking down everything from modern spa-like retreats to bold, pattern-heavy powder rooms. These ideas are trending on Pinterest right now because they prove that a private, beautiful sanctuary at home is more achievable than ever. And stay until the end — we break down the most common mistakes that can ruin these looks. 📌 Save this to Pinterest for later — you’ll want to revisit these ideas.
Just a heads-up: this post may contain affiliate links. This means we may earn a small commission if you make a purchase, at no extra cost to you. We only recommend products we truly love.
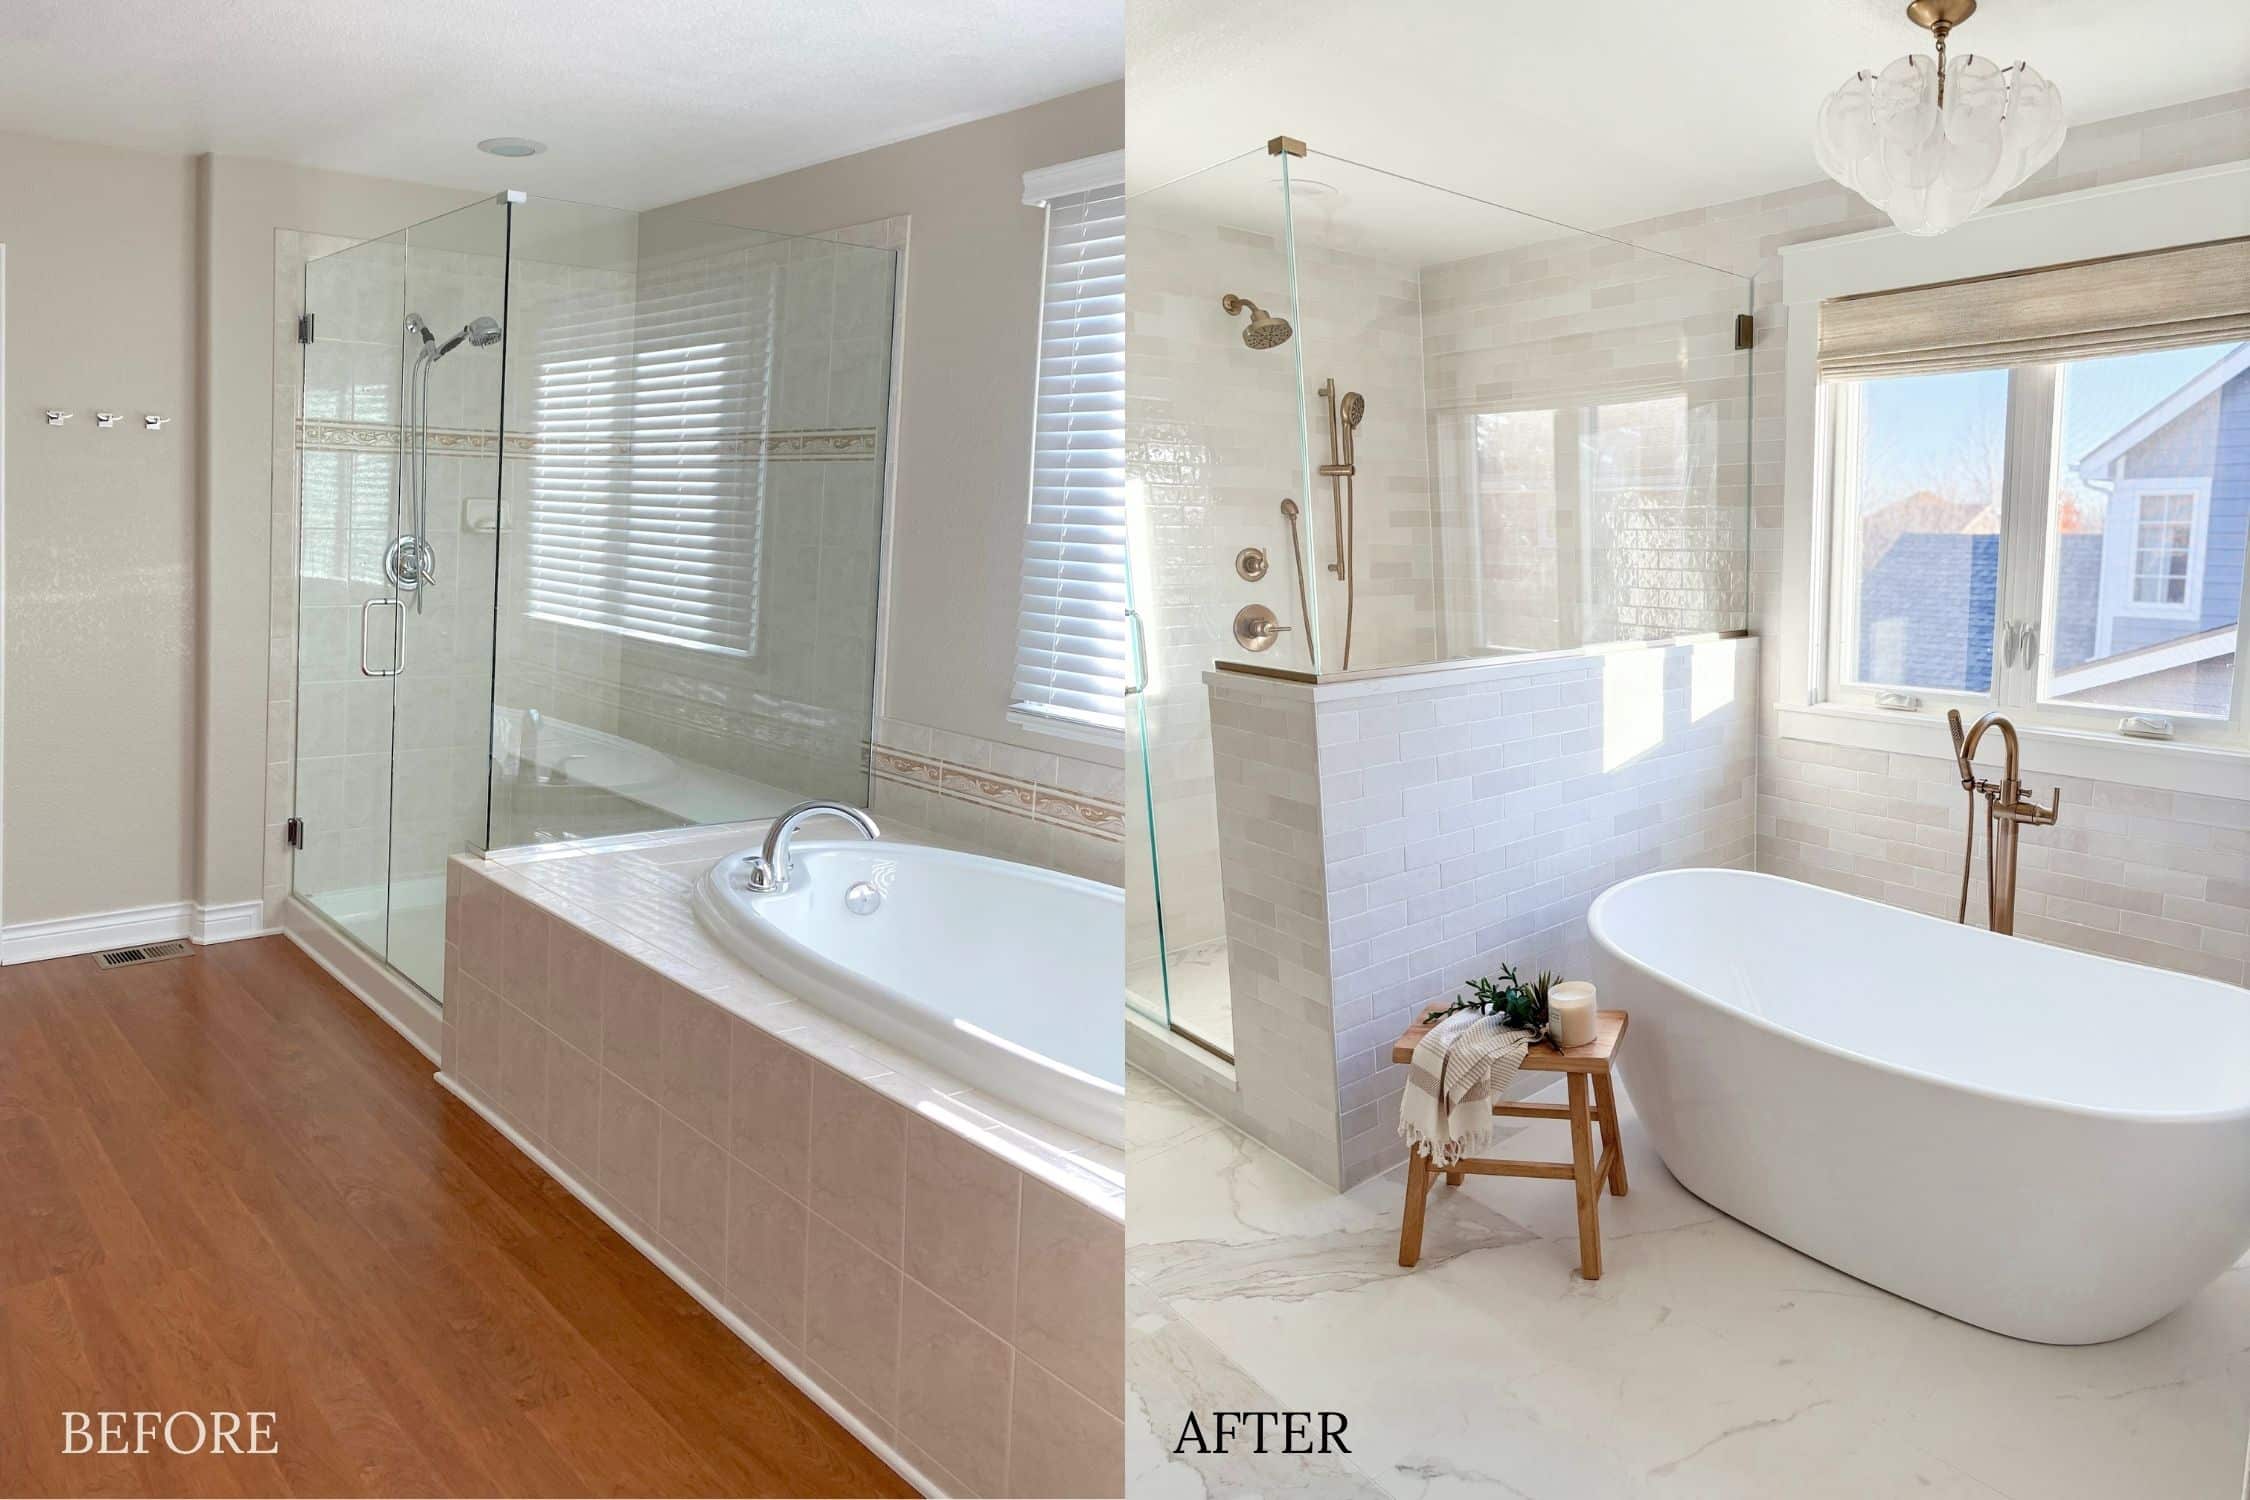
1. From Dated Tub to Freestanding Bliss with Subway Tile
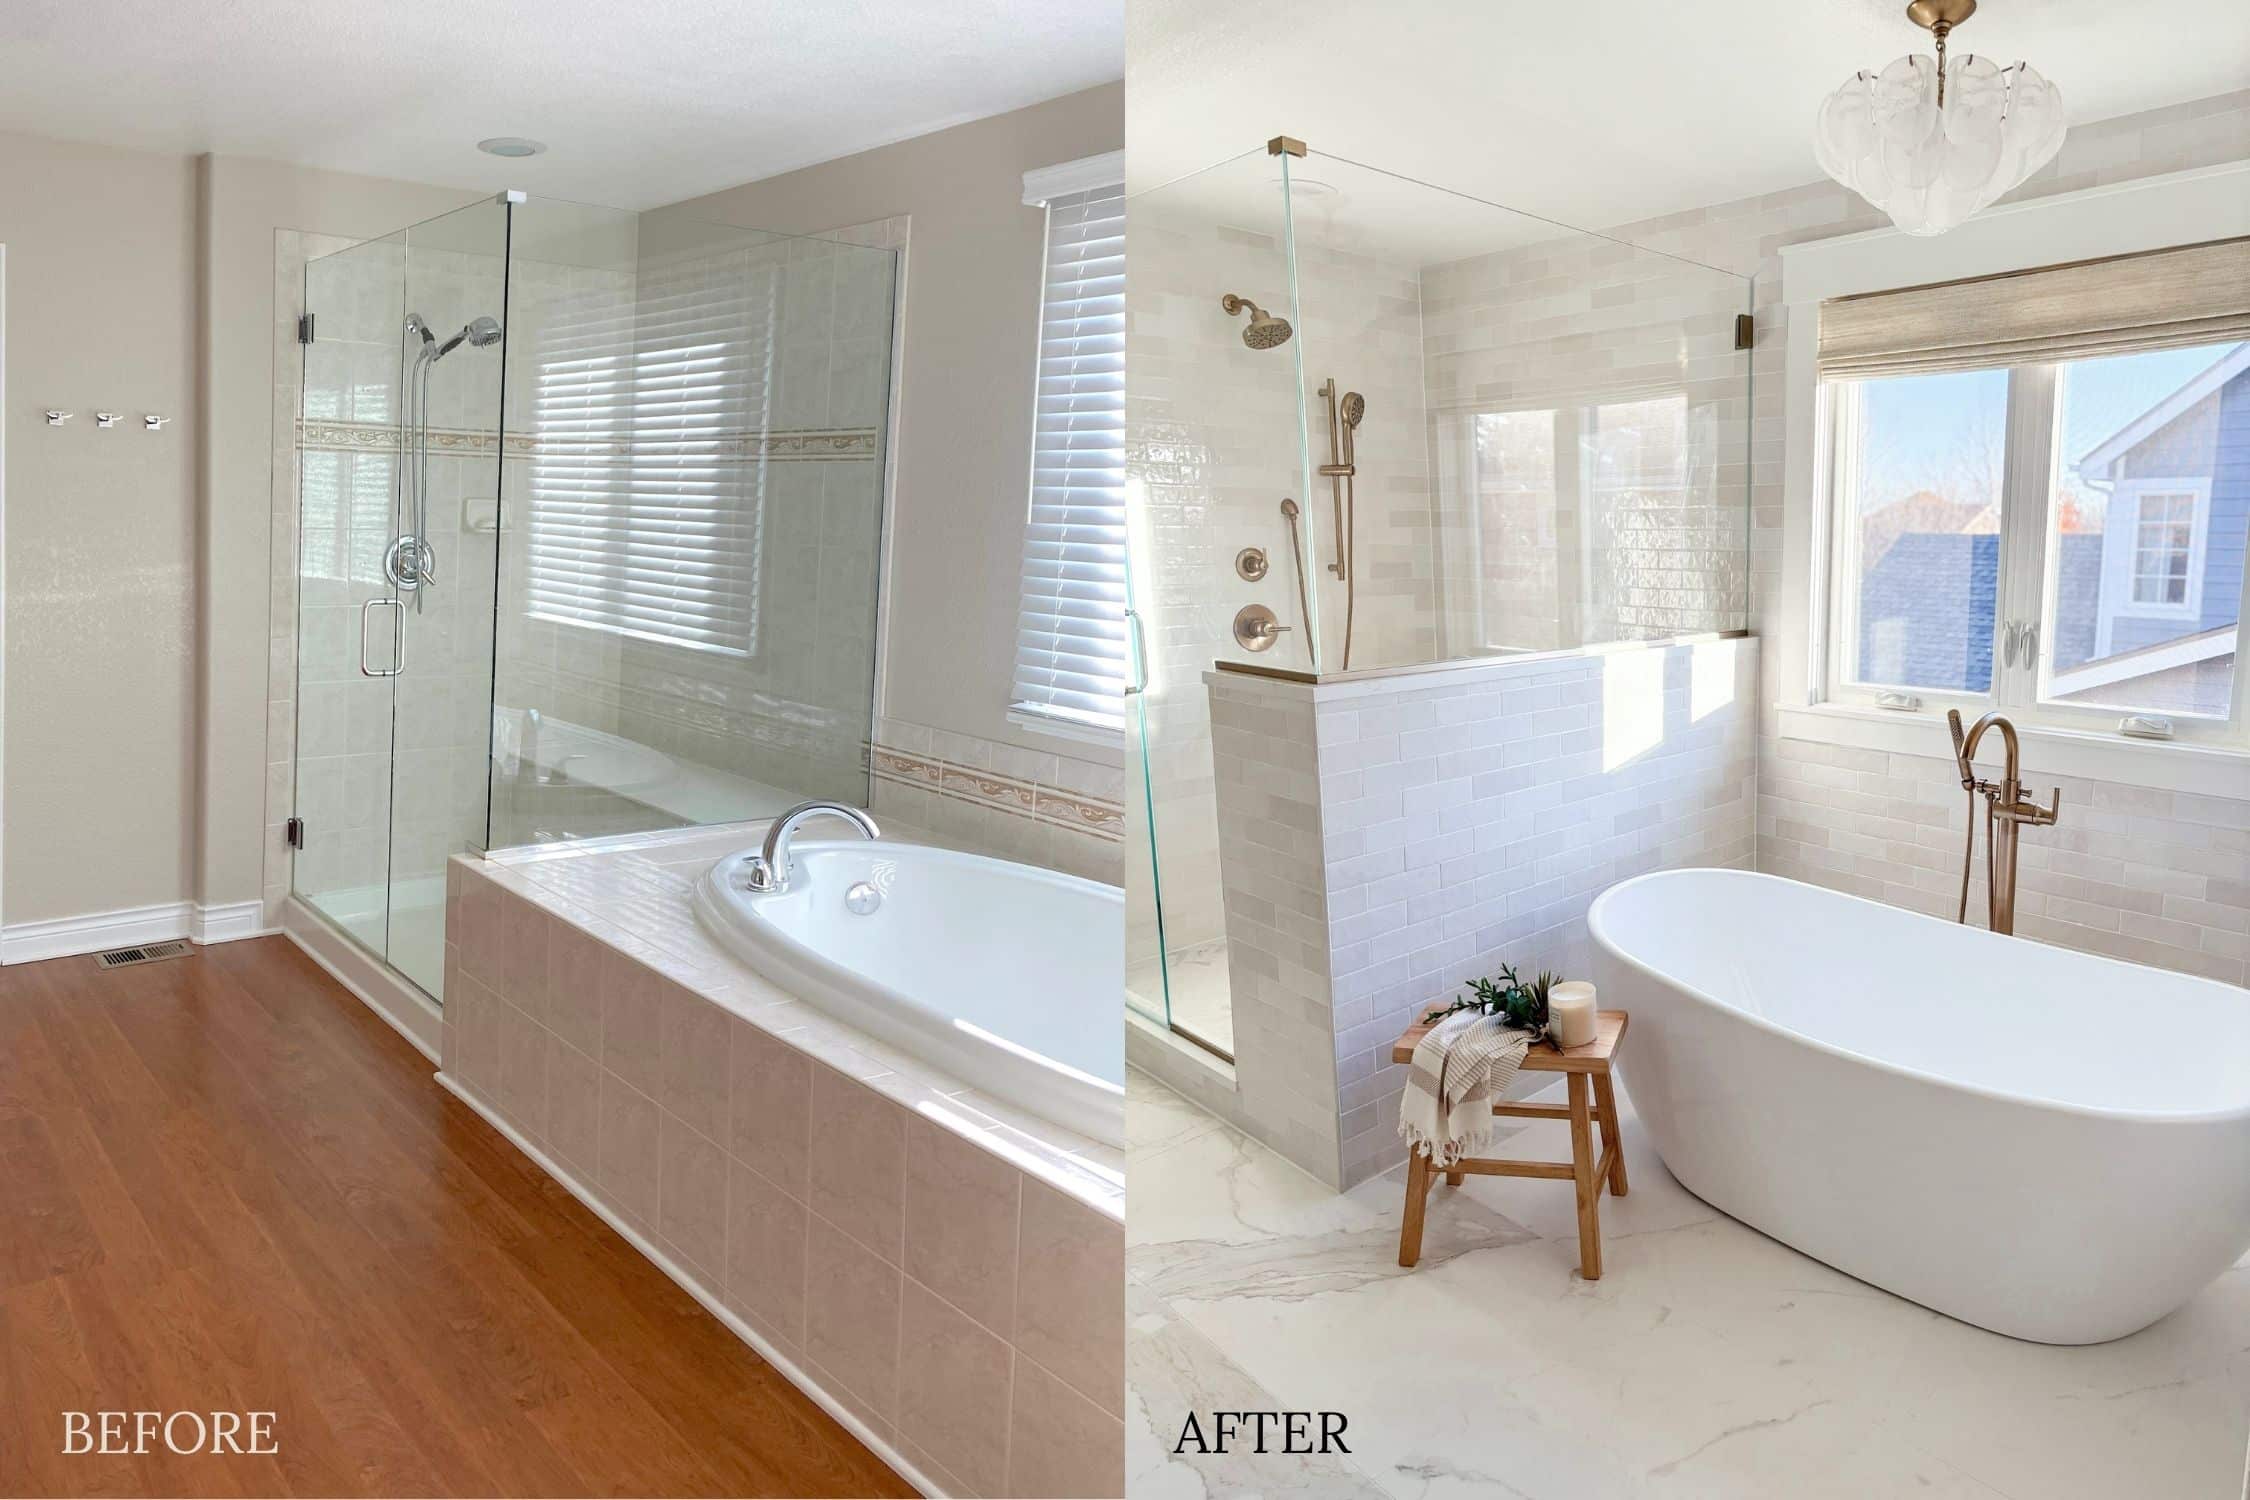
This transformation works because it introduces negative space. By removing the bulky, built-in tub and replacing it with a freestanding model, the floor is more visible, making the entire room feel larger and more open. The eye is drawn to the tub’s elegant shape rather than being stopped by a solid wall of tile. Paired with a classic white subway tile, the design feels timeless, allowing the warm, modern brass fixtures to stand out as beautiful jewelry for the room without competing with a busy background. The clear glass on the shower adds to this effect, maintaining an uninterrupted sightline across the space.
💡 Designer Tip
Here’s a look at what it might cost to bring this serene style home. Prices are estimates and can vary widely based on location, labor costs, and the specific brands you choose.
- Main Furniture (Freestanding Tub, Small Stool): $1,500 – $4,000
- Lighting (Chandelier): $300 – $900
- Textiles (Roman Blind): $150 – $400
- Finishes (Subway Tile, Floor Tile, Fixtures): $2,000 – $5,500
- TOTAL: $3,950 – $10,800+
- Budget alternative: Source a similar tub from an online retailer like Wayfair or Overstock, use a high-quality vinyl plank for the floor, and find a vintage chandelier on Facebook Marketplace to get this look for 40-50% less.
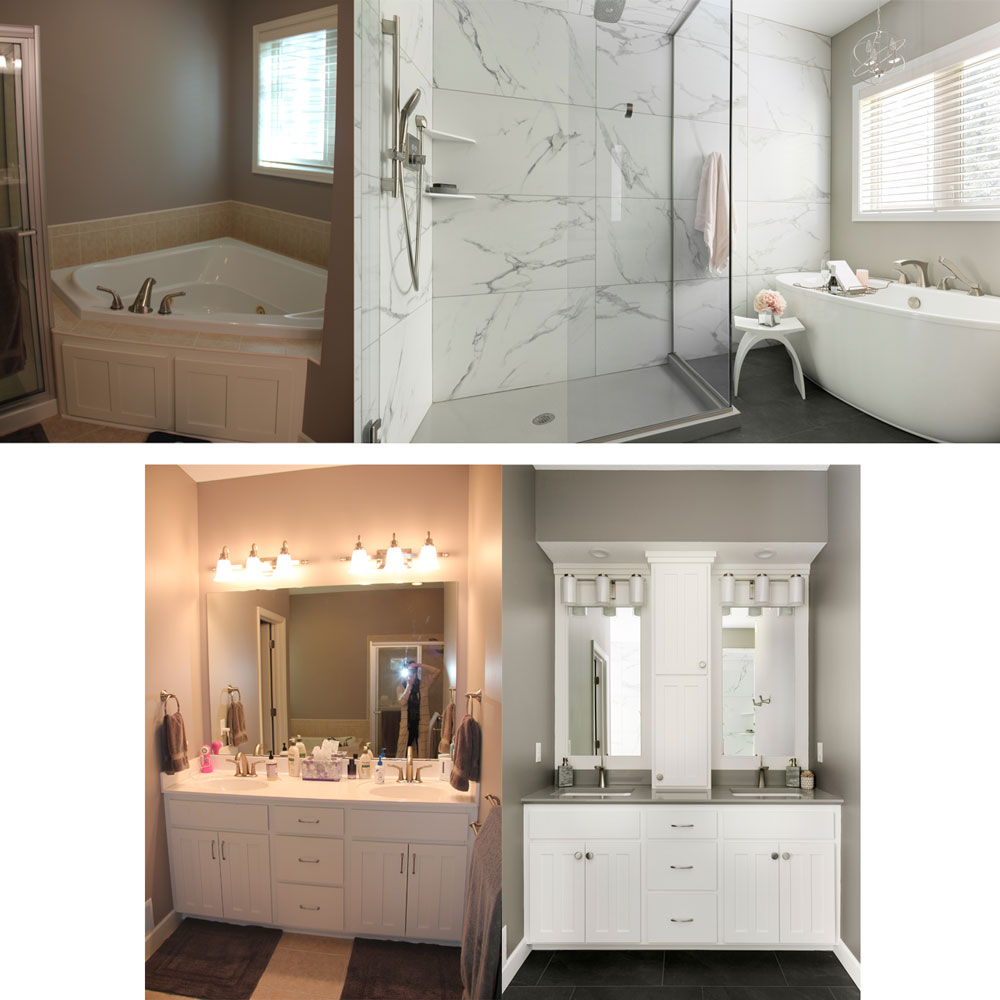
2. Creating a Spa-Like Retreat with Marble and Shaker Cabinetry
The formula for this elevated, spa-like atmosphere is all about balancing grand statements with clean lines. Think of it as: 50% large-format marble-look tile + 30% crisp white Shaker cabinetry + 20% sleek chrome and glass. The large tiles create a sense of luxury and minimize grout lines, making the space feel expansive and clean. The classic white vanity keeps it from feeling cold or ostentatious, while the chrome fixtures and glass shower door add a final layer of modern polish. You could swap the marble for a light concrete-look tile for a more industrial vibe while keeping the same successful ratio.
⚠️ Real Talk
When using large-format tiles (anything over 15 inches on one side), a professional installation is key. Ask your installer to do a “dry lay” on the floor before committing with mortar. This allows you to plan the layout to avoid awkward, skinny tile cuts at the edges of the room or in highly visible areas. For tiles with a strong vein pattern like this marble, a dry lay also ensures the patterns flow logically from one tile to the next, creating a more cohesive and high-end look.
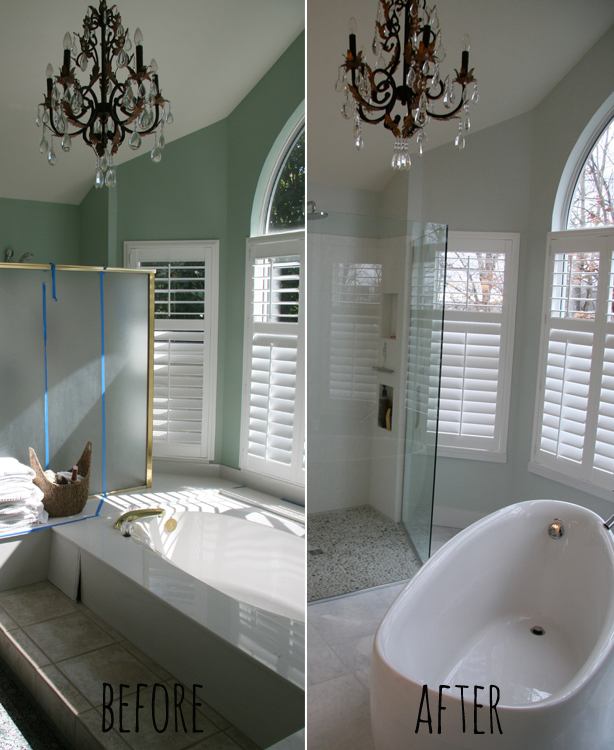
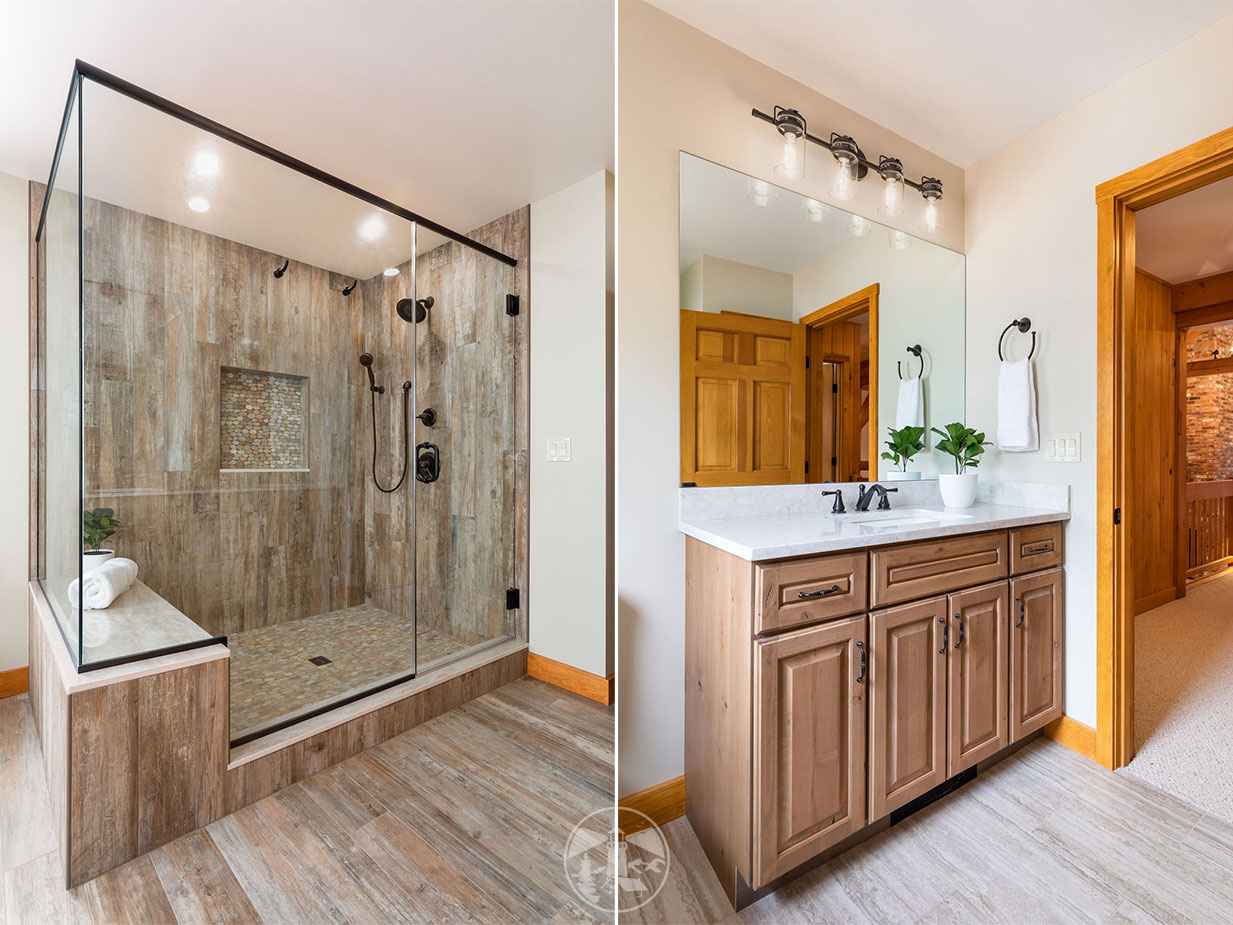
3. Neutralizing a Dated Bathroom for a Serene, Airy Feel
The single element that makes the biggest difference here is the freestanding tub. While the paint color and shower glass are great updates, removing the clunky, built-in tub deck completely transforms the room’s architecture and perceived size. It allows the arched window to become a true focal point and lets light from that window travel further into the space. Without this change, the room would still feel chopped up and dated, even with a fresh coat of gray paint. This single, bold move is what elevates the entire renovation from a simple refresh to a total transformation.
📐 Style Math
Let’s be honest: freestanding tubs are gorgeous, but they aren’t always the most practical choice. Cleaning behind and underneath them can be a pain, especially in a tight space. They also offer zero deck space for your shampoo, soap, or a glass of wine. You’ll need to account for a separate table or caddy, like the small wooden stool seen here. If you have small children, the lack of a ledge to sit on while bathing them can also be a challenge. Consider your lifestyle before committing to the tub you saw on Pinterest.
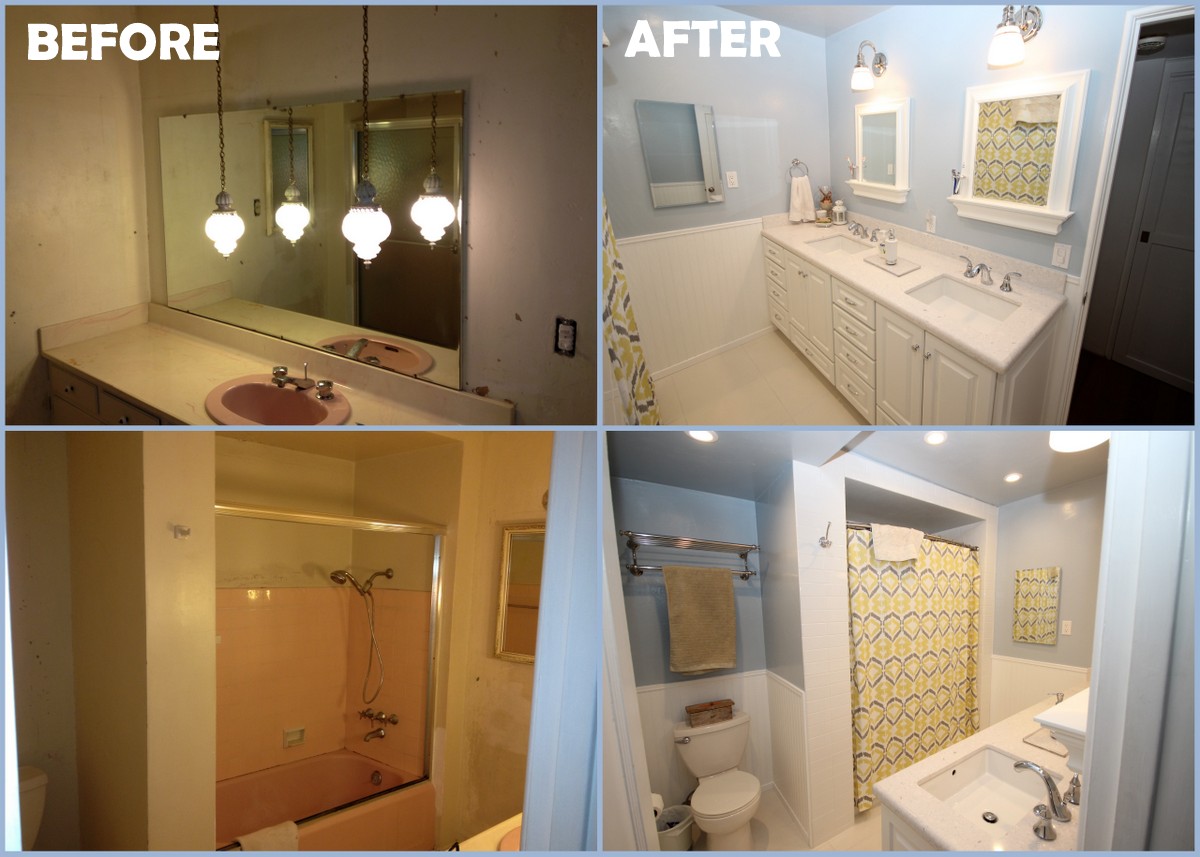
4. A Fresh Start with Light Blue Walls and Cheerful Yellow Accents
You don’t need a massive budget to achieve this bright and happy look. The real workhorses here are paint and textiles. A gallon of light blue paint costs around $40-$60, and white wainscoting can be convincingly faked with some MDF trim and white semi-gloss paint. The real pop comes from the shower curtain, and you can find bold, graphic patterns just like this one at Target, HomeGoods, or Amazon for under $40. Skip the pricey custom vanity and look for a simple white model from a big box store like Lowe’s or Home Depot to keep the total project cost surprisingly low.
⭐ The One Thing
This design is perfect for the classic American 5′ x 8′ guest or family bathroom. The wainscoting, which stops about two-thirds of the way up the wall, creates a strong horizontal line that makes the room feel wider. Using a light color like pale blue on top prevents the ceiling from feeling low. If you were to try this in a very large primary bathroom, the effect might be lost, making it a much better fit for small-to-medium-sized spaces. Compare this with the grander scale of Idea #2 to see the difference.
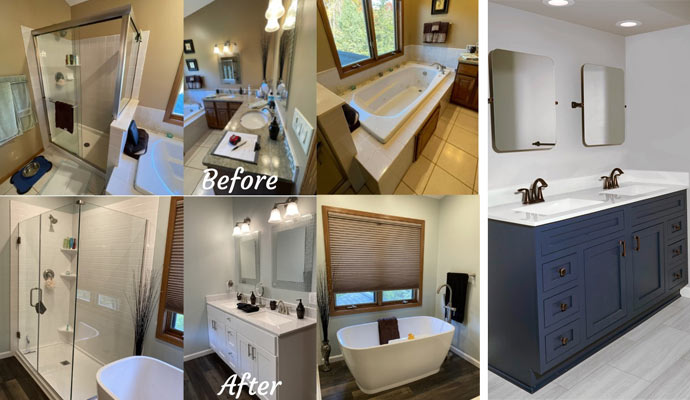
5. Modern Drama: A Navy Vanity and Sleek Bronze Fixtures
This design succeeds by mastering the art of balance. The deep, grounding navy of the double vanity provides a rich anchor in an otherwise light and airy room. This prevents the space from feeling sterile. The warm bronze of the hardware and fixtures acts as a bridge, connecting the cool tones of the light gray walls with the deep blue of the cabinetry, and adding a necessary touch of warmth and sophistication. The clean lines of the rectangular mirrors and simple lighting prevent the space from becoming overly traditional, keeping the overall vibe fresh and modern.
🔧 How-To Brief
Before you commit to a layout like this, run through this quick checklist:
- Tub Clearance: Do you have at least 6 inches of clearance on all sides of a freestanding tub for cleaning? For a tight fit, 4 inches is the bare minimum, but it won’t be fun to clean.
- Plumbing Relocation: Have you gotten a quote from a plumber to move the drain and supply lines for the tub and possibly the vanity? This can be a significant hidden cost.
- Vanity Space: A double vanity is great, but do you have at least 60 inches of wall space? Anything less will feel cramped for two people. 72 inches is ideal.
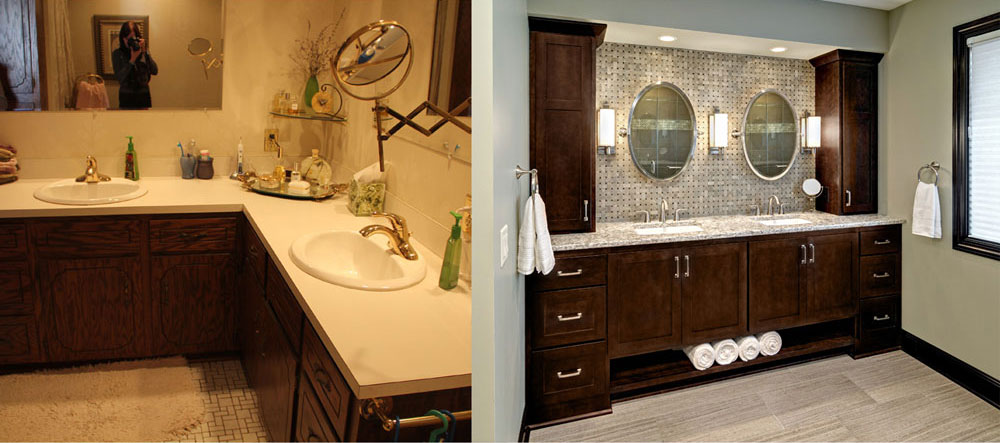
6. Sophisticated Update with a Dark Wood Vanity and Dual Oval Mirrors
When installing a mosaic tile backsplash behind vanity mirrors, tile the entire wall area *before* you hang the mirrors and sconces. It might seem like you can save money by only tiling the visible portions, but this will make it much harder to ever change your mirrors or lighting in the future. Tiling the full expanse provides ultimate flexibility and a more professional, high-end finish. For a project like this, it might only cost an extra $100-$200 in tile but will save you major headaches down the road.
🧹 Maintenance Reality
A dark-stained wood vanity like this is beautiful, but it requires some specific care to keep it looking its best. Dust and water spots will be more visible than on a white or light wood cabinet. Wipe it down daily with a soft, dry cloth to prevent water from sitting on the surface, which can damage the finish over time. Avoid harsh chemical cleaners; a simple damp cloth is all you need. Once a year, consider applying a quality furniture polish or wax to restore its luster and add a layer of protection against moisture.
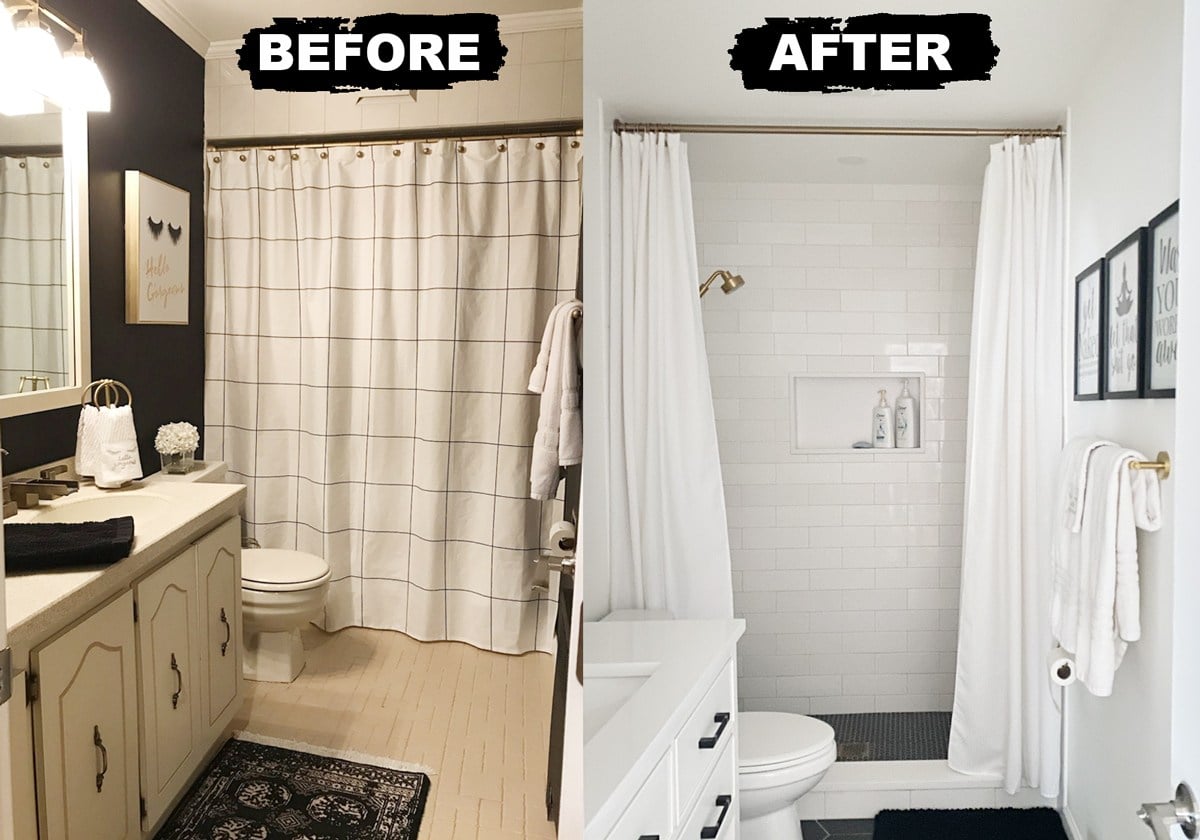
7. Bright White Bathroom Renovation with Black and Brass Accents
The single most impactful choice in this redesign is the switch to an all-white backdrop. By taking the walls from black to stark white and tiling the shower in classic subway tile, the room instantly feels larger, brighter, and cleaner. This high-contrast canvas is what allows the other elements—the black vanity hardware, the dark gray floor, and the warm brass shower fixtures—to truly pop. Without the white walls, those stylish accents would be lost in a sea of moody color. It’s a powerful reminder that sometimes, the simplest background makes the strongest statement.
🎯 What Makes It Work
This look is a direct reflection of the “Dopamine Decor” trend, but with a refined, long-lasting twist. Instead of committing to a bold color on the walls, the design uses a timeless black-and-white base and adds the “joyful” element with metallic fixtures. The mix of high-contrast black and white with warm, luxe gold/brass is incredibly popular on Pinterest because it feels both fresh and classic. It’s a trend with staying power because the core elements (white tile, simple vanity) are timeless, while the fixtures can be swapped out in a decade if your taste changes.
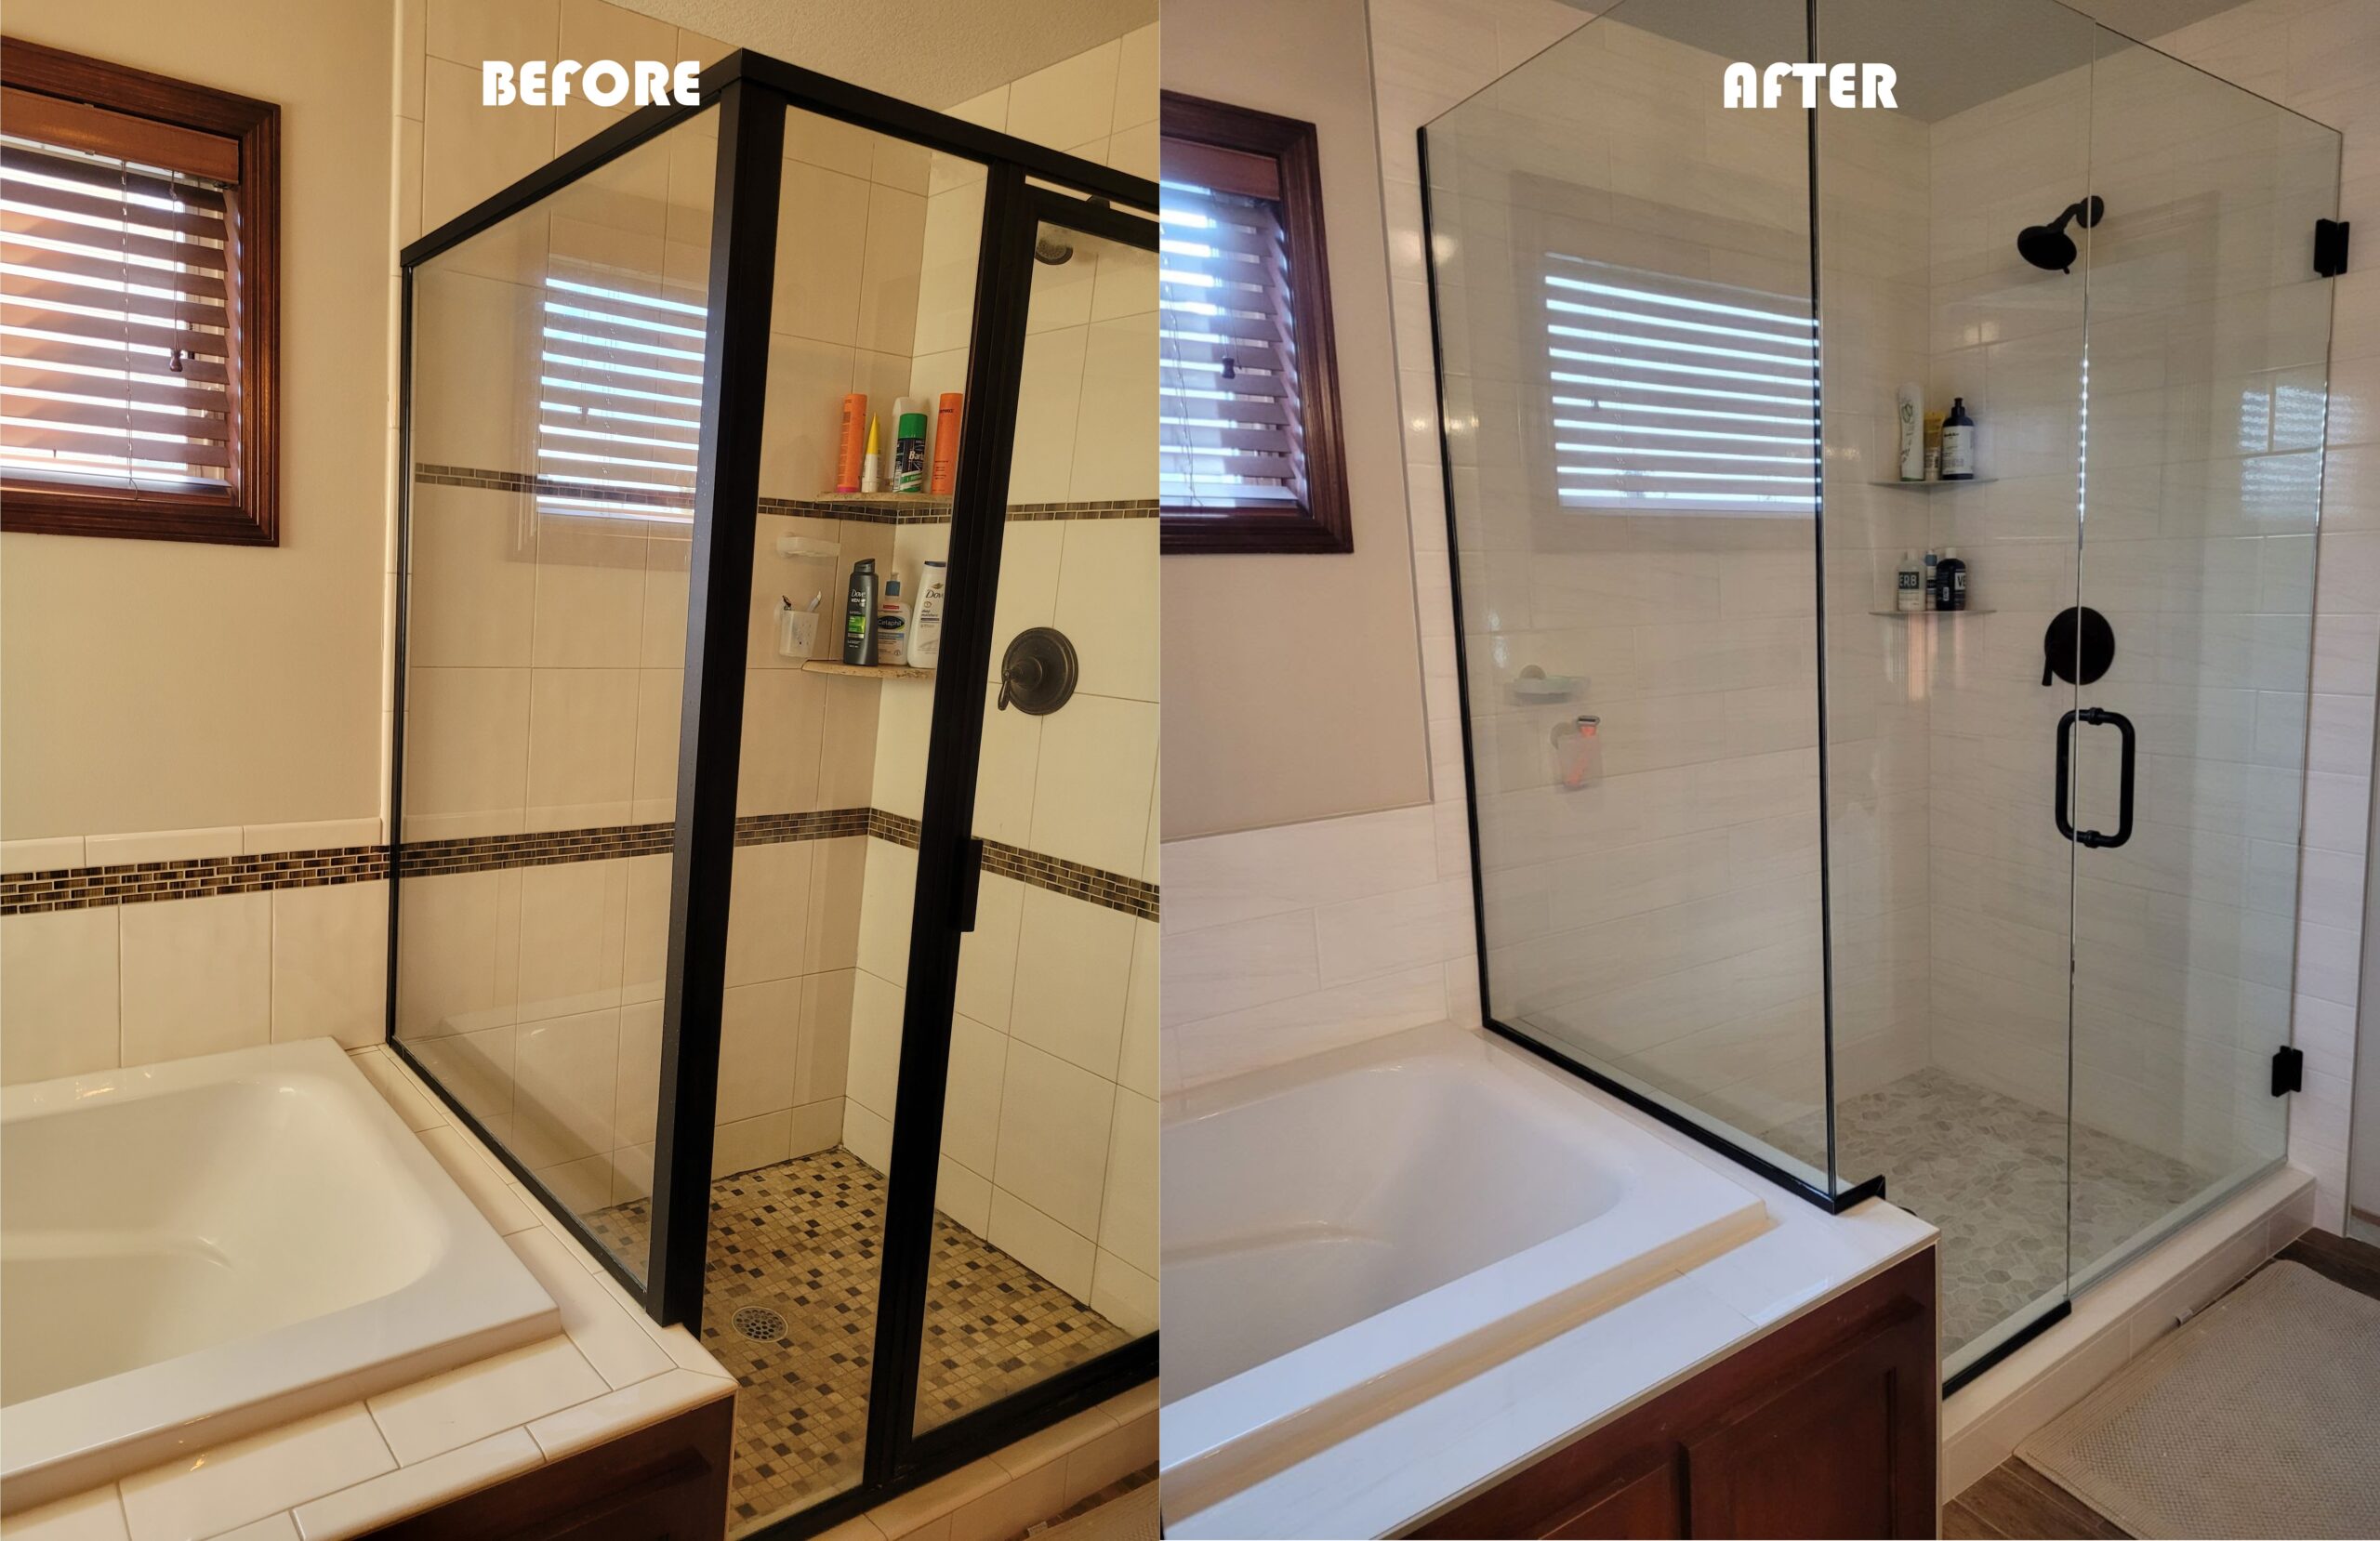
8. Modern Shower Upgrade: From Framed to Frameless Glass
The switch to a frameless glass shower enclosure is the hero of this refresh. The old, dark-gridded frame visually cluttered the space and chopped it into smaller zones. By replacing it with clear, uninterrupted glass, the sightline now extends all the way to the back of the shower. This, combined with the lighter-colored wall and floor tiles, makes the entire bathroom feel significantly larger and more open. The matte black fixtures serve as a modern, graphic counterpoint to all the light surfaces, adding a touch of sophisticated edge without adding visual bulk.
📏 Scale Guide
Thinking of going frameless? Be prepared for a little more upkeep. Frameless glass doors often have small gaps where the door meets the wall or floor, which can sometimes lead to minor water splashing outside the shower. It’s usually not a major issue, but you might need a more absorbent bath mat right outside the door. More importantly, to keep that glass looking crystal clear, you’ll need to squeegee it down after every single shower to prevent hard water spots and soap scum buildup. It’s a small daily habit that makes a huge difference.
9. A Dramatic Transformation with Dark Floral Wallpaper and Brass
You can hang wallpaper in a small powder room yourself in a weekend. Here’s a quick guide for this specific kind of project:
🔥 Trending Context
- Time Estimate: 4-6 hours
- Materials Cost: $150 – $400 (for wallpaper, adhesive, and tools)
- Step 1: Prep your walls. Remove all fixtures, patch any holes, and clean the walls thoroughly. Apply a wallpaper primer.
- Step 2: Measure and cut your first panel, leaving a few inches of excess at the top and bottom.
- Step 3: Apply paste to the wall or the paper (check manufacturer instructions) and hang your first piece, starting in a corner and smoothing out bubbles as you go.
- Step 4: Match the pattern for the next piece, cut, and hang, making sure the seam is tight. Continue around the room, trimming carefully around outlets and plumbing.
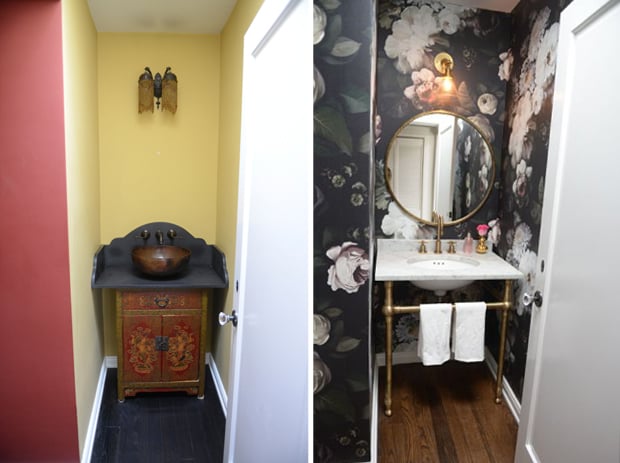
This look feels so luxurious because of its thoughtful equation: 60% dramatic pattern (the floral wallpaper) + 20% luxe metallic (the brass/gold fixtures and mirror) + 20% classic foundation (the white marble vanity and simple wood floor). The wallpaper is the star, but it needs the other elements to balance it. The brass adds warmth and a touch of vintage glamour, while the simple white marble and wood floors provide a quiet, elegant base that keeps the bold wallpaper from feeling overwhelming or chaotic. It’s a perfect formula for high-impact design.
10. Powder Room Refresh with Bold Floral Wallpaper
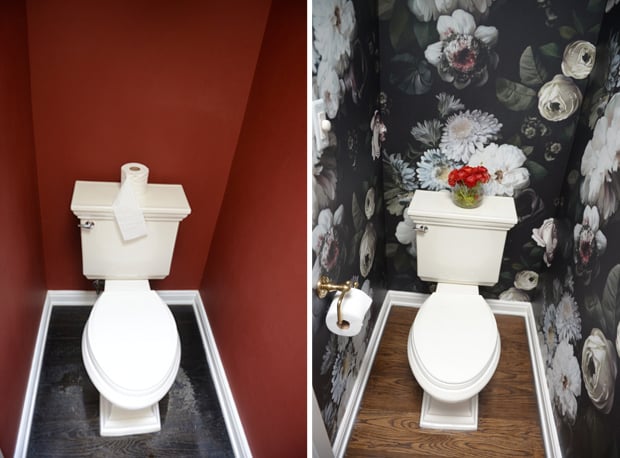
In a small space like a powder room, don’t be afraid to go bold with your wallpaper. A large-scale pattern can actually make a small room feel more interesting and designed, rather than just small. The trick is to keep the other elements relatively simple. Notice how the toilet, baseboards, and door frame are all a crisp white, which provides a visual resting place and keeps the dramatic wallpaper from becoming overwhelming. This is a much more impactful approach than the “before” look, where a bold red paint color just made the room feel dark and cavelike.
💸 Get This Look For Less
This wallpaper-focused idea is tailor-made for a compact powder room, typically no larger than 4′ x 5′. The enclosed nature of the space allows the dramatic pattern to feel like a jewel box. Trying to use such a dark, bold paper in a larger bathroom with a shower could feel overwhelming and might be susceptible to moisture damage if not properly ventilated. For a larger space with a similar vibe, consider the approach in Idea #8, or use the wallpaper on a single accent wall behind the vanity, as seen in Idea #17.
11. A Bright, Modern Update with a Patterned Floor and Navy Vanity
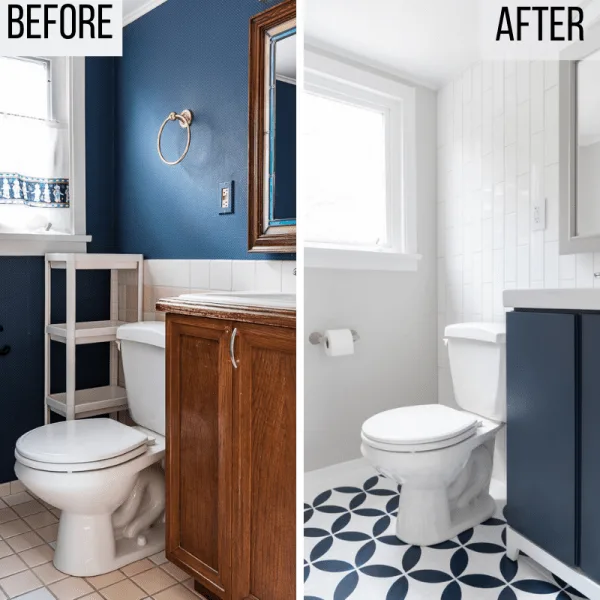
This makeover feels so successful because it addresses issues of both pattern and proportion. The original dark blue textured wallpaper made the room feel smaller and dated. By replacing it with a simple light gray paint and tiling only one feature wall with vertical subway tiles, the room instantly feels taller and brighter. The bold pattern is moved from the walls to the floor, which grounds the space without enclosing it. The modern, clean-lined navy vanity is also a better scale for the room than the previous traditional one, adding style without bulk.
✅ Before You Start
Want this look for less? The key elements are achievable on a budget. Geometric patterned floor tiles like this are widely available in affordable ceramic or even peel-and-stick vinyl versions from stores like Floor & Decor or Home Depot, often for under $5/sq ft. For the vanity, consider painting your existing one a deep navy blue and updating the hardware—a weekend project that can save you a thousand dollars or more. The vertical subway tile is also a cost-effective material, with its impact coming from the installation pattern, not the price.
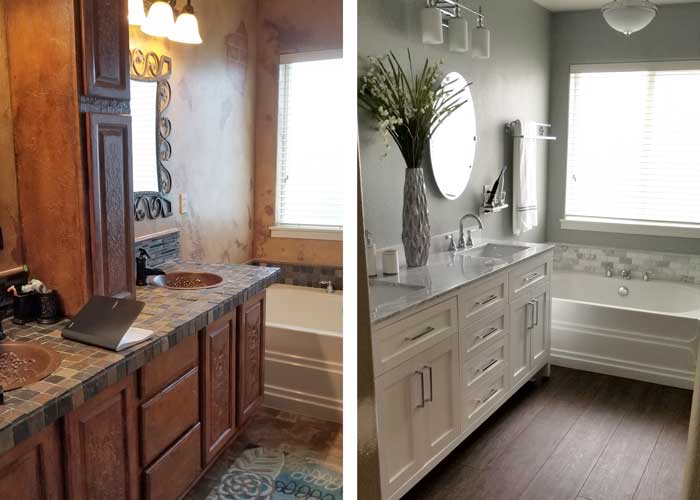
12. From Pink Tile to a Clean Look with a New Countertop
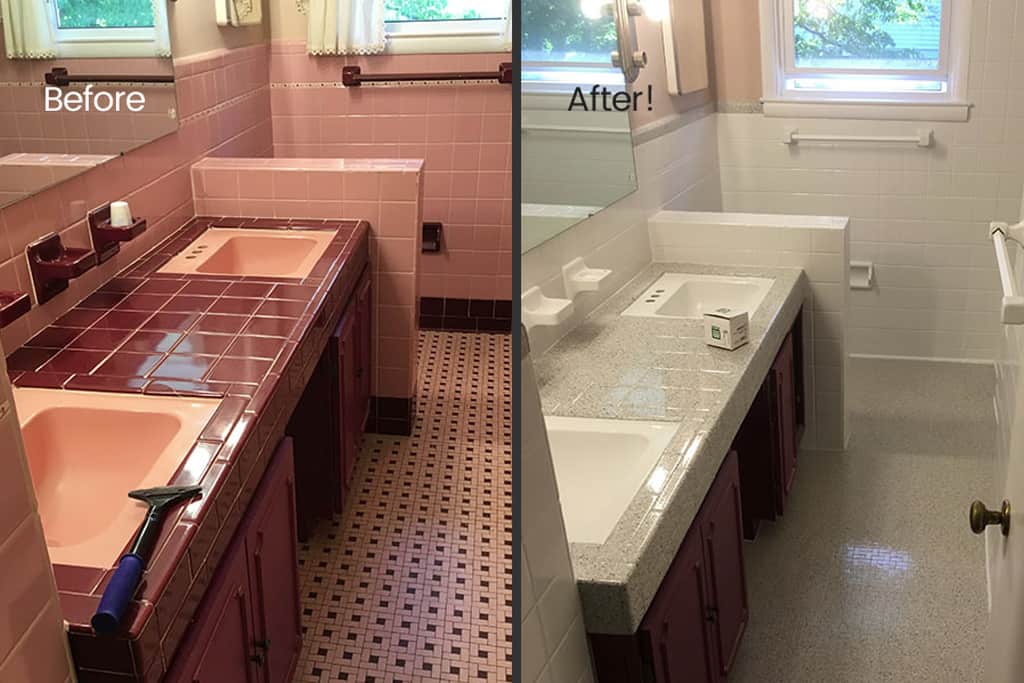
The single change that brings this bathroom into the modern era is replacing the countertop and sinks. The dated, reddish-brown tiled counter with its integrated shell-shaped sinks was the most prominent feature of the “before.” Swapping it for a clean, light gray speckled solid surface with crisp, rectangular undermount sinks instantly updates the entire aesthetic. Even though the dark red vanity cabinet remains, the new countertop makes it feel intentional and classic rather than just old. This one upgrade elevates everything else around it.
💰 Budget Breakdown
While the new specked light gray countertop is a massive visual improvement, it’s important to talk about grout. The “before” bathroom, with its tiled countertop, was a nightmare for cleaning, trapping gunk and mildew in the grout lines. The “after” wisely uses a solid surface, eliminating that problem on the counter. However, the floor appears to be a light gray tile with matching grout. Light-colored grout on a floor can be notoriously difficult to keep clean and is prone to staining over time. Regular sealing (at least once a year) is essential to keep it looking fresh.
13. Key Considerations Before a Major Bathroom Remodel
A full-scale bathroom remodel is one of the most disruptive home projects you can undertake. Be realistic about the timeline. Even with a great contractor, unexpected issues like hidden water damage, outdated plumbing that needs to be brought up to code, or electrical problems can emerge once the walls are opened up. Always set aside a contingency fund of at least 15-20% of your total budget to cover these surprises. It’s far better to have it and not need it than to have your project stall midway through because of an unexpected cost.
💡 Designer Tip
Before you hire a contractor, ask to see not just photos of their finished work, but also to speak with their last three clients. Ask those references specific questions: Did they finish on time and on budget? How did they handle unexpected problems? Was the communication clear and consistent? Were the clients happy with the quality of the work and the professionalism of the crew? A contractor’s past performance with real clients is the best indicator of what your own experience will be like. Don’t skip this due diligence.
14. Modernized Powder Room with Striped Wallpaper and Brass Accents
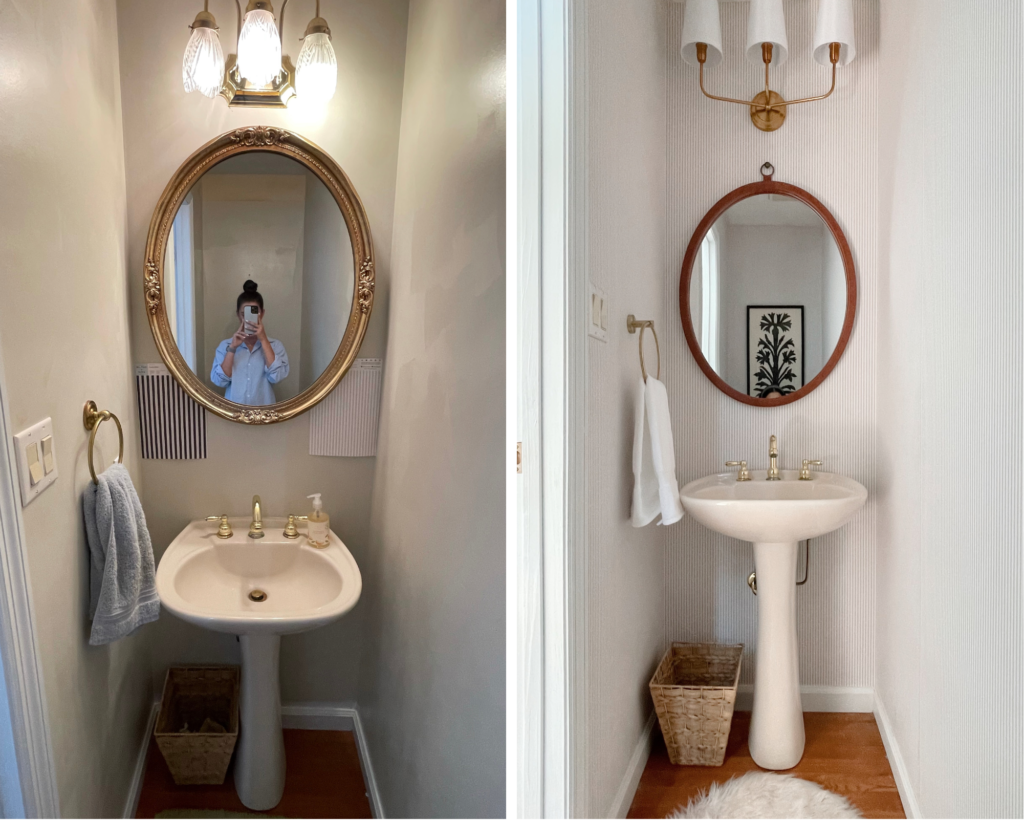
This refresh works because it simplifies and modernizes every element. The ornate, heavy gold mirror is replaced with a minimalist round mirror with a clean wood frame. The busy beige walls are swapped for a subtle, light-colored striped wallpaper that adds texture without overwhelming the small space. The lighting is updated from a dated, single-bulb fixture to a chic three-bulb sconce that provides better, more even light. While many of the core elements are the same (pedestal sink, gold-tone fixtures), the updated versions are all cleaner, fresher, and more refined.
⚠️ Real Talk
The visual recipe for this bright and airy powder room is simple: 70% light and neutral + 20% warm metallic + 10% natural texture. The neutral base is the striped wallpaper and the white sink and rug. The warm metallic comes from the thoughtfully chosen gold sconce, faucet, and towel ring. The final 10% of natural texture, from the wooden mirror frame and the wicker basket, keeps the room from feeling too formal and adds a touch of organic warmth. This is a formula you can easily adapt with different patterns or metals.
15. Rustic Farmhouse Update with a Whitewashed Vanity
The element that truly sells the “rustic farmhouse” story in this makeover is the texture. The “before” bathroom had green walls and a plain wood vanity, but it lacked character. The “after” introduces rich, varied textures that make the space feel authentic and curated. You see it in the horizontal lines of the shiplap walls, the rough-hewn feel of the whitewashed vanity, the organic, bark-like frame of the mirror, and the grain of the wooden shelves. Without these tactile details, the all-white room could feel flat and boring. Texture is the secret ingredient.

📐 Style Math
You can create a whitewashed finish on an old wooden vanity in just a few hours. It’s a great way to get the look seen here without buying new furniture.
- Time Estimate: 3-4 hours (plus drying time)
- Materials Cost: $30 – $50
- Step 1: Lightly sand your existing vanity to remove any glossy finish and give the paint something to grip. Clean it thoroughly.
- Step 2: Mix your whitewash. Combine one part white latex or chalk paint with one part water. Adjust for more or less transparency.
- Step 3: Brush the whitewash on in the direction of the wood grain.
- Step 4: Immediately wipe off the excess paint with a clean, lint-free rag. The more you wipe, the more grain will show through. Let it dry completely and add a second coat if desired.
16. Spa-Inspired Bathroom with Freestanding Tub and Brass Fixtures
The success of this design lies in its sophisticated mix of materials. Instead of using one uniform tile, it layers several textures and patterns for a richer, more custom look. You have the large-format marble-look floor tiles, the subtly varied white subway tiles on the main wall, and a different, smaller tile within the shower. This layering creates depth and visual interest. The warm brass of the fixtures and the natural wood of the stool and blind prevent the white-and-gray palette from feeling cold, resulting in a perfectly balanced, serene, and spa-like atmosphere. It feels less like a functional bathroom and more like a personal retreat.
⭐ The One Thing
This look is at the forefront of the “Modern Organic” trend that continues to dominate home design. Homeowners are craving spaces that feel both clean and modern, but also warm, calm, and connected to nature. This bathroom nails it by combining sleek elements like the freestanding tub and glass shower with natural textures (the woven blind, the wooden stool) and luxe, warm metallics (the brass fixtures). It’s a direct move away from the cold, sterile minimalism of the past toward a more livable and soulful version of modern design.
17. Updated Double Vanity with a Tiled Accent Wall
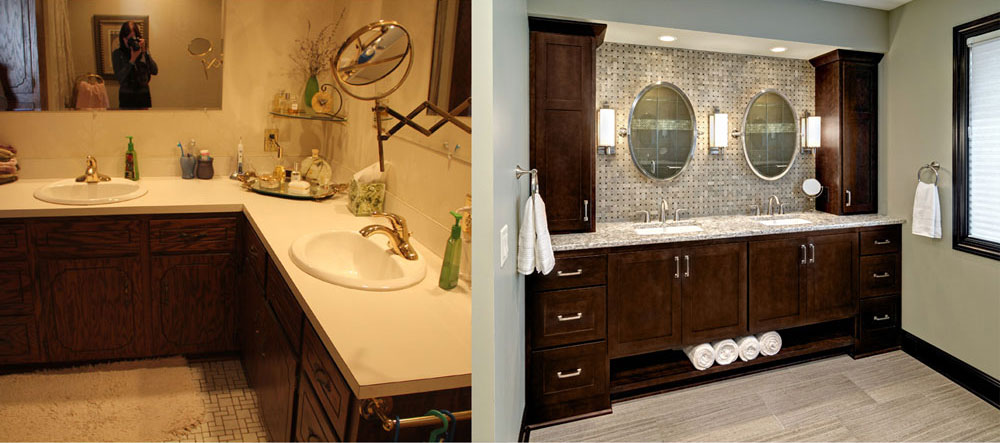
If you want to create a feature wall with mosaic tile behind a vanity, here’s a pro tip: end the tile at the outer edge of the countertop, not the vanity cabinet. Notice how the speckled granite countertop extends about an inch beyond the dark wood cabinets on each side? The tile follows this line, creating a more substantial and visually pleasing anchor for the entire vanity unit. Stopping the tile at the edge of the cabinet would make the installation look undersized and less impactful. It’s a small detail that makes a big difference in the final look.
🔧 How-To Brief
While a tiled accent wall looks amazing, remember that tile with a lot of texture and grout lines can be trickier to keep clean, especially behind a sink where it’s prone to toothpaste and water splashes. Unlike a painted wall that can be quickly wiped down, you’ll need to be more diligent with cleaning to prevent buildup in the grout. Using a darker grout can help camouflage stains, but it won’t eliminate the need for regular scrubbing with a detail brush to keep it looking fresh. A good quality grout sealer, applied annually, is a must.
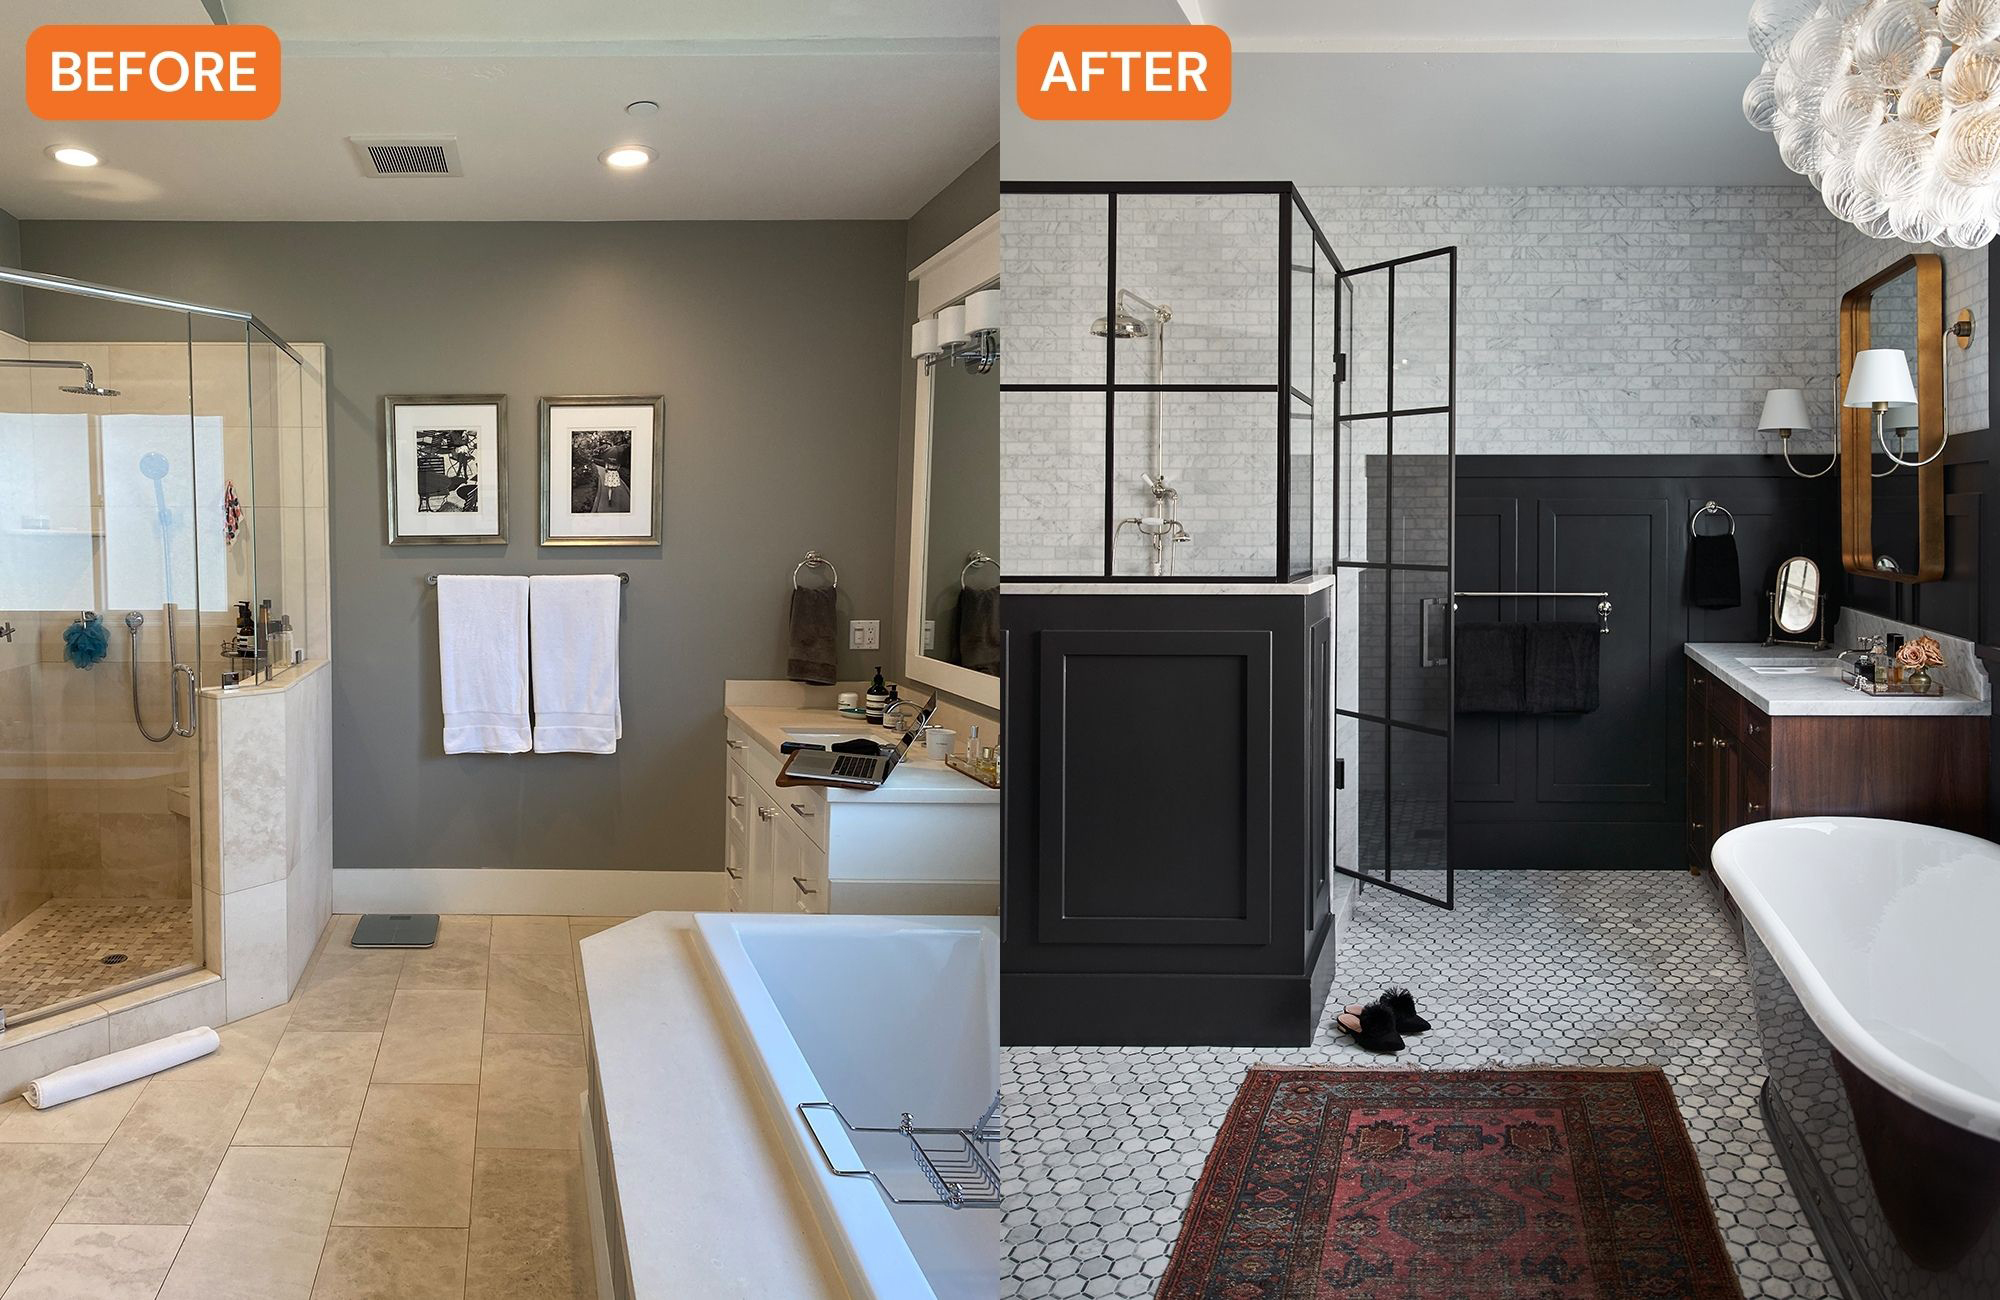
18. A Chic Black, White, and Marble Bathroom Transformation
The formula for this dramatic, elegant space is a study in high-contrast harmony. It breaks down to roughly 40% classic white marble tile + 30% bold matte black accents + 20% warm wood and brass + 10% color pop. The black (shower frame, floor tile details) and white (clawfoot tub, subway tile) create a timeless, graphic foundation. The dark wood vanity and brass fixtures inject essential warmth and luxury, preventing the room from feeling like a sterile checkerboard. The final touch, a small but powerful pop of red from the rug, adds personality and keeps the design from taking itself too seriously.
🧹 Maintenance Reality
The single element that elevates this from a nice bathroom to a truly chic and memorable one is the matte black paneled shower enclosure. It acts as a bold, architectural frame within the room, drawing the eye and adding a layer of industrial sophistication that contrasts beautifully with the classic marble and clawfoot tub. If you replaced it with a standard frameless glass door, the room would still be lovely, but it would lose its edge and its unique design personality. It’s the confident, trend-forward choice that makes the entire space work.
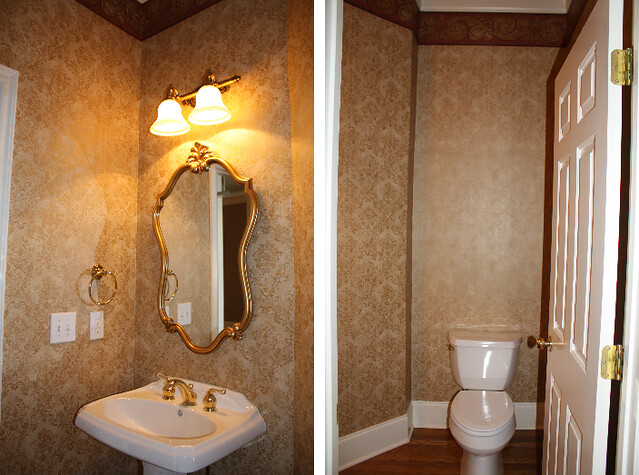
19. A Traditional Powder Room with Ornate Gold Accents
This design works because it fully commits to its traditional, ornate aesthetic in a small, jewel-box space. The key is consistency. Every element, from the textured golden-brown wallpaper and decorative border to the ornate gold-framed mirror and brass-toned fixtures, speaks the same design language. By embracing a maximalist approach in a compact powder room, the result feels intentional and enveloping rather than cluttered. The simple white pedestal sink and toilet provide just enough of a visual break to keep the rich patterns and finishes from becoming overwhelming.
🎯 What Makes It Work
Textured or fabric-backed wallpaper like this requires special care, especially in a bathroom environment. While powder rooms are generally safe from shower steam, splashes from the sink can still be an issue. These types of wallcoverings can’t just be wiped down like a vinyl paper; they can stain or warp if they get too wet. Dusting regularly with a soft brush attachment on a vacuum is the best way to keep it clean. For any spots, blot gently with a slightly damp cloth and test in an inconspicuous area first. This is a high-style but also a high-maintenance choice.
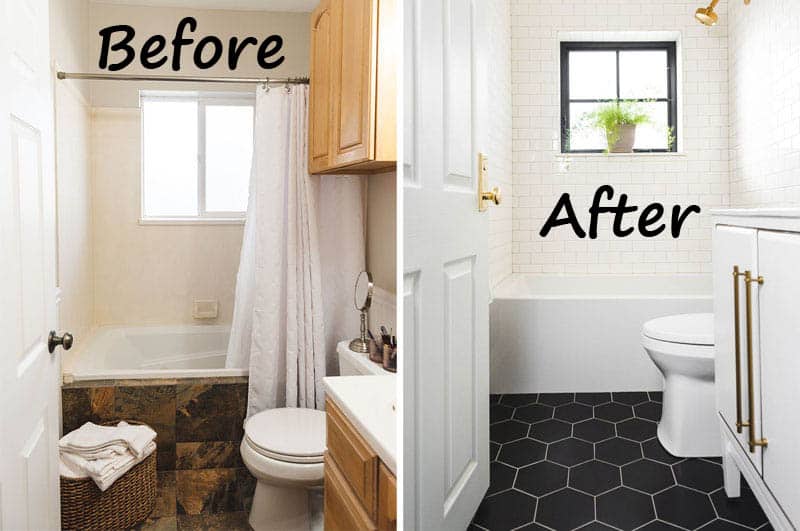
20. A Crisp and Modern Black and White Hexagon Tile Bathroom
This high-contrast look can be achieved at a surprisingly friendly price point. Black hexagon and white subway tiles are both classic, widely available, and very affordable, often costing just a few dollars per square foot. The real investment here is a quality vanity and the gold fixtures. To get the look for less, consider a simple white vanity from IKEA and source your gold hardware from a budget-friendly online retailer like Amazon. You can even find convincing “gold” spray paints to update an existing shower head for a fraction of the cost of a new one, though be aware it may not be as durable.
📏 Scale Guide
When using black floor tile, especially in a matte finish, opt for a dark-colored grout (a charcoal or dark gray, not pure black). Using a contrasting light-colored grout with black tile is a recipe for frustration, as every speck of dirt and dust will be highlighted. A darker grout will hide dirt, reduce the appearance of staining over time, and create a more seamless, monolithic look that allows the hexagonal *shape* of the tile to be the star, rather than the grid of grout lines. It’s a small choice that makes a big impact on long-term maintenance.
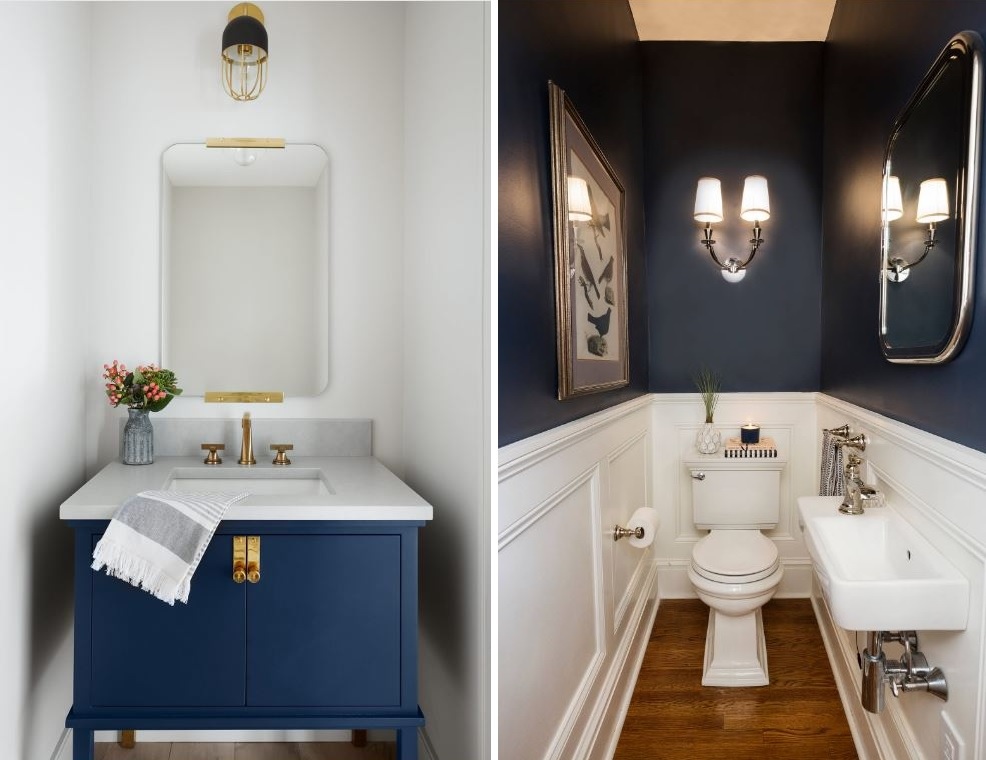
21. Contrasting Takes on a Navy and White Powder Room
This tale of two vanities shows how to adapt a color trend for different room sizes. The first image, with its full navy cabinet, is perfect for a bathroom with at least 30-36 inches of dedicated vanity space. It offers storage and counter space. The second image, however, is a brilliant solution for a very narrow powder room. The dark navy is used on the wall *above* the wainscoting, creating a sense of height, while a slim, wall-mounted floating sink keeps the floor clear, maximizing the perception of space. It delivers the same stylish color palette in a much smaller footprint.
🔥 Trending Context
The success of the narrow powder room comes from its clever use of vertical space and proportion. The white wainscoting covers the bottom third of the wall, making the room feel wider and brighter near the floor. Placing the dark, dramatic navy paint on the upper two-thirds draws the eye upward, creating an illusion of height. The simple, wall-mounted sink is perfectly scaled for the tiny room, providing function without a single inch of wasted space. It’s a masterclass in making a small space feel thoughtfully designed. Compare it with the similar colors but different layout in Idea #4.
22. Guest Bathroom Glow-Up: Small Changes, Big Impact
A guest bathroom doesn’t need a floor-to-ceiling gut job to feel fresh and welcoming. You can create a major impact with cosmetic changes. Start with paint – it’s the cheapest and fastest way to transform a space. Next, swap out the vanity light fixture and mirror; you can often find stylish options for under $200 for the pair. Finally, update the “soft goods”: a new shower curtain, plush towels, and a nice bath mat can make the entire room feel brand new. Focus your dollars on these high-impact, low-cost updates before considering a major tile or plumbing overall.
💸 Get This Look For Less
Remember who the primary user of a guest bathroom is: your guests. Prioritize function and ease of use over your most daring design impulses. Is there a clear, accessible place to hang a towel? Is the faucet easy to figure out? Is there a convenient outlet near the mirror? While a trendy vessel sink might look great in photos, it might be awkward for an older relative to use. Ensure the space is comfortable and intuitive for a visitor before you commit to a design that prioritizes form over function.
23. Modern Refresh with a Walk-In Subway Tile Shower
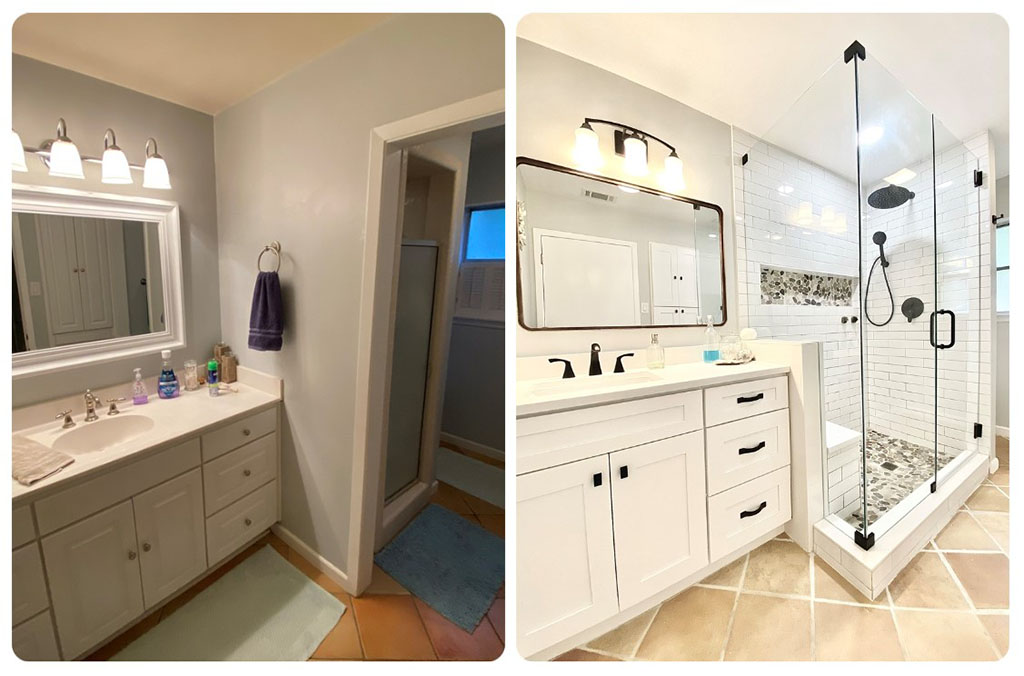
The visual equation for this clean, modern look is about balancing classic elements with functional updates. It’s about 50% timeless white finishes (the Shaker vanity and subway tile) + 30% bold black accents (the mirror frame, fixtures, and hardware) + 20% natural texture (the terra cotta floor and pebble tile niche). The black-and-white pairing provides a strong, graphic foundation, while the earthy floor and pebble details add warmth and an organic touch, keeping the space from feeling too clinical. This formula ensures the design is modern but also welcoming.
✅ Before You Start
A recessed shower niche is a sleek, practical alternative to a shower caddy. Here’s how it’s typically installed during a remodel:
- Time Estimate: Adds 2-3 hours to shower construction.
- Materials Cost: $50 – $150 (for pre-fabricated niche form).
- Step 1: During framing, the contractor creates a box between the wall studs. A pre-formed waterproof niche is the most common and reliable method.
- Step 2: The cement board for the shower walls is installed around the niche opening.
- Step 3: All seams are waterproofed with a liquid membrane or tape system. This is a critical step.
- Step 4: The niche is tiled along with the rest of the shower walls. Using an accent tile, like the pebble seen here, is a popular design choice.
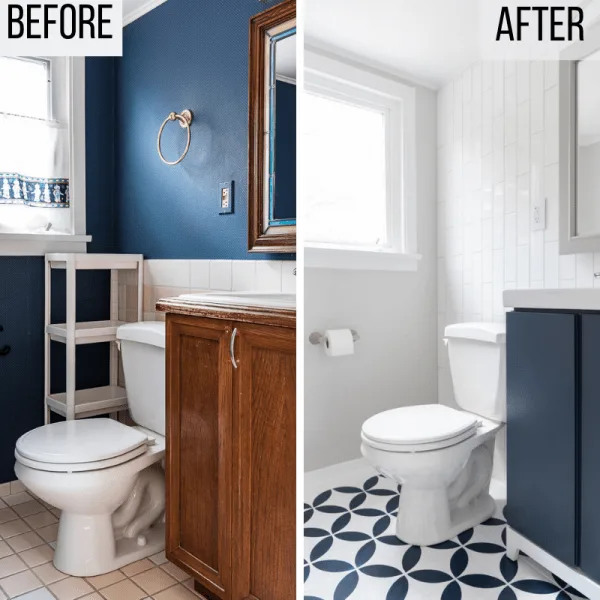
24. Dramatic Floor and Vanity Update from Blue to Navy
This transformation is so striking because it completely shifts where the “wow” factor is located. In the “before” photo, the focus was on the busy blue wallpaper. In the “after,” the walls are simplified to a calm gray and white, and the drama is moved to the floor with a bold, graphic black and white tile. This simple change makes the room feel more grounded and intentionally designed. The switch from a traditional oak vanity to a sleek, modern navy one further refines the space, creating a look that is both contemporary and timeless.
💰 Budget Breakdown
Before you commit to a patterned floor tile, get a sample. Actually, get a whole box if you can.
- Test the Pattern Repeat: Lay out at least 4-6 tiles on your floor to see how the pattern actually connects and repeats. Sometimes a single tile looks great, but the full pattern can be overwhelming or not what you expected.
- Check the Feel: Is the tile slippery when wet? This is a critical safety consideration for a bathroom. Look for a tile with a good DCOF (Dynamic Coefficient of Friction) rating.
- Judge the Color in Your Light: See how the tile looks in your bathroom’s specific natural and artificial light at different times of day. Colors can shift dramatically from the showroom to your home.
25. Modern Bohemian Refresh with a Dark Accent Wall
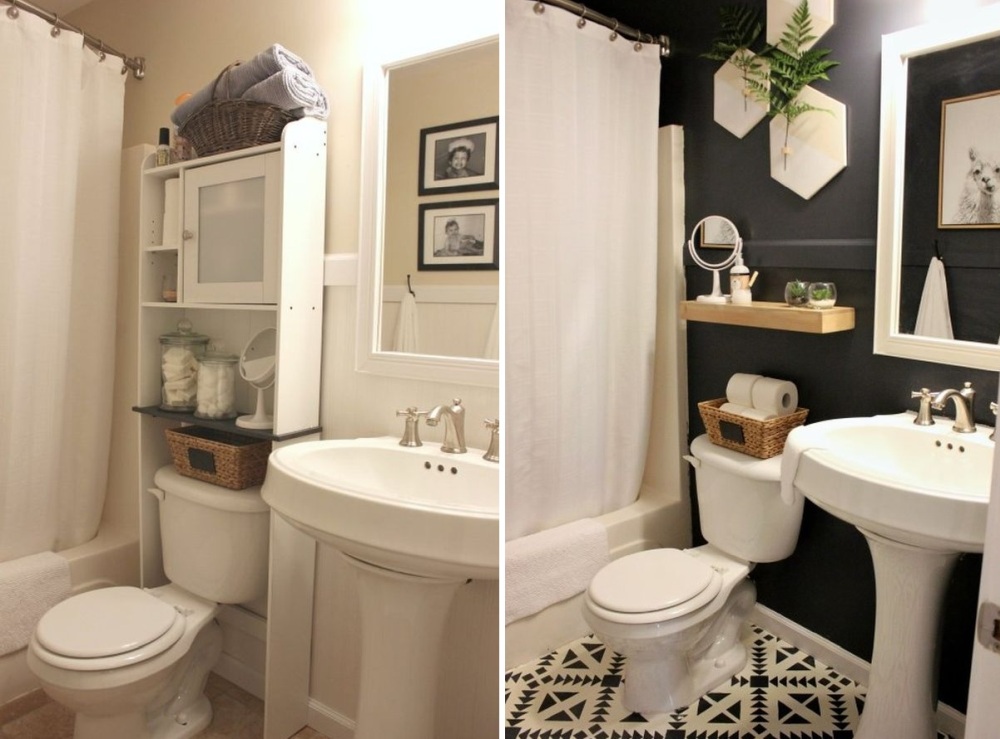
The single element that makes this makeover work is the patterned floor tile. While the dark accent wall is a bold choice, it’s the black and white geometric tile that ties everything together and provides the modern, slightly bohemian energy. Without it, a dark wall with a simple pedestal sink could feel disjointed or overly stark. The floor provides personality, pattern, and a clear design point of view that anchors the entire room. This is a great example of how flooring can be the star of the show, a tactic we also saw in Idea #24.
💡 Designer Tip
This is a perfect example of a high-impact, low-budget makeover. The key pieces—the pedestal sink and toilet—were reused. The biggest changes come from a can of black paint (around $40), a box or two of peel-and-stick vinyl floor tiles (which can be found for as little as $1.50/sq ft at places like Walmart or Amazon), and a simple wooden shelf. Even the hexagonal wall decor can be a DIY project using craft store supplies. This entire look could be convincingly recreated for under $200 if you’re willing to do the work yourself.
26. Powder Room Potential: From Dated to Dramatic
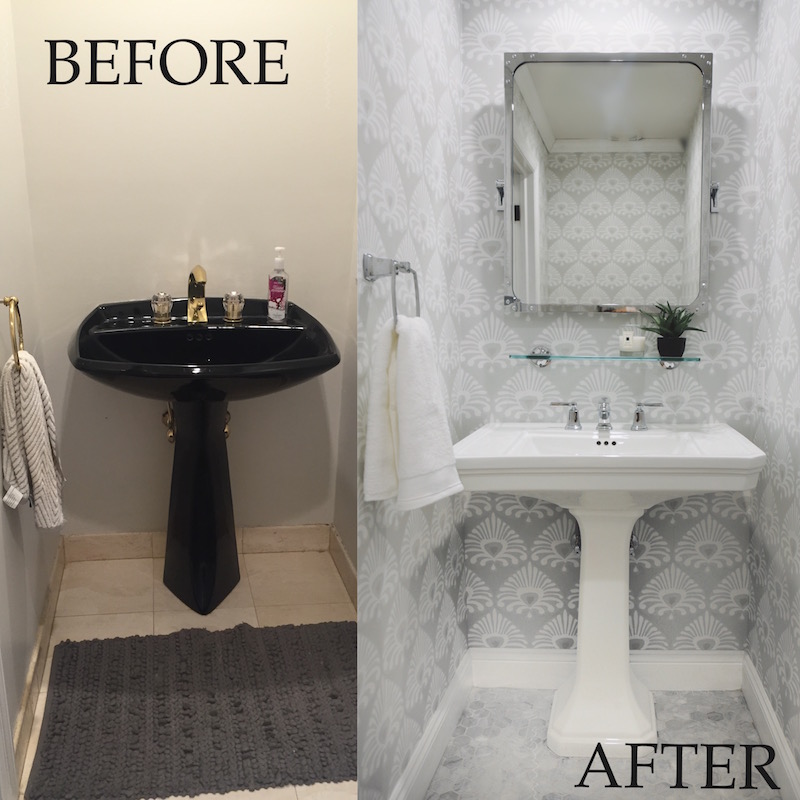
When working with a small powder room, think vertically. A common mistake is to add bulky storage on the floor or over the toilet. Instead, draw the eye upward to create a feeling of spaciousness. You can do this with vertical shiplap, a floor-to-ceiling mirror, or by using a wallpaper with a strong vertical pattern. Another great trick is to install a single, long floating shelf high on the wall for decor, which adds personality without cluttering the functional space below. Your goal is to make the walls feel taller, not to cram more things in.
⚠️ Real Talk
Even the simplest powder room has a design formula. A successful one often follows this ratio: 60% neutral base + 30% statement piece + 10% personal touch. The neutral base is your toilet, sink, and primary wall color. The statement piece could be a bold wallpaper accent wall, a dramatic floor tile (like in Idea #25), or an ornate mirror. The final 10% comes from your choice of hand towels, a unique soap dispenser, or a small piece of art. This ensures the room has a focal point without being chaotic.
27. Clean and Functional Update with Subway and Hexagon Tile
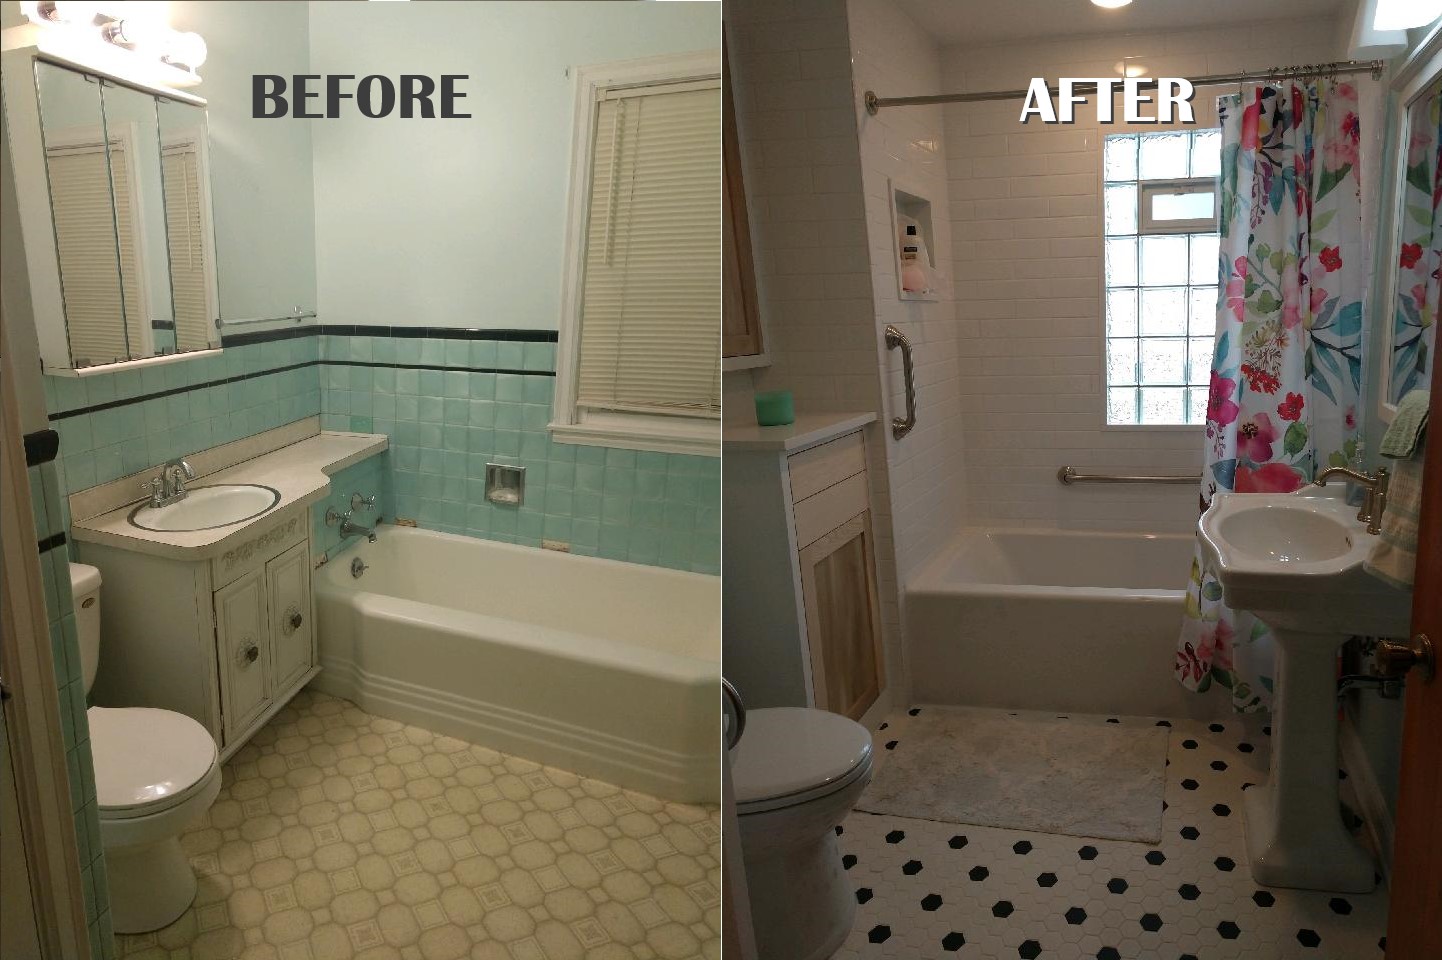
This makeover succeeds by embracing classic, durable materials that brighten and enlarge the space. The switch from dated aqua square tiles to timeless white subway tiles on the walls instantly makes the room feel cleaner and more spacious. On the floor, the small black-and-white hexagon mosaic tile is a classic choice that adds pattern and interest without overwhelming the room. It’s a nod to vintage style that still feels fresh. The combination is popular for a reason: it’s a nearly foolproof way to create a bright, clean, and functional bathroom that won’t feel dated in five years.
📐 Style Math
Notice the chrome grab bars installed in the shower. While grab bars are often associated with ADA compliance or aging-in-place, they are a fantastic safety and convenience feature for *everyone*. Don’t think of them as clinical; think of them as a sturdy, reliable place to steady yourself, prop a leg while shaving, or hang a washcloth. Installing blocking behind the tile during a remodel is the perfect time to prep for them. Modern grab bars come in a huge variety of stylish finishes (like the chrome seen here) to match your other fixtures.
28. From Teal and Jetted to a Sleek, Modern Sanctuary
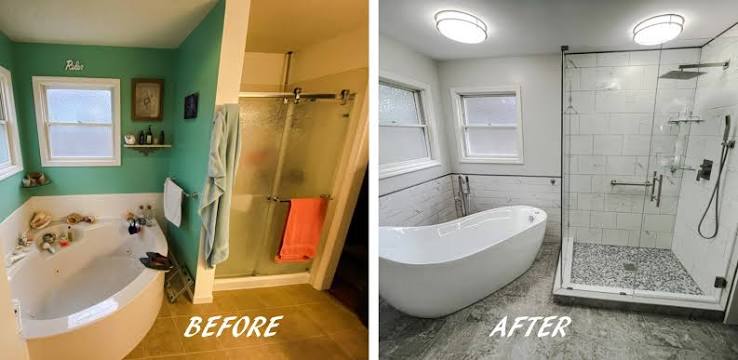
The most significant change in this renovation is the reconfiguration of the shower and tub area. The original layout, with its clunky corner jetted tub and cramped shower stall, was inefficient and dated. By replacing it with a spacious, full-width walk-in shower and a separate, elegant freestanding tub, the entire room now feels more luxurious, open, and functional. This new layout fundamentally improves how the space is used and perceived, turning it from a cluttered 90s bathroom into a sleek, modern sanctuary. The updated tile and fixtures are beautiful, but the improved layout is the true game-changer.
⭐ The One Thing
A layout featuring both a spacious walk-in shower and a separate freestanding tub requires a significant amount of floor space. To pull this off comfortably, you’ll need a primary bathroom that is at least 10 feet by 12 feet (120 sq ft) or larger. Anything smaller will result in a cramped space where the tub feels wedged-in and the shower isn’t as generous as it should be. For smaller bathrooms, it’s often a better choice to create one spectacular, large walk-in shower rather than trying to force in a separate tub, like the approach in Idea #23.
29. Bold and Modern with a Dark Wall and Patterned Floor
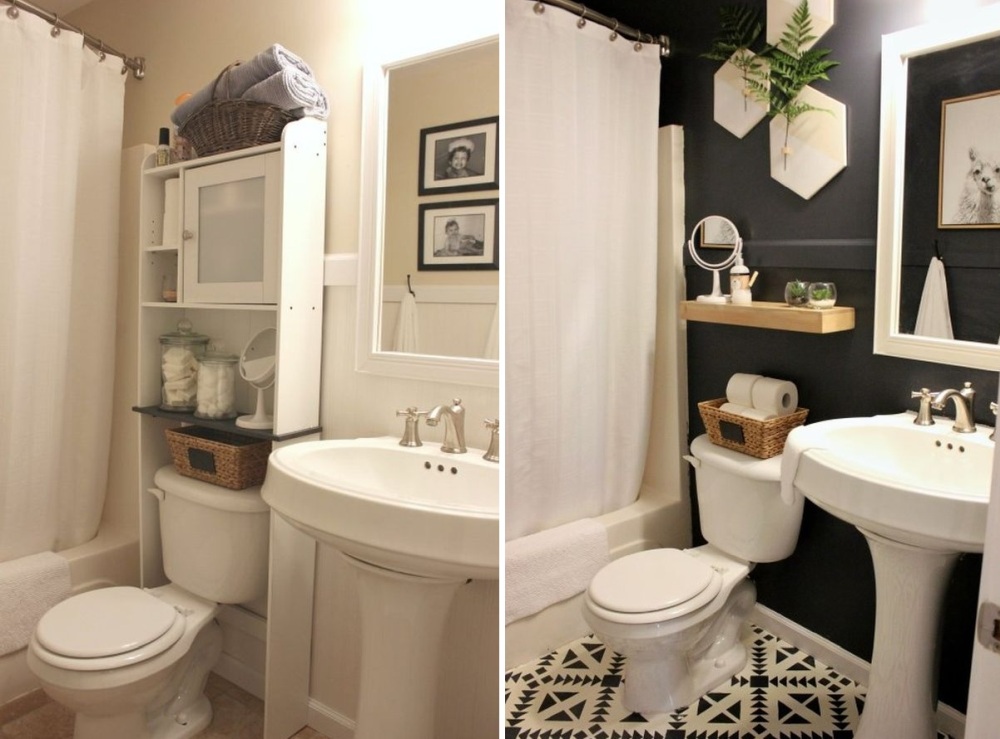
This design is a masterclass in using contrast to create a high-impact look in a small space. By painting just one wall a deep, dramatic black, it creates a focal point and an illusion of depth without making the whole room feel like a cave. The stark white of the pedestal sink, toilet, and shower curtain pops against this dark backdrop. The bold black-and-white patterned floor acts as the bridge that connects the light and dark elements, creating a cohesive and confident design statement. The touch of light wood on the shelf adds just enough warmth to keep it from feeling cold.
🔧 How-To Brief
If you decide to paint a wall black or another very dark color, your prep work is non-negotiable. Use a high-quality gray-tinted primer first. This will help the dark paint cover in fewer coats (saving you time and money) and result in a much richer, more even final color. If you paint a dark color directly over a light wall, you could end up needing four or five coats to get rid of streaks, and the final color may never reach its true depth. Don’t skip the tinted primer—it’s a pro secret for a perfect dark wall.
Your Bathroom’s Next Chapter
We’ve explored transformations big and small, from simple paint jobs to full-scale renovations. The best makeover is the one that not only looks beautiful but also feels right for *your* daily life. Hopefully, these 29 real-world examples have sparked some genuine inspiration for your own project.
Ready to start planning? Head over to Pinterest, create a new board for your dream bathroom, and start saving the ideas that speak to you. Your perfect before-and-after story starts now.