There’s a certain magic to stumbling upon a garden idea on Pinterest that feels both wonderfully creative and totally doable. If you’ve been saving pins of whimsical, colorful gardens, you’ve likely seen the incredible potential of old tires. We’ve gone deep into this trend, filtering through hundreds of concepts to find the ones that truly shine. This isn’t just a random list; it’s a curated collection of the 27 best tire planter ideas that blend rustic charm with serious personality.
From simple, single-tire setups you can finish in an afternoon to elaborate, playful sculptures, we’ve covered a range of styles. Whether your taste is more natural and rustic or bold and colorful, there’s something here for you. And stay until the end — we break down the most common mistakes that can ruin these looks. 📌 Save this to Pinterest for later — you’ll want to revisit these ideas.
1. Create a Cascading Wall of Colorful Tire Planters
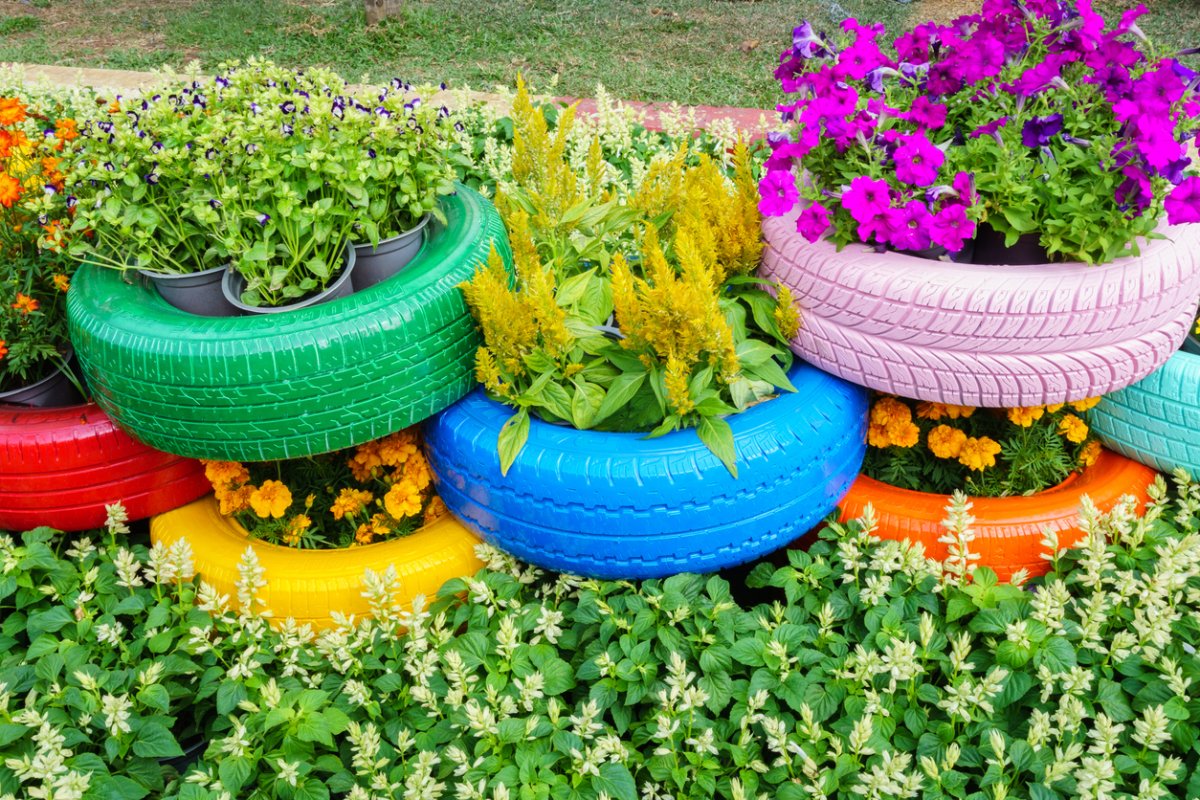
This idea is all about joyful repetition. Using the same object—a simple car tire—over and over again but changing the color each time creates a look that’s both cohesive and exciting. The cascading, slightly overlapping arrangement guides your eye through the space, making it feel dynamic and full of life. It’s a brilliant way to turn a flat, boring wall or fence into a three-dimensional garden feature that packs a huge visual punch.
💰 Budget Breakdown
Before you get started, let’s talk drainage. When you stack or overlap planters like this, water from the top tiers will flow directly into the lower ones. This can lead to over-watered and unhappy plants at the bottom. Be sure to drill several large drainage holes in the bottom of every single tire. Also, a stack of soil-filled tires is incredibly heavy. Make sure your base is perfectly level and stable before you start building up.
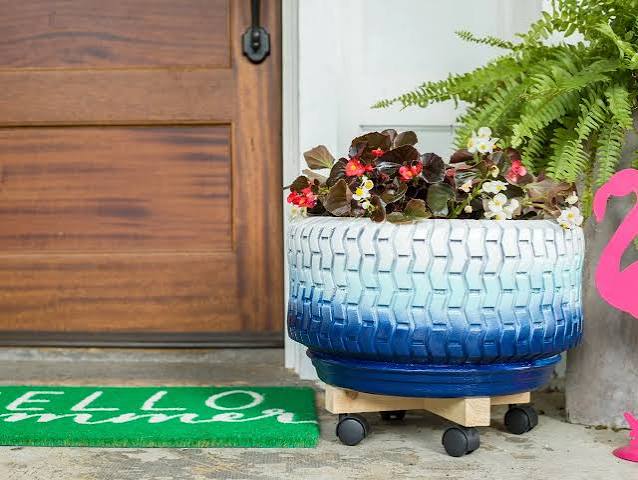
2. The Classic DIY Painted Tire Planter: A How-To Guide
For a project that delivers this much charm, the process is surprisingly straightforward. This is a perfect weekend DIY that completely transforms a piece of trash into a garden treasure.
🔥 Trending Context
- Clean the Tire: Give the tire a thorough scrubbing with a stiff brush and degreasing soap to remove all road grime and dirt. Let it dry completely.
- Prime Time: Apply a coat of exterior-grade, stain-blocking primer. This is the secret to getting your paint color to pop and adhere properly.
- Pick Your Paint: Choose a high-quality exterior latex or acrylic paint in your favorite color. Apply two coats for a rich, even finish.
- Drill for Drainage: Flip the tire over and use a powerful drill with a wide bit to create at least 5-6 drainage holes.
You can absolutely create this look for next to nothing. Ask your local auto repair shop or tire center if they have any old tires they’re getting rid of; they’re often happy to give them to you for free to save on disposal fees. For paint, check the “oops” section at hardware stores like Home Depot or Lowe’s. You can often find gallons of slightly mistinted, high-quality exterior paint for under $10. Add some seeds or starter plants, and you have a new garden feature for less than the cost of a single terra cotta pot.
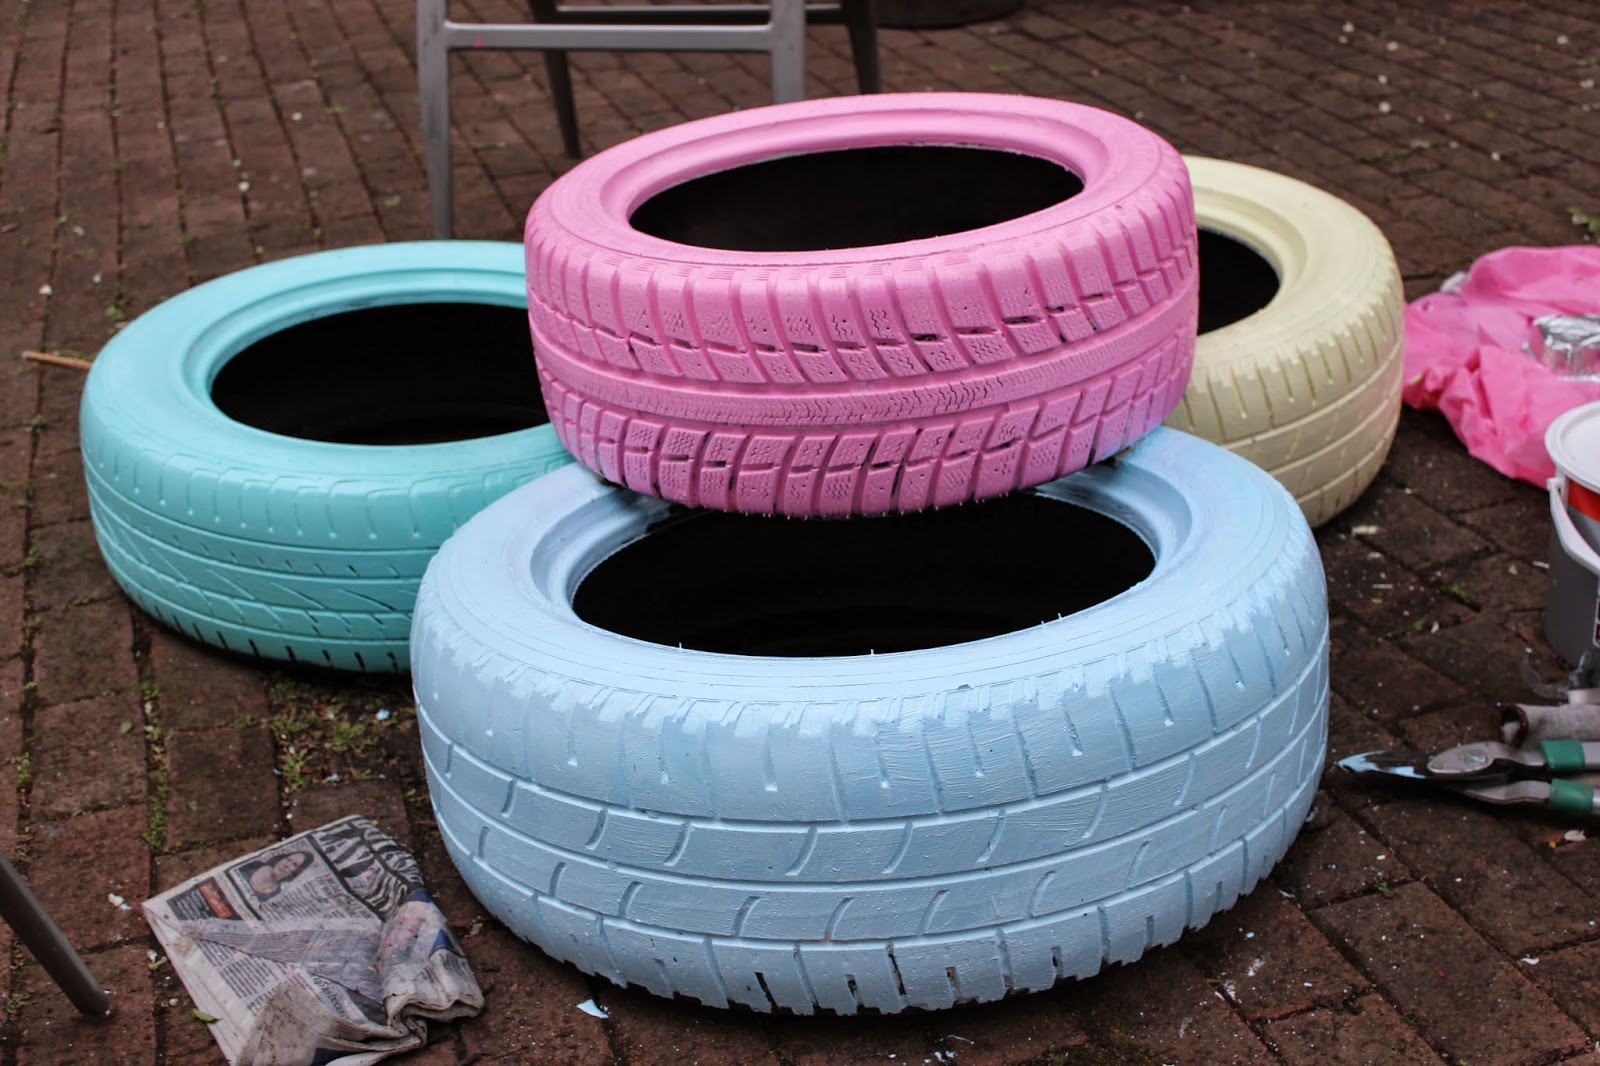
3. A Pastel Trio of Stacked Tire Planters on a Brick Patio
The charm of this arrangement is a simple but effective visual recipe: 60% soft pastel colors + 30% rustic texture + 10% fresh greenery. The light, almost candy-like hues of the paint (think light pink, robin’s egg blue, and pale yellow) create a gentle, welcoming vibe. This softness is balanced by the rough, earthy texture of the brick patio below. The final touch of green from the future plants will add just enough life to complete the picture. You could easily swap the pastels for bold primary colors for a more energetic look that uses the same formula.
📐 Style Math
Ready to give this a try? Tick these boxes before you even pick up a paintbrush:
- Find a Level Spot: A wobbly stack of tires is a safety hazard. Make sure the brick, patio, or ground you’re building on is completely flat.
- Gather Your Tires: You’ll need three tires of a similar size. Check that they don’t have any major damage or exposed steel belts.
- Prep for Painting: Have you thoroughly scrubbed and dried the tires? Rubber needs to be perfectly clean for paint to stick.
- Choose the Right Paint: Not all paint works on rubber. Make sure you have an exterior-grade paint designed for flexible surfaces.
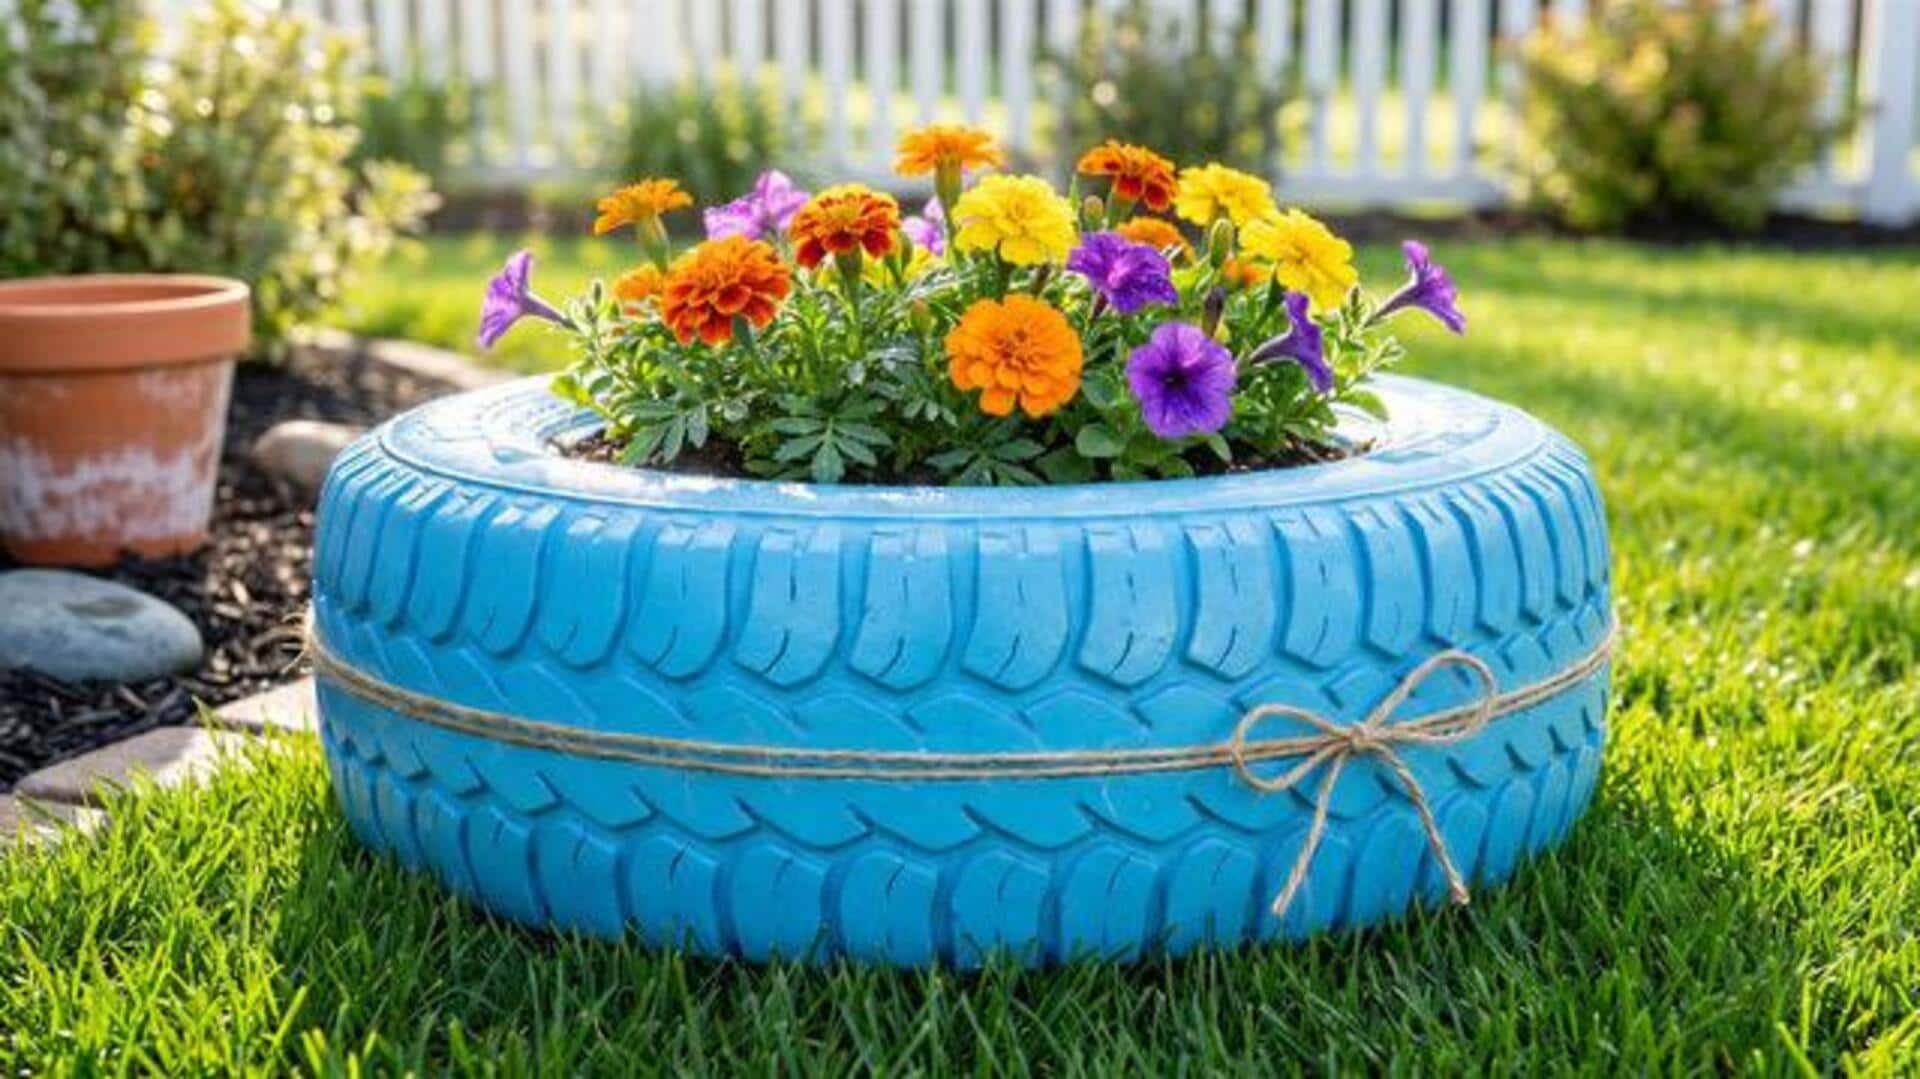
4. Bright Blue Tire Planter with a Jute Twine Bow
The single element that makes this design so successful is the jute twine bow. Without it, you’d have a bright blue tire with flowers—nice, but a little basic. That simple, rustic bow adds a touch of farmhouse charm and textural contrast that elevates the whole look. It’s the perfect counterpoint to the bright, modern blue paint and the industrial nature of the tire itself. It proves that a tiny, thoughtful detail can completely change the personality of a piece.
🎯 What Makes It Work
When you’re working with a single, bold planter, don’t skimp on the filling. A common mistake is to use a tire that’s too large and then not add enough plants, leaving it looking sparse and unfinished. For a standard 15- to 17-inch car tire, you should plan for at least 3 to 5 small bedding plants (like the petunias or calibrachoas shown here) to achieve that full, overflowing look from day one. Pack them in tightly; they’ll fill out and create a lush mound of color.
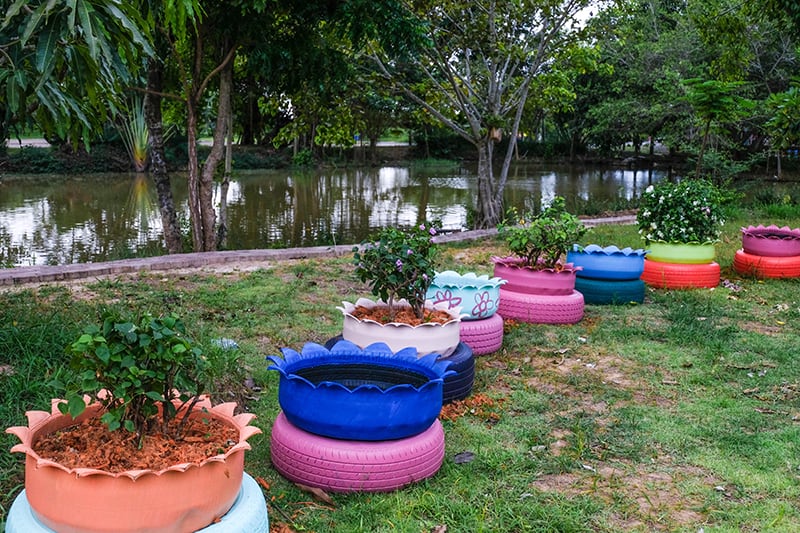
5. A Rainbow of Tire Planters Along a Tranquil Pond
This works because of the brilliant use of color against a natural, almost monochromatic background. The vibrant oranges, blues, pinks, and greens of the tires stand out sharply against the uniform green of the grass and the muted tones of the pond and trees. Repetition is also key; the repeating circular shapes create a sense of rhythm and intentionality. It doesn’t look like scattered junk; it looks like a deliberate, playful border. The similar sizing keeps it from feeling chaotic.
🧹 Maintenance Reality
This idea is perfect for defining a large, open space or creating a border along a property line, fence, or natural feature like this pond. To have a real impact, you’ll want a stretch of at least 15-20 feet to work with. This allows you to place 5-7 tires with enough breathing room between them. For smaller yards or patios, consider a smaller-scale version with just three tires clustered together, as seen in Idea #3, to avoid overwhelming the space.
6. Eclectic Indoor Planters from Stacked, Painted Tires
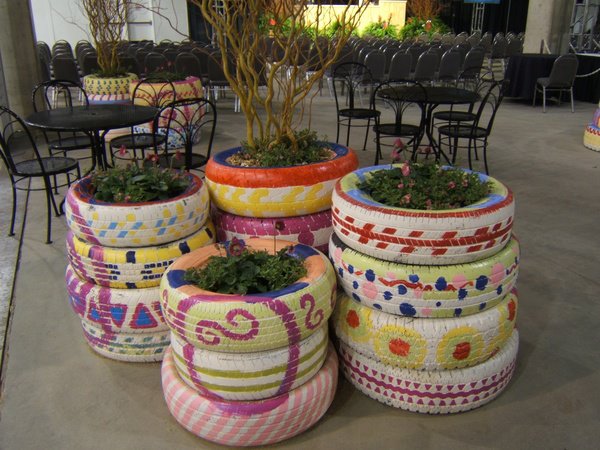
Bringing typically outdoor elements inside is a major trend, often seen with materials like concrete, brick, and reclaimed wood. This look taps right into that ‘industrial-meets-natural’ vibe. In an era of perfectly curated, minimalist homes, there’s a growing counter-movement towards playful, maximalist, and slightly quirky decor. These tire planters fit perfectly, telling a story of upcycling and creativity that feels authentic and personal, not mass-produced.
✅ Before You Start
While this is a super creative idea for an art studio or a very specific type of commercial space, let’s be honest about using tires indoors. Old tires can off-gas, releasing a subtle rubbery smell, especially when warmed by the sun. They are also notoriously difficult to get truly, deeply clean. This look is fantastic for its artistic merit, but for a typical living room, you would want to ensure the tires are sealed with a zero-VOC sealant and used in a well-ventilated area. Dusting all the crevices will also be a weekly chore.
7. Pale Yellow Tire Planter with Colorful Deer Silhouettes
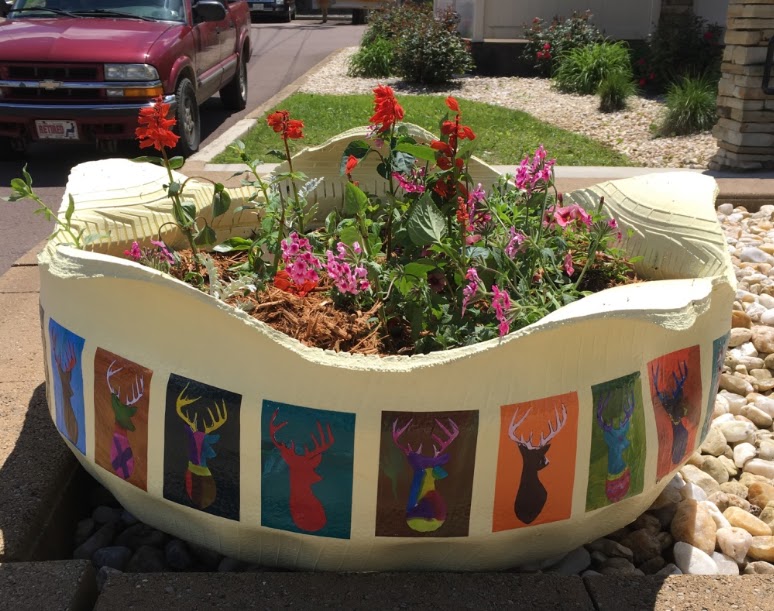
It’s all about the deer head decals. Without them, this is just a pleasant yellow planter. With them, it’s a piece of pop-art, rustic-kitsch genius. The pattern is unexpected and adds a layer of personality and humor that is completely captivating. It’s what makes you stop and look closer. It transforms the planter from a simple container into a conversation piece, showing that you don’t have to stick to solid colors or simple stripes when decorating your tires.
📏 Scale Guide
Here’s the recipe for this quirky-cool look: 50% rustic base (the tire and mulch) + 40% pop-art pattern (the colorful deer) + 10% classic floral (the simple red and pink flowers). The key is the tension between the country-style silhouette and the Warhol-esque color blocking of the decals. If you wanted to change it up, you could use the same formula with a different shape—think colorful chickens for a farmhouse vibe or bright pink flamingos for a touch of retro fun.
8. A Vivid Display of Scalloped-Edge Tire Planters on a Fence
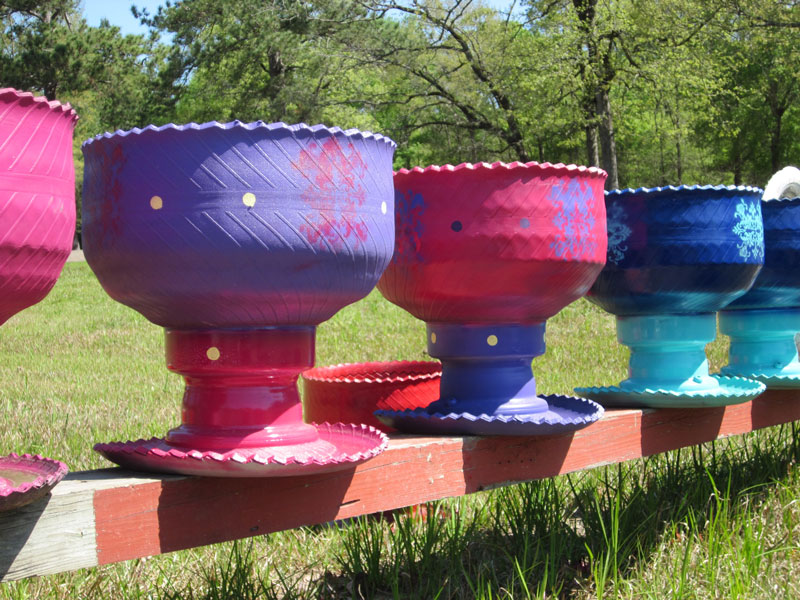
The scalloped edge is the detail that makes this project look so polished and intentional. To get this clean, flower-petal look, you need the right tool. Don’t struggle with a utility knife. A jigsaw with a fine-toothed blade is the best tool for the job. Draw your scallop pattern on the tire sidewall with a white paint pen, then carefully follow the line with the jigsaw. Brace the tire securely before you start cutting. This extra step takes a basic painted tire and turns it into something special.
⭐ The One Thing
The success of this design lies in its fearless use of contrast. First, you have the color contrast: hot pink against purple, turquoise against red. The colors are all highly saturated and refuse to be ignored. Second, there’s a textural contrast between the smooth, manufactured surface of the painted rubber and the rustic, weathered wood of the fence. Finally, the soft, curved shapes of the scallops contrast beautifully with the hard, straight lines of the fence planks. This pile-up of contrasts creates a ton of visual energy.
9. Bold Orange Tractor Tire Planter with Lush Greenery
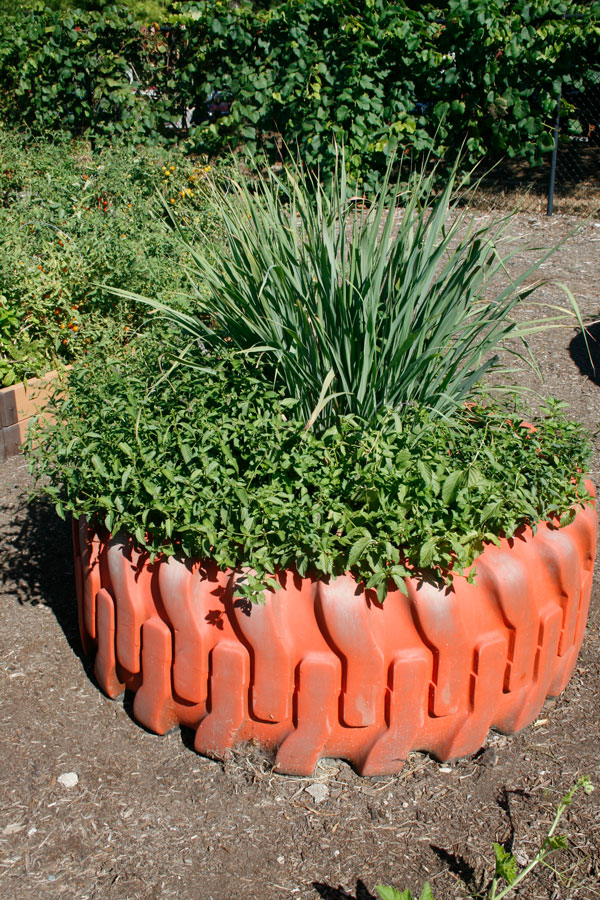
A single tractor tire makes a huge statement, so it needs room to breathe. This idea is best for a large yard or garden with at least 200-300 square feet of open space. A planter this size—often 4-5 feet in diameter—will completely dominate a small patio or backyard. It’s meant to be a focal point, so place it where it can be seen from a distance. Its massive scale makes it a perfect anchor for a large perennial bed or a standalone feature in a wide-open lawn.
🔧 How-To Brief
Let’s be real: a tractor tire is a beast. A standard rear tractor tire can weigh between 200 and 600 pounds *before* you add soil. This is not a one-person job. You will need a plan and probably a few strong friends to move it into place. Once it’s placed, it’s permanent for the season. Also, filling it requires a lot of soil—we’re talking multiple large bags. To save money and reduce weight, consider filling the bottom third with plastic bottles, packing peanuts, or other filler material before adding your soil.
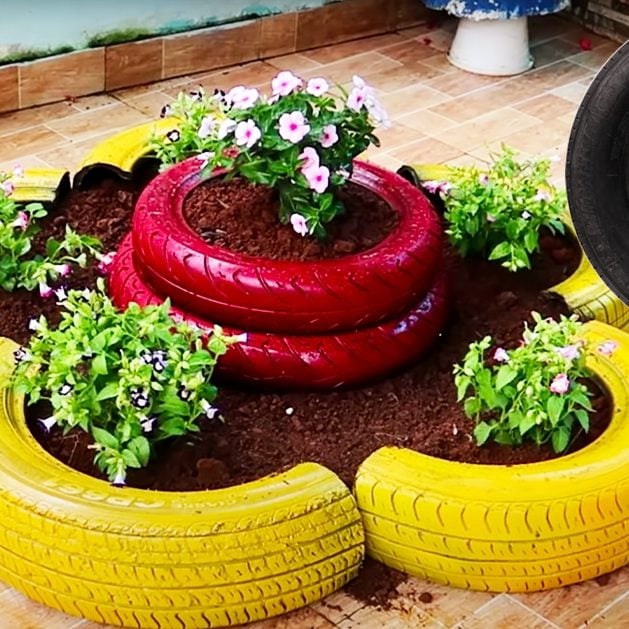
10. Tiered Red and Yellow Tire Planters on a Tiled Patio
This vibrant look is incredibly budget-friendly. You can often get old tires for free from local mechanics. A couple of cans of spray paint in bold primary colors will only run you $15-$20. The soil and small annual flowers are also inexpensive, usually just a few dollars per plant. For under $50, you can create a multi-level, high-impact garden feature that looks just as cheerful and creative as a set of expensive ceramic planters that could cost hundreds. This is a classic example of how creativity beats cash.
⚠️ Real Talk
This design works so well because it uses basic design principles effectively. The primary color scheme of red and yellow is inherently energetic and eye-catching. The use of tiers and different arrangements—some stacked, some cut and laid out—creates visual interest and depth. By planting the same type of small, delicate flowers throughout, the arrangement feels unified and intentional, rather than chaotic. The bright colors pop beautifully against the neutral tiled patio.
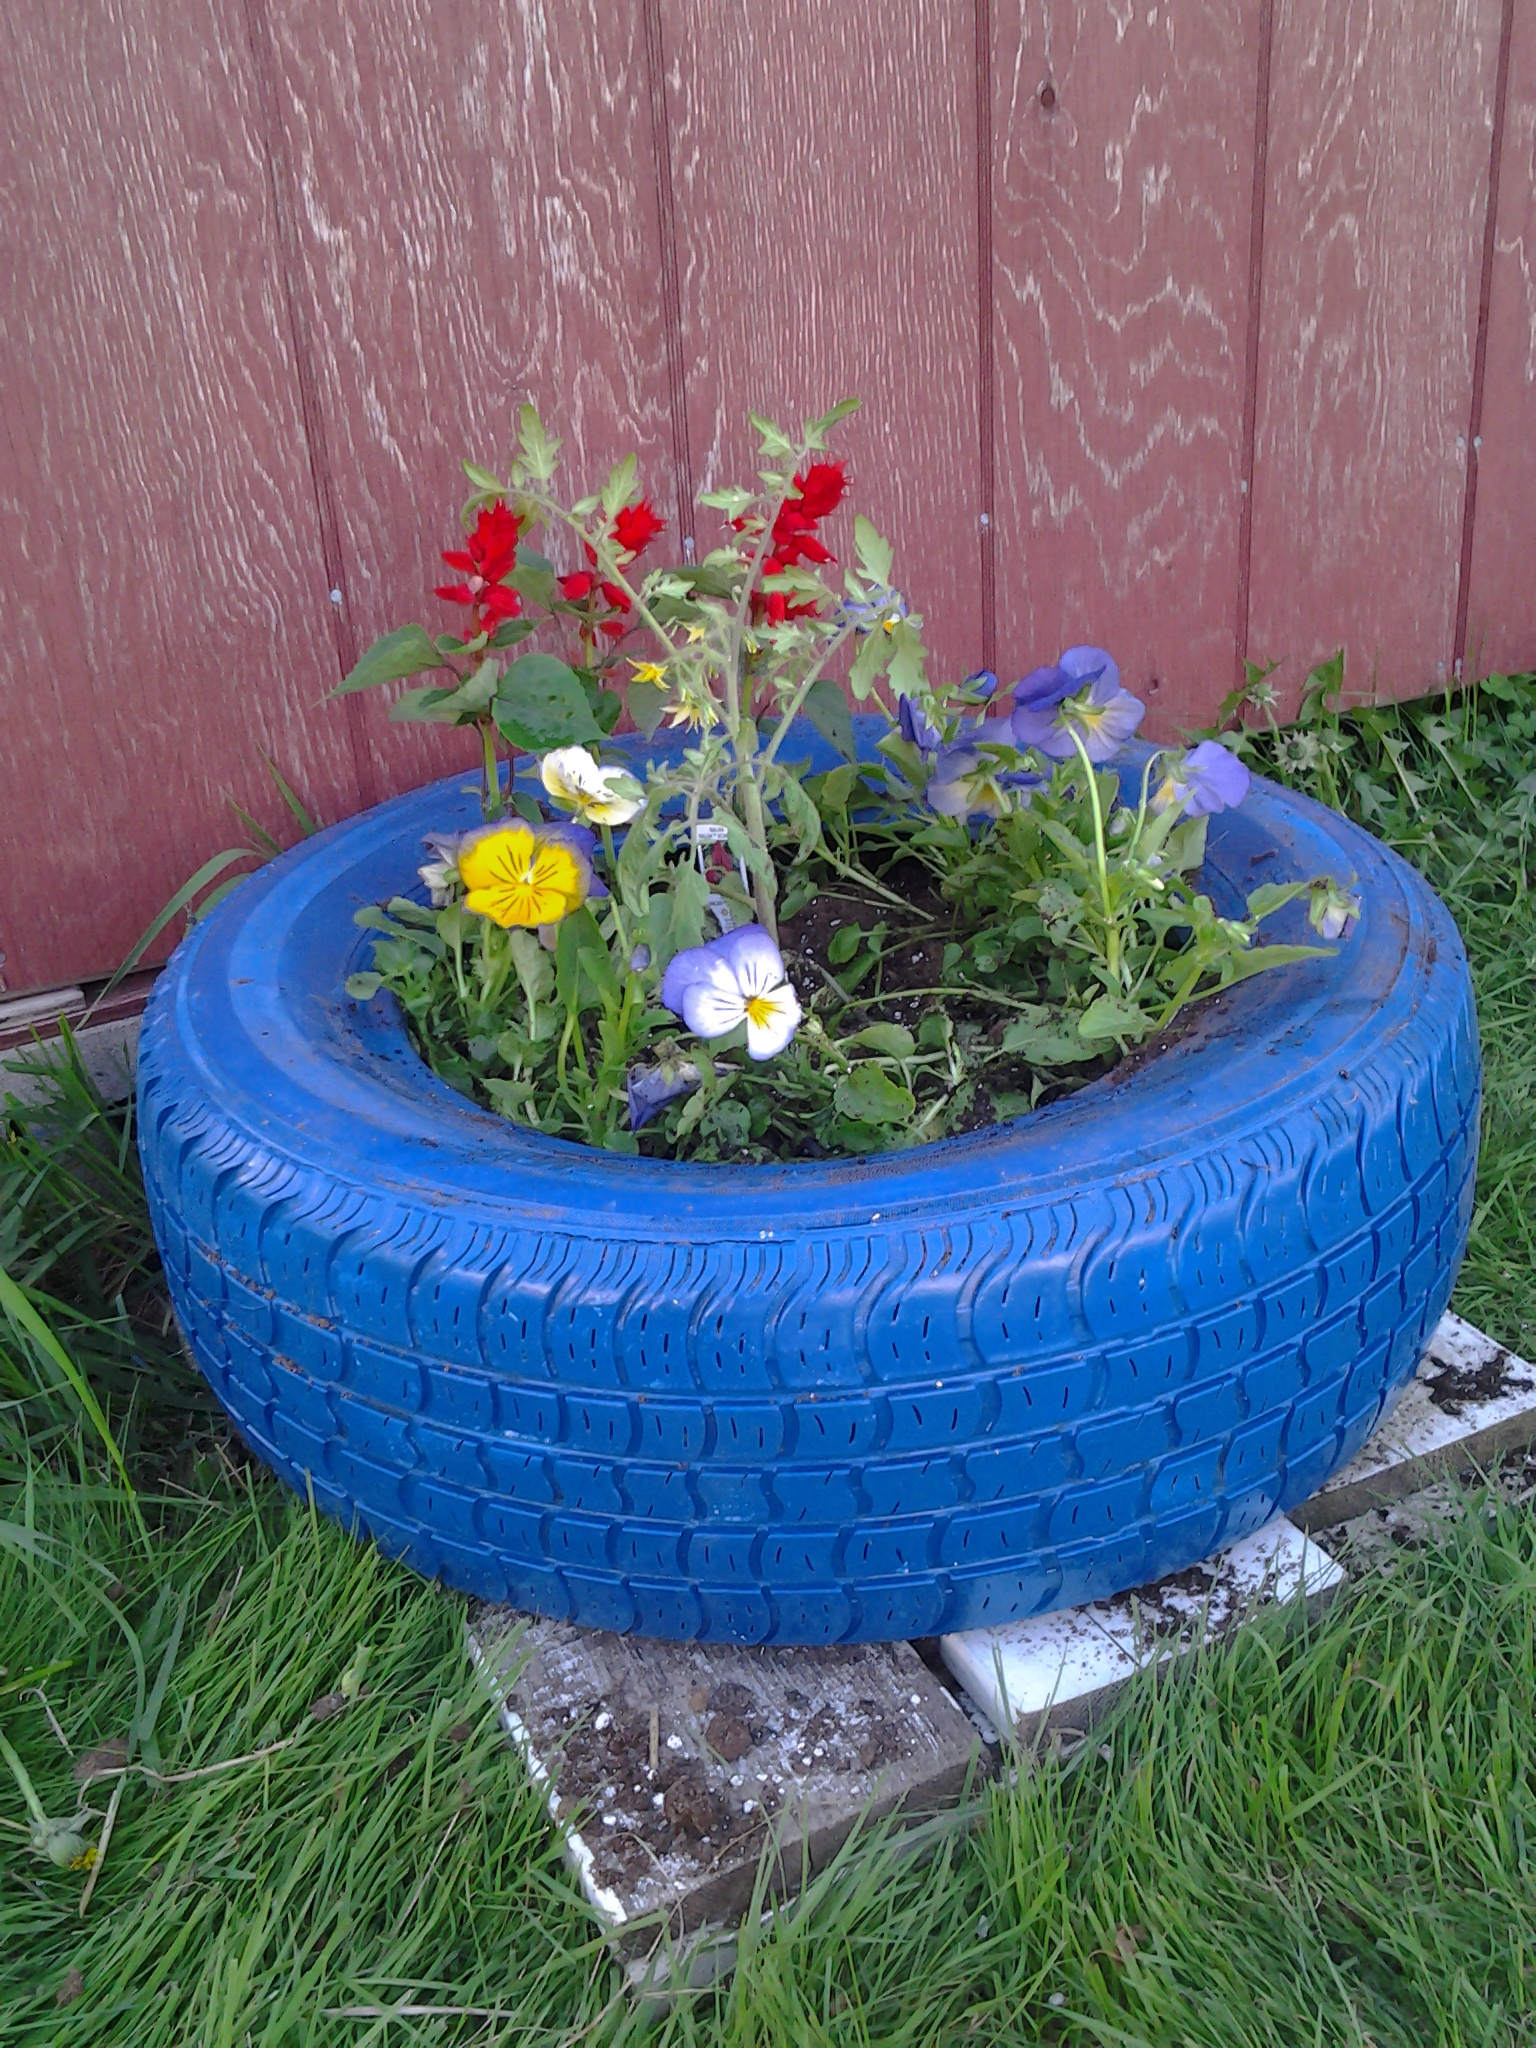
11. A Cheerful Blue Tire Planter Against a Rustic Red Wall
The beauty of this scene is its simple, powerful formula: 50% rustic texture (the weathered red wall) + 40% bold, solid color (the bright blue tire) + 10% natural detail (the assorted flowers and grass). The combination of primary colors—red and blue—is always a winner, creating a classic, high-contrast look. The weathered texture of the wall adds a layer of history and charm that keeps the bright colors from feeling too childish. It’s a perfect balance of old and new, polished and rustic.
💸 Get This Look For Less
A painted tire in the full sun will require some upkeep. The constant expansion and contraction of the rubber as it heats and cools can cause even the best paint to crack and peel over time. Expect to give your planter a fresh coat of paint every other year to keep it looking sharp. The intense, bright blue color is also prone to fading from UV exposure. Using a UV-protectant clear coat after painting can prolong its vibrancy, but a little fading is inevitable and just adds to the character.
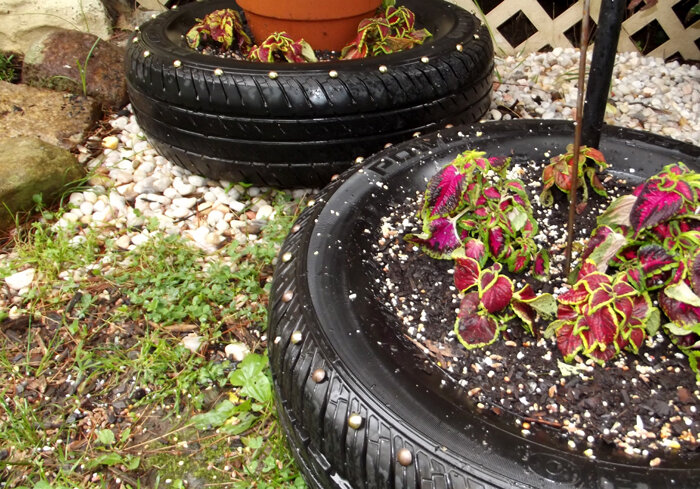
12. Edgy Black Tire Planters with Decorative Studs
The metallic studs are the key detail that elevates this from a simple recycled tire to a piece with a distinct personality. It’s a move straight out of a rock-and-roll playbook. The studs add a touch of industrial, almost punk-rock edge that contrasts brilliantly with the delicate, organic beauty of the coleus plants inside. By leaving the tire black and just adding that one bit of hardware, the design feels intentional and cool, not just thrifty. This feels much more designed than the brightly painted versions like Idea #8.
💡 Designer Tip
To get this look, don’t just use any old screw or nail. Search for “upholstery tacks” or “decorative nailheads” online or at a fabric store. They come in a variety of finishes (like nickel, brass, or antique bronze) and have a clean, rounded head that provides a professional look. For a standard car tire, plan on using 50-75 tacks, spaced about 1 to 1.5 inches apart, for a visually strong line. Just tap them in gently with a hammer.
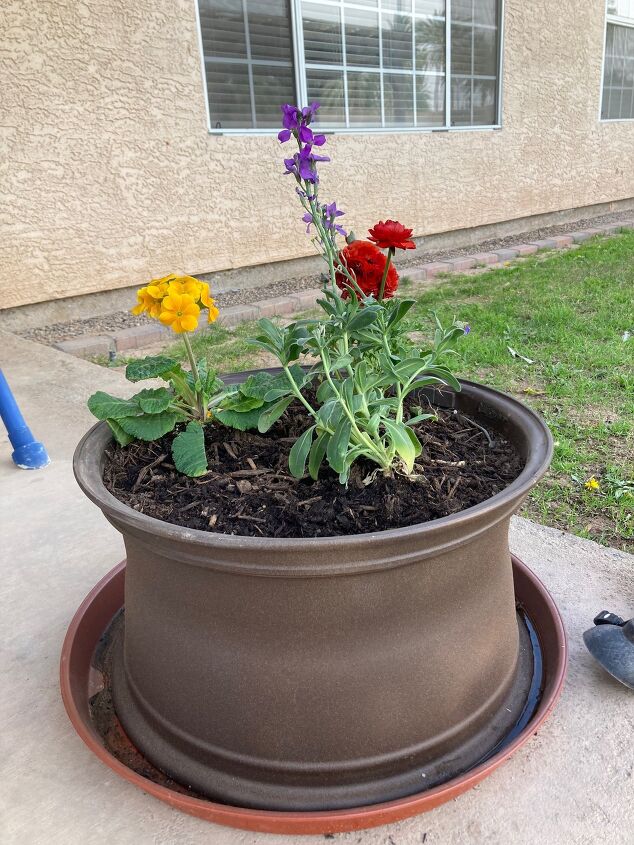
13. A Simple Dark Brown Tire Planter with Colorful Primrose
This design’s success lies in its simplicity and restraint. Instead of a loud, bright color, the tire is painted a subtle dark brown. This allows the tire to blend in with the soil and the terracotta saucer, essentially becoming a neutral frame. All the visual attention goes directly to the vibrant yellow, red, and purple flowers. It’s a smart choice when you want the plants, not the planter, to be the star of the show. It feels more like a traditional garden container and less like a quirky piece of yard art.
💰 Budget Breakdown
This is one of the most accessible garden ideas out there. A used tire is often free. A can of brown spray paint might cost you $8. The plastic saucer underneath is another few dollars. Even with the cost of potting soil and a nice mix of annual flowers like primrose and ranunculus, you can easily create this entire lush arrangement for under $30. It’s a testament to the fact that you don’t need a big budget to create a beautiful and welcoming patio garden.
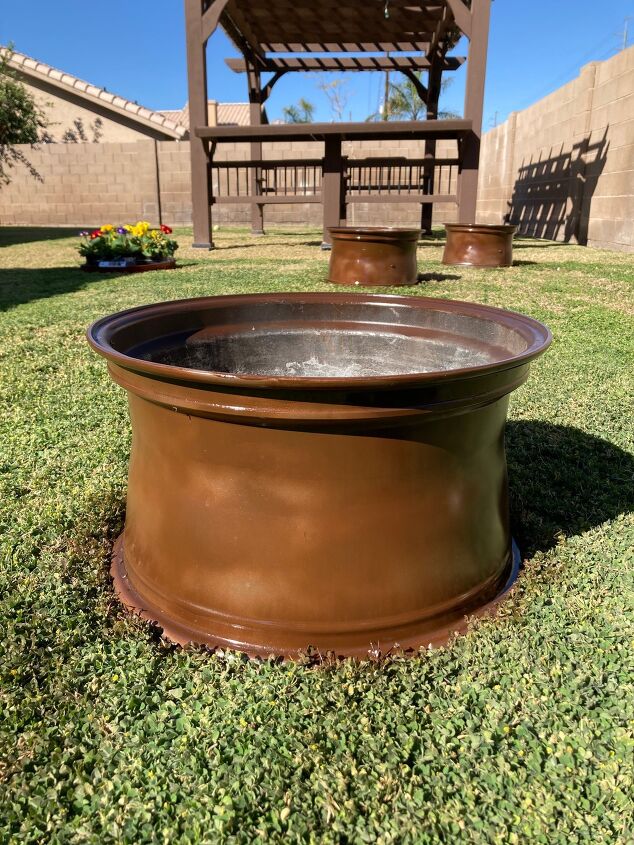
14. Brown Tire Planters for a Cohesive, Rustic Backyard
When using multiple tire planters in one space, painting them all the same color is the key to a cohesive, intentional look. Here, the consistent warm brown connects the planters to each other and also harmonizes with the wooden pergola in the background. This simple choice makes the planters feel like a deliberate part of the overall landscape design, rather than just a random collection of recycled objects. A single, unifying color is a powerful tool for creating order and calm.
🔥 Trending Context
This idea works well in a medium to large suburban backyard. The use of multiple tire planters, including a larger one in the foreground, requires enough lawn space so they don’t feel crowded. An area of at least 50 square feet of open lawn allows them to be staggered, creating depth without cluttering the view of the pergola and back wall. In a smaller space, using just one of the smaller tires would be more effective, preventing the yard from feeling filled with obstacles.
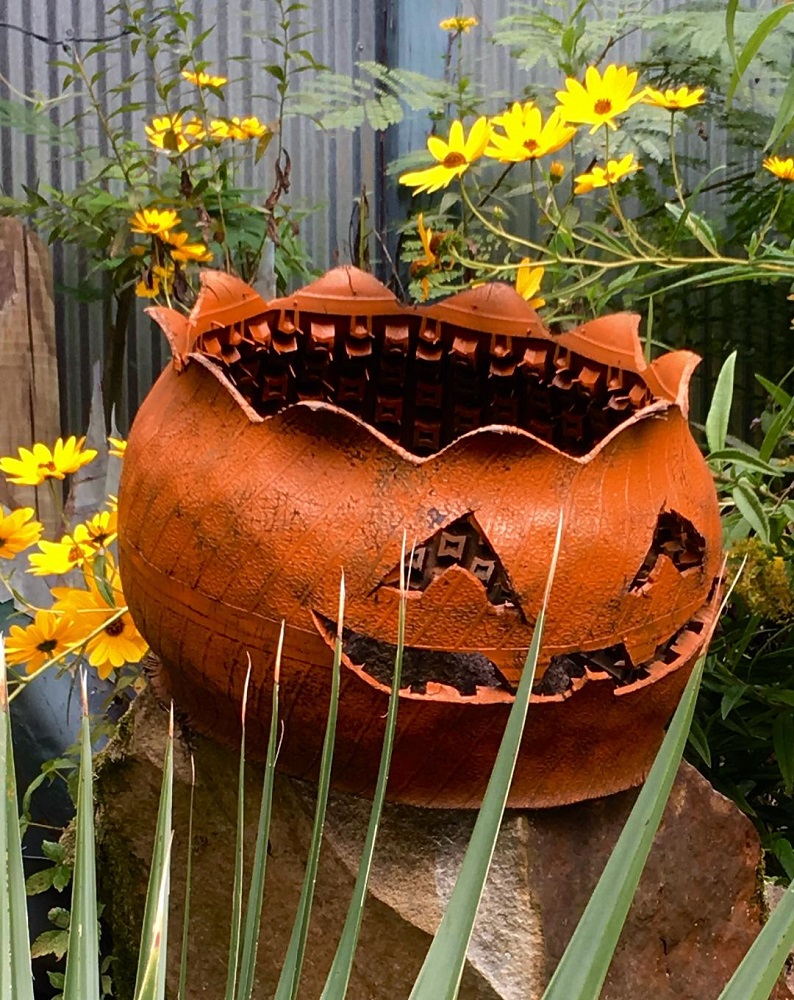
15. A Festive Jack-o’-Lantern from a Carved Tire Planter
This playful pumpkin planter is a fantastic seasonal project. Here’s how to make it happen:
📐 Style Math
- Choose Your Tire: Find a tire with a tread pattern that isn’t too chunky or deep.
- Draw the Face: Use a white or yellow chalk marker to draw a classic jack-o’-lantern face on the tire’s sidewall. Keep the shapes simple and bold.
- Make Your Cuts: This is the trickiest part. Use a very sharp utility knife or a jigsaw with a blade rated for rubber. Go slowly and carefully, following your lines. Remember to cut out a large circle from the top sidewall to create the planter opening.
- Paint it Orange: Clean the tire thoroughly, then paint it with a few coats of bright orange exterior paint. Let it dry completely before planting.
Creating this festive look is incredibly affordable, relying more on craftiness than cash. It’s a prime example of turning trash into a seasonal treasure.
- Used Tire: $0 (from a local garage)
- Paint & Primer: $15 – $25
- Plants (Mums, etc.): $10 – $20
- TOTAL: $25 – $45
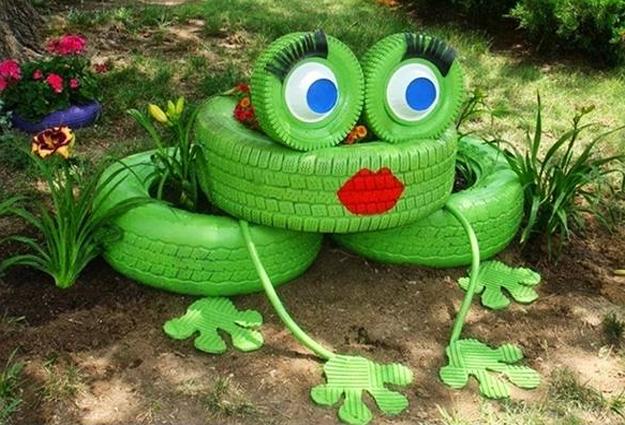
16. Whimsical Frog Sculpture Made from Recycled Tires
The eyes are everything. The entire character and charm of this frog sculpture comes from the two smaller tires stacked on top, painted with wide, cartoonish eyes. Without them, it would just be a weird green-painted tire. The simple, concentric circles of white, blue, and black instantly give it a playful personality that makes you smile. It’s a perfect lesson in how to create character and turn a stack of tires into a creature with a soul.
🎯 What Makes It Work
This is an adorable project, but be prepared for a bit of work. Cutting tires to create the legs is tough. You’ll need a jigsaw, a steady hand, and patience. Painting all the different components—the body, the eyes, the mouth—also takes time and attention to detail. And while it looks whimsical, it’s also a permanent feature for the season. Make sure you love where you place it, because moving a three-tire sculpture filled with soil is not a task you’ll want to do twice.
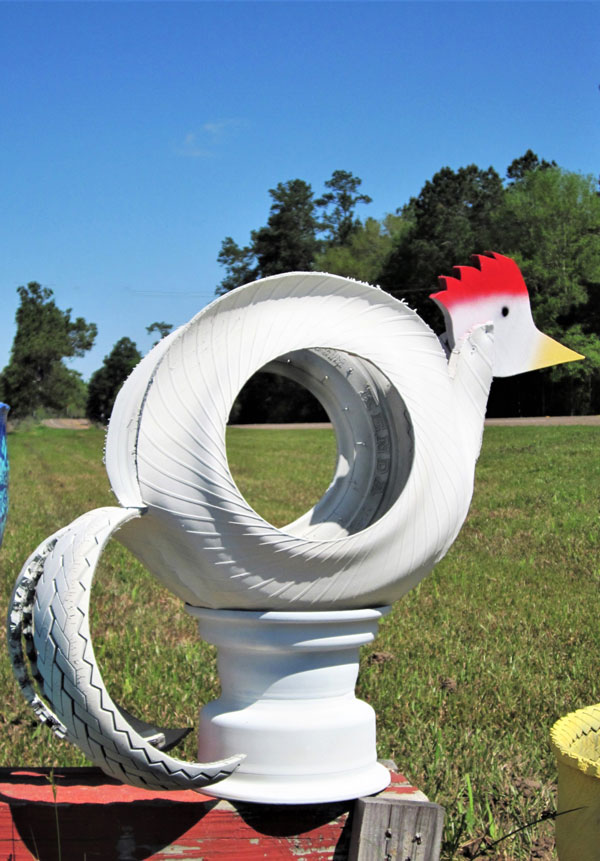
17. A Rustic Rooster Sculpture from White Painted Tires
This piece works by abstracting the form of a rooster down to its most essential, recognizable parts. You don’t see feathers or fine details, but the combination of a white body, a red comb, and a yellow beak is instantly readable as ‘rooster.’ The use of stacked, cut tires to create the body and tail feathers is clever and sculptural. It’s a fantastic example of folk art, where the artist has used humble, everyday materials to capture the spirit of a subject in a creative and stylized way.
🧹 Maintenance Reality
In a world of mass-produced garden gnomes and flamingos, there’s a huge desire for garden decor that feels unique and handmade. This rooster sculpture taps directly into the modern farmhouse trend and the broader appreciation for folk art. It has a story—you can see the creativity and effort involved. This kind of wholesome, rustic, and slightly quirky art feels authentic and brings a sense of individuality to a garden that you just can’t buy from a big-box store.
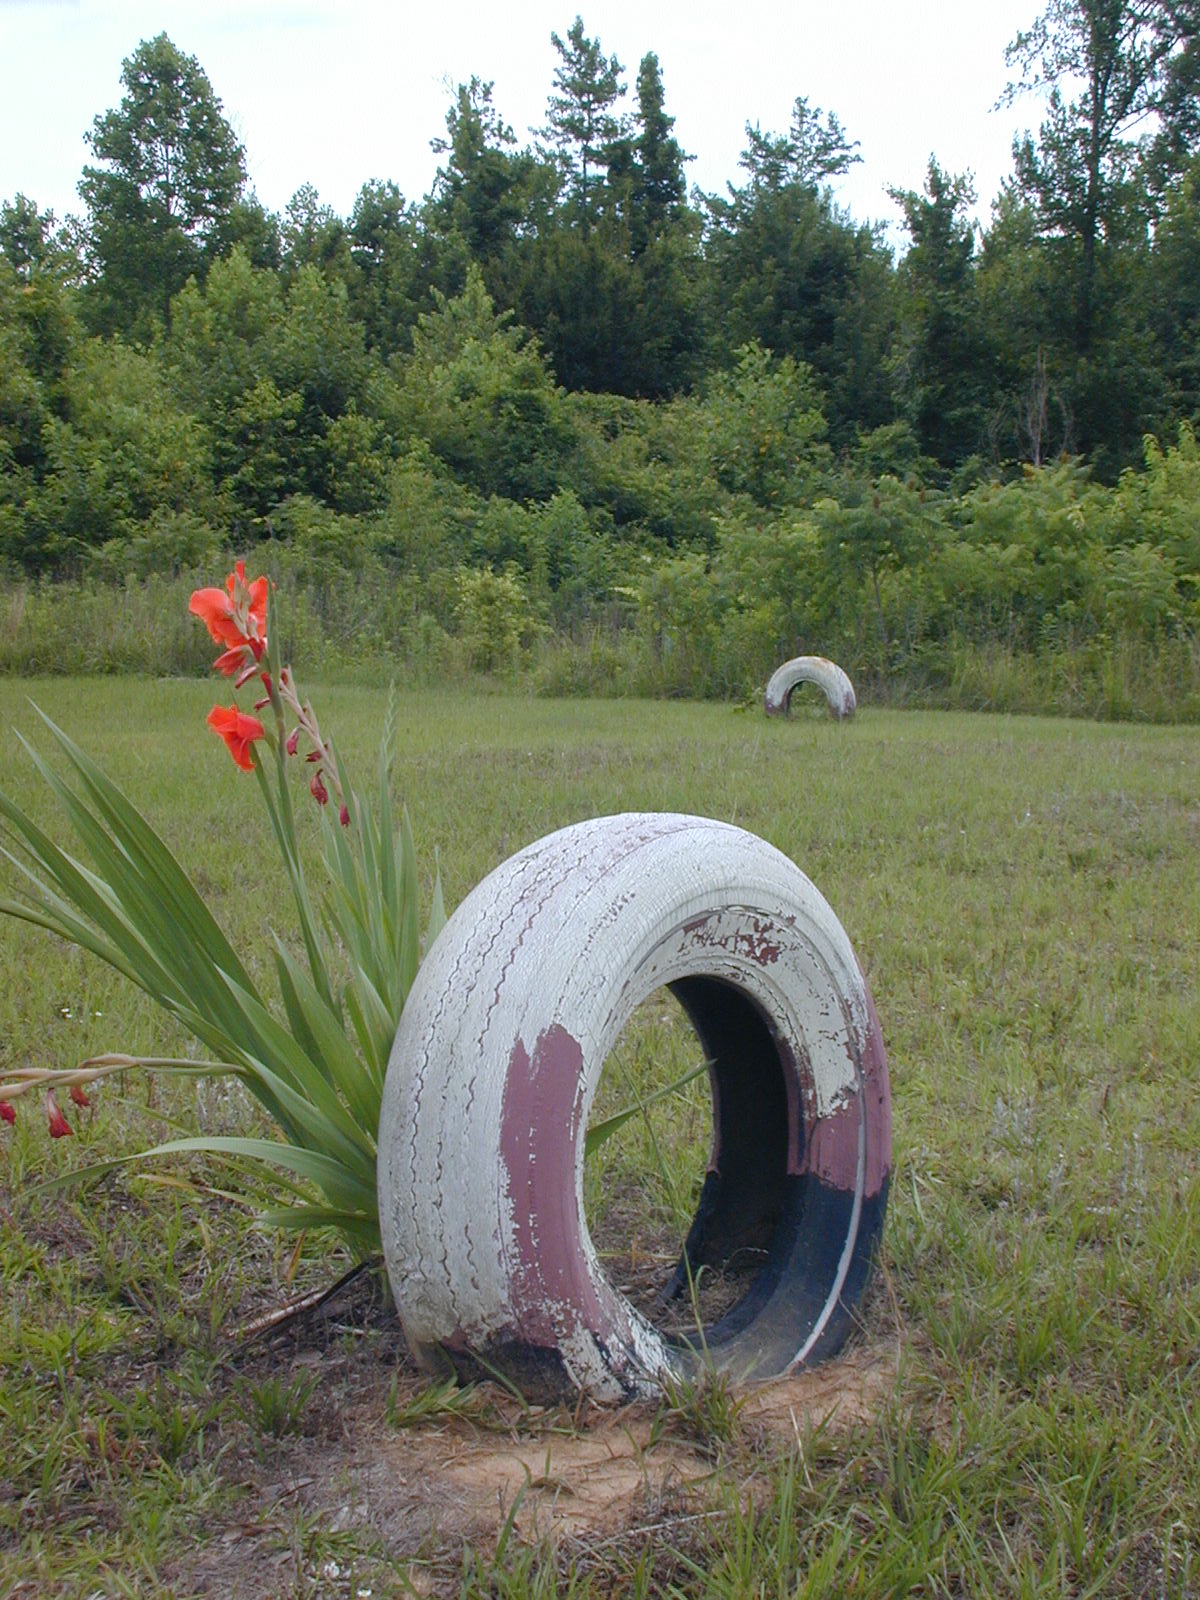
18. Weathered White Tire Planter with Red Flowers
The visual formula here is pure rustic charm: 80% natural and weathered textures (peeling paint, green grass, lush trees) + 20% a single, bold pop of color (the bright red flowers). The beauty of this look is that it’s not trying to be perfect. The faded, peeling white paint on the tire gives it a sense of history and belonging in the landscape. It feels found, not forced. The bright red flowers provide just enough of a focal point to draw your eye in without overwhelming the serene, natural setting.
✅ Before You Start
This is the ultimate low-budget, high-character garden accent. Find a tire that’s already a bit beaten up—the more weathered, the better. You might not even need to paint it. Let a few hardy, spreading perennials like the red flowers shown here establish themselves next to it, and allow them to creep and grow naturally in and around the tire. It’s a ‘less is more’ approach that relies on nature to do most of the work. For a similar vibe to Idea #14, but even more hands-off.
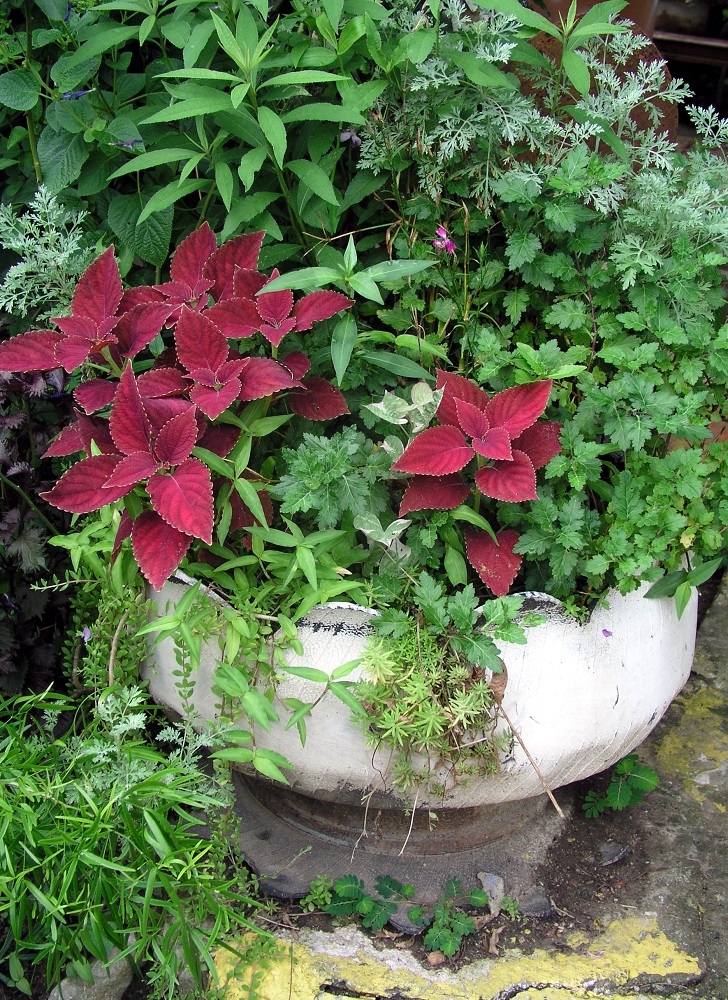
19. White Tire Planter Overflowing with Red and Green Coleus
The absolute star of this show is the plant choice. The dramatic, deep-red coleus provides a powerful color contrast against the simple white tire. Its large, velvety leaves create a lush, overflowing effect that makes the planter feel incredibly abundant and alive. Flanked by other plants with different leaf shapes and shades of green, the coleus stands out as the undeniable focal point. Using foliage for your main color pop, instead of flowers, gives a more modern and sophisticated feel.
📏 Scale Guide
Want that incredibly full, ‘spilling over’ look? The secret is the ‘thriller, filler, spiller’ planting method. The ‘thriller’ is a tall central plant (which isn’t obvious here, but could be added). The ‘filler’ are mounding plants that fill the middle, like this amazing coleus. The ‘spiller’ are plants that trail over the edge, like the silvery-green foliage seen here. For a standard tire, use one thriller, two to three fillers, and three to four spillers planted around the edge.
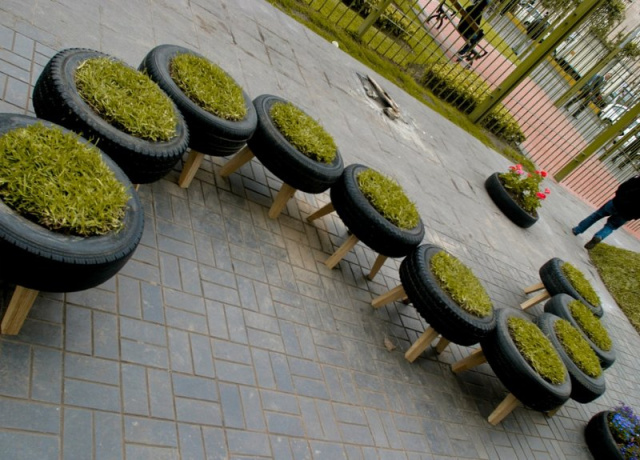
20. Modern Upcycled Tire Planters on Minimalist Wood Stands
This design succeeds by elevating a humble material. Placing the black tires on simple, light-wood stands instantly lifts them—both literally and figuratively. It signals ‘design object’ instead of ‘recycled junk.’ The contrast between the industrial black rubber and the natural, almost Scandinavian-style wood is clean and modern. By planting them with nothing but simple, bright green grass, the focus remains on the purity of the form and the materials. It’s a very disciplined and contemporary take.
⭐ The One Thing
While this looks amazing, be aware that planting grass in a container requires commitment. To keep it looking like a neat, tidy patch of lawn, you will need to mow it. Yes, you will be getting out scissors or small shears every week or two to give your tire planter a trim. It will also require consistent watering to keep it from getting brown and patchy, as containers dry out much faster than a regular lawn. It’s a high-concept look with higher-than-average maintenance.
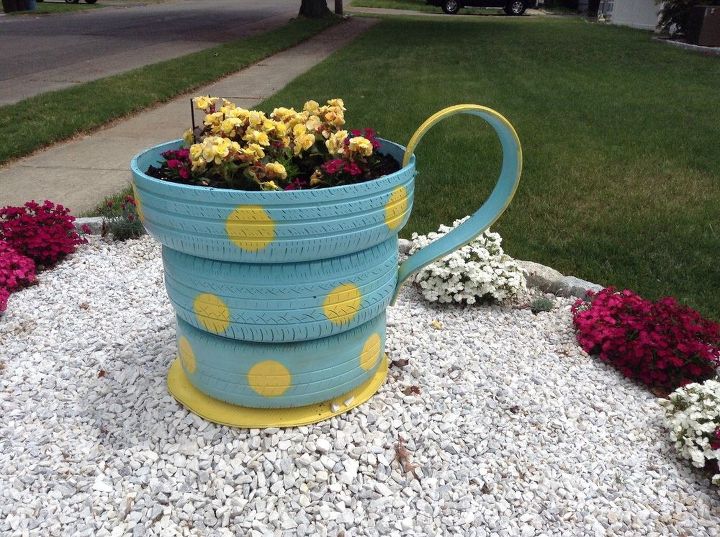
21. A Whimsical Teacup Planter with Yellow Polka Dots
It’s the handle. The body of the stacked tires creates the ‘cup’ and the flowers are the ‘tea,’ but it’s that jaunty, curved piece of tire on the side that sells the whole illusion. Without the handle, you would have a cute, polka-dotted tiered planter. With the handle, it’s unmistakably a teacup, and that’s where the magic lies. It’s the element that transforms the project from decorative to truly whimsical and story-like. For a similar but slightly different take on the teacup idea, check out Idea #27.
🔧 How-To Brief
This playful look is a formula of pure fun: 60% whimsical shape (the teacup form) + 30% cheerful pattern (the bright polka dots) + 10% complementary color (the yellow and magenta flowers). The key is that every element reinforces the cheerful, slightly silly theme. Nothing is serious. The light blue and bright yellow color combination is classic and friendly, and choosing flowers that match the yellow dots makes the whole design feel cohesive and thoughtfully planned.
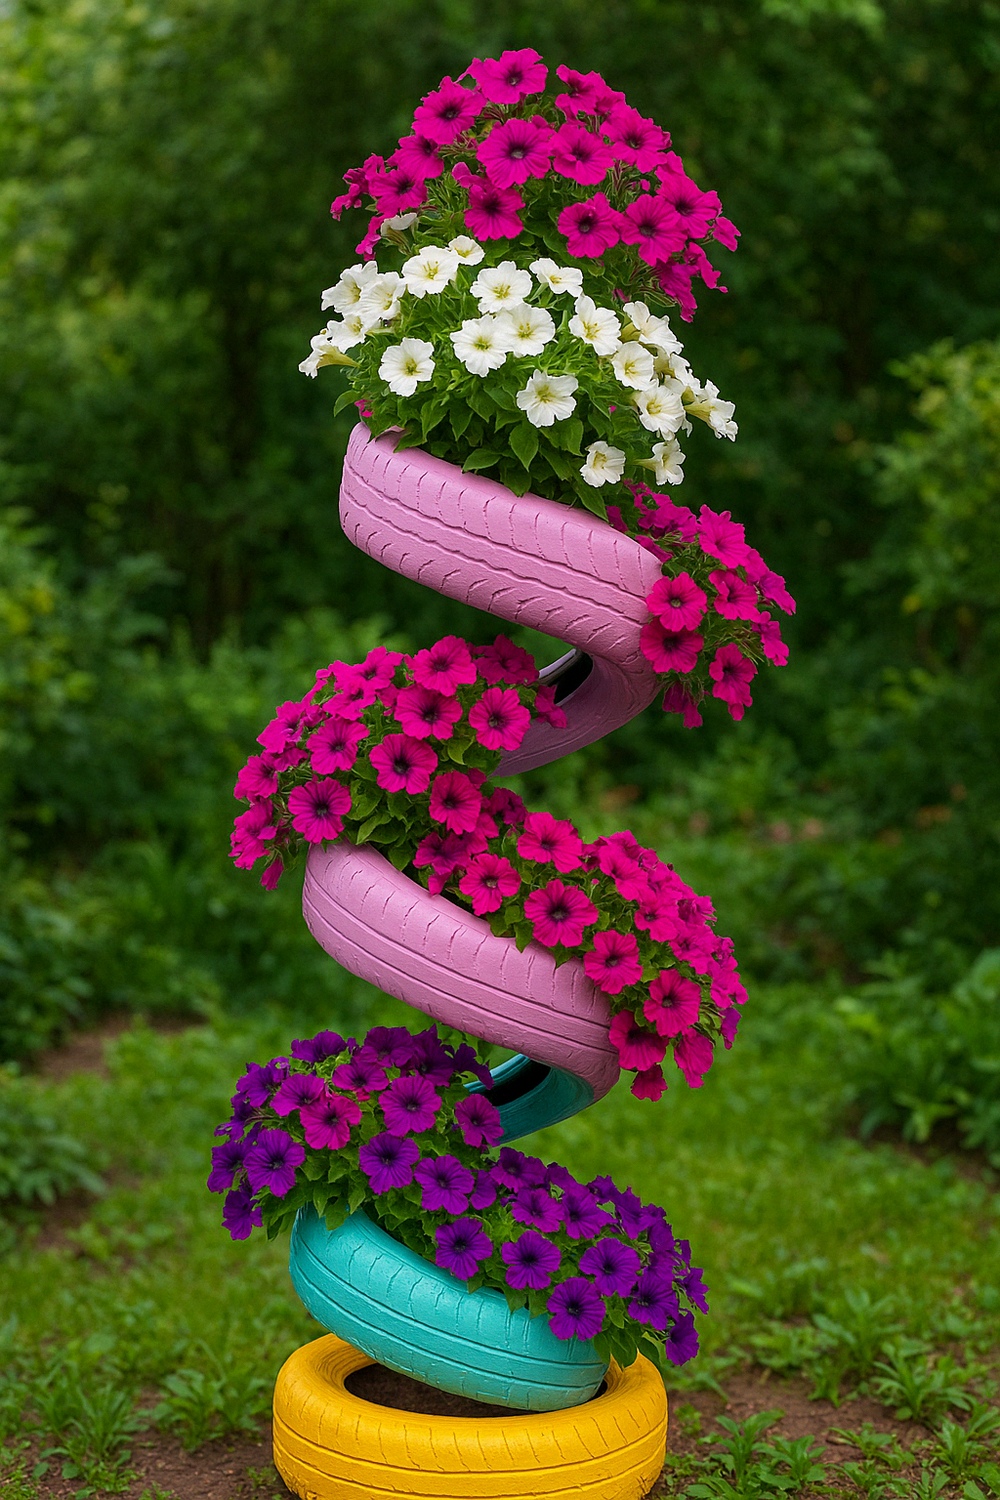
22. A Vertical Spiral of Colorful Petunia-Filled Tires
To create a stable tower of tires like this, the secret is in the stacking. Don’t just place them directly on top of each other. Instead, offset each tire by about a third of its diameter as you stack up. This creates that spiraling, stepped effect which provides pockets for planting. For stability in a tall stack (more than four tires), it’s a good idea to drive a sturdy metal stake or a piece of rebar down through the center of the whole tower and into the ground below.
⚠️ Real Talk
A vertical planter like this is a fantastic solution for small spaces. It allows you to pack a huge amount of color and life into a very small footprint. This idea works beautifully on a small patio, a balcony, or tucked into a tight corner of a garden bed. It draws the eye upward, creating a sense of height and drama. While the one shown here is quite tall, you could create a similar effect with just 3 or 4 tires, occupying a space no bigger than 3×3 feet.
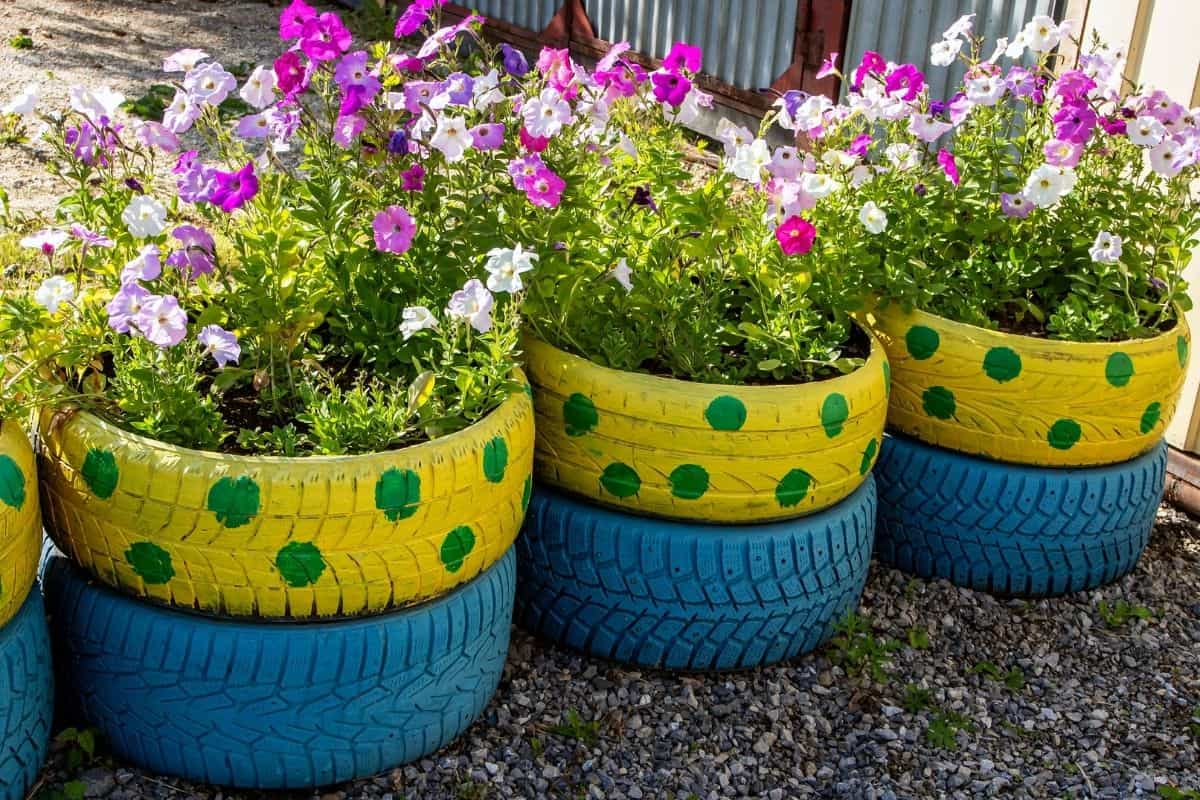
23. Stacked Blue and Yellow Planters with Green Polka Dots
This design is successful because it combines a few simple, powerful elements. The color palette is a classic split-complementary scheme—blue and yellow, with green as an accent—which is always vibrant and pleasing to the eye. The use of a pattern (the green polka dots on the yellow tire) adds a layer of playful detail that keeps the eye engaged. Finally, stacking the planters creates height and dimension, making it a much more substantial feature than a single planter would be on its own.
💸 Get This Look For Less
Creating this bold, multi-tiered look is surprisingly easy on the wallet. It’s a project that delivers a lot of visual bang for very little buck.
- Used Tires (2 per stack): $0
- Exterior Paint (Blue, Yellow, Green): $20 – $30
- Potting Soil & Flowers: $25 – $40
- TOTAL: $45 – $70 per stack
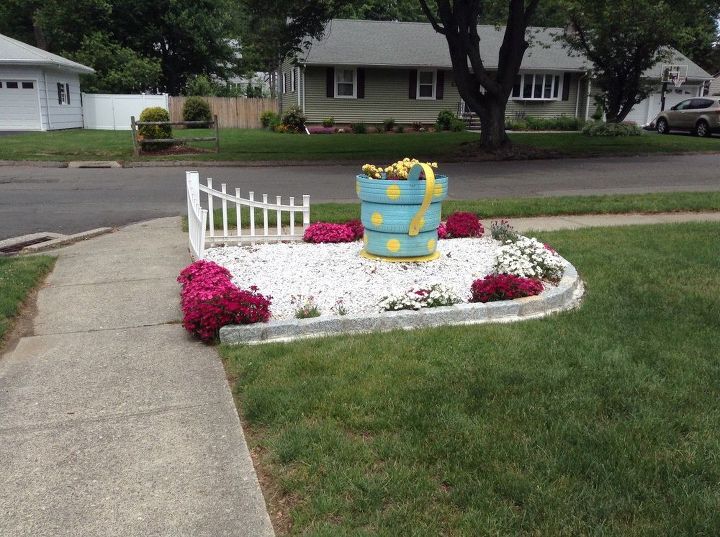
24. A Playful ‘Tipped Bucket’ Planter with Polka Dots
The single most important element here is the illusion of action. By arranging the cut tires to look like a tipped-over bucket or teacup spilling its contents, the entire scene comes to life. It’s not just a planter; it’s a tiny story. The white gravel acts as the ‘spilled’ liquid, with the flowers appearing to flow out from the container. This sense of movement and narrative is what makes it so charming and memorable. Compare this to the more static, upright teacup in Idea #21.
💡 Designer Tip
There’s a real trend in garden design right now towards creating playful, Instagrammable moments. People don’t just want a pretty garden; they want a garden that has personality and makes for a great photo. This ‘spilled planter’ idea is a perfect example. It’s whimsical, it’s clever, and it’s designed to make you smile. It reflects a shift away from formal, rigid garden layouts towards more relaxed, fun, and expressive outdoor spaces.
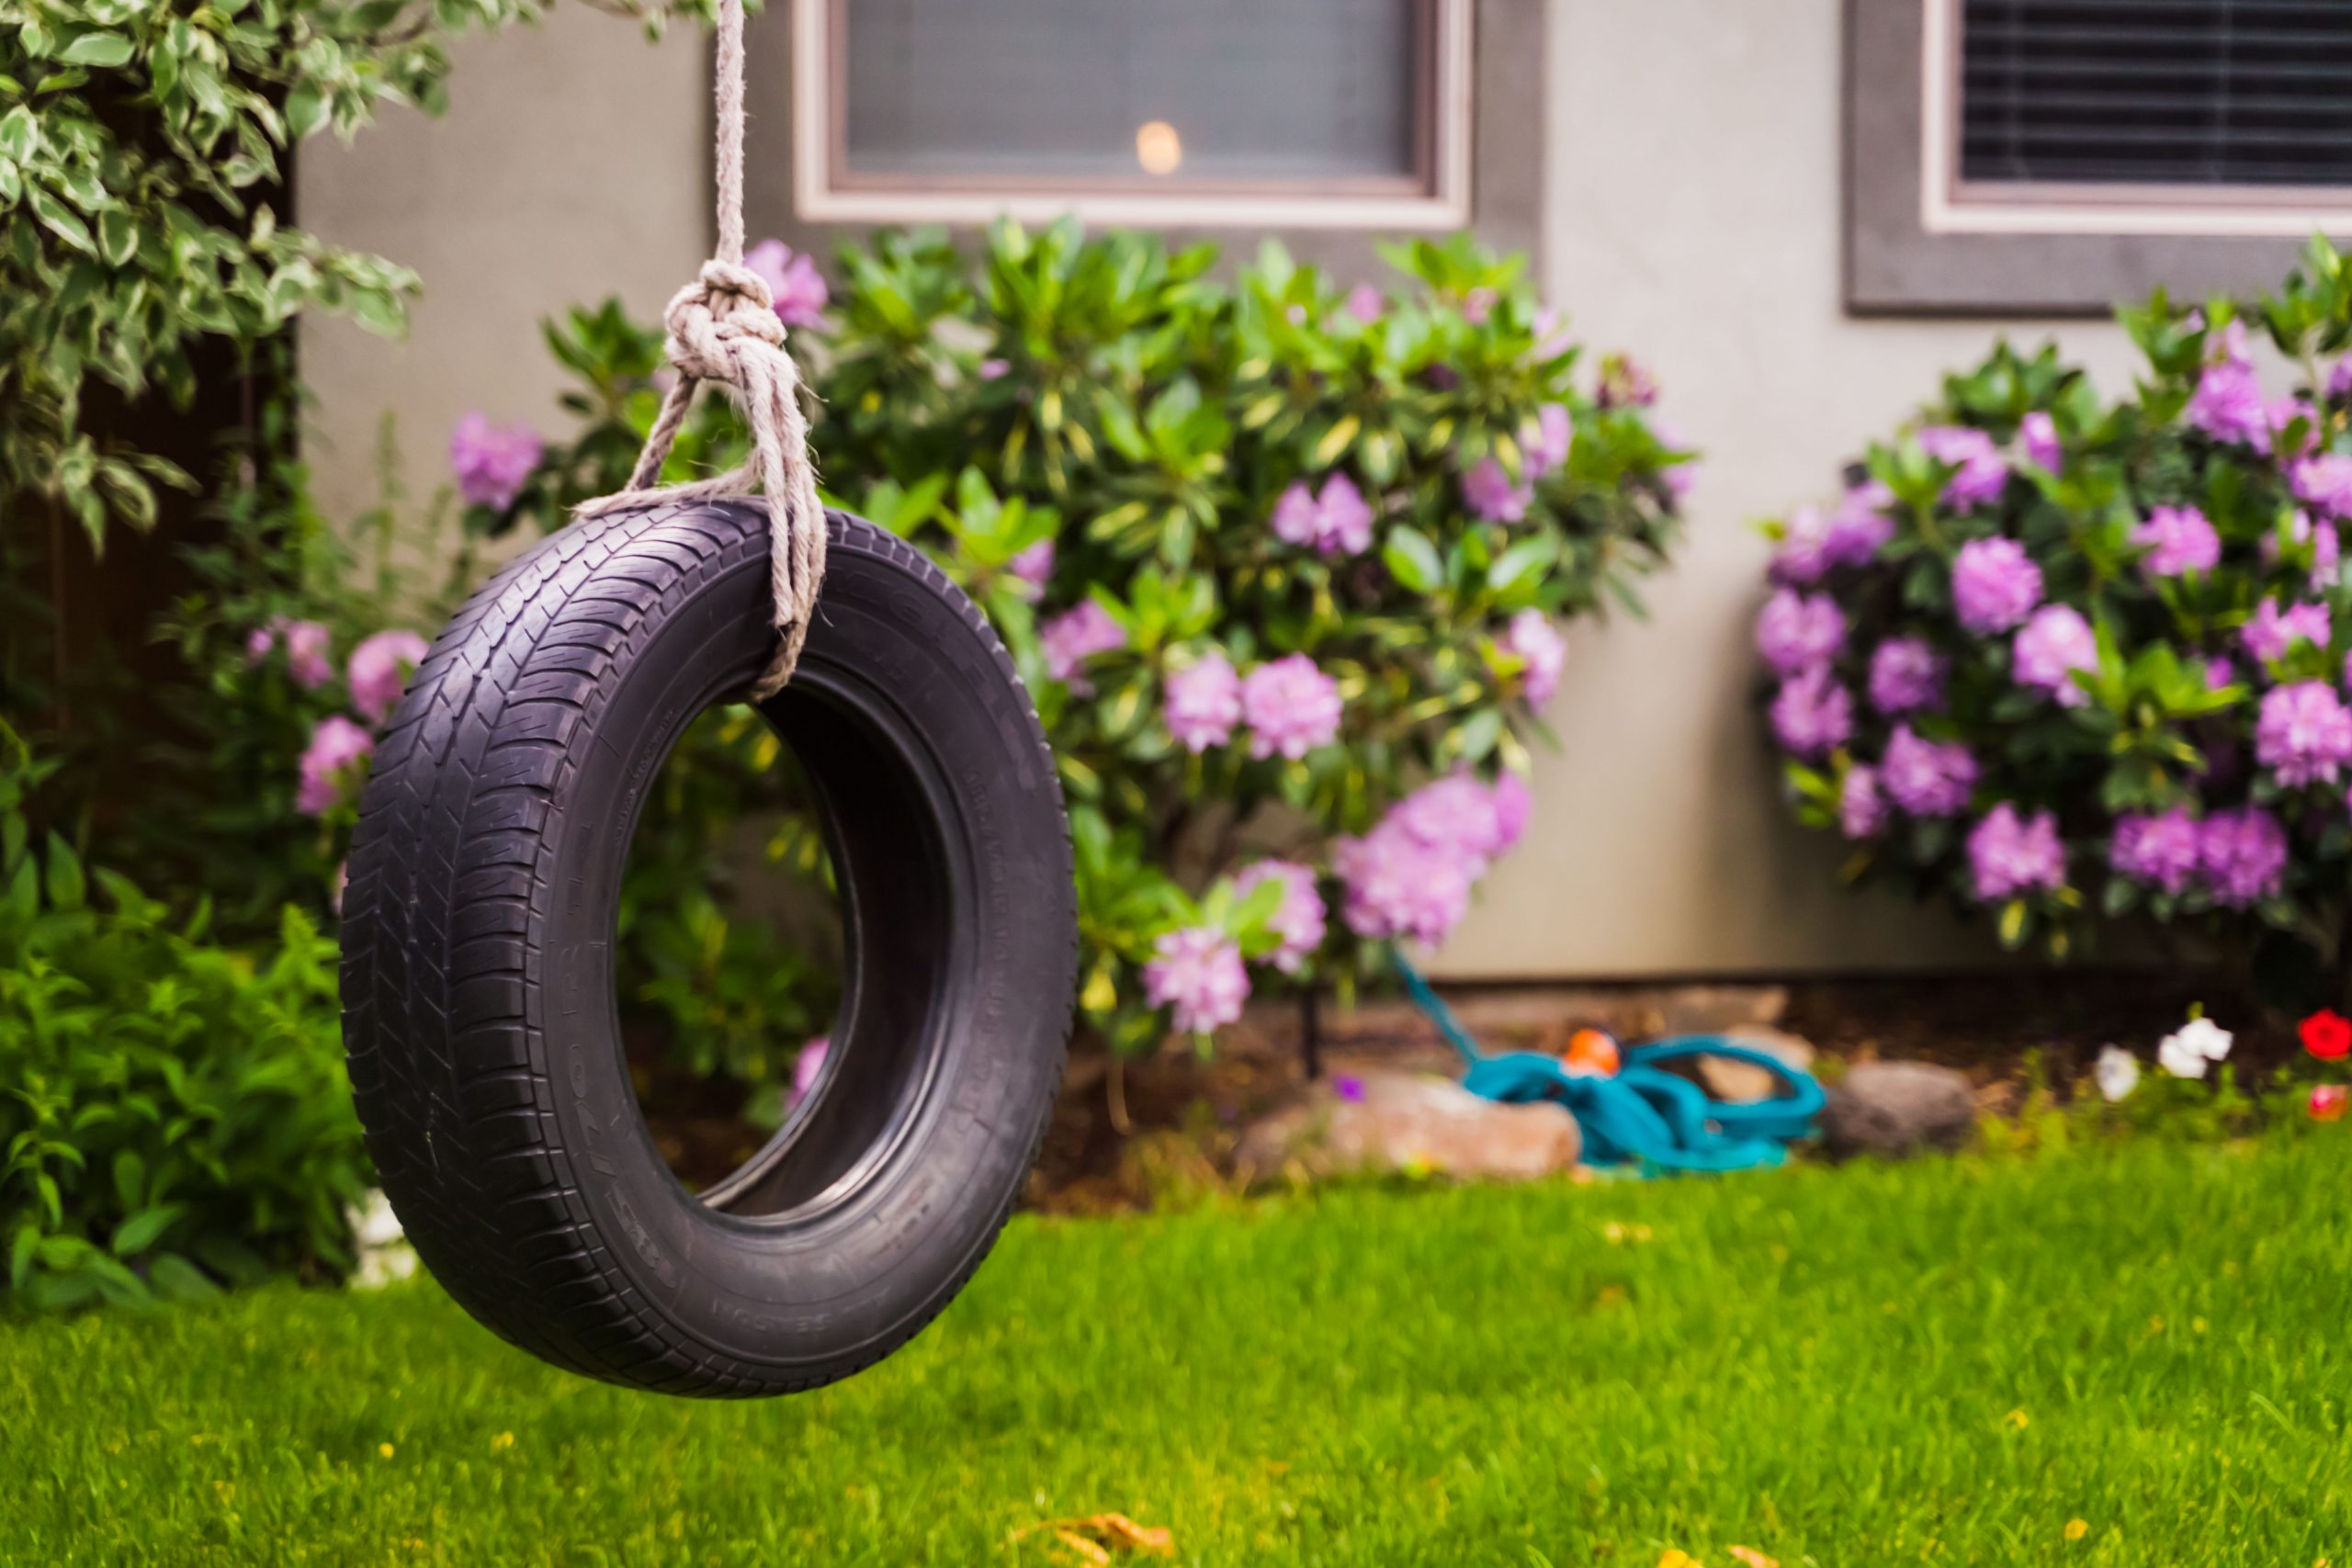
25. The Classic Tire Swing in a Lush Garden
This isn’t a planter, but it’s a classic recycled tire idea that captures a feeling of timeless, carefree joy. Its success lies in the simple, iconic silhouette of the black tire and rope against a lush, natural backdrop. The dark, solid circle of the tire provides a strong focal point and a pleasing geometric contrast to the soft, organic shapes of the leaves and pink flowers. It evokes a sense of nostalgia and simple pleasures, which is a powerful element in any family garden.
💰 Budget Breakdown
If you’re going to hang a tire swing, safety is the absolute number one priority. Don’t just toss a rope over any old branch. The tree branch must be healthy, solid hardwood (like oak or maple), at least 8 inches in diameter, and show no signs of cracking or disease. Inspect the branch and the rope regularly for wear and tear. Also, make sure you drill drainage holes in the bottom of the tire! Otherwise, you’ll have a permanently disgusting puddle of stagnant, mosquito-filled water after every rainstorm.
26. A Garden Turtle Sculpture Crafted from Painted Tires
The key to this creature’s charm is combining different materials. While the body is clearly a painted tire, the use of cut wooden shapes for the head and tail is what sells the ‘turtle’ illusion. This mix of materials adds a layer of crafty sophistication. It shows that you’re not just painting a tire; you’re sculpting with found objects. The thoughtful addition of the patterned shell and the distinctly shaped feet elevates it from a simple painted tire to a piece of folk art, much like the rooster in Idea #17.
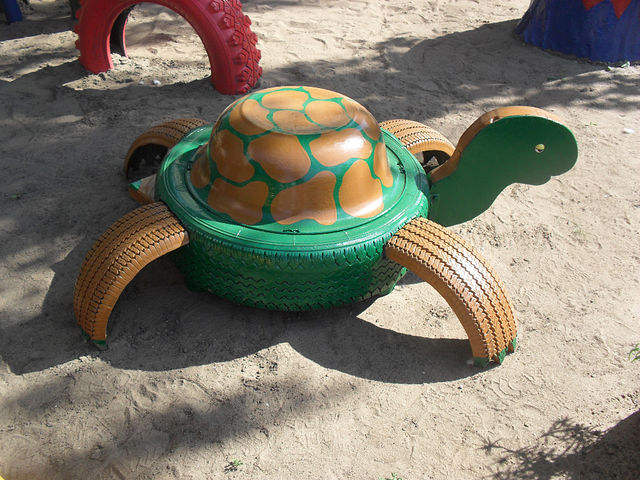
🔥 Trending Context
The formula for this garden creature is all about texture and form: 50% bold, painted shape (the main green tire ‘shell’) + 30% smaller, contrasting shapes (the brown tire-tread ‘legs’) + 20% sculpted details (the wooden head and tail). The different forms and materials all work together to create a convincing, if cartoonish, animal. You could apply this same math to create other animals, like a ladybug with a red tire body and black wooden head.
27. Bright Pink Teacup Planter with White Polka Dots
This design is pure, unapologetic fun, and it works because it leans into its own silliness. The electric pink color, the big, simple white polka dots, and the comically oversized teacup shape all scream ‘playful.’ There’s no attempt at naturalism or rustic charm here. It’s a bold, graphic statement. In a sea of green grass, this pop of color and shape is impossible to miss. It’s a garden decoration that refuses to be boring, and that confidence is exactly why it’s so appealing.
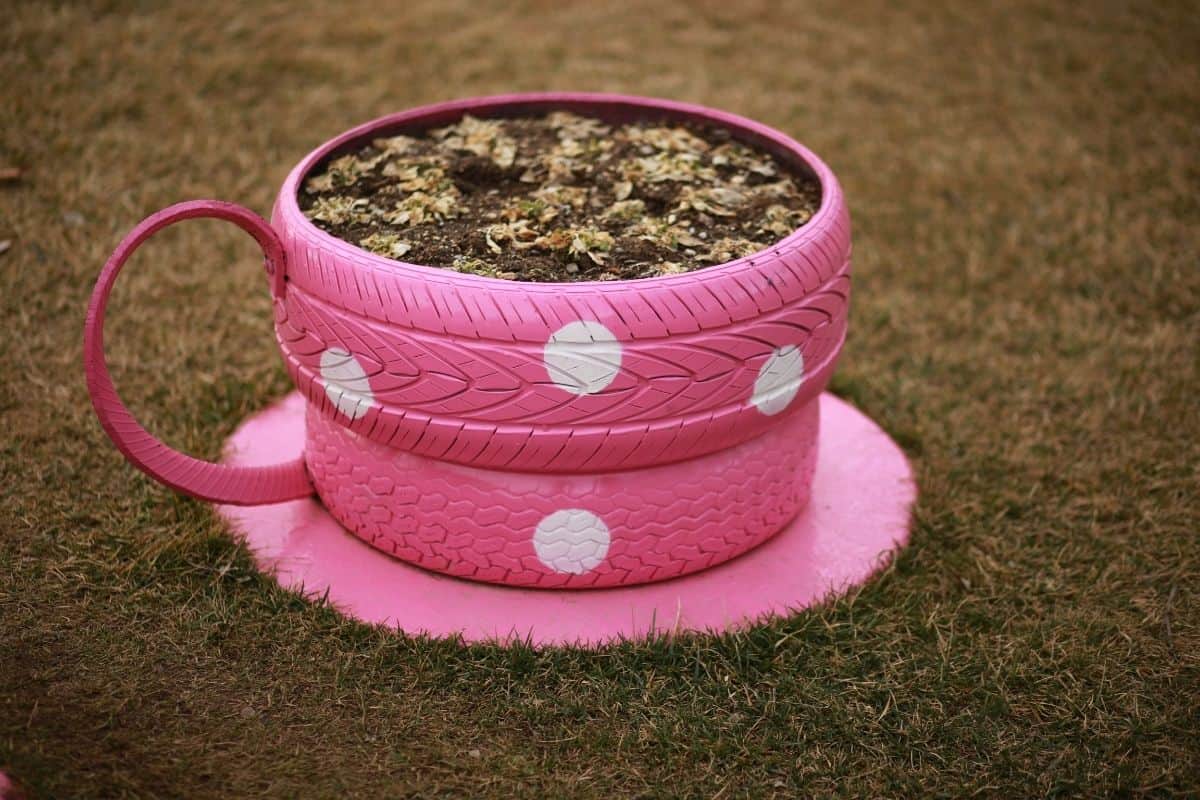
📐 Style Math
Thinking of making your own larger-than-life teacup? A quick pre-project checklist will save you a headache later:
- Secure Your Tires: Do you have three tires of roughly the same size? You’ll need two for the cup and one to cut up for the handle and saucer.
- Check Your Paint: Do you have an exterior primer and a vibrant, high-quality outdoor paint that will adhere well to rubber?
- Plan the Handle: How will you attach the handle piece to the cup? You’ll likely need to drill holes and use heavy-duty bolts to make it secure.
Ready to Get Your DIY On?
See? That old pile of rubber isn’t junk; it’s a garden waiting to happen. With a little bit of paint and a whole lot of imagination, you can create a feature that’s full of personality and charm. The best part about these projects is that there are no hard rules—so pick an idea that makes you smile and make it your own.
Feeling inspired? Go ahead and save your favorite ideas to your garden board on Pinterest. When you’re ready to start your project, you’ll know exactly where to find them.