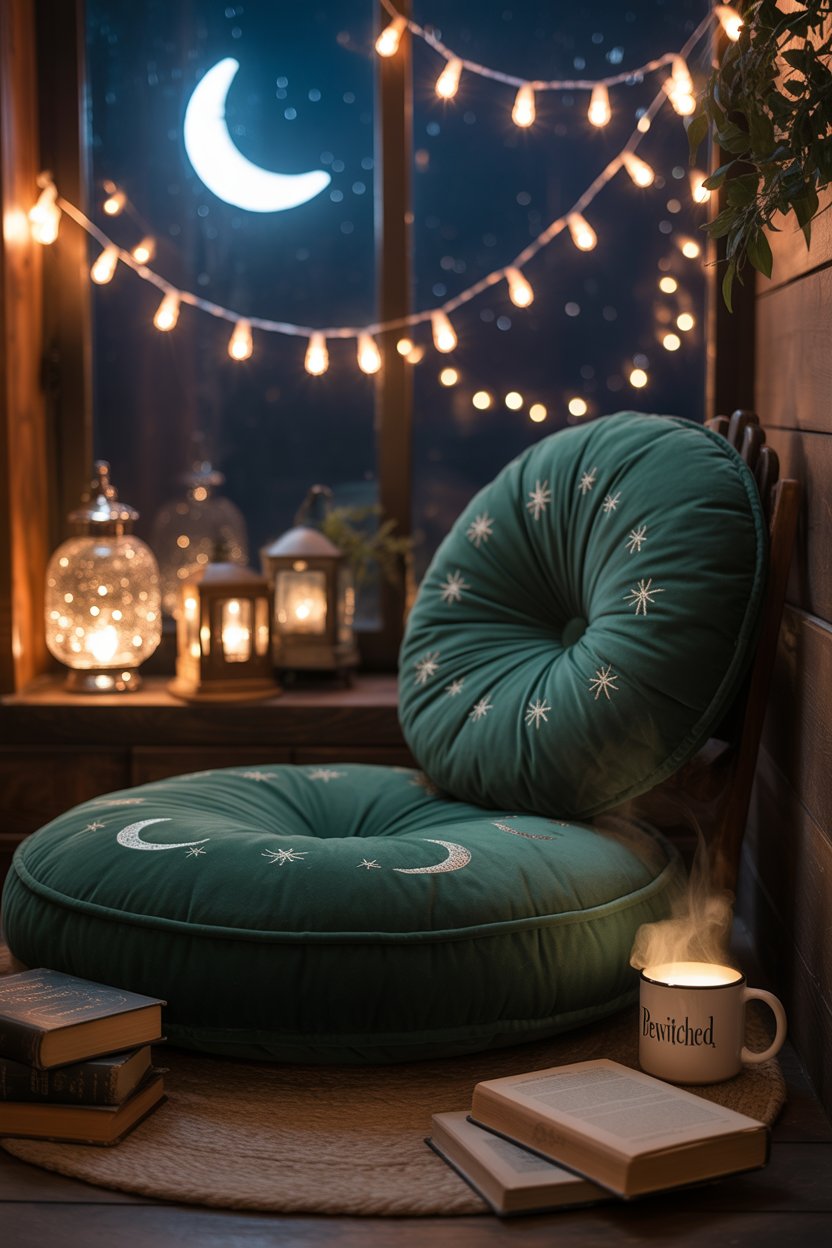
Still scrolling through Pinterest, overwhelmed by a sea of DIY Halloween decoration ideas? You save a pin here, a link there, but a clear plan for your own home never seems to materialize. It’s a classic case of inspiration overload, but this year, we’re cutting through the noise.
After filtering through hundreds of options, we narrowed it down to 32 incredible ideas that actually deliver. We’ve focused on looks you can create using accessible finds from places like Dollar Tree and Target, with projects ranging from a simple $10 craft to a full-yard display that might cost up to $500.
Inside, you’ll find 32 curated ideas covering every vibe from cute and playful to genuinely spooky and elegant. In 2026, the biggest trend is about creating a cohesive, almost cinematic story with your decor, not just placing random objects on the lawn. It’s about personal expression that goes beyond a single plastic skeleton.
And stay until the end — we break down the most common mistakes that can ruin these looks. 📌 Save this to Pinterest for later — you’ll want to revisit these ideas.
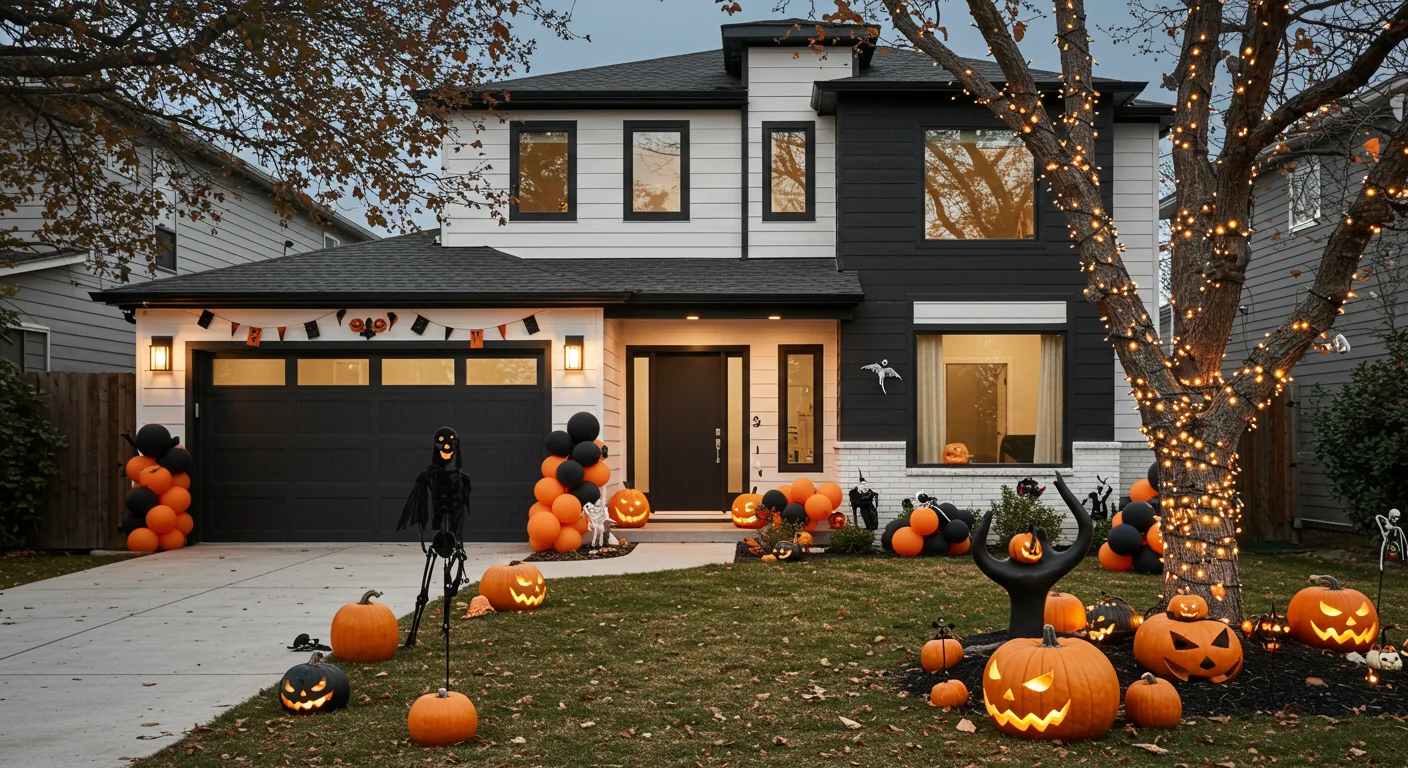
1. Modern House Facade with Black and Orange Decor
This look is so effective because it commits to a tight color palette. The design uses the home’s existing modern, neutral-colored facade as a canvas and strictly layers on black and orange. This color control prevents the numerous elements—balloons, jack-o’-lanterns, lights, and banners—from looking chaotic. The contrast between the bright, glowing orange and the deep black creates a classic Halloween vibe that feels both intentional and high-impact. It’s a masterclass in using repetition of color to unify a large-scale design.
🔧 How-To Brief
You don’t need a huge budget to get this modern, color-coordinated effect. Swap the large balloon arches for DIY balloon clusters made from packs from Dollar Tree ($1.25 each). Instead of dozens of real pumpkins, carve a few hero jack-o’-lanterns for the front porch and supplement with reusable foam pumpkins from Walmart or Target (around $5-$15 each) for the lawn. Black poster board can be used to create your own spooky banner, and a simple string of orange LED lights costs less than $20.
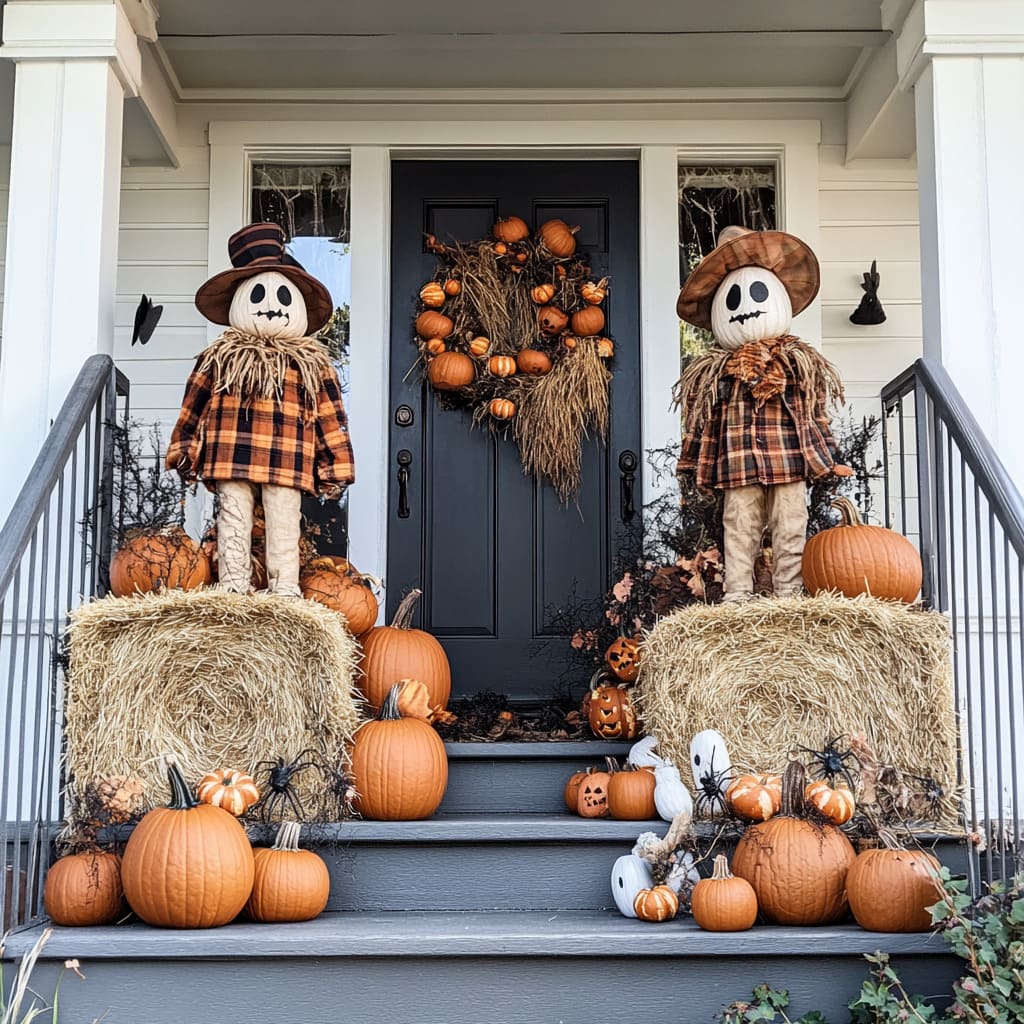
2. Hay Bale Scarecrows and Pumpkin Patch Porch
When creating a scene with figures like scarecrows, the key is to give them a sense of life and interaction. Don’t just stand them straight up; pose them. Have one scarecrow slightly turned toward the other, as if in conversation. Angle their pumpkin heads and adjust their plaid shirts to look natural and a bit rumpled. This subtle posing is what elevates the display from a simple collection of objects to a charming, narrative scene that captures the imagination of visitors and trick-or-treaters alike.
⚠️ Real Talk
that truly makes this design work is the use of hay bales as platforms. Without them, the scarecrows and pumpkins would sit low to the ground, losing their presence and feeling cluttered. The hay bales introduce verticality and create distinct zones, turning a simple porch into a multi-level stage. This elevation makes the entire arrangement feel more deliberate, substantial, and visually interesting from the street. It’s the structural element that holds the entire harvest theme together.
3. Ethereal Ghost Circle with Technicolor Lighting
Create your own ghostly gathering in about an hour with minimal materials.
- Gather 5-7 garden stakes or tall sticks and arrange them in a circle in your yard.
- Place a foam ball on top of each stake to create the head shape.
- Drape a large, sheer white sheet or tablecloth over each stake, letting it flow to the ground.
- Secure the fabric around the “neck” under the foam ball with clear fishing line or a zip tie.
- Pose the “arms” of the ghosts so they appear to be holding hands, using safety pins to connect the fabric.
- Place colored outdoor floodlights (like the red and blue shown here) at the base, aimed up at the figures.
This simple project costs less than $50 for the fabric and lights.
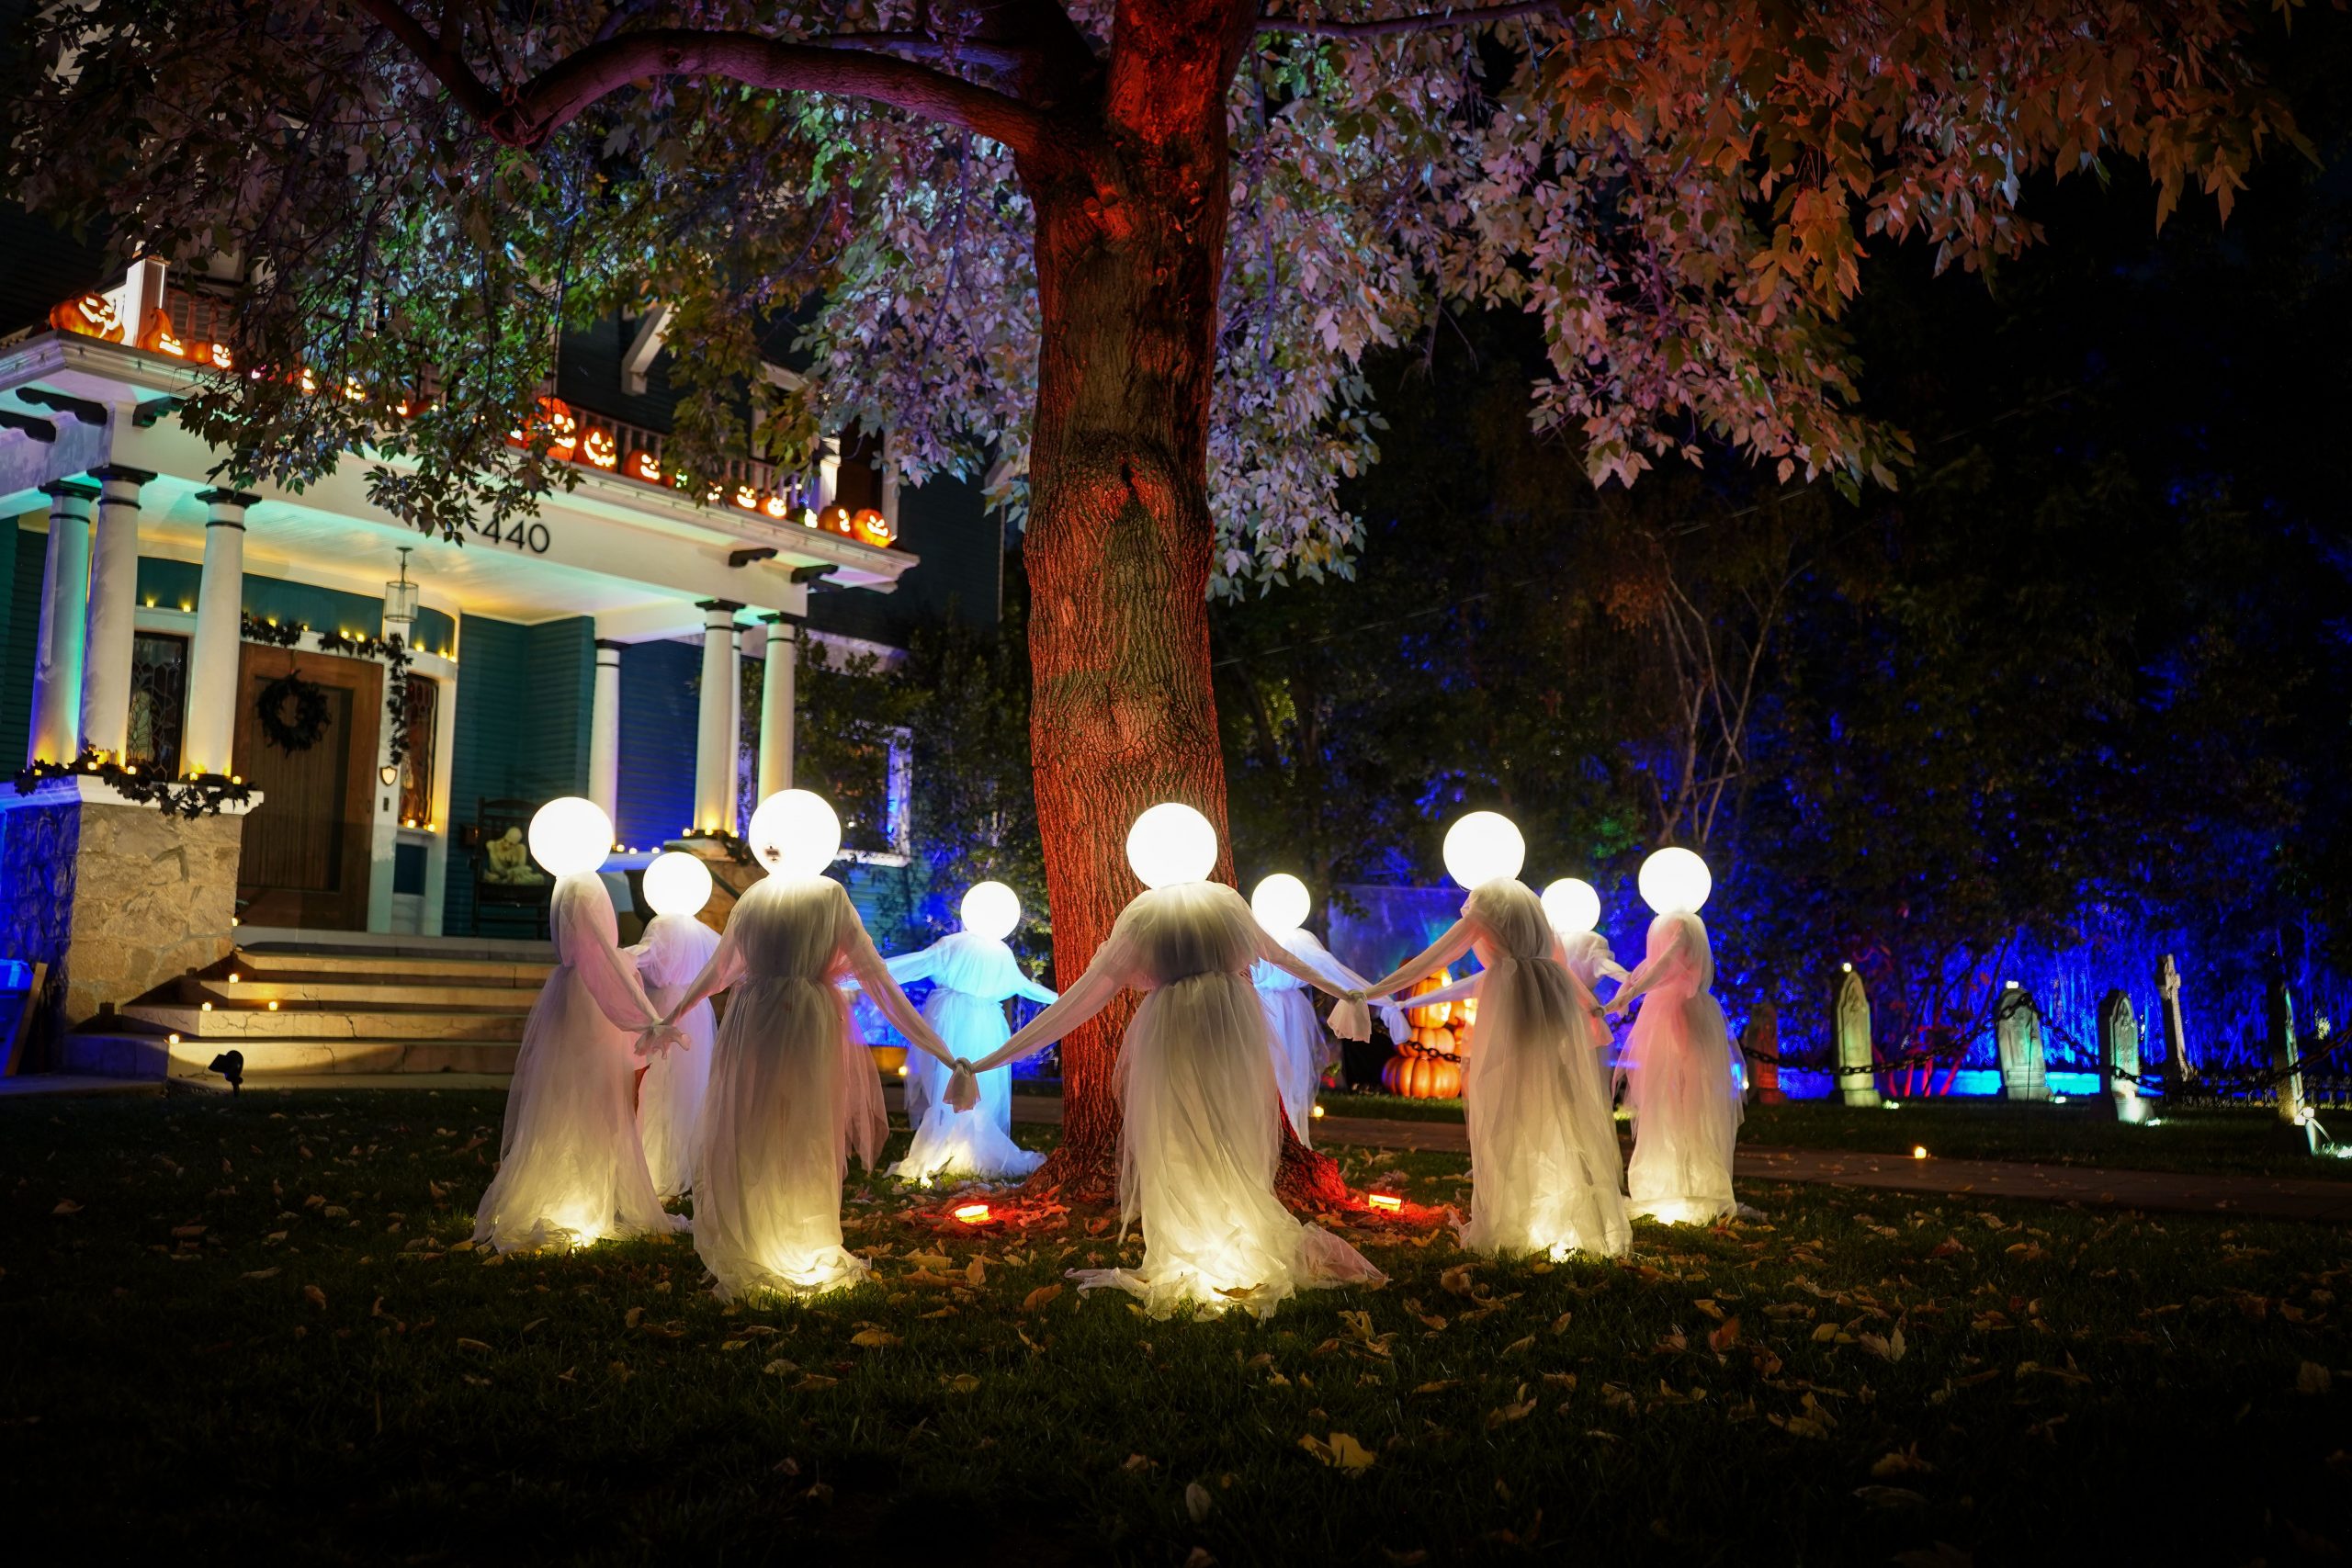
📐 Style Math
A vibrant, multi-colored lighting setup like this is stunning, but it can be tricky to get right. The key is separation. If the red, blue, and green lights overlap too much, you’ll end up with a muddy, washed-out look. Position your light sources carefully to illuminate specific zones: red on the tree, blue on the porch, green on the foliage. Use spotlights with a narrow beam to prevent color bleed. Also, remember that this effect is entirely dependent on darkness; in a well-lit neighborhood, the impact will be significantly reduced.
4. Humorous Halloween Scene: Skeleton Mowing the Lawn
This playful tableau follows a simple visual recipe: 50% spooky centerpiece + 30% ambient lighting + 20% natural texture. The skeleton and his green lawnmower are the undeniable star of the show. The warm string lights soften the spookiness and add a magical glow, making it festive rather than frightening. Finally, the bed of real pumpkins and scattered autumn leaves provides an earthy, textural base that grounds the scene. You could swap the lawnmower for a wheelbarrow or a grill and still achieve the same charming effect.
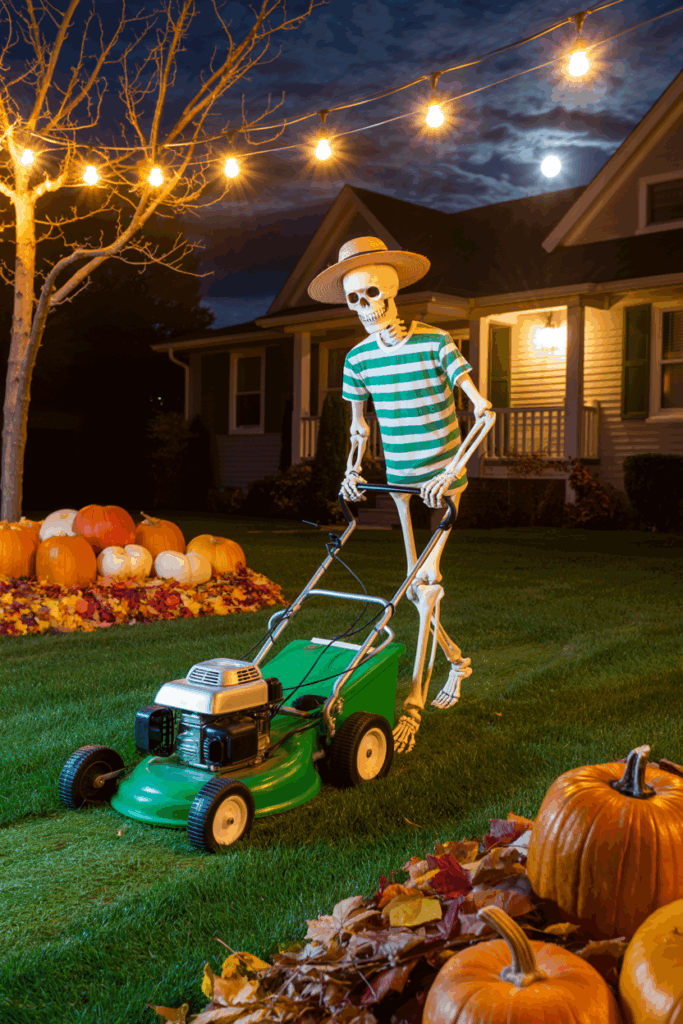
🧹 Maintenance Reality
While a joy to look at, a setup involving a real lawnmower and loose decorative elements requires some upkeep. Fallen leaves can quickly cover your pumpkin pile, especially after a windy or rainy night, so you may need to tidy up the arrangement every few days to keep it looking sharp. Be mindful of the string lights draped on the ground; ensure they are rated for outdoor use and placed where they won’t be a tripping hazard or get tangled in the actual lawnmower you use for yard work.
5. Menacing Scarecrow and Skeleton Yard Crew
The towering scarecrow figure with its branch-like arms is the single element that sets the tone for this entire yard. While the skeletons are a fun addition, the scarecrow provides the scale, texture, and eerie silhouette that command attention from the street. Its height creates a focal point that the other elements are arranged around. If you removed it, you’d be left with a standard skeleton display. With it, you have a story—a creepy guardian watching over its bony minions.
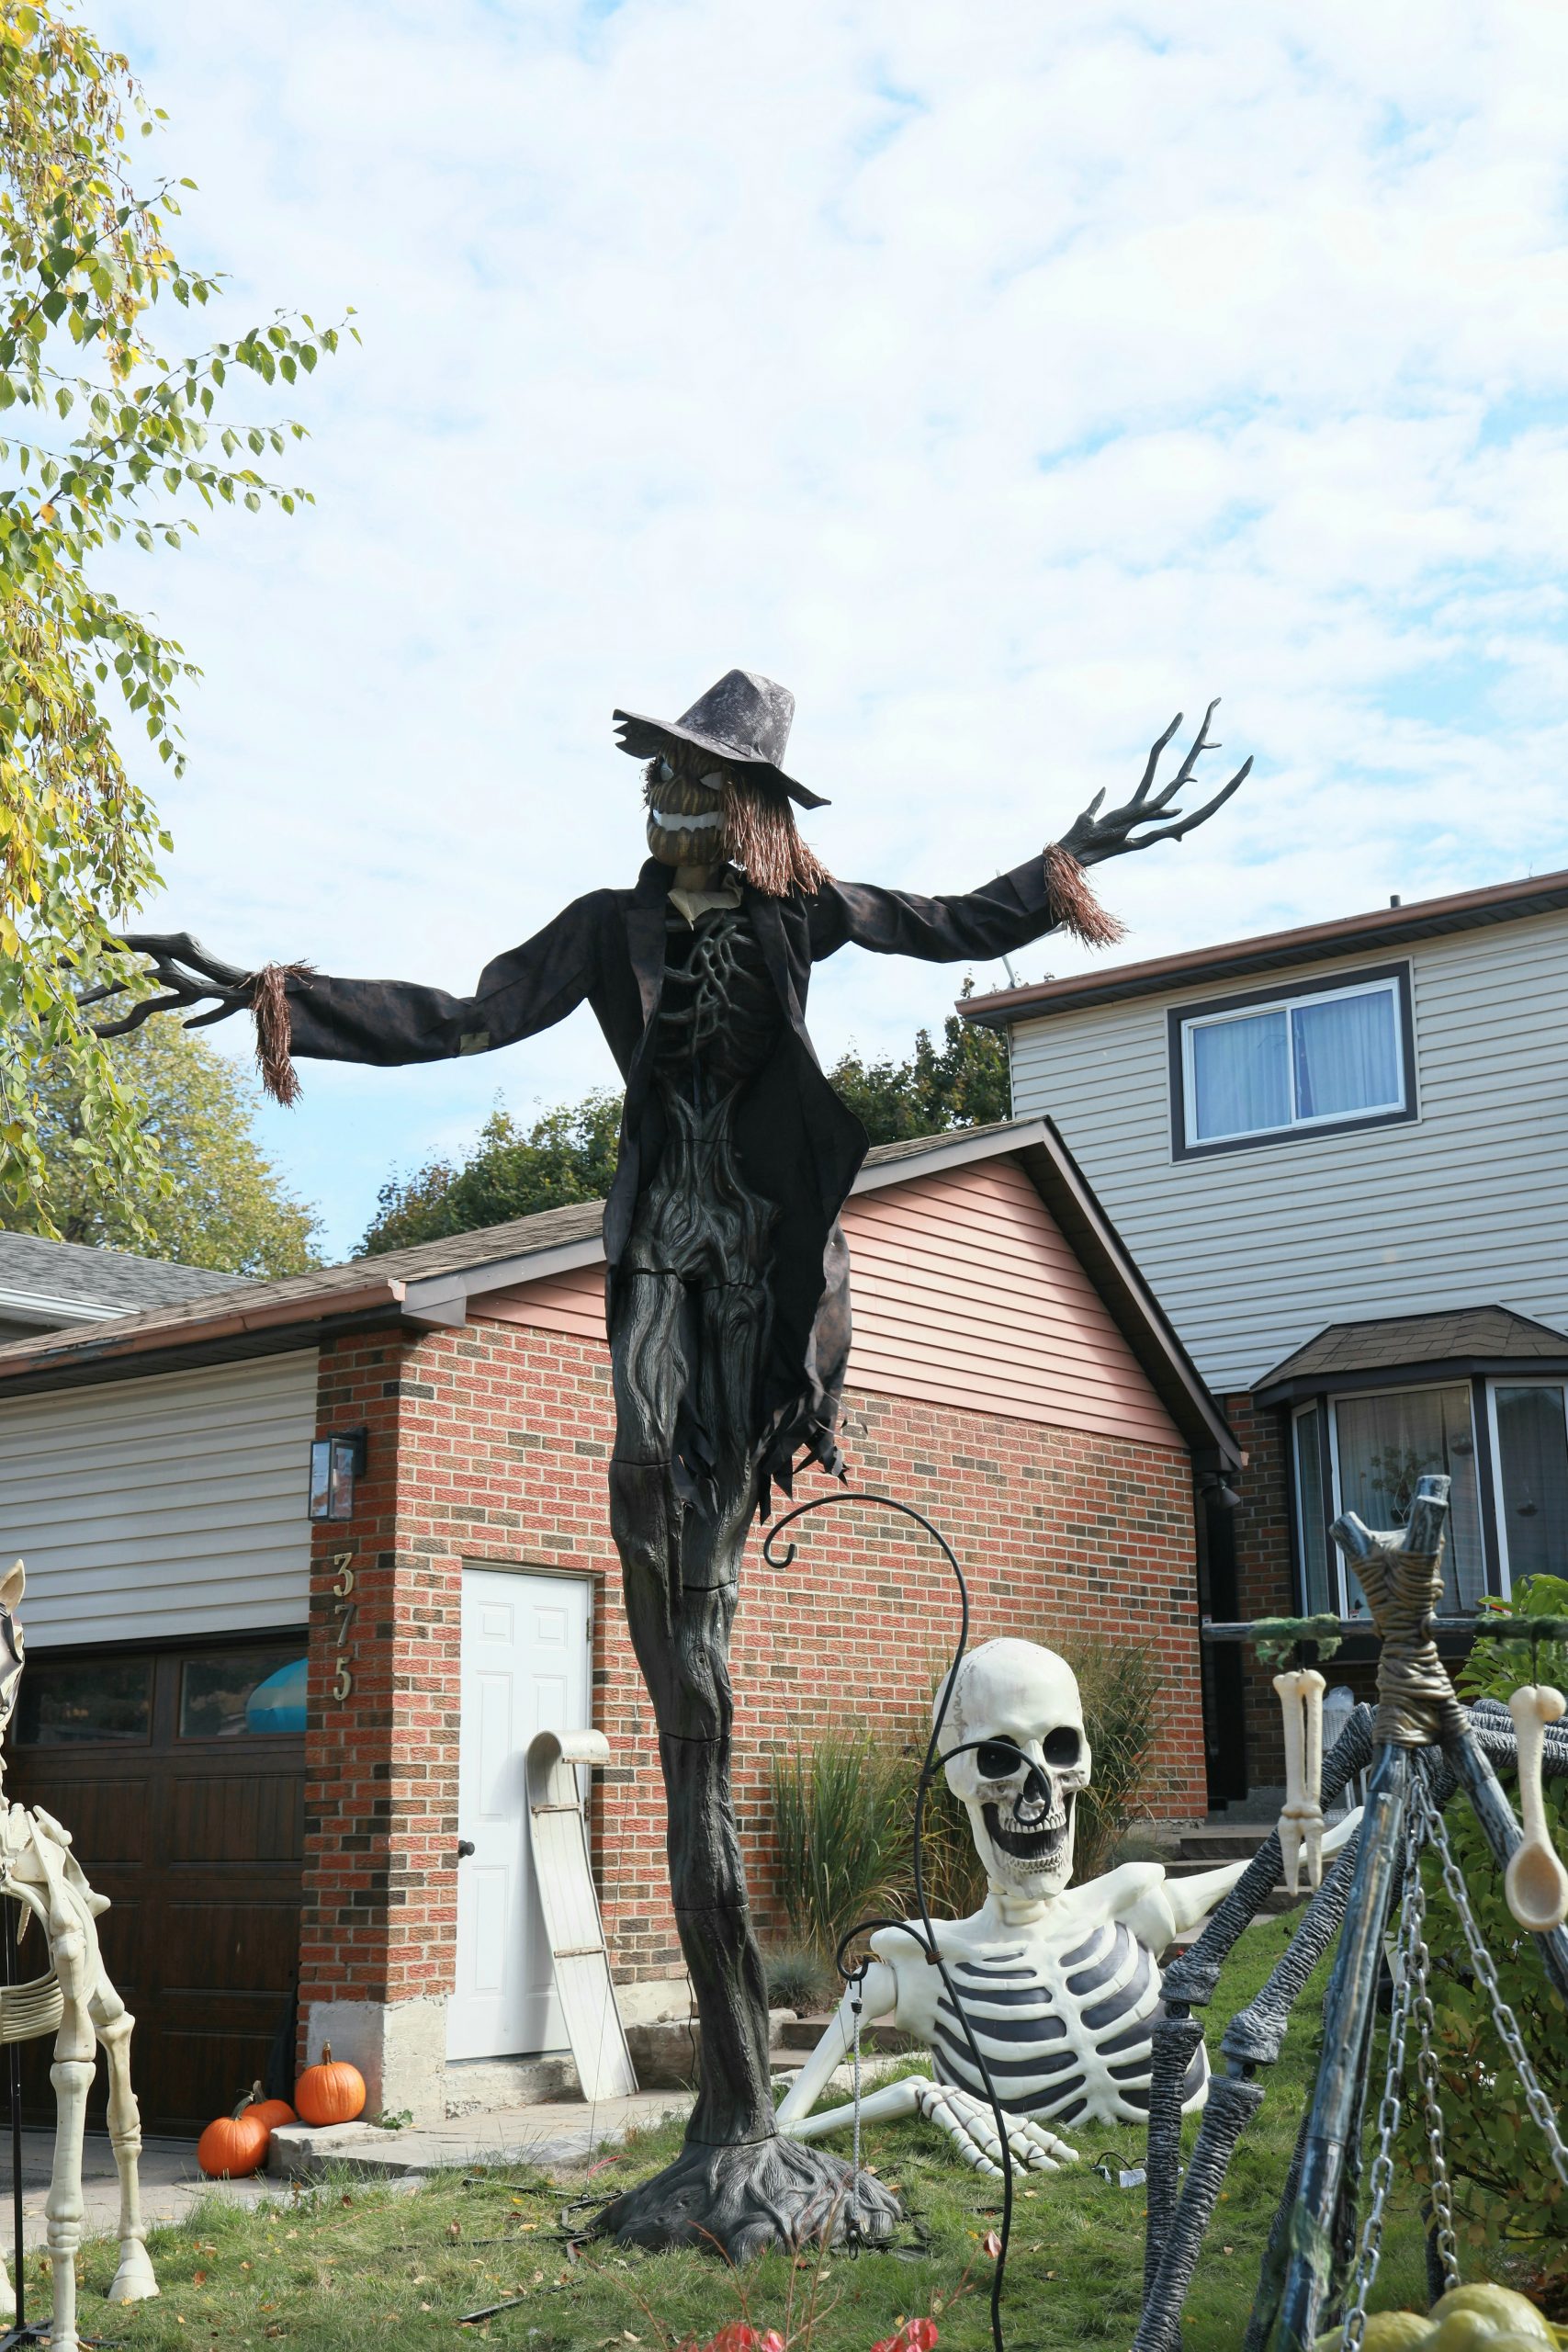
✅ Before You Start
Before you commit to a large-scale yard display like this, run through a quick checklist:
- Measure Your Space: Do you have at least 10×10 feet of open lawn space to create this scene without it feeling cramped?
- Check Your Anchors: The tall scarecrow will act like a sail in the wind. Do you have a plan to securely anchor it to the ground with rebar or heavy-duty stakes to prevent it from toppling over?
- Power Source: The glowing pumpkins need electricity. Is there a convenient outdoor outlet, or will you need to run a visible and potentially hazardous extension cord across the lawn?
- Neighborhood Vibe: Is your neighborhood generally receptive to spookier, more menacing decor, or is a lighter, more playful theme a better fit? Compare this to the friendlier feel of Idea #2.
6. Friendly Googly Eye Monster Front Door
For a project this simple, the secret is in the execution. To make your googly eyes look perfectly round and professional, don’t try to cut them freehand from poster board. Instead, use everyday household items as templates. Trace a large dinner plate for the white part and a smaller saucer or bowl for the black pupil. This ensures clean, perfect circles. For outdoor use, consider using white and black Coroplast (corrugated plastic) from a craft store, which will hold up to rain far better than paper products.
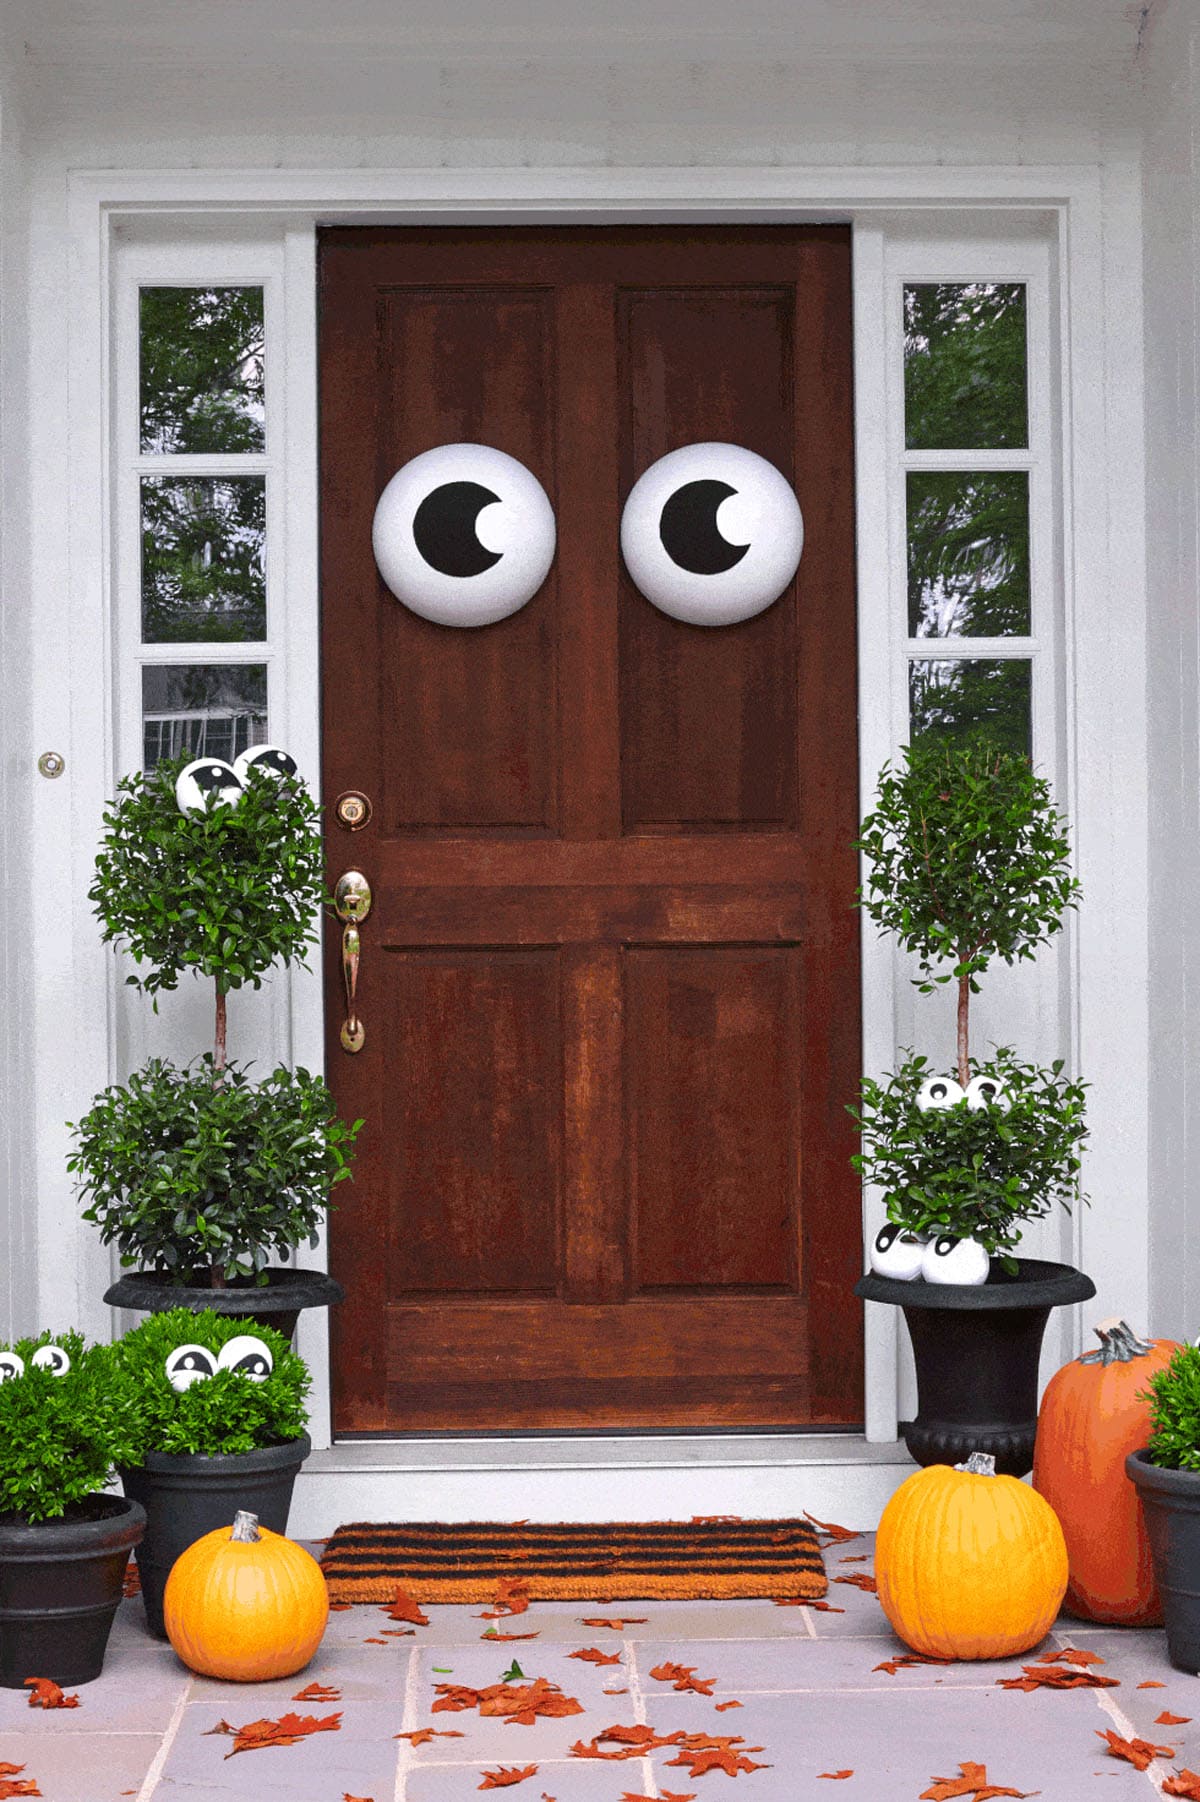
🎯 What Makes It Work
This idea is brilliant because of its simplicity and character. It works by using the principle of anthropomorphism—giving human-like qualities to an inanimate object. The front door is instantly transformed into a face, creating an immediate, friendly connection with anyone who approaches. The scattered pumpkins and potted plants with their own tiny eyes enhance the playful narrative, making it feel like a whole family of charming monsters has taken up residence on your porch. It’s effective because it’s not just decoration; it’s storytelling.
7. Classic Carved Pumpkins and Cobwebs on a Brick Porch
This traditional approach works beautifully on homes with existing architectural texture, like these brick steps and ledges. The idea is best suited for a porch or entryway with multiple levels, allowing for a cascading display of pumpkins. You need a space with at least 3-4 steps or ledges to create the sense of depth and abundance. If your porch is a single level, you can recreate this look by using crates or hay bales to build height, similar to the staging seen in Idea #2.
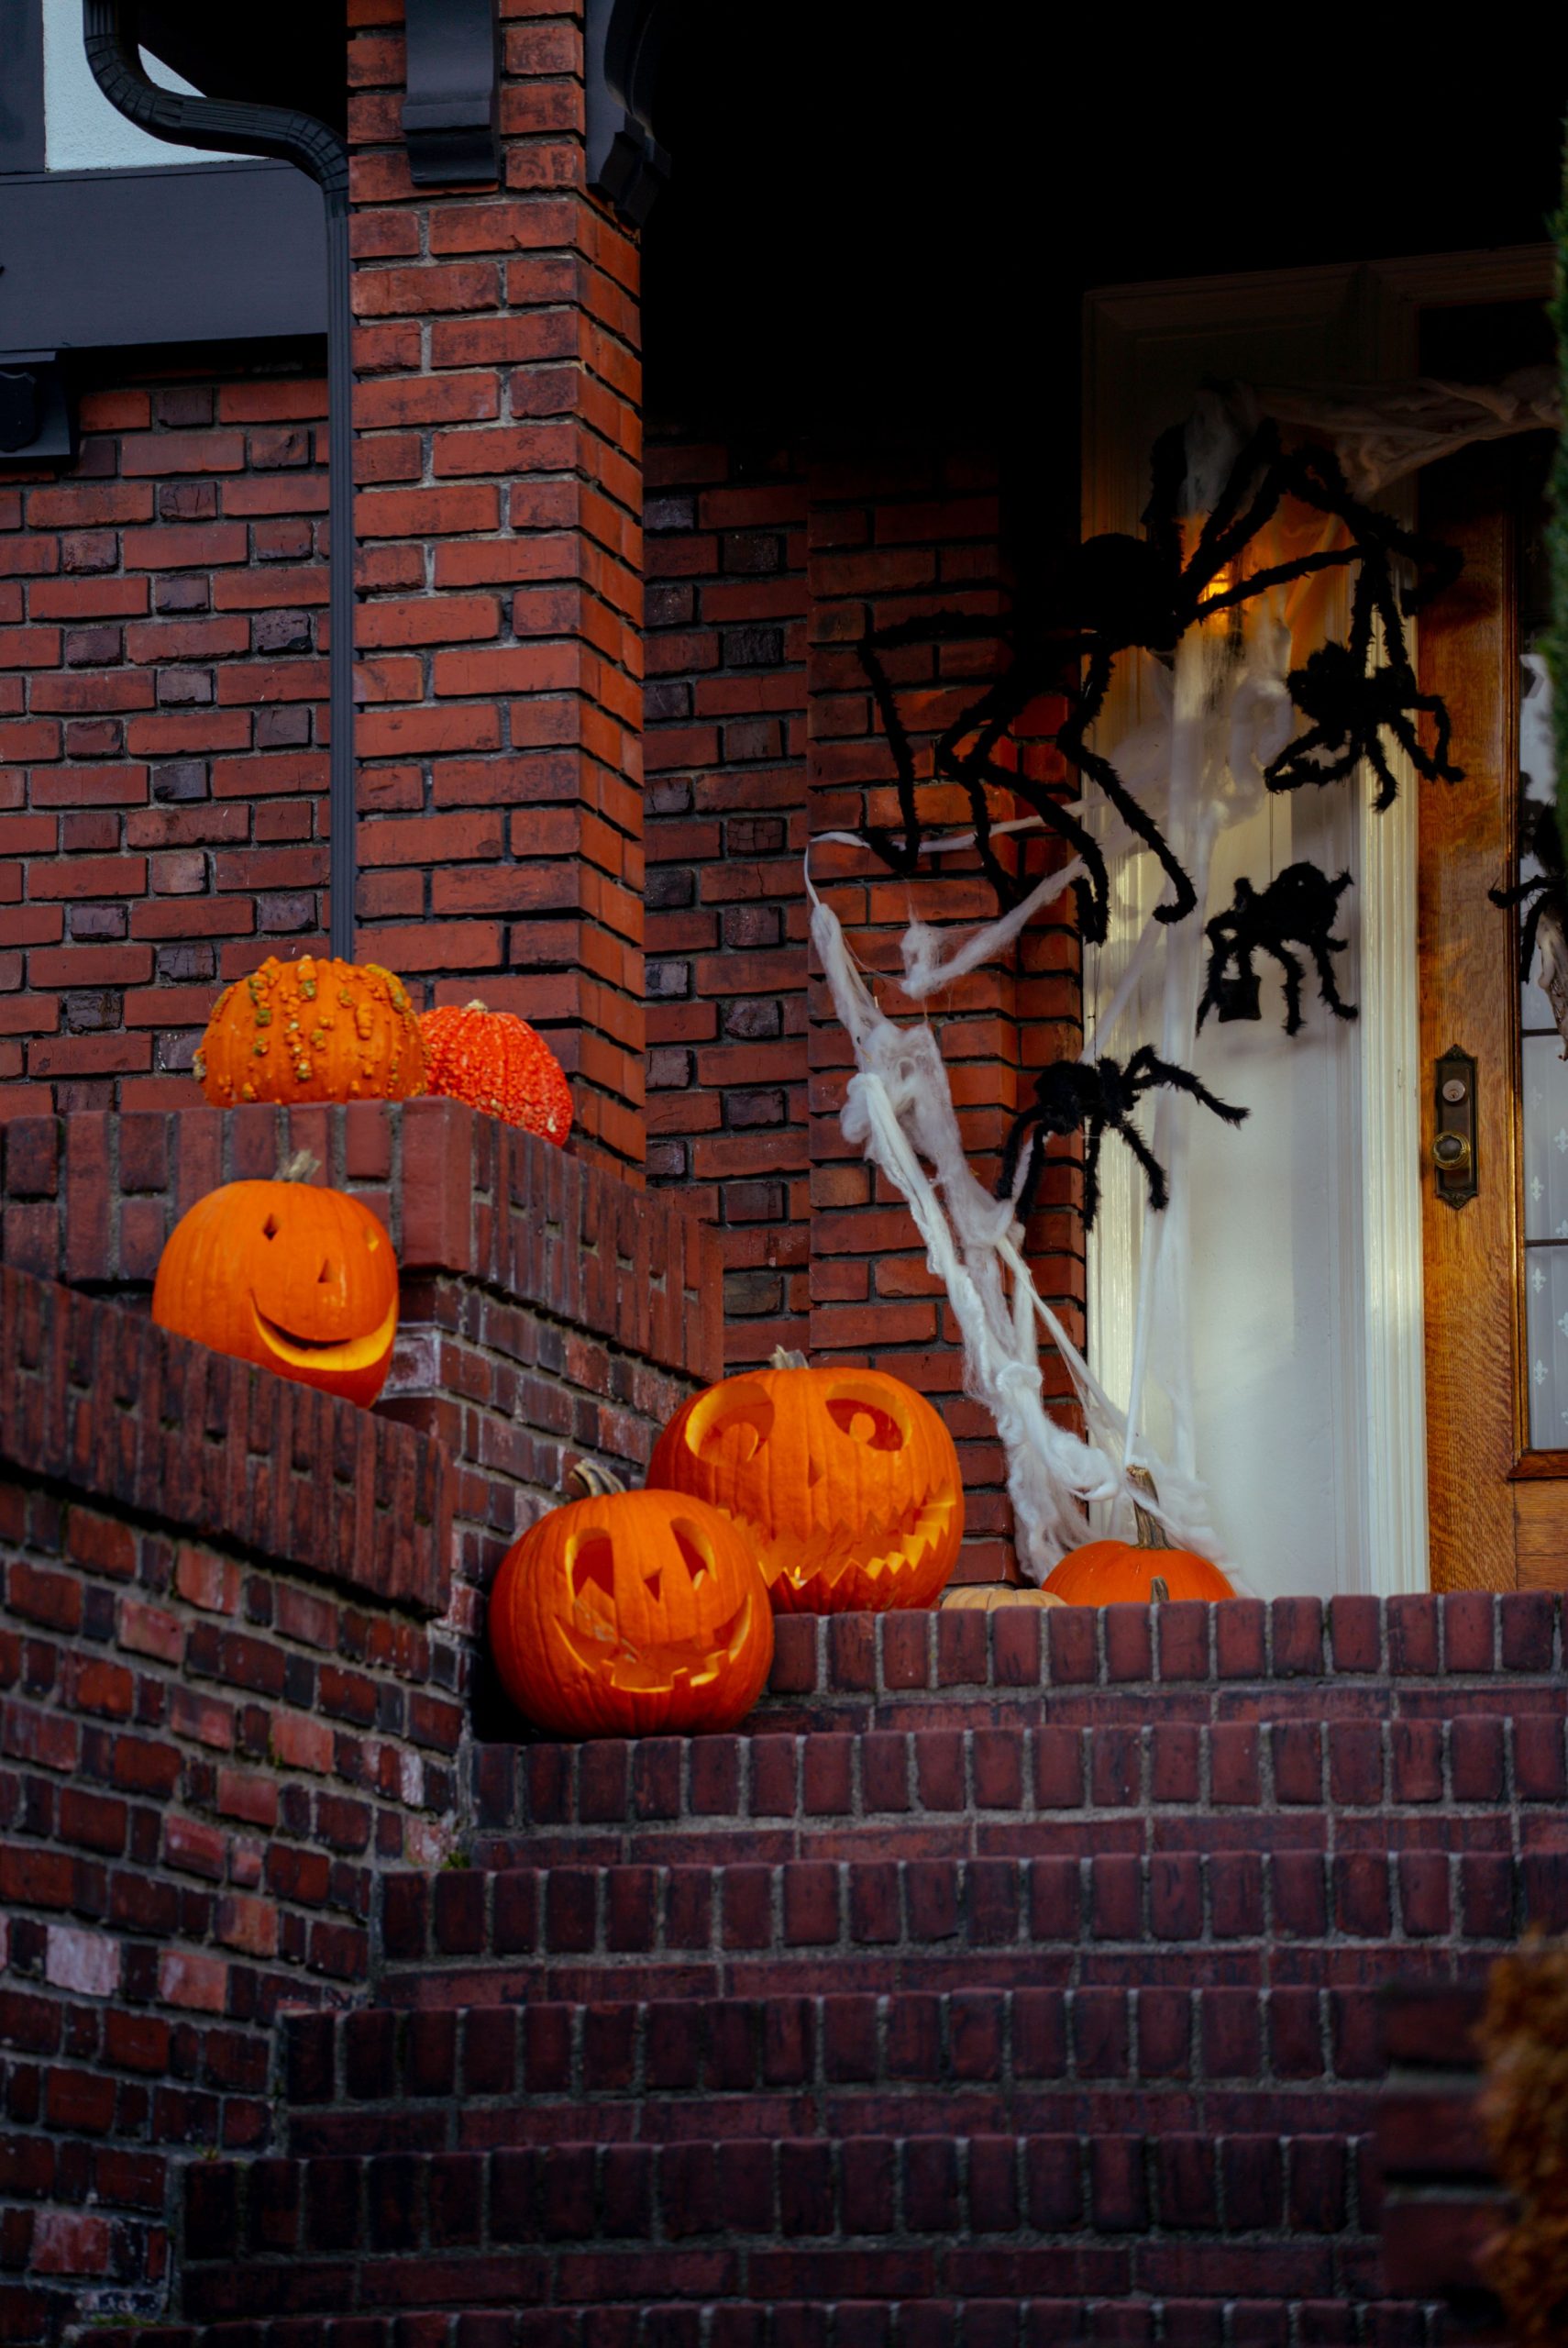
⭐ The One Thing
In an era of inflatables and high-tech projections, there’s a growing appreciation for classic, hands-on Halloween decorating. This look taps into a sense of nostalgia and tradition. Carving real pumpkins, stretching faux cobwebs, and arranging gourds is a sensory, family-friendly activity. On Pinterest and Instagram, authenticity is trending, and a display like this, with its charming imperfections and glowing, fire-lit pumpkins, feels more personal and grounded than a store-bought, mass-produced kit. It’s a return to the roots of Halloween.
8. Illuminated Porch with Inflatable Ghosts and Drapery
Creating this glowing ghost gallery is more accessible than it looks. Here’s a potential cost breakdown:
- Main Inflatables: Two or three inflatable ghosts with internal lighting can range from $30 – $80 each.
- Lighting: Extra strings of orange or warm white LED lights will be about $15 – $30.
- Textiles: Sheer white fabric for draping is inexpensive. Expect to pay $10 – $20 for several yards from a fabric store.
- Decor/Accessories: Spider cutouts, a door wreath, and other small touches can be found at Dollar Tree for around $10 – $15 total.
- TOTAL: $125 – $285
Budget alternative: Skip the large inflatables and create ghost figures using white sheets, balloons, and string lights for a similar glowing effect, bringing the total cost under $50.
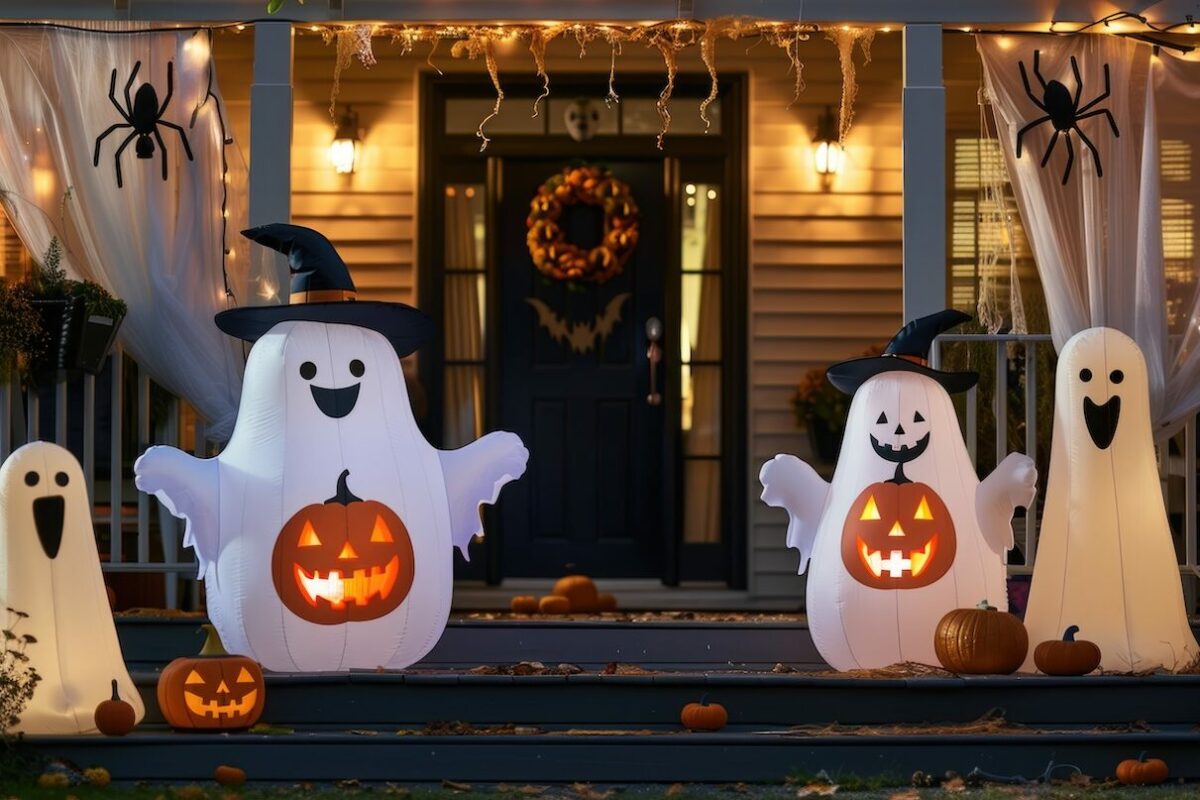
💸 Get This Look For Less
Inflatable decorations are incredibly popular for their big impact and easy setup, but they come with a practical downside: they require a constant power source. This means you’ll have a fan running 24/7 (or whenever they are inflated), which can contribute to your electricity bill and create a low, humming noise. Also, be prepared for them to deflate in a power outage. The sheer white drapery is beautiful but can be a hazard in windy or rainy weather if not secured very tightly to the porch posts.
9. Neon Green Skeleton Scene with Glowing Fish Bones
The power of this design lies in its bold, monochromatic color scheme. By drenching the entire scene—skeletons, fish bones, trees, and grass—in a single, vibrant neon green, the collection of disparate objects becomes a cohesive and otherworldly installation. The green light flattens the dimension and focuses the viewer’s attention on the silhouettes, making them appear to glow from within. This is a fantastic example of how strategic lighting can be a primary design element, not just an afterthought.
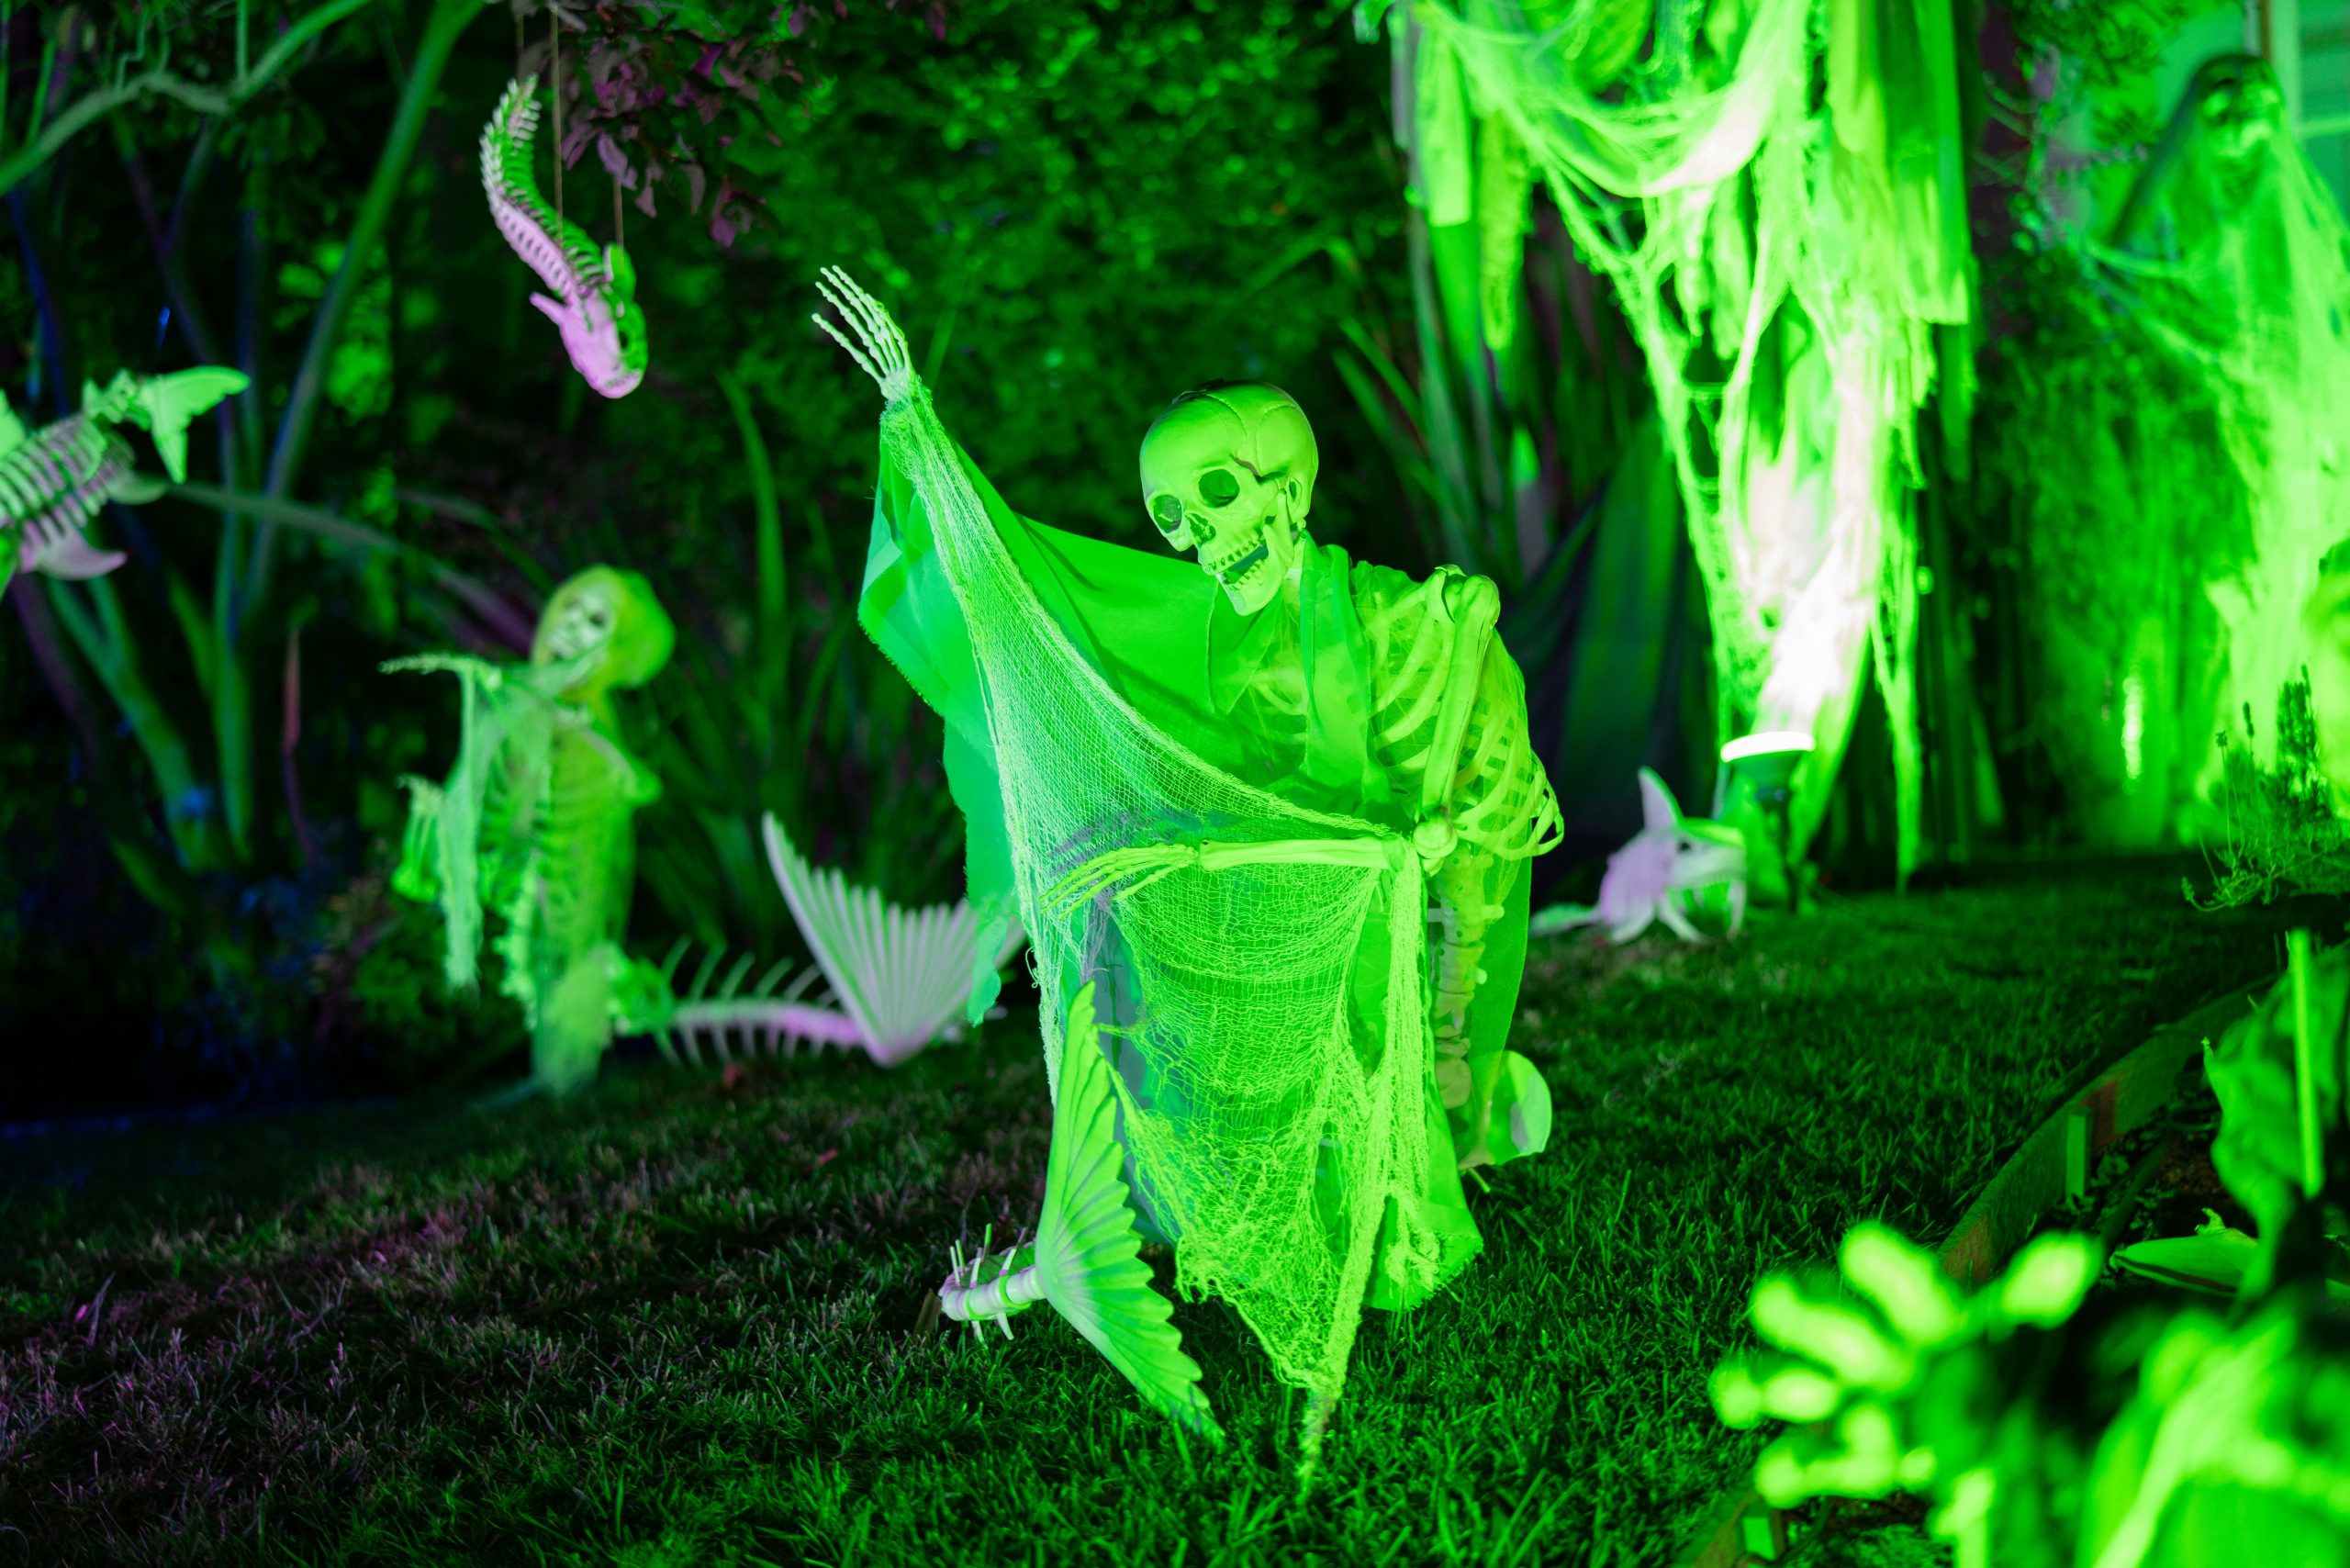
🔥 Trending Context
This glowing green graveyard relies on outdoor flood lights and potentially smaller, battery-powered LEDs for the effect. If you live in an area with frequent autumn rain, ensure all your lighting components are rated for wet conditions. Hiding the cords for a clean look can be a bit of a chore, often requiring you to bury them shallowly under mulch or leaves. The skeleton figures, especially if lightweight, will need to be staked securely into the grass to prevent them from being knocked over by wind or curious neighborhood pets.
10. Gory Skeleton Prison with Red Accent Lighting
It’s not the skeleton or the chains—it’s the red lighting. That single design choice transforms this from a standard spooky display into something genuinely frightening and cinematic. The red light suggests danger and horror, casting dramatic shadows and making the faux blood on the ‘PRISON’ sign look unnervingly realistic. Turn off that light, and the effect is halved. It’s a powerful reminder that lighting isn’t just for visibility; it’s for emotion.
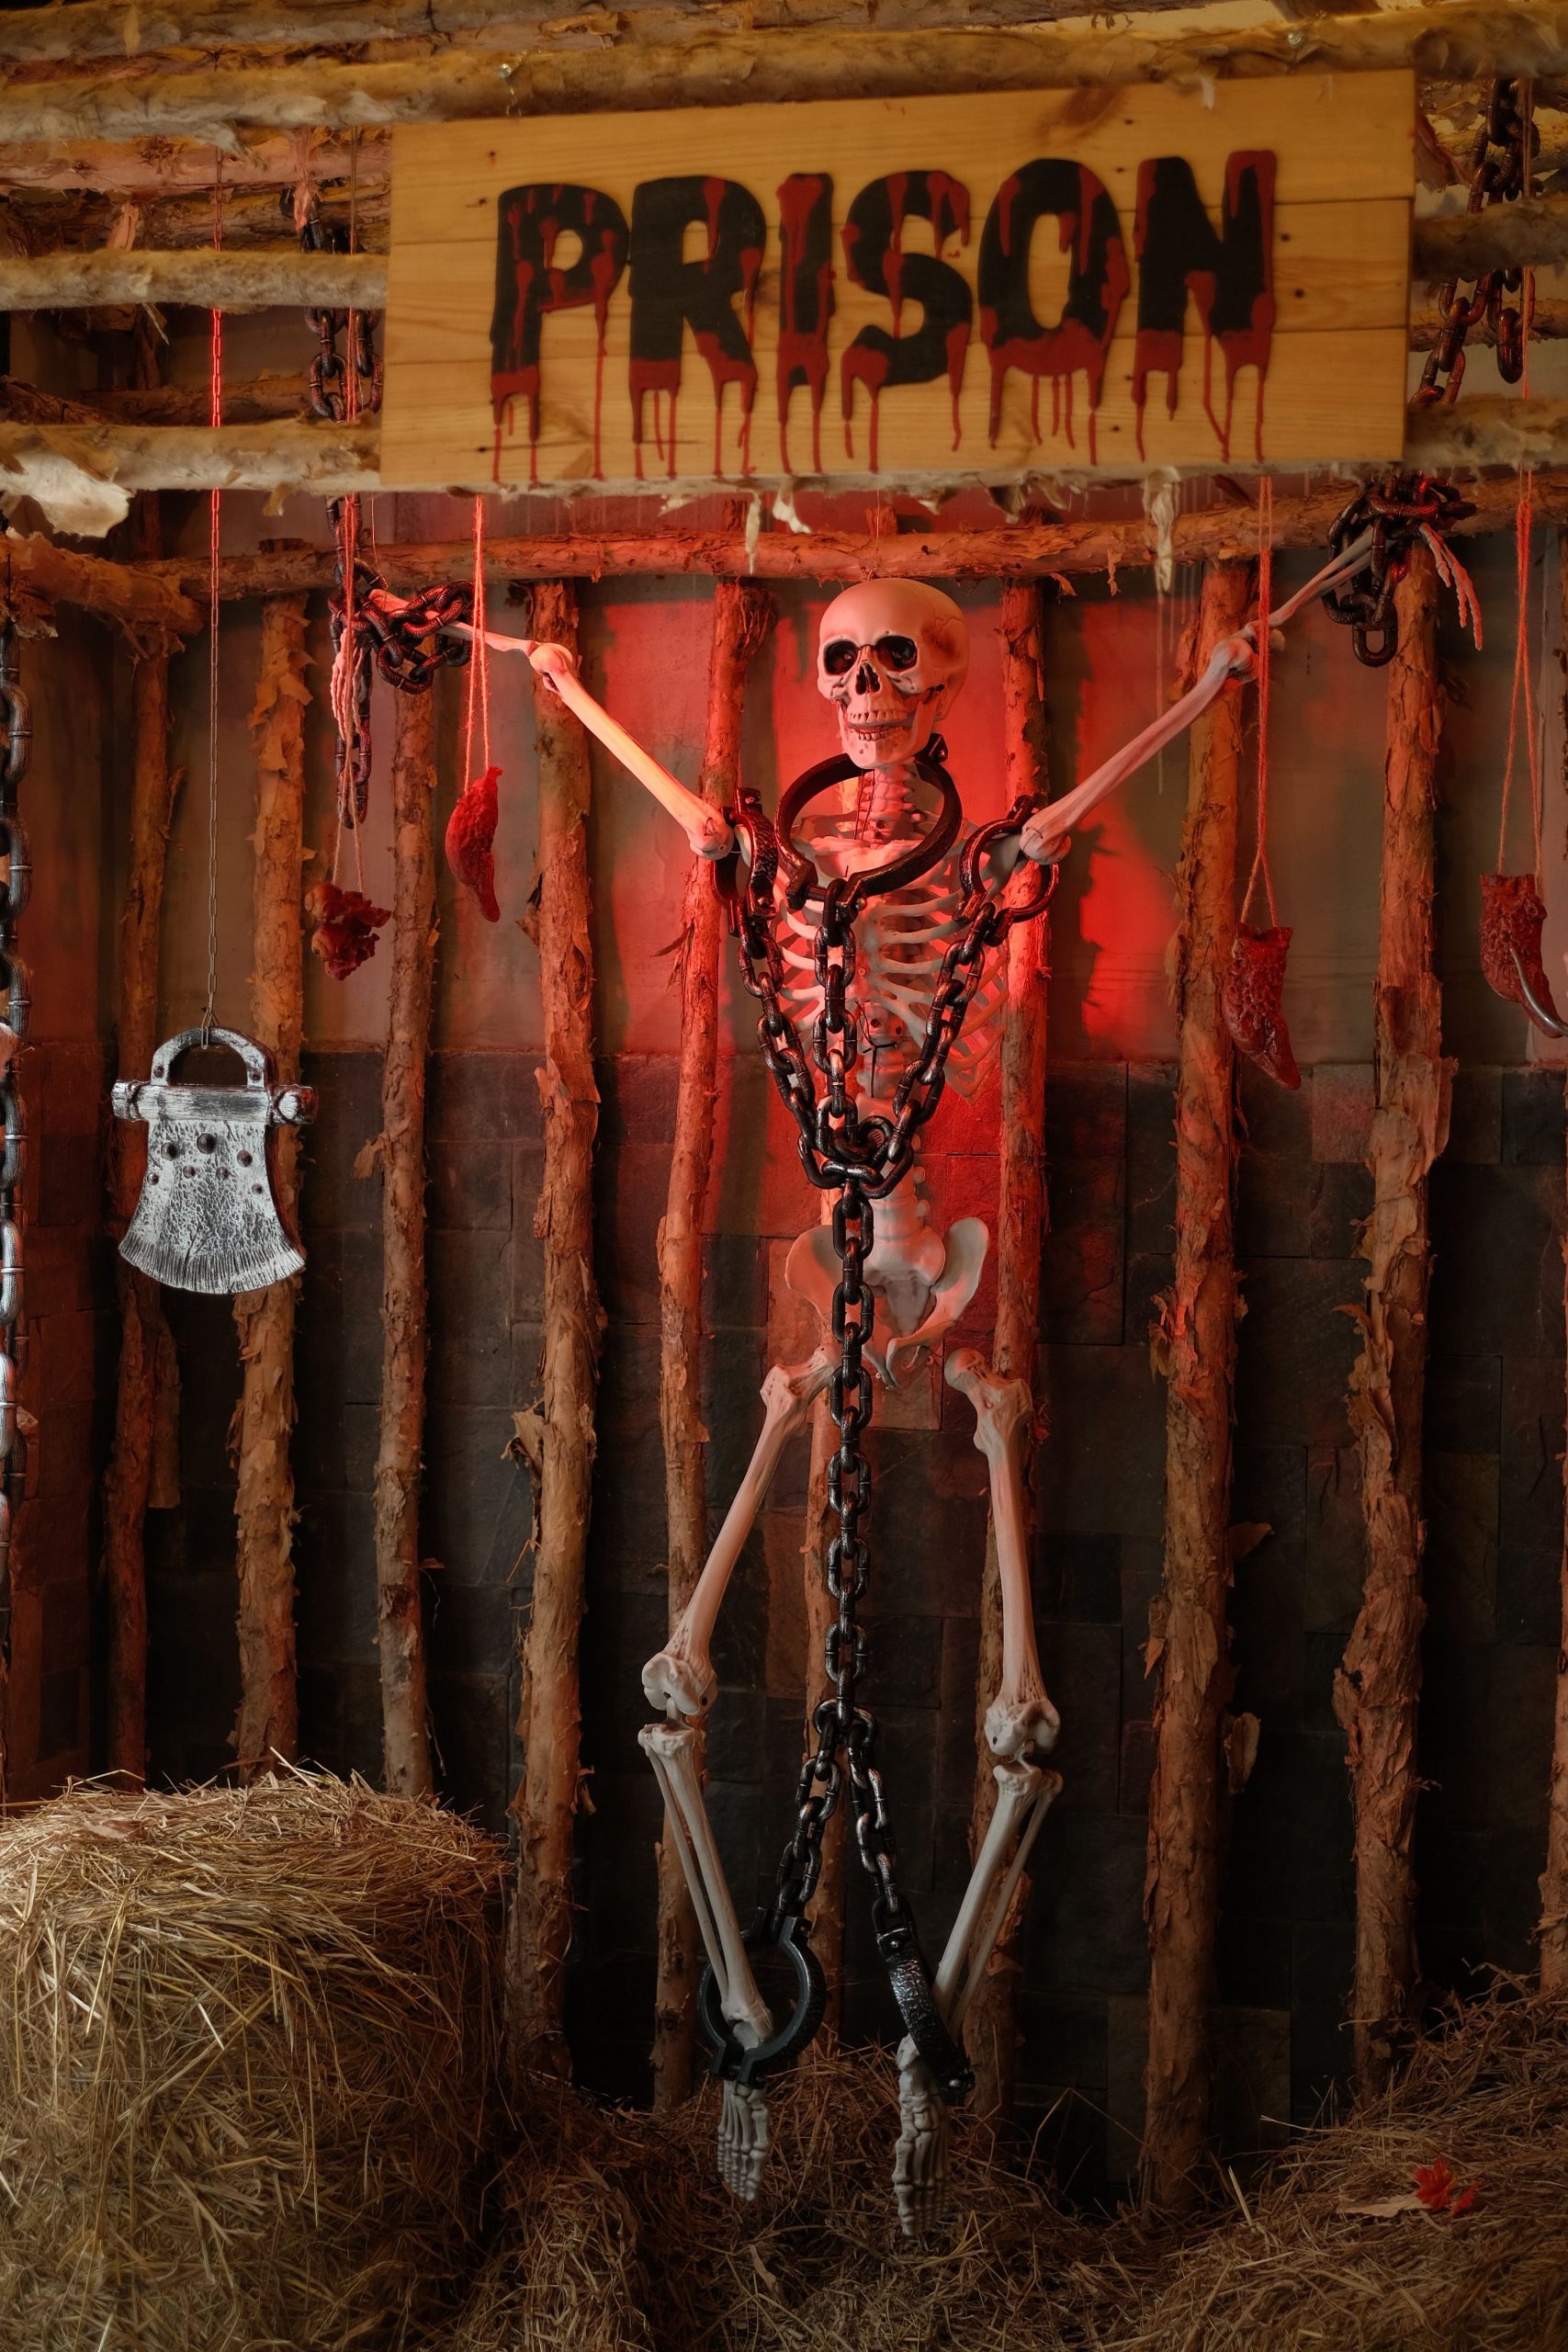
📏 Scale Guide
This is a contained, vignette-style decoration, making it perfect for smaller yards or even a corner of a larger porch. You don’t need a sprawling lawn. The ideal space would be about 6 feet wide by 4 feet deep to accommodate the wooden posts, skeleton, and hay bales without feeling cramped. It’s an excellent choice for townhouses or homes with limited front yard space, as it concentrates all its impact in a single, well-defined area. It’s more impactful than the sprawling scene in Idea #4 if you’re short on space.
11. Casually Dressed Skeleton Lounging on a Patio Chair
The key to a successful humorous skeleton display is all in the details of the outfit. Don’t just throw a t-shirt on it. Take the time to button it up, pop the collar, and add accessories that tell a story. The combination of a patterned shirt, a baseball cap, cool sunglasses, and a contemporary face mask makes this skeleton feel like a specific, relatable character. It’s these small, thoughtful touches that create the personality and make the joke land effectively.
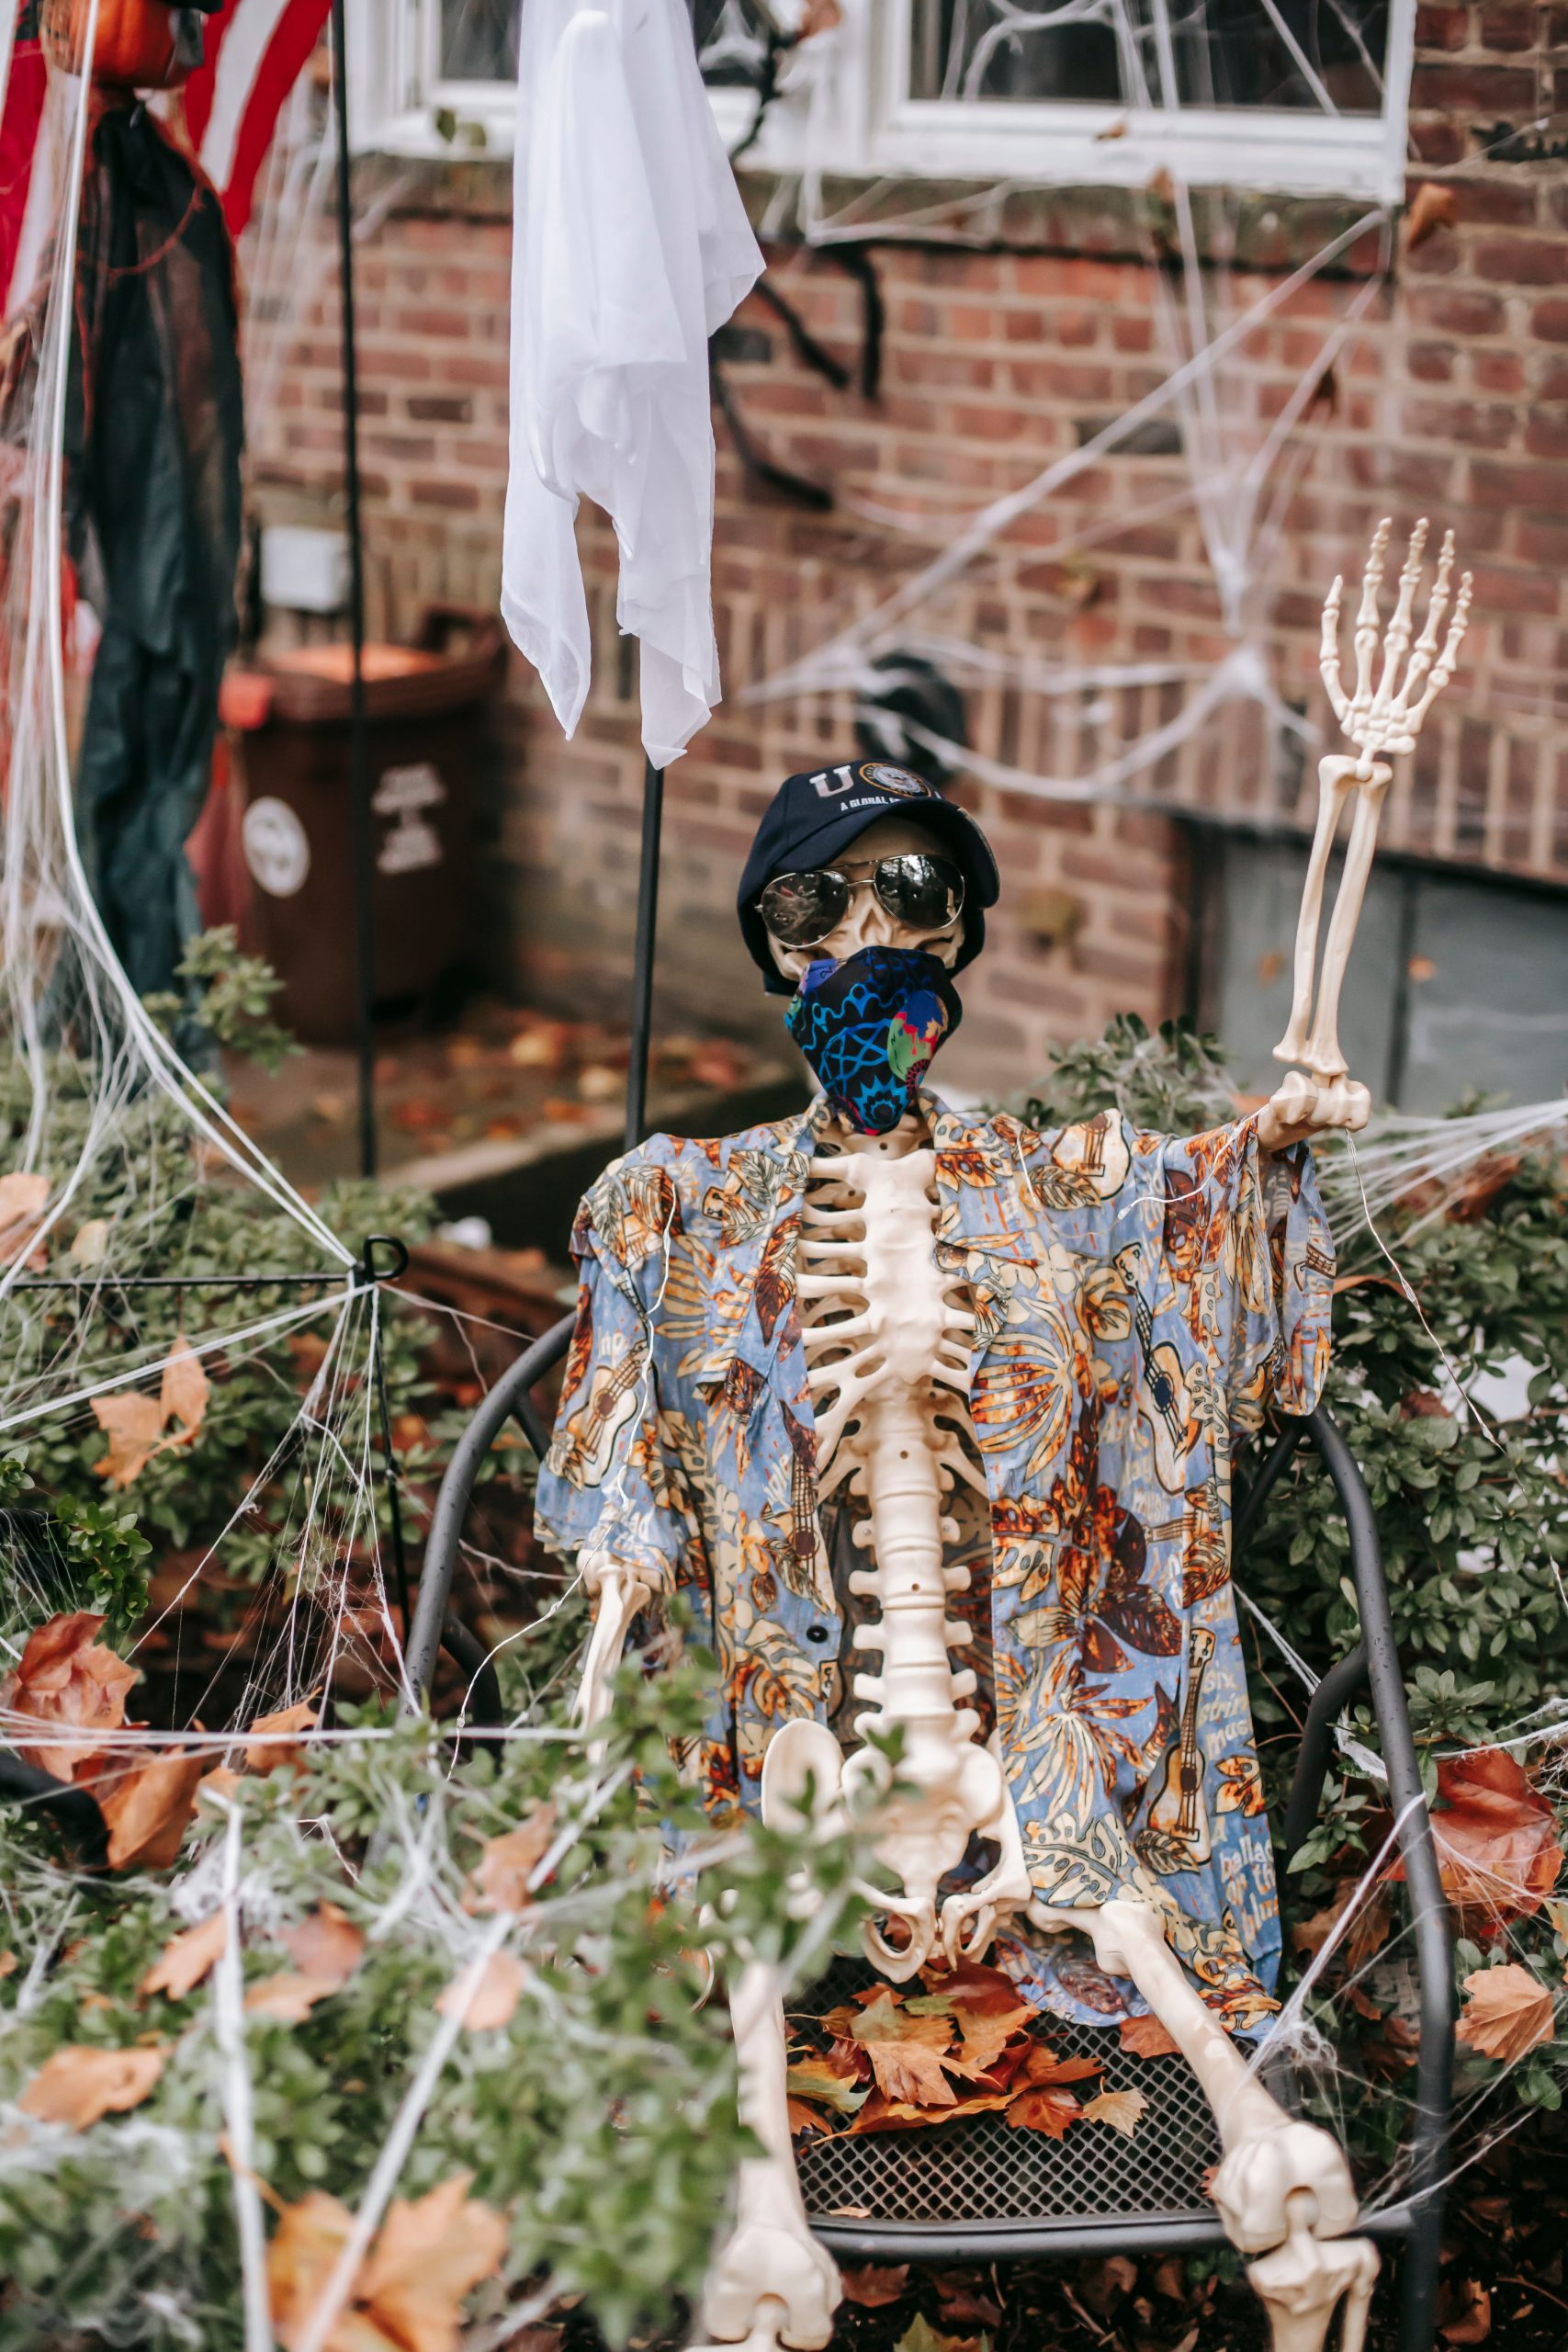
💡 Designer Tip
The formula for this quirky look is simple: 70% unexpected realism + 30% spooky context. The skeleton itself is the spooky element, but dressing it in a contemporary, casual outfit—a patterned shirt, baseball cap, and even a face mask—creates a hilarious and surprising dose of reality. The cobwebs and fall leaves in the background provide just enough Halloween context to remind viewers what they’re looking at. The magic is in the juxtaposition of the mundane and the macabre.
12. Autumnal Shelf Display with Skeletons and Gourds
This arrangement works so well because it expertly balances spooky and harvest themes through layering. The wooden shelf provides a rustic, neutral backdrop. The base layer is composed of classic autumn elements like fall foliage, pumpkins, and gourds. Then, the spooky layer—the posable skeletons—is introduced on top. The playful posing of the skeletons (two sitting, one leg discarded) adds a touch of humor that prevents it from feeling too creepy. The sheer variety of textures keeps the eye moving and engaged.
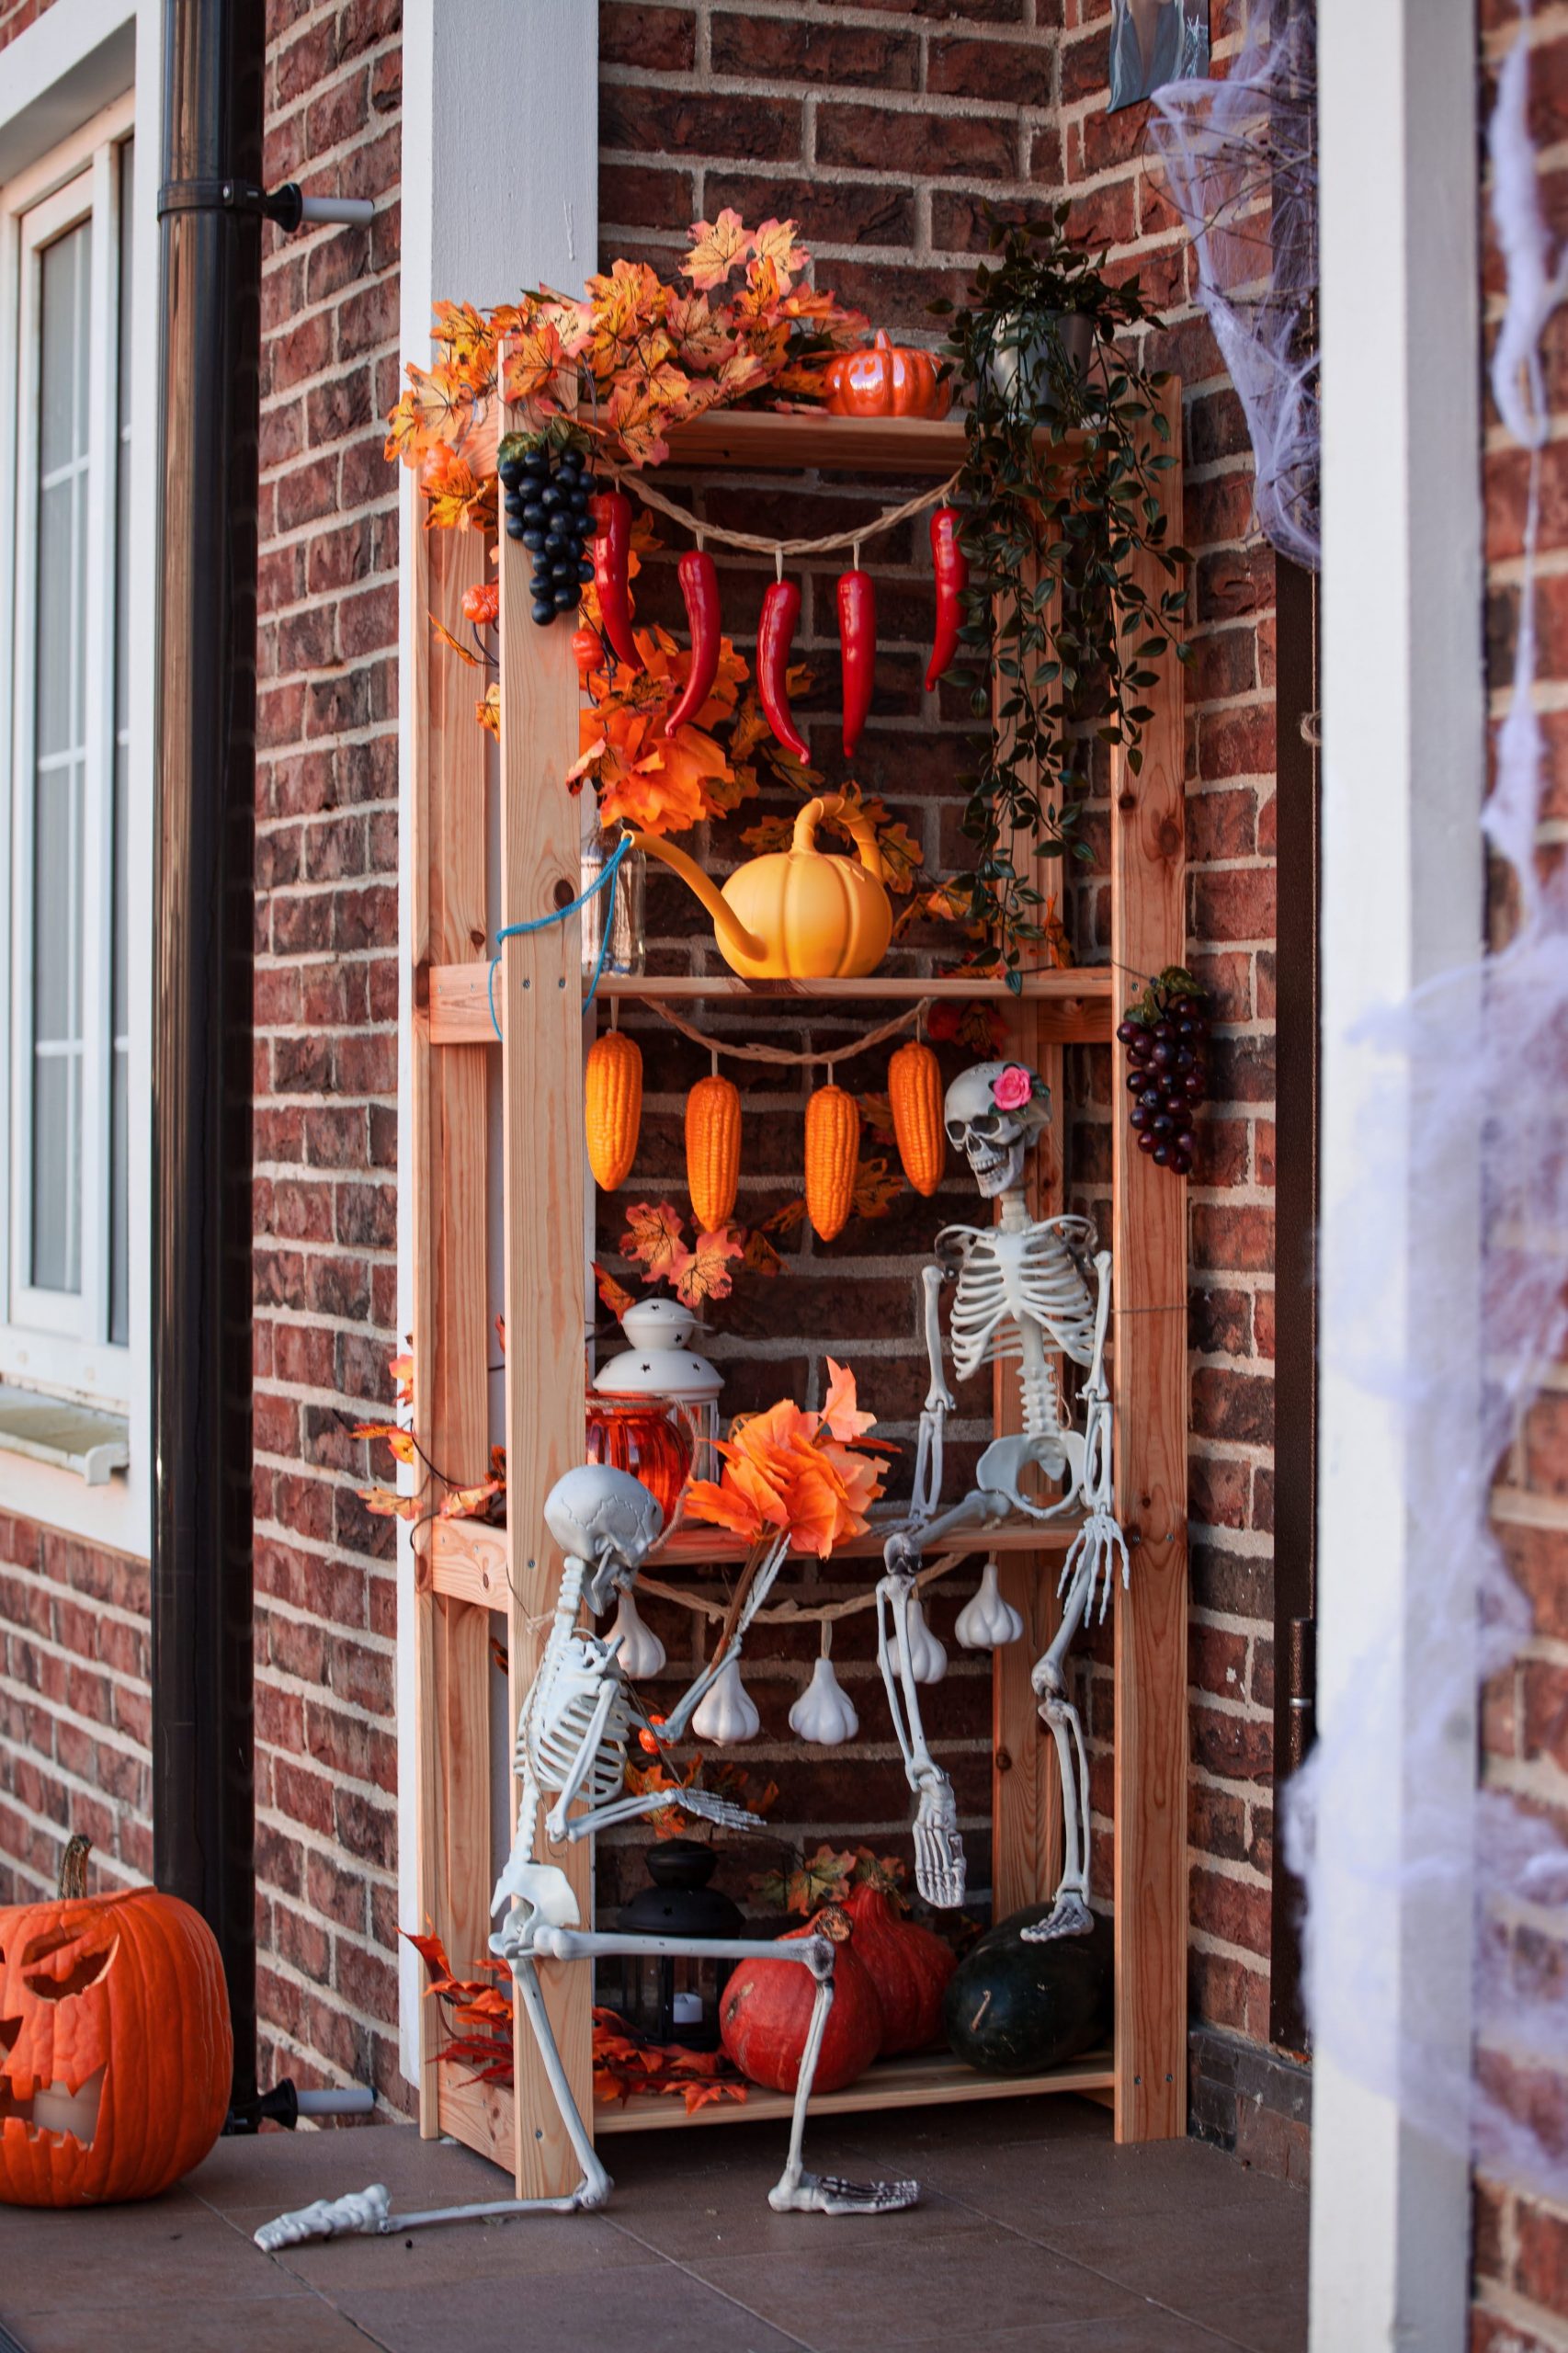
💰 Budget Breakdown
You can easily recreate this look for less. Start with a basic wooden or even plastic shelving unit—you can often find one secondhand on Facebook Marketplace for under $25. Skip the expensive decorative gourds and pumpkins from boutique stores. A bag of mini gourds and pumpkins from a grocery store or Trader Joe’s costs around $5-$10. The posable skeletons are key and are widely available at stores like Target or online for about $15-$30 each. Supplement with faux fall leaves from the Dollar Tree to fill in any gaps.
13. Tiered Corner Shelf with Painted Pumpkins and Wheat
The element that truly elevates this fall display is the pale grey painted pumpkin with the hand-drawn jack-o’-lantern face. Amidst the traditional orange and red tones, this cooler, more modern pumpkin provides a surprising and sophisticated focal point. It breaks up the expected color palette and demonstrates a more personalized, crafty approach. It’s the one piece that feels uniquely handmade and thoughtfully designed, rather than simply assembled.
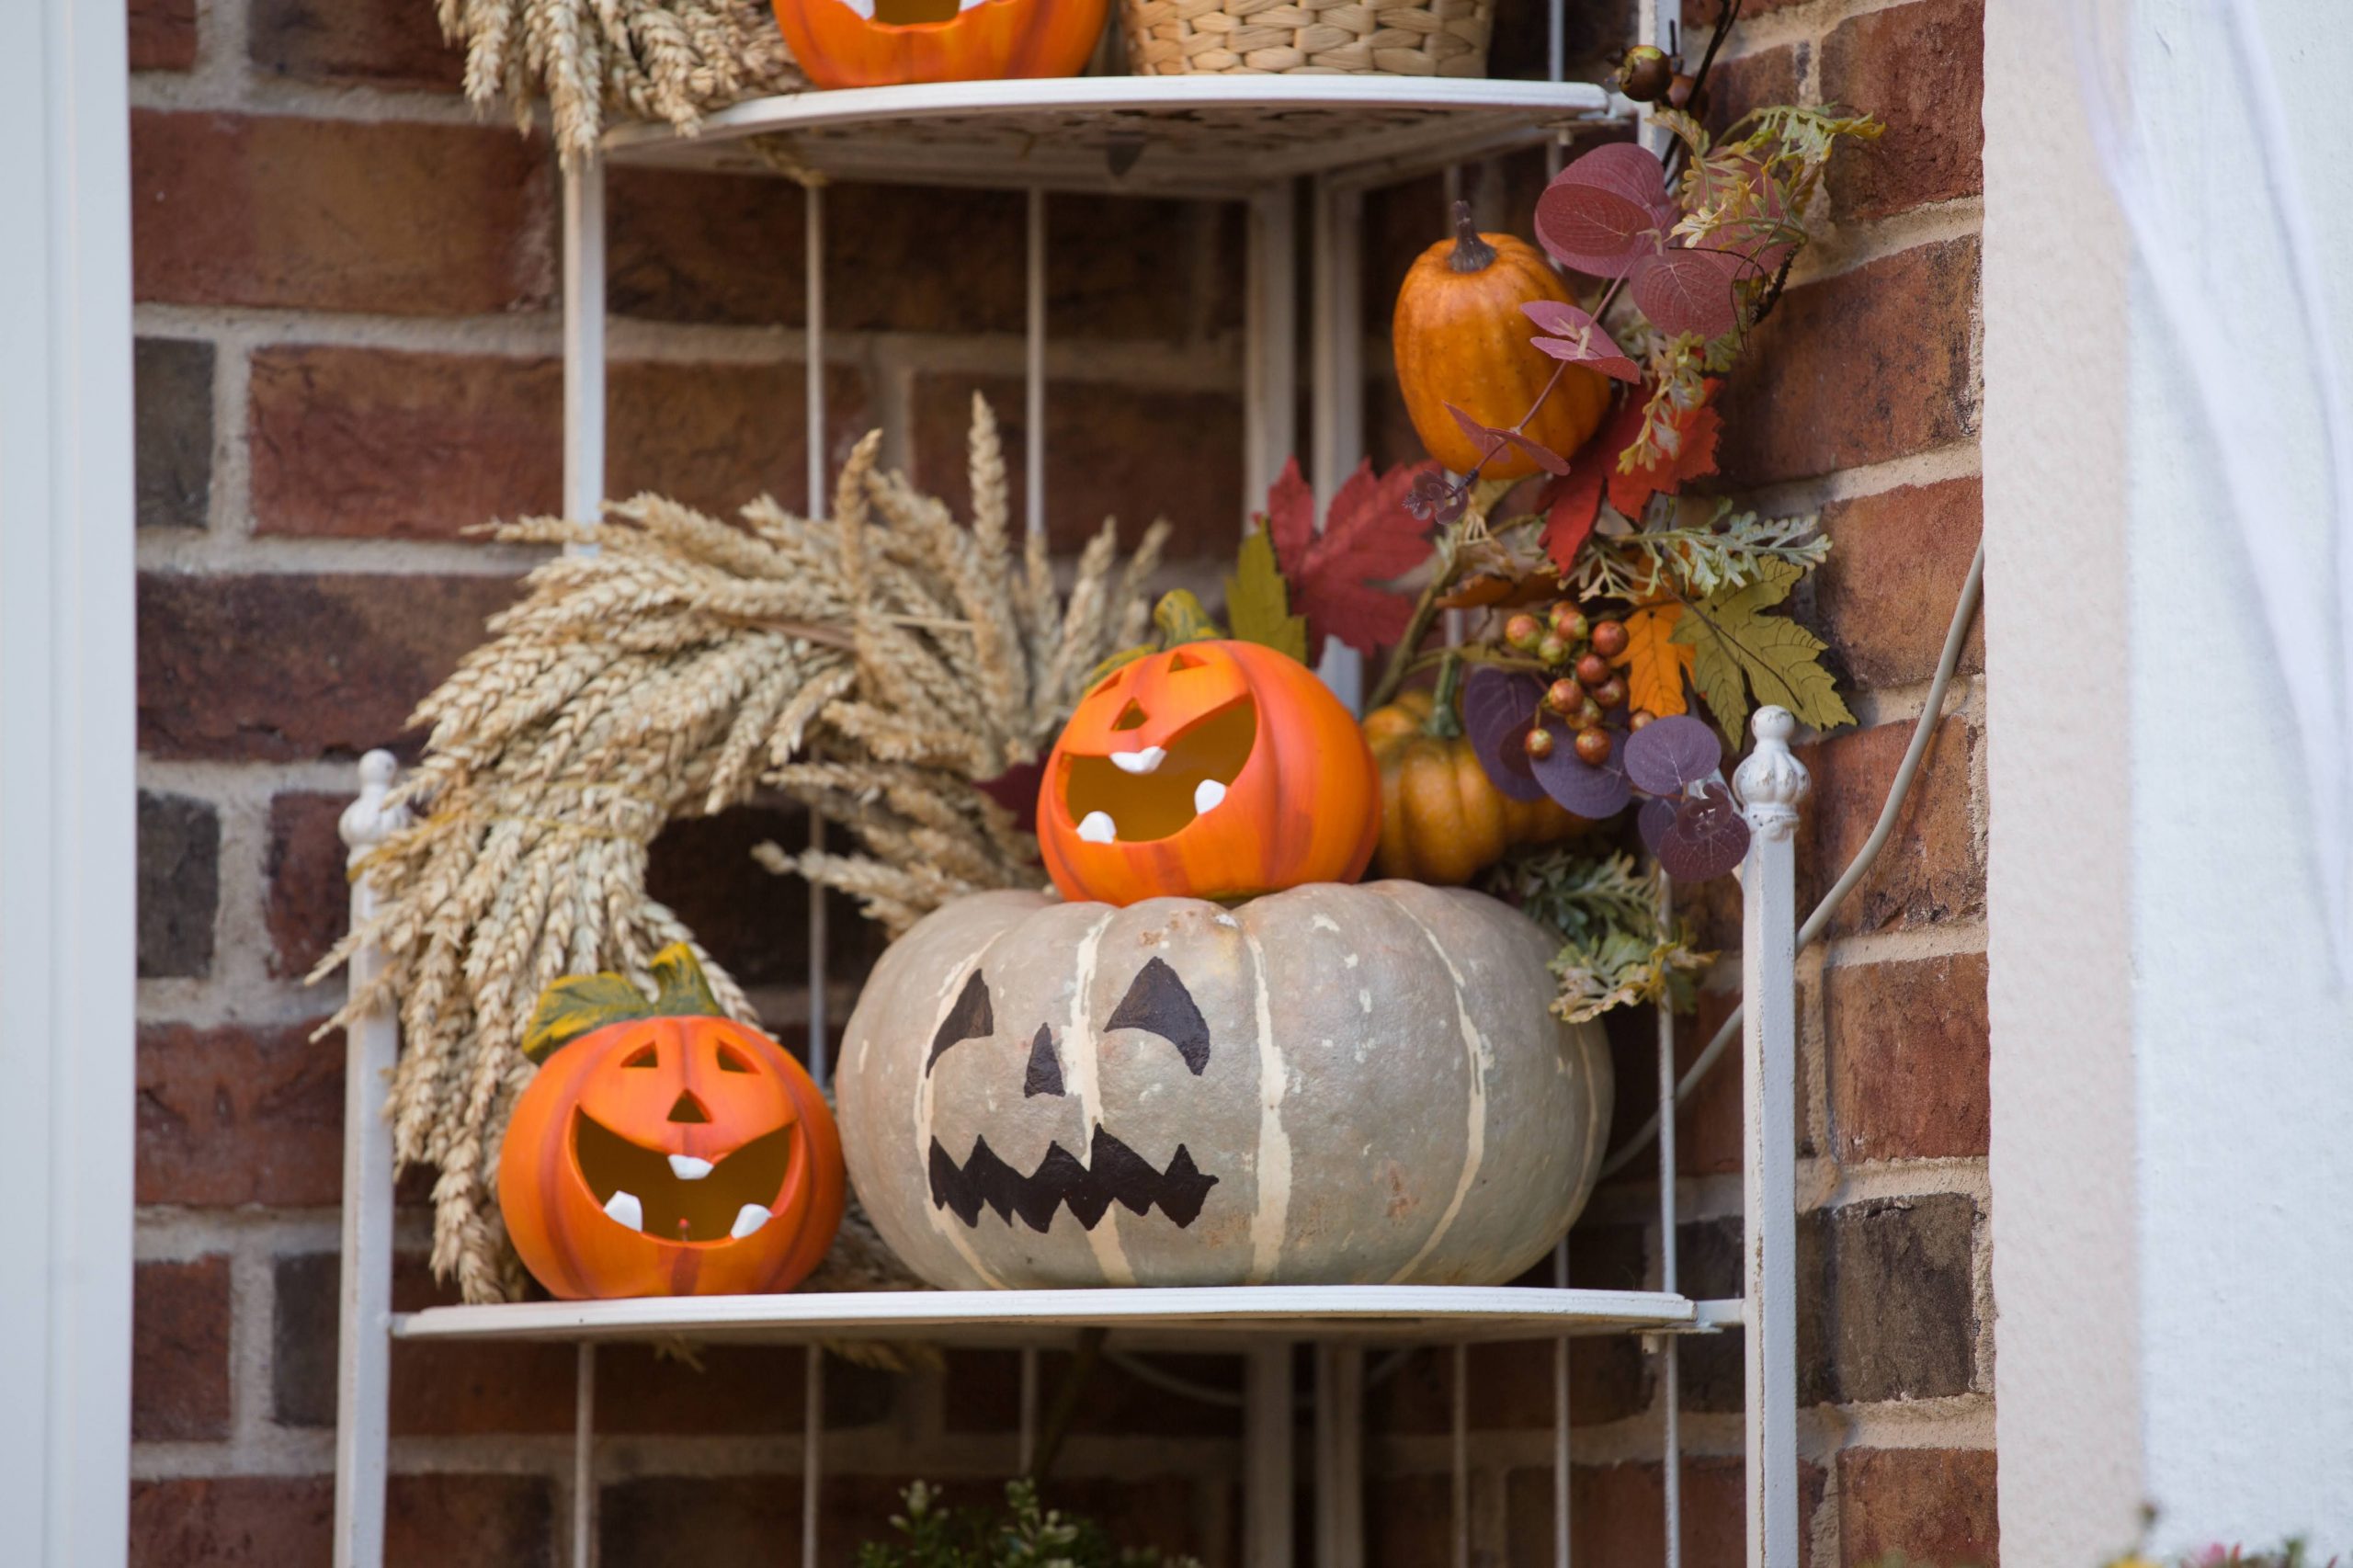
🔧 How-To Brief
Create your own painted pumpkins, like the grey one featured, in under 30 minutes.
- Start with a small foam or plastic pumpkin from a craft store (real ones work too, but won’t last).
- Apply one to two coats of matte acrylic craft paint in your desired color (e.g., pale grey, white, or even black). Let it dry completely.
- Using a black permanent marker or a small brush with black paint, draw a simple, charming jack-o’-lantern face. Don’t aim for perfection; a slightly quirky, hand-drawn look is part of the appeal.
- Let the face dry for about 10 minutes before placing it in your display.
This is a quick and inexpensive way to customize your decor, costing only a few dollars for paint.
14. Bedroom Decorated with Wall Bats and Autumn Foliage
When applying wall decals like these black bats, create a sense of motion by arranging them in a swooping, directional path. Start with a dense cluster in one corner (like emerging from behind the spiderweb) and have them gradually spread out and upward across the wall. Vary the angles of the bats slightly. This dynamic arrangement is far more visually interesting than just dotting them around randomly and creates a more dramatic, immersive effect in the room.
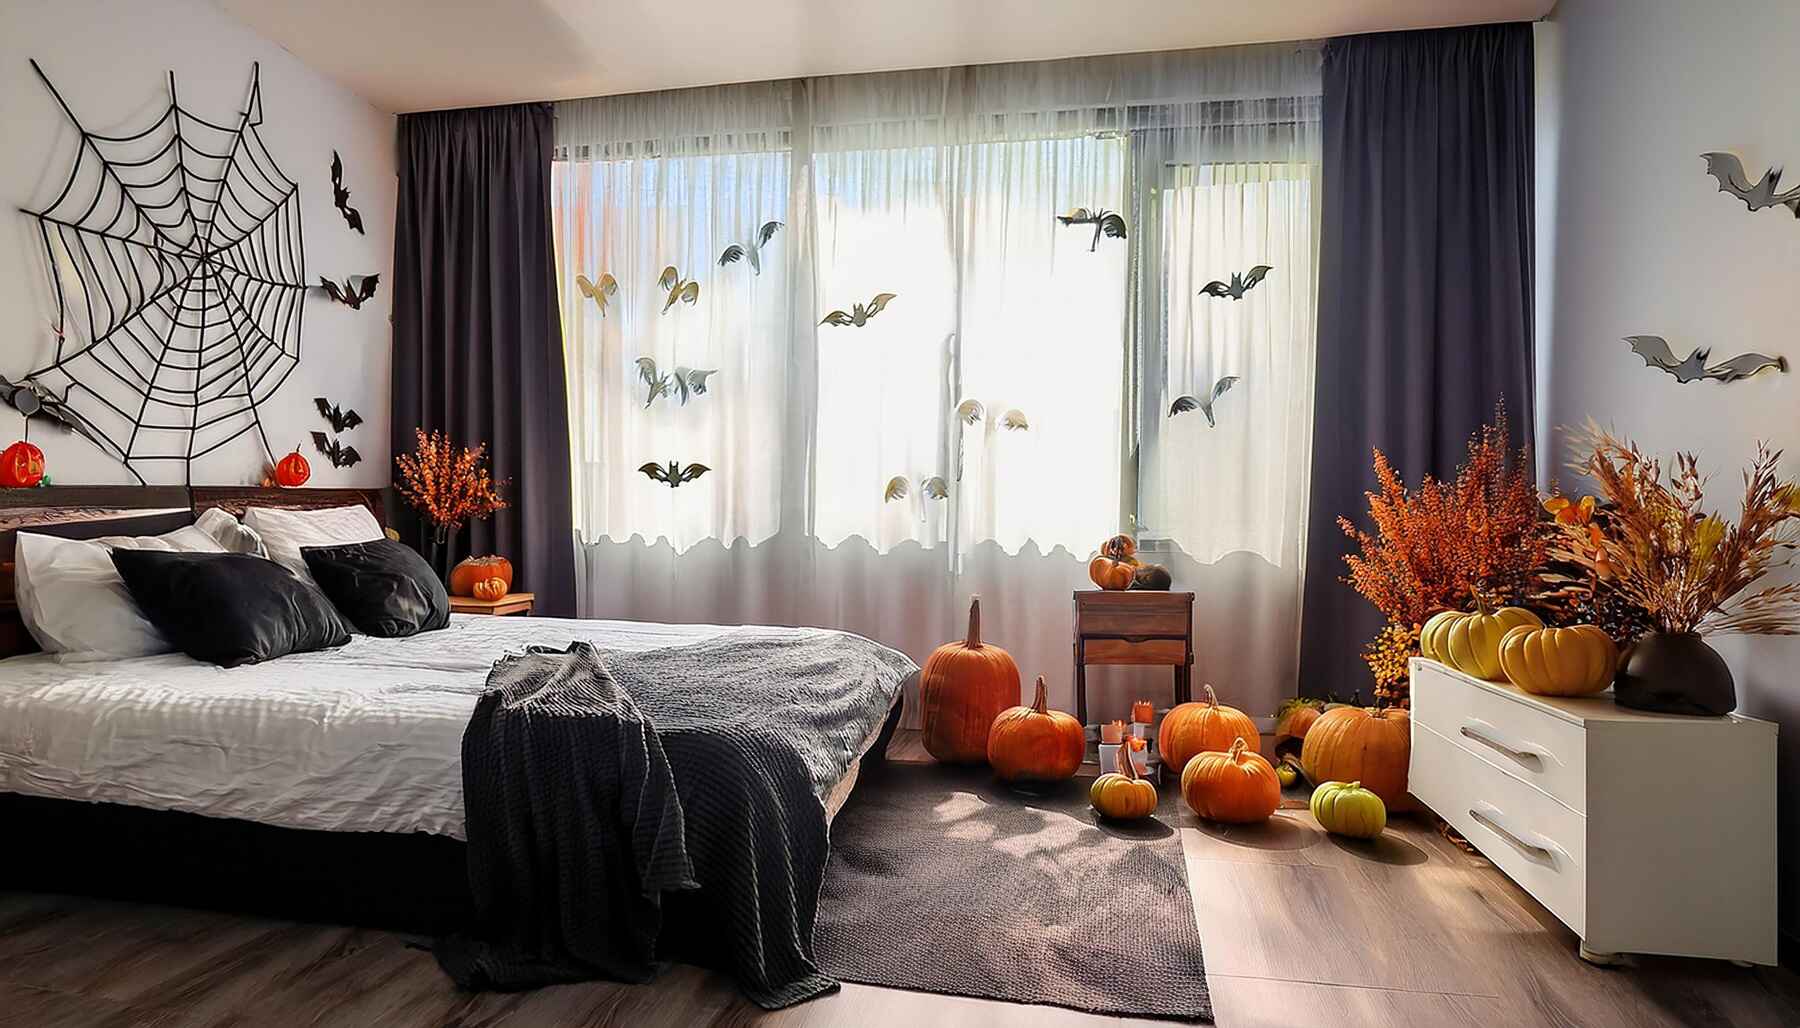
⚠️ Real Talk
Decorating a bedroom for Halloween can be a lot of fun, but remember that this is a space for rest. While the black spiderweb and bats are spooky and cool, they might not be conducive to a peaceful night’s sleep for everyone, especially younger kids. Also, be mindful of the materials you use. The cutout bats are likely attached with double-sided tape or putty, which can sometimes damage paint when removed. Test the adhesive in an inconspicuous spot first before committing to a full wall display.
15. Cozy Halloween Mantel with a Mix of Textures
styling your mantel, take stock of your collection.
- Vary Your Heights: Do you have tall items (like the candle holders), medium items (like the larger pumpkins and lantern), and small items (like the garland)? A mix is essential for a dynamic look.
- Mix Your Materials: Don’t use all ceramic or all wood. This display works because it combines wood, ceramic, crochet, glass, and metal. Ensure you have at least 3-4 different textures.
- Color Check: Does your decor fit a cohesive color story? Here, a base of white and wood is accented with orange, teal, and black. Pick your palette before you start arranging.
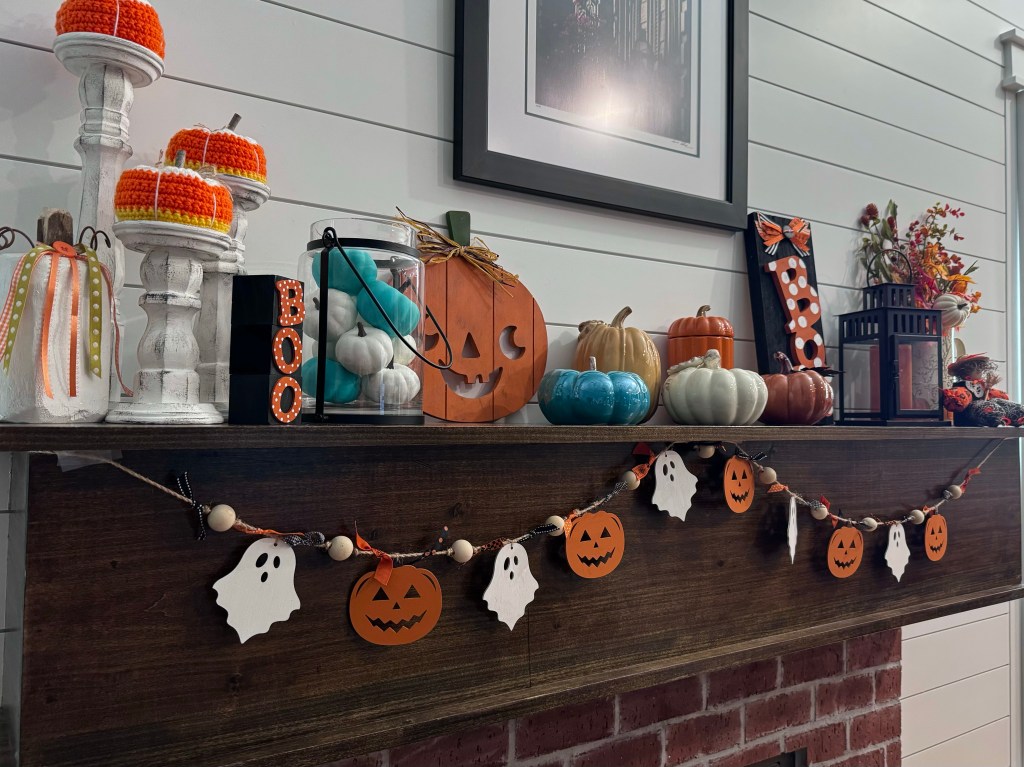
📐 Style Math
The charm of this mantel lies in its carefully balanced formula: 40% traditional orange + 40% neutral base + 20% surprise accent color. The pumpkins and garland provide the classic Halloween orange. The white shiplap wall, wooden mantel, and white candle holders create a clean, neutral foundation. Then, the unexpected pop of teal on the ‘BOO’ sign and one of the pumpkins adds a modern, whimsical twist. You could easily swap the teal for purple or lime green to change the mood while keeping the same successful ratio.
16. Modern Glam Mantel with Black Wreath and Disco Pumpkins
This design succeeds by subverting expectations. It takes traditional Halloween motifs—wreaths, bats, pumpkins—and gives them a modern, glamorous twist. The crescent moon wreath is dramatic and sculptural, a far cry from a typical round evergreen wreath. The bat cutouts create dynamic movement across the clean, paneled wall. What really makes it work is the surprising texture of the silver and pink disco balls mixed with the pumpkins. This high-contrast mix of spooky, modern, and glam elements feels fresh and exciting.
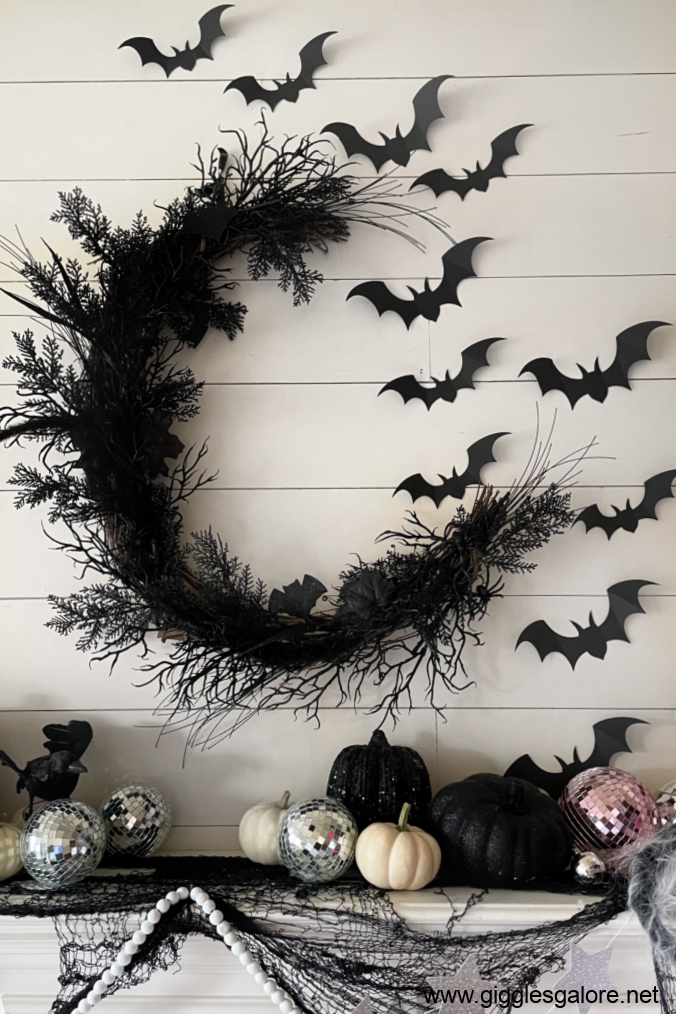
🧹 Maintenance Reality
This look is right on trend for 2026, reflecting a larger movement towards ‘holiday glam’ or ‘dark whimsy’. People are looking for decor that feels more personal and less like it came straight from a big-box store aisle. The inclusion of disco balls, a nod to retro and pop culture trends, injects a sense of fun and irony. This style has staying power because it’s highly adaptable; you can lean more spooky, more glam, or more modern depending on your personal taste, just by changing the ratio of pumpkins to disco balls.
17. Stylish and Cute Pink Halloween Decor
The ‘Pink Halloween’ aesthetic has exploded on Pinterest and TikTok, and for good reason. It offers a fresh, stylish alternative to the traditional orange and black, appealing to those with a more pastel or glam-leaning home decor style. It allows people to participate in the festive spirit without clashing with their existing interior design. This trend has serious staying power because it’s endlessly adaptable—from soft pastel pinks for a cute vibe to hot pinks for a more dramatic, Barbie-inspired Halloween look.

✅ Before You Start
To successfully pull off a pink Halloween theme, the key is to balance the pink with plenty of black and white. Use pink as your main accent color for pumpkins, artwork, and textiles, but ground it with black elements like bats, spiders, or a cauldron. White surfaces, like walls or furniture, will make the pink and black pop. For an extra touch of glam, add metallic accents like the gold decor seen in Idea #32, which pairs beautifully with pink.
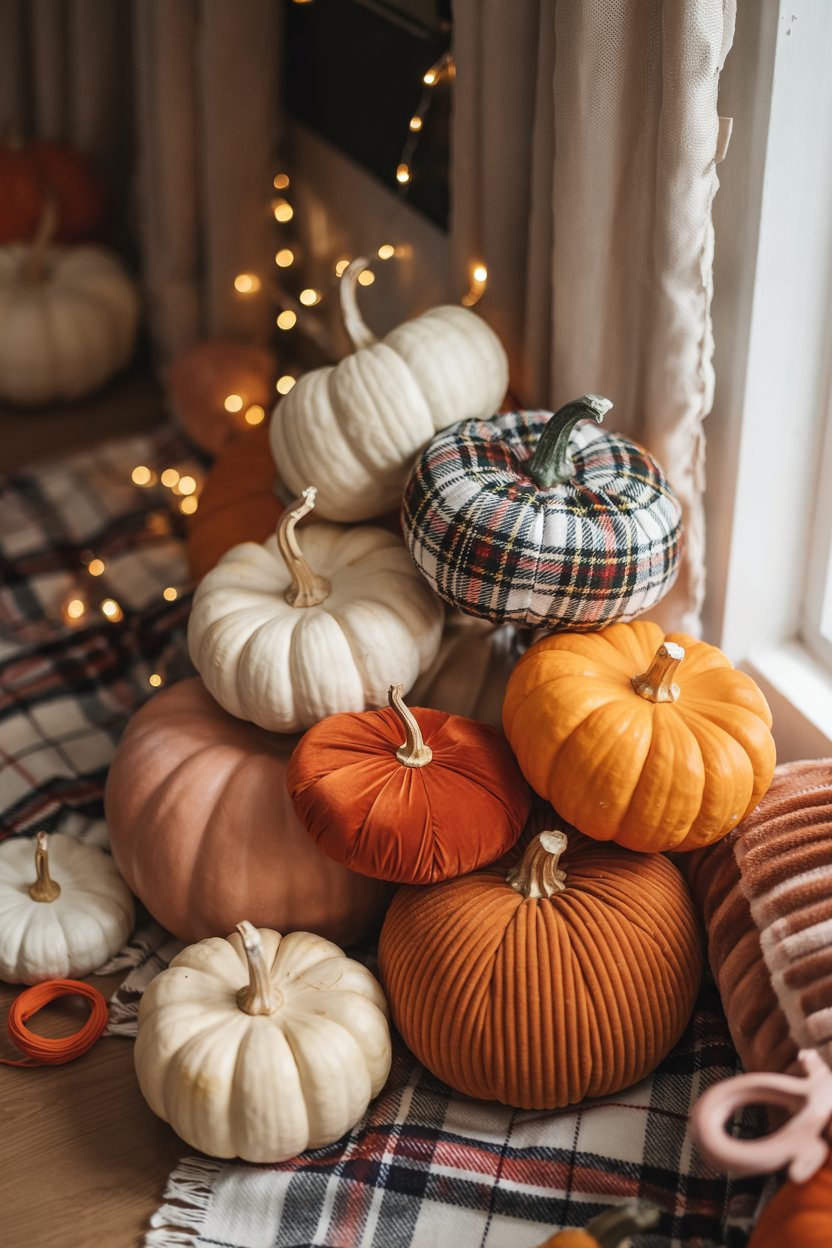
18. Stacked Trick-or-Treat Velvet Pumpkins
The single element that makes this piece so charming is the texture of the velvet fabric. If these were simply painted plastic pumpkins, the effect would be generic and common. The soft, plush velvet adds a layer of warmth, sophistication, and tactility. It elevates the piece from a simple seasonal novelty to a more substantial and stylish piece of decor. The fabric choice, combined with the classic black and white buffalo check bow, gives it a cozy, modern farmhouse feel.
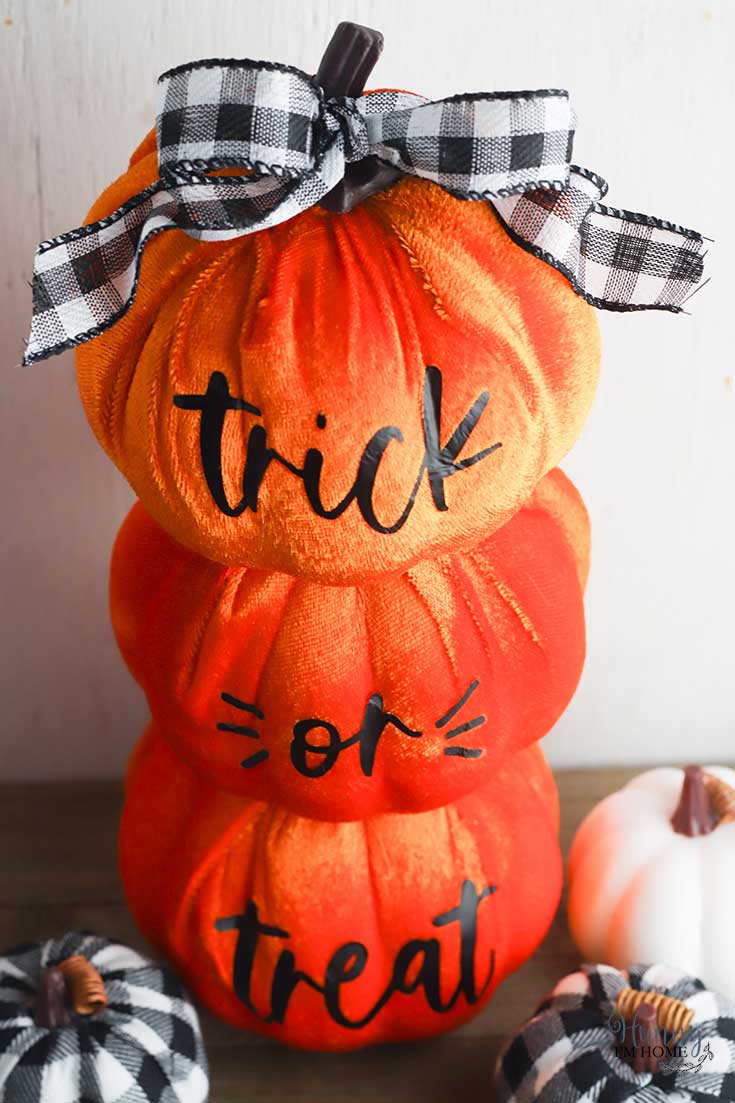
🎯 What Makes It Work
You can find pre-made stacks like this at home decor stores like HomeGoods or Michaels, typically costing between $25 and $40. However, this is a fantastic and easy DIY project. Purchase three foam pumpkins of graduating sizes, some orange velvet fabric, and black iron-on vinyl letters. Wrap the pumpkins, then apply the letters with a household iron. The total DIY cost would likely be under $20, especially if you have fabric scraps on hand. It’s a great way to get the exact color and font you want.
19. Warm and Cozy Jack-o’-Lantern with Pillar Candles
This simple arrangement is effective because it masters the art of atmosphere. The power comes from the warm, layered lighting. You have the internal glow from the jack-o’-lantern, the soft, flickering light from the pillar candles, and the gentle sparkle from the string lights in the background. This creates a rich, deep, and incredibly cozy ambiance. The scattered autumn leaves and acorns provide texture and reinforce the seasonal theme, but it’s the multi-source warm light that truly creates the magic.
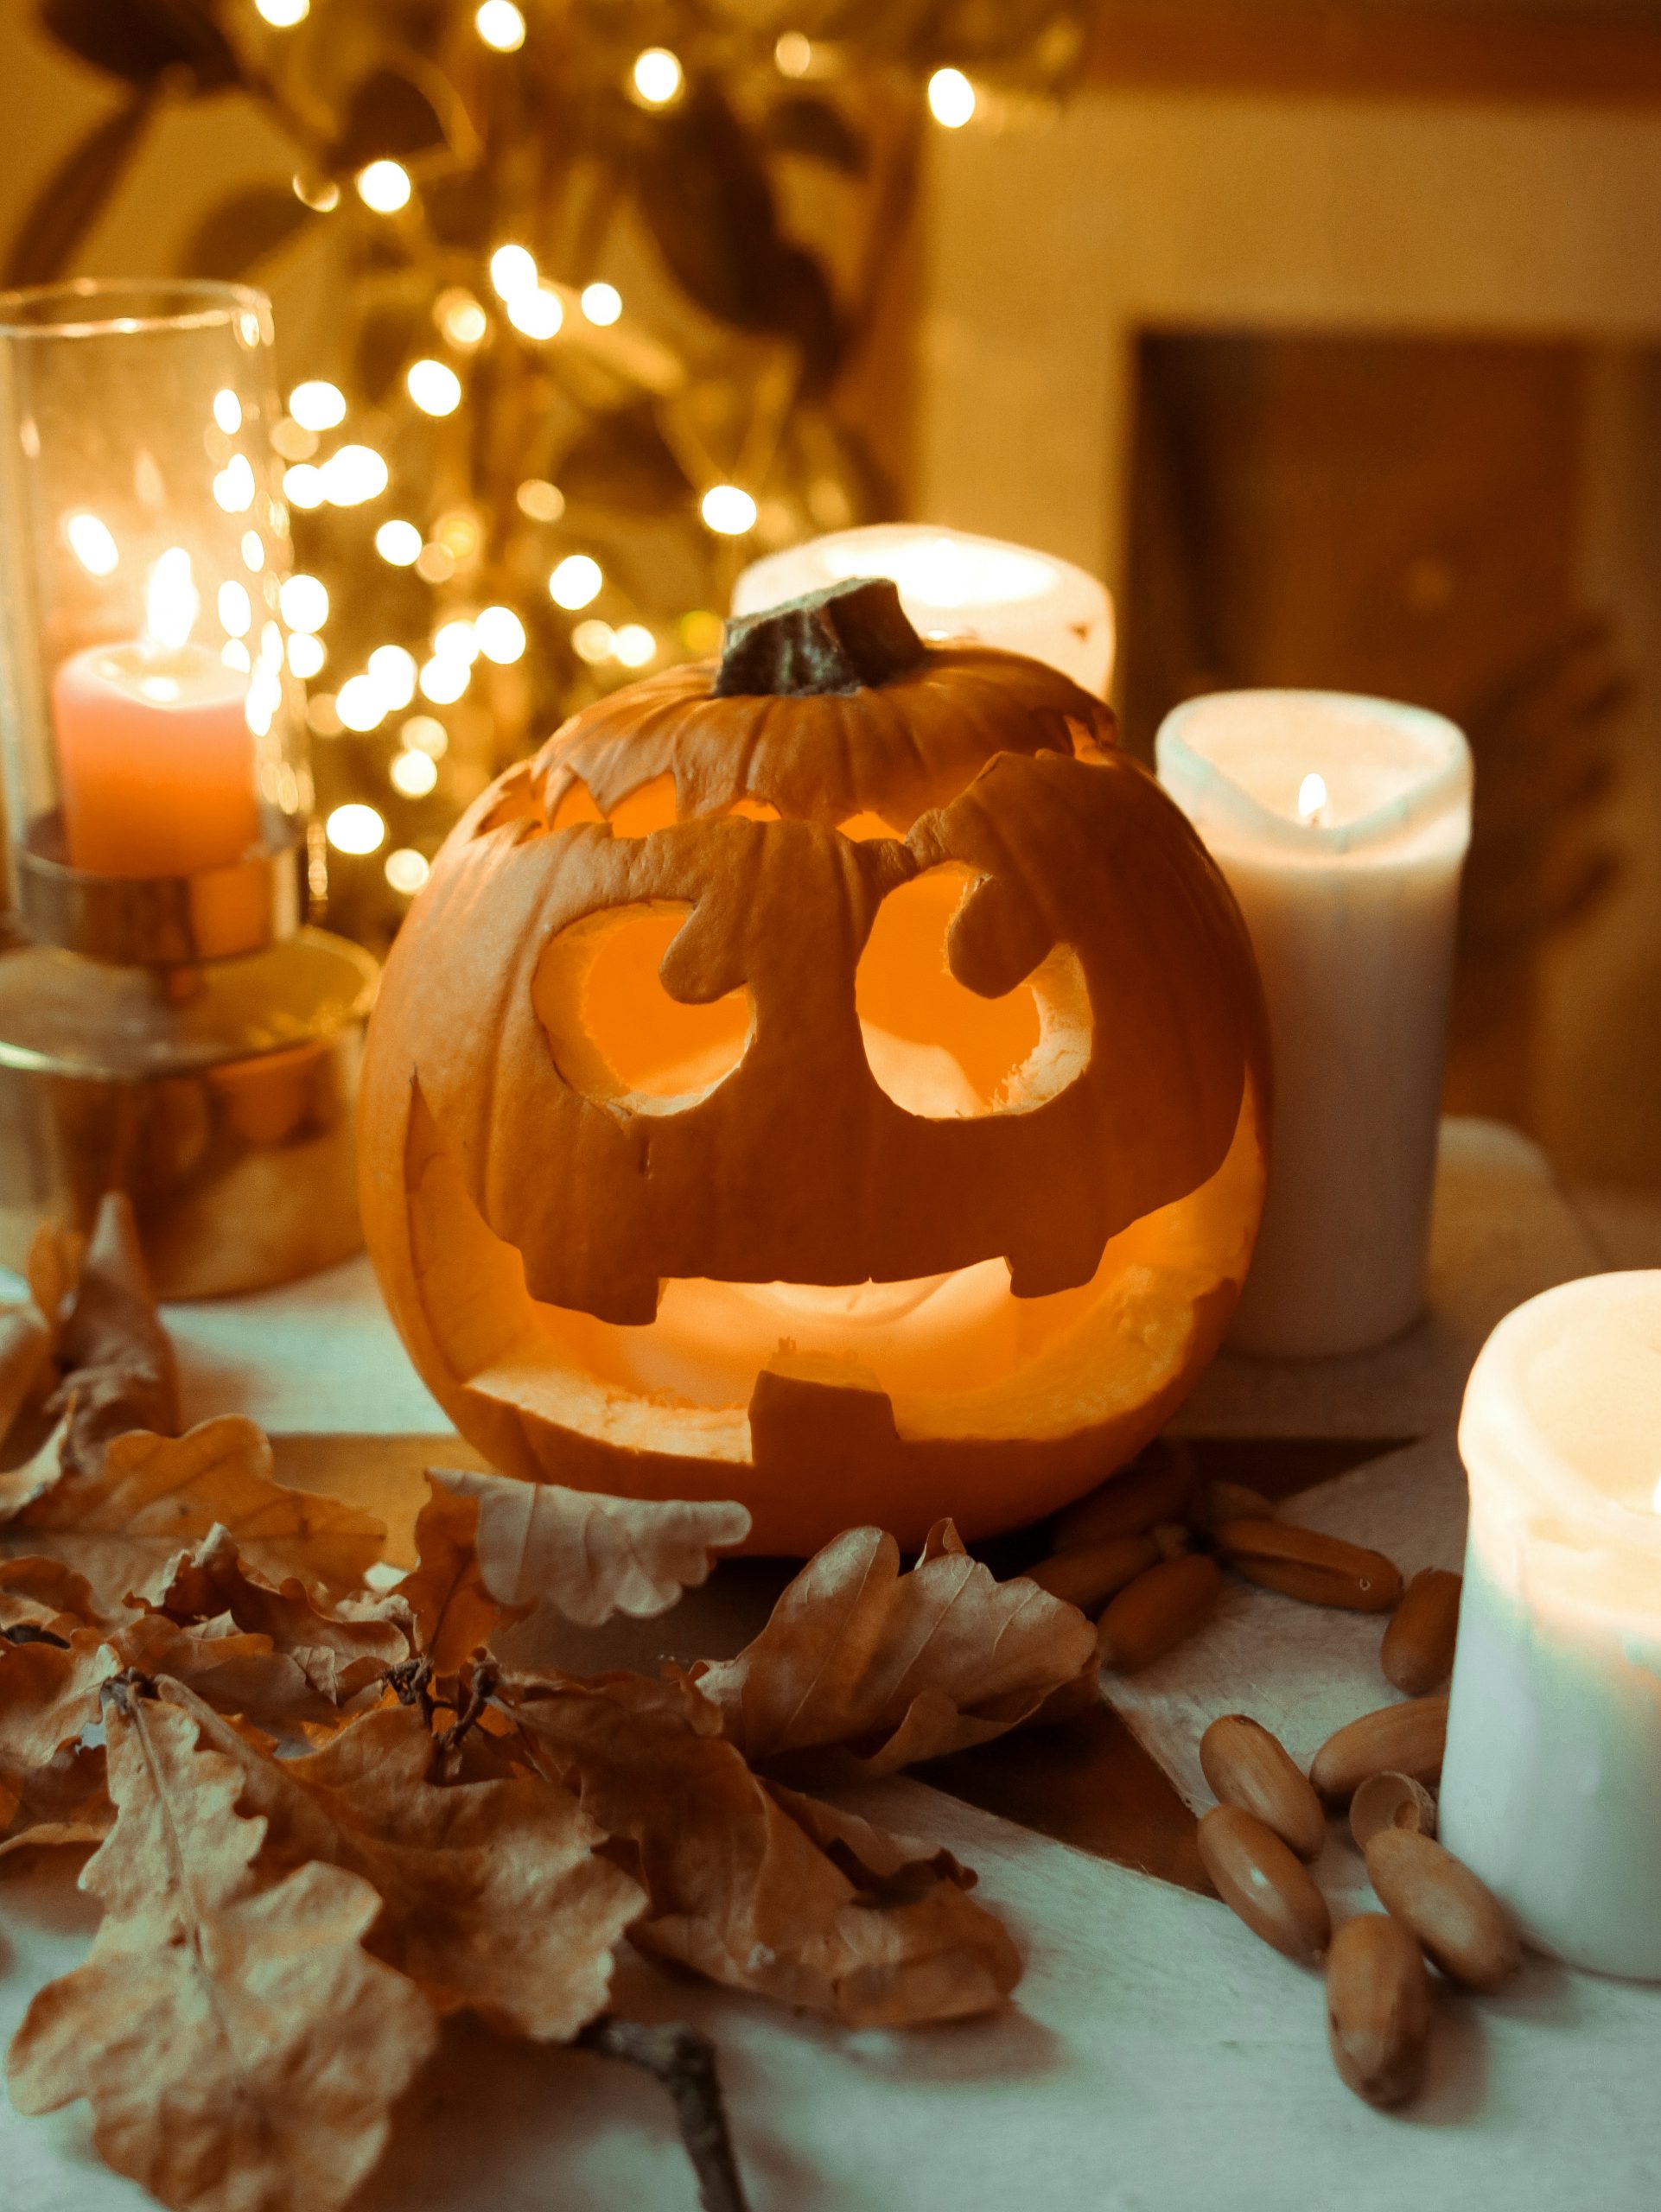
⭐ The One Thing
This is a beautiful, classic look, but using real candles always comes with a safety warning. Never leave lit candles unattended, especially when they are surrounded by flammable materials like dried leaves. To get the exact same warm, flickering ambiance without the risk, use high-quality flameless LED candles. Modern versions are incredibly realistic, often made with real wax, and many come with a remote control and timer function. It’s the best way to achieve this cozy glow with complete peace of mind.
20. Spooky Skeletons Illuminated with Purple and Green Light
You don’t need expensive, professional-grade lighting to create this eerie effect. Get the look by purchasing a couple of outdoor-rated LED floodlights with color-changing capabilities, which are available online or at home improvement stores for about $20-$30 each. Place one on either side of your skeleton display, one set to purple and one to green. For an even cheaper option, you can buy simple spotlights and use colored gel filters (or even colored cellophane) over the lenses to cast a spooky hue.
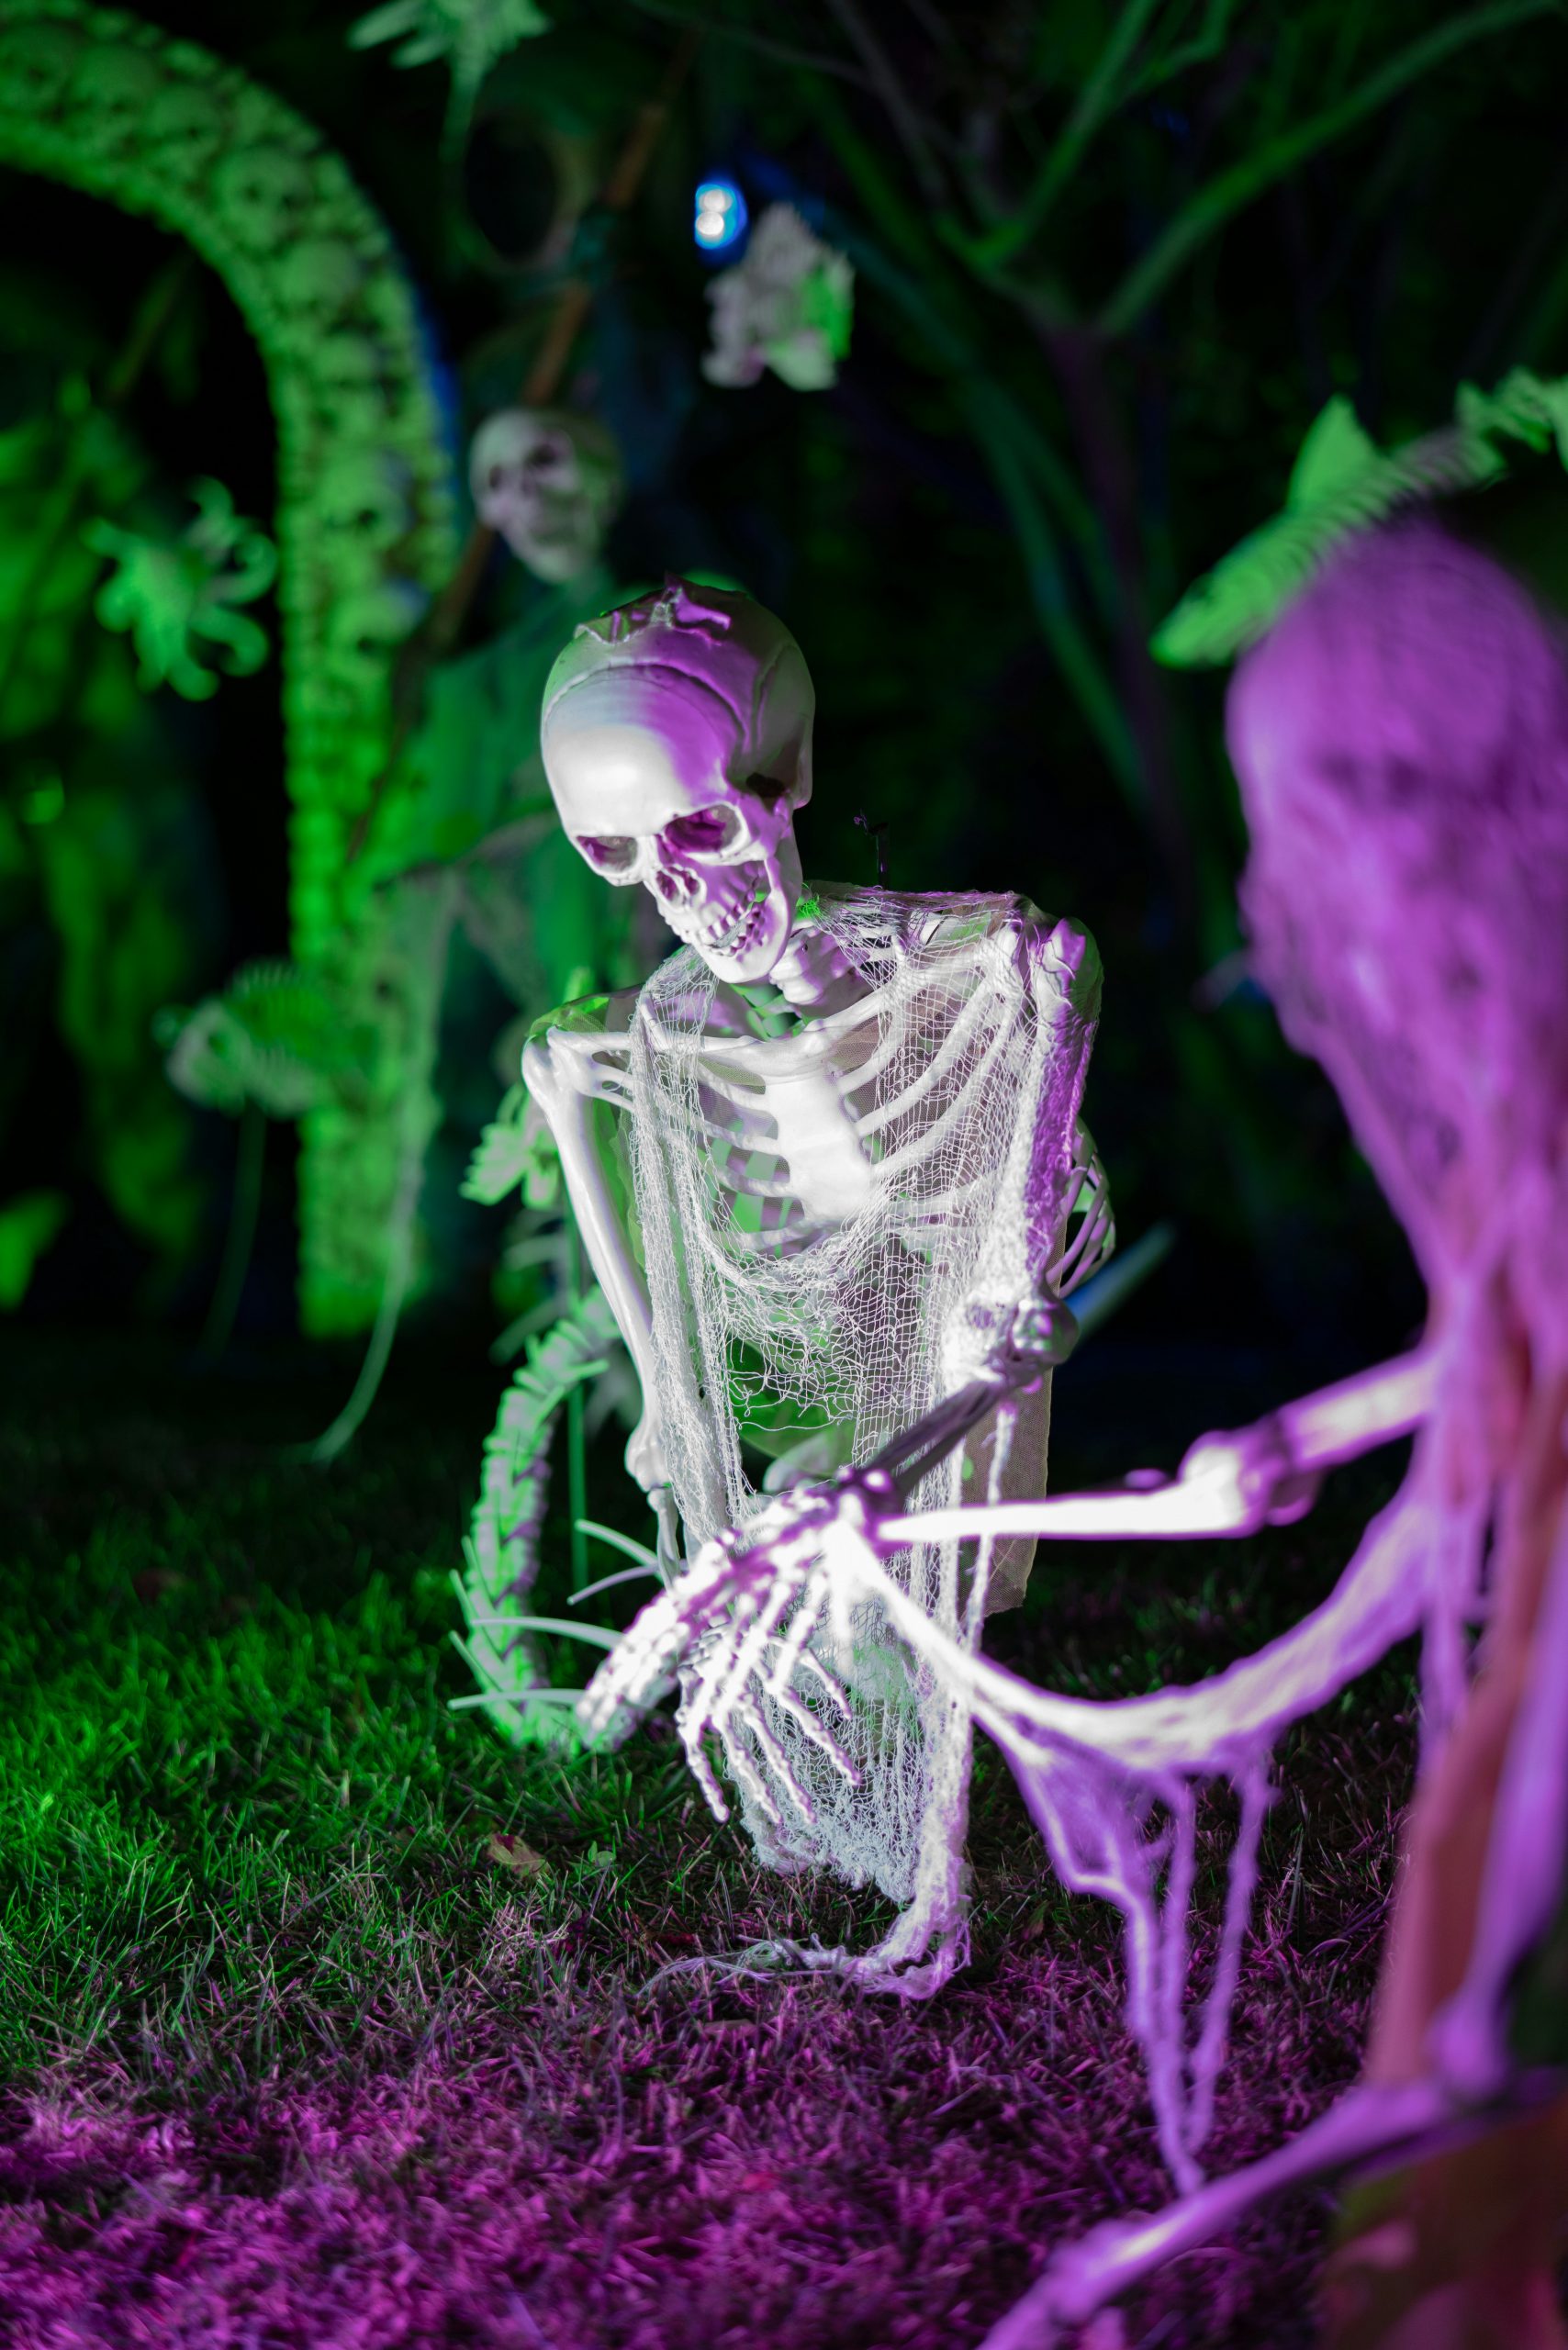
💸 Get This Look For Less
The secret to dynamic Halloween lighting is to use cross-lighting. Instead of pointing a single light source directly at your subject, position two different colored lights on opposite sides. As you can see here, the green light hits the skeleton from the front, while the purple light catches it from the side and back. This creates highlights and shadows, defines the form of the skeletons, and adds a vibrant, supernatural feel that you can’t achieve with a single light source.
21. Ornate Lantern and Cobweb-Covered Pumpkins on Porch
The ornate gold lantern is the key piece that elevates this display. While the pumpkins and cobwebs are classic Halloween, the lantern adds a touch of gothic elegance and sophistication. Its intricate metalwork and warm glow contrast beautifully with the rustic wooden crate and spooky textures. It acts as a central anchor, suggesting a haunted mansion or a forgotten crypt, and makes the entire arrangement feel more curated and thoughtfully designed compared to a simple pile of pumpkins.
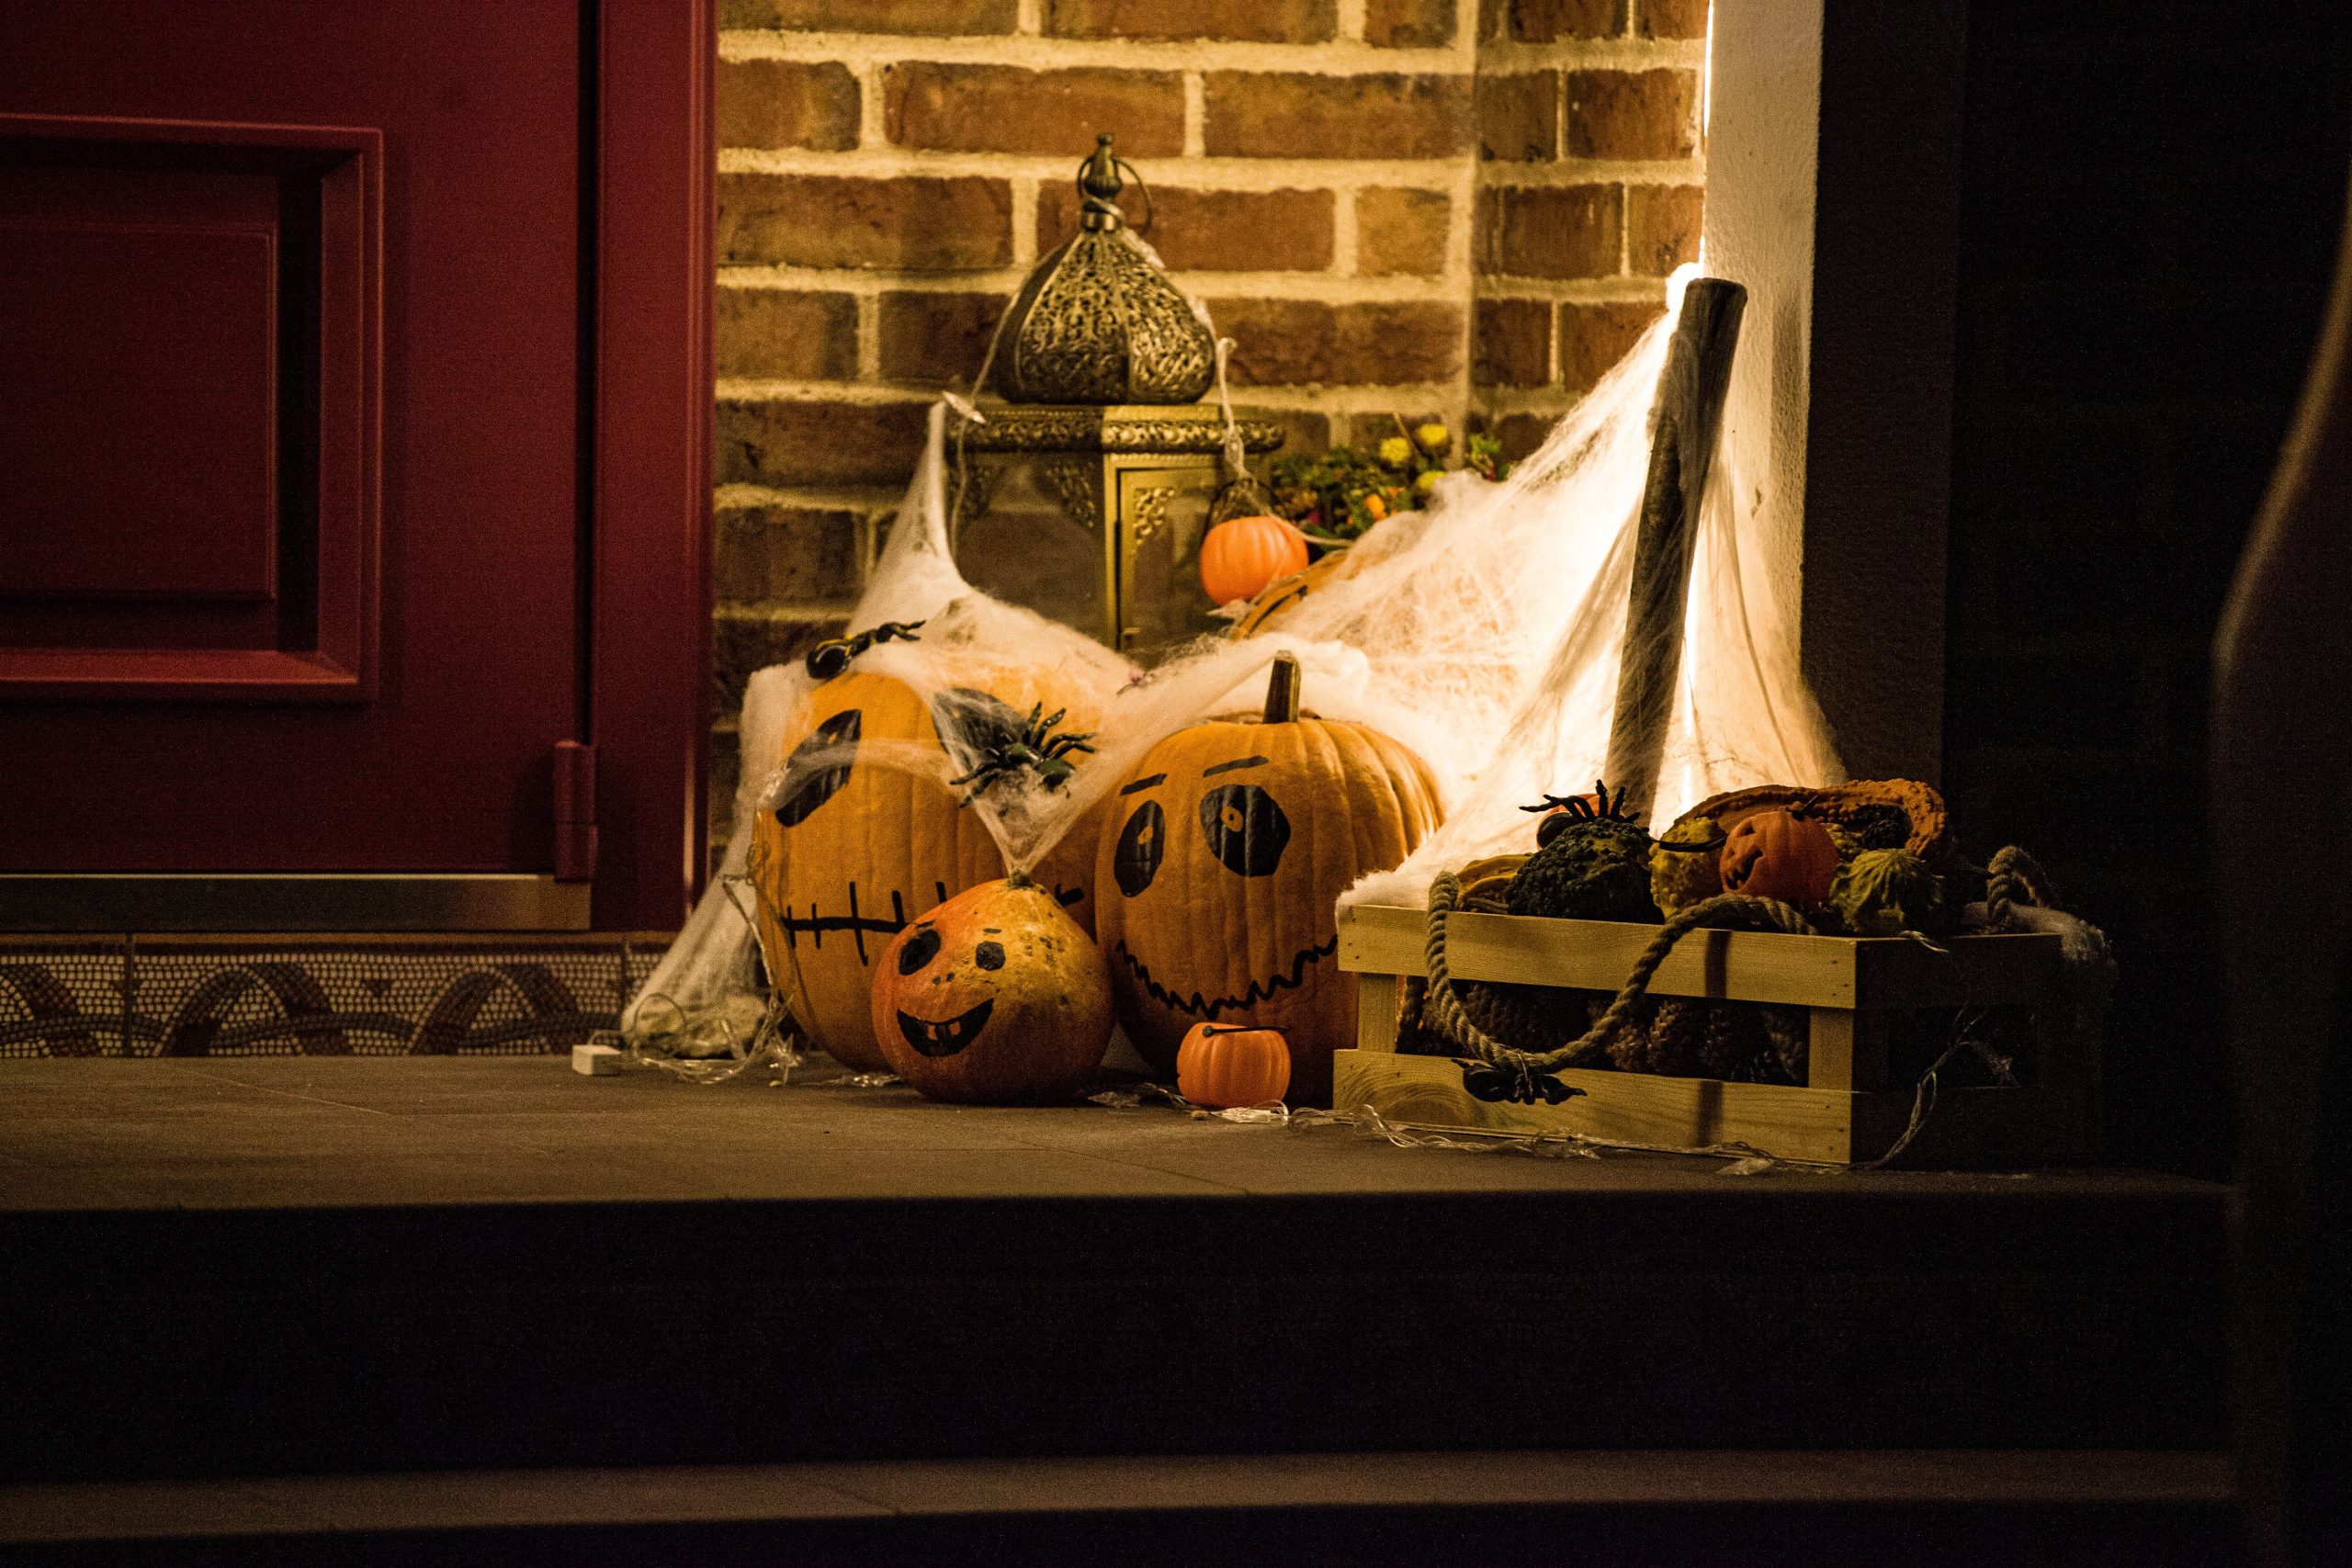
🔥 Trending Context
Get that professionally spooky, multi-layered cobweb look in just a few steps.
- Start with a bag of ‘stretch spider web’ material, not the thick, ropey kind.
- Anchor the web firmly to a few key points first (e.g., the lantern handle, a pumpkin stem, the corner of the crate).
- Now, the most important step: pull it WIDE. Stretch it as thin as you possibly can, until it separates into fine, wispy strands. The thinner you stretch it, the more realistic it looks.
- Once stretched, drape and snag the strands over different elements in your display to create layers.
- Finally, add a few small plastic spiders onto the web to complete the illusion.
This process takes about 10 minutes and is the secret to avoiding clumpy, fake-looking webs.
22. Skeletons in Tuxedos Greeting Guests at an Elegant Entrance
This design is a masterclass in unexpected juxtaposition. The humor and style come from placing formal, elegant elements in a traditionally spooky context. Skeletons are inherently Halloween, but dressing them in black tie tuxedos is brilliantly absurd. The luxurious red carpet runner leading to the door further commits to the bit, treating these bony figures like distinguished guests at a gala. It works because it’s a fully realized, high-concept theme that is both sophisticated and delightfully playful.
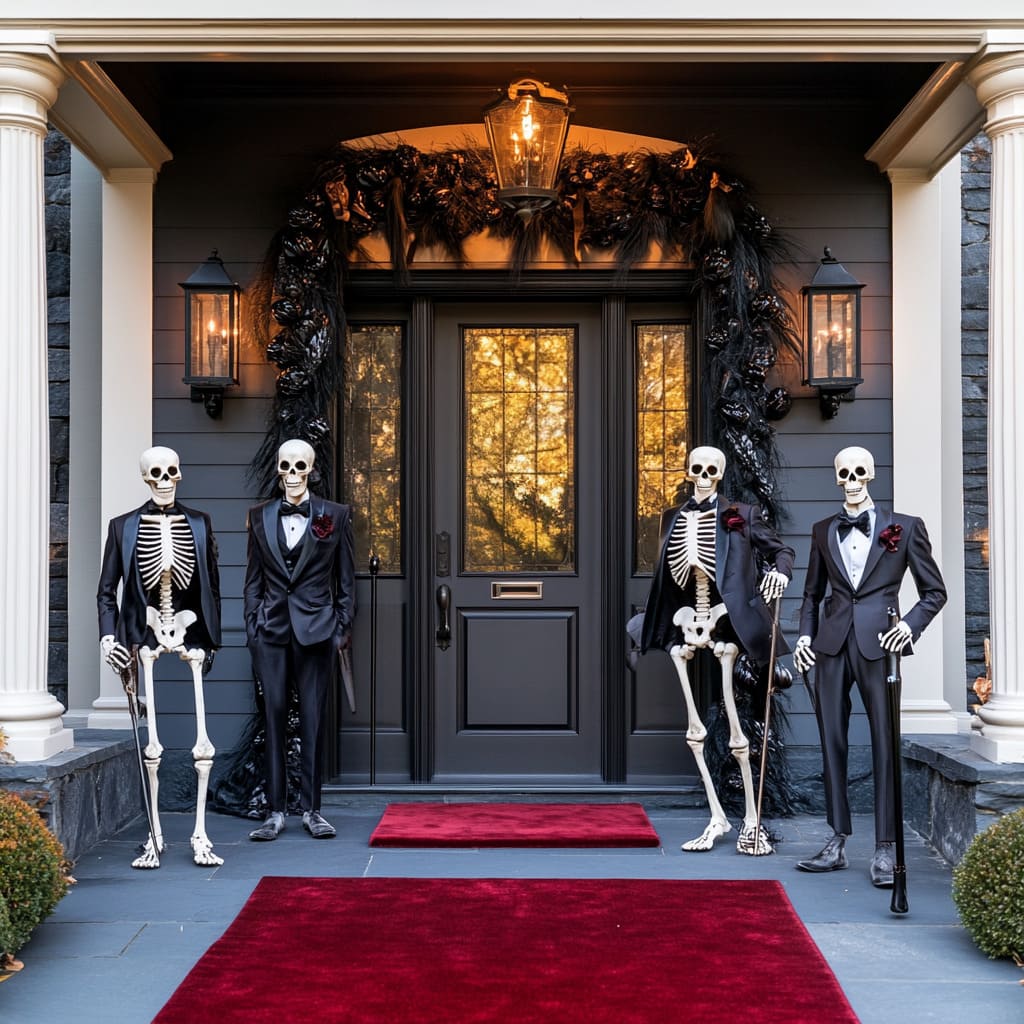
📏 Scale Guide
A grand, symmetrical display like this requires a fitting canvas. This idea is best for homes with a formal, centered entryway. You need a doorway with at least 3-4 feet of clear space on either side to position the skeletons without blocking passage. A porch or landing that is at least 8 feet wide and 5 feet deep is ideal. The long red runner also requires a straight walkway of at least 10-15 feet to have the intended dramatic effect. For smaller entrances, consider a single tuxedoed skeleton doorman instead of the full quartet.
23. Whimsical Skeletons Enjoying a Picnic on the Lawn
The single element that brings this entire scene to life is the posing. It’s not just two skeletons sitting on a blanket; it’s two skeletons actively having a picnic. One is poised to pour a drink, the other gestures towards the food. Their heads are tilted, their limbs are arranged in relaxed, natural positions. This careful articulation turns them from static props into characters in a story. Without the thoughtful posing, the joke wouldn’t land nearly as well.
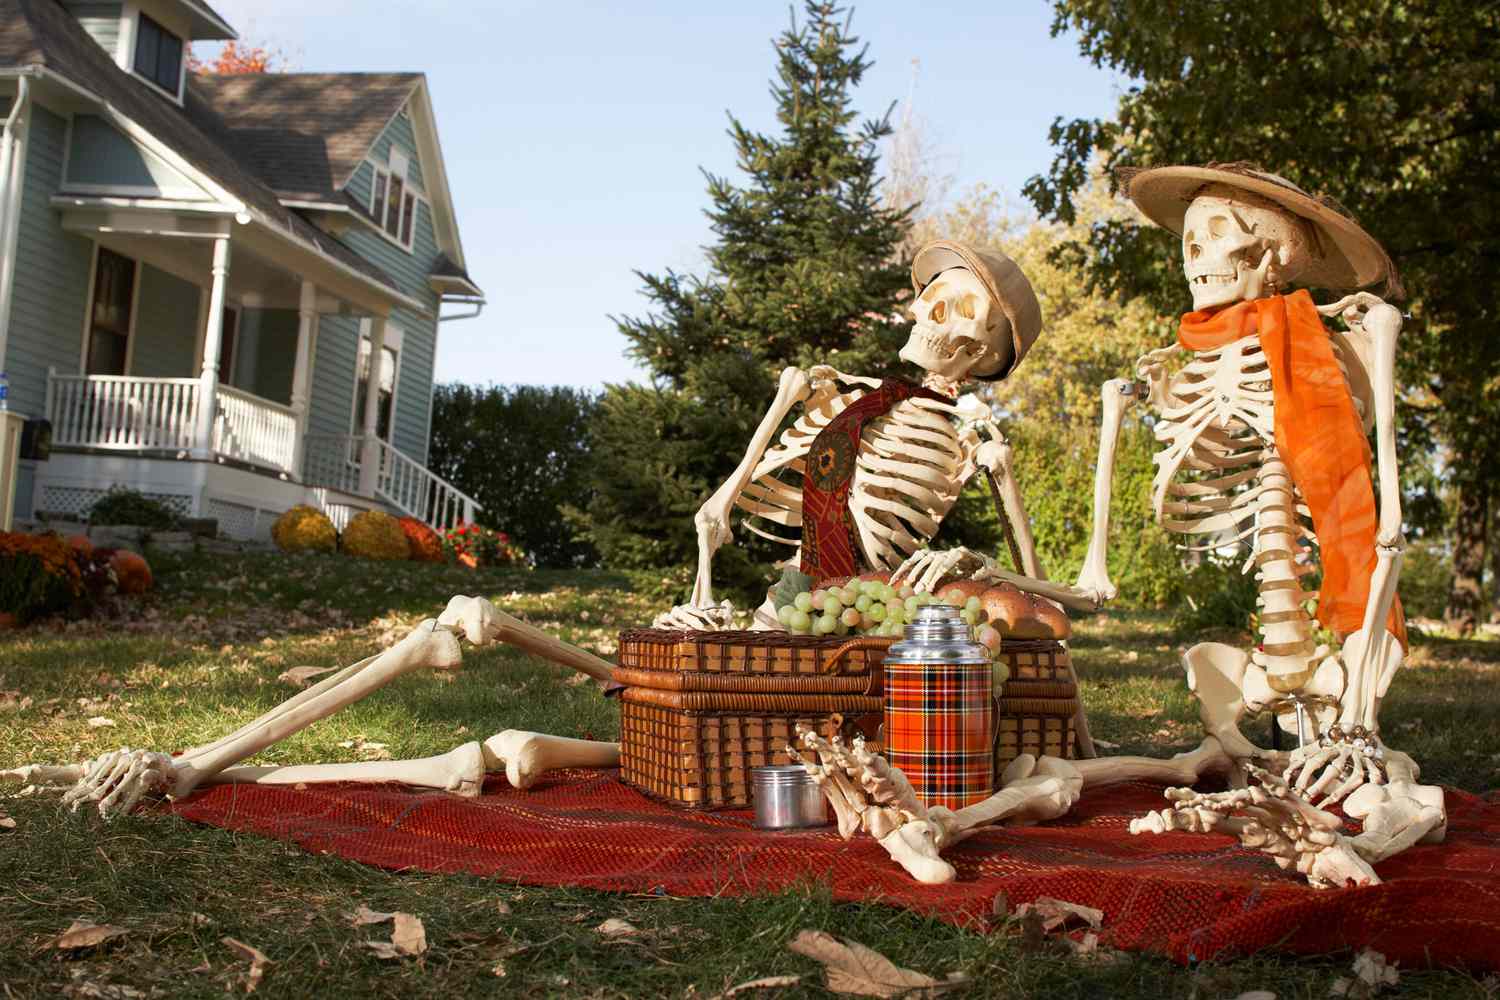
💡 Designer Tip
An outdoor picnic scene is charming, but it’s vulnerable to the elements. A sudden gust of wind can send scarves, hats, and plastic food flying across the yard. A rainstorm can soak the blanket and make the wicker baskets brittle. If you’re planning to leave this display out for an extended period, you’ll need to secure everything. Use fishing line to tie the hats and scarves to the skeletons, and consider gluing the faux food into the baskets for a more permanent, worry-free setup.
24. Ethereal Ghostly Figures with Crowns on a Porch
This stunning, ghostly scene is all about texture and light. The formula is approximately 60% flowing, sheer fabric + 30% strategic warm lighting + 10% regal accessories. The sheer white fabric draped over the mannequins and stairs creates the ethereal, ghostly forms and captures the light beautifully. The warm uplighting from below is what gives the figures their glow and sense of mystery. Finally, the silver crowns and small wings add a touch of unexpected elegance, elevating them from simple ghosts to something more mystical and royal.
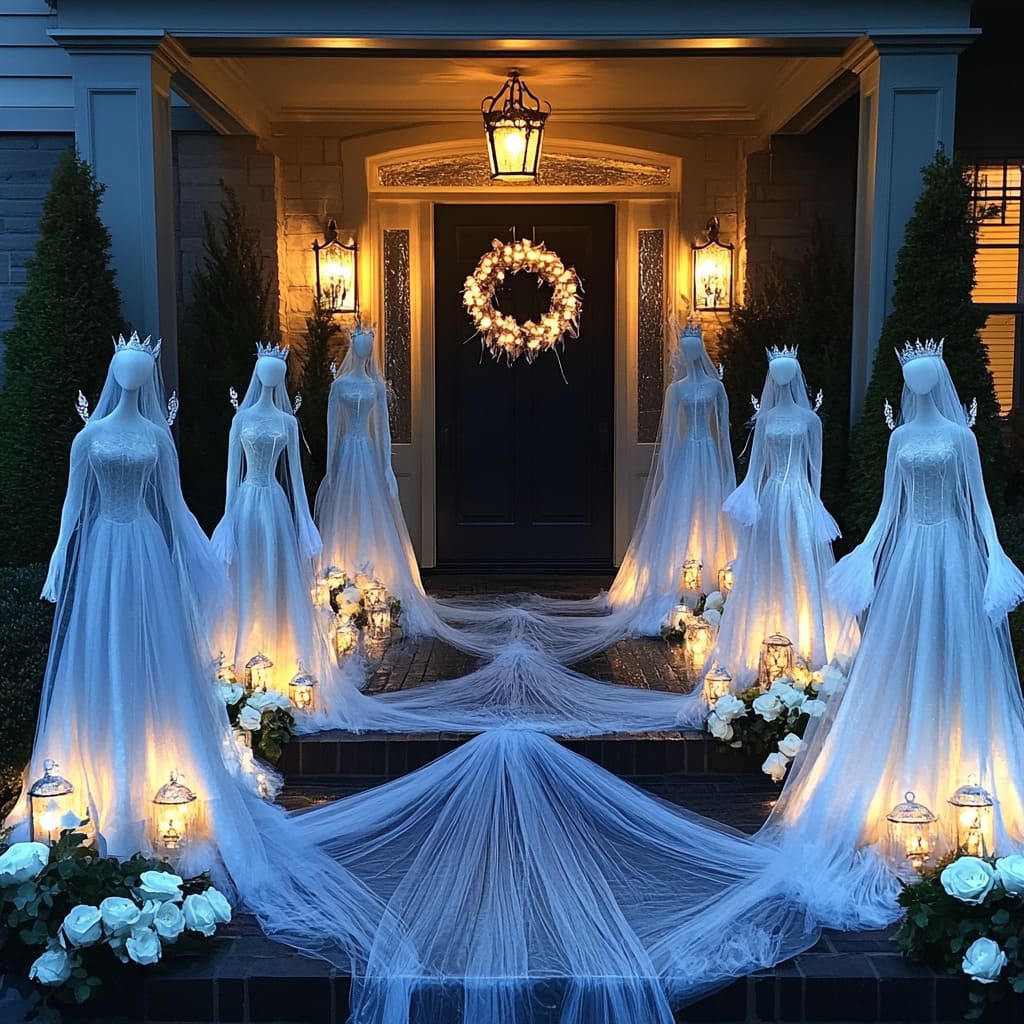
💰 Budget Breakdown
You don’t need expensive mannequins to achieve this look. This is a budget-friendly version of the ghost circle from Idea #3. Create the ghostly forms using tall garden stakes or even tomato cages as a base. Drape them with inexpensive sheer white curtains or tulle from a fabric store. You can craft crowns from silver pipe cleaners or spray-painted cardboard. The key element is the lighting; use inexpensive solar-powered spotlights or string lights bunched at the base of each figure to create that essential spooky glow from within.
25. Spooky Porch Corner with a Witch and Warning Sign
To give your store-bought figures like this witch and skeleton a more custom, high-end look, focus on adding texture. The tattered, layered fabric and long, stringy hair are what make these figures feel genuinely creepy. Buy extra cheesecloth or burlap from a craft store, rip it into strips, and layer it onto your figures. You can even soak it in a bit of watered-down brown or grey paint to give it a grimy, aged appearance. These extra textural details make a huge difference.
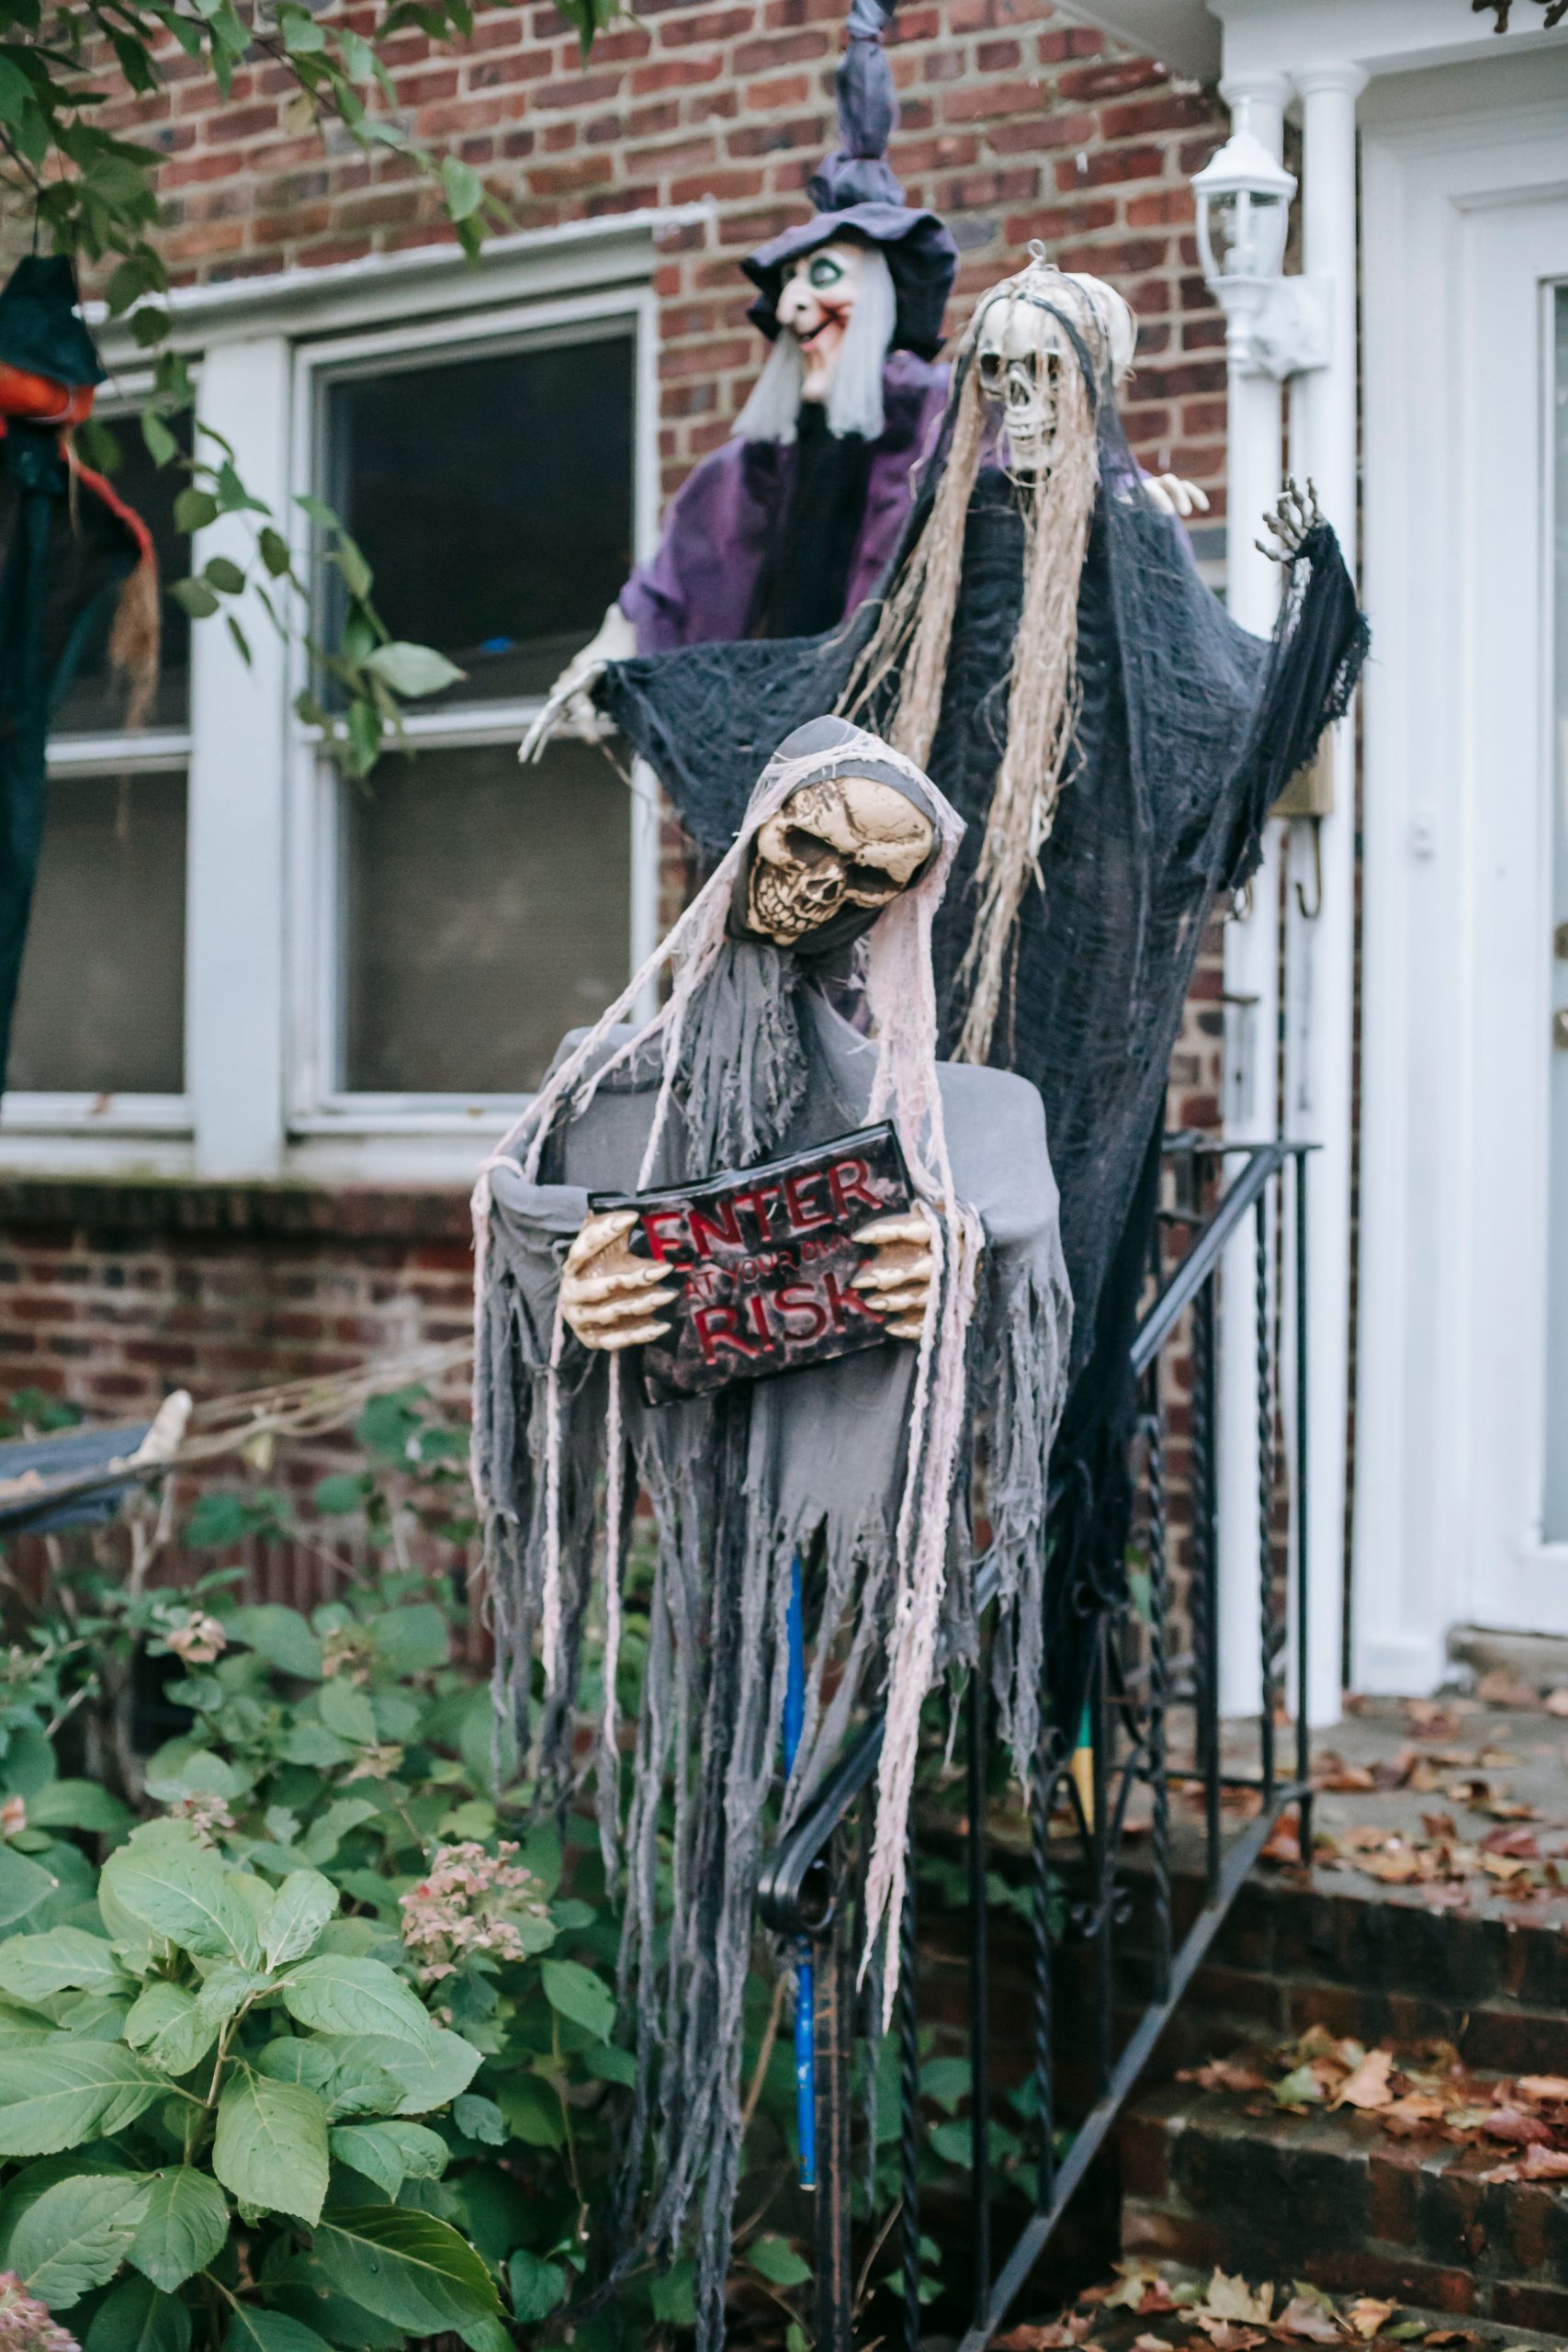
🔧 How-To Brief
This corner display is effective because it uses the principle of layering to create a sense of depth and chaos. The witch figure is placed in the back, while the skeleton with the sign is pushed forward, creating a foreground and background even in a small space. The overlapping, tattered grey fabric is draped over the railing, figures, and floor, visually connecting all the elements into a single, cohesive scene. Adding the ‘ENTER AT YOUR OWN RISK’ sign introduces a narrative element that directly engages the viewer.
26. Spooky Graveyard Scene with Cobwebs and Autumn Leaves
Creating your own mini-cemetery is a classic DIY project with a scalable budget. Here’s a possible breakdown:
- Tombstones: You can buy 3-5 plastic tombstones for $20-$40, or make your own from foam insulation boards for about $15.
- Cobwebs: A large bag of stretchy spider web material is a must. This is a budget-friendly staple at around $5.
- Foliage & Leaves: The autumn leaves are likely free from your own yard! Faux foliage can be added for extra color for about $10 from a craft store.
- Accessories: A plastic skull or other small spooky props can be found at Dollar Tree for $5-$10.
- TOTAL: $40 – $65
Budget alternative: This is already a very budget-friendly idea! To make it even cheaper, focus on making the tombstones yourself from leftover cardboard, painted grey and ‘aged’ with black craft paint.
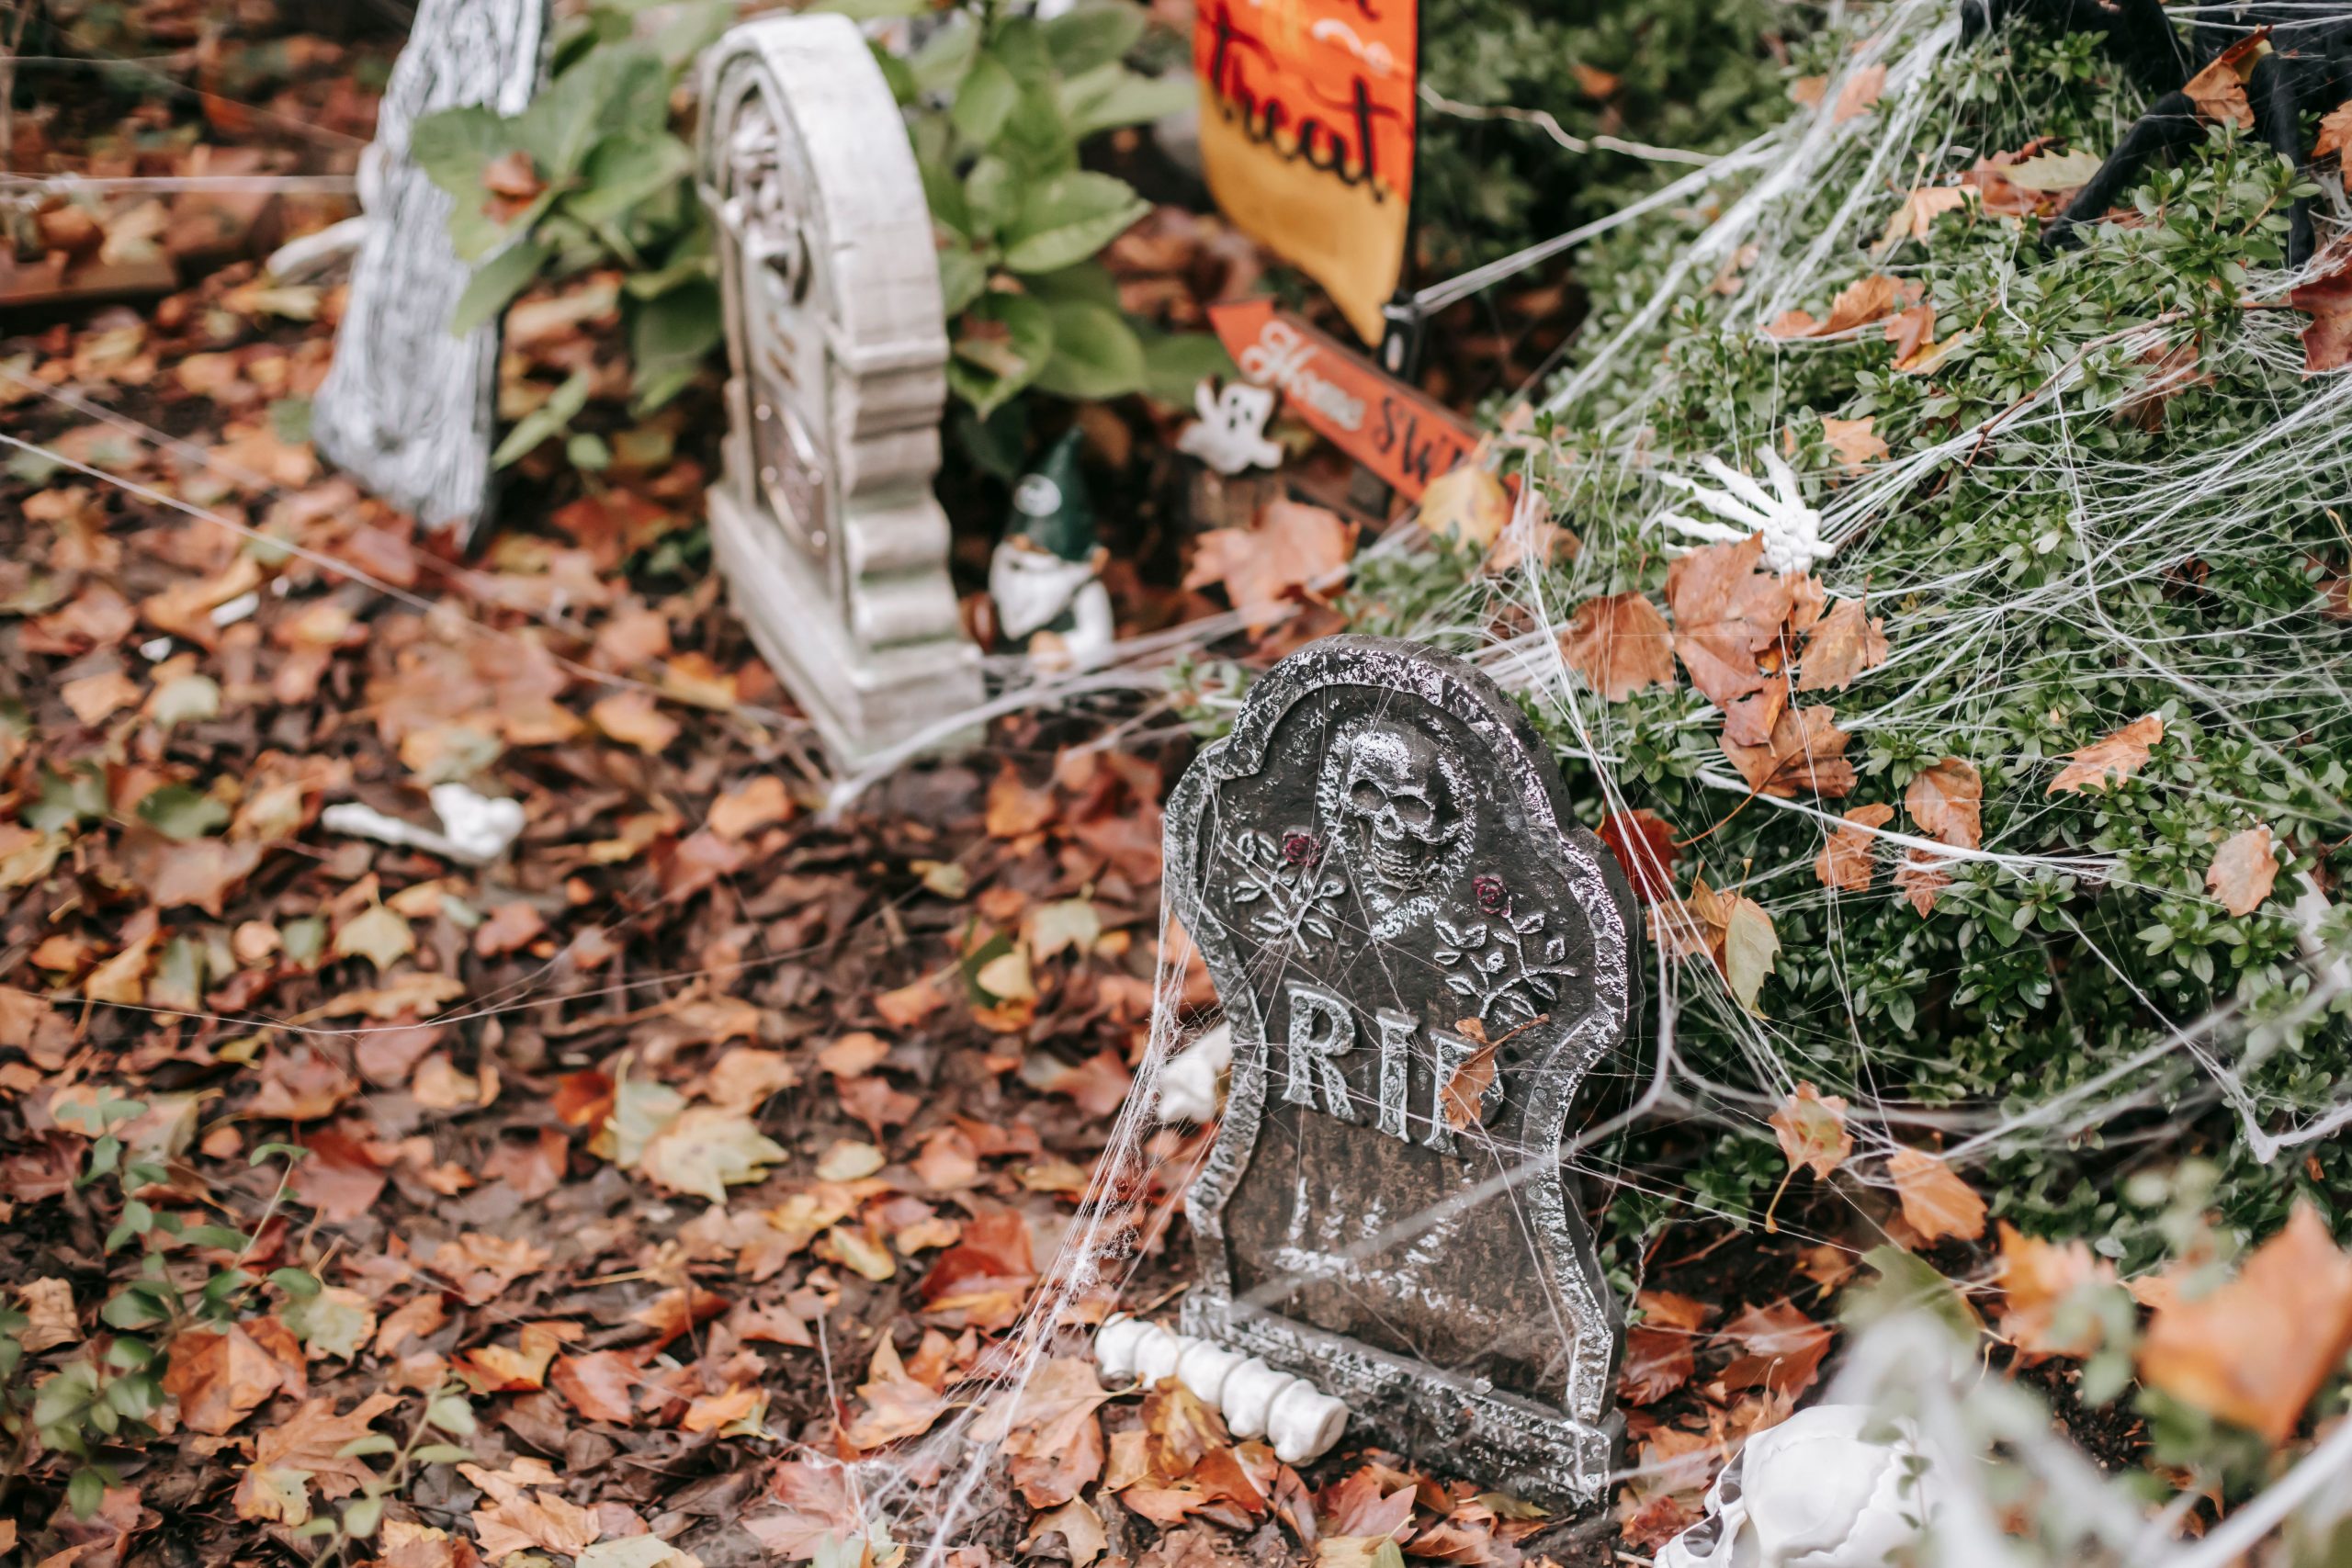
⚠️ Real Talk
Be aware that lightweight foam or plastic tombstones can easily be blown over or carried away by strong autumn winds. Most store-bought tombstones come with flimsy plastic stakes that are not sufficient for holding them securely. You’ll need to upgrade to metal stakes or rebar driven into the ground behind each tombstone to keep them upright throughout the season. The stretched cobwebs can also become a tangled mess after a windy or rainy day, requiring frequent adjustments.
27. DIY Burlap Scarecrow with a Painted Pumpkin Head
The personality of this entire scarecrow comes from its cheerful, hand-painted pumpkin face. The wide, toothy grin, pink nose, and oversized white eyes give it a friendly, whimsical character that is more playful than spooky. If the head were a scary carved jack-o’-lantern or a plain burlap sack, the scarecrow’s entire mood would change. This painted face is the focal point and the source of its undeniable charm, making it perfect for a family-friendly display.
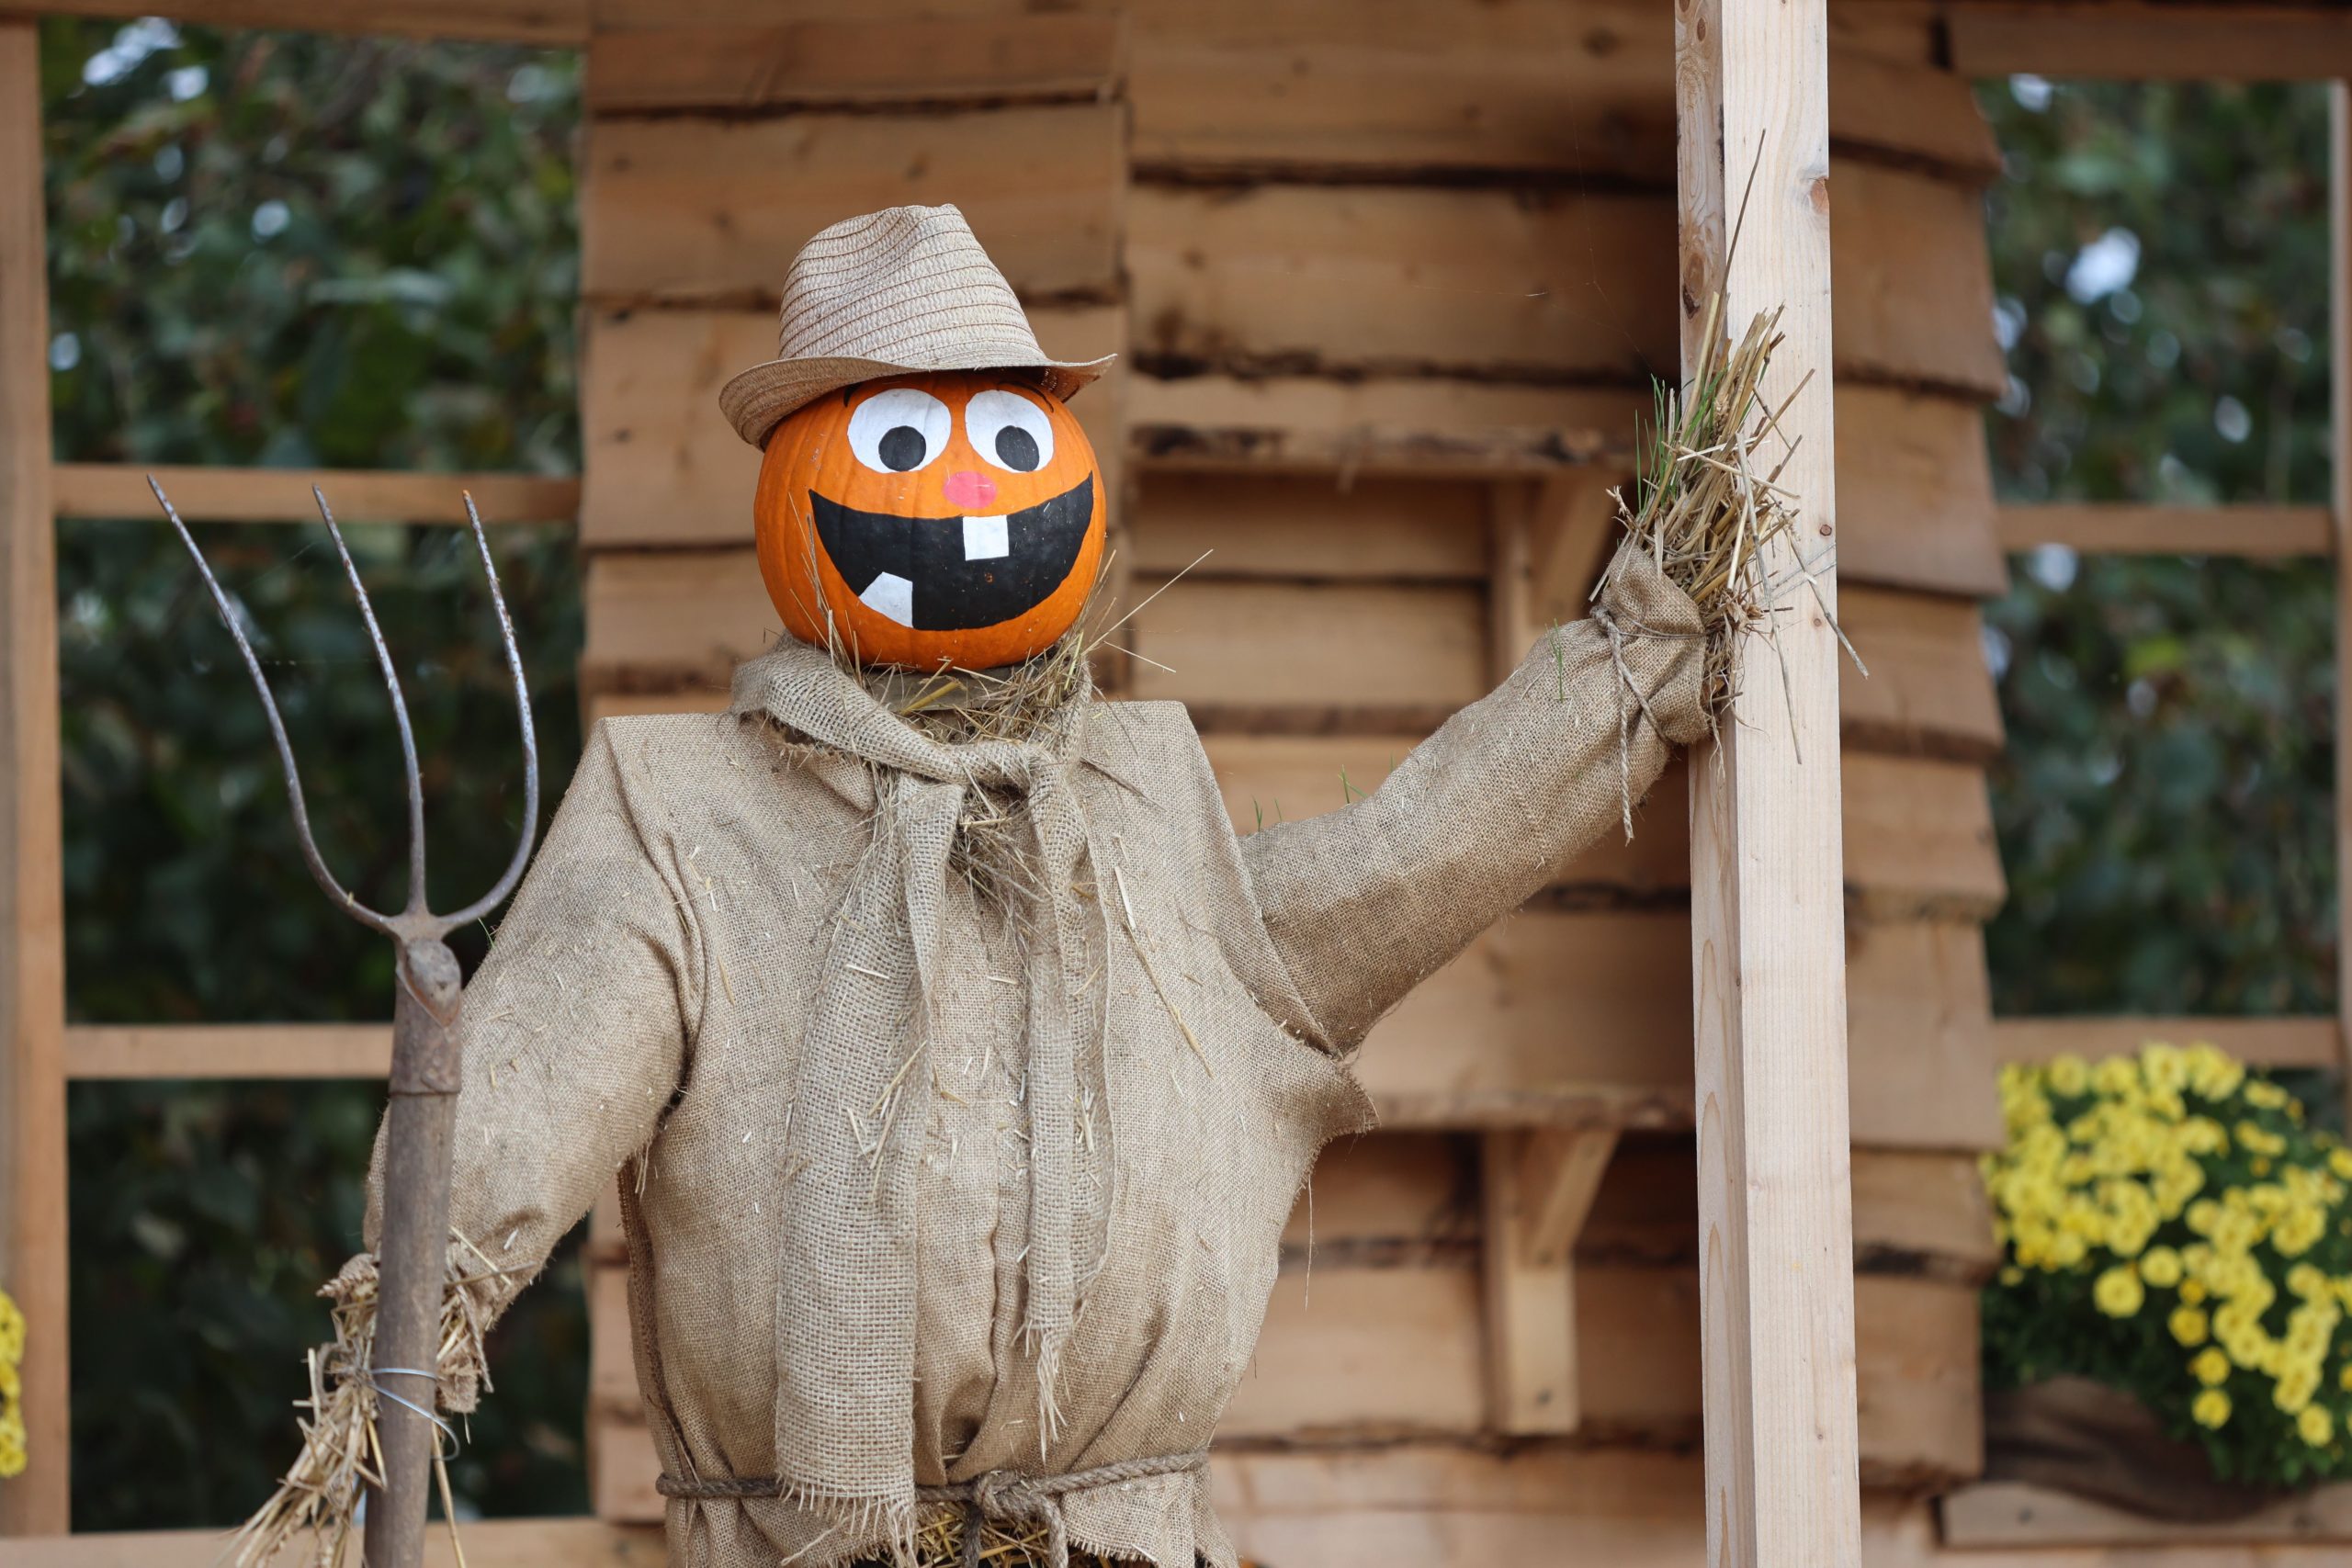
📐 Style Math
Create a charming pumpkin scarecrow head in about 45 minutes.
- Select a medium-sized, round pumpkin for the head. Wipe it clean.
- Using white acrylic paint, create two large round or oval shapes for the eyes. Let them dry.
- With black acrylic paint, add smaller circles inside the white for pupils. Then, paint a wide, smiling mouth and a few square teeth.
- Use pink or red paint for a small triangular or circular nose to add a touch of warmth.
- Once all the paint is completely dry, place a straw hat on top of the pumpkin stem.
- Attach the finished head to your scarecrow body.
This no-carve method ensures your scarecrow head lasts much longer!
28. Giant Scarecrow with Carved Pumpkin Head in an Autumn Display
A figure of this magnitude needs room to breathe. This giant scarecrow works best as the centerpiece of a large yard display, requiring a minimum of a 15×15 foot area to feel properly staged. Its impressive height (likely 8-10 feet) would overwhelm a small porch or tiny front lawn. The success of this idea relies on having enough surrounding space for the accompanying elements like hay bales, potted flowers, and scattered pumpkins, which help to balance its scale and ground it in the landscape. It’s a go-big-or-go-home concept.
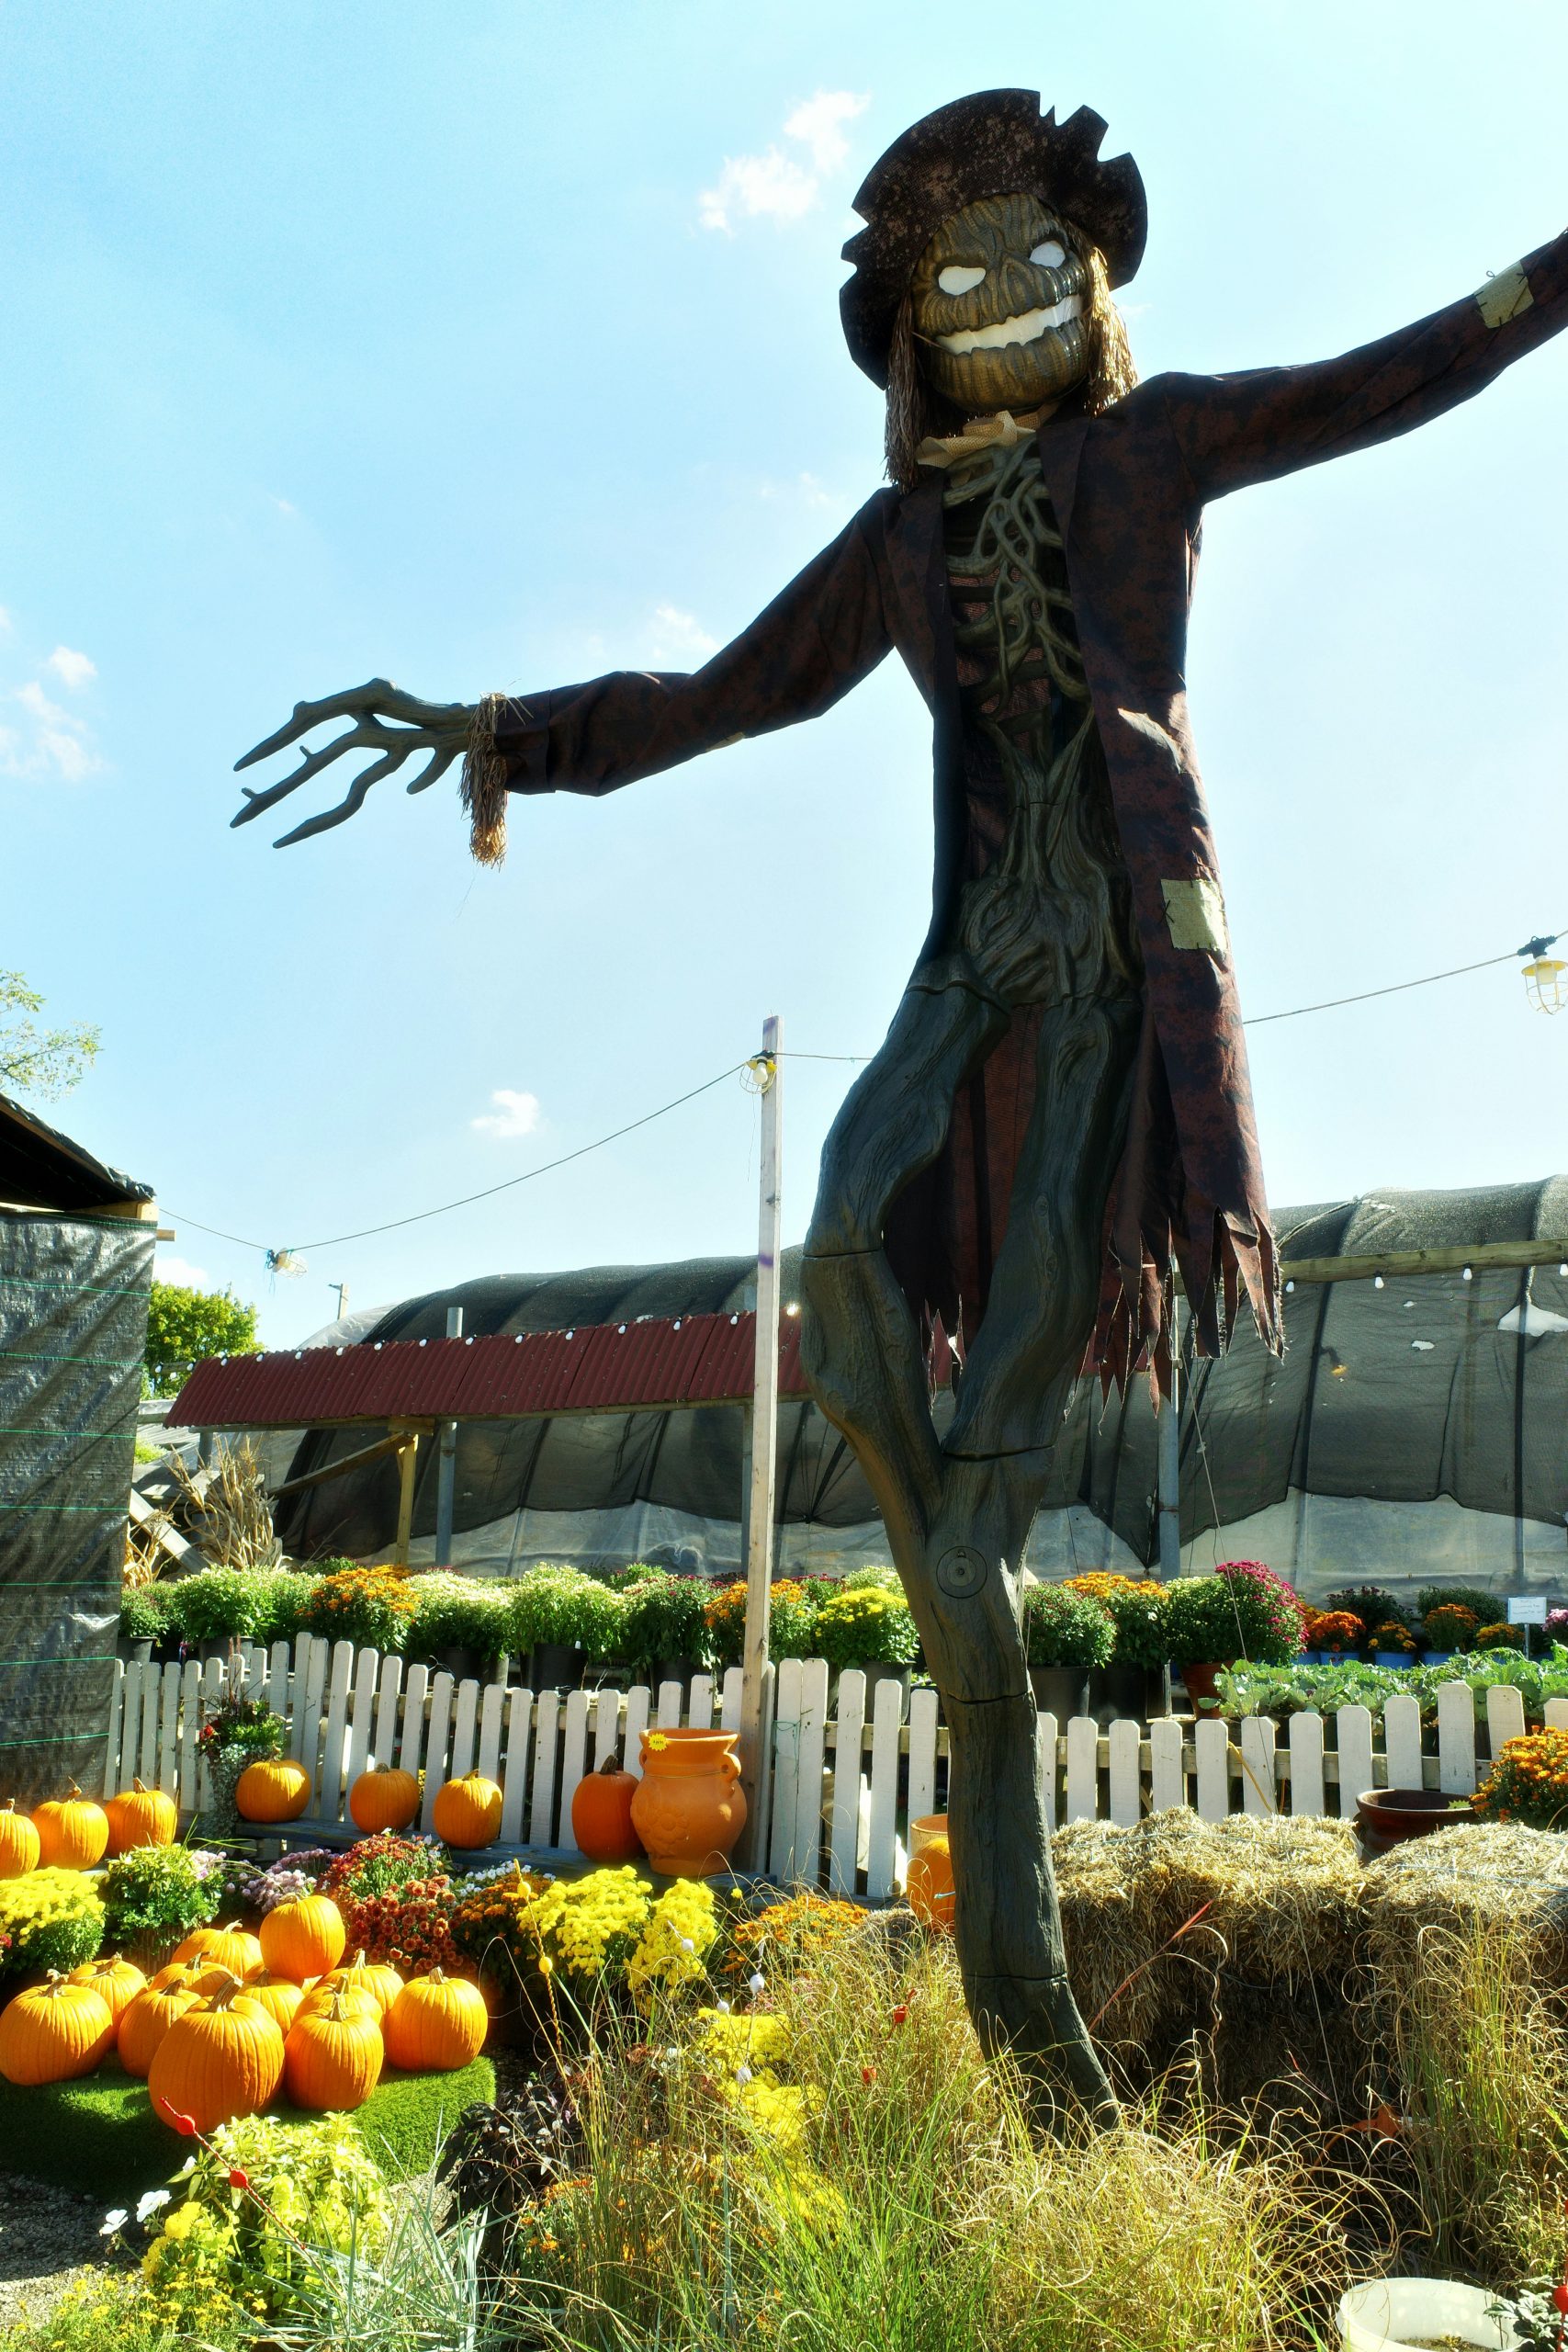
🧹 Maintenance Reality
For a giant figure like this, creating convincing hands is crucial to selling the illusion. Don’t just stuff gloves with straw. Use gnarled branches or bundles of twigs tied together with twine to form the hands and fingers. This creates a much more organic, creepy, and structurally interesting look than soft, floppy gloves. The rigid, claw-like shape of the branch hands, as seen here, adds significantly to the scarecrow’s spooky character. It’s a detail that makes a huge impact.
29. Festive Fall Porch with Mums and a Wire-Frame Pumpkin
This design is so pleasing because it expertly mixes different representations of the same object: the pumpkin. We see a classic jack-o’-lantern candy dish, a sculptural wire-frame pumpkin, and the living, breathing ‘pumpkin-colored’ chrysanthemums. This repetition with variation is a sophisticated design technique that feels cohesive without being boring. The range of textures—shiny ceramic, rustic wire, and soft petals—creates a rich, layered look that celebrates the autumn season in a multi-dimensional way.
✅ Before You Start
Live chrysanthemums are the star of many fall displays, but they do require some care to stay looking their best through Halloween. Mums need consistent moisture, so be prepared to water them every other day, especially if they are in direct sunlight. To encourage continuous blooming, you’ll need to ‘deadhead’ them by pinching off the spent, wilted flowers. This tells the plant to direct its energy into producing new buds, keeping your display vibrant and colorful all season long.
30. Playful Skeletons Peeking Over a Brick Wall
The single element that makes this idea work is the wall. The wall is not just a backdrop; it is an essential part of the narrative. It creates a barrier that the skeletons are interacting with, giving them a purpose and a sense of playful mischief as they peek over. Without the wall, you would just have two skeletons lying in the grass. The act of ‘peeking’ is what tells the story and creates the humor. It leverages an existing landscape feature to create a dynamic and clever scene. A similar effect could be achieved with a fence or a large hedge.
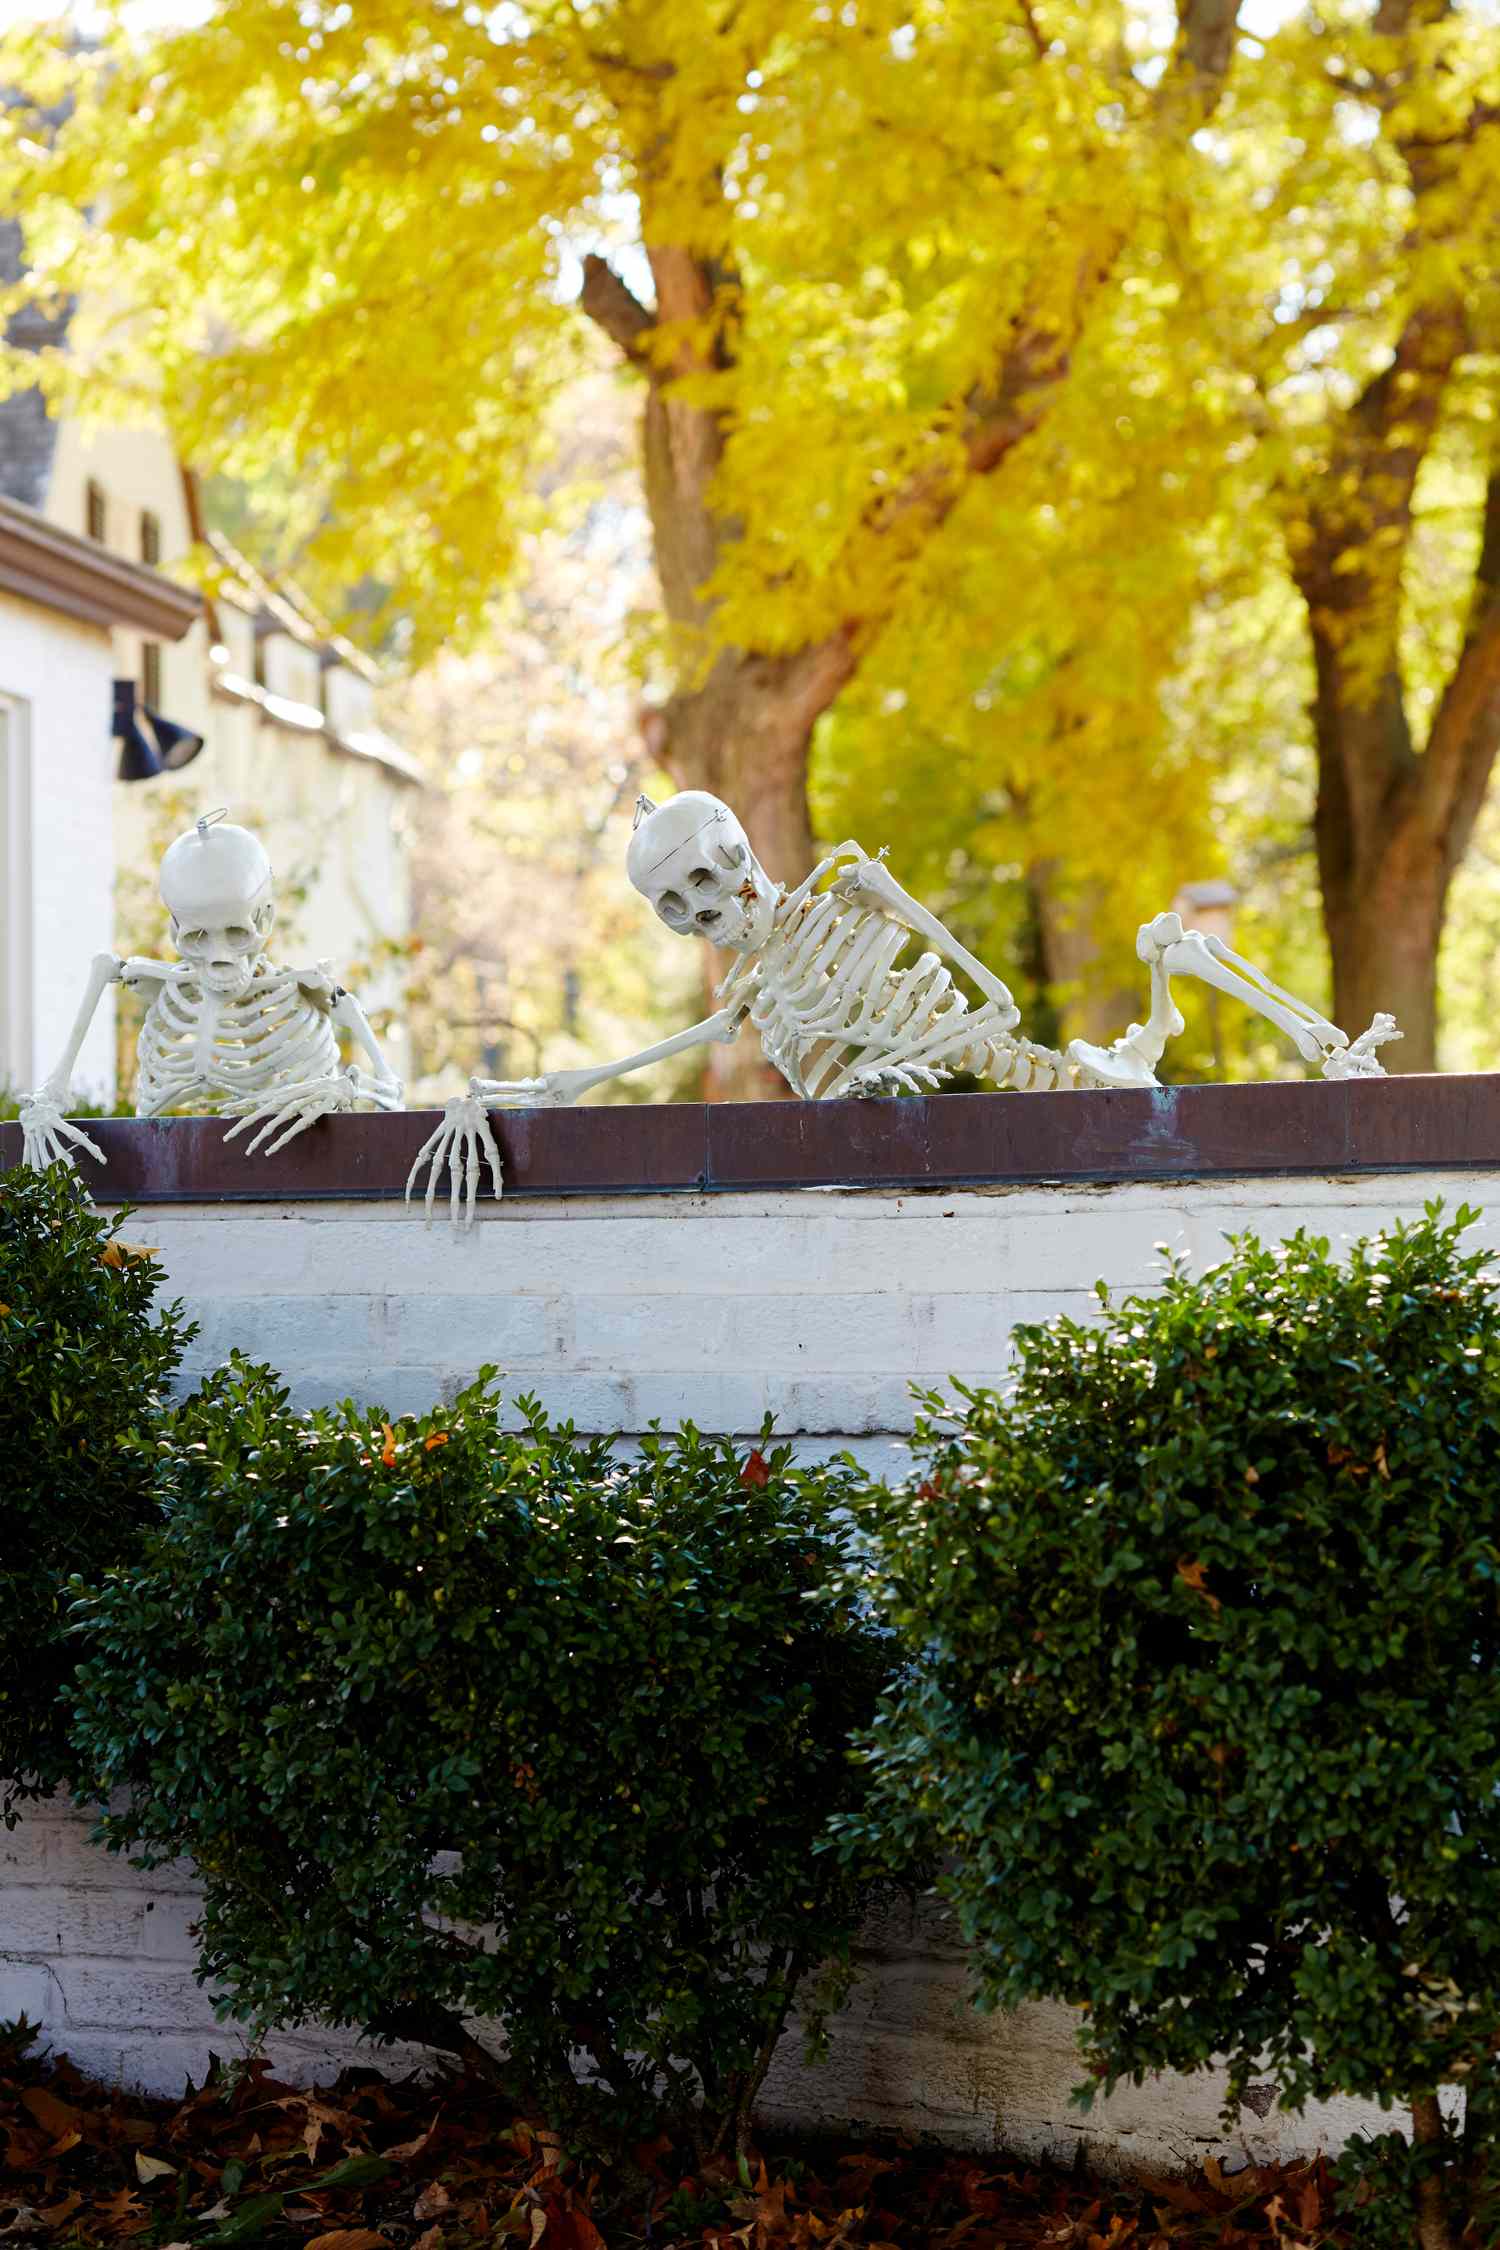
🎯 What Makes It Work
Love this idea but don’t have a low brick wall in your front yard? You can easily fake it! Get a few lightweight, faux stone wall panels from a home improvement store (they’re often used for garden edging). Prop them up and brace them from behind with stakes. Place your skeletons behind the faux wall, and you’ve got the same peeking effect for under $50. You could also achieve a similar look by having the skeletons peeking out from behind a large bush or a strategically placed hay bale, as seen in Idea #2.
31. Glowing Pumpkin-Shaped Path Lights Along a Walkway
When installing path lights, spacing is everything. The biggest mistake people make is placing them too far apart. For maximum impact and effective pathway lighting, place your pumpkin stakes no more than 2-3 feet apart. This creates a strong, continuous line of light that draws the eye and clearly defines the walkway for trick-or-treaters. Any further apart, and the effect becomes diluted and patchy. A tighter grouping makes the decoration look more intentional and abundant.
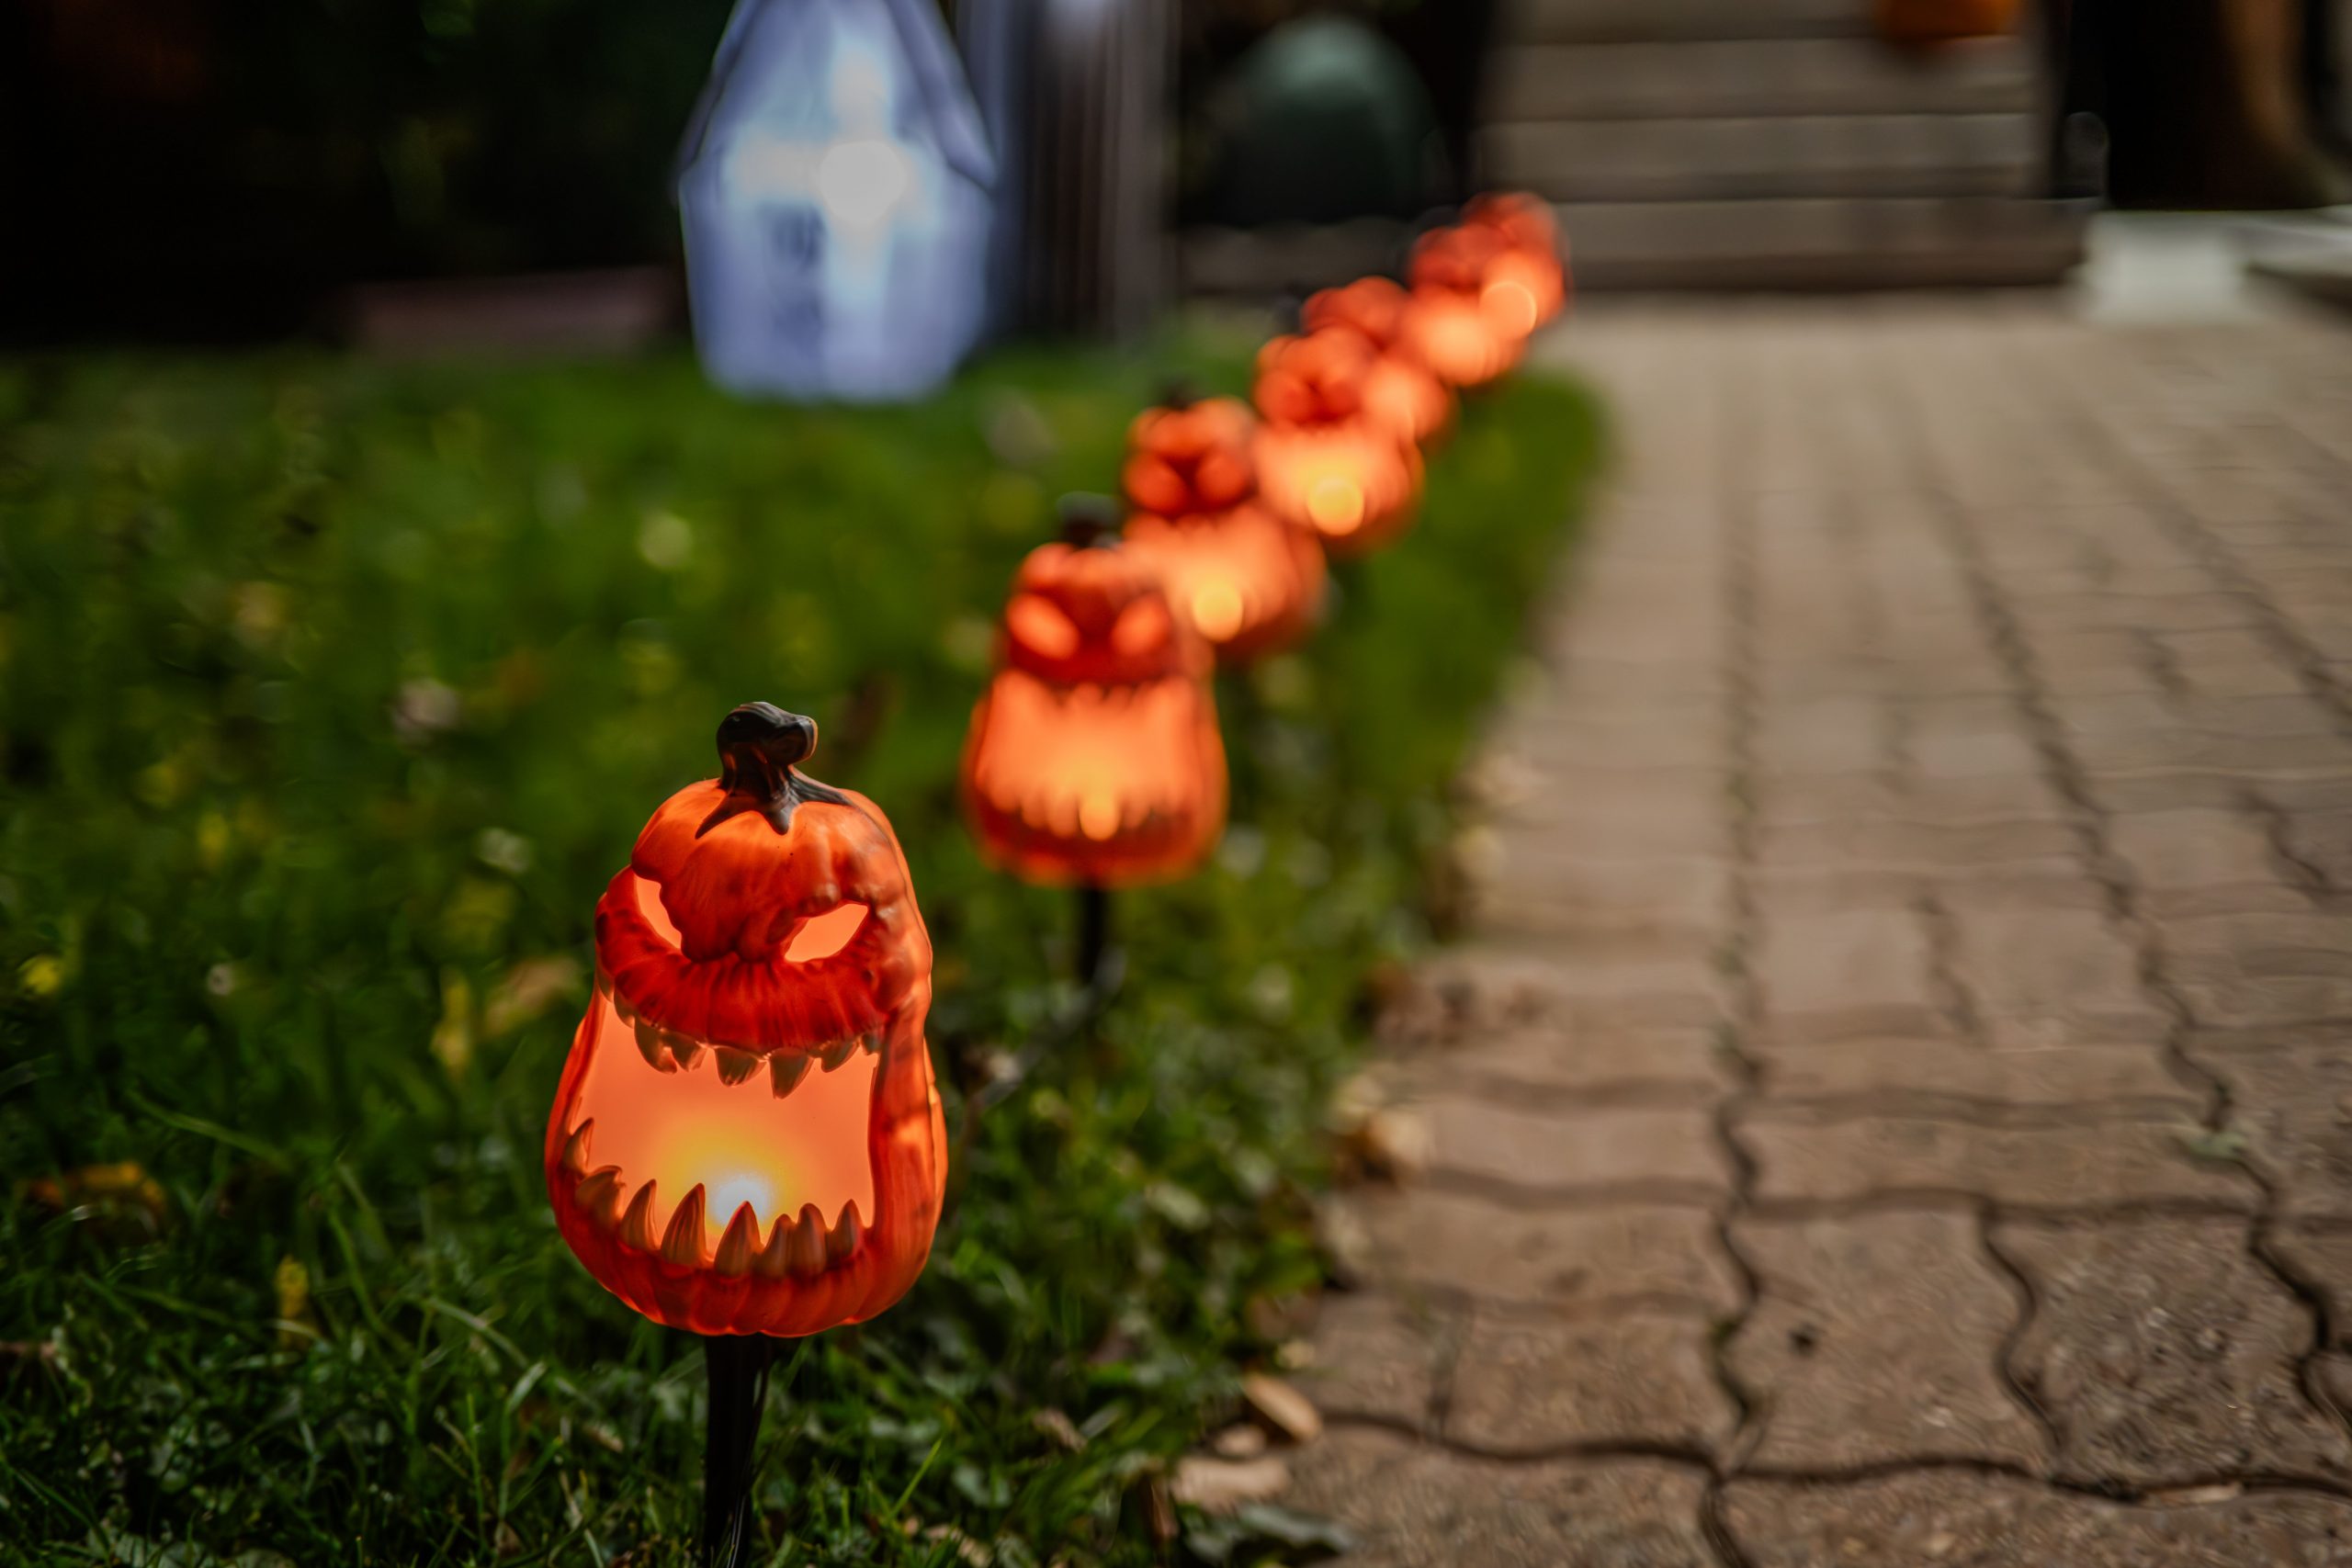
⭐ The One Thing
This idea is effective for two reasons: function and form. Functionally, it provides safe, clear illumination for a path, guiding visitors and trick-or-treaters to the door after dark. This is especially important on Halloween night. Form-wise, the repetition of the glowing pumpkin shapes creates a strong visual rhythm that is incredibly pleasing to the eye. It’s a simple, clean, and organized way to add a significant amount of festive cheer without creating clutter.
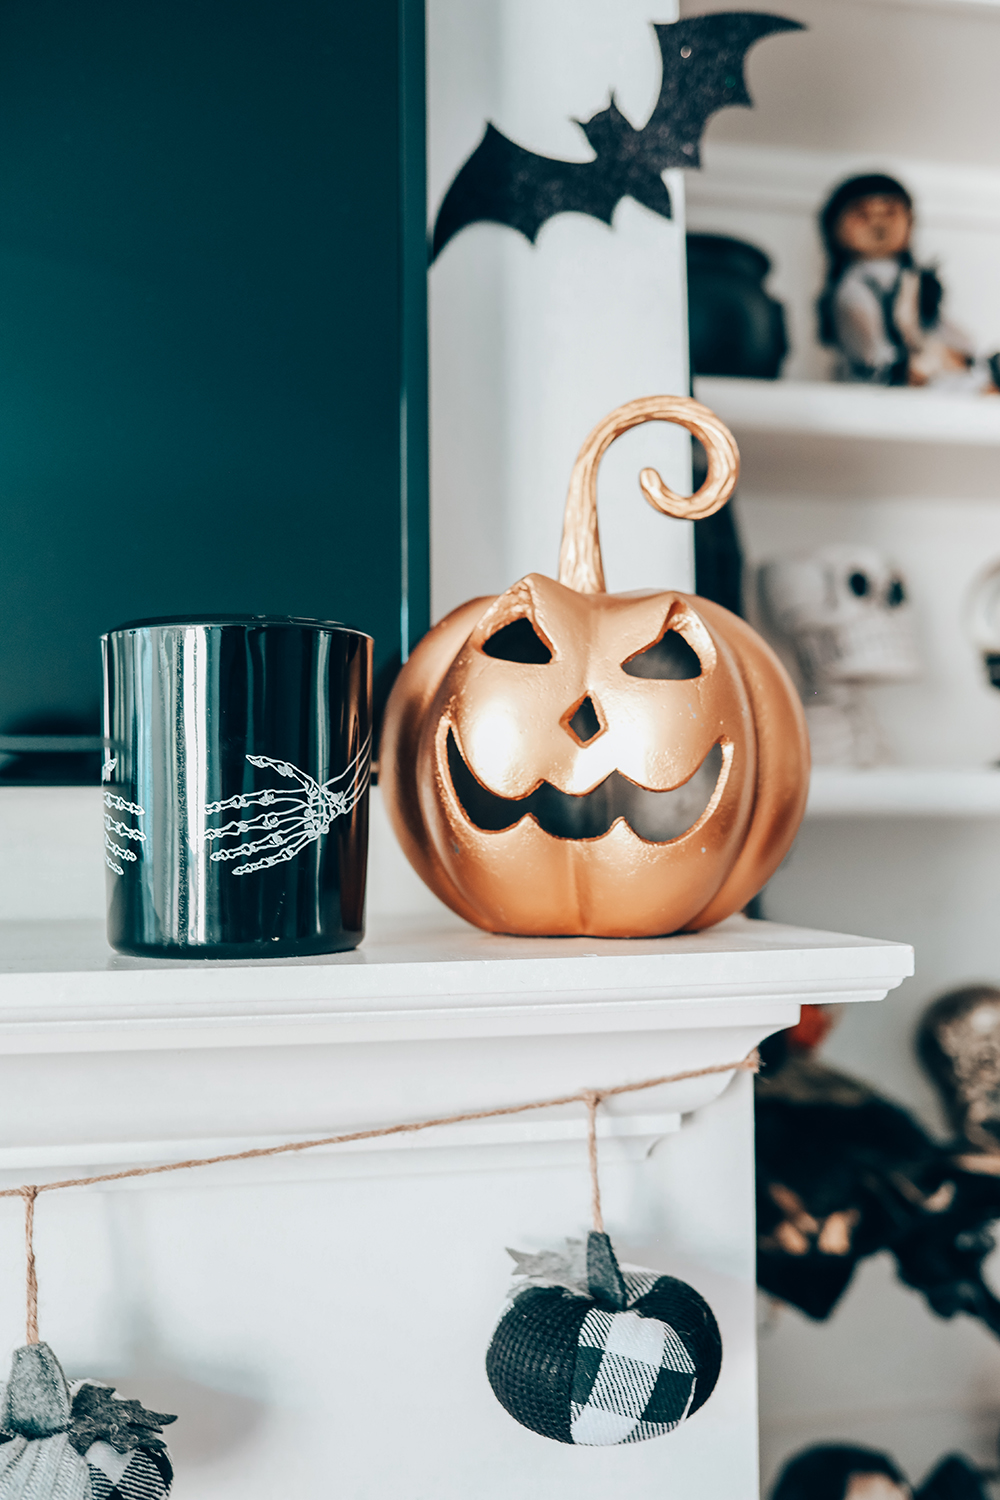
32. Modern Mantel with a Gold Pumpkin and Buffalo Plaid
This chic mantel display follows a simple and effective formula: 50% modern glam + 30% rustic charm + 20% classic spooky. The shiny gold jack-o’-lantern and sleek black candle holder provide the modern glamour. The buffalo plaid pumpkin garland brings in a touch of cozy, rustic farmhouse charm. And the single black bat cutout adds just the right amount of classic, spooky fun without overwhelming the sophisticated aesthetic. This balanced mix is what makes the look feel current and curated.
💸 Get This Look For Less
This look is perfectly in sync with the 2026 ‘dopamine decor’ trend, which is all about using colors, textures, and finishes that bring you joy. The shiny gold pumpkin is a perfect example—it’s playful, luxurious, and provides a happy little pop of metallic shine. Combining it with the comfortable, familiar pattern of buffalo plaid creates a look that is both aspirational and down-to-earth. It shows that Halloween decor doesn’t have to be cheesy; it can be just as stylish and personalized as your everyday interior design.
Your Halloween Lookbook Is Complete
We’ve walked through everything from playful pumpkins to full-blown ghostly graveyards. Each idea is a starting point, ready for you to adapt and make your own. Now it’s your turn to pick a favorite, get creative, and start decorating.
Don’t forget to save this guide to your Halloween board on Pinterest! You’ll have all this inspiration ready to go when it’s time to bring your spooky vision to life.