You know that feeling when you finally find the DIY headboard that looks exactly right for your space, only to realize the tutorial is from a decade ago? It’s frustrating. A headboard isn’t just a piece of furniture; it’s the anchor of your bedroom, but finding an idea that feels fresh and actually doable can feel like searching for a needle in a Pinterest haystack.
We’ve done the deep-dive for you, filtering through hundreds of options to bring you the 28 most creative and inspiring DIY headboard ideas that truly work for 2026. This isn’t just a list of pretty pictures; it’s a curated guide packed with actionable advice, covering styles from modern and rustic to elegant and boho. We’re showing you how to bring these looks to life with materials from places like Home Depot, Etsy, and even Facebook Marketplace, with projects ranging from a simple $50 update to a more involved $500 weekend build. And stay until the end — we break down the most common mistakes that can ruin these looks.
📌 Save this to Pinterest for later — you’ll want to revisit these ideas.
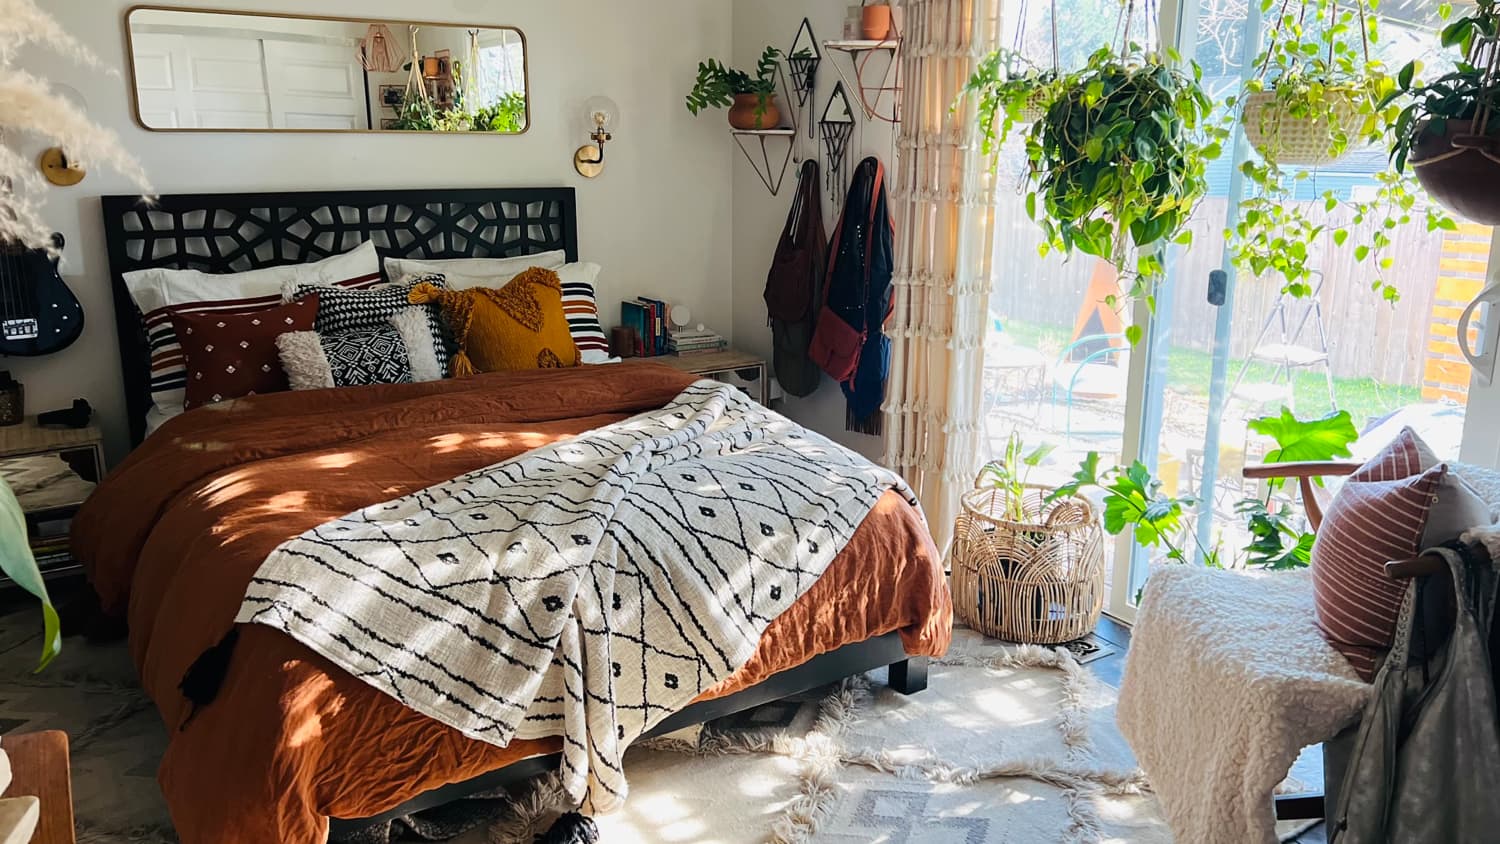
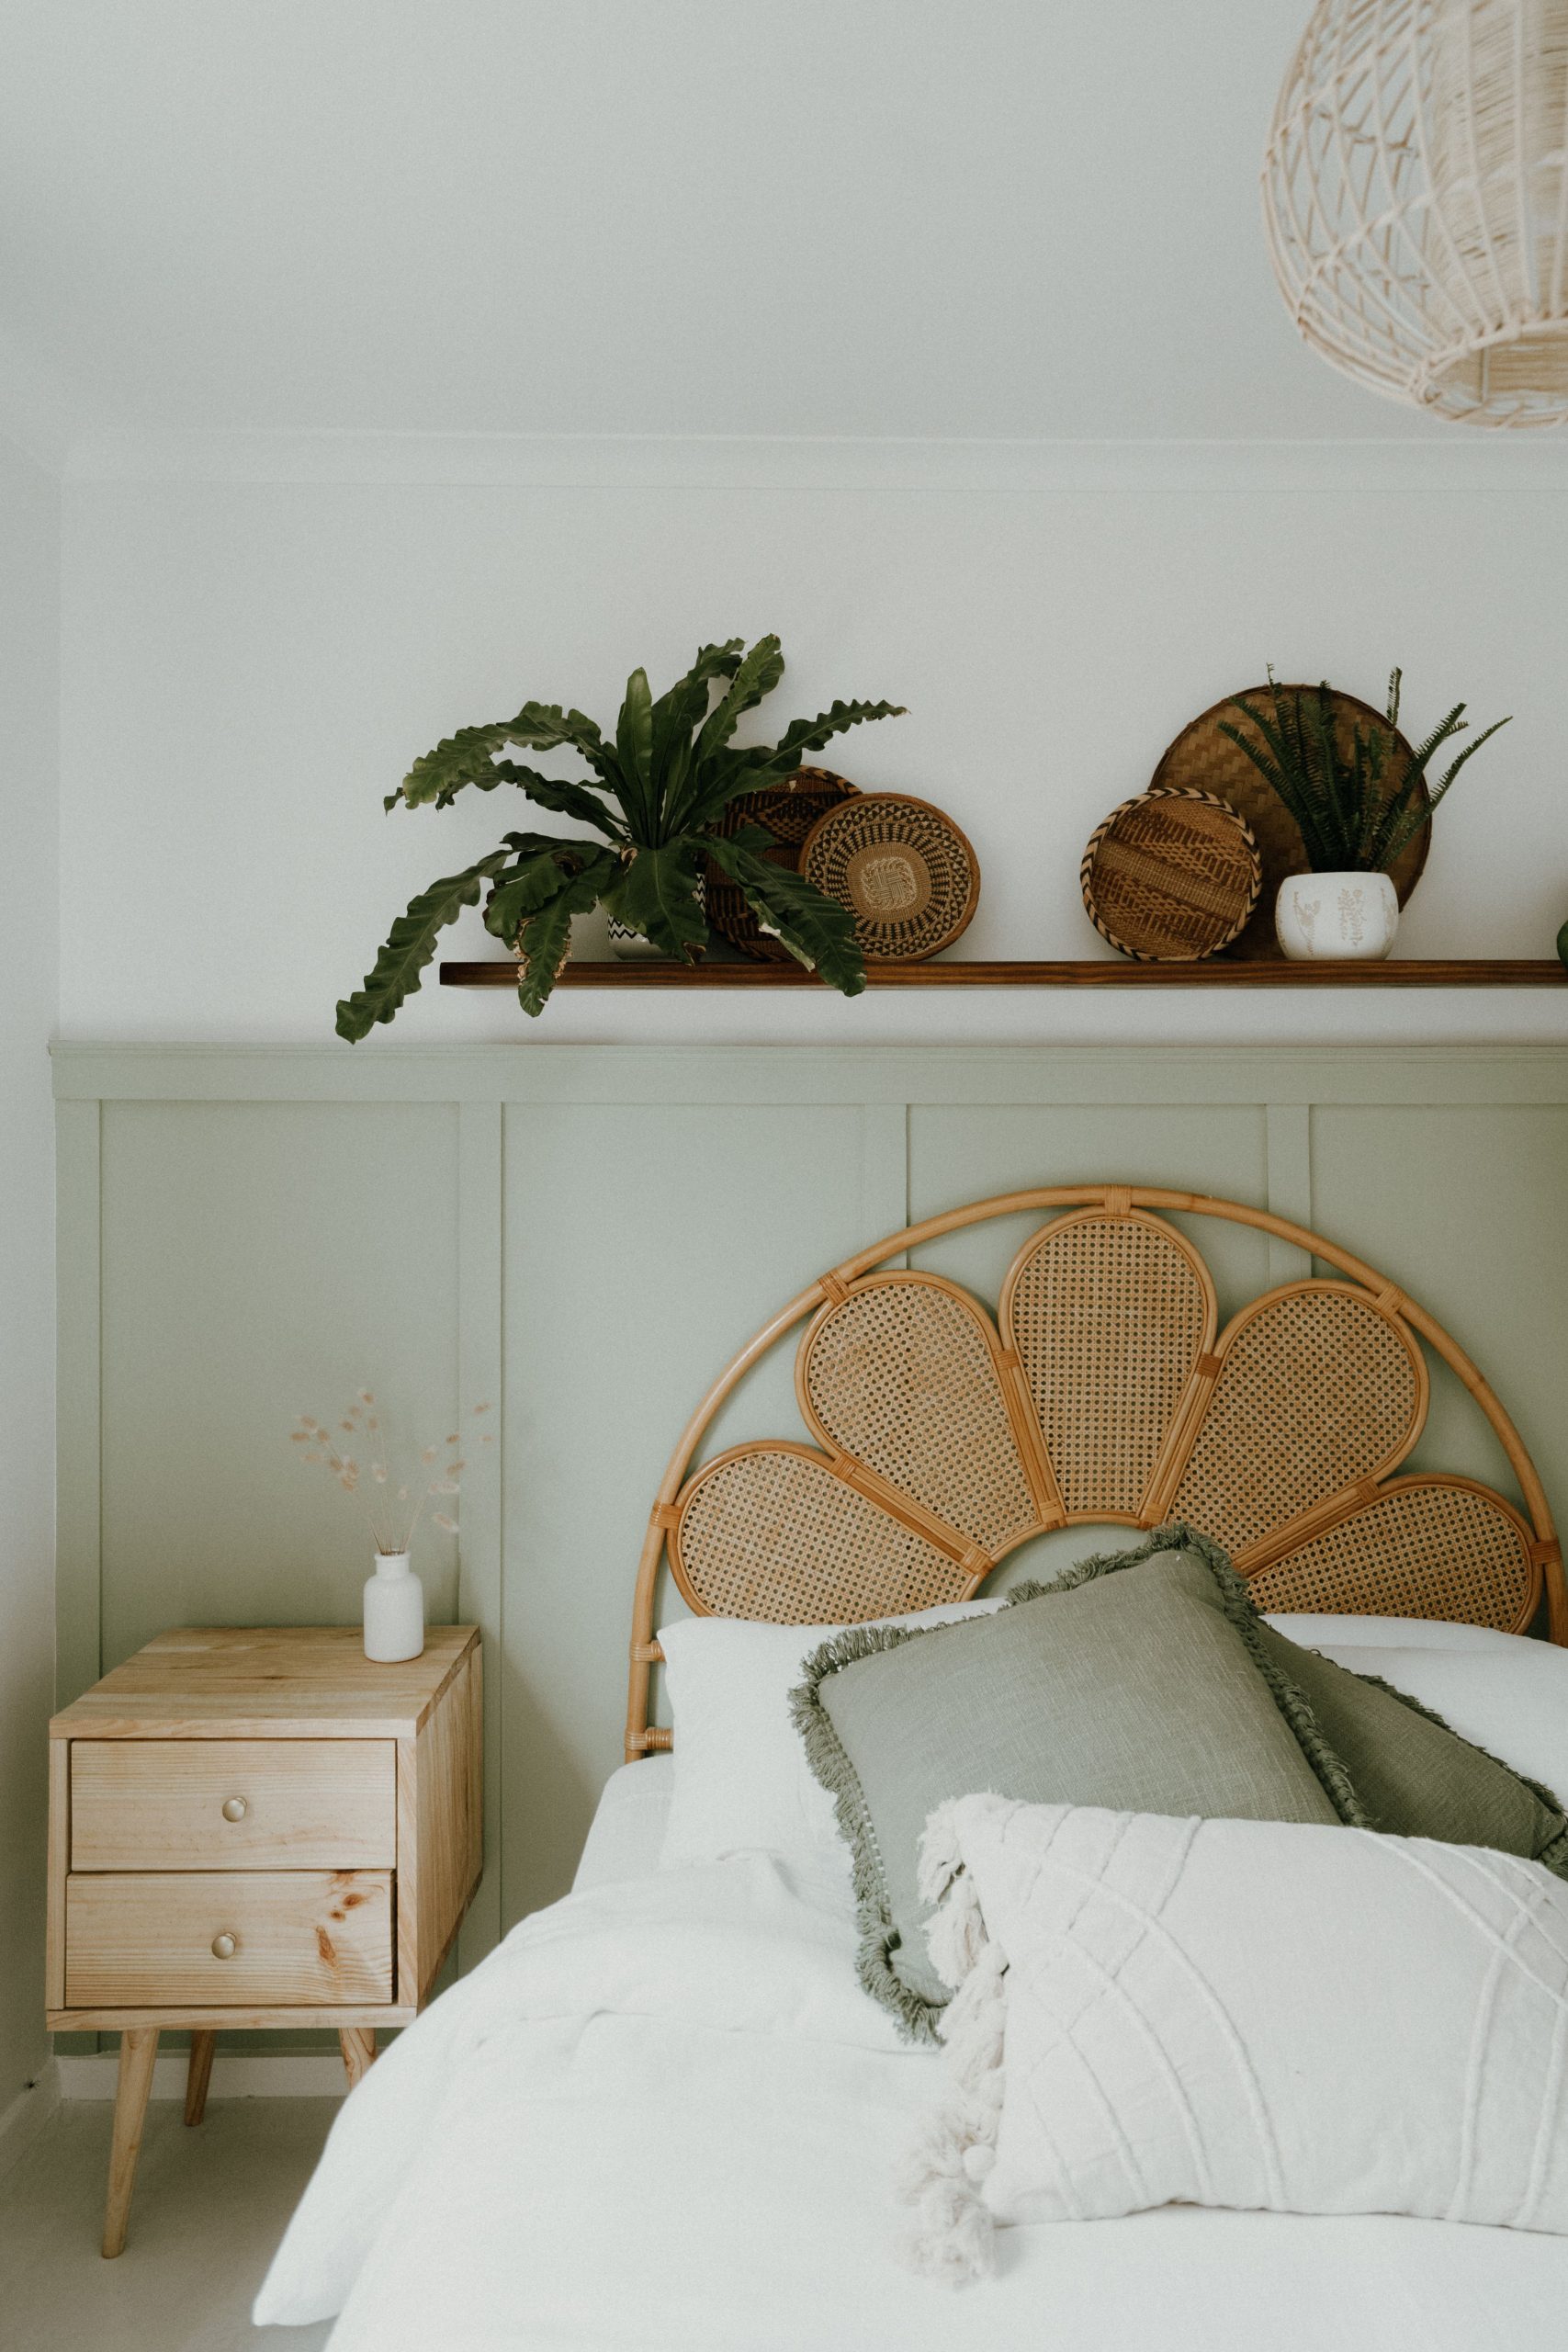
1. Carved Boho Headboard with Lush Greenery
The magic here is all about the beautiful tension between refined craftsmanship and wild nature. The dark, intricately carved wood of the headboard provides a strong, grounding focal point with a sense of history and artistry. This is then softened and brought to life by the sheer abundance of green, leafy plants surrounding it. The rich terra cotta bedding acts as a perfect bridge between the dark wood and the vibrant greens, echoing earthy tones and completing a scene that feels both sophisticated and incredibly relaxing.
⚠️ Real Talk
That carved wood is gorgeous, but it can be pricey. For a similar bohemian vibe on a budget, hunt for laser-cut wood panels or even decorative metal screens at stores like Home Depot or on Etsy (around $80-$150). You can mount three of these panels side-by-side on the wall behind your bed. Pair them with terracotta-colored sheets from Target ($40) and a collection of affordable plants from your local nursery or even propagated from friends’ clippings to capture that lush, earthy feel for a fraction of the cost.
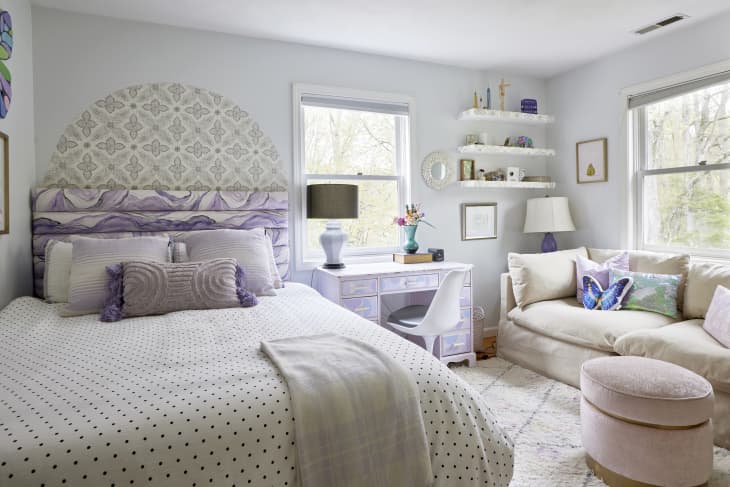
2. Painted Arch & Wood Plank Headboard
This whimsical headboard is a fantastic project that combines paint and texture. It’s a brilliant way to create a high-impact feature without a traditional headboard frame. You can achieve this playful, artistic look in a weekend.
📐 Style Math
- Time: 3-4 hours
- Cost: $50-$80
- Step 1: Start with your wood planks. These can be new, smooth planks or reclaimed pallet wood for more texture. Cut them to your desired headboard width and affix them horizontally to the wall, right above the mattress.
- Step 2: Use painter’s tape and a pencil tied to a string to draw your arch on the wall above the planks. The string acts as a compass to get a perfect curve.
- Step 3: Apply a peel-and-stick wallpaper or use a stencil to create the pattern within your taped-off arch.
- Step 4: Get creative with the planks! Use a dry-brush technique with lavender and white paint to create those soft, swirling patterns.
When creating a painted arch feature like this, the trick to making it look intentional is scale. The top of the arch should extend at least 48 inches above the top of your mattress, or roughly two-thirds of the way to an 8-foot ceiling. This height ensures the arch feels grand and acts as a true focal point, rather than a disconnected half-circle floating awkwardly above the bed. It draws the eye upward and gives the entire installation a sense of purpose and presence.
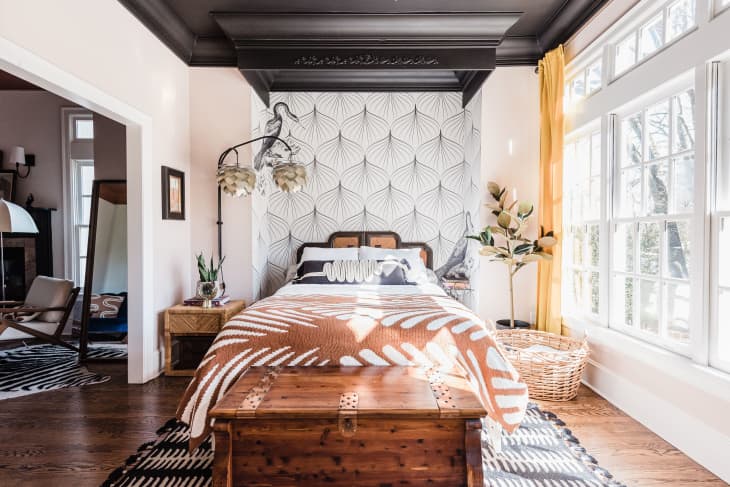
3. Cozy Recessed Bed Nook with a Cane Headboard
The single element that makes this bedroom feel so special and inviting is the recessed nook itself. By building the wall out around the bed, the design creates an architectural embrace. It’s an instant cozy-maker. Without the nook, the wallpaper and headboard would still be lovely, but they wouldn’t have the same impact. The recess provides a sense of sanctuary and definition, turning a simple bed into a deliberate, room-defining feature. The addition of patterned wallpaper within the nook is just the icing on the cake, adding depth and personality to the space.
🔧 How-To Brief
An idea like this is perfect for adding character but requires some specific room dimensions to work without feeling cramped. For a queen-sized bed (60″ wide), the nook should have a minimum width of 70-75 inches to allow for bedding and a little breathing room. The depth of the recess should be at least 12 inches to feel intentional, but no more than 24 inches to avoid feeling cavernous. This design works best in bedrooms that are at least 11 feet wide, ensuring you still have plenty of circulation space on either side of the nook structure.
4. Carved Wood Headboard & Ornate Wall Paneling
This serene look is a masterclass in layering texture within a monochromatic palette. Think of it as: 60% neutral base (the off-white bedding and wall color) + 30% natural texture (the carved light brown wood of the headboard and art piece) + 10% architectural detail (the ornate, raised relief paneling). You could easily swap the primary material while keeping the formula. Imagine replacing the carved wood with a warm, channel-tufted velvet headboard, and the wood art with a large, textured abstract canvas in shades of cream and beige for a softer, more contemporary take.
📏 Scale Guide
Let’s be honest: intricate carvings and raised wall paneling are dust magnets. A room this detailed requires a commitment to cleaning. To keep it looking fresh, you’ll need to dust the headboard, wall art, and paneling grooves at least once a week with a microfiber duster or a soft brush attachment on your vacuum. For the wood, a gentle wipe-down with a wood-safe cleaner every month will maintain its luster. The trade-off for this stunning, high-texture look is a cleaning routine that’s a bit more involved than just wiping down a flat wall.
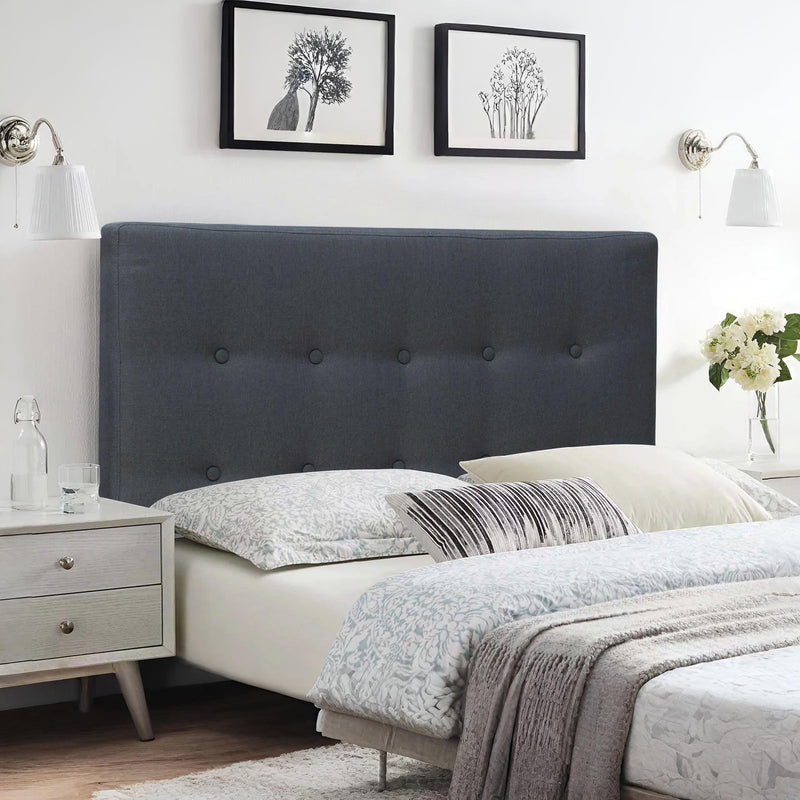
5. Channel-Tufted Headboard with a Silver Sunburst Mirror
Recreating this chic, contemporary look is surprisingly accessible. The key is to balance a few key statement pieces with simple, clean basics. The upholstered headboard is the biggest investment, but the rest of the elements can be found at affordable prices.
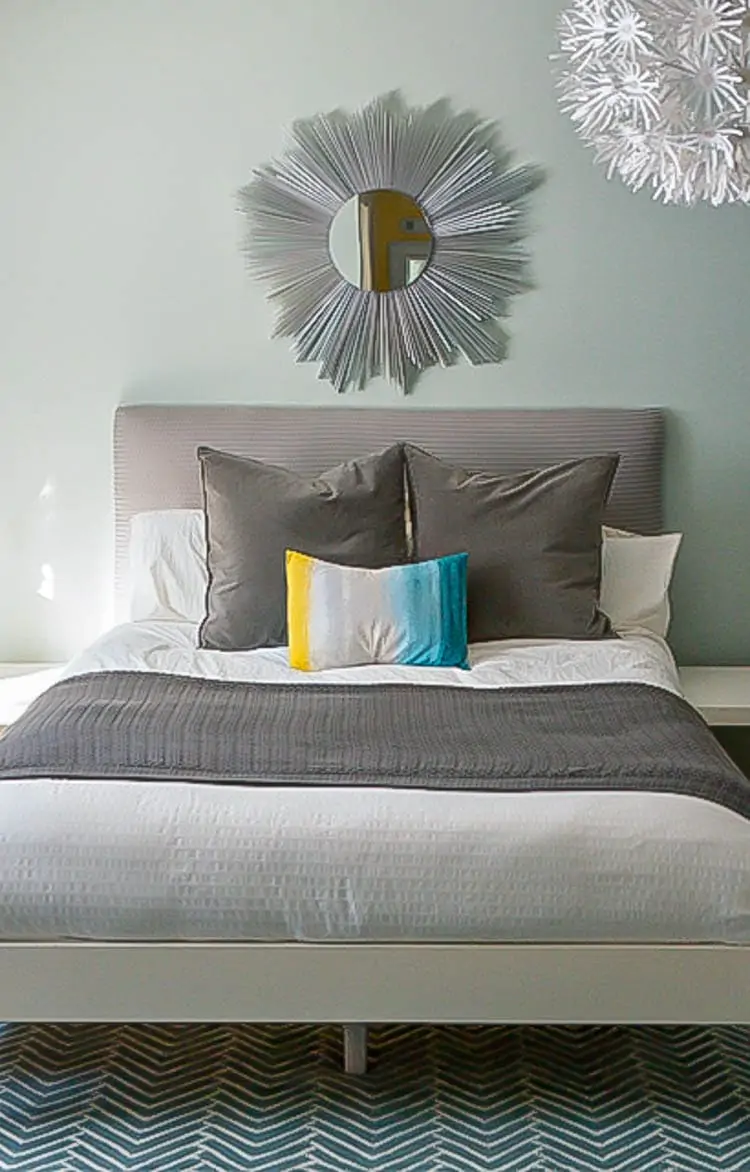
🧹 Maintenance Reality
- Upholstered Headboard: $250 – $500
- Sunburst Mirror: $70 – $150
- Bedding & Throw: $100 – $200
- Chevron Rug (5×7): $80 – $180
- Paint (Muted Blue-Green): $40 – $70
- TOTAL: $540 – $1,100
- Budget alternative: Build a simple plywood headboard and upholster it yourself using foam and gray fabric for under $100. Find a similar mirror at a home goods store like At Home or on Facebook Marketplace.
The sunburst mirror is the perfect companion for a headboard, but the scale is critical. A common mistake is choosing one that’s too small. As a rule of thumb, the diameter of the mirror should be between one-half and two-thirds the width of your headboard. For a standard queen bed (60 inches wide), aim for a mirror that is 30 to 40 inches in diameter. This ensures the mirror is a confident statement piece that complements the headboard rather than getting lost above it. This is a much simpler look to achieve than the detailed upholstering in Idea #23.
6. Chevron Wood Plank Headboard in Blue & White
This headboard works so well because it nails the mix of rustic and refined. The chevron pattern itself is a classic, geometric motif that feels orderly and sophisticated. However, building it from wood planks—especially with some weathered blue-gray pieces mixed in—gives it a wonderfully rustic, handmade quality. This contrast is what makes it interesting. The look is further elevated by the smart use of textiles: the various patterns in the pillows add a layer of bohemian charm, while the solid navy blanket grounds the entire composition.
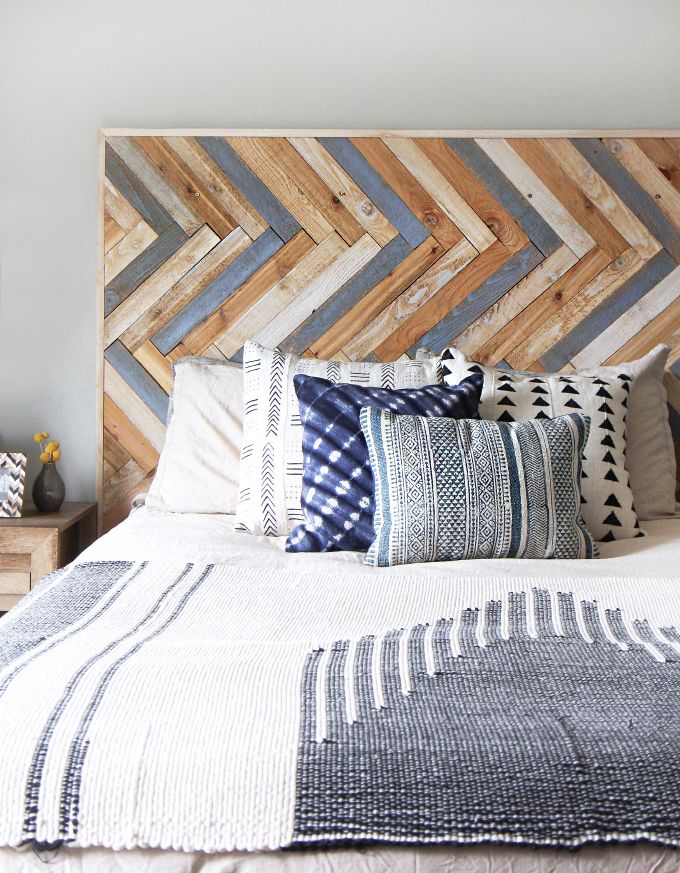
🔥 Trending Context
A headboard made of individual wood planks, especially reclaimed ones, can be a bit high-maintenance. The uneven surfaces and gaps between planks are prime spots for dust to collect. Also, depending on how well the wood is sanded and sealed, there’s a risk of splinters or rough edges snagging your pillows and bedding. If you have kids or pets who like to climb, you’ll want to be extra sure that every surface is perfectly smooth and sealed with a durable, non-toxic matte polyurethane to protect both your family and your linens.
7. Overlapping Rattan Medallions for a Boho Vibe
The genius of this idea is the overlapping composition. Using a single rattan medallion or placing three side-by-side could look predictable. But by layering them and varying their sizes, the arrangement becomes a single, sculptural piece of art. It creates rhythm and movement on the wall, turning simple, affordable decorative objects into a custom, high-impact headboard. It’s this thoughtful arrangement that elevates the idea from just “hanging stuff on a wall” to a genuine design statement that feels both casual and intentional.
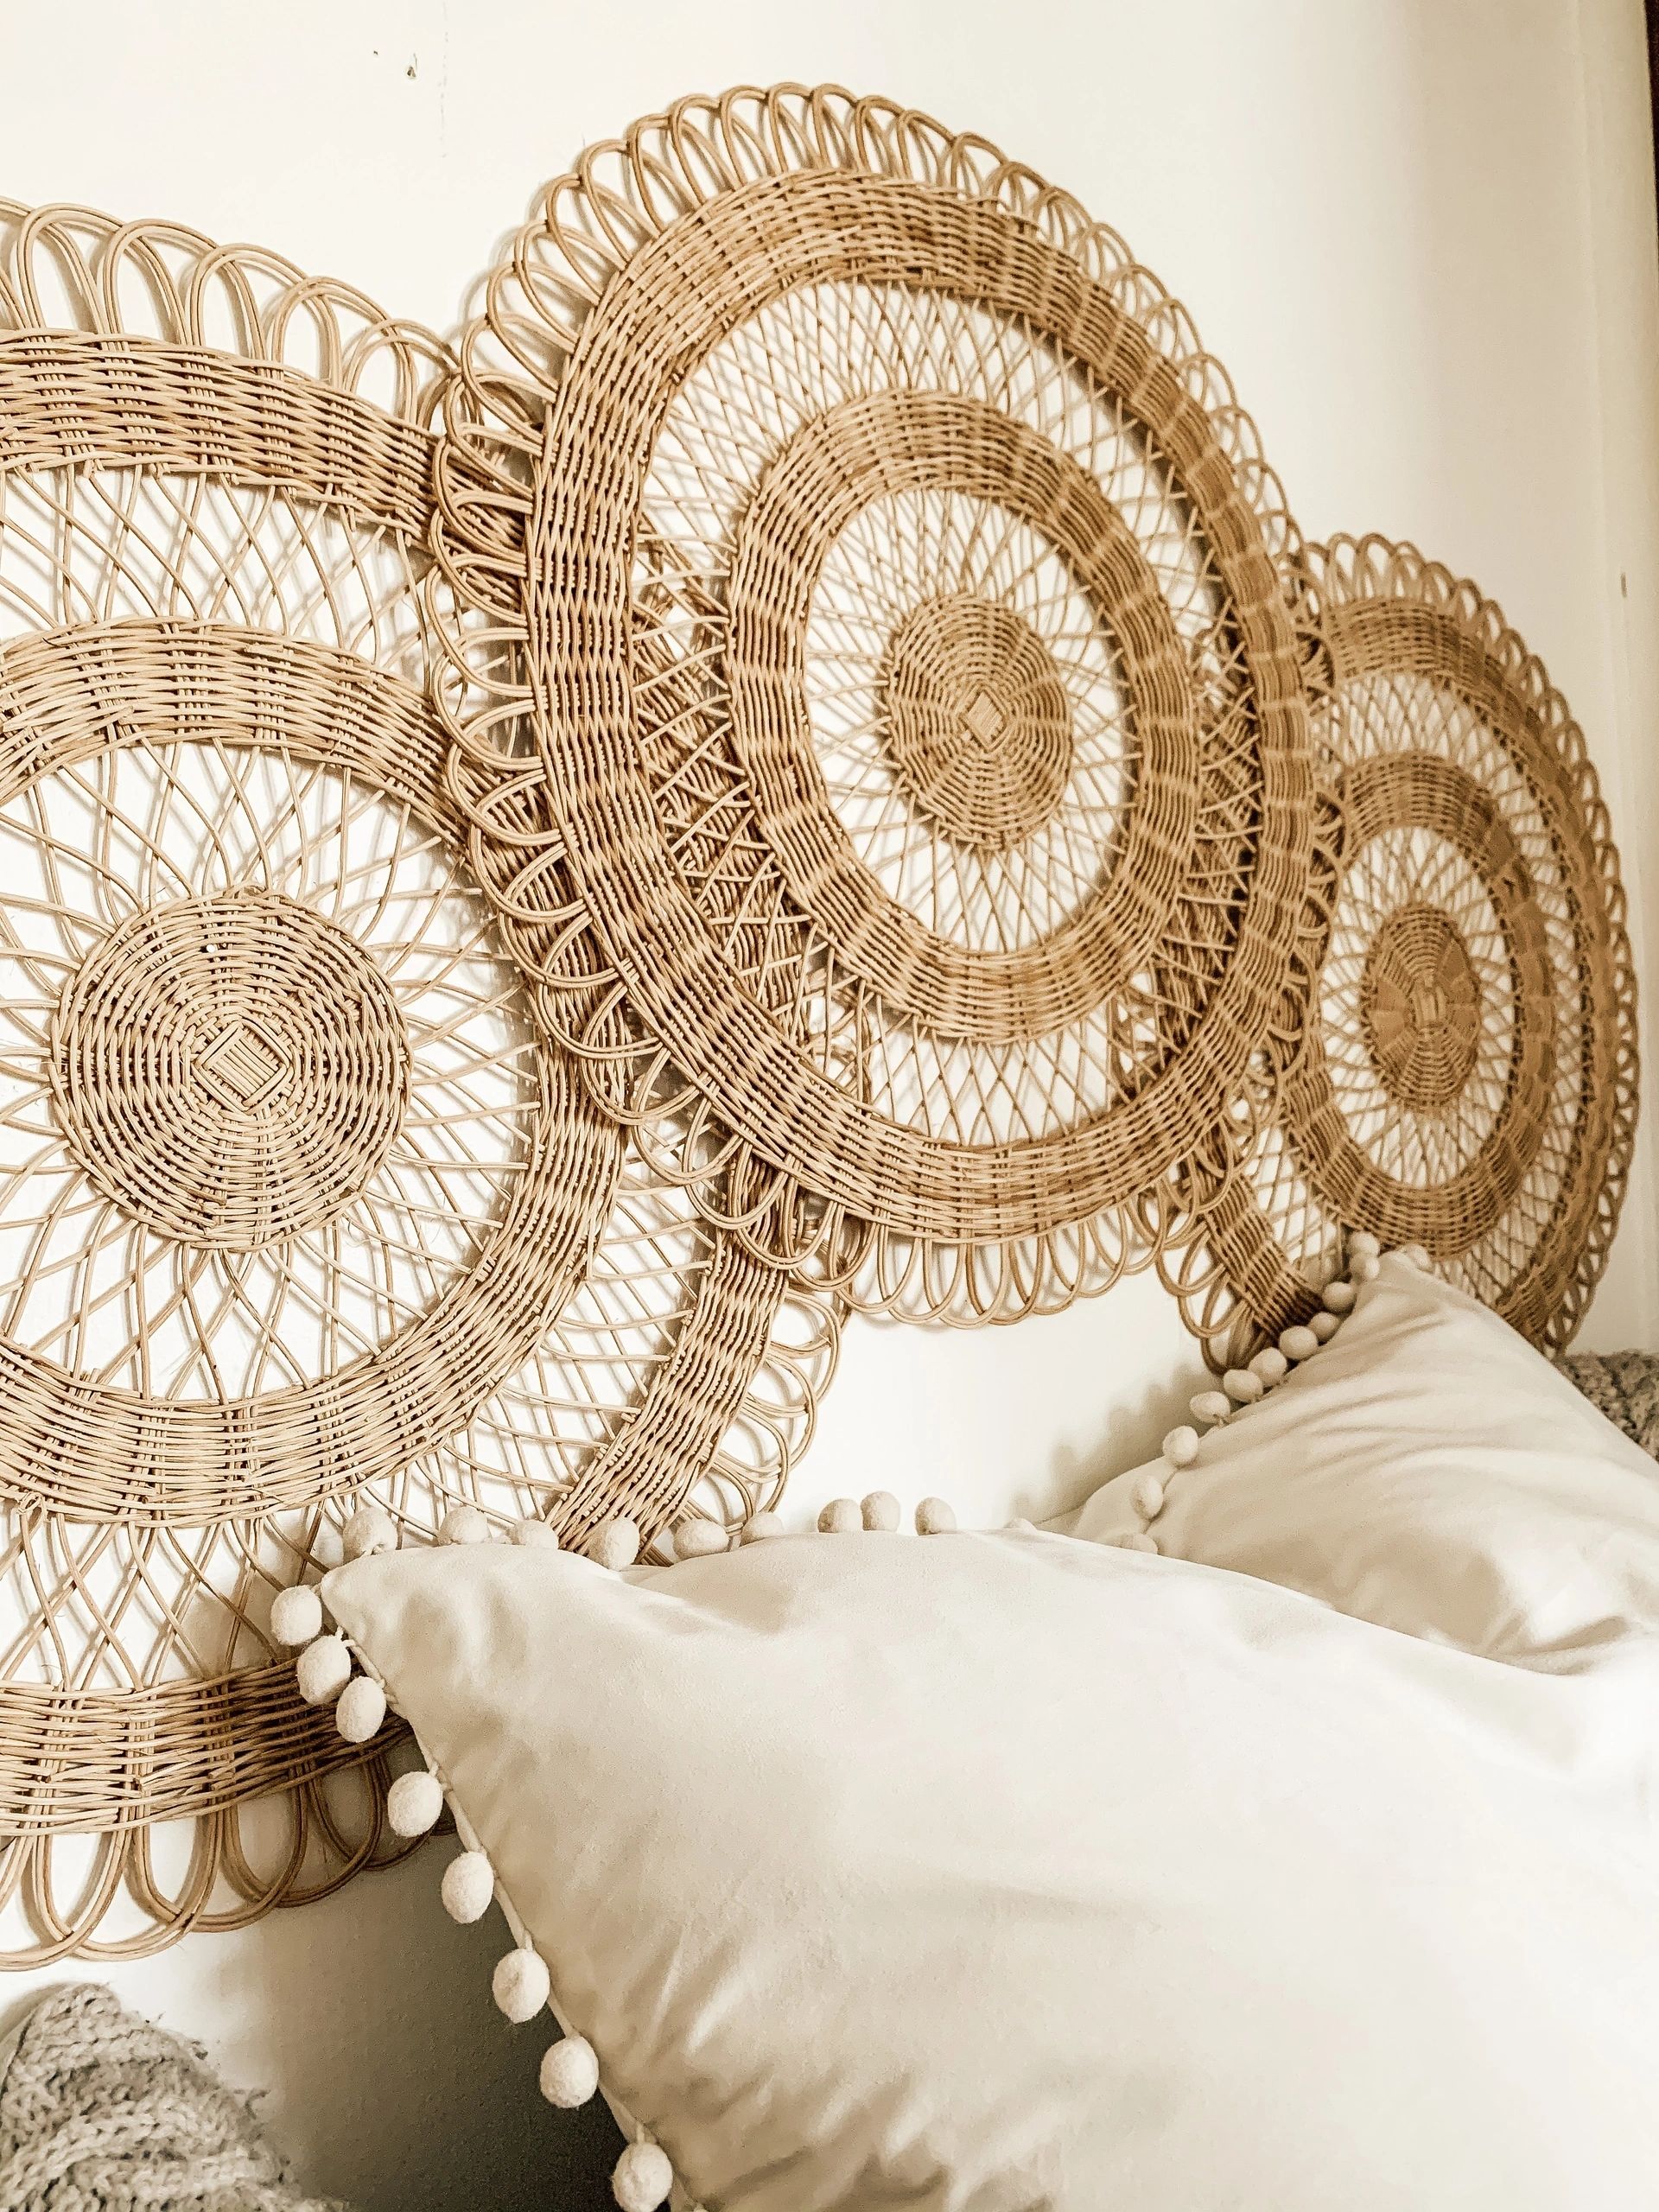
🎯 What Makes It Work
This is a wonderfully simple and budget-friendly idea, but a few checks will ensure it looks polished, not sloppy.
- Measure Your Wall Space: Plan the arrangement on the floor first. Measure the total width and height of your composition to ensure it’s properly scaled for your bed. It should be slightly wider than your mattress.
- Check for Studs: While the medallions are light, it’s always best to anchor them securely. Use a stud finder to locate studs in the wall for the most secure mounting, especially for the largest, central piece.
- Confirm Your Palette: Hold the rattan medallions up to your wall and bedding in both daylight and evening light. The natural tones of rattan can vary, so make sure they harmonize with your existing neutrals and don’t clash.
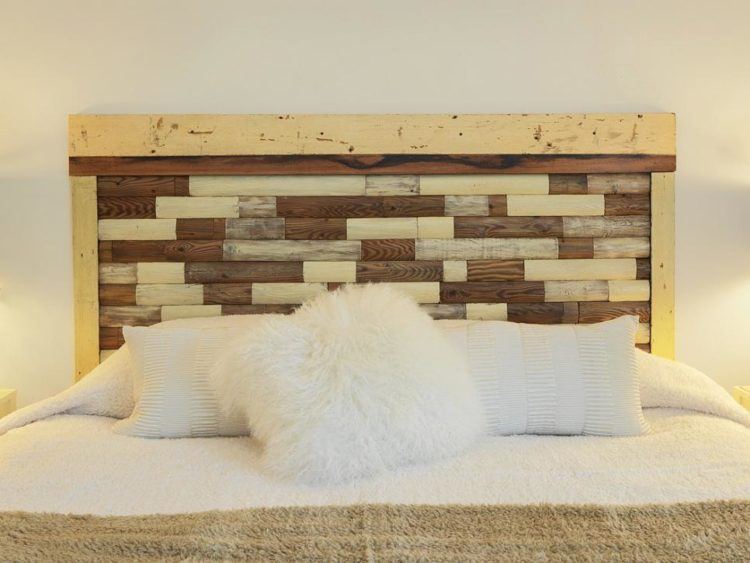
8. Rustic Headboard from Reclaimed Wood Planks
This look is already budget-friendly, but you can take it a step further. The most expensive part might be sourcing the wood if you don’t have it on hand. Check Facebook Marketplace or Craigslist for
9. Tall Fluted Brown Faux Leather Headboard
When incorporating a tall, dramatic headboard, a common pitfall is neglecting the wall behind it. Painting the wall a deep, saturated color—like the blue shown here—is a pro move. It prevents a tall, light-colored headboard from looking washed out and a dark one from feeling too heavy. A dark wall color creates contrast and depth, making the headboard ‘pop’ as a sculptural element. It also makes the overall composition feel more cohesive and luxurious. Don’t be afraid to go bold with your paint choice!
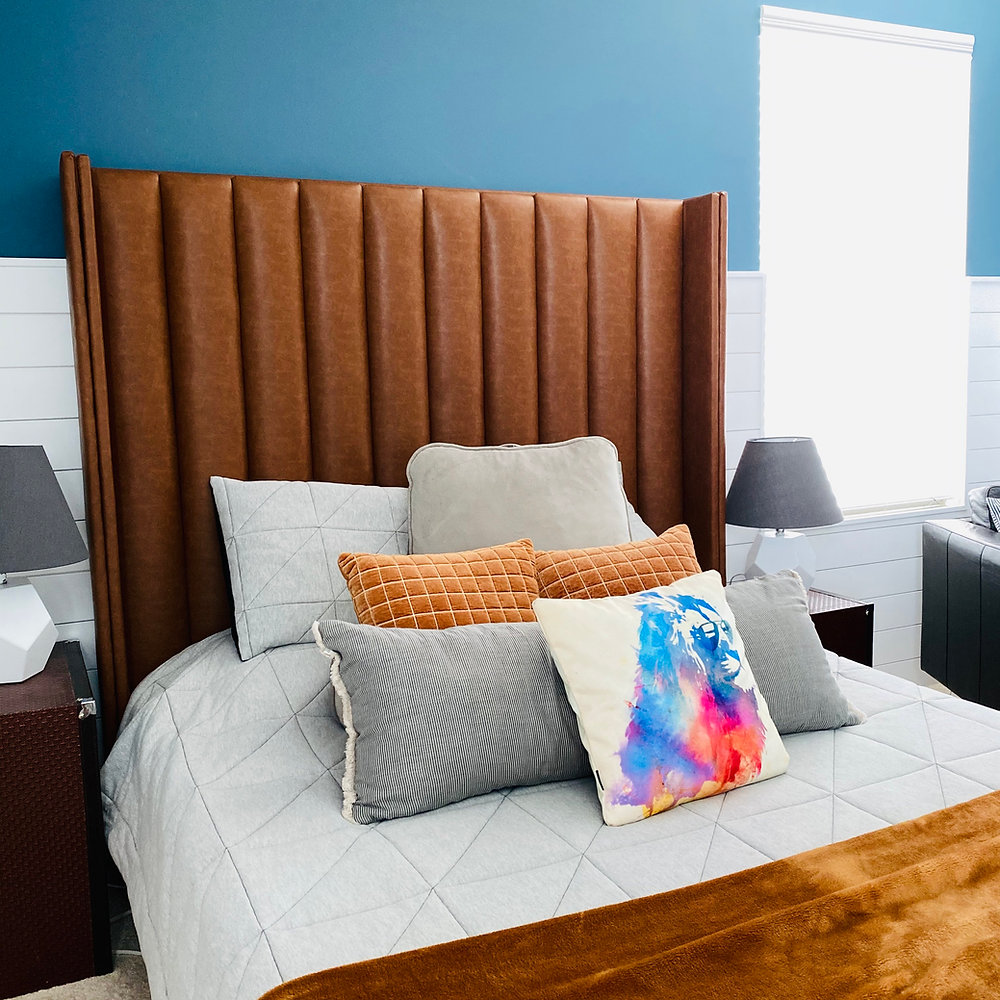
💰 Budget Breakdown
A tall headboard like this makes a huge statement, but it needs vertical space to breathe. This style works best in rooms with ceilings that are at least 9 feet high. In a room with a standard 8-foot ceiling, a headboard this tall can feel overwhelming and actually make the ceiling feel lower. The ideal height for the headboard itself would be between 58 and 70 inches from the floor. This ensures it’s a grand feature without completely dominating the room’s proportions.
10. Arched Plaid Headboard in a Soft Blue-Green Room
This room’s serene elegance comes from a carefully balanced formula: 50% soft, solid color (the blue-green walls) + 30% classic pattern (the plaid upholstery) + 15% clean neutrals (the off-white bedding and ceiling) + 5% metallic accent (the brass curtain rod and mirror). The plaid is the star, but it’s supported by the calming solid color. You could create a moodier version of this by swapping the soft blue-green for a deep navy and using a tartan plaid with reds and greens for a cozy, library-like feel.
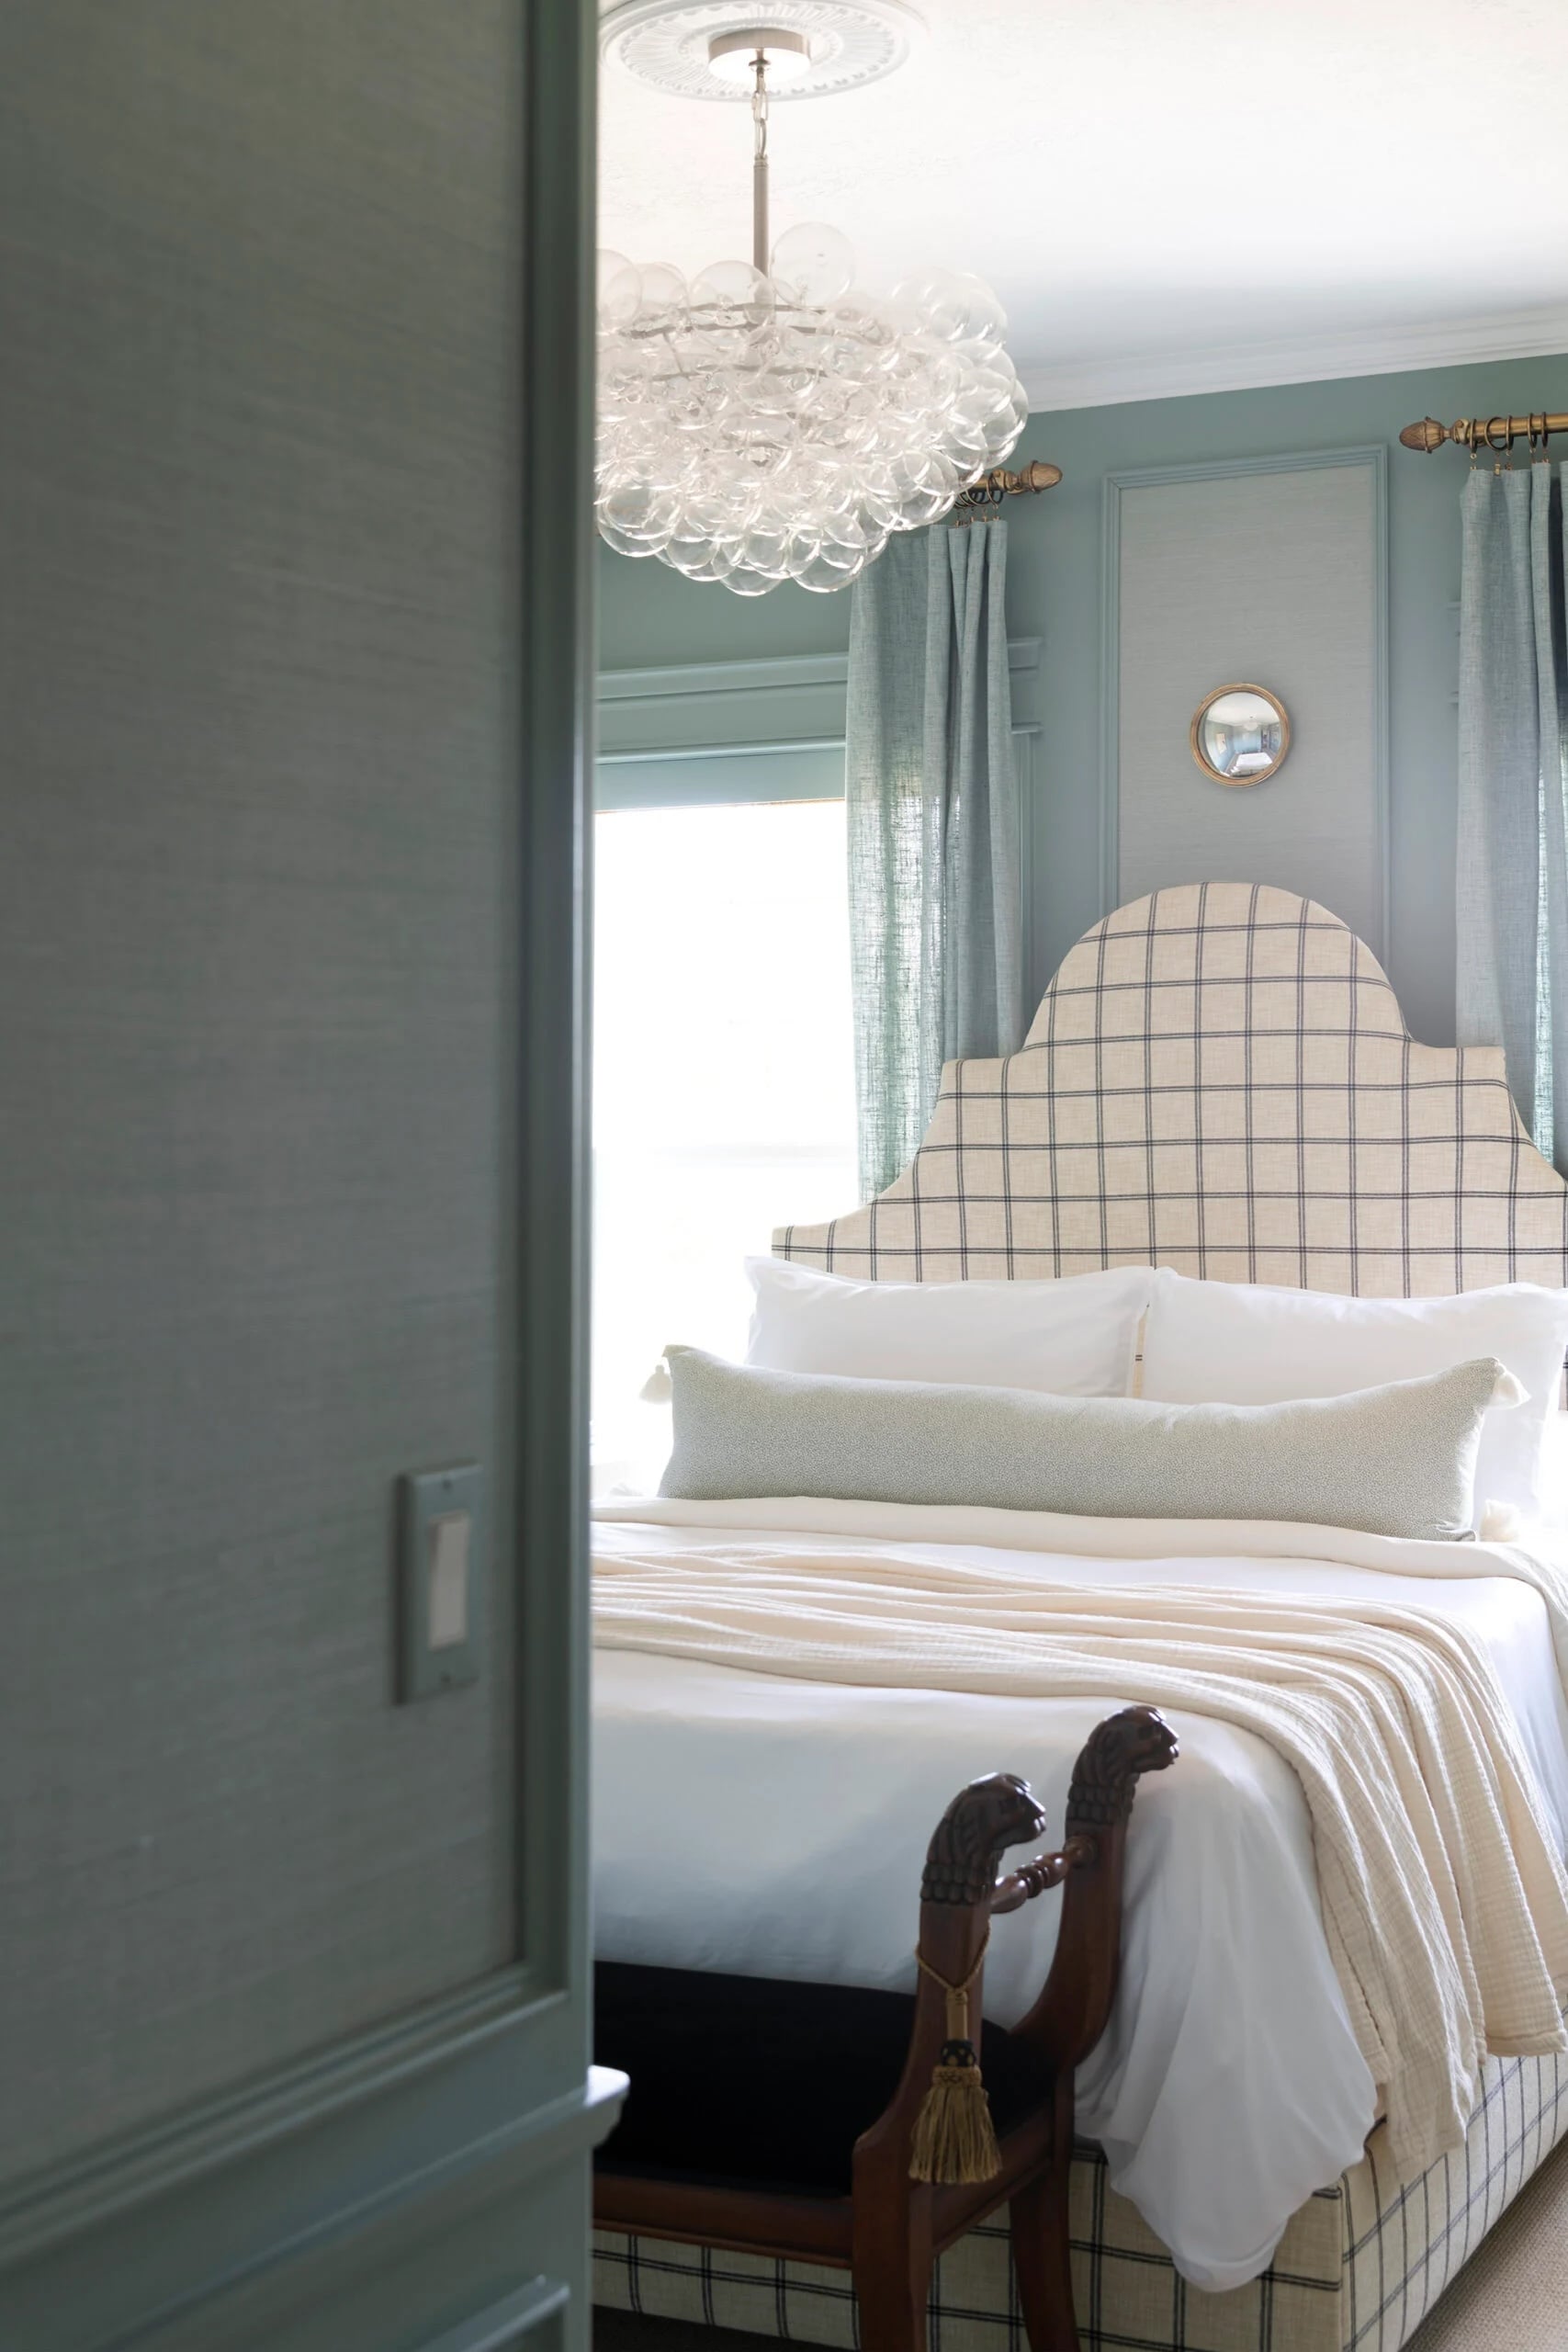
💡 Designer Tip
Committing to a patterned upholstered bed is a bigger decision than choosing a patterned duvet cover. While this plaid is beautiful and timeless, it is a significant visual statement that you can’t easily swap out next season. Before you invest in a fully upholstered piece like this, make sure you absolutely love the pattern and can see yourself living with it for at least 5-7 years. Consider getting a large fabric sample and pinning it to your wall for a week to see how you feel about it in different light and moods.
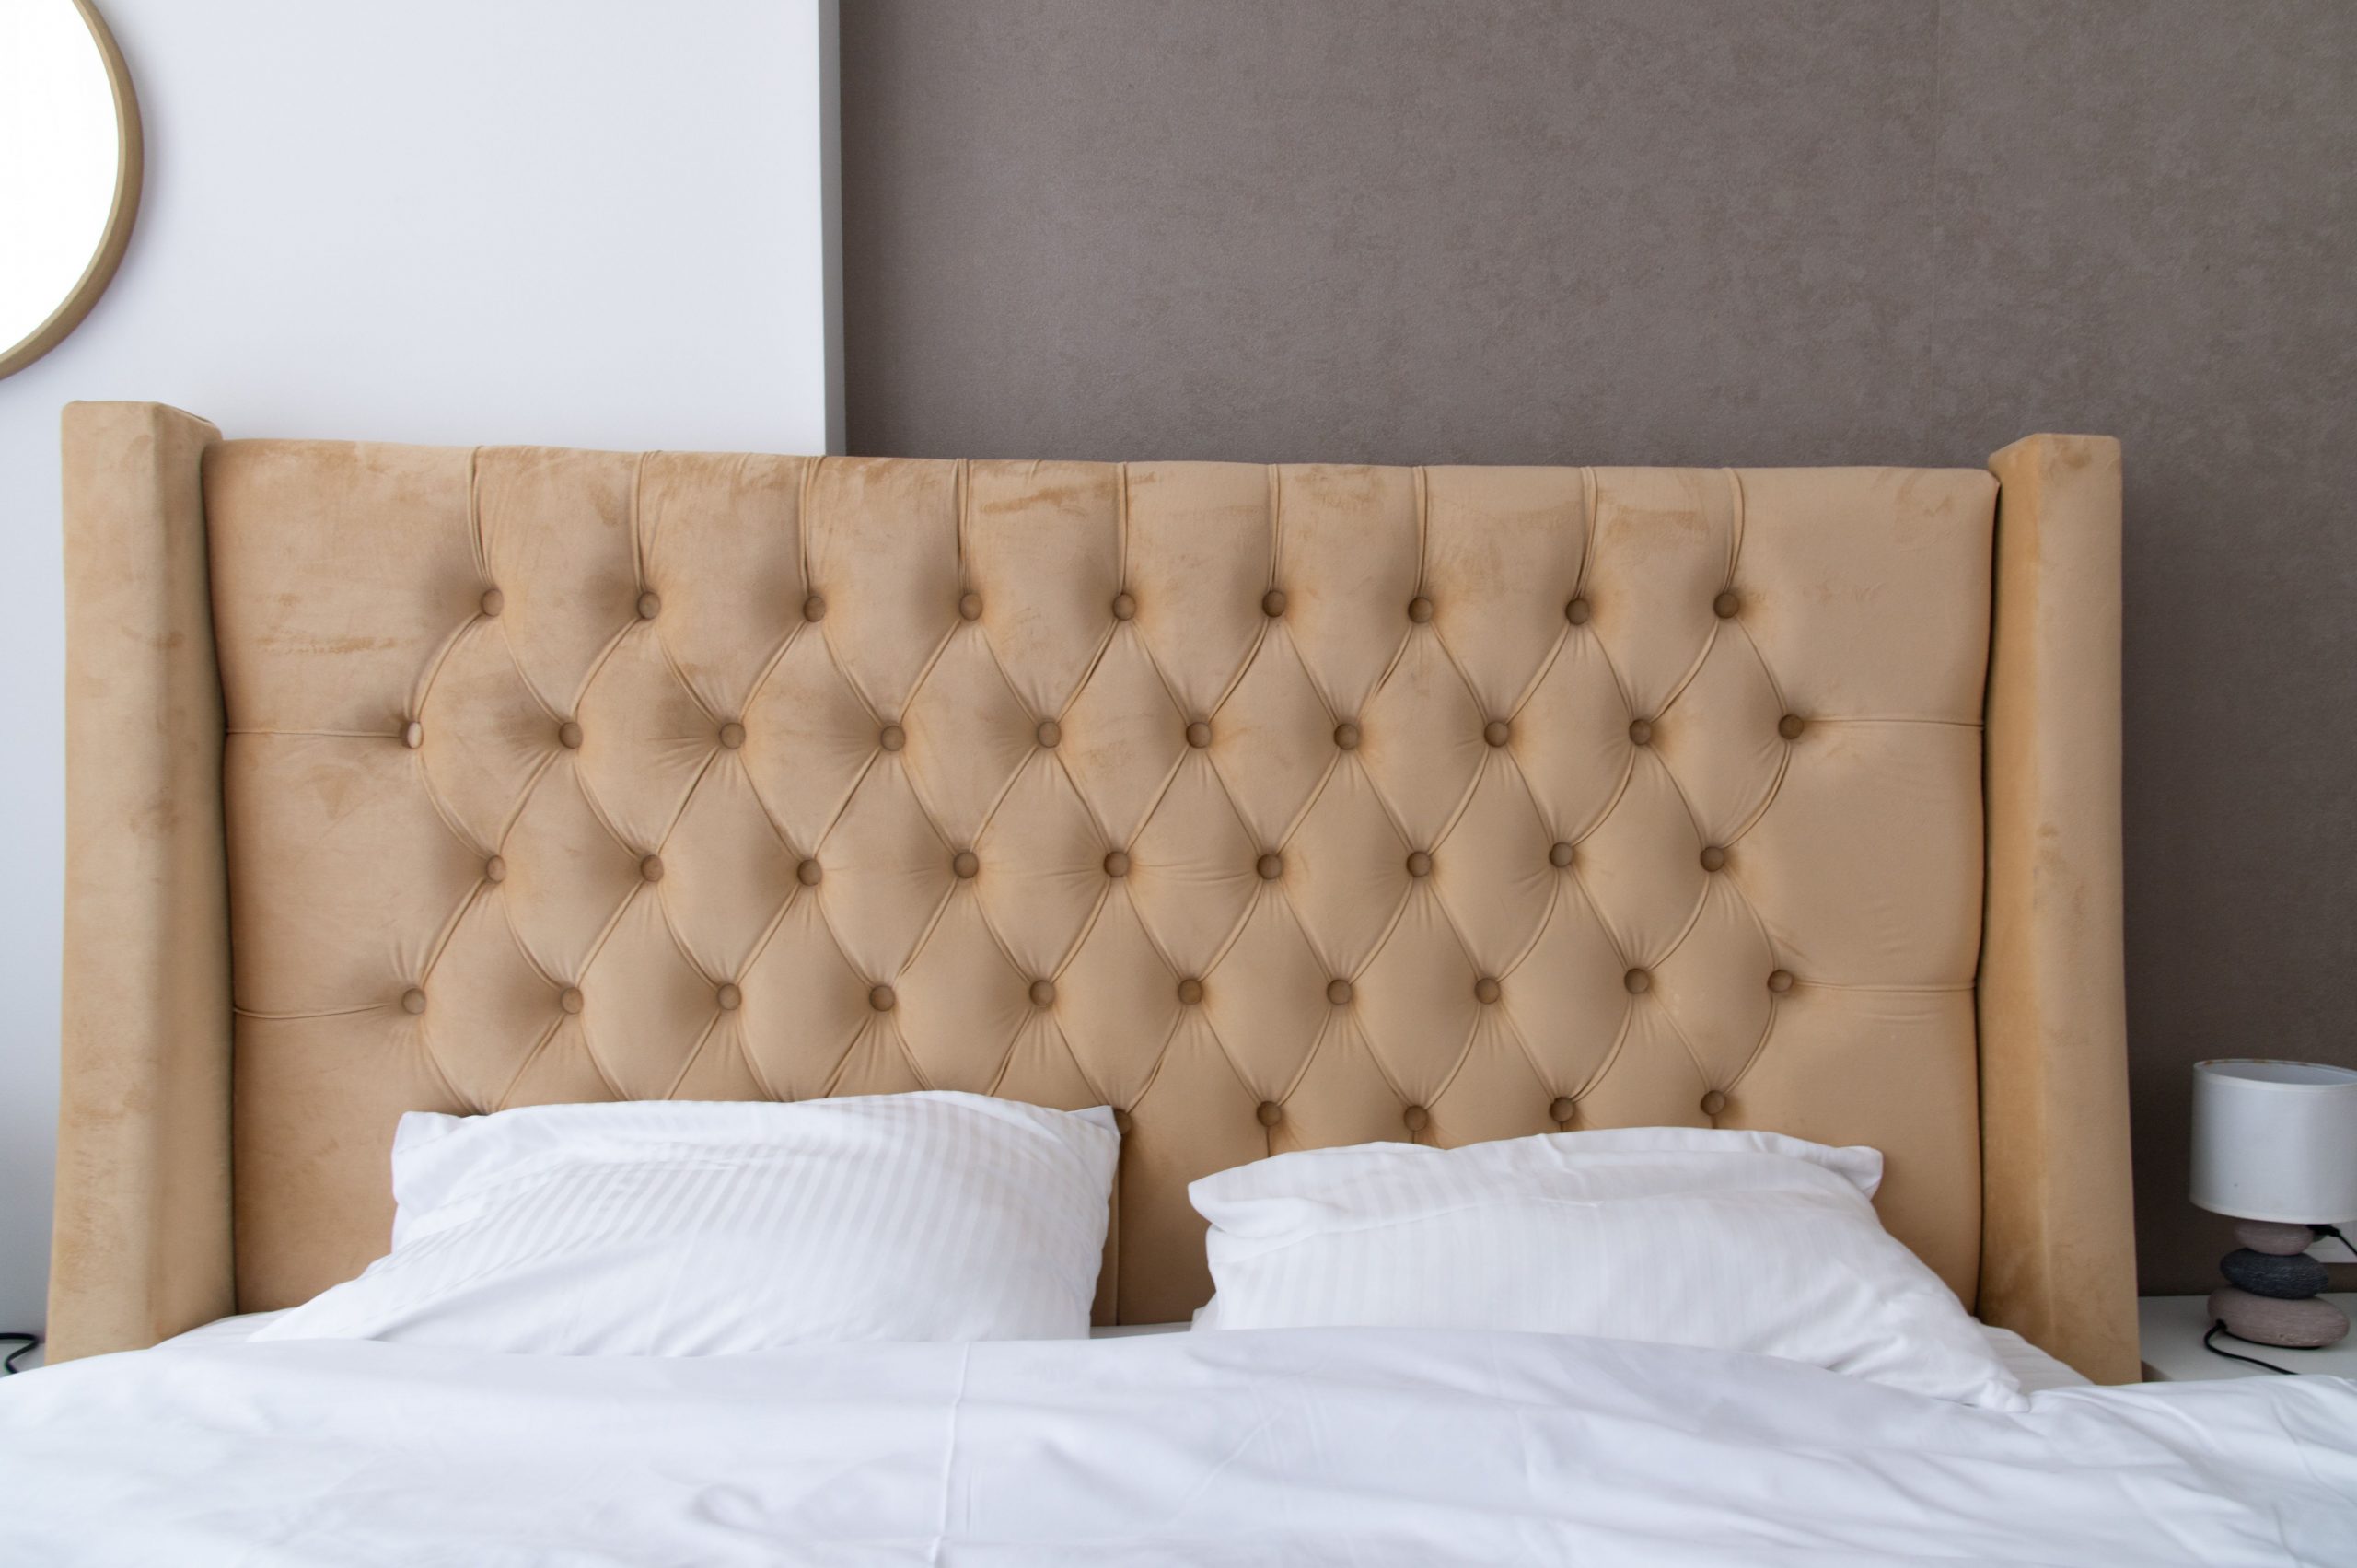
11. Plush in Tan: A Tufted Velvet Wingback Headboard
Velvet looks and feels luxurious, but it does require a bit of specific care. The tufting, in particular, can be a trap for dust and pet hair. Plan on vacuuming the headboard weekly with a soft brush attachment to keep it fresh. For spills, act quickly! Blot (don’t rub) the spot with a clean, dry cloth. For more stubborn stains, a mix of gentle dish soap and water applied sparingly can work, but always test on an inconspicuous area first. The wingback design, similar to the one in Idea #28, creates extra corners where dust can settle, so pay them special attention.
💸 Get This Look For Less
The success of this design lies in its sophisticated layering of textures against a high-contrast backdrop. The plush, soft velvet of the headboard provides a luxurious tactile quality. This is set against a wall that is itself texturally interesting, with a rough, dark gray section meeting a clean white one. The deep diamond tufting adds another layer of visual rhythm and depth. This combination of smooth, soft, and rough textures all in a tight, neutral palette is what gives the room its quiet, confident elegance.
12. A Navy Paneled Accent Wall as a Headboard
This DIY project creates a huge impact, turning a flat wall into a sophisticated architectural feature that doubles as a headboard. It looks expensive, but it’s a manageable weekend project.
⭐ The One Thing
- Time: 5-7 hours (plus paint drying time)
- Cost: $100 – $200 (for wood trim, adhesive, and paint)
- Step 1: Design your grid on paper first. A classic board and batten style with 3-4 vertical battens looks great. Measure your wall and plan the spacing for a balanced look.
- Step 2: Cut your MDF or pine trim boards to size. A miter saw will give you the cleanest cuts. Lightly sand any rough edges.
- Step 3: Use a level and construction adhesive to attach the trim boards to the wall. Reinforce with a few finishing nails.
- Step 4: Caulk all the seams where the wood meets the wall and where boards meet each other. This is the secret to a professional finish!
- Step 5: Prime and paint everything—the wall and the trim—in the same color and finish. A satin or eggshell finish in a deep navy creates this exact luxe look.
When you have a strong, dark feature wall like this navy paneling, keep the headboard itself simple and light. A low-profile, cream upholstered headboard without any busy patterns or deep tufting is the perfect choice. It provides a soft, comfortable surface to lean against without competing visually with the wall. The goal is for the paneled wall to be the star of the show. The light-colored headboard creates a beautiful contrast that highlights the architectural detail behind it.
13. Classic Luxury with a Carved Wood and Tufted Headboard
The single element that defines this headboard’s grand, luxurious character is the ornate, gold-accented carved wood frame. While the tufted upholstery provides comfort and softness, it’s the lavish, almost baroque-style carving that announces the piece’s formal, classic intentions. Remove that frame, and you have a pleasant, but much simpler, upholstered headboard. The dark wood and metallic gold details are what create the drama and give the design its opulent, heirloom quality. It’s a commitment to a very specific, traditional aesthetic.
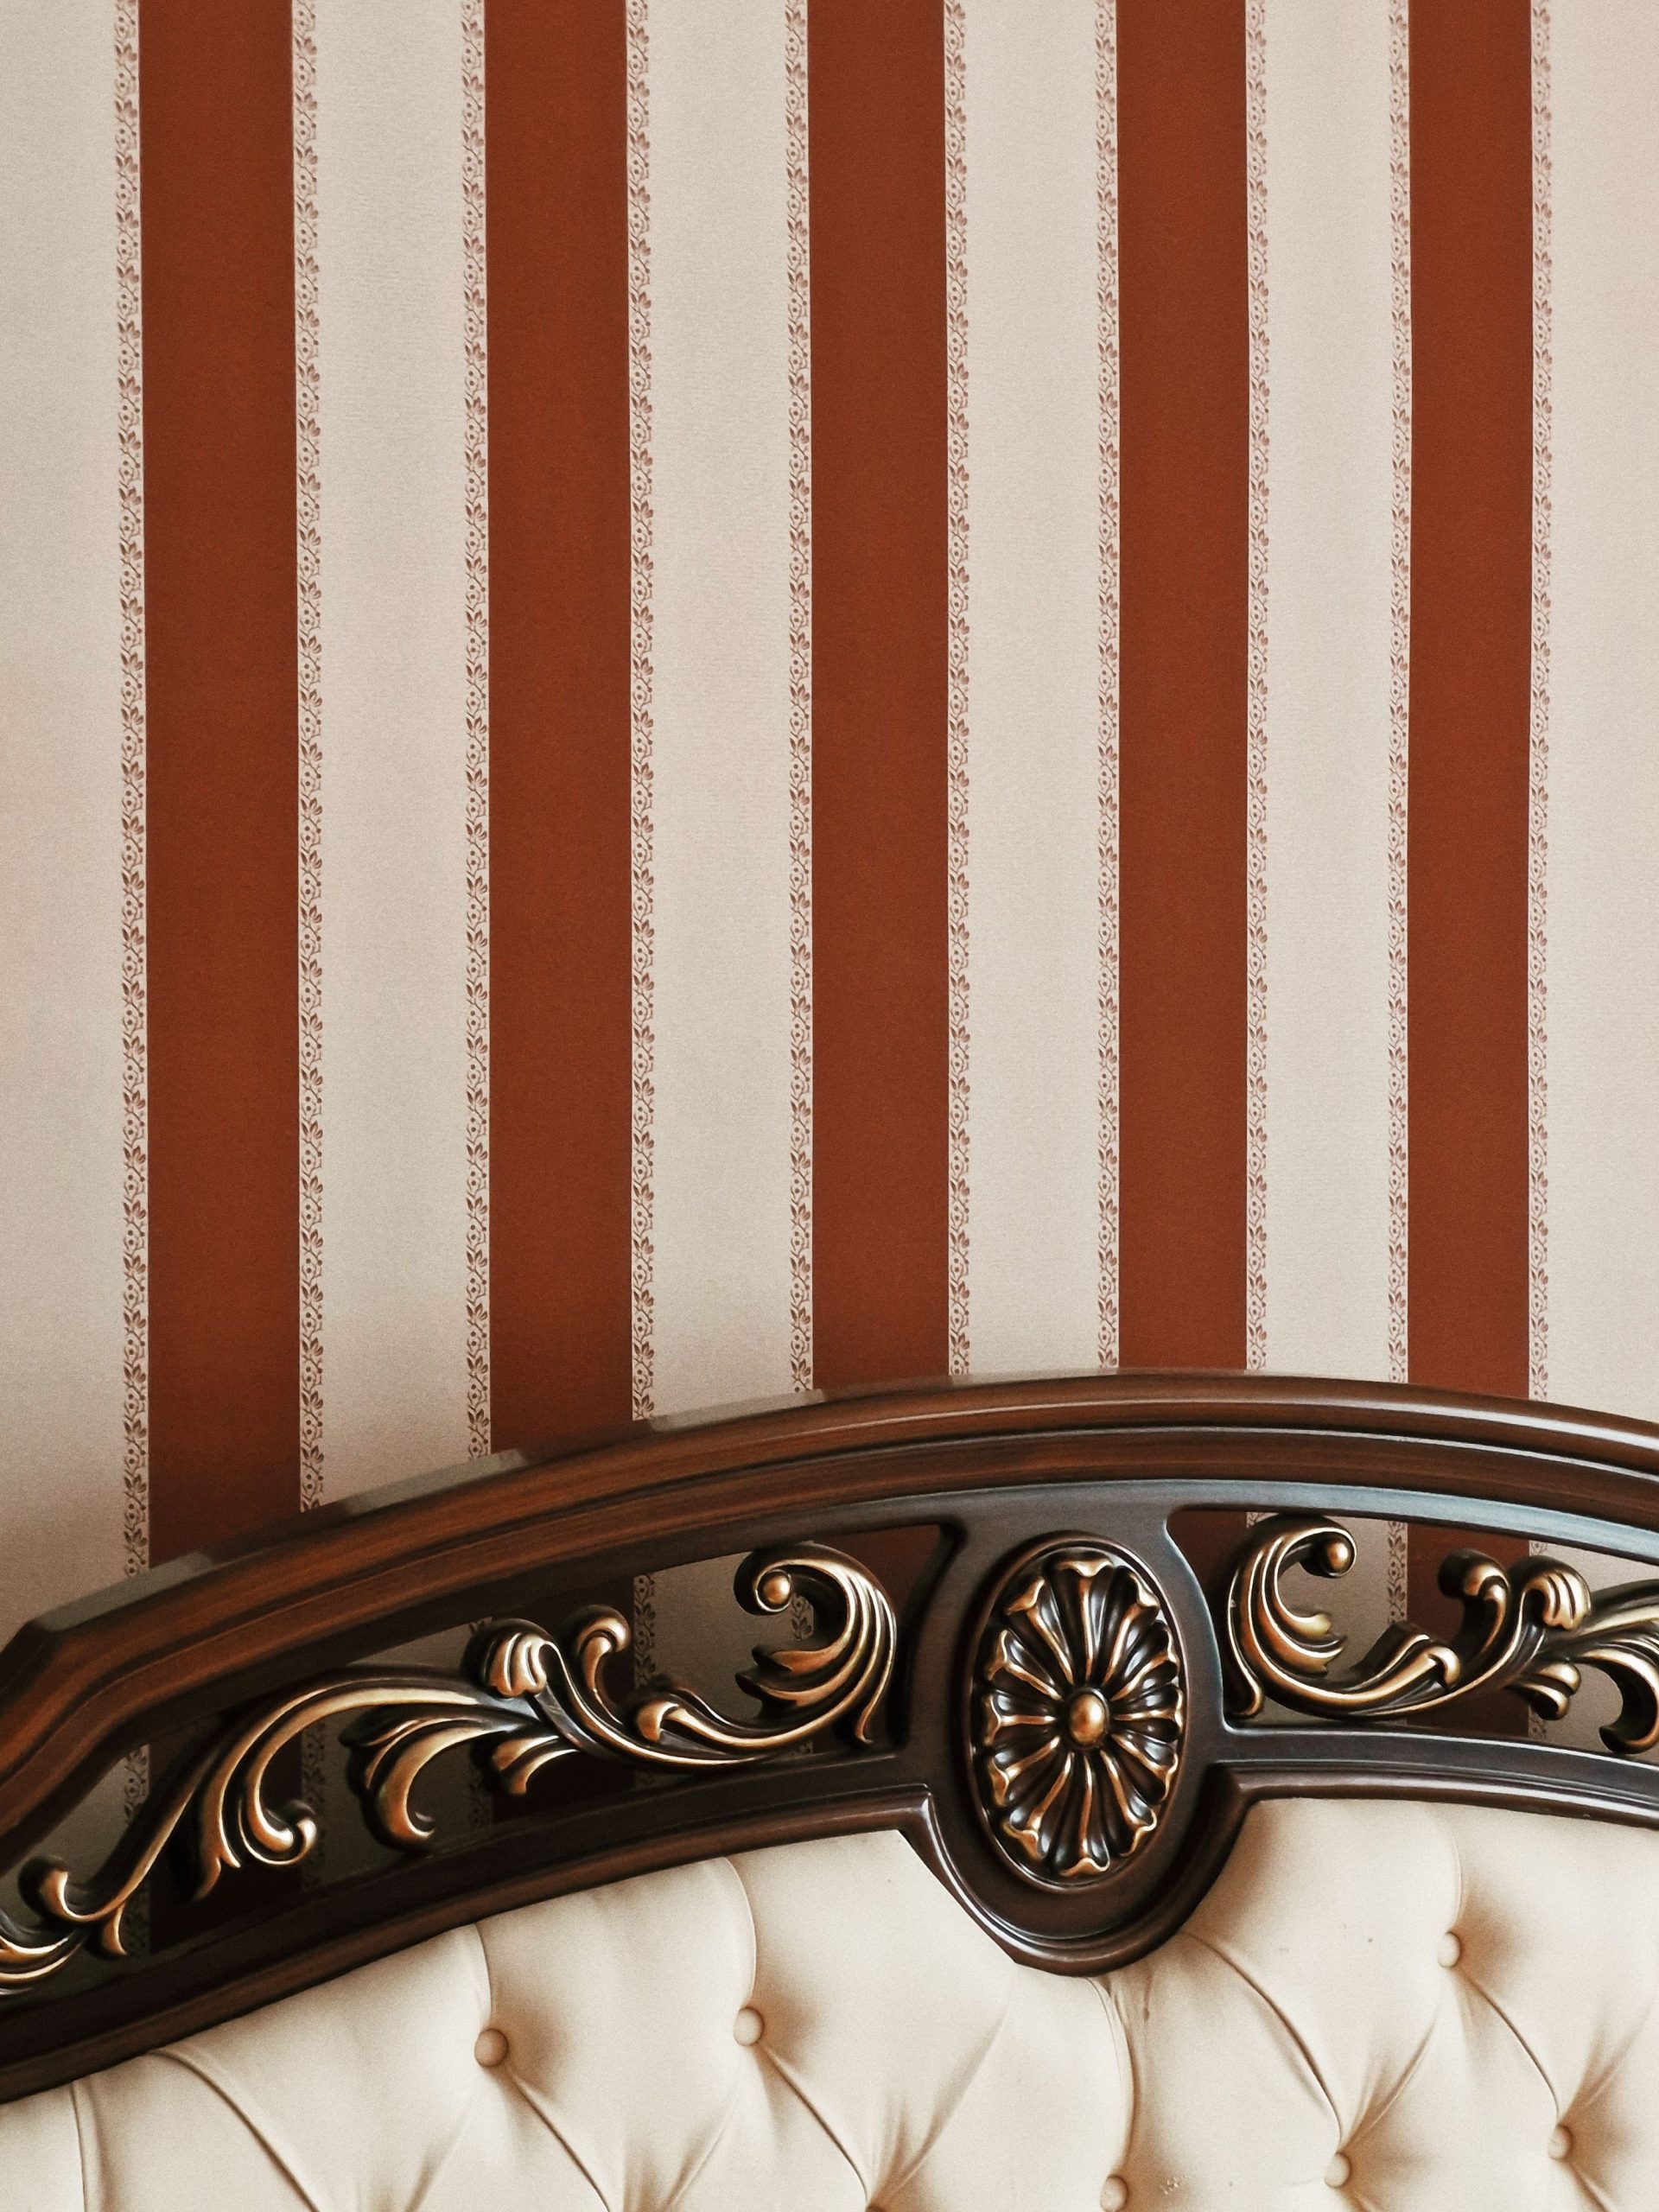
⚠️ Real Talk
An antique-style carved wood headboard can cost thousands. To get this opulent look for less, focus on creating the *illusion* of a single, grand piece. Start with a basic, affordable tufted headboard from Wayfair or Amazon ($150-$250). Then, source pre-made decorative wood appliqués or onlays online (around $50-$100 for a set). Paint these appliqués with a good quality gold metallic paint (like Rub ‘n Buff for $10) and affix them directly to the wall above the headboard, creating a custom ‘crown’ that mimics the look of a solid, carved frame.
14. Simple Elegance: A Beige Tufted Headboard with Soft Blue Walls
This look is a perfect example of how a calm, analogous color scheme can create a deeply serene atmosphere. The palette is built from colors that sit next to each other on the color wheel—soft blues, beiges, and whites. There are no jarring contrasts, which allows the subtle textures to take center stage. The gentle tufting of the headboard, the soft drape of the curtains, and the natural form of the cotton branches all contribute to a layered, tactile experience that feels incredibly peaceful and put-together without shouting for attention. It feels less ‘decorated’ and more ‘curated’.
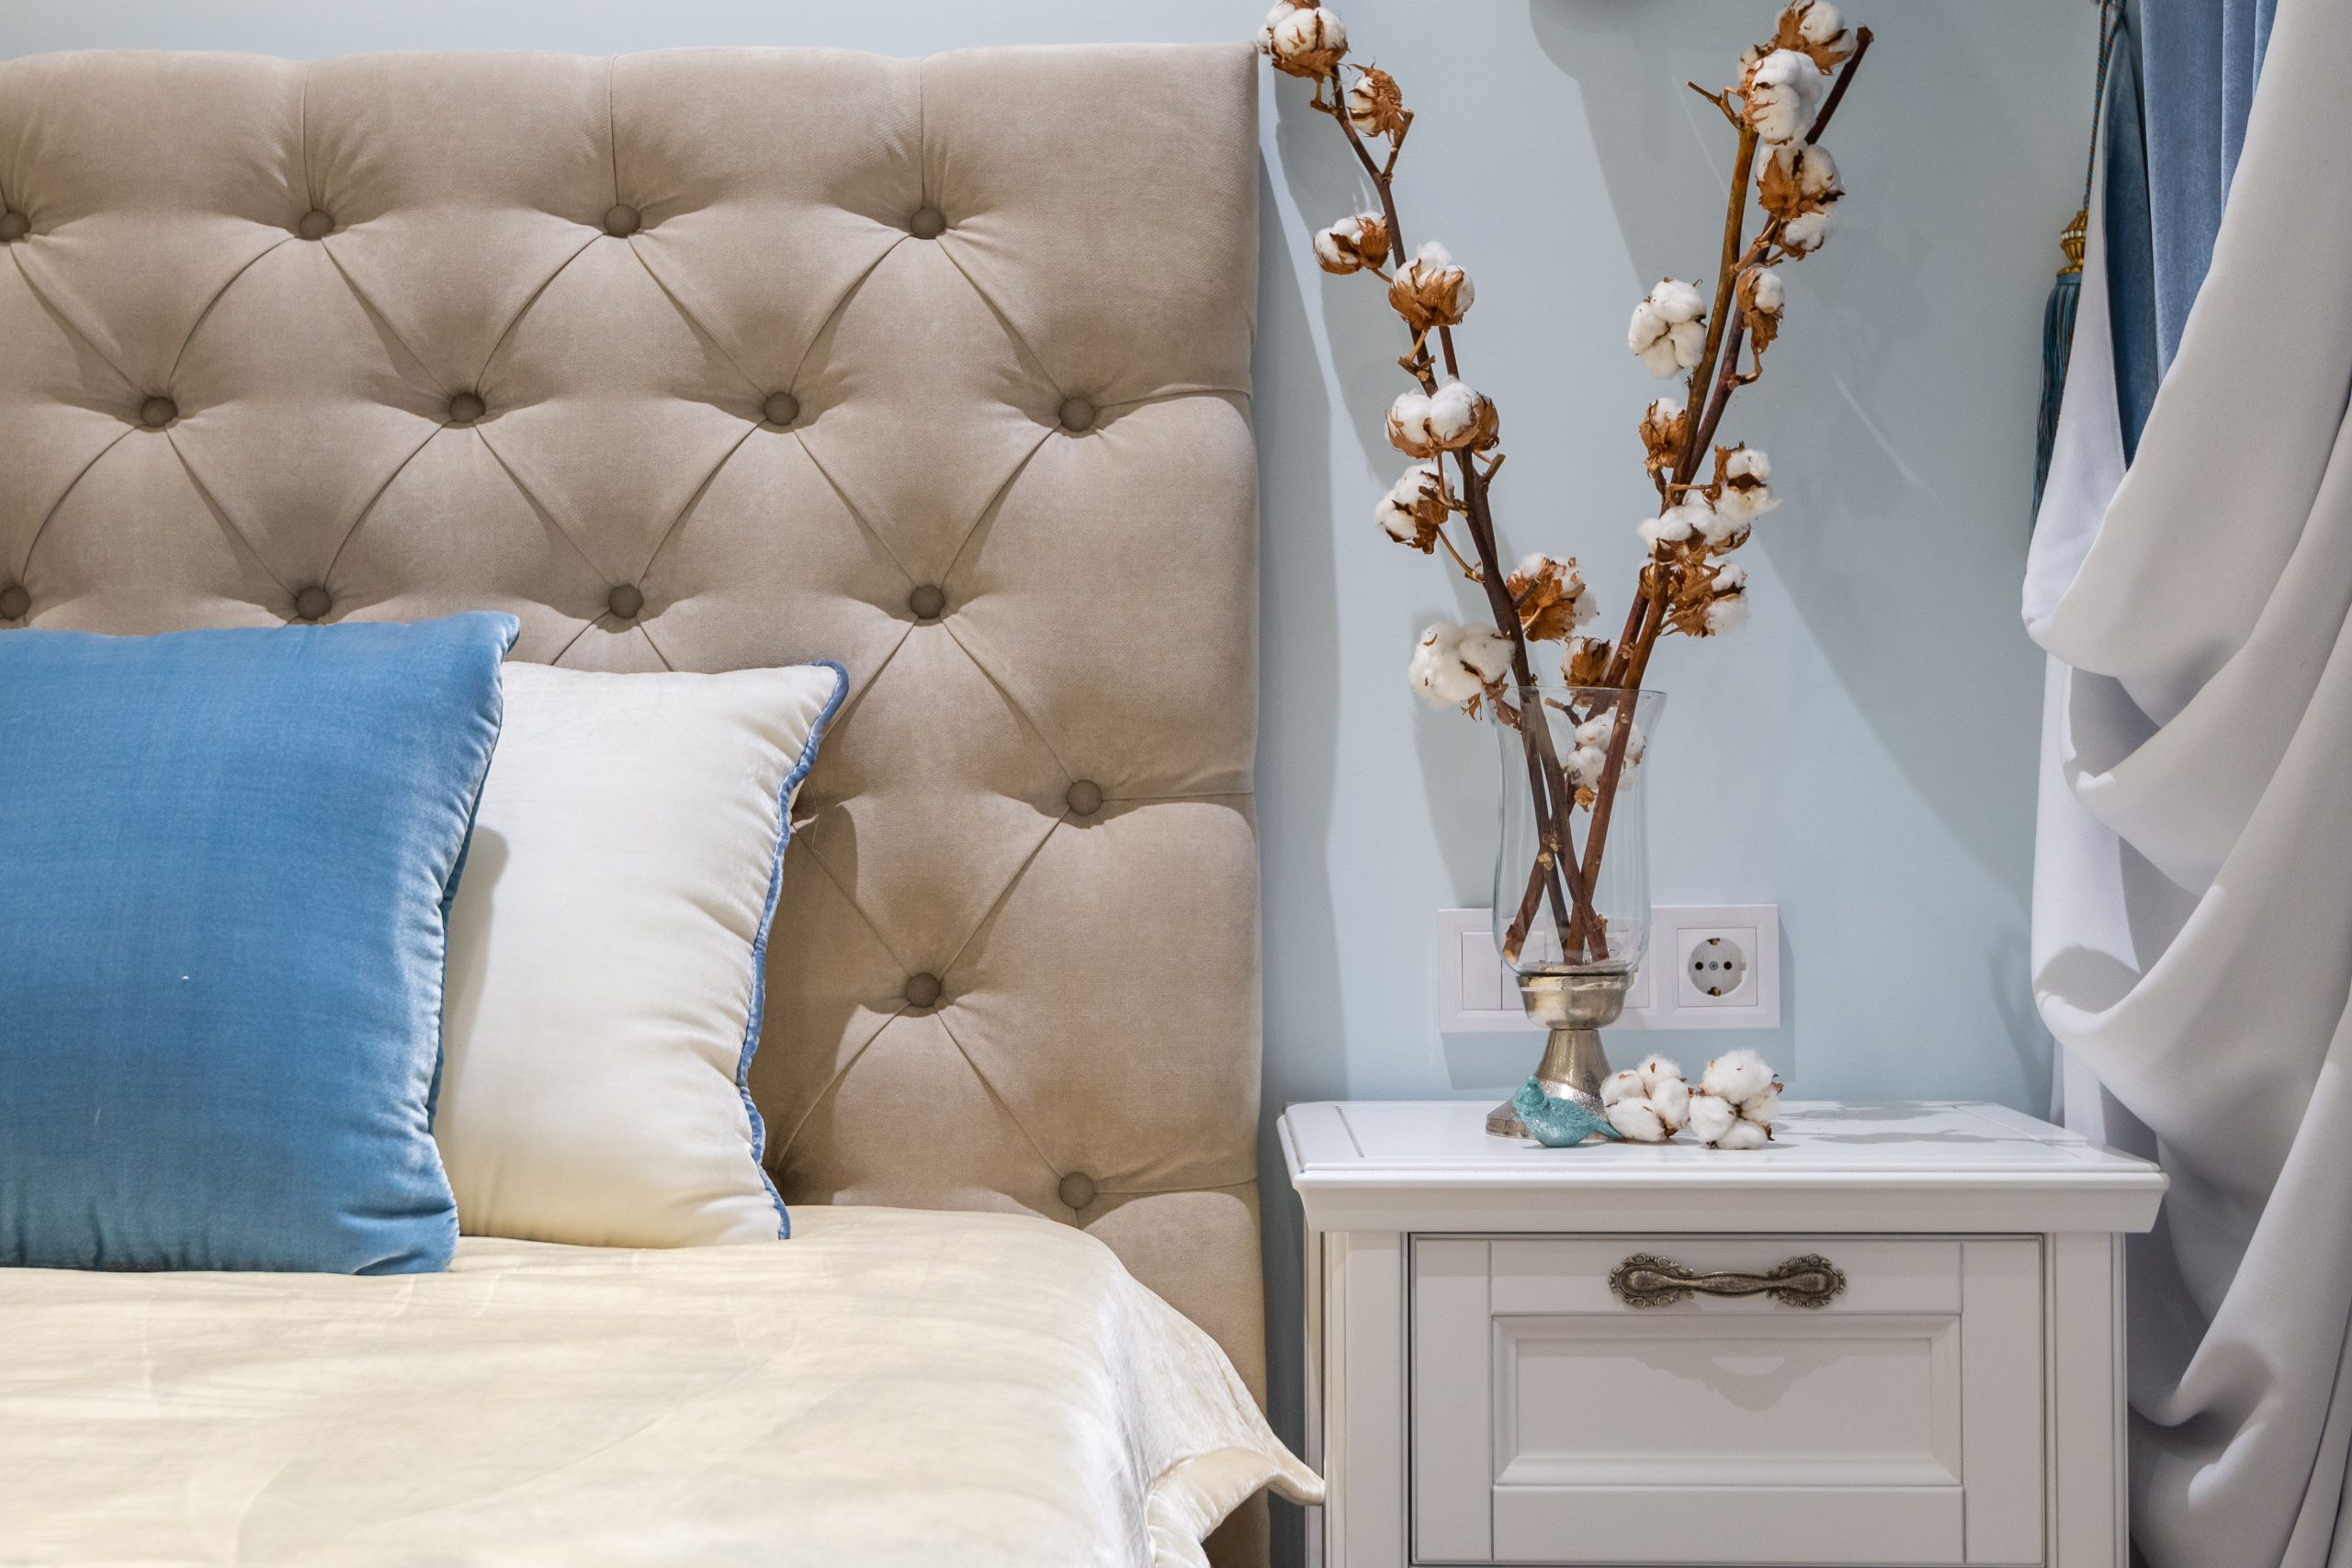
📐 Style Math
This soft and serene look is beautiful, but it’s important to check a few things before you commit to the palette.
- Test Your Paint: Light blue can be tricky. A shade that looks perfect online can turn into baby blue or a dull grey depending on your room’s natural light. Get samples of 2-3 shades and paint large swatches on your wall. Observe them throughout the day.
- Check Your Undertones: The beige headboard has a specific undertone (is it cool, warm, or neutral?). Make sure it complements the undertone of your blue wall paint. A warm beige with a cool blue can sometimes look ‘off’.
- Measure for a Nightstand: The nightstand should be roughly the same height as the top of your mattress. Before buying, measure your bed height to ensure comfortable access.
15. Warm Wood Panels with an Ornate Brass Sconce
The cozy, inviting feel of this bedroom comes down to a simple but effective formula: 50% warm wood texture (the paneled headboard) + 40% cool solid color (the light blue wall) + 10% warm metallic accent (the brass sconce). The key is the mix of color temperatures. The warm wood and brass bring a sunny, inviting energy, while the cool blue wall keeps the space from feeling too rustic or heavy. It feels balanced, modern, and comfortable. You could switch the blue wall to a soft sage green for a more earthy, nature-inspired vibe.

🔧 How-To Brief
When using wall-mounted sconces next to a bed, placement is everything. For reading in bed, the bottom of the shade should be positioned approximately 20-22 inches above the top of the mattress. Horizontally, it should be about 6-12 inches from the edge of the headboard. This placement ensures the light is cast down onto your book without creating glare in your eyes when you’re sitting up or harsh shadows when you’re lying down. It also ensures the sconce feels connected to the bed, not just floating on the wall.
16. Romantic Carved Wood and Cane with a Sheer Canopy
This look is tapping directly into the resurgence of romantic and ‘cottagecore’ aesthetics that we’re seeing all over Pinterest and Instagram. After years of sharp, minimalist design, there’s a collective yearning for softness, detail, and a touch of nostalgia. Cane and carved wood have a timeless, heirloom quality, while the sheer, scalloped canopy adds a layer of dreamy escapism. It’s a direct move away from sterile, hotel-like bedrooms toward spaces that feel personal, layered, and comforting—a little bit of a fairy tale in your own home.

📏 Scale Guide
A sheer fabric canopy is undeniably romantic, but let’s be practical: it’s a dust catcher. Fabric hanging horizontally will collect dust, pollen, and pet dander much faster than other surfaces in your room. To keep it looking fresh and ethereal (and not sad and grimy), you’ll need to commit to taking it down and washing it at least once every 1-2 months. Be sure to choose a fabric that is machine washable and durable enough to handle regular laundering. It’s a small chore, but essential for maintaining the magic.
17. A Simple DIY Upholstered Corner for a Daybed
This DIY corner headboard solution is absolutely brilliant for small bedrooms, guest rooms, or any space where a daybed does double duty as a sofa. It works best with a standard twin (38″ x 75″) or twin XL (38″ x 80″) daybed. The upholstered panels provide a soft backrest, making the corner placement feel intentional and cozy. Because it’s mounted to the wall, it takes up zero floor space, which is a massive win in rooms under 100 square feet. This approach defines the sleeping zone without the bulk of a traditional headboard and footboard.
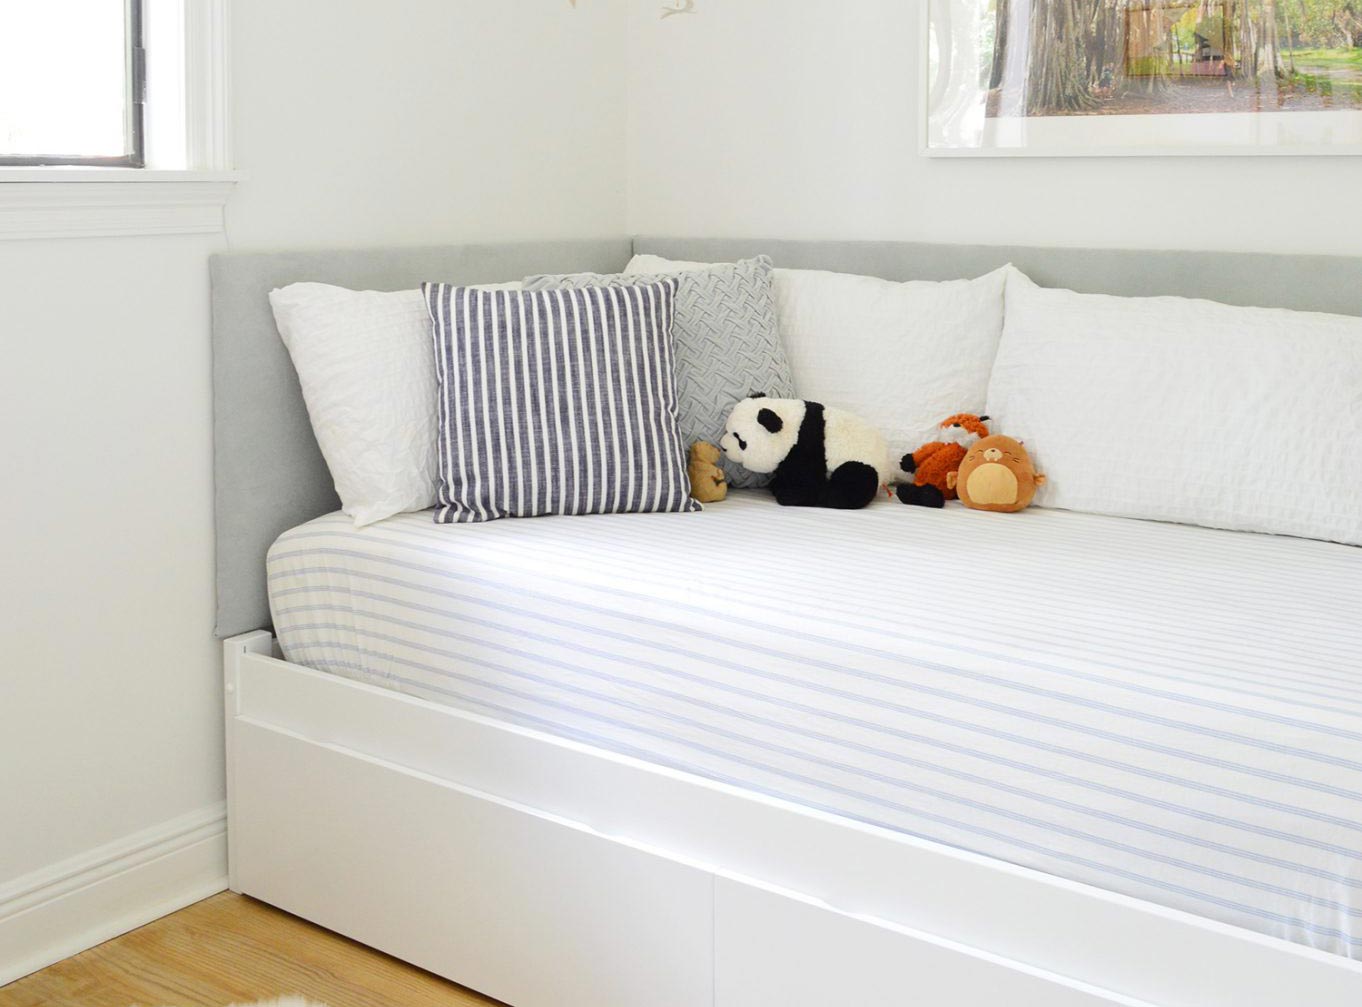
🧹 Maintenance Reality
Creating these simple upholstered panels is an easy and affordable DIY project that makes a daybed infinitely more comfortable.
- Time: 2-3 hours
- Cost: $70-$120
- Step 1: Cut two pieces of 1/2-inch plywood. One should be the length of your mattress (e.g., 75″) and the other the width (e.g., 38″). A standard height of 18-24 inches above the mattress works well.
- Step 2: Cover each plywood board with 2-inch thick upholstery foam, using a spray adhesive to secure it.
- Step 3: Wrap each panel in a layer of quilt batting, pulling it taut and stapling it to the back of the plywood. This softens the edges.
- Step 4: Cover the panels with your chosen fabric (the soft grey here is chic and versatile). Pull the fabric tight, folding the corners neatly, and staple it securely to the back.
- Step 5: Mount the panels to the wall using French cleats for a secure, hidden installation.
18. Cottage Charm with a Gingham Curtain Headboard
The single element that gives this room its unique cottage personality is the gingham curtain headboard. A standard wooden or upholstered headboard would have been fine, but using a fabric curtain on a simple canopy frame is a stroke of genius. It introduces softness, pattern, and a touch of country-inspired charm in an unexpected way. It’s what transforms the bed from a piece of furniture into a cozy, fabric-draped sanctuary and serves as the primary inspiration for the room’s entire pattern-mixing scheme.
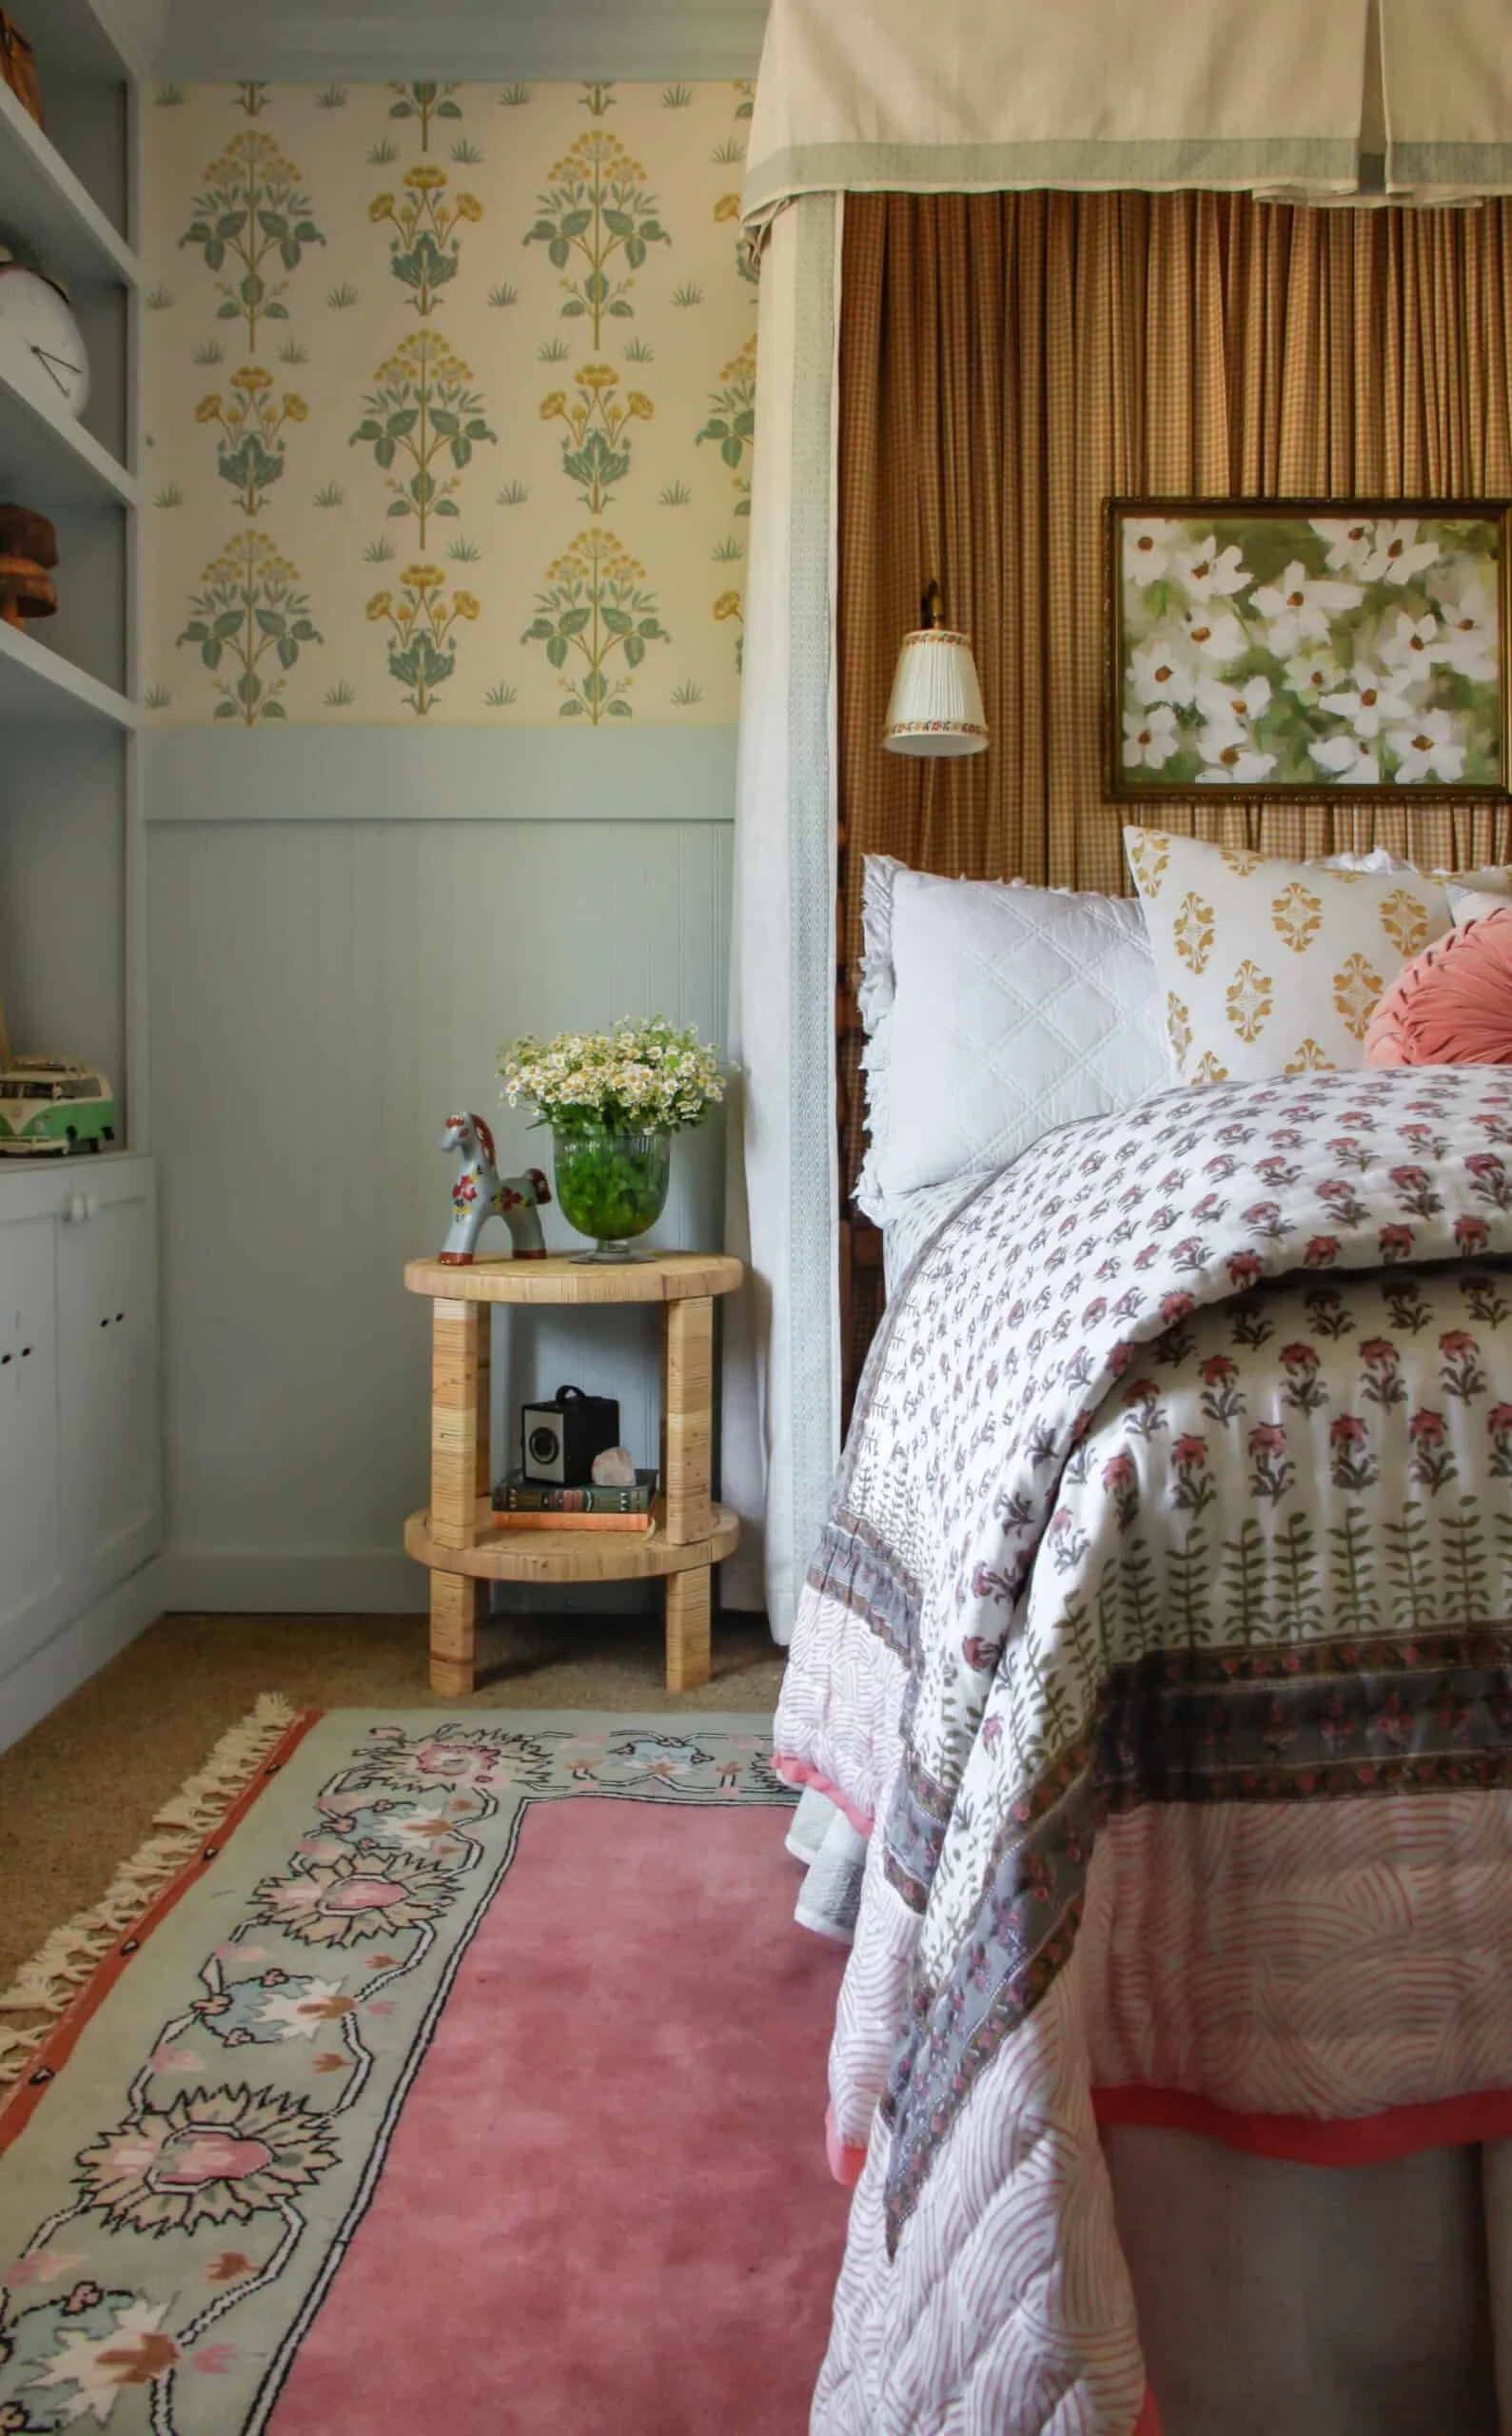
🔥 Trending Context
This charming, layered look is all about confident pattern mixing. Let’s break down the math: 40% large-scale classic pattern (the brown gingham curtain) + 30% medium-scale organic pattern (the yellow and green botanical wallpaper) + 20% small-scale geometric pattern (the patterned rug) + 10% calming solids (the light blue wainscoting and white canopy). The secret is varying the scale and style of the patterns. This allows them to coexist playfully without competing, creating a room that feels curated and full of personality.
19. Rustic Reclaimed Wood with a Chevron Inlay
The strength of this design lies in its bold, rustic simplicity. The use of thick, substantial reclaimed wood posts for the frame gives the bed an undeniable sturdiness and presence. It feels grounded and permanent. The chevron inlay in the headboard adds a touch of focused craftsmanship, breaking up the horizontal lines and providing a point of visual interest without feeling overly decorative. It’s a confident piece of furniture that celebrates the natural texture and strength of the wood, making it a perfect anchor for a warm, rustic-themed room. It’s a more substantial version of the planked headboard in Idea #8.
![]()
🎯 What Makes It Work
A solid wood bed frame can be a major investment. To capture this rustic, substantial look on a smaller budget, focus on the headboard. Use reclaimed 2x4s or pallet wood to build a headboard with a similar chevron pattern. Instead of building a whole new bed frame, attach the DIY headboard to your existing simple metal bed frame. Then, purchase a bed skirt in a neutral color that reaches the floor, which will hide the metal frame and create the illusion of a solid, cohesive base, giving you that chunky wood look for a fraction of the cost.
20. A Blooming Headboard: The Rattan Flower
When you have a headboard with such a strong, sculptural shape like this rattan flower, you need to balance it. The sage green paneled wall behind it is the perfect solution. It does two things: First, the color is soft and natural, complementing the rattan without competing with it. Second, the vertical lines of the paneling provide a subtle, orderly structure that contrasts beautifully with the headboard’s round, organic form. This contrast makes the flower shape pop even more. A plain white wall would have been fine, but the colored paneling makes the whole scene feel more thoughtful and complete.
✅ Before You Start
A rattan headboard is a beautiful, natural choice, but its woven texture does mean it requires some specific care. Dust is its main enemy. Use a vacuum with a soft brush attachment or a feather duster at least bi-weekly to get into all the nooks and crannies of the weave. Avoid using wet cloths or harsh chemical cleaners, as moisture can cause the rattan to swell, warp, or grow mildew. If you have a spill, blot it immediately and let it air dry completely. A little preventative dusting is all it takes to keep it looking great.
21. An Organic Headboard Made of Natural Wood Slices
This incredibly creative headboard brings the raw beauty of the forest indoors. It’s a project that requires patience but results in a one-of-a-kind art piece.
💰 Budget Breakdown
- Time: 6-8 hours
- Cost: $80 – $150 (depending on wood source)
- Step 1: Source your wood slices. You can buy them from craft stores, Etsy, or cut them yourself from fallen branches (ensure the wood is fully dried out!). Get a variety of sizes, from 2 to 6 inches in diameter.
- Step 2: Cut a piece of 1/4-inch plywood to the desired shape and size of your headboard. Paint it a dark color to help hide any gaps.
- Step 3: Arrange the wood slices on the plywood, starting with the largest pieces and filling in gaps with smaller ones. Aim for a natural, organic layout.
- Step 4: Once you’re happy with the arrangement, glue each slice down with strong wood glue. Let it dry completely for 24 hours.
- Step 5: Optionally, you can seal the entire piece with a matte polyurethane to protect the wood and make dusting easier. Mount it to the wall with a French cleat.
Let’s talk about the critters. When you’re working with natural, raw wood with the bark still on, there is a non-zero chance of bringing in tiny insects or their eggs. To be safe, it’s a good practice to either bake the wood slices in an oven at a low temperature (around 200°F for about an hour) or seal them thoroughly with a clear coat of polyurethane. This will kill any potential pests and prevent the bark from flaking off everywhere, so you can enjoy your rustic masterpiece without any unwelcome roommates.
22. Full-Height Whitewashed Plank Headboard with Integrated Lighting
This project looks like a custom built-in, but it’s a very achievable DIY that combines the headboard and lighting into one cohesive feature. It’s especially great for making a room feel taller.
💡 Designer Tip
- Wood Planks (Pine or Poplar): $150 – $250
- Wall-Mounted Lamps (2): $100 – $300
- Paint/Whitewash Supplies: $40 – $60
- Electrical (if hiring an electrician): $150 – $300
- TOTAL (DIY electrical): $290 – $610
- Budget alternative: Use reclaimed pallet wood for the planks (free!) and choose plug-in wall sconces to avoid the cost of an electrician. The total cost could be as low as $150.
A full-height headboard like this is a fantastic way to add architectural interest. This idea is best suited for rooms with standard 8 to 9-foot ceilings. In a room with very high, vaulted ceilings, the effect might be lost. The key is to run the planks all the way from the floor to the ceiling. This continuous vertical line draws the eye upward, creating the illusion of more height. The width of the planked section should be at least the width of the bed plus the nightstands on either side to look properly anchored and intentional.
23. Beige Upholstery with a Silver Nailhead Trim Pattern
When you’re creating a pattern with nailhead trim, precision is non-negotiable. Don’t try to eyeball it! Use a quilting ruler and a chalk pencil (which can be easily brushed away) to draw your design directly onto the fabric before you start. For perfectly even spacing, you can use a nailhead trim spacer tool, or simply use the width of your own thumb as a consistent guide between each nail. Applying the nailheads one by one is time-consuming, but the sharp, professional result is worth the effort.
💸 Get This Look For Less
The nailhead trim pattern is, without a doubt, the element that makes this headboard stand out. A simple beige upholstered headboard is nice, but it’s a common staple. The addition of the intricate, geometric ‘Greek Key’ inspired pattern in shimmering silver nailheads elevates it from a background piece to a deliberate, stylish statement. It adds a touch of glamour and custom detail that catches the eye and gives the entire bed a more expensive, boutique-hotel feel. This detail is far more ornate than the simple border on the headboard in Idea #12.
24. Modern Mood: A Dark Gray Tufted Headboard
This room feels so calm and clean because of its adherence to a tight, high-contrast color palette and symmetrical layout. The dark gray headboard creates a strong anchor point against the crisp white wall. This simple, bold contrast is a classic modern move. The symmetry—a lamp, a nightstand, and a framed print mirrored on each side of the bed—creates a sense of order and tranquility. Your eye knows exactly what to expect, which is incredibly restful. The patterns in the bedding are kept light and low-contrast, adding texture without disrupting the calm.
⭐ The One Thing
A dark gray tufted headboard is a modern classic, and you absolutely do not need to spend a fortune to get this look. Big box stores like Target and Walmart, as well as online retailers like Amazon and Wayfair, have dozens of options for under $200 for a queen size. To get the best deal, look for a simple rectangular shape and a durable fabric like linen-look polyester. The ‘look’ is more about the color and tufting than the specific brand, so you can confidently shop for a bargain. This is a much more subdued look compared to the bright channel-tufted headboard in Idea #5.
25. Soft Rustic Charm with a Panelled Arched Headboard
This cozy, rustic-yet-soft aesthetic follows a lovely formula: 60% simple structure (the beige paneled, arched headboard) + 30% crisp neutrals (the white bedding) + 10% contrasting depth (the dark olive green wall). The arch in the headboard softens the straight lines of the panels, and the floral pillow adds a single touch of pattern and color. To change the mood, you could keep the headboard and bedding, but paint the wall a deep charcoal gray for a more modern, dramatic feel, or a soft terracotta for a warmer, earthier vibe.
⚠️ Real Talk
This looks like a simple, charming setup, but there are a few key details to confirm before you start building or buying.
- Confirm Wall Color First: A dark wall like this olive green makes a huge impact. Paint the wall *before* you install the headboard. Make sure you love how the color looks in your room’s specific lighting conditions.
- Check Your Bedding Dimensions: The beauty of this look is the crisp, textured white bedspread. Ensure your bedspread is large enough to drape nicely. Measure your mattress height and add it to the width to find the minimum size you’ll need.
- Plan for the Arch: If you’re DIY-ing this headboard, the arch is the trickiest part. Draw it out on a large piece of cardboard first to use as a template. Make sure the peak of the arch is perfectly centered.
26. Playful Scalloped Headboard with Yellow & Grey Bedding
A scalloped edge is a really fun, whimsical detail, but it can be tricky to get right. If the scallops are too small or too pointy, the headboard can end up looking a bit juvenile or dated, like something from a 1980s catalog. The key to keeping it modern is to use large, gentle curves. Fewer, wider scallops will feel more sophisticated and contemporary than many small, tight ones. Also, pairing it with clean, geometric patterns, like the yellow and white duvet cover here, helps to ground the playful shape in a modern context.
📐 Style Math
Creating that perfect scalloped edge is the key to this DIY project. It looks impressive, but it’s mostly about careful tracing and cutting.
- Time: 3-4 hours
- Cost: $90-$160
- Step 1: Start with a rectangular piece of 1/2-inch plywood cut to the width of your bed.
- Step 2: Find a round object to trace—a large dinner plate or a pot lid is perfect. Trace half-circles along the top edge of the plywood to create your scallop pattern.
- Step 3: Carefully cut out the scalloped shape using a jigsaw. Take your time to get clean curves.
- Step 4: Use spray adhesive to attach a 2-inch layer of foam to the plywood, then trim the foam to match the scalloped shape.
- Step 5: Wrap the board in batting and then your final fabric, stapling securely on the back. For the scalloped indentations, you’ll need to cut small slits in the fabric and fold them carefully to get a smooth finish.
27. Traditional Toile Fabric for a Classic Upholstered Headboard
This look is a perfect example of the ‘Grandmillennial’ or ‘New Traditional’ trend that’s going strong. It’s a reaction against years of stark minimalism, embracing instead the comfort and nostalgia of traditional design elements like toile fabric, pleated lampshades, and classic furniture shapes. But it’s done with a fresh, modern sensibility—the color palette is calm and restrained, and the room isn’t cluttered. It’s about cherry-picking the best of traditional style and making it feel relevant and personal for today.
🔧 How-To Brief
When working with a large-scale repeating pattern like this floral toile, it’s crucial to center the design on your headboard. Before you make a single cut, lay your fabric over the headboard frame and find the most visually appealing part of the pattern repeat. This will likely be a prominent motif or flower. Align this central element to the absolute center of your headboard. This small step ensures the final piece looks balanced and professional, not like a random, crooked slice of fabric.
28. Inviting & Natural: A Beige Upholstered Wingback Bed
The element that truly defines this room’s inviting, sanctuary-like feel is the wingback design of the headboard. The ‘wings’ on the side wrap forward slightly, creating a subtle sense of enclosure and coziness. It feels like the bed is giving you a gentle hug. This architectural detail makes the bed feel more substantial and luxurious than a simple flat headboard would. It’s a classic shape that provides a perfect, comfortable nook for reading in bed, turning the bed into a multi-functional space for rest and relaxation.
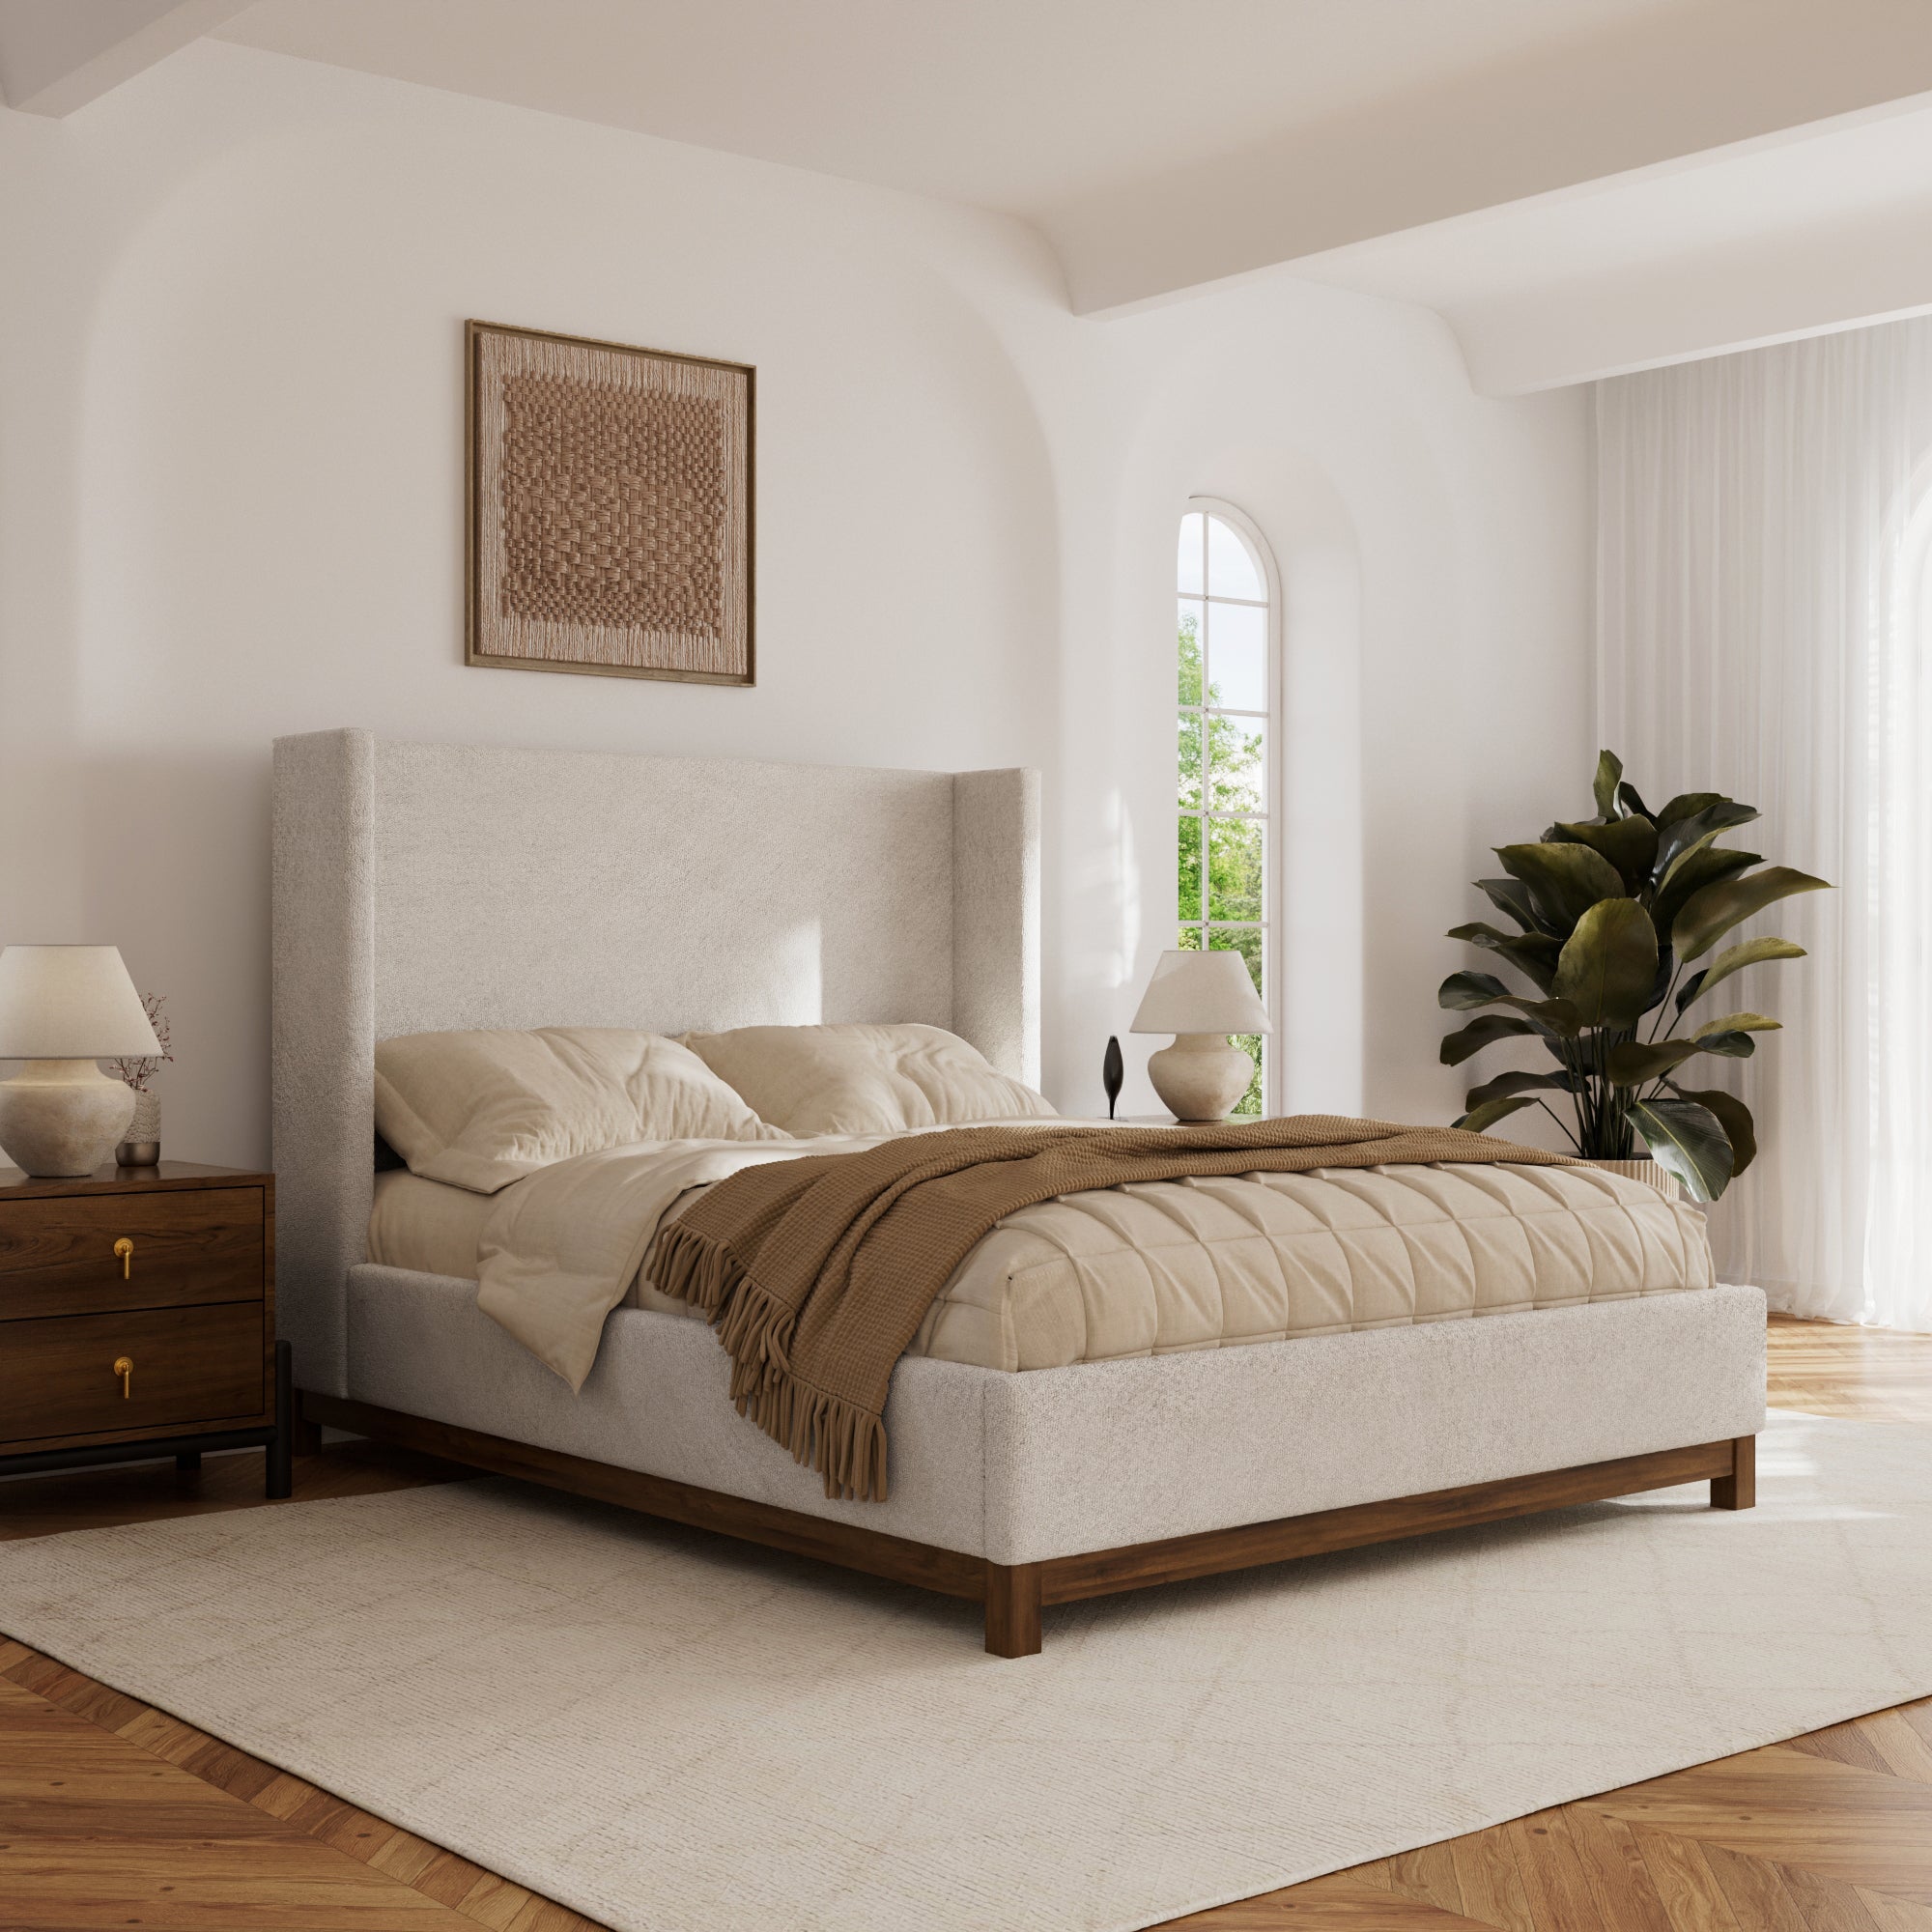
📏 Scale Guide
A substantial wingback bed requires a room with adequate scale to avoid feeling cramped. This style is best suited for a primary bedroom that is at least 12 feet by 14 feet. The wings of the headboard add extra depth, so you need to account for that. Also, the visual weight of a large, upholstered piece like this needs breathing room. Ensure you have at least 30-36 inches of clear walking space between the foot of the bed and the opposing wall or furniture. This bed’s grandeur is best appreciated when it doesn’t have to fight for space.
Your Dream Headboard Awaits
That’s a wrap on our favorite DIY headboard ideas for the year! We hope you’re feeling inspired and empowered to create a bedroom that truly feels like you. Whether you’re ready for a full weekend project or a simple afternoon update, the perfect starting point is right here in this list.
Now, go take another look at your Pinterest board and start planning. You’ve got this!