You know that feeling when you finally find the pool design that looks exactly right for your space? It can feel like searching for a needle in a haystack. After filtering through hundreds of options across Frontgate, Restoration Hardware, and CB2, we narrowed it down to the looks that actually deliver on both style and function. We’re bringing you the 31 most inspiring outdoor pool ideas, covering everything from Modern Minimalist escapes to Lush Tropical retreats and Classic Estate designs. These are the certified Pinterest-worthy looks for 2026, driven by the desire to create true outdoor living rooms. And stay until the end — we break down the most common mistakes that can ruin these looks. 📌 Save this to Pinterest for later — you’ll want to revisit these ideas.
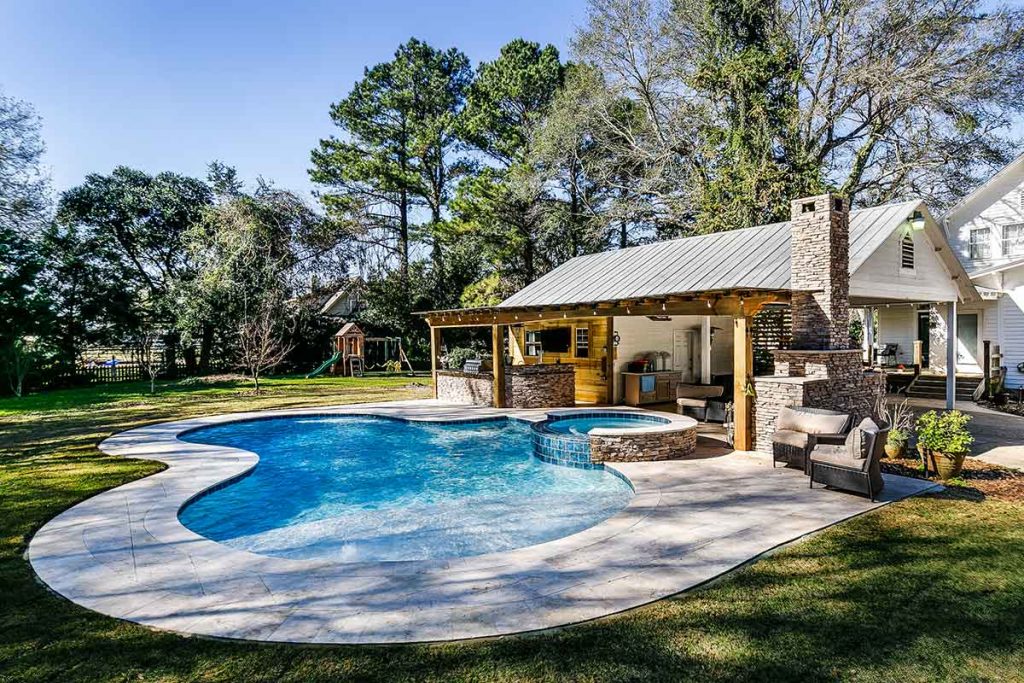
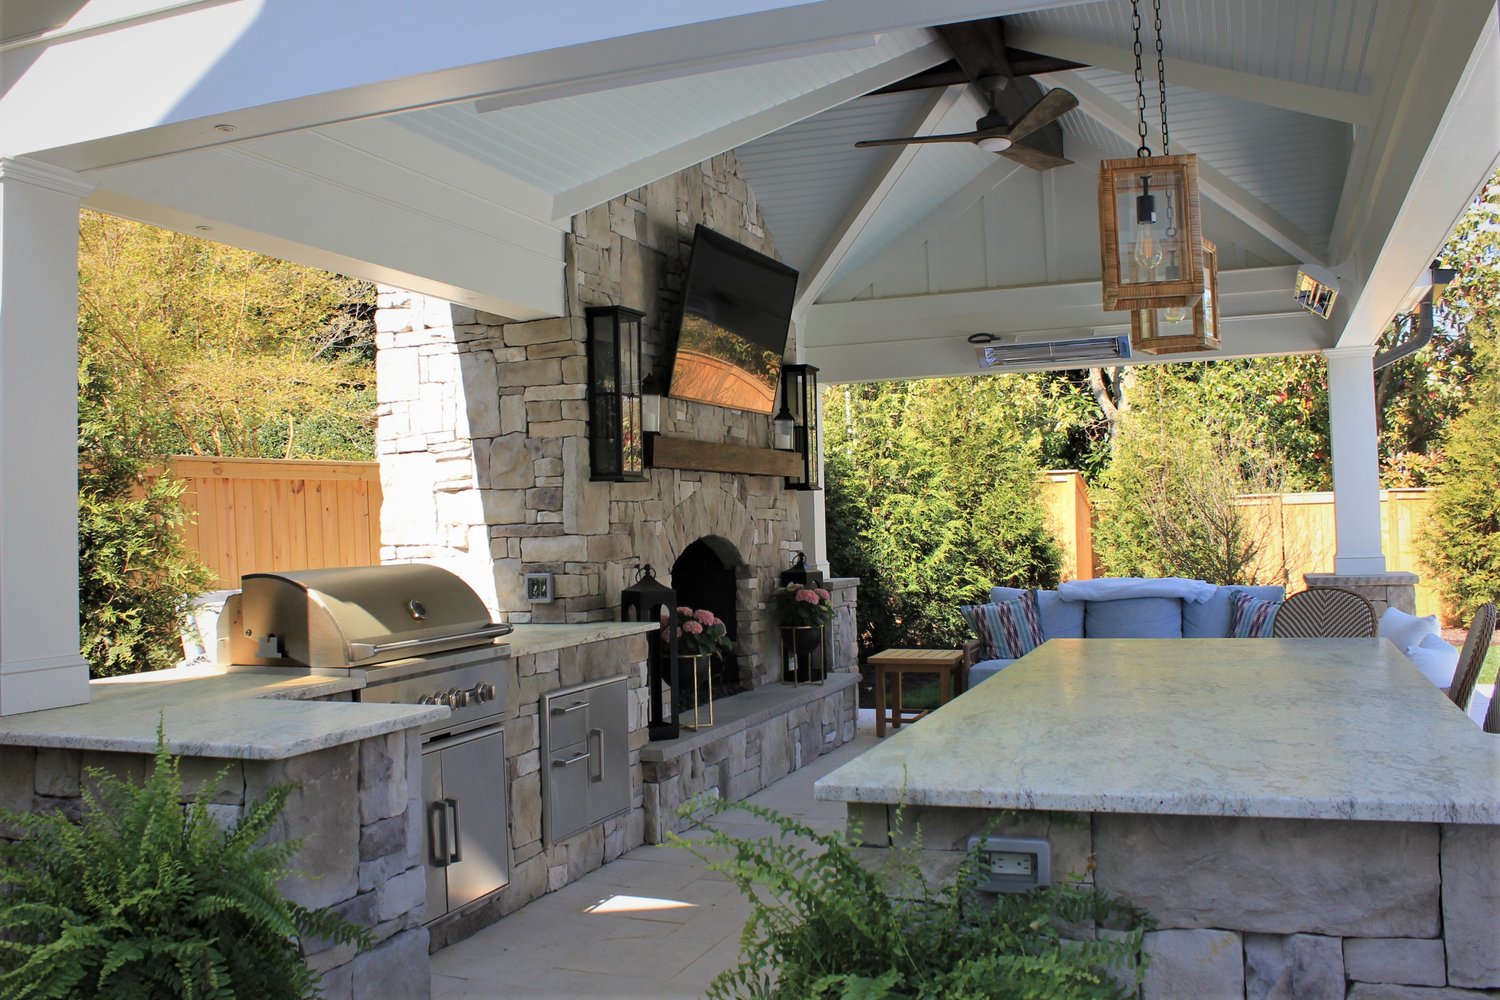
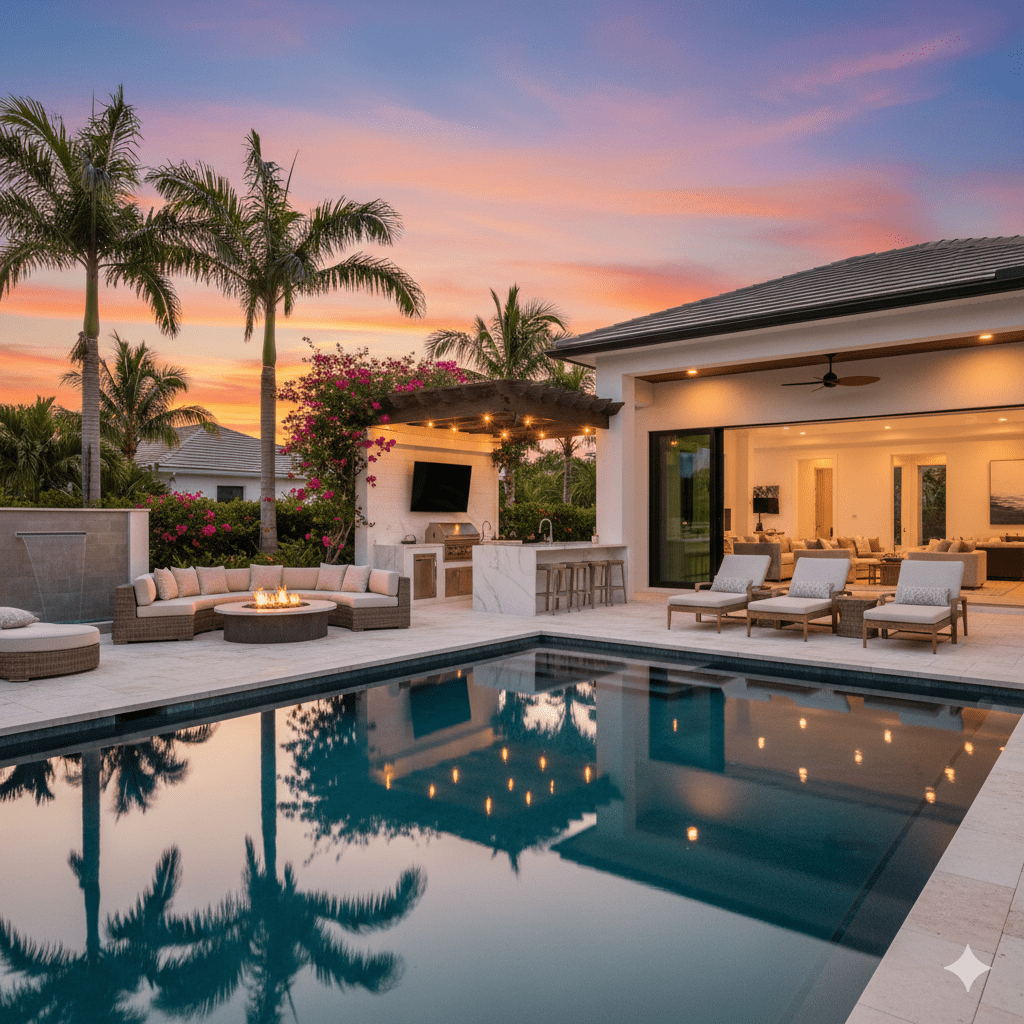
1. Build a Five-Star Outdoor Pool and Kitchen
Even without a specific image, the concept of a luxury outdoor kitchen by the pool is a major trend. The formula for this look is about balancing high-end function with relaxed comfort. Think of it as 50% professional-grade appliances (grill, fridge, sink), 30% durable, beautiful surfaces (stone countertops, weatherproof cabinetry), and 20% plush, inviting seating. The key is making it feel like a seamless extension of your indoor living space, not just a place to flip burgers. You can swap the stone for polished concrete or the stainless steel for matte black fixtures, but the ratio of utility to comfort should stay the same.
⚠️ Real Talk
Why is this a key look for 2026? The post-pandemic era cemented our desire for homes that do more. We don’t just want a backyard; we want a destination. An outdoor kitchen and pool area transforms a simple yard into a full-service hospitality suite for your family and friends. It reflects a larger cultural shift towards investing in the home as a primary hub for both relaxation and entertainment. This isn’t just about cooking outside; it’s about creating a lifestyle where life flows effortlessly between indoors and out. This trend has serious staying power because it fundamentally expands a home’s usable square footage.
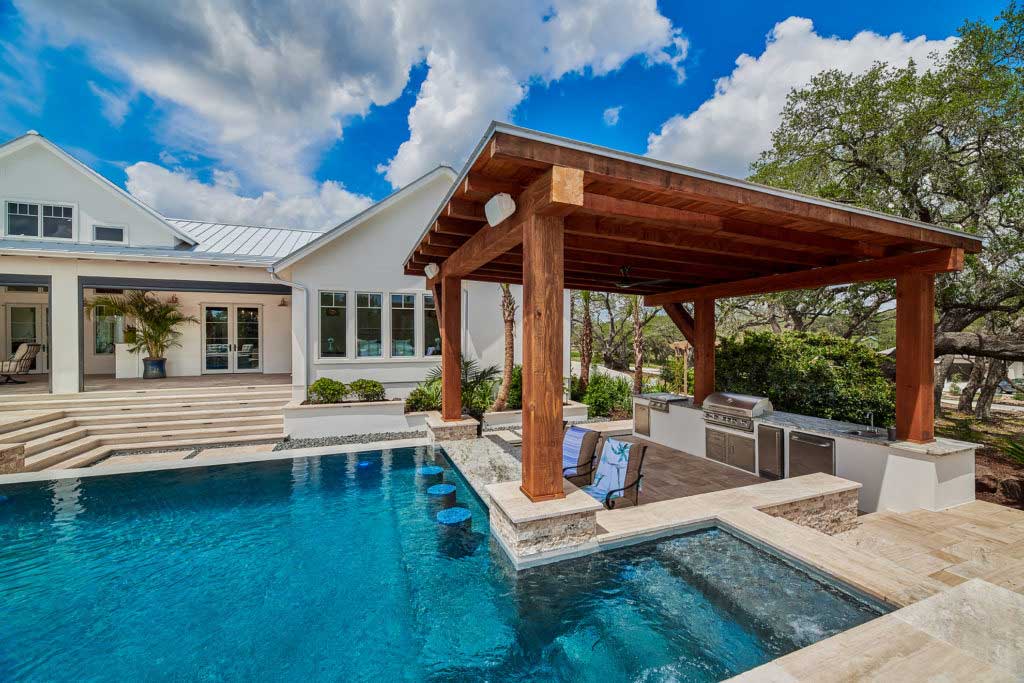
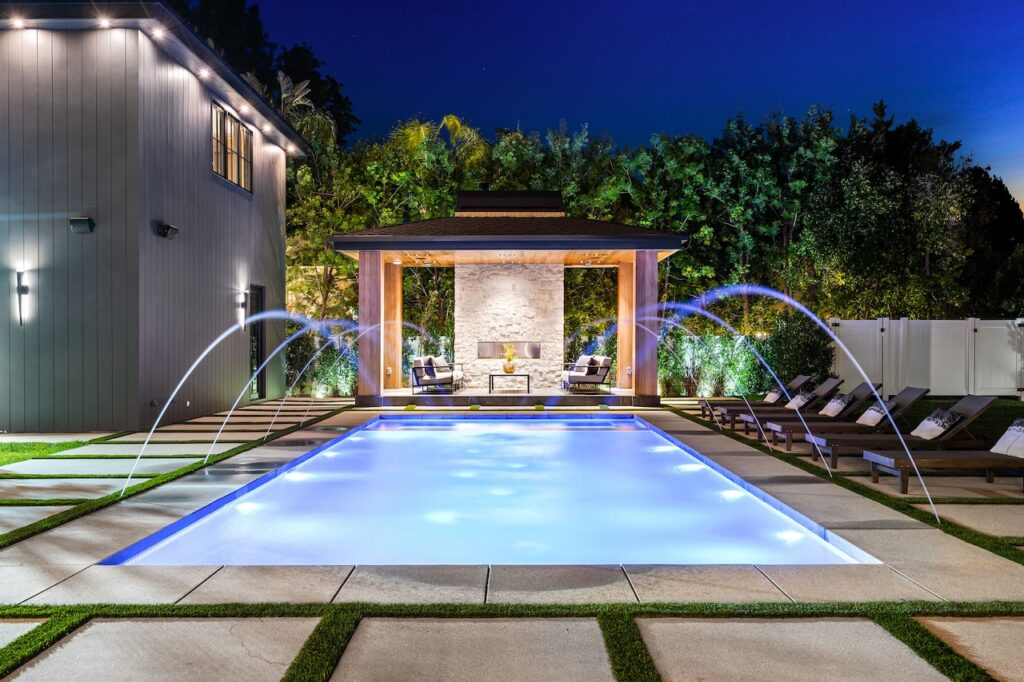
2. Create a Modern Coastal Vibe with a Pergola-Covered Kitchen
This design nails the balance between sleek modernism and relaxed coastal style. What makes it work is the smart use of materials. The dark blue of the pool tiles provides a rich, deep anchor for the entire space, preventing the light-colored paving and white stucco from feeling washed out. The substantial wooden pergola adds necessary warmth and texture, breaking up the hard surfaces of stone and steel. Finally, the in-pool bar stools are a playful, functional touch that screams ‘resort life’ — they blur the line between the swimming area and the entertainment zone, making the whole space feel connected and interactive.
🔥 Trending Context
When installing an outdoor kitchen under a pergola, pay close attention to your task lighting. You’ll need more than just ambient string lights. Install hard-wired, waterproof LED downlights directly above the primary work zones: the grill, the sink, and the main prep counter. Aim for a warm white temperature (around 3000K) to maintain a cozy evening atmosphere. This ensures you can actually see what you’re doing after the sun goes down, turning your outdoor kitchen into a true evening destination instead of just a daytime amenity.
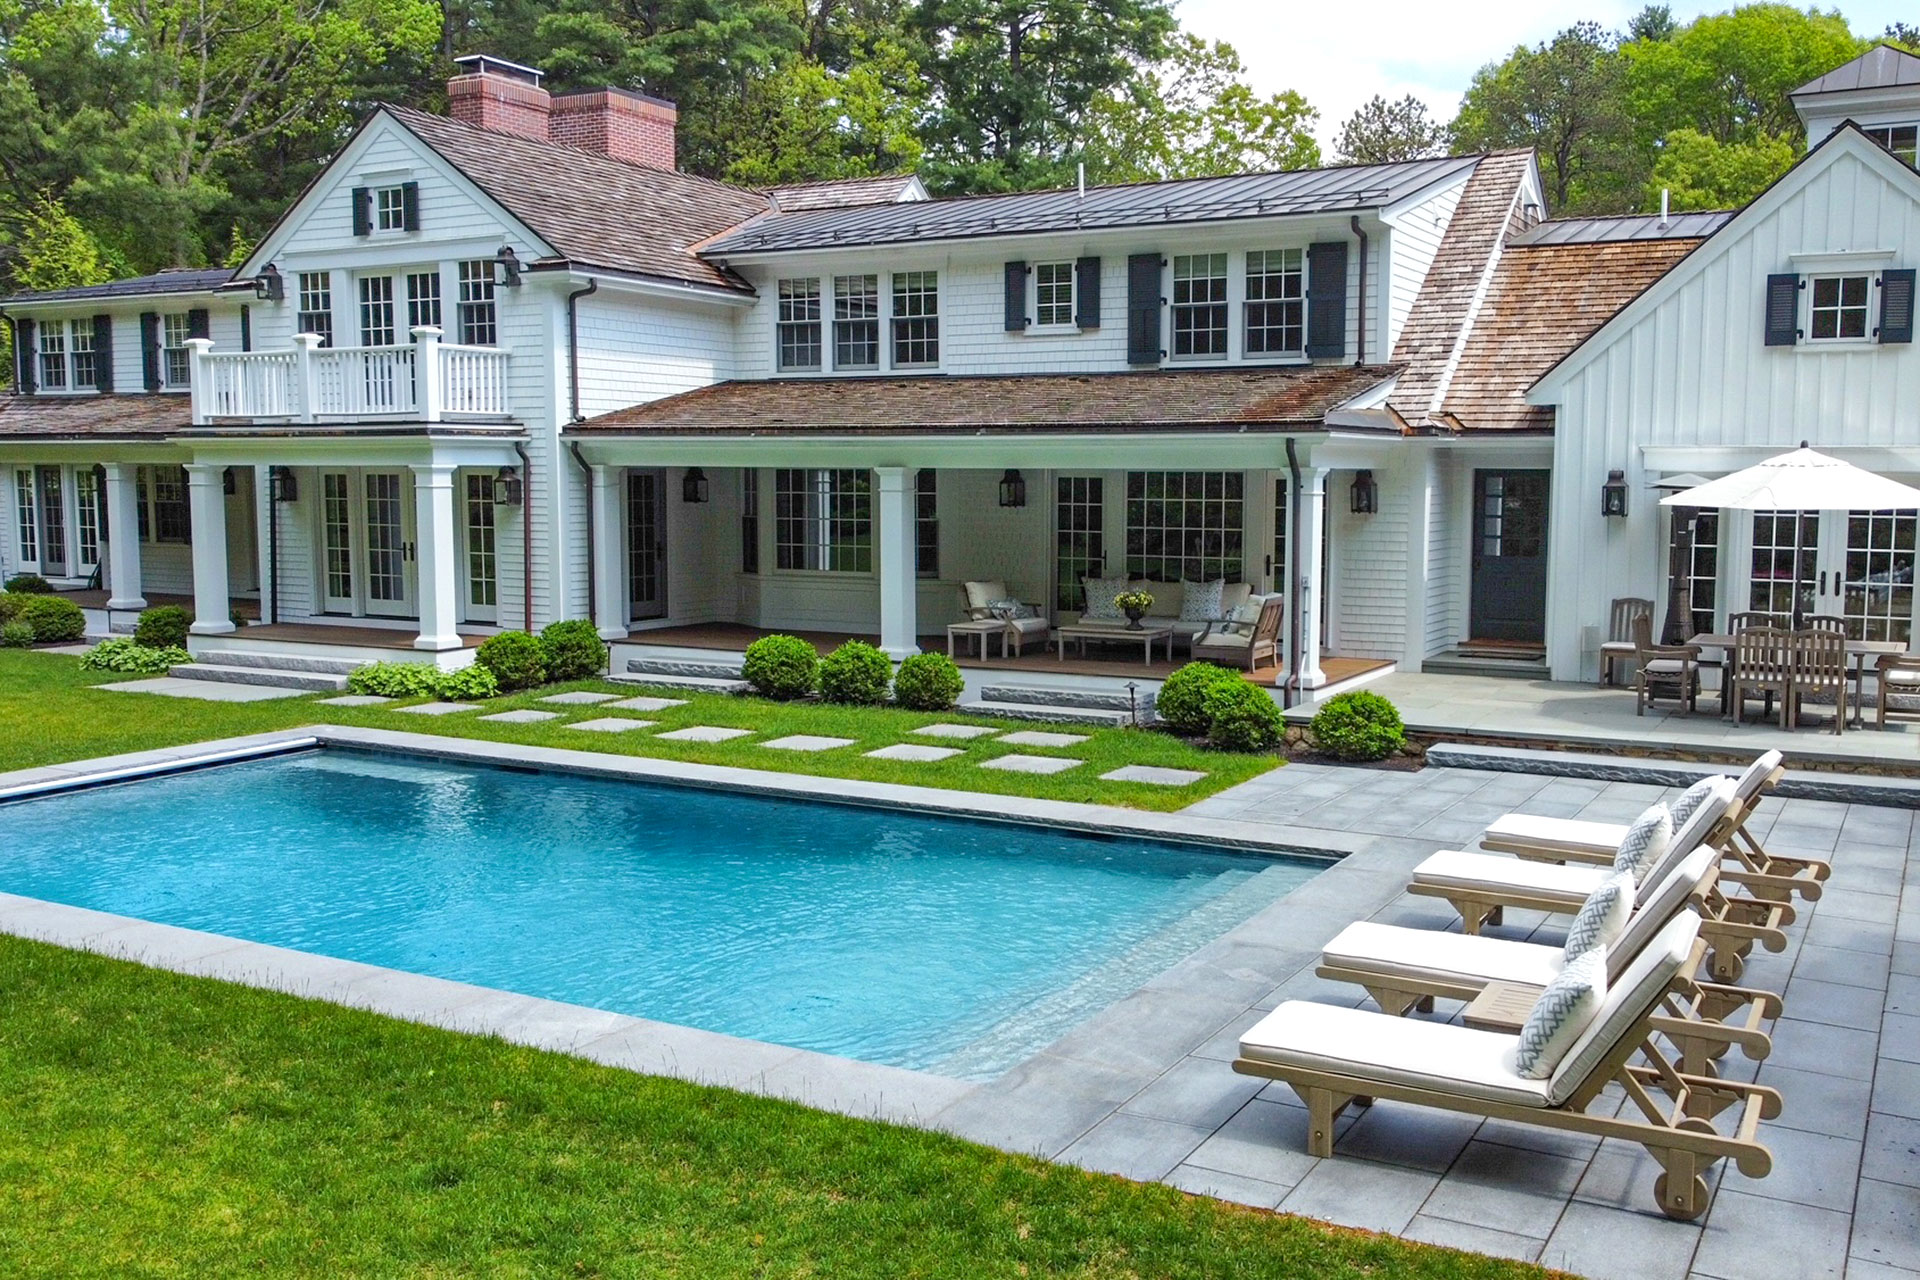
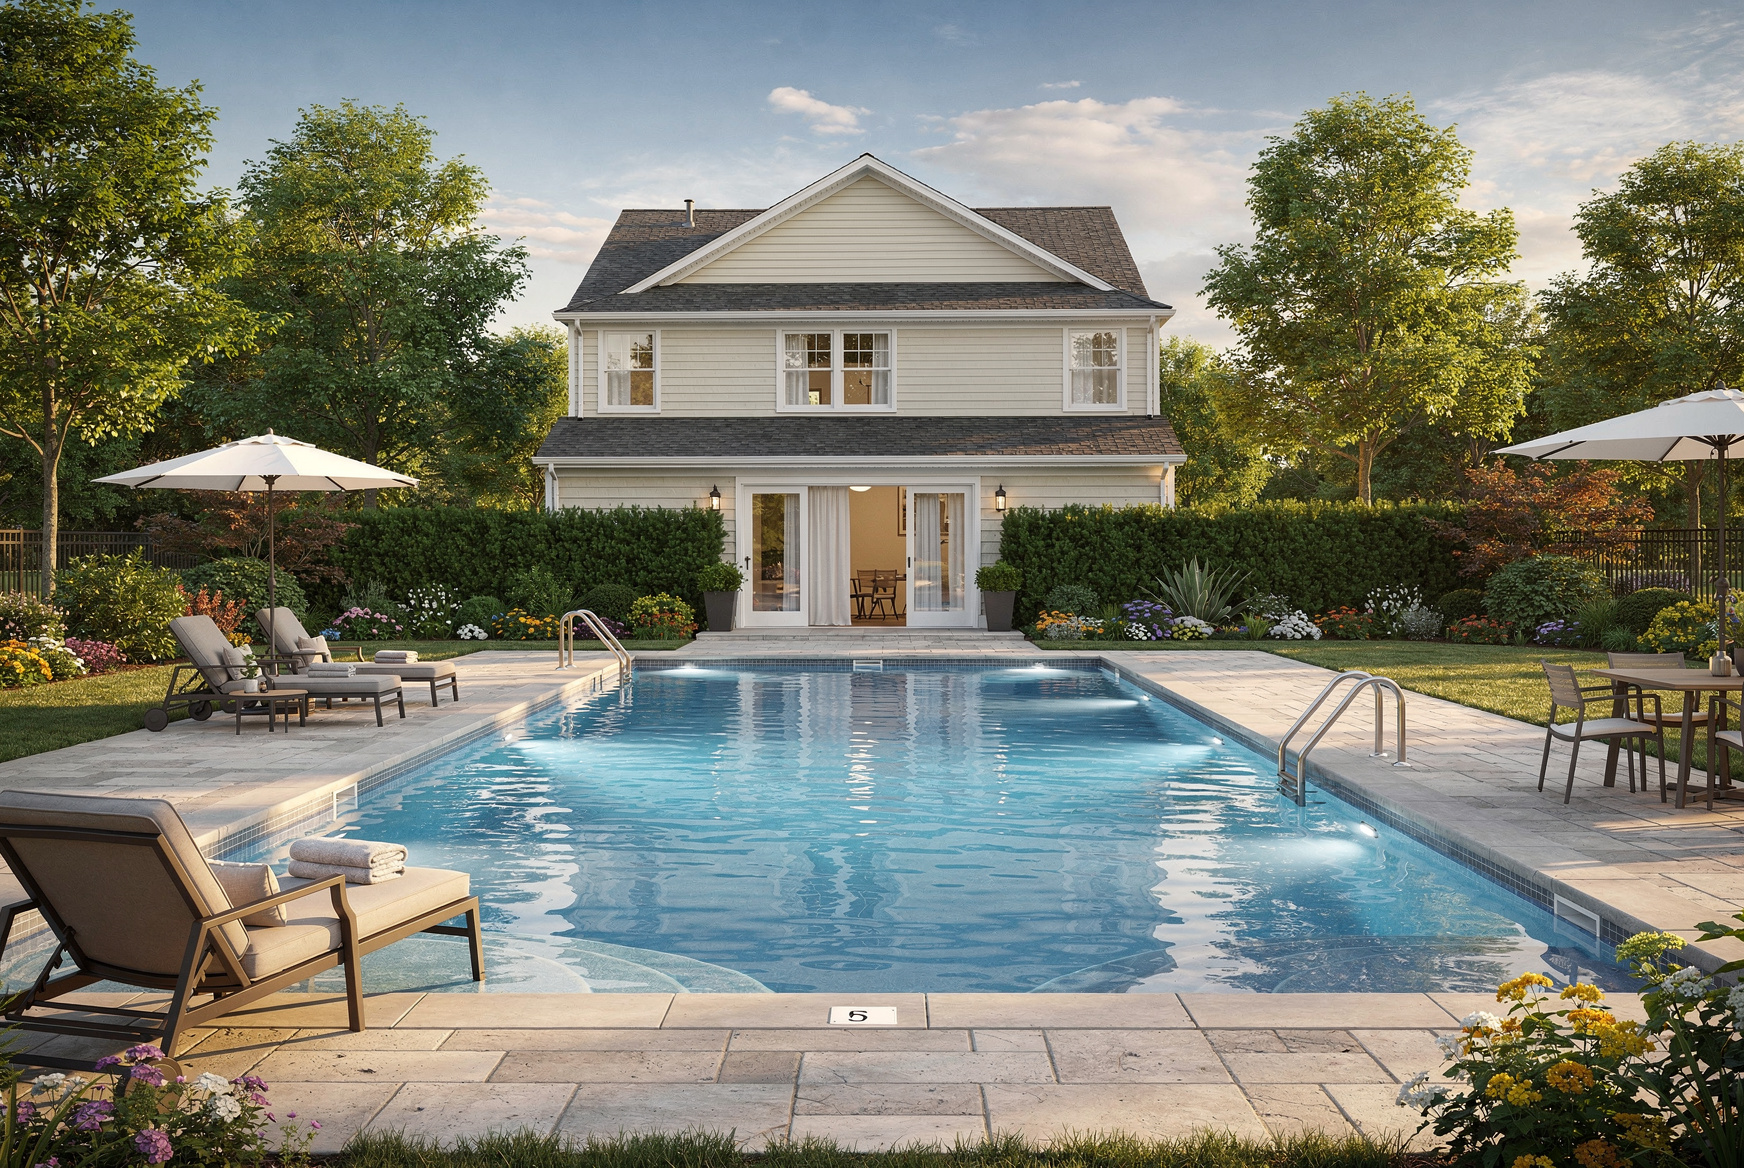
3. Embrace Classic American Style with a Shingle House and Pool
Achieving this timeless, established look involves significant investment in both structure and landscaping. The large scale is a major factor in the cost.
- Main Furniture (lounge chairs, dining set): $4,000 – $9,000
- Pool Installation (rectangular, gunite): $60,000 – $120,000+
- Hardscaping (stone patio, pavers): $15,000 – $35,000
- Covered Porch Structure: $25,000 – $60,000
- Decor & Accessories (cushions, planters): $1,500 – $3,000
- TOTAL: $105,500 – $227,000+
- Budget Alternative: Opt for a vinyl liner pool, concrete pavers instead of natural stone, and source secondhand wood furniture to capture the vibe for 40-50% less.
🎯 What Makes It Work
This design is best suited for a larger property, ideally a half-acre or more, to avoid the house and pool feeling cramped. The key is creating a sense of expanse. You need a minimum of 15 feet of patio/lawn space on at least two sides of the pool to accommodate both lounge and dining areas without feeling cluttered. The house itself acts as a grand backdrop, so this look works best when the pool is at least 40-50 feet away from the main structure, allowing for that beautiful green lawn to create a visual break.
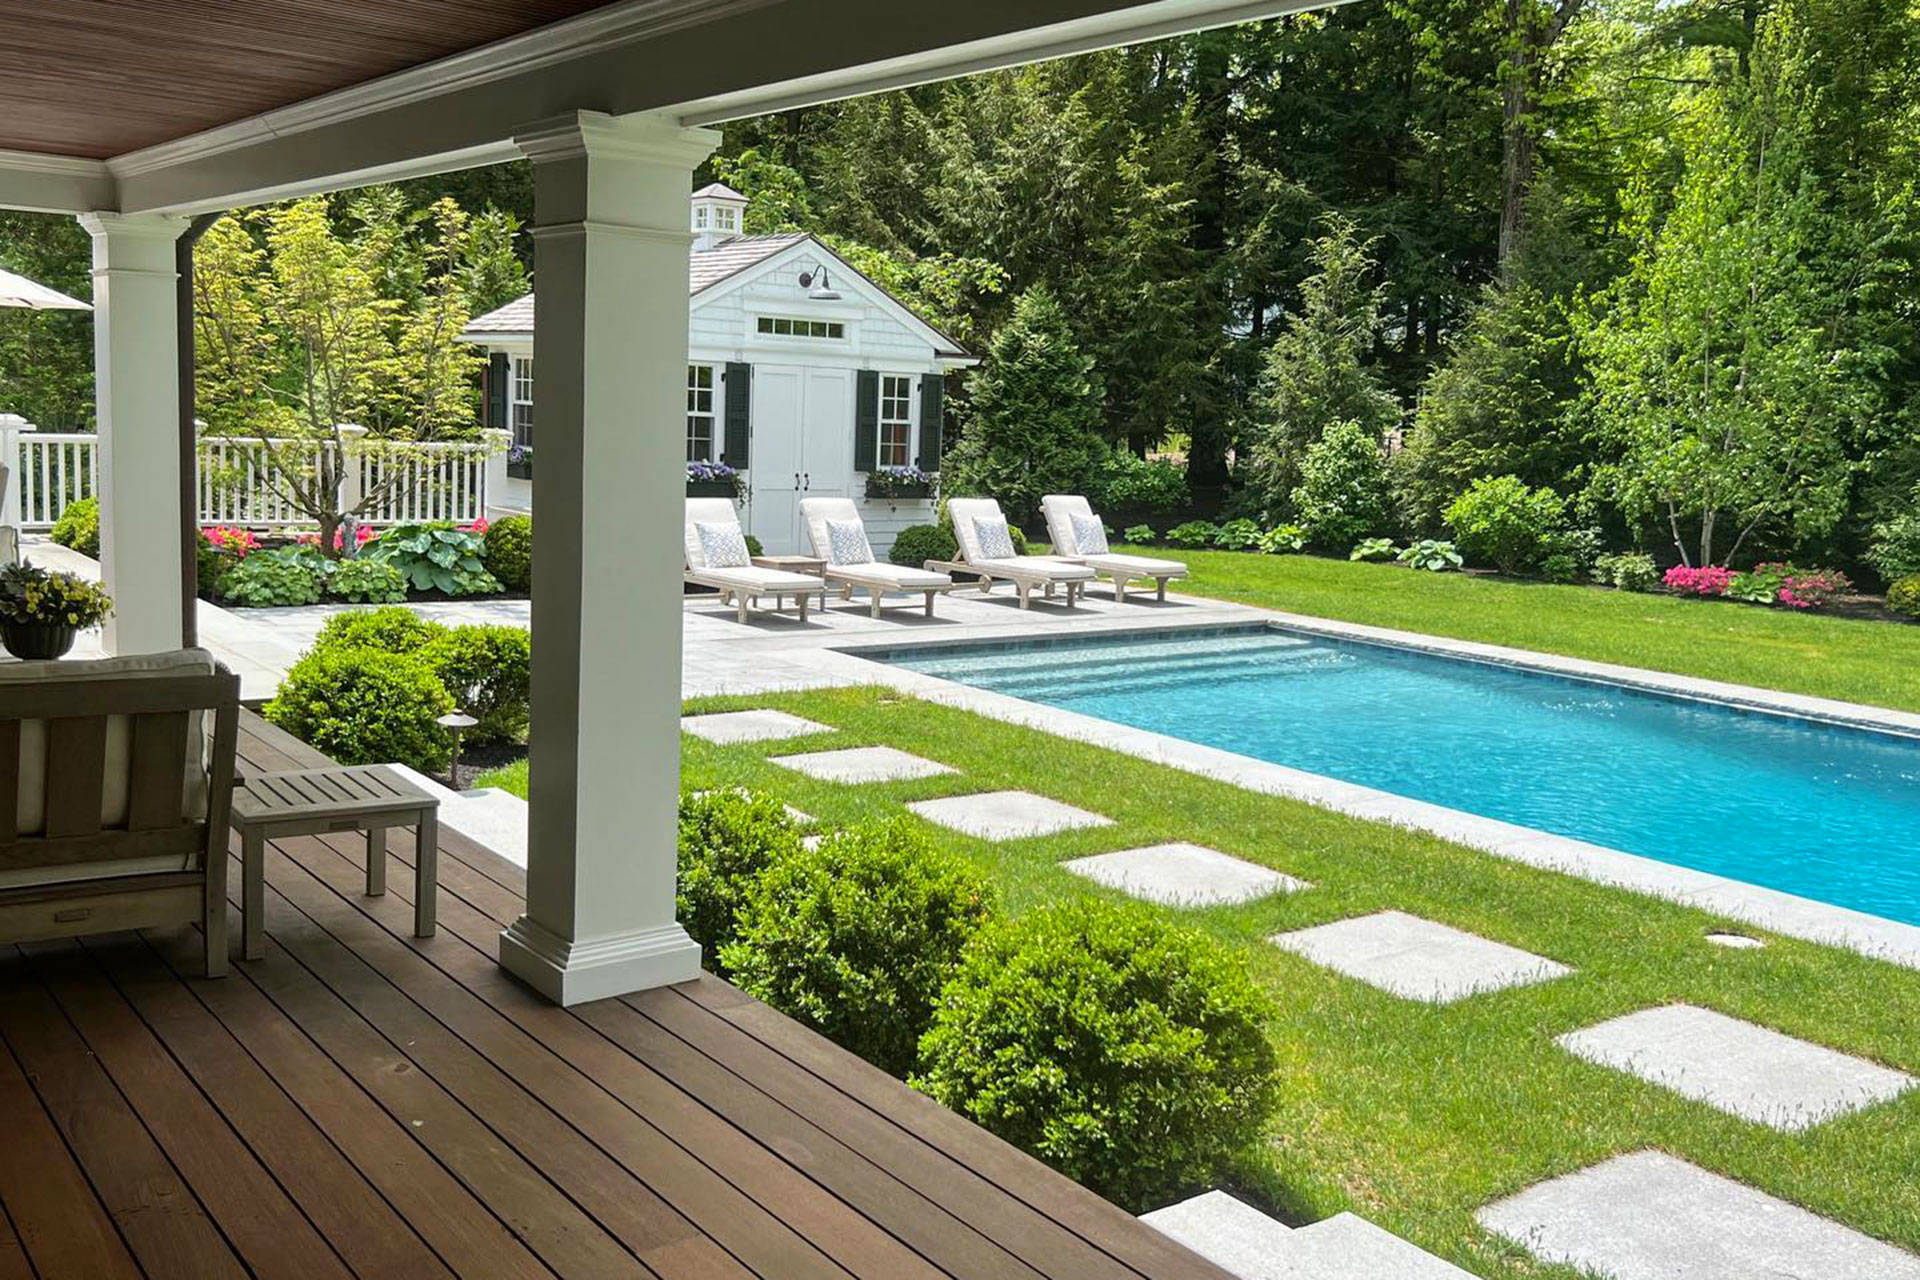
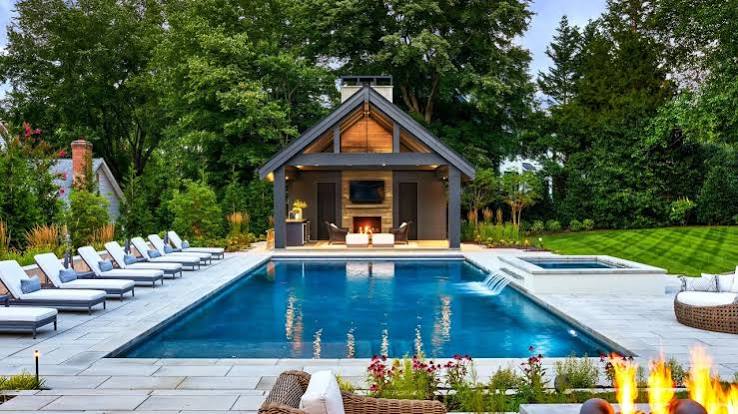
4. Design a Serene Escape with a Classic White Pool House
The single most important element here is the white pool house. Without it, this is just a lovely pool in a big lawn. With it, the entire area is transformed into a destination with a powerful focal point. It anchors the whole design, giving the chaise lounges a direction and purpose. The pool house provides a sense of enclosure and permanence, making the poolside feel like a dedicated outdoor ‘room.’ Its classic architecture, with the dark shutters and cupola, lends an air of timeless elegance that elevates the simple rectangular pool into something much more special.
✅ Before You Start
While a lush, expansive lawn looks incredible, it’s a significant maintenance commitment. Expect weekly mowing from spring through fall. To keep it looking this green and uniform, you’ll need a seasonal fertilization and weed control plan (professional services can cost $400-$800 annually). You’ll also need to consider aeration and potentially overseeding every couple of years. Be prepared for higher water bills if you have an irrigation system. For a lower-maintenance alternative that still provides a green border, consider high-quality artificial turf around the immediate pool deck.
5. Go Big with a Hillside Pool and Terraced Gardens
The success of this design lies in its masterful handling of a challenging terrain. The terraced gardens are the hero, turning a difficult slope into a stunning, structured feature. This use of levels creates visual interest and makes the large space feel more organized and intentional. Another key is repetition: the consistent use of manicured green hedges provides a recurring element that ties the different levels together. Finally, the strategic placement of the tall, slender palm trees adds verticality, drawing the eye upward and balancing the horizontal expanse of the pool.
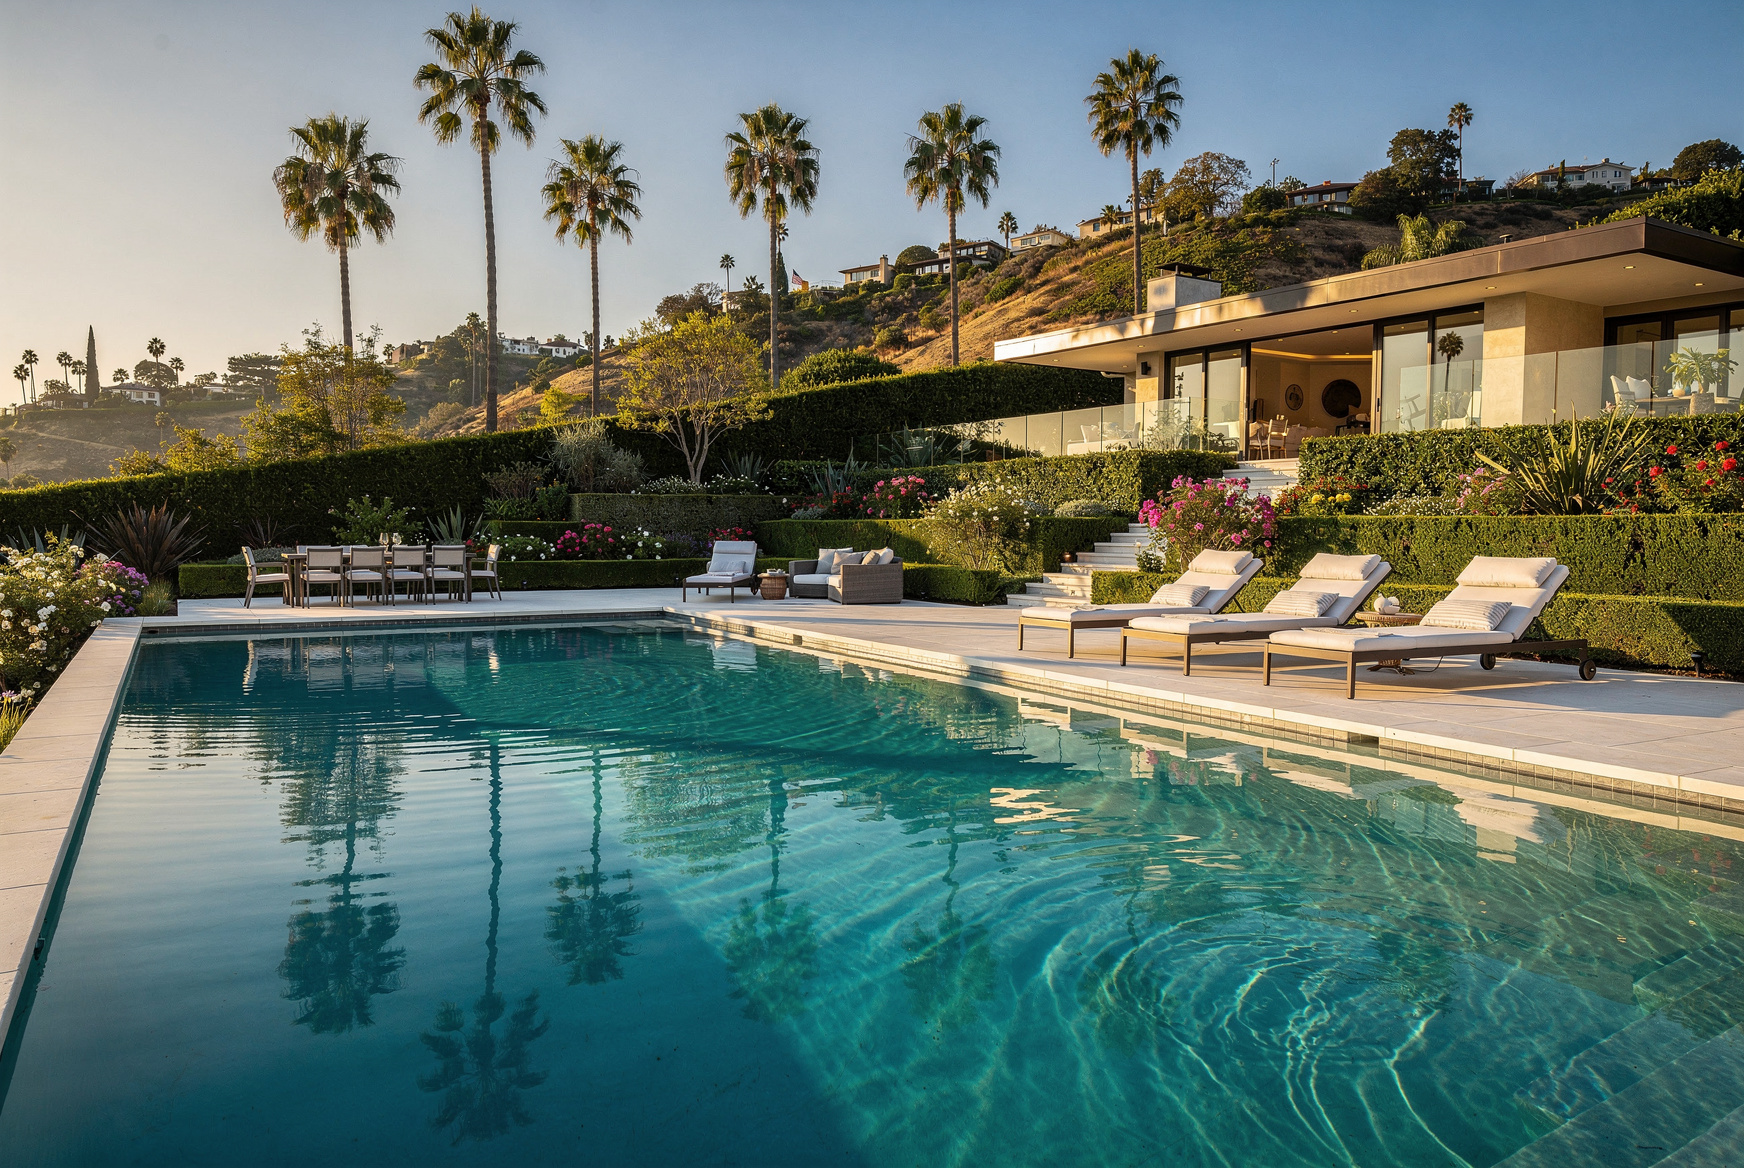
💸 Get This Look For Less
A hillside pool is a major engineering and construction challenge. Drainage is your number one concern. You must have a robust system of French drains and retaining walls to manage water runoff from the slope, protecting both the pool’s structure and the landscaping from erosion. This requires specialized geological and structural engineering assessments before you even break ground, which can add significant unexpected costs to your budget. Don’t underestimate the complexity; this isn’t a standard pool installation.
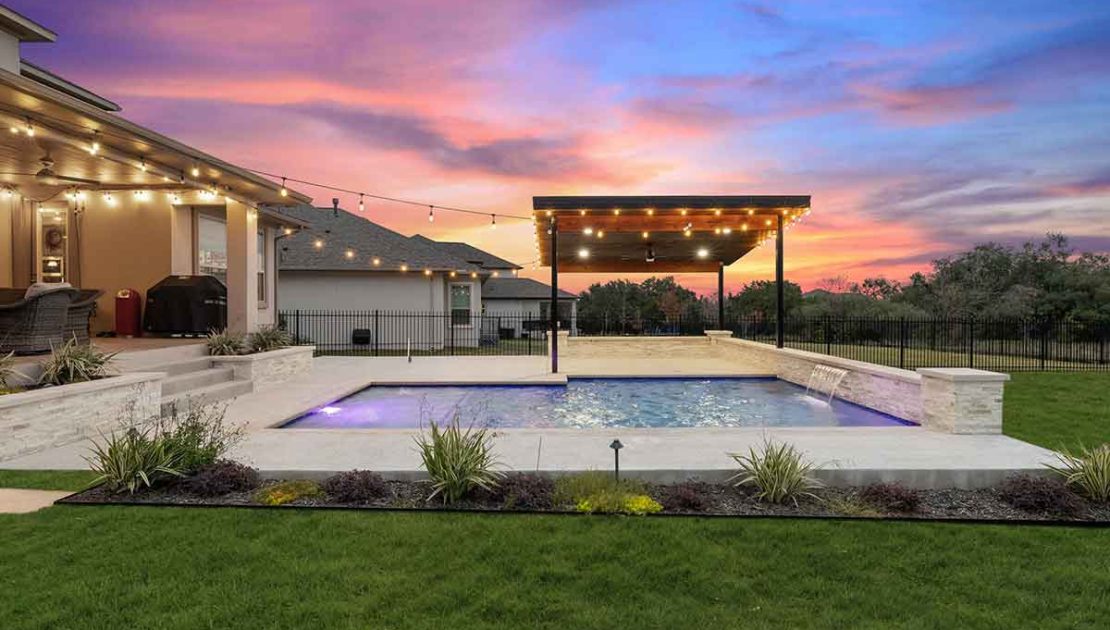
6. A Modern Hangout with a Waterfall and Pergola Canopy
You don’t need a custom build to get this modern, relaxed feel. The core elements are achievable on a tighter budget. Start with the decking; instead of expensive composite, look at treated pine or cedar, which you can stain to a similar light-wood look for around $15-$25 per square foot installed. For the shade structure, a simple black metal pergola kit from a big box store like Wayfair or Overstock can run $500-$1,500. Add a retractable fabric canopy for another $300. The stainless steel waterfall is a great feature, and you can find ready-to-install units online for $200-$500. Pair it all with a simple dining set from IKEA or Target for a fantastic result that costs thousands less than a fully custom job.
📐 Style Math
This look is all about texture and clean lines. The formula is approximately 60% smooth, hard surfaces + 40% soft or textured elements. The pool water, white house walls, and stainless steel waterfall provide the sleek base. The wood-look decking, fabric pergola canopy, and mesh privacy screen bring in the necessary texture to keep it from feeling clinical. You could swap the wood-look deck for light-colored composite, or the fabric canopy for wooden slats, as long as you maintain that essential contrast between smooth and textured materials.
7. Blur the Lines with an Open-Plan Indoor-Outdoor Flow
The massive sliding glass doors are the absolute key to this entire design. Take them away, and you have a nice patio next to a house. With them, the boundary between inside and outside vanishes. They create a seamless visual and physical connection that makes both the interior living area and the outdoor patio feel larger and more unified. This element dictates the entire breezy, open-air lifestyle this home embodies. It’s a commitment to a way of living, not just a design choice. For a similar, but more budget-friendly approach, check out the lighter pergola setup in Idea #6.
💡 Designer Tip
An open-plan setup like this is stunning, but it has its practical downsides. With the doors open constantly, expect a lot more dust, pollen, and insects inside your home. Your climate matters—this is an amazing feature for long stretches of the year in places like Southern California, but less practical in regions with high humidity, extreme heat, or intense bug seasons. Also, consider the wear and tear on your interior flooring near the threshold from foot traffic coming in from the pool. A very durable indoor/outdoor rug can be a good investment to protect the transition area.
8. Add Warmth with a Wood Slat Ceiling Over the Patio
When installing a wood-slatted ceiling outdoors, the type of wood and finish are critical for longevity. Don’t just use standard interior-grade lumber. Opt for naturally weather-resistant woods like cedar, teak, or ipe. Crucially, you must seal every single board on all six sides *before* installation. This prevents moisture from seeping in through the backside and top, which is a common cause of warping and rot. Re-sealing the visible face every 2-3 years will keep it looking great, but that initial all-around seal is the professional trick to making it last.
📏 Scale Guide
This space feels so serene because of the expert layering of white, wood, and water. The white structure and decking create a bright, reflective canvas that bounces light around. The wood slat ceiling then introduces a layer of natural warmth and texture overhead, preventing the white from feeling too stark or clinical. This creates a ‘sandwich’ effect with the warm wood above and the cool blue water below. The extensive glass walls are the final touch, ensuring the lush green foliage outside feels like part of the room’s decor.
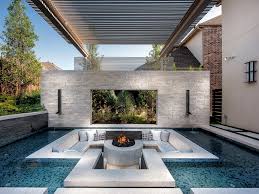
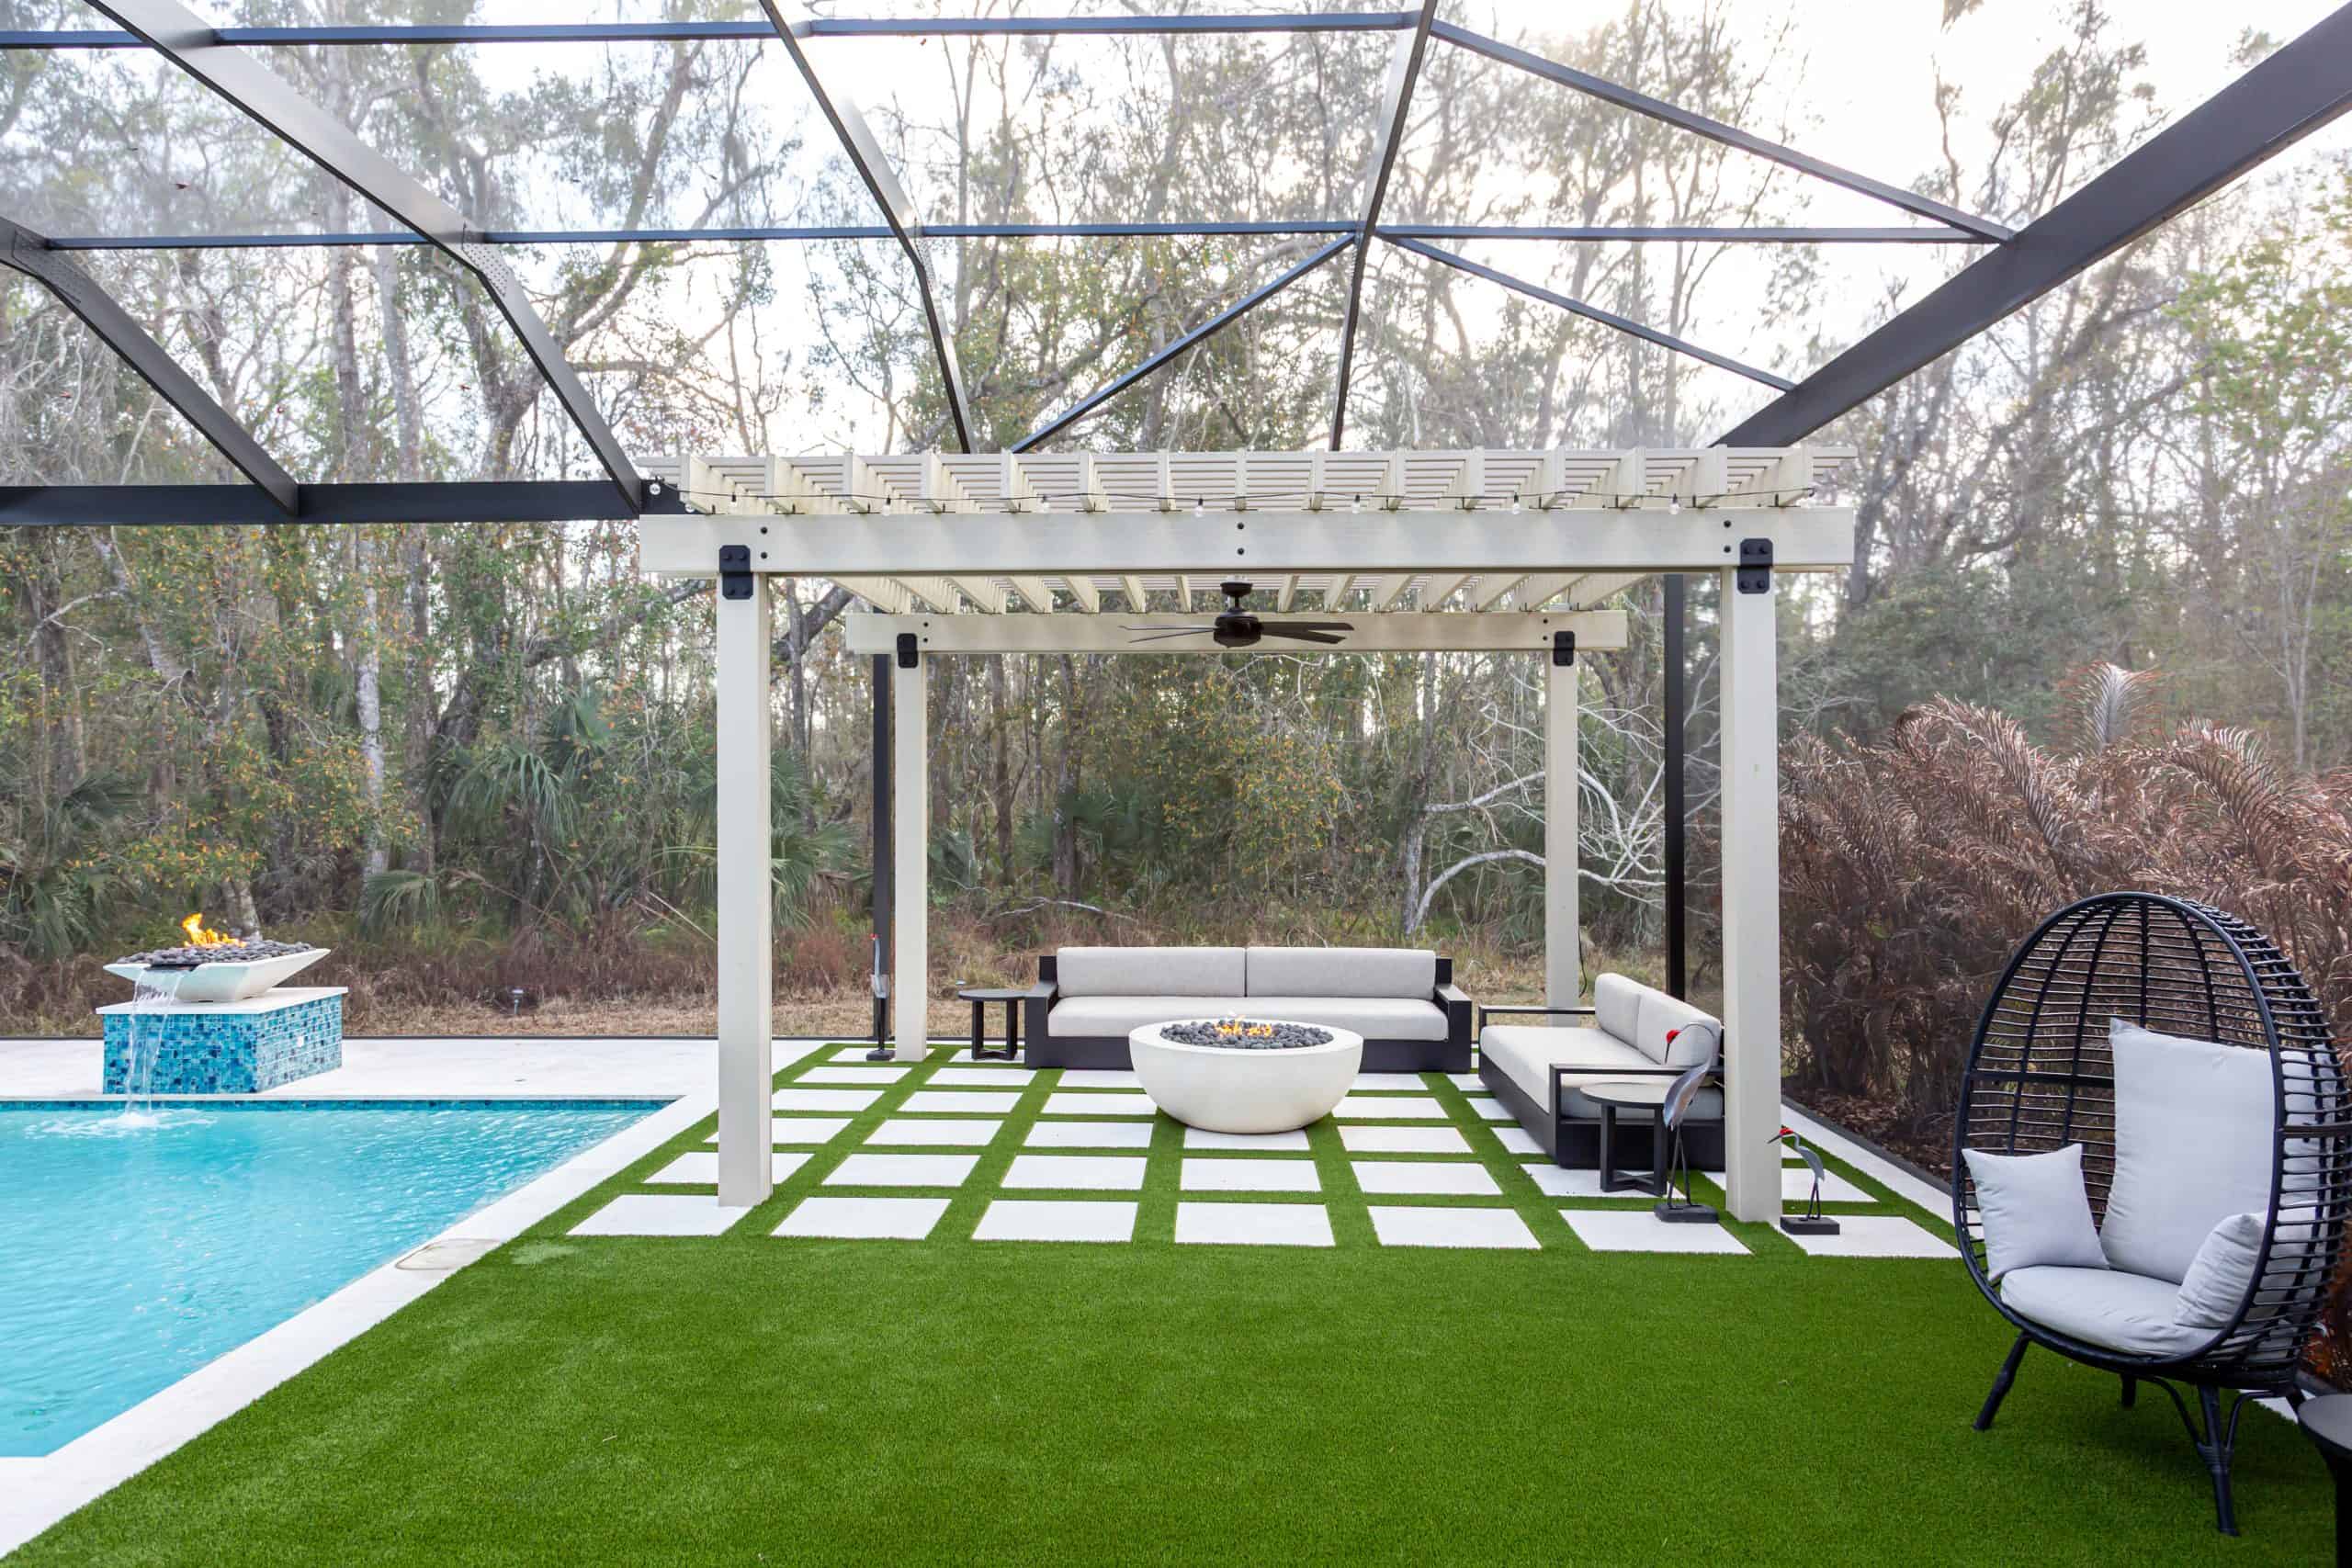
9. Carve Out a Sunken Lounge for a Sleek, Modern Look
A sunken lounge is a fantastic feature, but it requires a significant amount of space to feel inviting rather than claustrophobic. For a conversation pit that comfortably seats 6-8 people around a fire feature, you need a sunken area that is at least 12×12 feet, not including the retaining walls. The ‘step down’ should be at least 18 inches to feel deliberate. This means the total footprint is closer to 15×15 feet. This feature works best in larger backyards (at least 50 feet wide) where it won’t dominate the entire pool deck or obstruct pathways.
🔧 How-To Brief
Before you commit to a sunken lounge, go through this checklist to make sure it’s the right move for your space and lifestyle.
- Drainage Plan: Do you have a clear, professionally-vetted plan for preventing the pit from becoming a pond? This is non-negotiable.
- Accessibility: Is the step-down design safe and comfortable for your family and typical guests, including older adults or small children?
- Furniture Fit: Have you pre-measured and sourced the low-profile outdoor sofa or sectional that will fit the space? Custom cushions are often required.
- Proximity to Pool: Is it at least 10-12 feet from the pool’s edge to prevent trip hazards and awkward circulation?
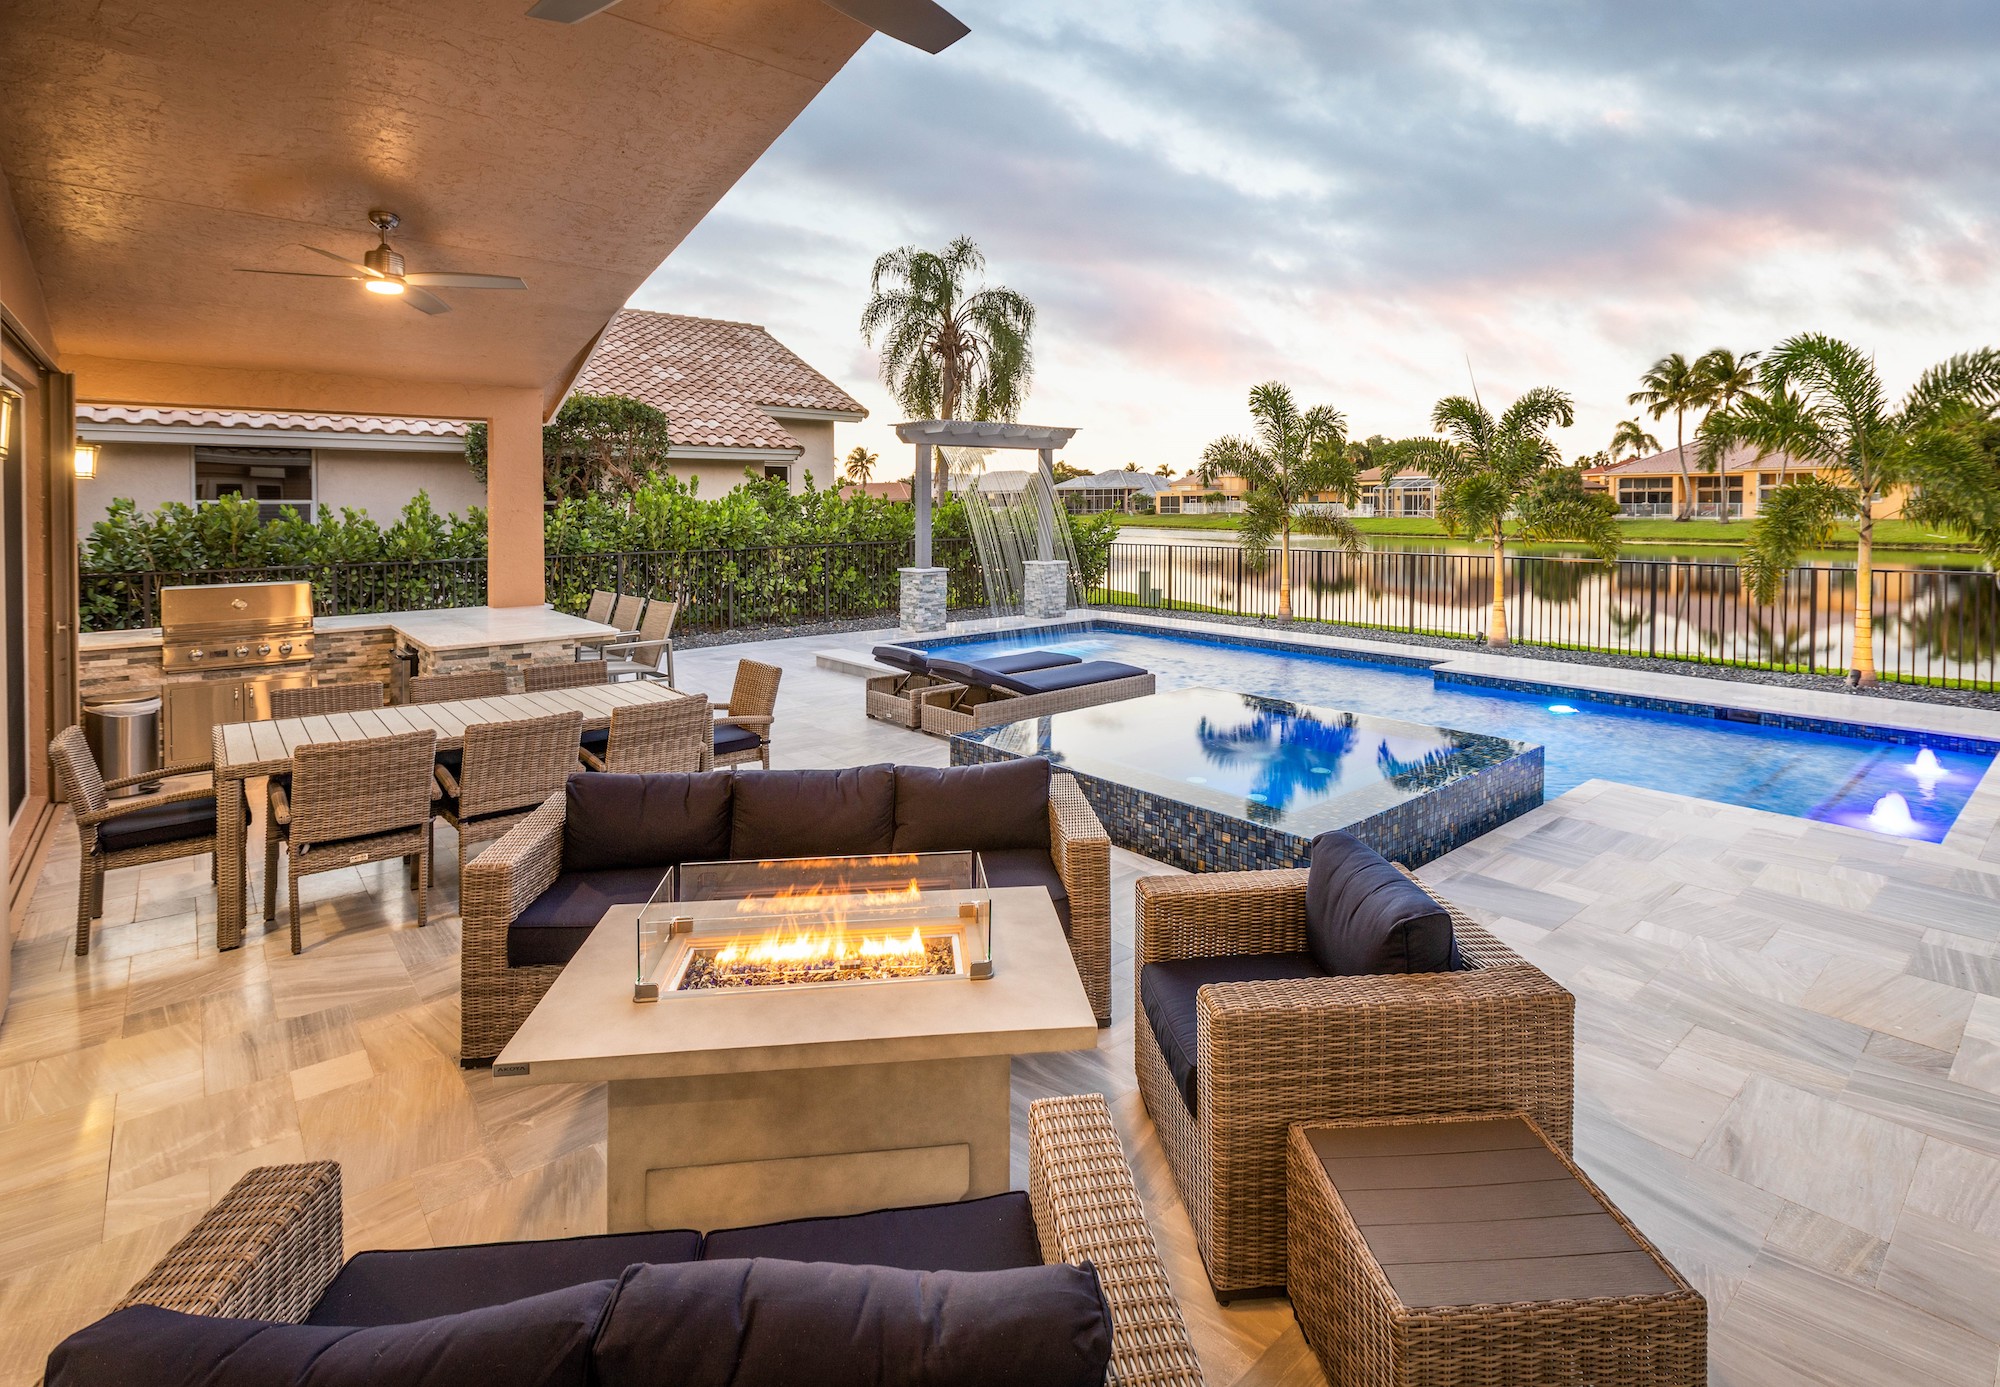
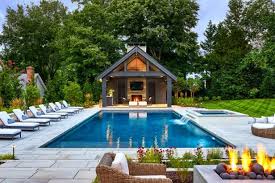
10. Entertain in Style with a Lakeside Pool and Fire Pit
When you have a stunning view like a lake, orient your main conversation area towards it, not towards the house or the pool. Here, the woven rattan furniture is smartly angled to take full advantage of the vista. A pro tip for arranging furniture in a large open patio is to create distinct ‘zones’ using area rugs. Use a large outdoor rug (at least 8×10) to anchor the fire pit seating area. This visually separates it from the dining zone and the poolside lounging spots, making the whole patio feel more organized and intentional, even though it’s one continuous surface.
💰 Budget Breakdown
This layout is a masterclass in creating an entertainer’s paradise. It works because it offers multiple ‘destinations’ within one cohesive space. You have the active zone of the pool and spa, the relaxing warmth of the fire pit lounge, and the functional utility of the outdoor kitchen and dining area. The consistent use of light-colored patio tiles throughout unifies these different zones, while the water view provides a constant, calming backdrop for every activity. The result is a space that can comfortably host a large party or a quiet family evening.
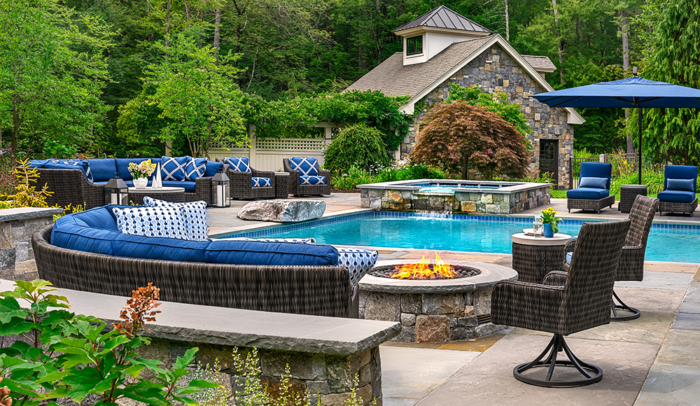
11. Get Cozy with a Stone Fire Pit and Deep-Seated Wicker
The star of this show is undeniably the stone fire pit. It’s the heart of the design, creating a magnetic gathering spot that pulls you away from the water’s edge and into a cozy, intimate circle. Without it, the various seating groups might feel disconnected. The fire pit gives the entire patio a clear purpose beyond just swimming. It introduces a warm, primal element that contrasts beautifully with the cool water and lush greenery, making the space functional and inviting on cool evenings long after the sun goes down.
⭐ The One Thing
Let’s be honest about all that beautiful wicker and those plush cushions: they require work. Woven furniture, even all-weather versions, can trap dust, pollen, and cobwebs. You’ll want to hose it down and give it a gentle scrub a few times a season. The real maintenance is the cushions. To keep them from getting mildewed or sun-faded, you really need to invest in waterproof covers or have a designated storage box to put them away when not in use. Leaving them exposed 24/7 is a recipe for disappointment and replacement costs down the line.
12. Craft an Oasis with a Custom Inground Pool
While a full custom pool is a huge project, you can get a taste of luxury by focusing on one high-impact element: upgrading your pool’s water line tile. This is the 6-inch band of tile at the top of the pool wall.
- Time Estimate: 2-3 Days
- Material Cost: $500 – $2,500 (for an average residential pool)
- Step 1: Choose a standout tile—a vibrant mosaic, a modern geometric, or a textured stone.
- Step 2: Have a professional drain the pool water about 8-10 inches below the existing tile.
- Step 3: The old tile is carefully chipped out and the surface is prepped.
- Step 4: The new tile is installed using a high-bond, waterproof mortar and grout.
This relatively small change can completely transform the look and feel of your existing pool.
🧹 Maintenance Reality
The ‘custom oasis’ feel doesn’t have to come from a six-figure pool budget. The real vibe comes from creating a complete environment. You can achieve this by investing heavily in landscaping. Instead of a complex pool shape, opt for a simple rectangular vinyl liner pool (saving you $30,000+). Then, take a significant portion of that savings and hire a landscape designer to create lush, layered garden beds around it using mature plants. Add comfortable, well-made furniture from a store like Target or HomeGoods and high-quality outdoor lighting. The result is a luxurious-feeling space, even if the pool itself is a budget-friendly model.
13. Make a Statement with a Stone Gazebo and Lawn Pavers
This design is successful because of its bold use of contrast. The dark, sleek lines of the lounge chairs and gazebo structure create a striking juxtaposition against the light grey concrete pavers and the white stacked stone of the fireplace wall. Furthermore, there’s a great play between hard and soft textures. The rigid geometry of the pool and pavers is softened by the artificial grass joints, the plush pillows, and the movement of the water jets. It’s a carefully balanced composition that feels both modern and comfortable. Compare the modern feel here with the more classic approach in Idea #4.
⚠️ Real Talk
Pavers set with artificial turf joints look fantastic, but they have a specific cleaning need. The turf strips are a magnet for small debris like leaves, dirt, and pet hair. You can’t just sweep it away. A powerful leaf blower is your best friend for quickly clearing the surface. For deeper cleaning or spills, you’ll need to spray the area with a hose and use a stiff brush. While the turf itself is low-maintenance (no watering or mowing!), keeping the ‘grout lines’ clean is a regular task to maintain that crisp, modern look.
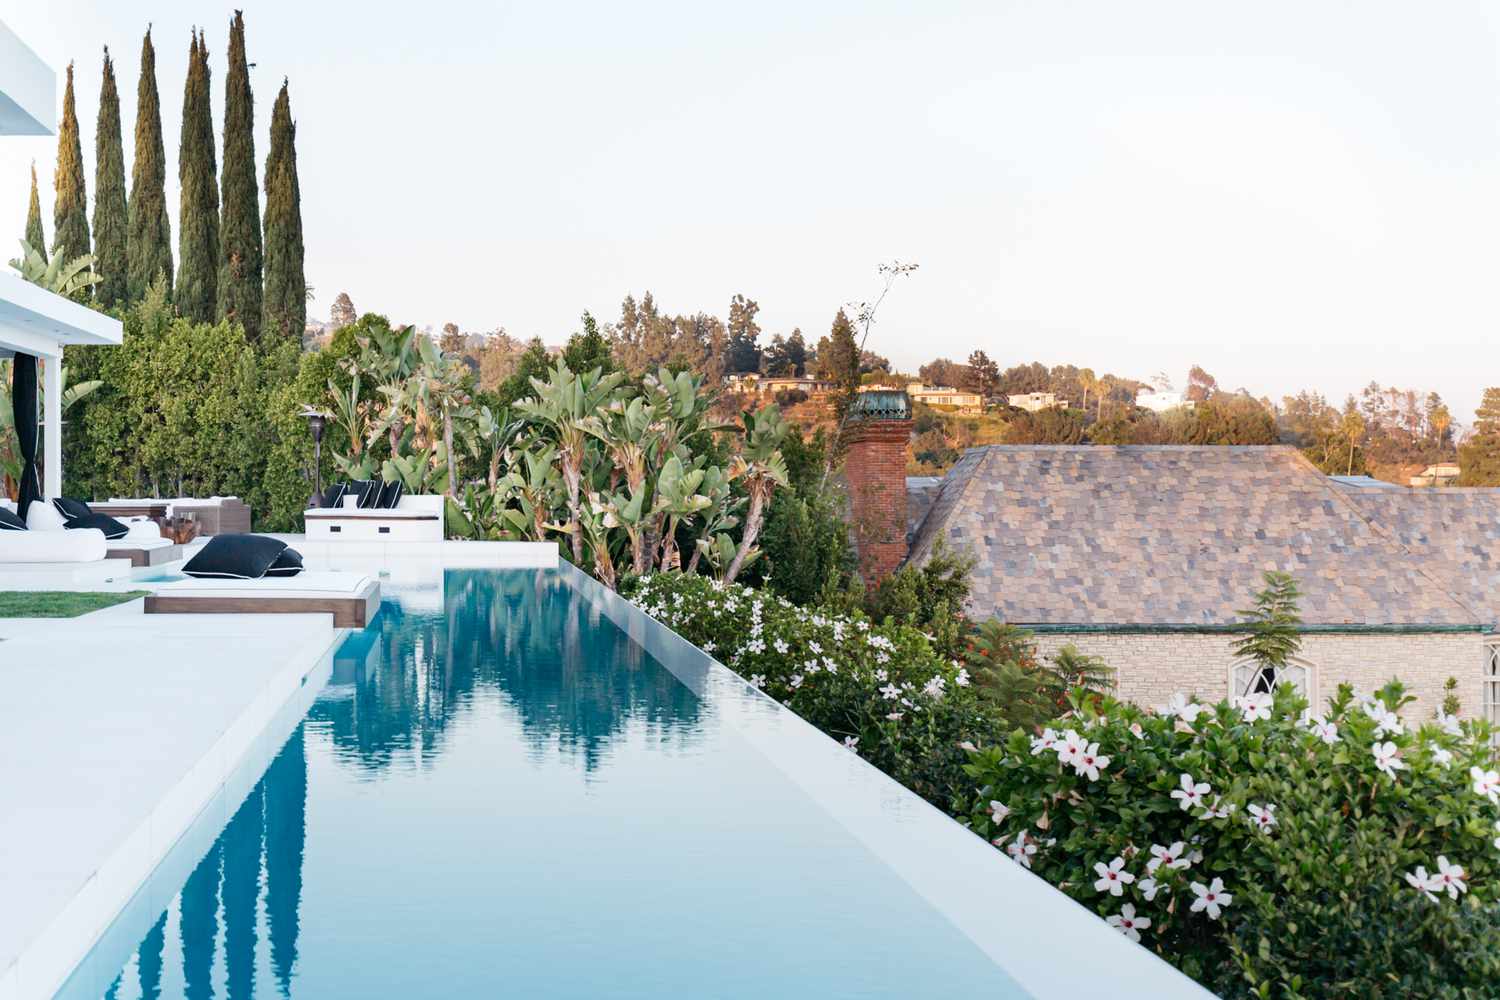
14. Achieve Serenity with a Minimalist White Infinity Pool
The single element that defines this entire space is the infinity edge. It’s not just a pool; it’s a piece of kinetic art. By hiding the far edge, the water appears to merge with the sky or the landscape beyond, creating a sense of boundless space and tranquility. This feature transforms the pool from a container of water into a reflective surface that mirrors the changing light and clouds. Removing it would turn a luxurious, serene oasis back into a conventional (though still beautiful) backyard swimming pool. It is the core of the entire experience.
🔥 Trending Context
An infinity edge pool is visually stunning but has specific site requirements. This design works best on a property with a natural slope or a significant drop-off. The ‘vanishing edge’ effect is lost without a lower elevation for the water to spill over into. On a flat lot, you’d have to build up the entire pool structure significantly, which can be costly and look awkward. The minimum ‘drop’ needed to sell the illusion is about 20-30 feet of unobstructed view, whether that’s down a hill, over a valley, or out to sea. Without the grade change, the effect just won’t work.
15. Embrace Mediterranean Vibes with White Stucco and Arches
To achieve this serene, textured look on stucco walls, it’s all about the application technique. Ask your plasterer for a ‘light lace’ or ‘skip trowel’ finish. This involves applying a thin coat of stucco and then ‘skipping’ a trowel over the surface to create subtle, irregular high and low spots. It’s less uniform than a standard smooth finish and more sophisticated than a heavy, dated texture. For the color, don’t use a pure, stark white. Instead, choose a slightly off-white or very light cream with a matte finish to get that soft, sun-baked look.
🎯 What Makes It Work
This minimalist Mediterranean formula is about simplicity and natural materials. Think 70% architectural form + 20% natural texture + 10% curated greenery. The white walls and clean pool lines provide the dominant structure. The light wood of the pergola and door frames offers a crucial touch of warmth and organic texture. Finally, the carefully placed potted plants and palms act as living sculptures, adding life and a pop of color without cluttering the serene composition. The balance is key; too much wood or too many plants would undermine the minimalist feel.
16. Mix Dark Wood and Olive Green for a Modern Tropical Deck
This design feels so lush and sophisticated because of its moody, high-contrast color palette. The dark-stained wooden deck and black pool perimeter create a dramatic, grounding base that makes the surrounding greenery pop with an almost electric vibrancy. The choice of olive green for the cushions instead of a more predictable blue or beige is genius; it connects directly to the foliage, reinforcing the tropical, natural vibe. The modular, low-slung sofas keep the profile sleek and modern, preventing the dark colors from feeling too heavy or traditional.
✅ Before You Start
A dark-stained deck requires more upkeep than a natural or light-colored one. Dark surfaces absorb more heat, meaning they get hotter on bare feet and the finish can degrade faster under intense sun. Expect to re-stain the deck every 2-3 years to maintain the rich color and protect the wood from UV damage and moisture. A pressure washer can damage the wood surface, so cleaning should be done with a deck-specific cleaner and a stiff brush. It’s a stunning look, but you have to commit to the maintenance schedule.
17. Create a Private Paradise with a Bamboo Fence
A bamboo fence is one of the most cost-effective ways to get a high-end, tropical look and instant privacy. You don’t need to install individual culms. You can buy pre-made, rolled bamboo fencing online or at home improvement stores. A 6-foot tall, 8-foot long panel can cost as little as $50-$100. You simply unroll it and attach it to an existing chain-link fence or a simple wooden frame of posts and rails. For a few hundred dollars and a weekend of work, you can completely transform a boring backyard fence into a lush, tropical backdrop.
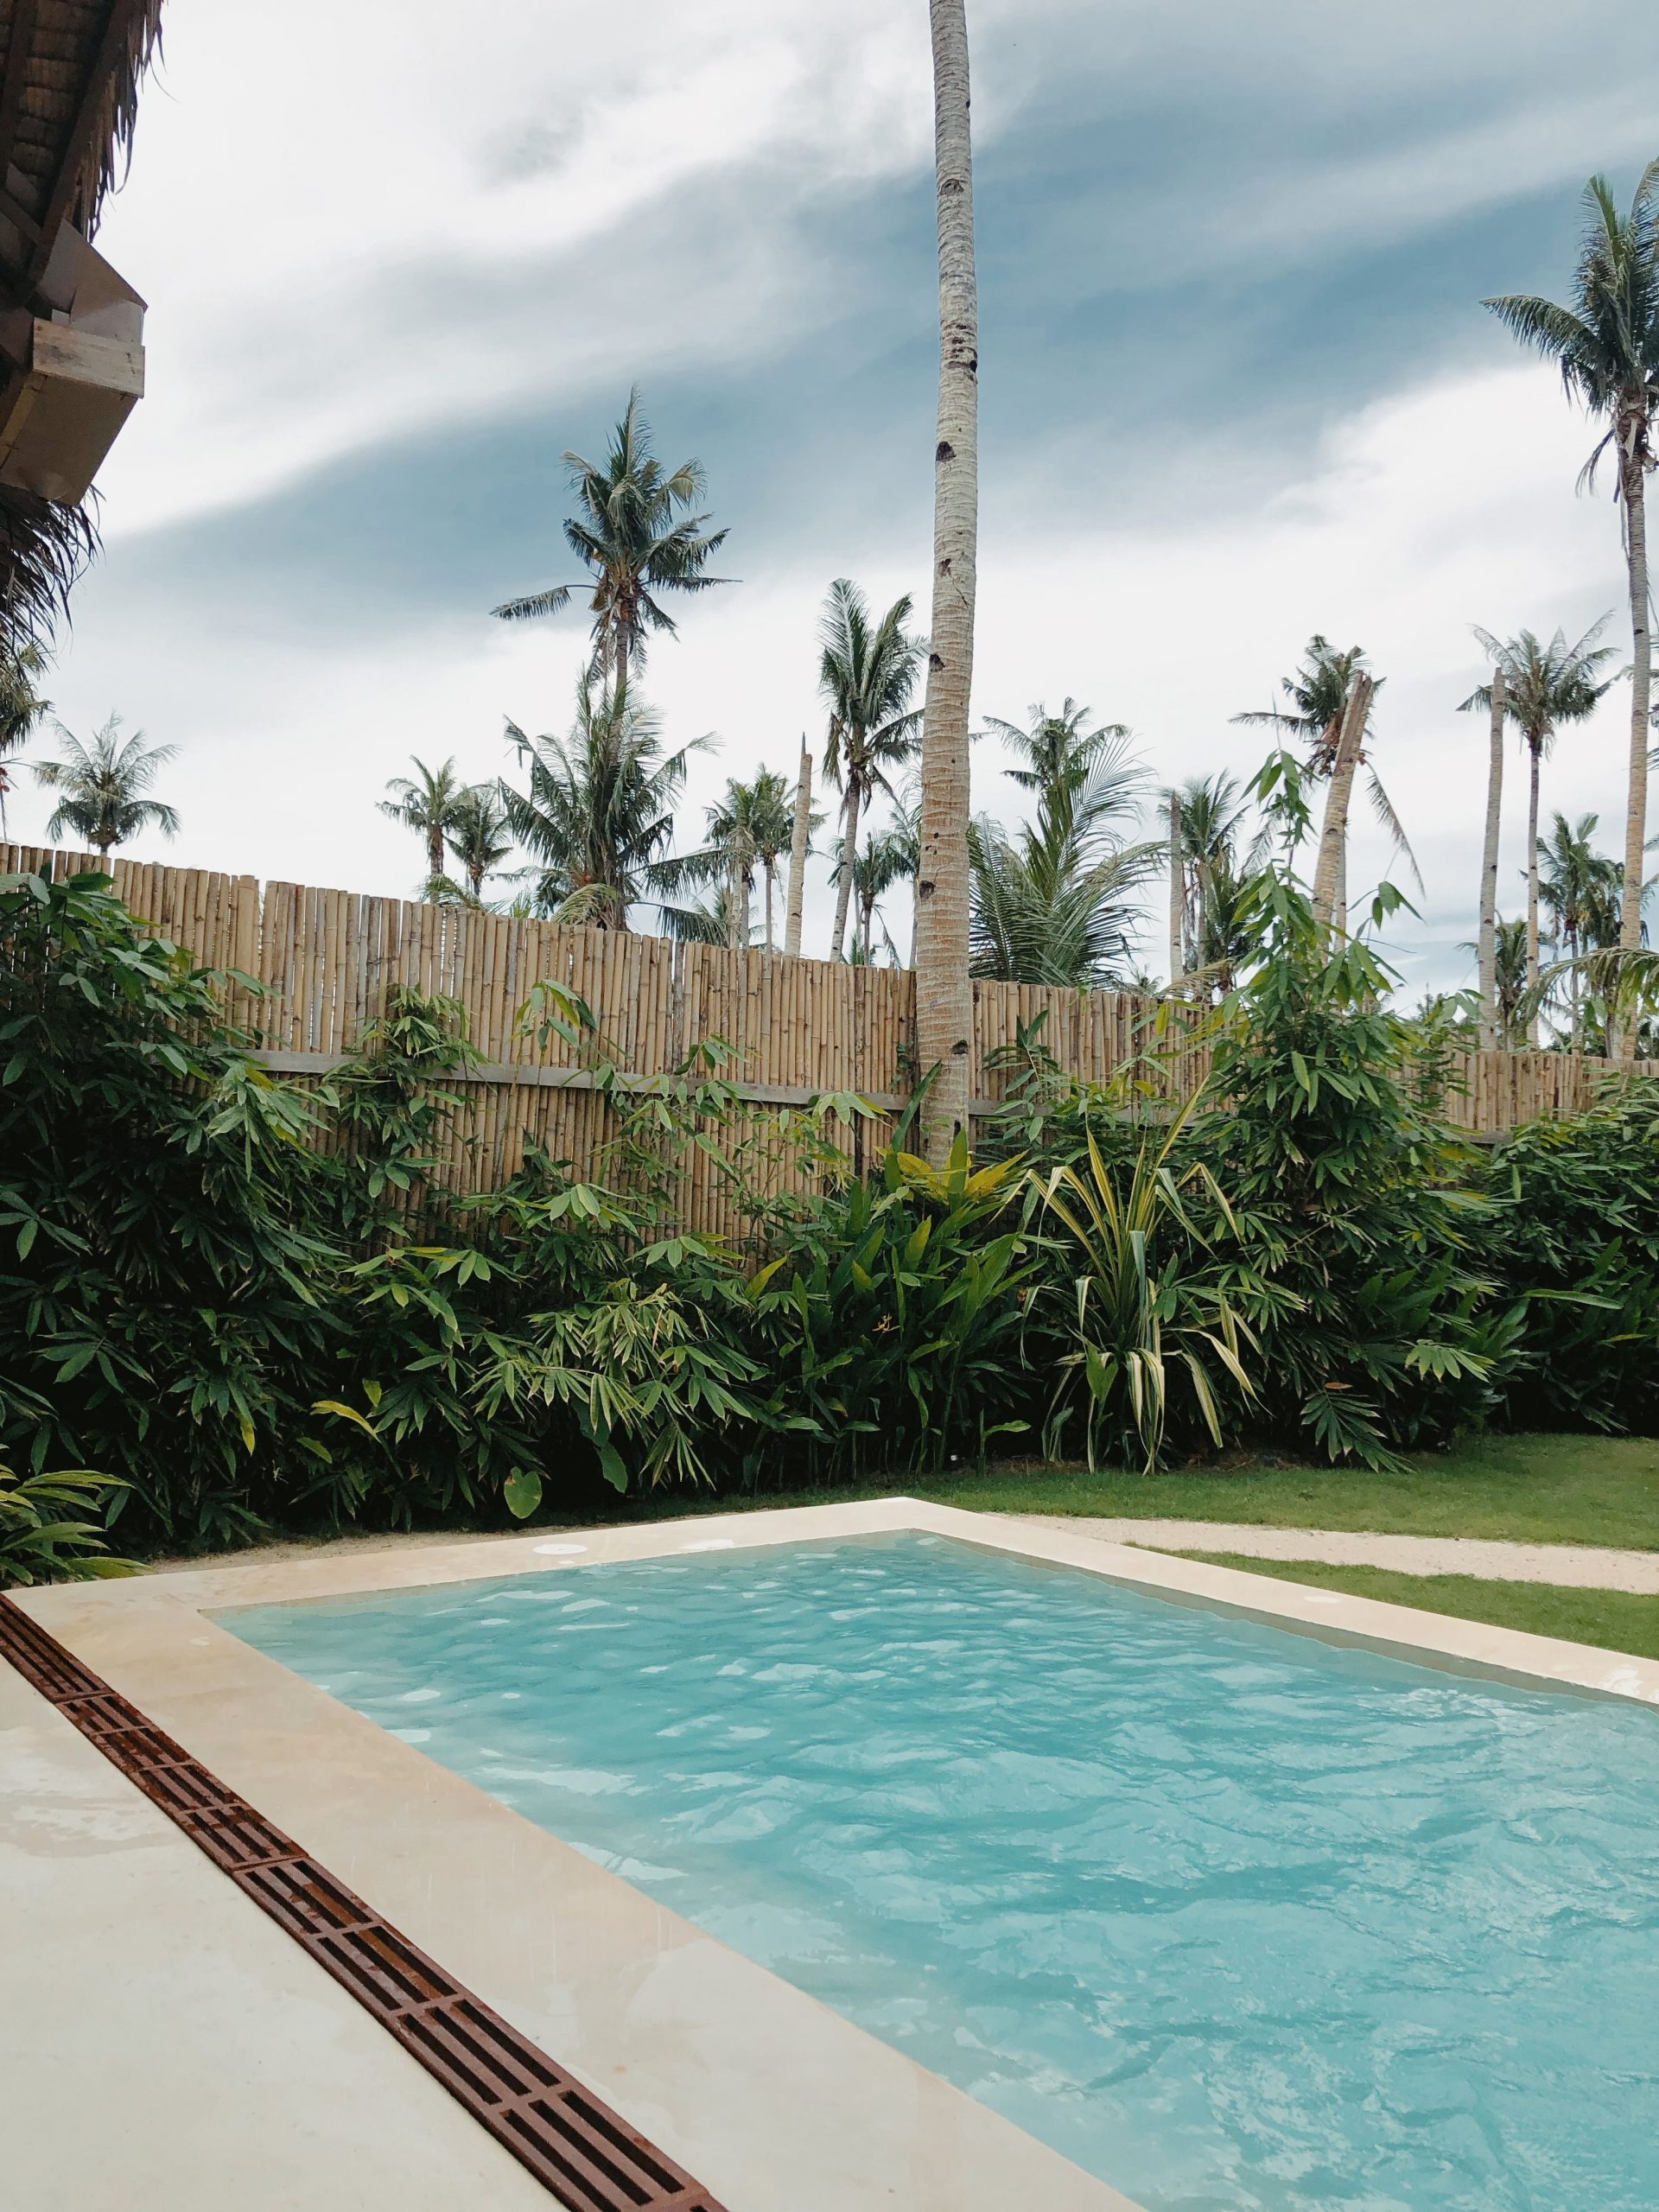
💸 Get This Look For Less
The bamboo fence is the single element that sets the entire mood here. Without it, this would be a simple pool next to a possibly uninspired boundary. The bamboo immediately transports you, signaling a tropical, serene, and private space. It’s a powerful visual cue that’s doing all the heavy lifting in terms of style and atmosphere. It screens out the outside world and cocoons the pool area in a natural, textured wall that makes everything inside feel more special and secluded. It proves you don’t need a huge budget to create a strong design point of view.
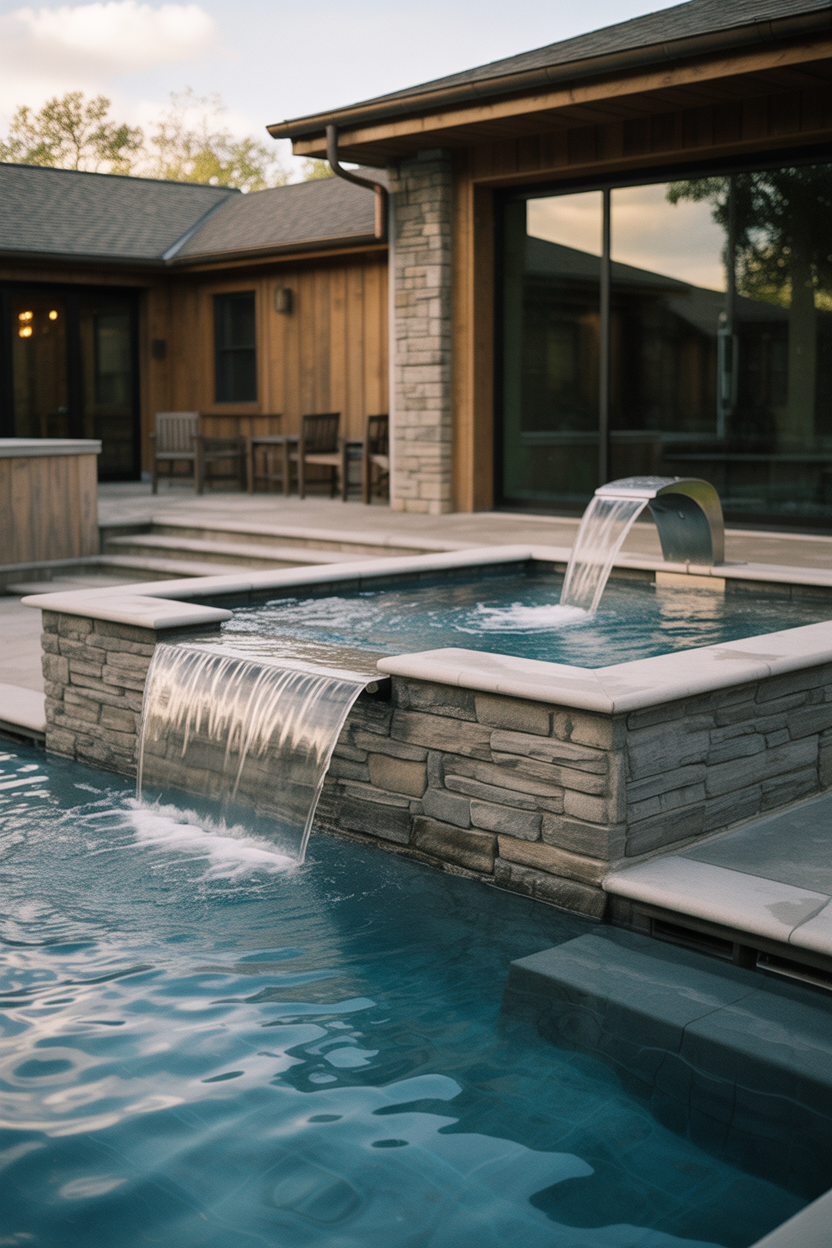
18. Dive into Detail with Blue Mosaic Pool Tiles
When using mosaic tile in a pool, the grout color is just as important as the tile itself. While white or light grey grout is a common choice, consider a darker shade like charcoal or even a medium blue. A darker grout will make the individual tile colors pop and can give the pool a deeper, more uniform appearance from a distance. It’s also much more forgiving when it comes to hiding minor stains or algae growth, reducing the visual maintenance and keeping the pool looking pristine for longer. Always use an epoxy-based grout for maximum durability and stain resistance in a submerged environment.
📐 Style Math
A full mosaic tile pool finish is the absolute peak of luxury, but it comes with a price tag to match. Tiling a whole pool can cost anywhere from $30 to $100+ per square foot, installed. For an average-sized residential pool, this can mean a total cost of $50,000 to $150,000, just for the interior surface. It’s incredibly durable and beautiful, but it’s a massive investment. If you love the look but not the price, consider using the mosaic tiles just on the waterline and steps as an accent, and finishing the rest of the pool in a standard plaster that’s tinted to a complementary blue.
19. Keep it Simple with a Weathered Wood Deck and Turquoise Water
This look is the definition of minimalist chic, and it works because of a very simple formula: 80% raw texture + 20% bold color. The vast majority of the visual space is dedicated to the weathered, gray-toned wood deck. Its texture is everything. The other 20% is that punch of brilliant turquoise water. There are no other competing colors or elements. The white lounge chairs are functional but neutral; they don’t demand attention. By keeping the palette this restricted, both the texture of the deck and the color of the water become more powerful. For a similar feel with different materials, check out Idea #23.
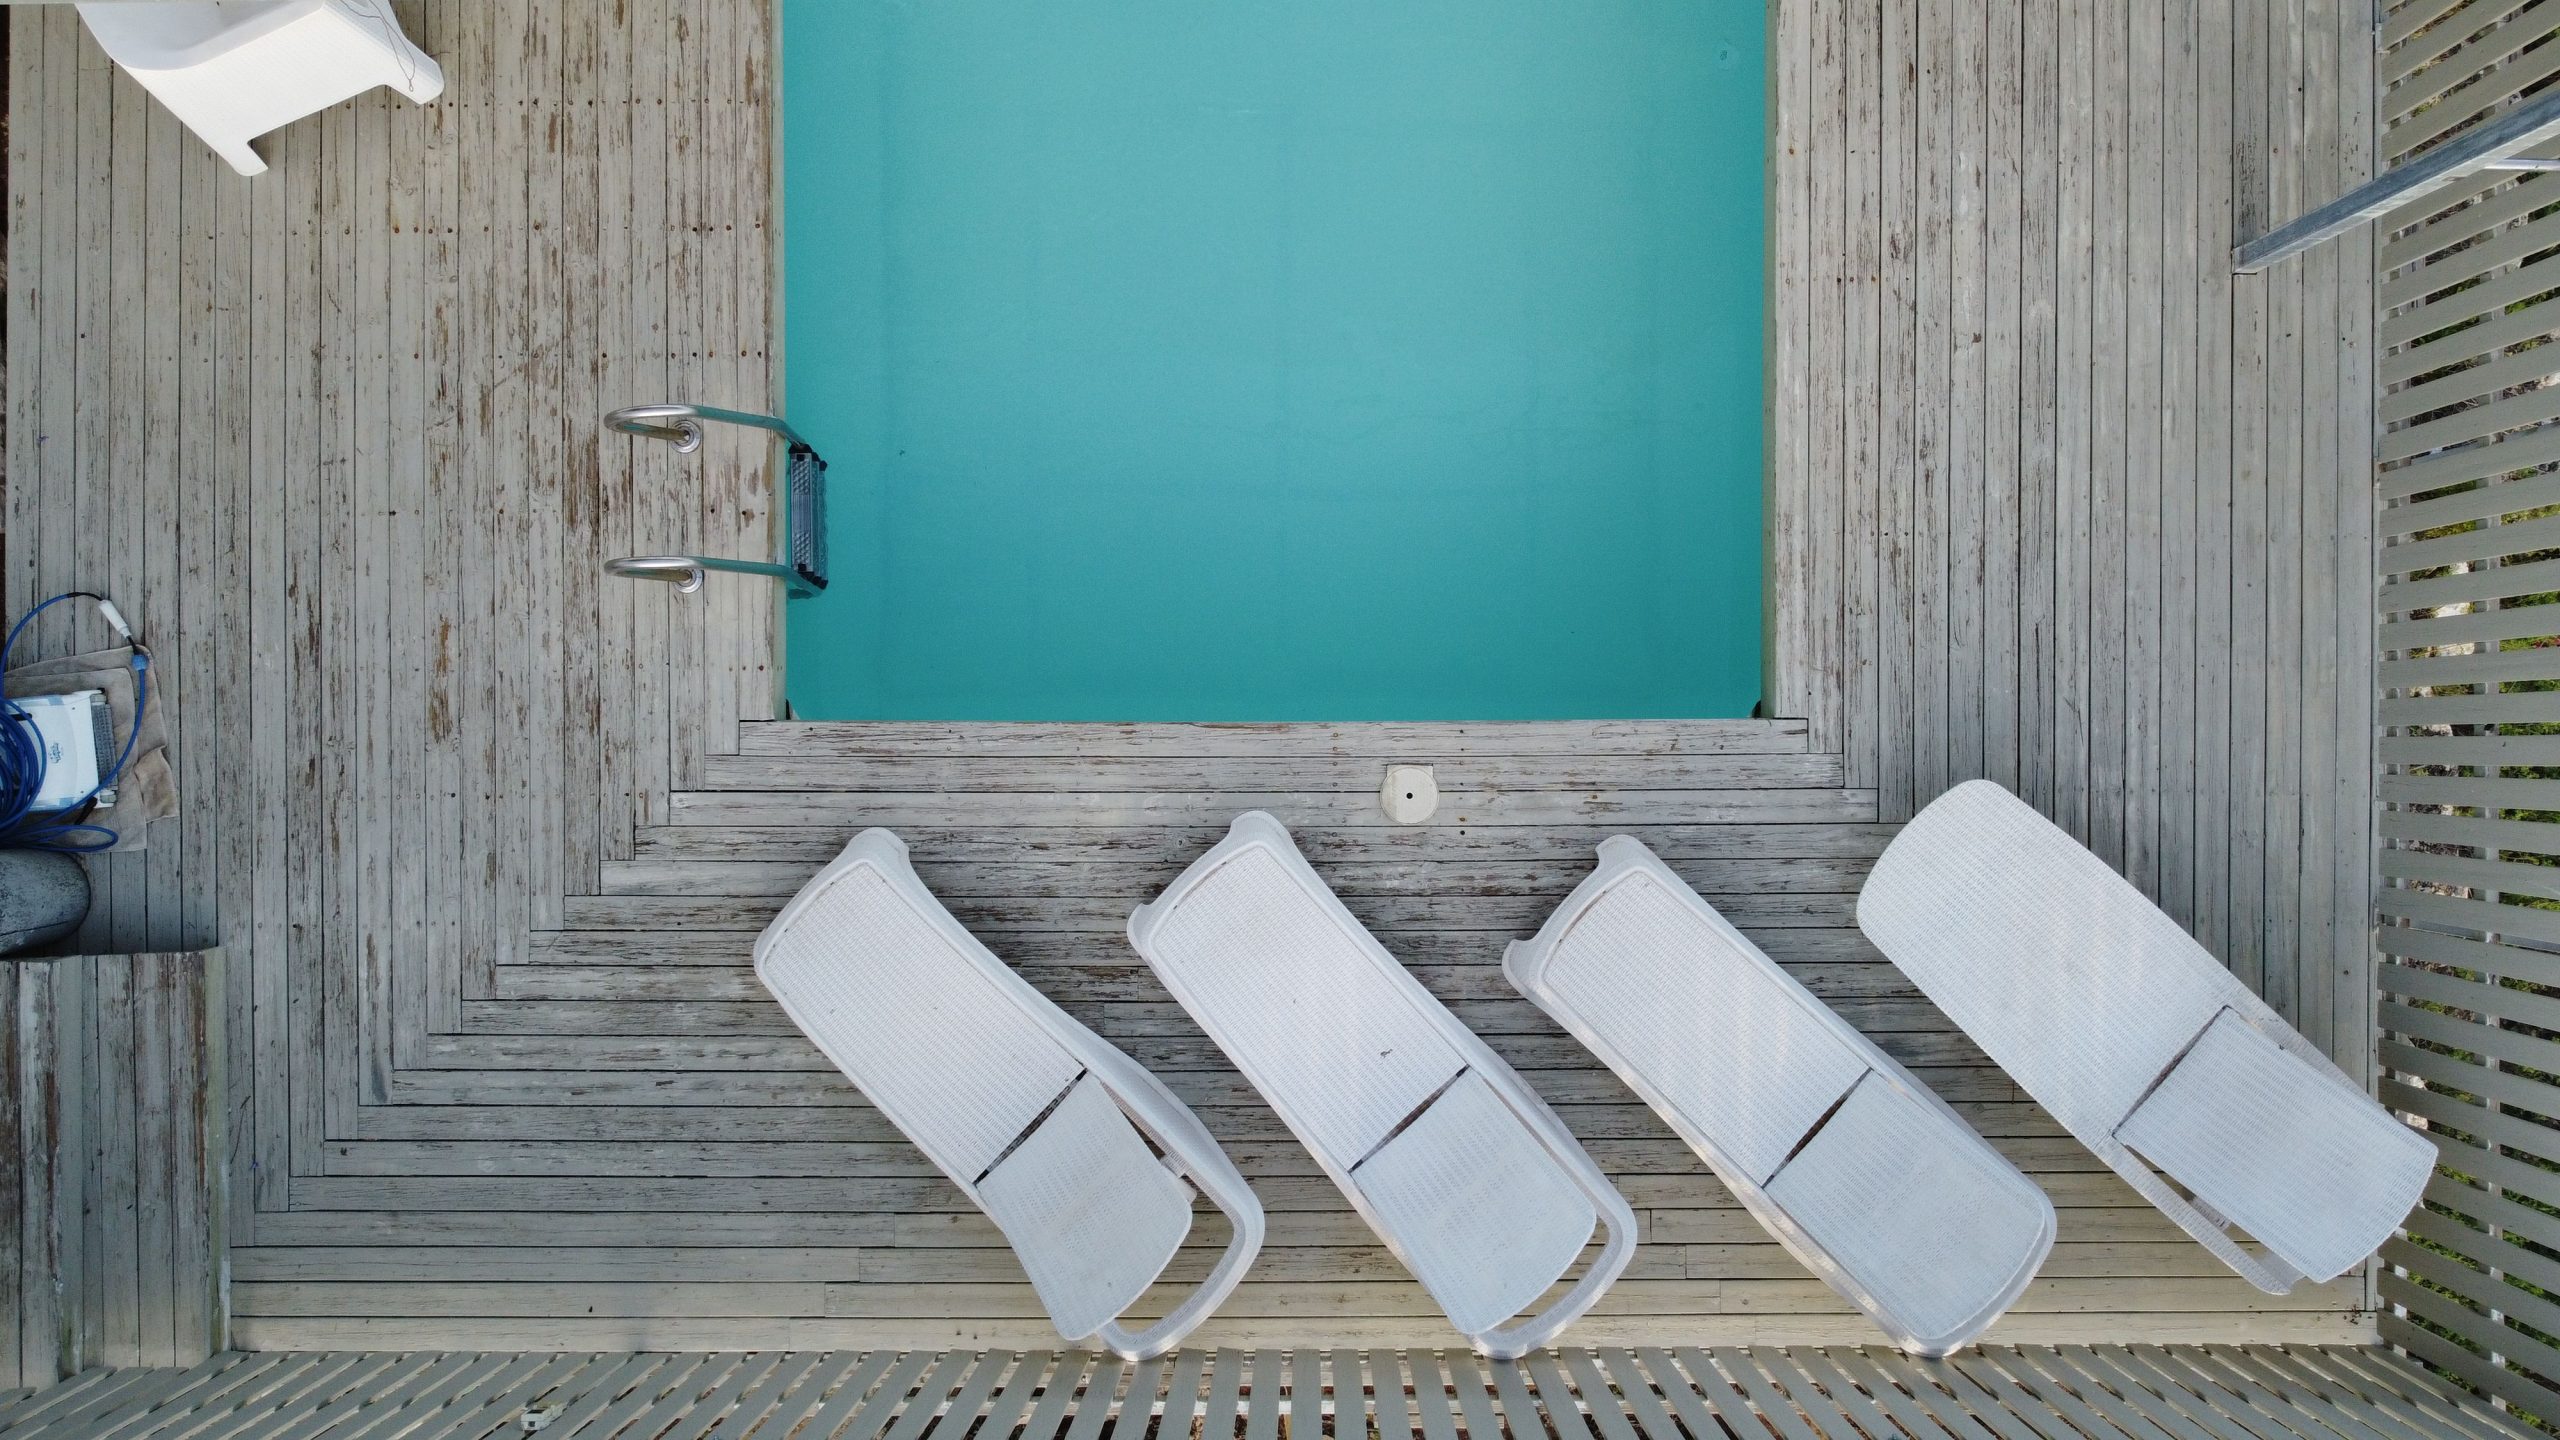
💡 Designer Tip
This is one of the most budget-friendly in-ground pool looks you can create. The key is to opt for a vinyl liner pool, which allows you to choose that vibrant turquoise color for a fraction of the cost of tile or colored plaster. A simple rectangular shape is the most economical. The deck can be built with standard pressure-treated pine, which will naturally weather to a soft gray in a few years, or you can speed up the process with a gray-weathering stain. The white plastic lounge chairs are an absolute classic and can be found for under $50 each at places like Walmart or Home Depot. It’s a champagne look on a beer budget.
20. Go for a Timeless Look with a Brick-Paved Pool Deck
This design feels so established and comfortable due to its classic, natural materials. The red-brown brick pavers provide immense warmth and texture, a welcome departure from modern concrete or stone. The curvilinear shape of the pool is softer and more organic than a harsh rectangle, which complements the traditional feel. Most importantly, the mature, dense greenery surrounding the deck isn’t just a backdrop; it’s an integral part of the design, creating a sense of privacy and a lush, garden-like atmosphere that feels like it has been there for decades.
📏 Scale Guide
Brick paving is beautiful, but it requires specific upkeep. Because bricks are porous, they can be prone to moss or algae growth, especially in damp, shady areas. You’ll likely need to gently pressure wash a brick deck every year or two and re-sand the joints to keep weeds from sprouting. The un-mortared joints can also lead to unevenness over time as the ground settles. While it’s very durable, it’s not the ‘set it and forget it’ surface that poured concrete is. The charm and character, however, are often worth the extra effort for many homeowners.
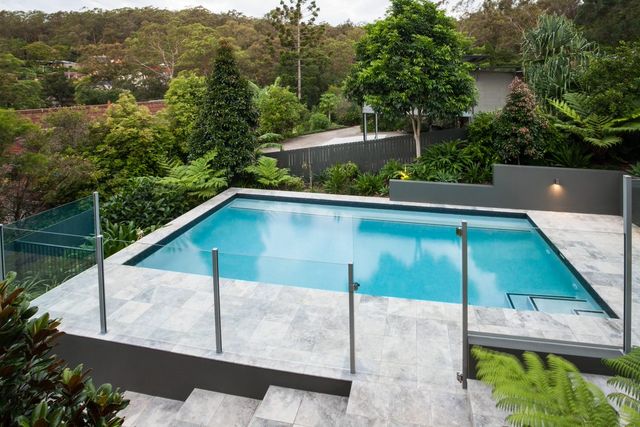
21. Create Symmetry with a Classic Centerline Pool Layout
For a formal, symmetrical layout like this, the key is to establish a strong central axis and mirror your elements perfectly on either side. In this case, the axis runs right down the middle of the pool. Notice how the lounge chairs and umbrellas are a perfect reflection of each other. A pro tip is to use your landscape for reinforcement: the matching planters at the corners of the pool and the identical hedges on either side are just as important as the furniture placement for creating that powerful sense of order and calm.
🔧 How-To Brief
The single element that makes this backyard feel so grand and stately is the symmetry. It’s a classic design principle for a reason. By creating a perfectly balanced composition with the pool as the centerpiece, the design communicates a sense of calm, order, and intention. If the furniture were arranged randomly or the landscaping was asymmetrical, the vibe would be far more casual. The strict adherence to mirroring the lounge chairs, umbrellas, and planters is what elevates this from a simple backyard to a formal, resort-like environment.
22. Layer Neutrals and Natural Wood for a Modern Minimalist Deck
This area feels incredibly relaxing because of its sophisticated, low-contrast color palette and focus on texture. The light beige upholstery on the lounge chairs, the neutral beanbags, and the tan deck tiles create a seamless, calming foundation. The masterstroke is the introduction of the medium-toned wooden frames on the loungers. This adds just enough warmth and natural grain to keep the space from feeling sterile. The pop of rust on the accent pillows is the perfect finishing touch—it’s a warm, earthy color that complements the wood and provides a focal point without shouting. This is a great example of layering neutrals effectively, similar to the vibe in Idea #15.
💰 Budget Breakdown
You can get this chic, neutral vibe for much less. The key is the color palette, not the price of the furniture. Look for simple, wooden-framed lounge chairs from IKEA’s outdoor collections, like the ÄPPLARYD or BONDHOLMEN series. Pair them with light beige cushions. The rust-colored pillows can be found at Target or H&M Home for under $20 each. For seating, a couple of outdoor-friendly beanbag chairs from a brand like Big Joe provides that relaxed feel without the designer price tag. It’s all about sticking to that tight, earthy color scheme.
23. Get a Resort Feel with White Loungers and Sheer Curtains
It’s the sheer white curtains. Take them away and you have a perfectly nice, simple pool area. But adding those curtains, even just tied back, introduces a sense of softness, luxury, and drama. They imply a cabana-like enclosure, creating a resort atmosphere instantly. They catch the breeze, adding gentle movement to a space that’s otherwise full of hard surfaces like concrete and plastic. It’s a simple, relatively inexpensive addition that has a massive impact on the overall mood, elevating the entire setup.
⭐ The One Thing
Want to add this breezy curtain look? It’s a simple DIY project.
- Time Estimate: 3 hours
- Material Cost: $150 – $400
- Step 1: Install a sturdy, outdoor-rated curtain rod. A galvanized steel pipe or a purpose-built outdoor rod works best. Ensure the mounting brackets are securely anchored.
- Step 2: Purchase outdoor-rated sheer curtains. Look for mildew-resistant polyester fabrics. You’ll want them to be long enough to touch or ‘puddle’ slightly on the ground.
- Step 3: Thread the curtains onto the rod before securing the rod in the brackets.
- Step 4: Install simple tie-backs on the posts or walls where you want to secure the curtains when they are open.
This small project adds a huge amount of style and resort-like feel.
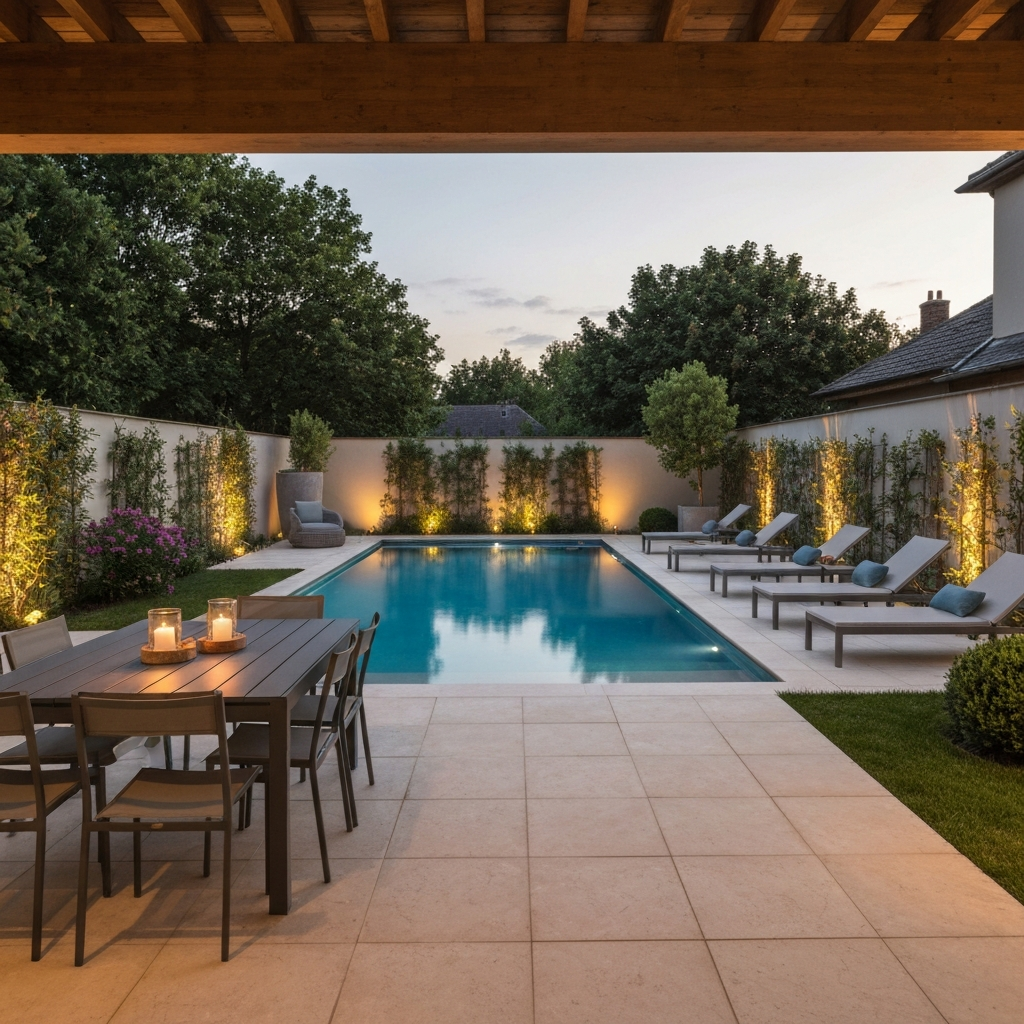
24. Use Landscape Lighting to Create Evening Ambiance
The key to successful outdoor lighting is to use multiple, layered sources of low-intensity light rather than a few harsh, high-intensity ones. Focus on ‘up-lighting’ and ‘wall-washing’ to create atmosphere. Here, the lights at the base of the walls and climbing plants graze the surfaces, highlighting their texture and creating a soft, ambient glow. This is far more effective than a single, overhead floodlight. Use warm-temperature bulbs (2700K-3000K) to create a welcoming, intimate feel. And always point lights away from seating areas to avoid glare in people’s eyes.
🧹 Maintenance Reality
This scene is so inviting because it creates distinct ‘rooms’ through lighting. The dining area under the pergola feels like one zone, the lounge seating another, and the pool itself a third, all unified by the warm, consistent glow. The lighting on the perimeter walls defines the boundary of the space, making it feel secure and enclosed. By illuminating the vertical surfaces (the walls and plants) instead of just the floor, the design adds depth and dimension, making the entire patio feel larger and more sophisticated at night.
25. Build the Ultimate Outdoor Living Room with a Stone Fireplace
This is the pinnacle of outdoor living, and the budget reflects that. The cost is driven by the permanent structures, high-end appliances, and finishes.
- Structure (foundation, roof, columns): $40,000 – $100,000+
- Stone-Clad Fireplace & Chimney: $20,000 – $45,000
- Outdoor Kitchen (appliances, countertops, plumbing): $15,000 – $35,000
- Furniture & Decor (sofa, fan, TV): $5,000 – $15,000
- TOTAL: $80,000 – $195,000+
- Budget Alternative: Create a similar ‘room’ feel with a large pergola, a pre-fabricated fireplace kit, and a modular outdoor kitchen island. This could achieve a similar function for 50-60% less.
⚠️ Real Talk
A full outdoor living room like this requires a substantial amount of space. You’re essentially building a small house addition. A minimum footprint of 20×25 feet is recommended to comfortably fit a distinct kitchen/bar area and a separate seating lounge around the fireplace. Ceiling height is also key; the vaulted ceiling here makes the space feel grand and airy. You’ll want a peak height of at least 14-16 feet to prevent it from feeling like a cramped, low-ceilinged porch.
26. Pair a Dark-Tiled Pool with Light Wood and Bright Blue
This poolside look is so vibrant and appealing because of its bold, high-contrast color choices. The dark, almost black, pool tiles create a dramatic, reflective surface that makes the water look deep and mysterious. This dark anchor allows the other colors to shine. The light wood-effect decking provides a warm, natural contrast, preventing the dark pool from feeling too somber. The masterstroke is the use of that specific, vibrant turquoise-blue on the daybed and cushions. This accent color sings against the dark background, infusing the whole scene with energy and a tropical vacation vibe. Compare this modern take with the more tropical feel of Idea #16.
🔥 Trending Context
You can get this high-energy look on a smaller budget. It’s all about the color combination. Start with an affordable above-ground pool with a dark-colored liner. Build a simple deck around it using pressure-treated wood, but instead of expensive composite, use a light-colored, semi-transparent stain. The key furniture piece is the daybed; you can find surprisingly affordable outdoor daybeds at stores like Wayfair or even Walmart. Then, go all-in on the accessories. Find a vibrant blue outdoor mattress topper, and load up on cushions and throws in that same electric shade from Target or Amazon.
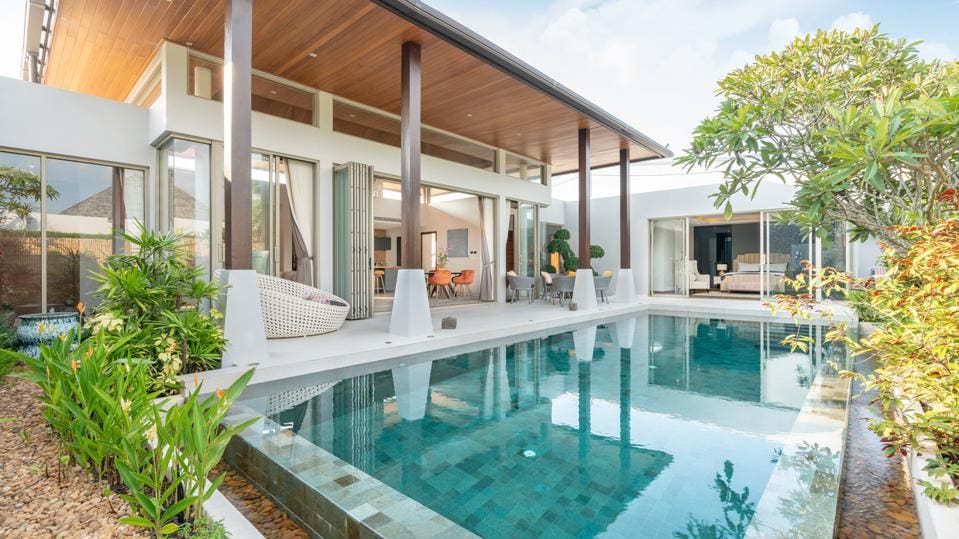
27. Design a Contemporary Pool-and-Poolhouse Combo
Achieving this resort-style look is about a specific architectural ratio: think 40% clean-lined structure, 40% serene water, and 20% lush, controlled landscaping. The poolhouse isn’t an afterthought; it’s a co-star with the pool itself. Its modern form, large glass openings, and flat rooflines are essential. The pool should be a simple geometric shape that echoes the lines of the building. The landscaping is the final piece, used to soften the edges and add organic texture without overwhelming the clean, contemporary feel. The balance between these three core elements is what creates the total look.
🎯 What Makes It Work
The rise of the ’boutique hotel’ aesthetic on social media is a huge driver for this trend in 2026. People don’t just want a place to swim; they want a highly stylized, photogenic experience in their own backyard. This look, with its combination of a sleek poolhouse and a minimalist pool, is perfectly tailored for that. It provides multiple ‘vignettes’ for relaxation and entertaining, much like a small luxury resort. It’s a move away from purely functional backyards towards creating a personal brand of leisure and style.
28. Curate an Outdoor Gallery with a Pool and Kitchen
When designing an outdoor space with multiple ‘zones’—like a kitchen, dining area, and pool—the key to a cohesive look is a unified flooring material. Using the same paver, tile, or decking material throughout the entire space will make it feel larger and more intentionally designed. You can then use outdoor rugs to define specific conversational areas, but the underlying continuous flooring is what will tie the ‘gallery’ of spaces together into a single, flowing design. Resist the urge to use different materials for the kitchen floor versus the pool deck.
✅ Before You Start
Before you begin designing a multi-zone outdoor space, it’s crucial to map out the flow and function. Ask yourself these key questions.
- Where will the primary path of travel be between the house and the pool? Keep it clear and wide.
- Is the outdoor dining area conveniently close to the outdoor kitchen, or will you be carrying plates of food on a long, awkward journey?
- How does the afternoon sun travel across the space? Ensure your primary lounge seating has an option for shade.
- From where will you most often be viewing the space? Place your most attractive features (like a waterfall or fire pit) in that sightline.
29. Go Luxe with a Fire Pit, Pergola, and Marble Bar
This design excels by creating a variety of inviting experiences within one area. The curved sofa around the fire pit encourages conversation, offering a cozy counterpoint to the more open, active pool area. The bar under the pergola provides a second, more casual social hub. What ties it all together is the masterful layering of textures: the smooth marble countertop, the rustic wood of the pergola, the soft woven wicker of the sofa, and the delicate pink flowers. This rich textural palette makes the space feel incredibly detailed and luxurious.
💸 Get This Look For Less
A heads-up on using real marble for an outdoor countertop: it’s a commitment. Marble is porous and can be susceptible to staining from things like red wine, citrus, and bird droppings. It also requires regular sealing—at least once a year—to protect it from the elements. While its veining is undeniably beautiful, it’s a higher-maintenance choice than granite or quartzite. If you love the look but not the upkeep, consider a porcelain slab that mimics the look of marble. It will be far more durable and resistant to staining in an outdoor environment.
30. Integrate a Sunken Lounge and Poolside Bar
When designing a sunken lounge, the elevation change is everything. For a dramatic and functional effect, aim for a drop of 18 to 24 inches from the main pool deck. This is deep enough to create a distinct sense of enclosure and allows the back of the built-in sofa to double as a safety barrier. Anything less than 12 inches feels awkward and can be a trip hazard. Also, ensure the stairs leading down are wide (at least 4 feet) and well-lit to make it feel like a grand, inviting entrance. For a cozier feel check out the fire pit in Idea #11.
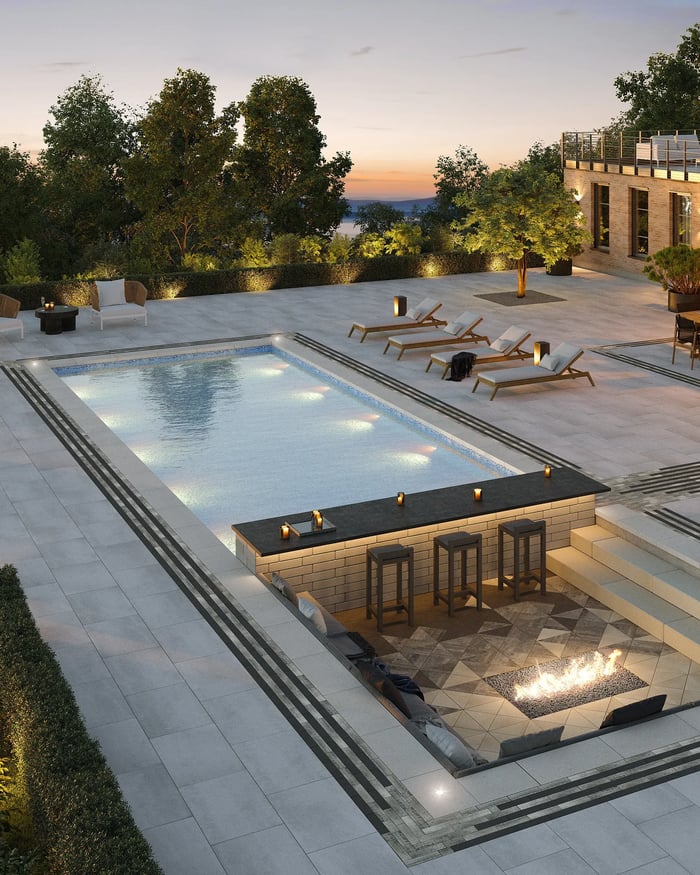
📐 Style Math
This sophisticated modern look is a game of levels and light. The formula is: 50% main level hardscape + 30% sunken level feature + 20% strategic lighting. The light gray paving of the main pool deck provides a clean, expansive foundation. The sunken lounge acts as the main feature, carving out a dramatic, multi-dimensional space. Finally, the subtle up-lighting on the trees and the internal pool lights add the final 20%, bringing the entire composition to life after dark and highlighting the different elevations.
31. Style a Contemporary Poolhouse in Resort Style
The single most defining element here is not the pool, but the poolhouse itself. Its architecture—characterized by clean lines, a flat roof, and an abundance of glass—dictates the entire contemporary, resort-like aesthetic. It acts as a stylish, functional backdrop that elevates the entire space. Without the strong architectural statement of the poolhouse, this would just be a nice pool. With it, it’s a complete, designed environment that feels curated and luxurious, providing shade, storage, and a powerful visual anchor.
💡 Designer Tip
This look, which pairs a significant architectural outbuilding with a large pool, demands a generous amount of land. To avoid a cramped feeling, you’ll want a total area of at least 2,000-2,500 square feet for the pool and its immediate deck and the poolhouse footprint. There should be a comfortable 15-20 feet of deck space between the pool’s edge and the poolhouse entrance to allow for foot traffic and lounging. This is a design for a suburban or rural lot, not a tight urban backyard.
Your Backyard’s Next Chapter Starts Here.
That’s a lot of inspiration to soak in, but the perfect outdoor pool area is all about finding the elements that truly fit your lifestyle. Whether it’s a cozy fire pit for cool evenings or a full-blown outdoor kitchen for entertaining a crowd, the best designs are the ones you’ll actually use. Don’t be afraid to mix and match ideas to create your own unique oasis. Now, go start a new Pinterest board — your dream backyard is waiting.